stop start Alfa Romeo Stelvio 2018 Owner's Guide
[x] Cancel search | Manufacturer: ALFA ROMEO, Model Year: 2018, Model line: Stelvio, Model: Alfa Romeo Stelvio 2018Pages: 276, PDF Size: 5.79 MB
Page 111 of 276
Overtaking Vehicles
If another vehicle is overtaken slowly,
with a difference in speed of less than
approximately 15 mph (25 km/h) and the
vehicle stays in the blind spot for
approximately 1.5 seconds, the warning
light on the door mirror of the
corresponding side illuminates.
If the difference in speed between the
two vehicles is greater than
approximately 15 mph (25 km/h), the
warning light does not illuminate.
Rear Cross Path Detection (RCP)
System
This system assists the driver during
reverse maneuvers in the case of reduced
visibility.
The RCP system monitors the rear
detection areas on both sides of the
vehicle to detect objects moving toward
the sides of the vehicle, with a minimum
speed between approximately 1 mph
(1 km/h) and 2 mph (3 km/h) and objects
moving at a maximum speed of 21 mph
(35 km/h), in areas such as parking lots.
The system activation is signaled to the
driver by an audible warning.
Note:If the sensors are covered by
objects or vehicles, the system may not
work as intended.
Warning!
Rear Cross Path Detection (RCP) is not a
back up aid system. It is intended to be used
to help a driver detect an oncoming vehicle in
a parking lot situation. Drivers must be
careful when backing up, even when using
RCP. Always check carefully behind your
vehicle, look behind you, and be sure to check
for pedestrians, animals, other vehicles,
obstructions, and blind spots before backing
up. Failure to do so can result in serious
injury or death.
Operating Mode
The system may be activated/
deactivated via the Information and
Entertainment System. To access the
function, select the following items on
the main menu in sequence:
1. “Settings.”
2. “Safety.”
3. “Blind Spot Alert.”
"Blind Spot Alert", "Visual" Mode
When the system is enabled, the warning
light within the door mirror on the side of
the detected object illuminates.
The visual warning on the mirror will blink
if the driver activates the turn signals,
thus indicating the intention to change
lane. The warning light will be constant if the
driver stays in the same lane.
"Blind Spot Alert" Function
Deactivation
When the system is deactivated ("Blind
Spot Alert" mode off), the BSM or RCP
systems will not emit neither an acoustic
nor visual warning.
The BSM system will store the operating
mode that was active when the engine
was stopped. Each time the engine is
started, the operating mode last set will
be recalled and used.
General Information
This vehicle has systems that operate on
radio frequency that comply with Part
15 of the Federal Communications
Commission (FCC) rules and with
Industry Canada Standards RSS-
GEN/210/220/310.
Operation is subject to the following two
conditions:
1. The device may not cause harmful
interference.
2. The device must accept any
interference received, including
interference that may cause undesired
operation of the device.
Changes or modifications to any of these
systems by other than an authorized
service facility could void authorization
to use this equipment.
109
Page 120 of 276
Seat Belt Systems
Buckle up even though you are an
excellent driver, even on short trips.
Someone on the road may be a poor
driver and could cause a collision that
includes you. This can happen far away
from home or on your own street.
Research has shown that seat belts save
lives, and they can reduce the
seriousness of injuries in a collision.
Some of the worst injuries happen when
people are thrown from the vehicle. Seat
belts reduce the possibility of ejection
and the risk of injury caused by striking
the inside of the vehicle. Everyone in a
motor vehicle should be belted at all
times.
Enhanced Seat Belt Use Reminder
System (BeltAlert)
Driver and Passenger BeltAlert (if
equipped)
BeltAlert is a feature intended to
remind the driver and outboard front
seat passenger (if equipped with
outboard front passenger seat BeltAlert)
to buckle their seat belts. The Belt Alert
feature is active whenever the ignition
switch is in the START or ON/RUN
position. Initial Indication
If the driver is unbuckled when the
ignition switch is first in the START or
ON/RUN position, a chime will signal for a
few seconds. If the driver or outboard
front seat passenger (if equipped with
outboard front passenger seat BeltAlert)
is unbuckled when the ignition switch is
first in the START or ON/RUN position
the Seat Belt Reminder Light will turn on
and remain on until both outboard front
seat belts are buckled. The outboard
front passenger seat BeltAlert is not
active when an outboard front passenger
seat is unoccupied.
BeltAlert Warning Sequence
The BeltAlert warning sequence is
activated when the vehicle is moving
above a specified vehicle speed range
and the driver or outboard front seat
passenger is unbuckled (if equipped with
outboard front passenger seat BeltAlert)
(the outboard front passenger seat
BeltAlert is not active when the outboard
front passenger seat is unoccupied). The
BeltAlert warning sequence starts by
blinking the Seat Belt Reminder Light and
sounding an intermittent chime. Once the
BeltAlert warning sequence has
completed, the Seat Belt Reminder Light
will remain on until the seat belts are
buckled. The BeltAlert warning sequence
may repeat based on vehicle speed until
the driver and occupied outboard front
seat passenger seat belts are buckled.The driver should instruct all occupants
to buckle their seat belts.
Change of Status
If the driver or outboard front seat
passenger (if equipped with outboard
front passenger seat BeltAlert)
unbuckles their seat belt while the
vehicle is traveling, the BeltAlert warning
sequence will begin until the seat belts
are buckled again.
The outboard front passenger seat
BeltAlert is not active when the outboard
front passenger seat is unoccupied.
BeltAlert may be triggered when an
animal or other items are placed on the
outboard front passenger seat or when
the seat is folded flat (if equipped). It is
recommended that pets be restrained in
the rear seat (if equipped) in pet
harnesses or pet carriers that are
secured by seat belts, and cargo is
properly stowed.Lap/Shoulder Belts
All seating positions in your vehicle are
equipped with lap/shoulder belts.
The seat belt webbing retractor will lock
only during very sudden stops or
collisions. This feature allows the
shoulder part of the seat belt to move
freely with you under normal conditions.
However, in a collision the seat belt will
lock and reduce your risk of striking the
inside of the vehicle or being thrown out
of the vehicle.
118
SAFETY
Page 131 of 276
Warning!
Deployed air bags and seat belt
pretensioners cannot protect you in another
collision. Have the air bags, seat belt
pretensioners, and the seat belt retractor
assemblies replaced by an authorized dealer
immediately. Also, have the Occupant
Restraint Controller System serviced as
well.
Note:
Air bag covers may not be obvious in
the interior trim, but they will open
during air bag deployment.
After any collision, the vehicle should
be taken to an authorized dealer
immediately.
Enhanced Accident Response
System
In the event of an impact, if the
communication network remains intact,
and the power remains intact, depending
on the nature of the event, the ORC will
determine whether to have the Enhanced
Accident Response System perform the
following functions:
Cut off fuel to the engine (If Equipped)
Cut off battery power to the electric
motor (If Equipped)
Flash hazard lights as long as the
battery has power
Turn on the interior lights, which
remain on as long as the battery has
power or for 15 minutes from the
intervention of the Enhanced Accident
Response System.
Unlock the power door locks.
Your vehicle may also be designed to
perform any of these other functions in
response to the Enhanced Accident
Response System:
Turn off the Fuel Filter Heater, Turn off
the HVAC Blower Motor, Close the HVAC
Circulation Door
Cut off battery power to the:
– Engine
– Electric Motor (if equipped)
– Electric power steering
– Brake booster
– Electric park brake
– Automatic transmission gear selector
– Horn
– Front wiper
– Headlamp washer pump
Note: After an accident, remember to
cycle the ignition to the STOP
(OFF/LOCK) position and remove the key from the ignition switch to avoid draining
the battery. Carefully check the vehicle
for fuel leaks in the engine compartment
and on the ground near the engine
compartment and fuel tank before
resetting the system and starting the
engine. If there are no fuel leaks or
damage to the vehicle electrical devices
(e.g. headlights) after an accident, reset
the system by following the procedure
described below.
Enhanced Accident Response
System Reset Procedure
After the event occurs, when the system
is active, a message regarding fuel cutoff
is displayed. Turn the ignition switch from
ignition AVV/START or MAR/ACC/ON/
RUN to ignition STOP/OFF/LOCK.
Carefully check the vehicle for fuel leaks
in the engine compartment and on the
ground near the engine compartment and
fuel tank before resetting the system and
starting the engine.
Depending on the nature of the event the
left and right turn signal lights, located in
the instrument panel, may both be
blinking and will continue to blink. In order
to move your vehicle to the side of the
road, you must follow the system reset
procedure.
129
Page 132 of 276
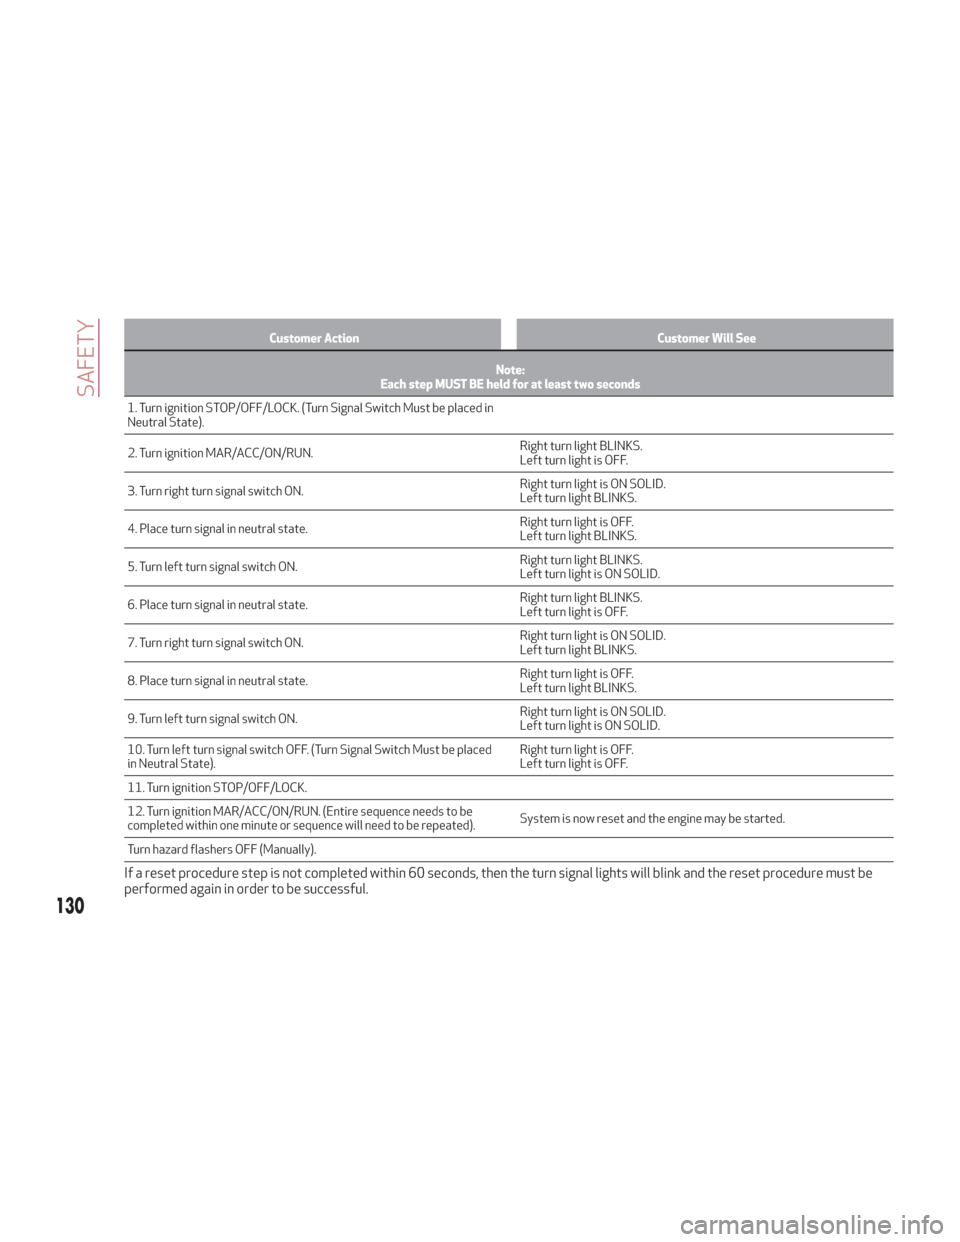
Customer ActionCustomer Will See
Note:
Each step MUST BE held for at least two seconds
1. Turn ignition STOP/OFF/LOCK. (Turn Signal Switch Must be placed in
Neutral
State).
2. Turn ignition MAR/ACC/ON/RUN. Right turn light BLINKS.
Left turn light is OFF.
3. Turn right turn signal switch ON. Right turn light is ON SOLID.
Left turn light BLINKS.
4. Place turn signal in neutral state. Right turn light is OFF.
Left turn light BLINKS.
5. Turn left turn signal switch ON. Right turn light BLINKS.
Left turn light is ON SOLID.
6. Place turn signal in neutral state. Right turn light BLINKS.
Left turn light is OFF.
7. Turn right turn signal switch ON. Right turn light is ON SOLID.
Left turn light BLINKS.
8. Place turn signal in neutral state. Right turn light is OFF.
Left turn light BLINKS.
9. Turn left turn signal switch ON. Right turn light is ON SOLID.
Left turn light is ON SOLID.
10. Turn left turn signal switch OFF. (Turn Signal Switch Must be placed
in Neutral State). Right turn light is OFF.
Left turn light is OFF.
11. Turn ignition STOP/OFF/LOCK.
12. Turn ignition MAR/ACC/ON/RUN. (Entire sequence needs to be
completed within one minute or sequence will need to be repeated). System is now reset and the engine may be started.
Turn hazard flashers OFF (Manually).
If a reset procedure step is not completed within 60 seconds, then the turn signal lights will blink and the reset procedure must be
performed again in order to be successful.
130
SAFETY
Page 147 of 276
STARTING AND OPERATING
Let’s get to the core of the vehicle, and
see how you can explore its fullest
potential. We’ll look at how to drive
safely in any situation, making it a
welcome companion with our comfort
and wallets in mind.STARTING THE ENGINE........146
ENGINE BLOCK HEATER — IF
EQUIPPED ............... .149
ELECTRIC PARK BRAKE ........149
AUTOMATIC TRANSMISSION .....152
ALFA DNA PRO SELECTOR ......158
ALFA ACTIVE SUSPENSION (AAS) . .161
STOP/START SYSTEM .........161
SPEED LIMITER .............163
SPEED CONTROL
(CRUISE CONTROL) ..........164
ADAPTIVE CRUISE CONTROL (ACC) —
IF EQUIPPED .............. .166
PARK SENSORS SYSTEM .......173
LANE DEPARTURE WARNING (LDW)
SYSTEM — IF EQUIPPED .......176
REAR BACK-UP CAMERA / DYNAMIC
GRIDLINES .............. .179
REFUELING THE VEHICLE .......180
VEHICLE LOADING ...........182
SUGGESTIONS FOR DRIVING .....183
145
Page 150 of 276
Warning!
Never pour fuel or other flammable liquid
into the throttle body air inlet opening in an
attempt to start the vehicle. This could
result in flash fire causing serious personal
injury.
Do not attempt to push or tow your
vehicle to get it started. Vehicles equipped
with an automatic transmission cannot be
started this way. Unburned fuel could enter
the catalytic converter and once the engine
has started, ignite and damage the
converter and vehicle.
If the vehicle has a discharged battery,
booster cables may be used to obtain a
start from a booster battery or the battery
in another vehicle. This type of start can be
dangerous if done improperly. Refer to
“Jump Starting” in “In Case Of Emergency”
for further information.
Caution!
To prevent damage to the starter, do not
continuously crank the engine for more than
25 seconds at a time. Wait 60 seconds
before trying again.
After Starting — Warming Up The
Engine
Proceed as follows:
Travel slowly, letting the engine run at
a reduced RPM, without accelerating
suddenly.
It is recommended to wait until the
digital engine coolant temperature
indicator starts to rise for maximum
performance.
Stopping The Engine
To stop the engine, proceed as follows:
1. Park the vehicle in a position that is
not dangerous for oncoming traffic.
2. Engage the PARK (P) mode.
3. With engine idling, push the
START/STOP button on the steering
wheel to STOP the engine.
Note: Do not leave the ignition in ON
mode when the engine is off.
To shut off the engine with vehicle speed
greater than 5 mph (8 km/h), you must
push and hold the ignition or push the
START/STOP button three times
consecutively within a few seconds. The
engine will shut down, and the ignition will
be placed in the ON mode
With the keyless ignition system, it is
possible to go away from the vehicle
taking the key fob with you, without the
engine switching off. The vehicle will inform about the absence of the key on
board, only if the doors are closed.
Stopping the engine (cycling from the ON
to the STOP position) the accessories are
still powered for about three minutes, or
until a door is opened.
When the ignition is in the STOP/OFF
mode, the window switches remain active
for three minutes. Opening a front door
will cancel this function.
After severe driving, idle the engine to
allow the temperature inside the engine
compartment to cool before shutting off
the engine.
Turbocharger Cool Down
It is recommended before switching the
vehicle off, to keep the engine idling for a
few minutes so that the turbocharger can
be suitably lubricated. This procedure is
particularly recommended after severe
driving.
After a full load operation, keep the
engine idling for three to five minutes
before switching it off.
This time allows the lubricating oil and
the engine coolant to eliminate the
excessive heat from combustion
chamber, bearings, inner components and
turbocharger.
148
STARTING AND OPERATING
Page 152 of 276
Note:Normally, the electric parking
brake is engaged automatically when the
engine is stopped. This function can be
deactivated/activated on the
Information and Entertainment system
by selecting the following items in
sequence on the main menu: "Settings",
"Driver Assistance" and "Automatic
Parking Brake".
In addition to engaging the electric park
brake, along with steering and positioning
chocks in front of the wheels (when on a
steep slope), you must always place the
vehicle in the PARK (P) mode before
leaving.
Should the vehicle battery be faulty, the
battery must be replaced in order to
unlock the electric park brake.
Engaging The Park Brake Manually
Briefly pull the switch located on the
center console to manually engage the
electric park brake when the vehicle is
stationary.
Noise may be heard from the rear of the
vehicle when engaging the electric
parking brake.
A slight movement of the brake pedal
may be detected when engaging the
electric parking brake with the brake
pedal pressed.
With the electric parking brake engaged,
the BRAKE warning light on the
instrument panel and the switch will
illuminate.
Caution!
With the Electronic Parking Brake failure
warning light on, some functions of the
electric parking brake are deactivated. In
this case the driver is responsible for brake
activation and vehicle parking in complete
safety conditions.
If, under exceptional circumstances, the
use of the brake is required with the
vehicle in motion, keep the switch on the
center console pulled as long as the brake
action is necessary.
The BRAKE warning light may turn on
with the hydraulic system temporarily
unavailable; in this case, braking is
controlled by the motors.
The brake lights will also automatically
turn on in the same way as normal braking
with the use of the brake pedal.
Release the switch on the center console
to stop the braking action with the
vehicle in motion.
If, through this procedure, the vehicle is
braked until a speed below 1.9 mph
(3 km/h) is reached and the switch is kept
pulled, the park brake will definitively
engage.
Note: Driving the vehicle with the
electric parking brake engaged, or using
it several times to slow down the vehicle,
may cause severe damage to the braking
system. Disengaging The Electric Park Brake
Manually
In order to manually release the park
brake, the ignition should be in the ON
mode. Press the brake pedal, and then
push the switch on the center console
briefly.
Noise may be heard from the rear of the
vehicle, and a slight movement of the
brake pedal may be detected during
disengagement.
After disengaging the electric parking
brake, the BRAKE warning light on the
instrument panel and the light on the
switch will turn off.
If the BRAKE warning light on the
instrument panel remains on with the
electric parking brake disengaged, this
indicates a fault: in this case, contact an
authorized dealer.
Warning!
Never leave children alone in a vehicle, or
with access to an unlocked vehicle.
Allowing children to be in a vehicle
unattended is dangerous for a number of
reasons. A child or others could be seriously
or fatally injured. Children should be warned
not to touch the park brake, brake pedal or
the gear selector.
150
STARTING AND OPERATING
Page 154 of 276
AUTOMATIC TRANSMISSION
The vehicle can be equipped with an
electronically controlled 8-speed
automatic transmission where gear
shifting automatically takes place,
depending on the vehicle usage
instantaneous parameters (vehicle
speed, grade, and accelerator pedal
position).
The new transmission is an absolute
innovation, as it can match the
Stop/Start system with the traditional
automatic transmissions with built-in
torque converter. For further
information, refer to the “Stop/Start”
section within this chapter.
Manual gear shifting can still occur
thanks to the "Sequential" mode position
for the gear selector.
Warning!
It is dangerous to shift out of PARK or
NEUTRAL if the engine speed is higher than
idle speed. If your foot is not firmly pressing
the brake pedal, the vehicle could
accelerate quickly forward or in reverse.
You could lose control of the vehicle and hit
someone or something. Only shift into gear
when the engine is idling normally and your
foot is firmly pressing the brake pedal.
Unintended movement of a vehicle could
injure those in or near the vehicle. As with all
vehicles, you should never exit a vehicle
while the engine is running. Before exiting a
vehicle, always apply the park brake, shift
the transmission into PARK, and turn the
ignition STOP/OFF. When the ignition is in
the STOP/OFF mode, the transmission is
locked in PARK, securing the vehicle against
unwanted movement.
When leaving the vehicle, always make
sure the ignition is in the STOP/OFF mode,
remove the key fob from the vehicle, and
lock the vehicle.
Never leave children alone in a vehicle, or
with access to an unlocked vehicle. Allowing
children to be in a vehicle unattended is
dangerous for a number of reasons. A child
or others could be seriously or fatally
injured. Children should be warned not to
touch the parking brake, brake pedal or the
transmission gear selector.
Do not leave the key fob in or near the
vehicle (or in a location accessible to
children), and do not leave the ignition in the
AVV or ON mode. A child could operate
power windows, other controls, or move the
vehicle.
Caution!
Damage to the transmission may occur if
the following precautions are not observed:
Shift into or out of PARK or REVERSE
only after the vehicle has come to a
complete stop.
Do not shift between PARK, REVERSE,
NEUTRAL, or DRIVE when the engine is
above idle speed.
Before shifting into any gear, make sure
your foot is firmly pressing the brake pedal.
Display
The following information is shown on the
dedicated area of the display:
In Automatic Mode : the active mode
(P, R, N, D) and with "D" the current gear
number.
152
STARTING AND OPERATING
Page 156 of 276
To transition the vehicle into REVERSE
(R) mode from DRIVE (D) mode, or into
DRIVE (D) mode from REVERSE (R)
mode, it is necessary to move the gear
selector by pushing the gear selector
button.
When using AutoStick, activate it by
moving the gear selector from DRIVE (D)
to the left and then forward toward the -
symbol or backward toward the + symbol
and the gear is changed.
To shift out of PARK (P), or to pass from
position NEUTRAL (N) to position DRIVE
(D) or REVERSE (R), the vehicle must be
moving at a low speed or stopped, and
the brake pedal must also be pressed.
Note:
DO NOT accelerate while shifting
from position PARK (P) or NEUTRAL (N)
to another position.
After selecting a gear, wait a few
seconds before accelerating. This
precaution is particularly important with
engine cold.
It is not possible to select NEUTRAL
(N) mode from PARK (P) mode.
Transmission Operating Modes
PARK (P)
The transmission is locked in this mode.
The engine can be started in this mode.
Note: Never try to engage PARK (P)
mode when the vehicle is moving. Before
leaving the vehicle, make sure this mode is engaged (letter P shown on the display
and gear selector) and that the park
brake is engaged.
When parking on a flat surface, first
engage the PARK (P) mode and then
engage the electric park brake.
When parking uphill, before activating
the PARK (P) mode, engage the electric
park brake. Otherwise, it could be
difficult to engage the (P) mode.
To check that the PARK (P) mode is actually
engaged, make sure (P) is illuminated on
the display and on the gear selector.
Warning!
Never use the PARK position as a
substitute for the park brake. Always apply
the park brake fully when parked to guard
against vehicle movement and possible
injury or damage.
Your vehicle could move and injure you
and others if it is not in PARK. Check by
trying to move the gear selector out of
PARK with the brake pedal released. Make
sure the transmission is in PARK before
leaving the vehicle.
It is dangerous to shift out of PARK or
NEUTRAL if the engine speed is higher than
idle speed. If your foot is not firmly pressing
the brake pedal, the vehicle could
accelerate quickly forward or in reverse.
You could lose control of the vehicle and hit
someone or something. Only shift into gear
when the engine is idling normally and your
foot is firmly pressing the brake pedal.
Unintended movement of a vehicle could
injure those in or near the vehicle. As with all
vehicles, you should never exit a vehicle
while the engine is running. Before exiting a
vehicle, always apply the park brake, shift
the transmission into PARK, and turn the
ignition STOP/OFF. When the ignition is in
the STOP/OFF mode, the transmission is
locked in PARK, securing the vehicle against
unwanted movement.
When leaving the vehicle, always make
sure the ignition is in the STOP/OFF mode,
remove the key fob from the vehicle, and
lock the vehicle.
Never leave children alone in a vehicle, or
with access to an unlocked vehicle. Allowing
children to be in a vehicle unattended is
dangerous for a number of reasons. A child
or others could be seriously or fatally
injured. Children should be warned not to
touch the park brake, brake pedal or the
transmission gear selector.
Do not leave the key fob in or near the
vehicle (or in a location accessible to
children), and do not leave the ignition in the
ON mode. A child could operate power
windows, other controls, or move the
vehicle.
154
STARTING AND OPERATING
Page 157 of 276
Caution!
Before moving the transmission gear
selector out of PARK, you must push the
ignition button to cycle from STOP/OFF
mode to the ON mode, and also press the
brake pedal. Otherwise, damage to the gear
selector could result.
DO NOT race the engine when shifting
from PARK or NEUTRAL into another gear
range, as this can damage the drivetrain.
REVERSE (R)
Select this mode only with the vehicle at
a standstill.
NEUTRAL (N)
Use this range when the vehicle is
standing for prolonged periods with the
engine running. The engine may be
started in this range. Apply the electric
park brake and shift the transmission
into PARK (P) if you must leave the
vehicle.
Warning!
Do not coast in NEUTRAL and never turn off
the ignition to coast down a hill. These are
unsafe practices that limit your response to
changing traffic or road conditions. You
might lose control of the vehicle and have a
collision.
DRIVE (D)
Use this mode in normal driving
conditions.
Shifting from DRIVE (D) to PARK (P) or
REVERSE (R) modes must take place
only after releasing the accelerator
pedal, with vehicle at a standstill and
brake pedal pressed.
This mode ensures automatic
engagement of the most suitable gears
for driving needs and maximum fuel
economy in terms of consumption.
In this position, the transmission shifts
the gears automatically, selecting the
most suitable for forward driving among
those available as you go. In this way the
vehicle's optimal driving characteristics
are provided for all conditions.
AutoStick
In the case of frequent shifting (e.g. for
sport driving, when the vehicle is driven
with a heavy load, on slopes, when towing
heavy trailers), it is recommended to use
the AutoStick (sequential shifting) mode
to select and keep a lower fixed ratio.
In these conditions, the use of a lower
gear improves vehicle performance and
prevents overheating.
It is possible to shift from DRIVE (D)
mode to AutoStick mode regardless of
vehicle speed. Activation
Starting from DRIVE (D) mode, to
activate the sequential drive mode, move
the gear selector to the left (– and +
indication of the trim). The gear engaged
will be shown on the display.
Shifting is made by moving the gear
selector forward, toward symbol – or
backward, toward symbol +.
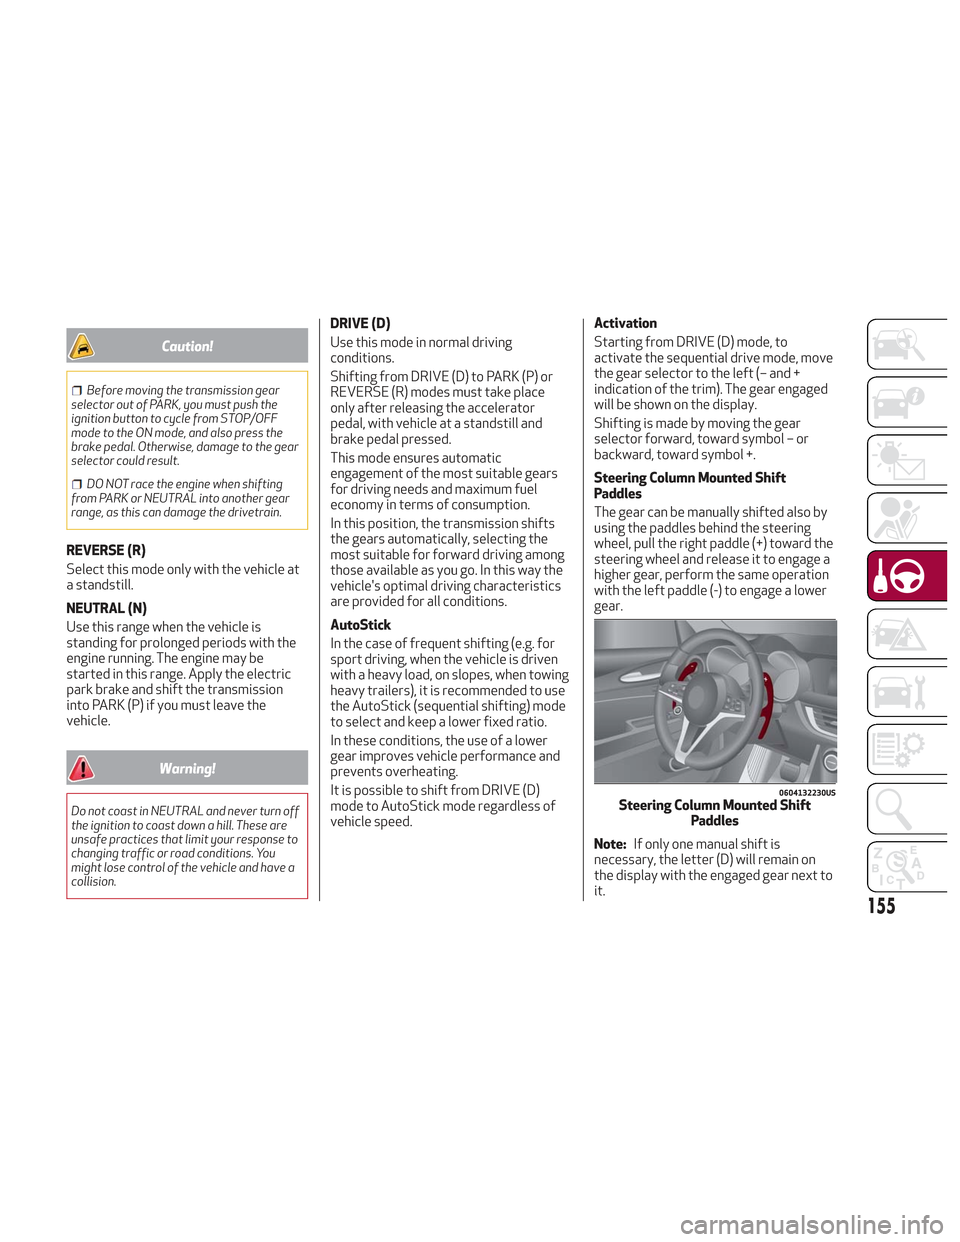
Steering Column Mounted Shift
Paddles
The gear can be manually shifted also by
using the paddles behind the steering
wheel, pull the right paddle (+) toward the
steering wheel and release it to engage a
higher gear, perform the same operation
with the left paddle (-) to engage a lower
gear.
Note:
If only one manual shift is
necessary, the letter (D) will remain on
the display with the engaged gear next to
it.
0604132230USSteering Column Mounted Shift Paddles
155