REAR SEATS Alfa Romeo Stelvio 2018 Owner's Manual
[x] Cancel search | Manufacturer: ALFA ROMEO, Model Year: 2018, Model line: Stelvio, Model: Alfa Romeo Stelvio 2018Pages: 276, PDF Size: 5.79 MB
Page 29 of 276
System Activation/Deactivation
The Passive Entry system can be
activated or deactivated using the
Information and Entertainment System.
General Information
The following regulatory statement
applies to all radio frequency (RF)
devices equipped in this vehicle:
This device complies with Part 15 of the
FCC Rules and with Industry Canada
license-exempt RSS standard(s).
Operation is subject to the following two
conditions:
1. This device may not cause harmful
interference, and
2. This device must accept any
interference received, including
interference that may cause undesired
operation.
Note:Changes or modifications not
expressly approved by the party
responsible for compliance could void the
user’s authority to operate the
equipment.
Power Lock
The power lock is a safety device that
prevents the operation of the interior
door handles and the door lock and
unlock buttons. The power lock also
prevent opening of the doors from inside
the passenger compartment.
It is recommended to lock the vehicle
doors each time the vehicle is parked.
Activating The Power Lock
The power lock is enabled on all the doors
by quickly pushing the lock button on the
key fob twice.
The turn signals will flash to let you know
that the power lock is active.
If one or more of the doors are not closed
correctly, the power lock will not activate,
preventing a person from getting stuck
inside the passenger compartment by
entering the vehicle, and then closing, the
open door.
Deactivating The Power Lock
The power lock disengages
automatically:
When the doors are unlocked, pushing
the unlock button on the key fob.
When the keyless ignition is placed in
the ON position.
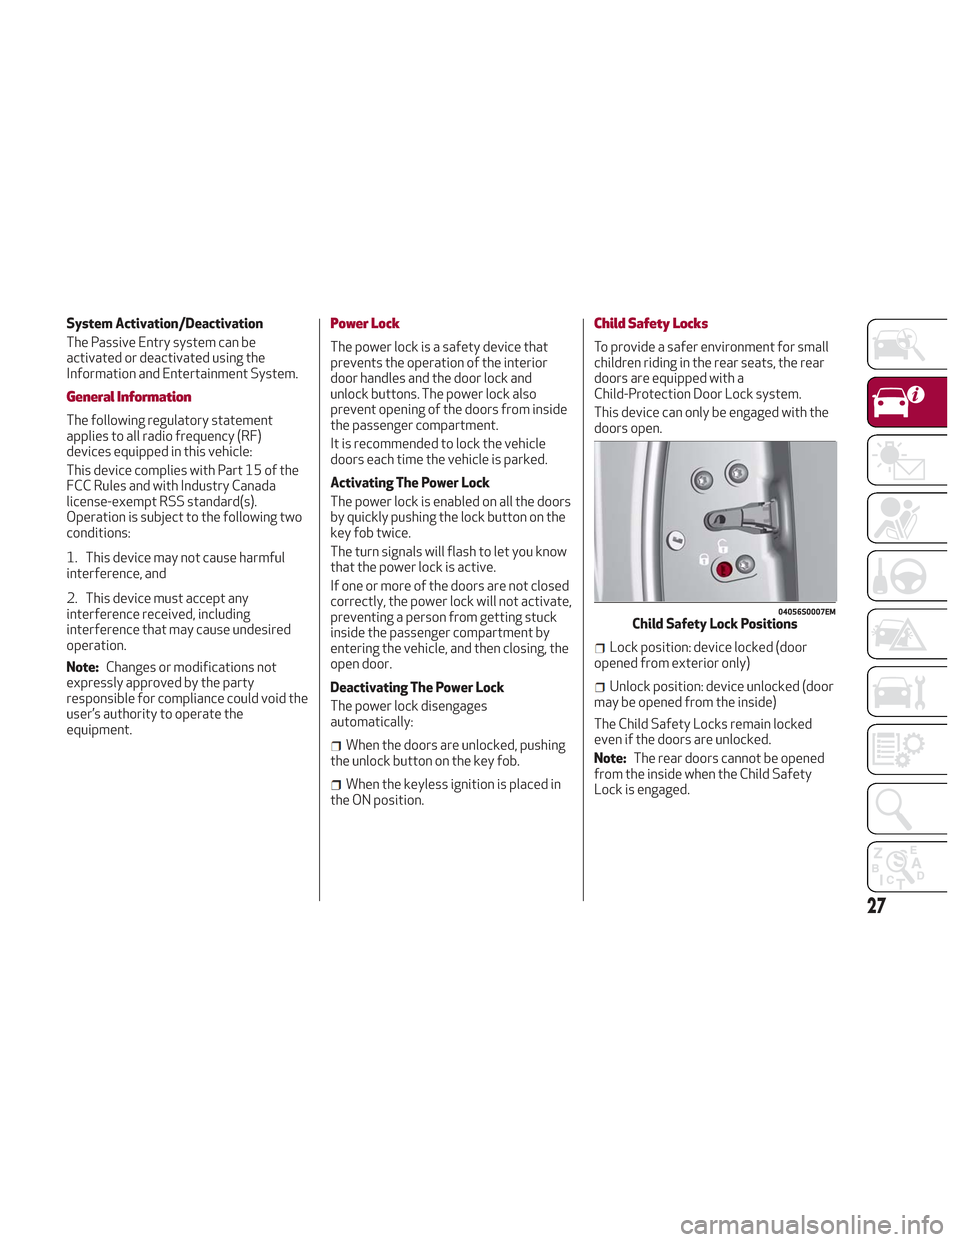
Child Safety Locks
To provide a safer environment for small
children riding in the rear seats, the rear
doors are equipped with a
Child-Protection Door Lock system.
This device can only be engaged with the
doors open.
Lock position: device locked (door
opened from exterior only)
Unlock position: device unlocked (door
may be opened from the inside)
The Child Safety Locks remain locked
even if the doors are unlocked.
Note: The rear doors cannot be opened
from the inside when the Child Safety
Lock is engaged.
04056S0007EMChild Safety Lock Positions
27
Page 30 of 276
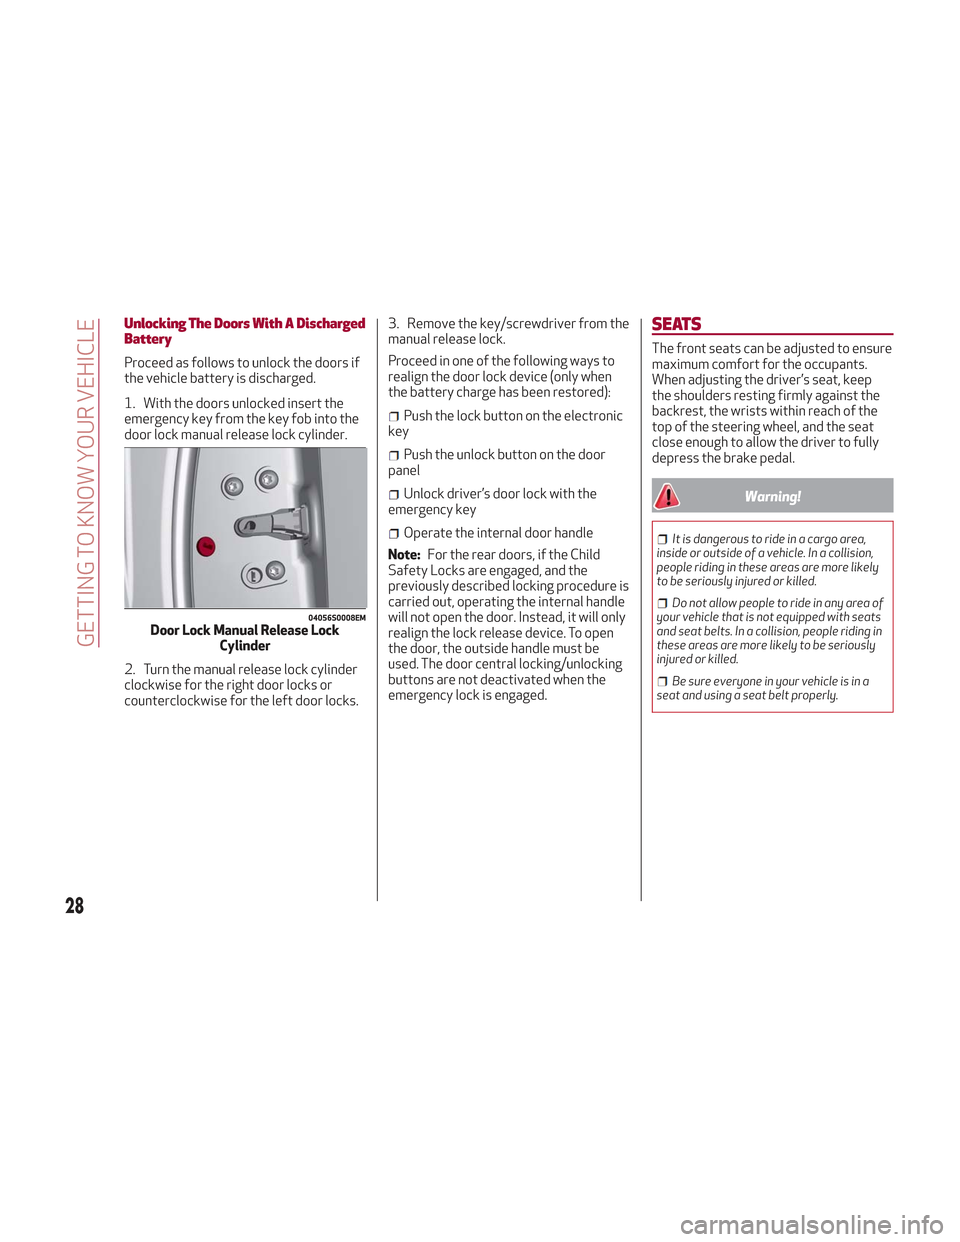
Unlocking The Doors With A Discharged
Battery
Proceed as follows to unlock the doors if
the vehicle battery is discharged.
1. With the doors unlocked insert the
emergency key from the key fob into the
door lock manual release lock cylinder.
2. Turn the manual release lock cylinder
clockwise for the right door locks or
counterclockwise for the left door locks.3. Remove the key/screwdriver from the
manual release lock.
Proceed in one of the following ways to
realign the door lock device (only when
the battery charge has been restored):
Push the lock button on the electronic
key
Push the unlock button on the door
panel
Unlock driver’s door lock with the
emergency key
Operate the internal door handle
Note: For the rear doors, if the Child
Safety Locks are engaged, and the
previously described locking procedure is
carried out, operating the internal handle
will not open the door. Instead, it will only
realign the lock release device. To open
the door, the outside handle must be
used. The door central locking/unlocking
buttons are not deactivated when the
emergency lock is engaged.
SEATS
The front seats can be adjusted to ensure
maximum comfort for the occupants.
When adjusting the driver’s seat, keep
the shoulders resting firmly against the
backrest, the wrists within reach of the
top of the steering wheel, and the seat
close enough to allow the driver to fully
depress the brake pedal.
Warning!
It is dangerous to ride in a cargo area,
inside or outside of a vehicle. In a collision,
people riding in these areas are more likely
to be seriously injured or killed.
Do not allow people to ride in any area of
your vehicle that is not equipped with seats
and seat belts. In a collision, people riding in
these areas are more likely to be seriously
injured or killed.
Be sure everyone in your vehicle is in a
seat and using a seat belt properly.
04056S0008EMDoor Lock Manual Release Lock Cylinder
28
GETTING TO KNOW YOUR VEHICLE
Page 31 of 276
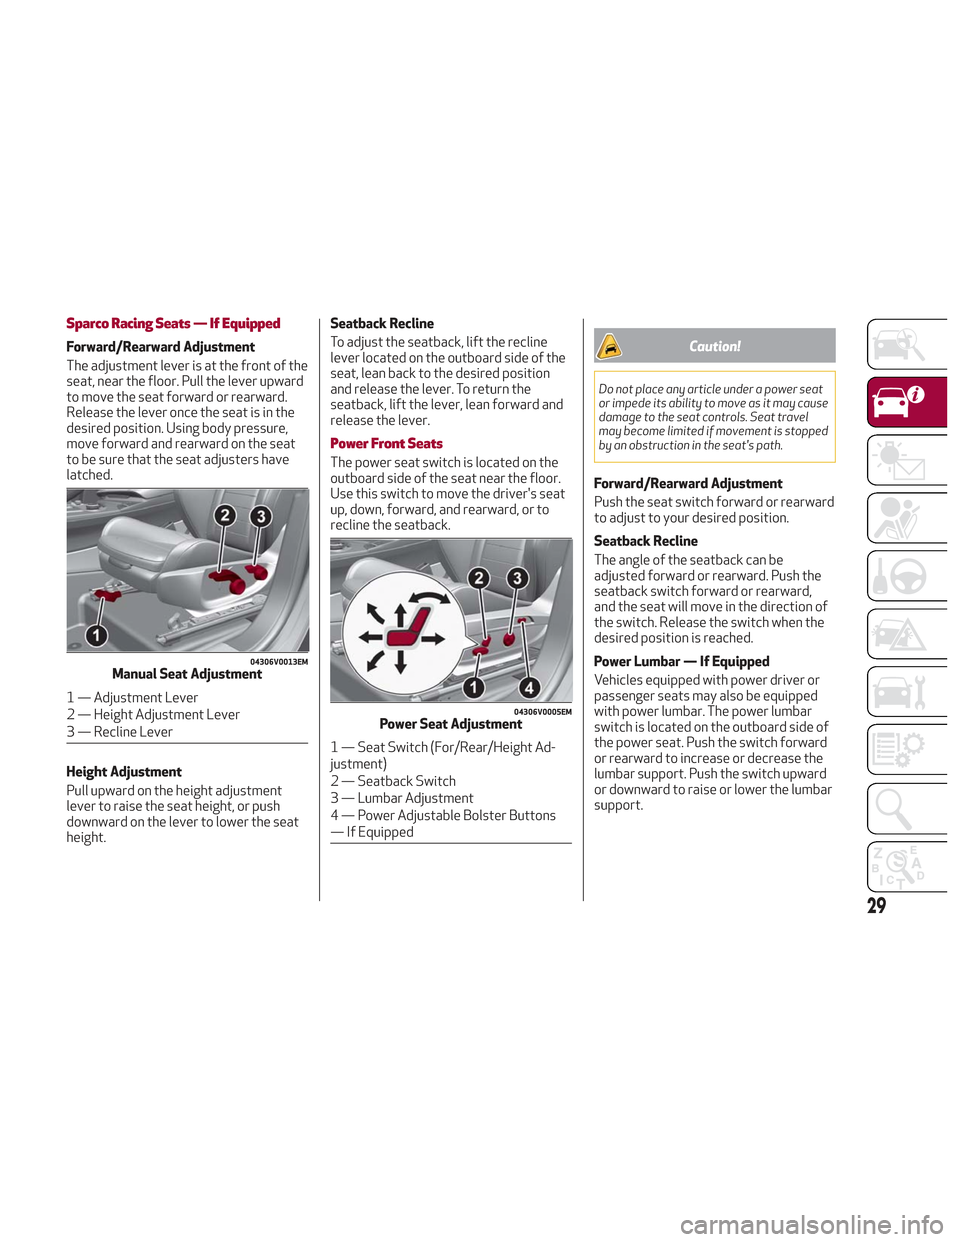
Sparco Racing Seats — If Equipped
Forward/Rearward Adjustment
The adjustment lever is at the front of the
seat, near the floor. Pull the lever upward
to move the seat forward or rearward.
Release the lever once the seat is in the
desired position. Using body pressure,
move forward and rearward on the seat
to be sure that the seat adjusters have
latched.
Height Adjustment
Pull upward on the height adjustment
lever to raise the seat height, or push
downward on the lever to lower the seat
height.Seatback Recline
To adjust the seatback, lift the recline
lever located on the outboard side of the
seat, lean back to the desired position
and release the lever. To return the
seatback, lift the lever, lean forward and
release the lever.
Power Front Seats
The power seat switch is located on the
outboard side of the seat near the floor.
Use this switch to move the driver's seat
up, down, forward, and rearward, or to
recline the seatback.
Caution!
Do not place any article under a power seat
or impede its ability to move as it may cause
damage to the seat controls. Seat travel
may become limited if movement is stopped
by an obstruction in the seat's path.
Forward/Rearward Adjustment
Push the seat switch forward or rearward
to adjust to your desired position.
Seatback Recline
The angle of the seatback can be
adjusted forward or rearward. Push the
seatback switch forward or rearward,
and the seat will move in the direction of
the switch. Release the switch when the
desired position is reached.
Power Lumbar — If Equipped
Vehicles equipped with power driver or
passenger seats may also be equipped
with power lumbar. The power lumbar
switch is located on the outboard side of
the power seat. Push the switch forward
or rearward to increase or decrease the
lumbar support. Push the switch upward
or downward to raise or lower the lumbar
support.
04306V0013EMManual Seat Adjustment
1 — Adjustment Lever
2 — Height Adjustment Lever
3 — Recline Lever04306V0005EMPower Seat Adjustment
1 — Seat Switch (For/Rear/Height Ad-
justment)
2 — Seatback Switch
3 — Lumbar Adjustment
4 — Power Adjustable Bolster Buttons
— If Equipped
29
Page 32 of 276
Height Adjustment
The height of the seats can be adjusted
up or down. Pull upward or push
downward on the seat switch, and the
seat will move in the direction of the
switch. Release the switch when the
desired position is reached.
Seat Angle Adjustment (Tilting) — If
Equipped
The seat angle can be adjusted in four
directions. Lift or push the front part of
seat switch to move the front part of the
seat in the corresponding direction.
Release the seat switch when the seat
has reached the desired position.
Power Bolster Adjustment — If
Equipped
Push the power bolster adjustment
buttons to regulate the width of the
backrest through the lateral padding.
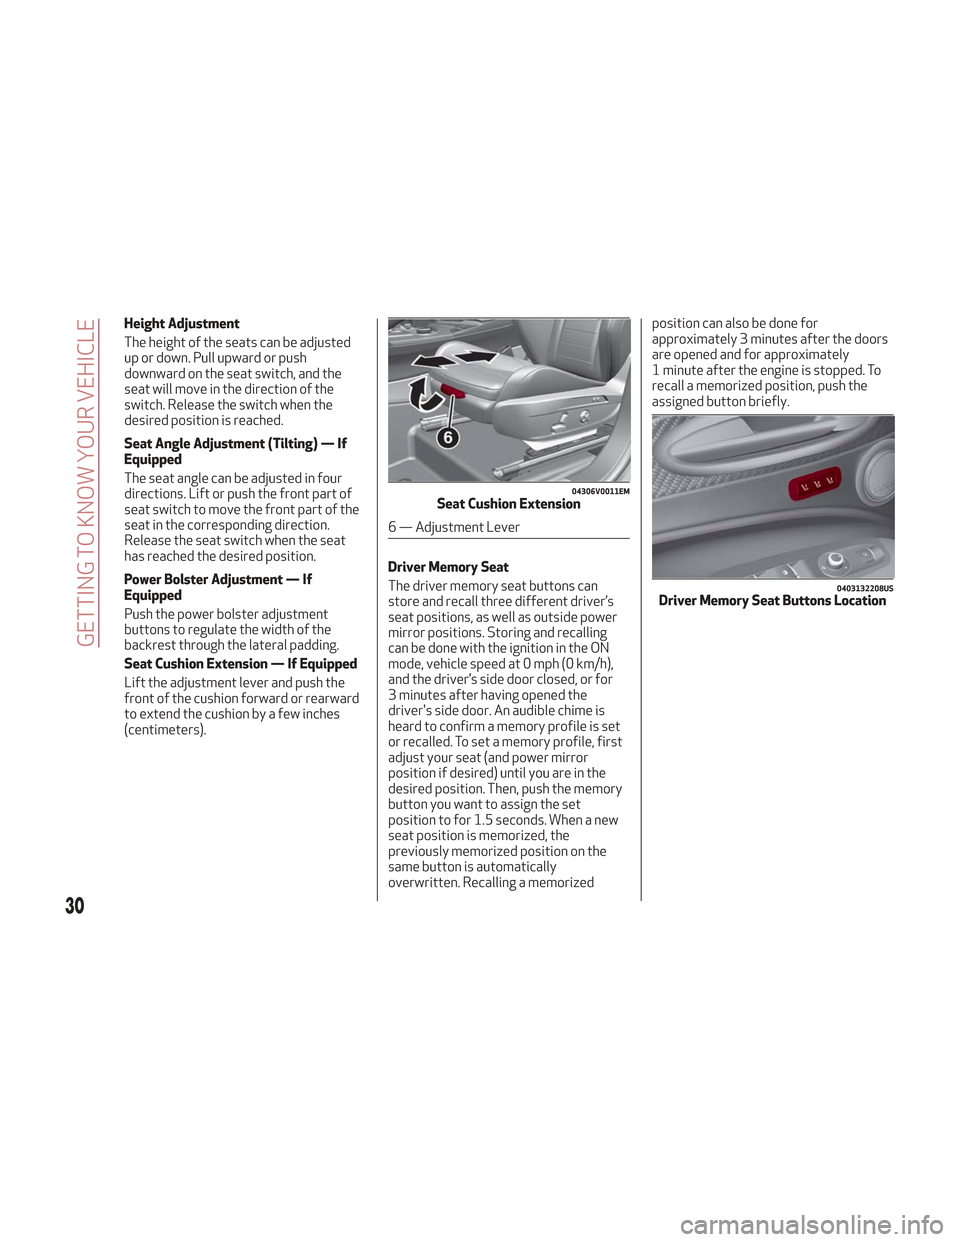
Seat Cushion Extension — If Equipped
Lift the adjustment lever and push the
front of the cushion forward or rearward
to extend the cushion by a few inches
(centimeters).Driver Memory Seat
The driver memory seat buttons can
store and recall three different driver’s
seat positions, as well as outside power
mirror positions. Storing and recalling
can be done with the ignition in the ON
mode, vehicle speed at 0 mph (0 km/h),
and the driver’s side door closed, or for
3 minutes after having opened the
driver's side door. An audible chime is
heard to confirm a memory profile is set
or recalled. To set a memory profile, first
adjust your seat (and power mirror
position if desired) until you are in the
desired position. Then, push the memory
button you want to assign the set
position to for 1.5 seconds. When a new
seat position is memorized, the
previously memorized position on the
same button is automatically
overwritten. Recalling a memorizedposition can also be done for
approximately 3 minutes after the doors
are opened and for approximately
1 minute after the engine is stopped. To
recall a memorized position, push the
assigned button briefly.
04306V0011EMSeat Cushion Extension
6 — Adjustment Lever
0403132208USDriver Memory Seat Buttons Location
30
GETTING TO KNOW YOUR VEHICLE
Page 33 of 276
Warning!
Adjusting a seat while driving may be
dangerous. Moving a seat while driving
could result in loss of control which could
cause a collision and serious injury or death.
Seats should be adjusted before
fastening the seat belts and while the
vehicle is parked. Serious injury or death
could result from a poorly adjusted seat
belt.
Do not ride with the seatback reclined so
that the shoulder belt is no longer resting
against your chest. In a collision you could
slide under the seat belt, which could result
in serious injury or death.
Heated Seats — If Equipped
Front Heated Seats
With the engine in the ON position, push
the driver or passenger heated seat
button
located on the instrument
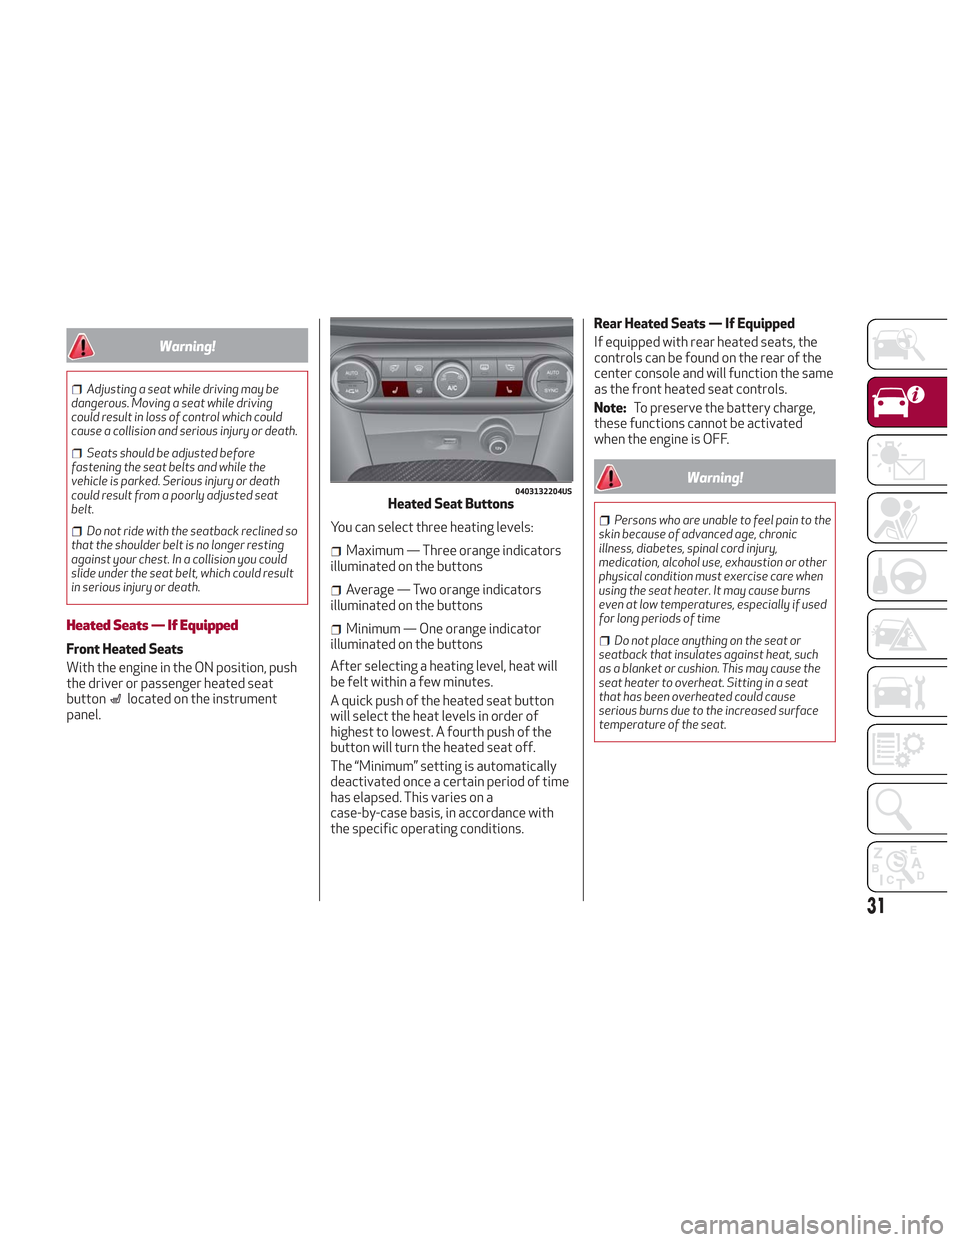
panel. You can select three heating levels:
Maximum — Three orange indicators
illuminated on the buttons
Average — Two orange indicators
illuminated on the buttons
Minimum — One orange indicator
illuminated on the buttons
After selecting a heating level, heat will
be felt within a few minutes.
A quick push of the heated seat button
will select the heat levels in order of
highest to lowest. A fourth push of the
button will turn the heated seat off.
The “Minimum” setting is automatically
deactivated once a certain period of time
has elapsed. This varies on a
case-by-case basis, in accordance with
the specific operating conditions. Rear Heated Seats — If Equipped
If equipped with rear heated seats, the
controls can be found on the rear of the
center console and will function the same
as the front heated seat controls.
Note:
To preserve the battery charge,
these functions cannot be activated
when the engine is OFF.
Warning!
Persons who are unable to feel pain to the
skin because of advanced age, chronic
illness, diabetes, spinal cord injury,
medication, alcohol use, exhaustion or other
physical condition must exercise care when
using the seat heater. It may cause burns
even at low temperatures, especially if used
for long periods of time
Do not place anything on the seat or
seatback that insulates against heat, such
as a blanket or cushion. This may cause the
seat heater to overheat. Sitting in a seat
that has been overheated could cause
serious burns due to the increased surface
temperature of the seat.
0403132204USHeated Seat Buttons
31
Page 34 of 276
Rear Seats
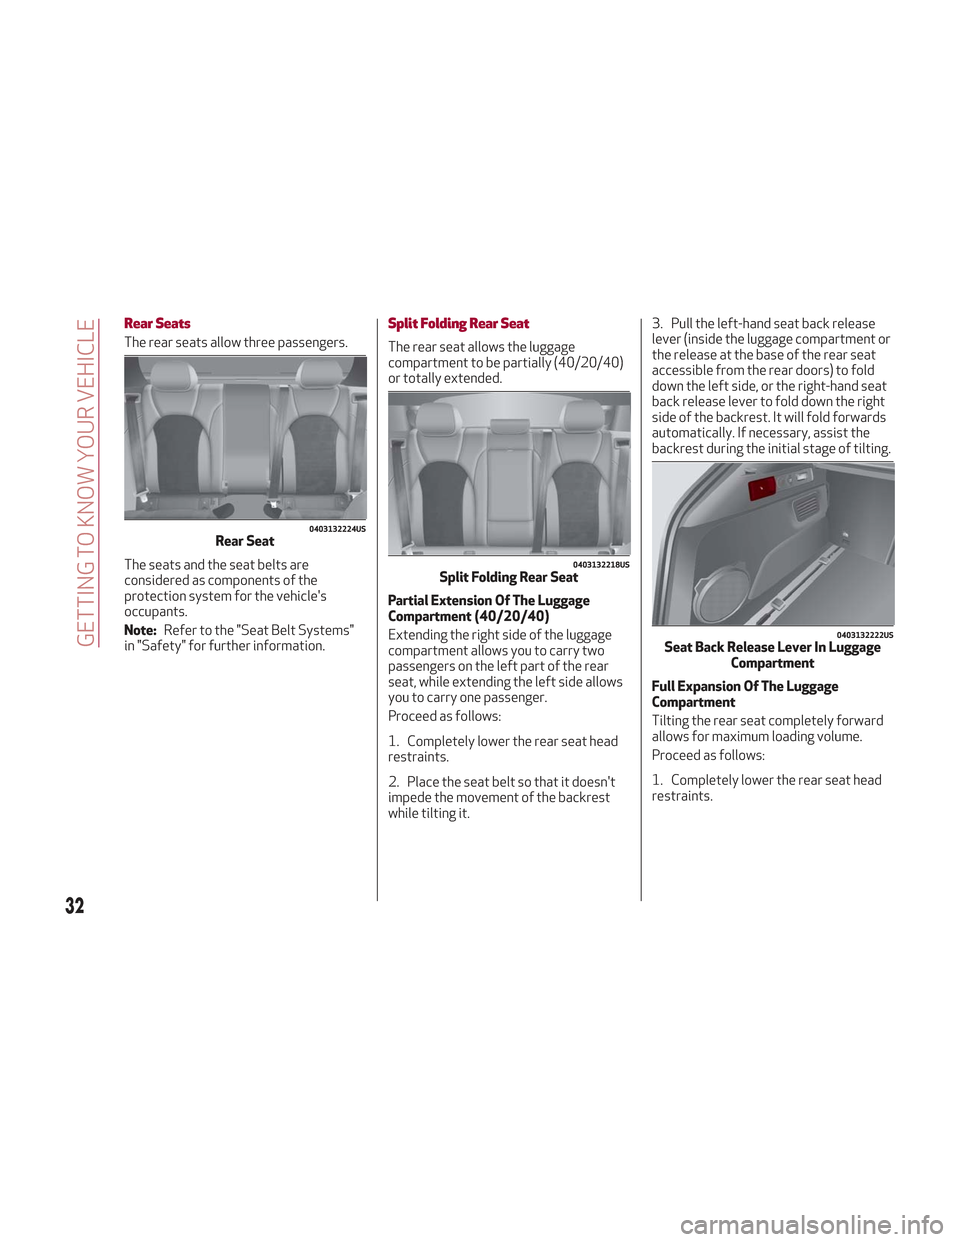
The rear seats allow three passengers.
The seats and the seat belts are
considered as components of the
protection system for the vehicle's
occupants.
Note:Refer to the "Seat Belt Systems"
in "Safety" for further information.
Split Folding Rear Seat
The rear seat allows the luggage
compartment to be partially (40/20/40)
or totally extended.
Partial Extension Of The Luggage
Compartment (40/20/40)
Extending the right side of the luggage
compartment allows you to carry two
passengers on the left part of the rear
seat, while extending the left side allows
you to carry one passenger.
Proceed as follows:
1. Completely lower the rear seat head
restraints.
2. Place the seat belt so that it doesn't
impede the movement of the backrest
while tilting it. 3. Pull the left-hand seat back release
lever (inside the luggage compartment or
the release at the base of the rear seat
accessible from the rear doors) to fold
down the left side, or the right-hand seat
back release lever to fold down the right
side of the backrest. It will fold forwards
automatically. If necessary, assist the
backrest during the initial stage of tilting.
Full Expansion Of The Luggage
Compartment
Tilting the rear seat completely forward
allows for maximum loading volume.
Proceed as follows:
1. Completely lower the rear seat head
restraints.
0403132224USRear Seat
0403132218USSplit Folding Rear Seat
0403132222USSeat Back Release Lever In Luggage
Compartment
32
GETTING TO KNOW YOUR VEHICLE
Page 35 of 276
2. Place the seat belt so that it doesn't
impede the movement of the backrest
while tilting it.
3. Pull both seat back release levers to
fold down the backrests. They will fold
forward automatically. If necessary,
assist the backrests during the initial
stage of tilting.
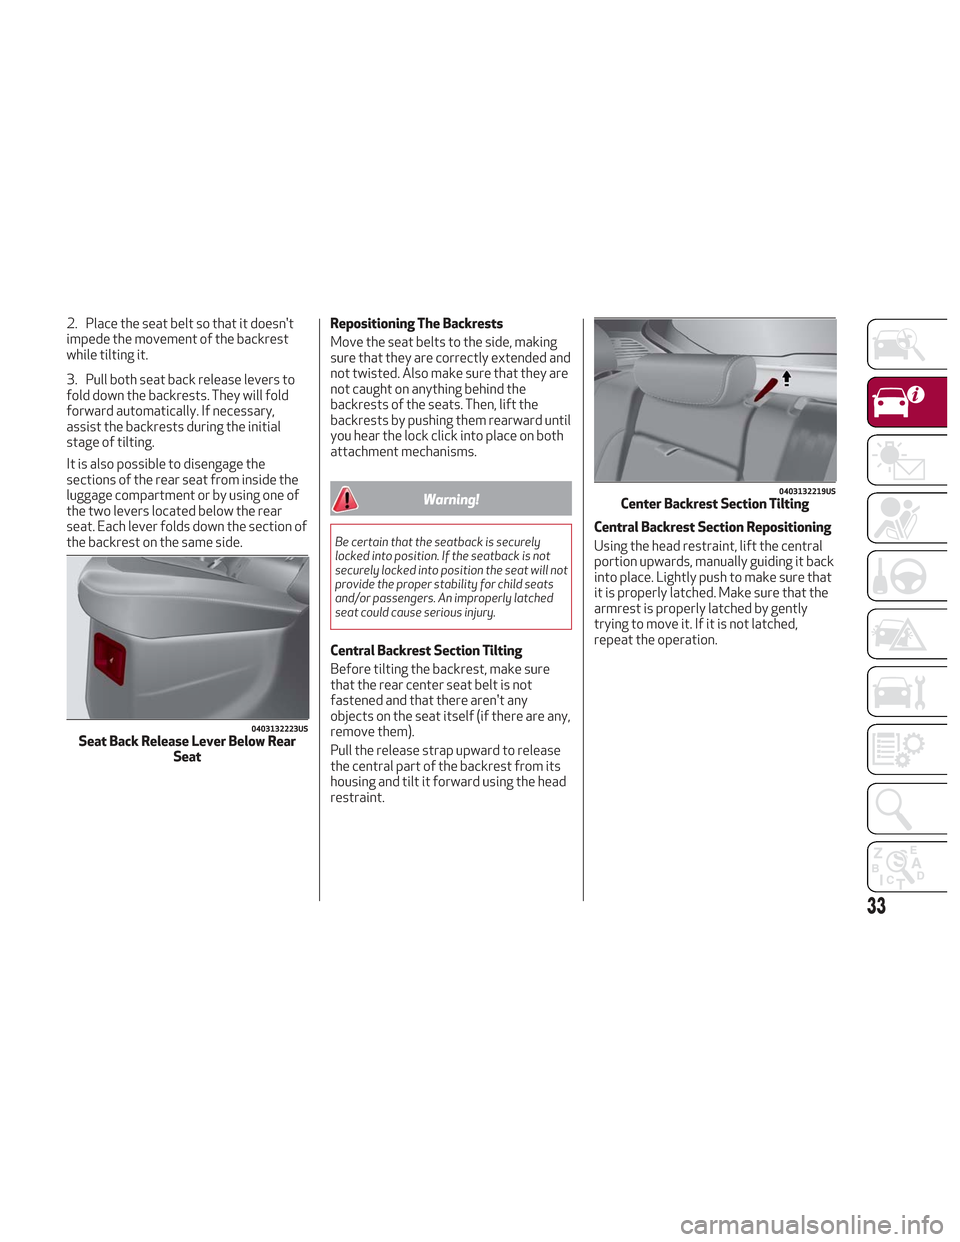
It is also possible to disengage the
sections of the rear seat from inside the
luggage compartment or by using one of
the two levers located below the rear
seat. Each lever folds down the section of
the backrest on the same side.Repositioning The Backrests
Move the seat belts to the side, making
sure that they are correctly extended and
not twisted. Also make sure that they are
not caught on anything behind the
backrests of the seats. Then, lift the
backrests by pushing them rearward until
you hear the lock click into place on both
attachment mechanisms.
Warning!
Be certain that the seatback is securely
locked into position. If the seatback is not
securely locked into position the seat will not
provide the proper stability for child seats
and/or passengers. An improperly latched
seat could cause serious injury.
Central Backrest Section Tilting
Before tilting the backrest, make sure
that the rear center seat belt is not
fastened and that there aren't any
objects on the seat itself (if there are any,
remove them).
Pull the release strap upward to release
the central part of the backrest from its
housing and tilt it forward using the head
restraint.Central Backrest Section Repositioning
Using the head restraint, lift the central
portion upwards, manually guiding it back
into place. Lightly push to make sure that
it is properly latched. Make sure that the
armrest is properly latched by gently
trying to move it. If it is not latched,
repeat the operation.
0403132223USSeat Back Release Lever Below Rear
Seat
0403132219USCenter Backrest Section Tilting
33
Page 36 of 276
HEAD RESTRAINTS
Head restraints are designed to reduce
the risk of injury by restricting head
movement in the event of a rear impact.
Head restraints should be adjusted so
that the top of the head restraint is
located above the top of your ear.
Warning!
A loose head restraint thrown forward in
a collision or hard stop could cause serious
injury or death to occupants of the vehicle.
Always securely stow removed head
restraints in a location outside the occupant
compartment.
ALL the head restraints MUST be
reinstalled in the vehicle to properly protect
the occupants. Follow the re-installation
instructions above prior to operating the
vehicle or occupying a seat.
Do not place items over the top of the
Reactive Head Restraint, such as coats,
seat covers or portable DVD players. These
items may interfere with the operation of
the Reactive Head Restraint in the event of
a collision and could result in serious injury
or death.
Front Head Restraints (Adjustments)
Note: If the vehicle is equipped with
Sparco Racing Seats, the head restraints
are not adjustable or removable.
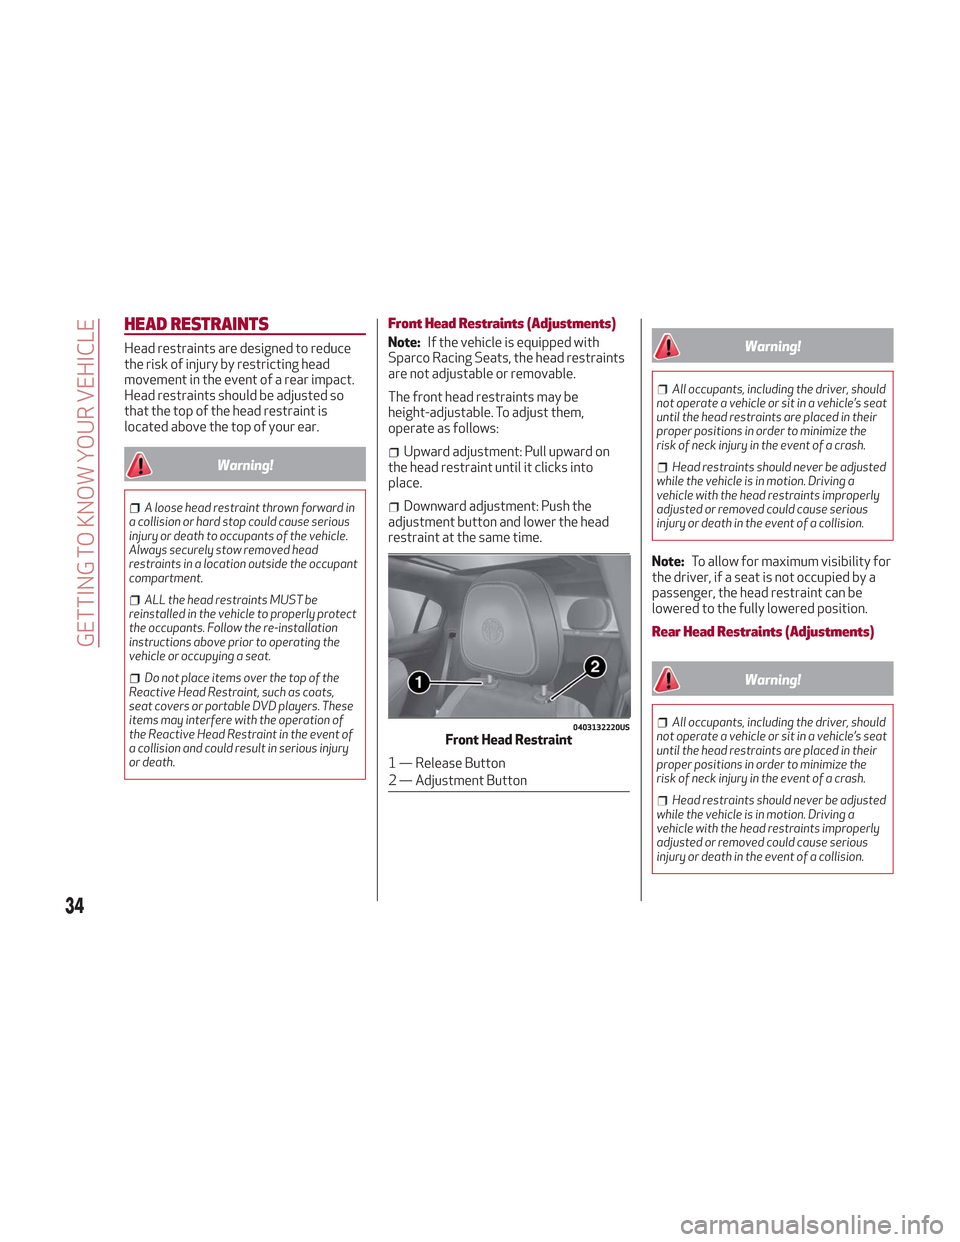
The front head restraints may be
height-adjustable. To adjust them,
operate as follows:
Upward adjustment: Pull upward on
the head restraint until it clicks into
place.
Downward adjustment: Push the
adjustment button and lower the head
restraint at the same time.
Warning!
All occupants, including the driver, should
not operate a vehicle or sit in a vehicle’s seat
until the head restraints are placed in their
proper positions in order to minimize the
risk of neck injury in the event of a crash.
Head restraints should never be adjusted
while the vehicle is in motion. Driving a
vehicle with the head restraints improperly
adjusted or removed could cause serious
injury or death in the event of a collision.
Note: To allow for maximum visibility for
the driver, if a seat is not occupied by a
passenger, the head restraint can be
lowered to the fully lowered position.
Rear Head Restraints (Adjustments)
Warning!
All occupants, including the driver, should
not operate a vehicle or sit in a vehicle’s seat
until the head restraints are placed in their
proper positions in order to minimize the
risk of neck injury in the event of a crash.
Head restraints should never be adjusted
while the vehicle is in motion. Driving a
vehicle with the head restraints improperly
adjusted or removed could cause serious
injury or death in the event of a collision.
0403132220USFront Head Restraint
1 — Release Button
2 — Adjustment Button
34
GETTING TO KNOW YOUR VEHICLE
Page 119 of 276
OCCUPANT RESTRAINT
SYSTEMS
Some of the most important safety
features in your vehicle are the restraint
systems:
Occupant Restraint Systems Features
Seat Belt Systems
Supplemental Restraint Systems
(SRS) Air Bags
Child Restraints
Some of the safety features described in
this section may be standard equipment
on some models, or may be optional
equipment on others. If you are not sure,
ask your authorized dealer.
Important Safety Precautions
Please pay close attention to the
information in this section. It tells you
how to use your restraint system
properly, to keep you and your
passengers as safe as possible.
Here are some simple steps you can take
to minimize the risk of harm from a
deploying air bag:
1. Children 12 years old and under
should always ride buckled up in the rear
seat of a vehicle with a rear seat. 2. If a child from 2 to 12 years old (not in
a rear-facing child restraint) must ride in
the front passenger seat, move the seat
as far back as possible and use the
proper child restraint (refer to “Child
Restraints” in this section for further
information).
3. Children that are not big enough to
wear the vehicle seat belt properly (refer
to “Child Restraints” in this section for
further information) should be secured in
the rear seat of a vehicle with a rear seat
in child restraints or belt-positioning
booster seats. Older children who do not
use child restraints or belt-positioning
booster seats should ride properly
buckled up in the rear seat of a vehicle
with a rear seat.
4. Never allow children to slide the
shoulder belt behind them or under their
arm.
5. You should read the instructions
provided with your child restraint to
make sure that you are using it properly.
6. All occupants should always wear
their lap and shoulder belts properly.
7. The driver and front passenger seats
should be moved back as far as practical
to allow the front air bags room to inflate.
8. Do not lean against the door or
window. If your vehicle has side air bags,
and deployment occurs, the side air bags
will inflate forcefully into the space
between occupants and the door and
occupants could be injured.
9. If the air bag system in this vehicle
needs to be modified to accommodate a
disabled person, refer to the “Customer
Assistance” section for customer service
contact information.
Warning!
Never place a rear-facing child restraint in
front of an air bag. A deploying passenger
front air bag can cause death or serious
injury to a child 12 years or younger,
including a child in a rear-facing child
restraint.
Only use a rear-facing child restraint in
the rear seat of a vehicle with a rear seat.
117
Page 121 of 276
Warning!
Relying on the air bags alone could lead to
more severe injuries in a collision. The air
bags work with your seat belt to restrain
you properly. In some collisions, the air bags
won’t deploy at all. Always wear your seat
belt even though you have air bags.
In a collision, you and your passengers can
suffer much greater injuries if you are not
properly buckled up. You can strike the
interior of your vehicle or other passengers,
or you can be thrown out of the vehicle.
Always be sure you and others in your
vehicle are buckled up properly.
It is dangerous to ride in a cargo area,
inside or outside of a vehicle. In a collision,
people riding in these areas are more likely
to be seriously injured or killed.
Do not allow people to ride in any area of
your vehicle that is not equipped with seats
and seat belts.
Be sure everyone in your vehicle is in a
seat and using a seat belt properly.
Occupants, including the driver, should
always wear their seat belts whether or not
an air bag is also provided at their seating
position to minimize the risk of severe injury
or death in the event of a crash.
Wearing your seat belt incorrectly could
make your injuries in a collision much worse.
You might suffer internal injuries, or you
could even slide out of the seat belt. Follow
these instructions to wear your seat belt
safely and to keep your passengers safe,
too.
Two people should never be belted into a
single seat belt. People belted together can
crash into one another in a collision, hurting
one another badly. Never use a lap/shoulder
belt or a lap belt for more than one person,
no matter what their size.
Warning!
A lap belt worn too high can increase the
risk of injury in a collision. The seat belt
forces won’t be at the strong hip and pelvic
bones, but across your abdomen. Always
wear the lap part of your seat belt as low as
possible and keep it snug.
A twisted seat belt may not protect you
properly. In a collision, it could even cut into you.
Be sure the seat belt is flat against your body,
without twists. If you can’t straighten a seat
belt in your vehicle, take it to your authorized
dealer immediately and have it fixed.
A seat belt that is buckled into the wrong
buckle will not protect you properly. The lap
portion could ride too high on your body,
possibly causing internal injuries. Always buckle
your seat belt into the buckle nearest you.
A seat belt that is too loose will not protect
you properly. In a sudden stop, you could move
too far forward, increasing the possibility of
injury. Wear your seat belt snugly.
A seat belt that is worn under your arm is
dangerous. Your body could strike the inside
surfaces of the vehicle in a collision,
increasing head and neck injury. A seat belt
worn under the arm can cause internal injuries. Ribs aren’t as strong as shoulder
bones. Wear the seat belt over your
shoulder so that your strongest bones will
take the force in a collision.
A shoulder belt placed behind you will not
protect you from injury during a collision.
You are more likely to hit your head in a
collision if you do not wear your shoulder
belt. The lap and shoulder belt are meant to
be used together.
A frayed or torn seat belt could rip apart
in a collision and leave you with no
protection. Inspect the seat belt system
periodically, checking for cuts, frays, or
loose parts. Damaged parts must be
replaced immediately. Do not disassemble
or modify the seat belt system. Seat belt
assemblies must be replaced after a
collision.
Lap/Shoulder Belt Operating
Instructions
1. Enter the vehicle and close the door.
Sit back and adjust the seat.
2. The seat belt latch plate is above the
back of the front seat, and next to your
arm in the rear seat (for vehicles
equipped with a rear seat). Grasp the
latch plate and pull out the seat belt.
Slide the latch plate up the webbing as
far as necessary to allow the seat belt to
go around your lap.
3. When the seat belt is long enough to
fit, insert the latch plate into the buckle
until you hear a “click.”
119