wiper Alfa Romeo Stelvio 2018 Owner's Manual
[x] Cancel search | Manufacturer: ALFA ROMEO, Model Year: 2018, Model line: Stelvio, Model: Alfa Romeo Stelvio 2018Pages: 276, PDF Size: 5.79 MB
Page 15 of 276
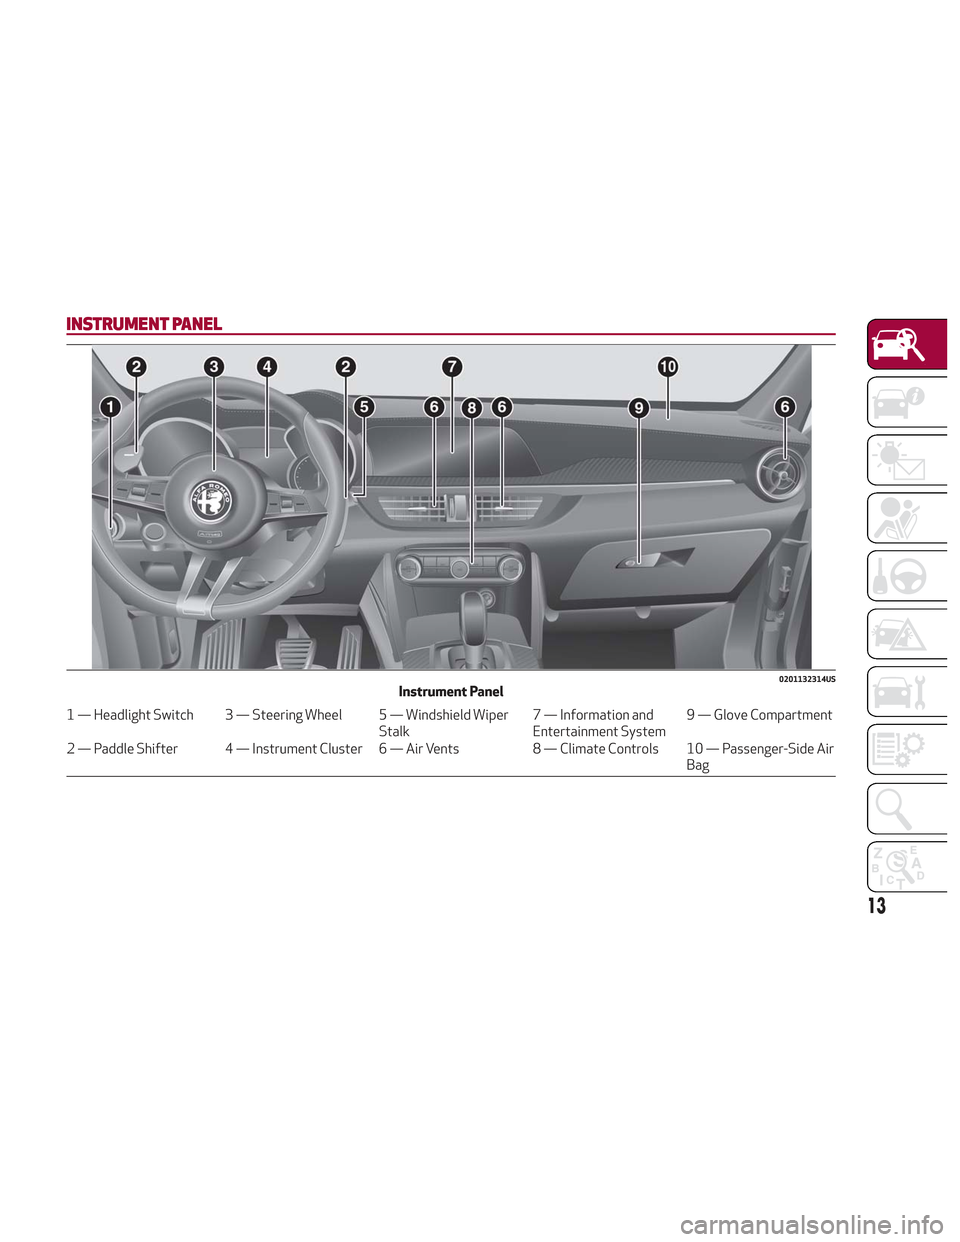
INSTRUMENT PANEL
0201132314USInstrument Panel
1 — Headlight Switch 3 — Steering Wheel 5 — Windshield WiperStalk7 — Information and
Entertainment System9 — Glove Compartment
2 — Paddle Shifter 4 — Instrument Cluster 6 — Air Vents 8 — Climate Controls 10 — Passenger-Side Air
Bag
13
Page 17 of 276
GETTING TO KNOW YOUR VEHICLE
In this section, you will find important
information to help you become familiar
with the features needed to operate your
vehicle, and how they function.KEYS ....................16
IGNITION SYSTEM............19
ENGINE IMMOBILIZER .........20
SECURITY ALARM SYSTEM — IF
EQUIPPED .................21
DOORS ...................23
SEATS....................28
HEAD RESTRAINTS ...........34
STEERING WHEEL ............36
MIRRORS ..................37
EXTERIOR LIGHTS ............38
INTERIOR LIGHTS ............41
WINDSHIELD WIPERS ..........44
HEADLAMP WASHERS ..........46
CLIMATE CONTROL ...........47
POWERWINDOWS............54
POWER SUNROOF — IF EQUIPPED . .55
HOOD....................57
POWER LIFTGATE ............58
INTERNAL EQUIPMENT .........63
15
Page 46 of 276
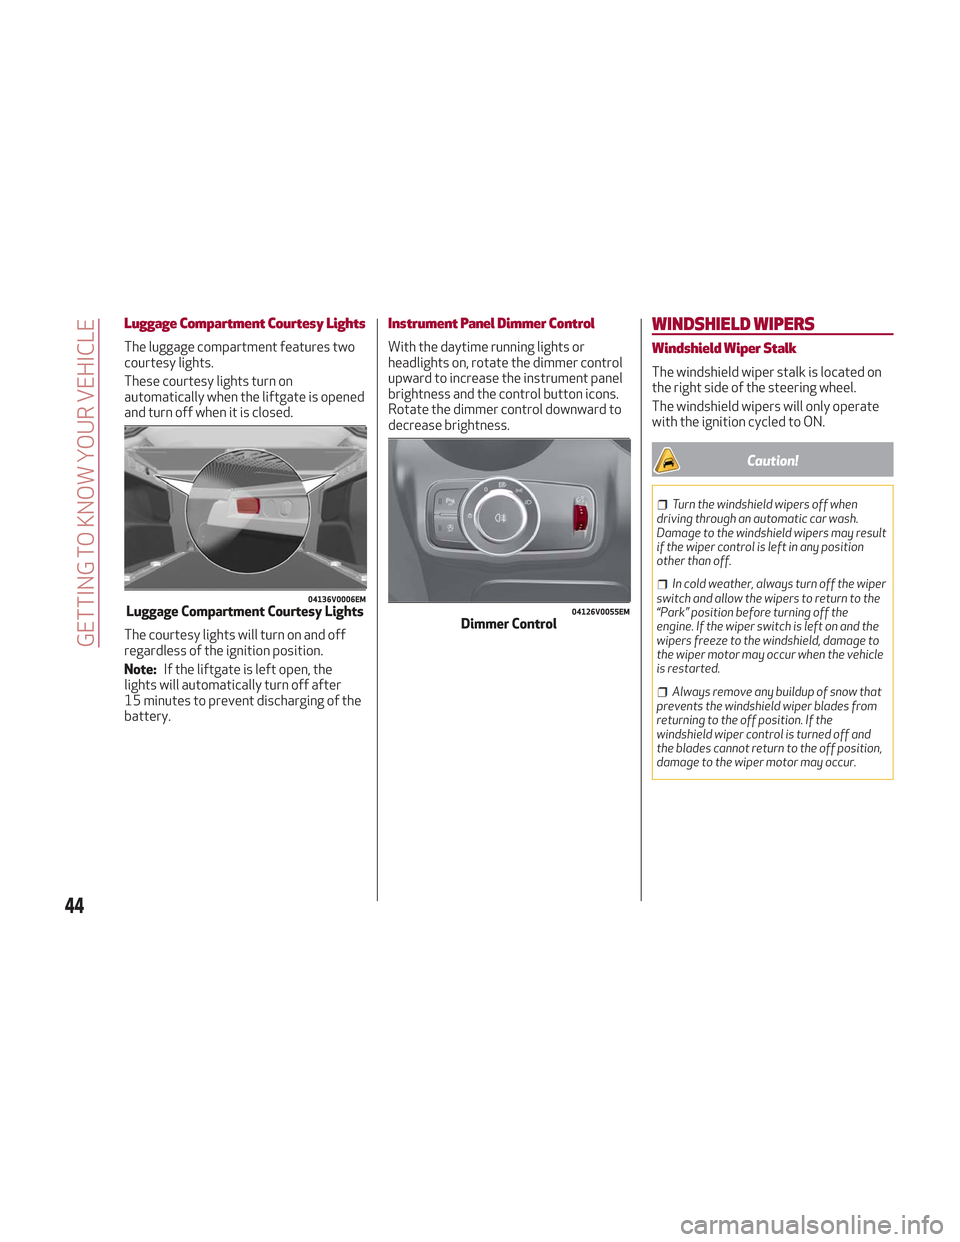
Luggage Compartment Courtesy Lights
The luggage compartment features two
courtesy lights.
These courtesy lights turn on
automatically when the liftgate is opened
and turn off when it is closed.
The courtesy lights will turn on and off
regardless of the ignition position.
Note:If the liftgate is left open, the
lights will automatically turn off after
15 minutes to prevent discharging of the
battery.
Instrument Panel Dimmer Control
With the daytime running lights or
headlights on, rotate the dimmer control
upward to increase the instrument panel
brightness and the control button icons.
Rotate the dimmer control downward to
decrease brightness.
WINDSHIELD WIPERS
Windshield Wiper Stalk
The windshield wiper stalk is located on
the right side of the steering wheel.
The windshield wipers will only operate
with the ignition cycled to ON.
Caution!
Turn the windshield wipers off when
driving through an automatic car wash.
Damage to the windshield wipers may result
if the wiper control is left in any position
other than off.
In cold weather, always turn off the wiper
switch and allow the wipers to return to the
“Park” position before turning off the
engine. If the wiper switch is left on and the
wipers freeze to the windshield, damage to
the wiper motor may occur when the vehicle
is restarted.
Always remove any buildup of snow that
prevents the windshield wiper blades from
returning to the off position. If the
windshield wiper control is turned off and
the blades cannot return to the off position,
damage to the wiper motor may occur.
04136V0006EMLuggage Compartment Courtesy Lights04126V0055EMDimmer Control
44
GETTING TO KNOW YOUR VEHICLE
Page 47 of 276
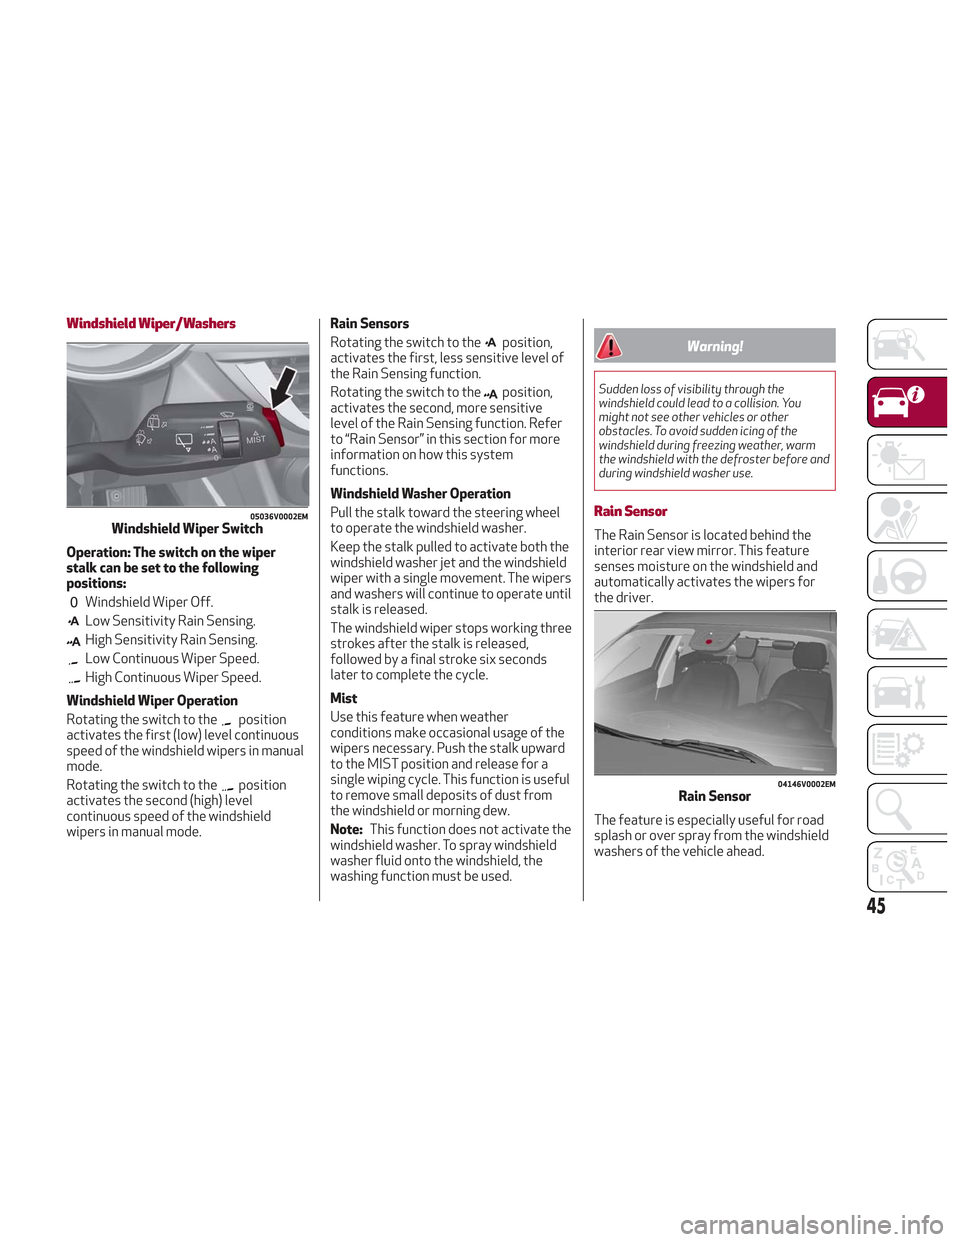
Windshield Wiper/Washers
Operation: The switch on the wiper
stalk can be set to the following
positions:
Windshield Wiper Off.
Low Sensitivity Rain Sensing.
High Sensitivity Rain Sensing.
Low Continuous Wiper Speed.
High Continuous Wiper Speed.
Windshield Wiper Operation
Rotating the switch to the
position
activates the first (low) level continuous
speed of the windshield wipers in manual
mode.
Rotating the switch to the
position
activates the second (high) level
continuous speed of the windshield
wipers in manual mode. Rain Sensors
Rotating the switch to the
position,
activates the first, less sensitive level of
the Rain Sensing function.
Rotating the switch to the
position,
activates the second, more sensitive
level of the Rain Sensing function. Refer
to “Rain Sensor” in this section for more
information on how this system
functions.
Windshield Washer Operation
Pull the stalk toward the steering wheel
to operate the windshield washer.
Keep the stalk pulled to activate both the
windshield washer jet and the windshield
wiper with a single movement. The wipers
and washers will continue to operate until
stalk is released.
The windshield wiper stops working three
strokes after the stalk is released,
followed by a final stroke six seconds
later to complete the cycle.
Mist
Use this feature when weather
conditions make occasional usage of the
wipers necessary. Push the stalk upward
to the MIST position and release for a
single wiping cycle. This function is useful
to remove small deposits of dust from
the windshield or morning dew.
Note: This function does not activate the
windshield washer. To spray windshield
washer fluid onto the windshield, the
washing function must be used.
Warning!
Sudden loss of visibility through the
windshield could lead to a collision. You
might not see other vehicles or other
obstacles. To avoid sudden icing of the
windshield during freezing weather, warm
the windshield with the defroster before and
during windshield washer use.
Rain Sensor
The Rain Sensor is located behind the
interior rear view mirror. This feature
senses moisture on the windshield and
automatically activates the wipers for
the driver.
The feature is especially useful for road
splash or over spray from the windshield
washers of the vehicle ahead.
05036V0002EMWindshield Wiper Switch
04146V0002EMRain Sensor
45
Page 48 of 276
The sensor has an adjustment range that
varies progressively from wiper still (no
stroke) when the windshield is dry, to
wiper at continuous speed (fast
operation) with intense rain.
Activation
Rotating the wiper switch to position
oractivates the rain sensor.
The activation of the rain sensor system
is done by tapping the wiper stalk
upwards while the switch is in the
orposition.
The variation in sensitivity during rain
sensor operation is also signaled by a
stroke of the wiper (command acquired
and implemented). This stroke is also
executed with the windshield dry.
If the windshield washer is used with the
rain sensor activated, the normal washing
cycle is performed, after which the rain
sensor resumes its normal automatic
operation.
Note: Keep the glass in the sensor area
clean.
Deactivation
Use the wiper switch or cycle the ignition
to STOP mode.
In the event of malfunction of the rain
sensor while it is active, the windshield
wiper operates intermittently at a speed
consistent with the sensitivity setting of
the rain sensor, whether or not there is
rain on the glass for as long as the sensor
failure is indicated on the display. The sensor continues to operate and it is
possible to set the windshield wiper to
continuous mode
or. The failure
indication remains on for as long as the
sensor is active.
The rain sensor is able to recognize and
automatically adjust itself in the
presence of the following conditions:
Presence of dirt on the controlled
surface (e.g. salt, dirt, etc.).
Presence of streaks of water caused
by the worn window wiper blades.
Difference between day and night.
Rear Window Wiper/Washer
Shifting the vehicle into REVERSE with
the windshield wiper operating, activates
a single cycle of the rear window wiper.
Activation of the rear window
wiper/washer can be done by moving the
stalk to one of the following positions:
Pushing the stalk towards the
instrument panel activates the rear
window washer (a brief push activates
one washing cycle, keeping the stalk
pushed washes continuously until the
stalk is released).
Pushing the stalk downward
activates/deactivates continuous rear
wiper operation.
HEADLAMP WASHERS
The windshield wiper stalk operates the
headlight washers when the ignition is in
the ON position and the headlights are
turned on. The windshield wiper stalk is
located on the right side of the steering
column. To use the headlight washers, pull
the stalk toward you and release it. The
headlight washers will spray a timed
high-pressure spray of washer fluid onto
each headlight lens. In addition, the
windshield washers will spray the
windshield and the windshield wipers will
cycle.
46
GETTING TO KNOW YOUR VEHICLE
Page 59 of 276
HOOD
Opening The Hood
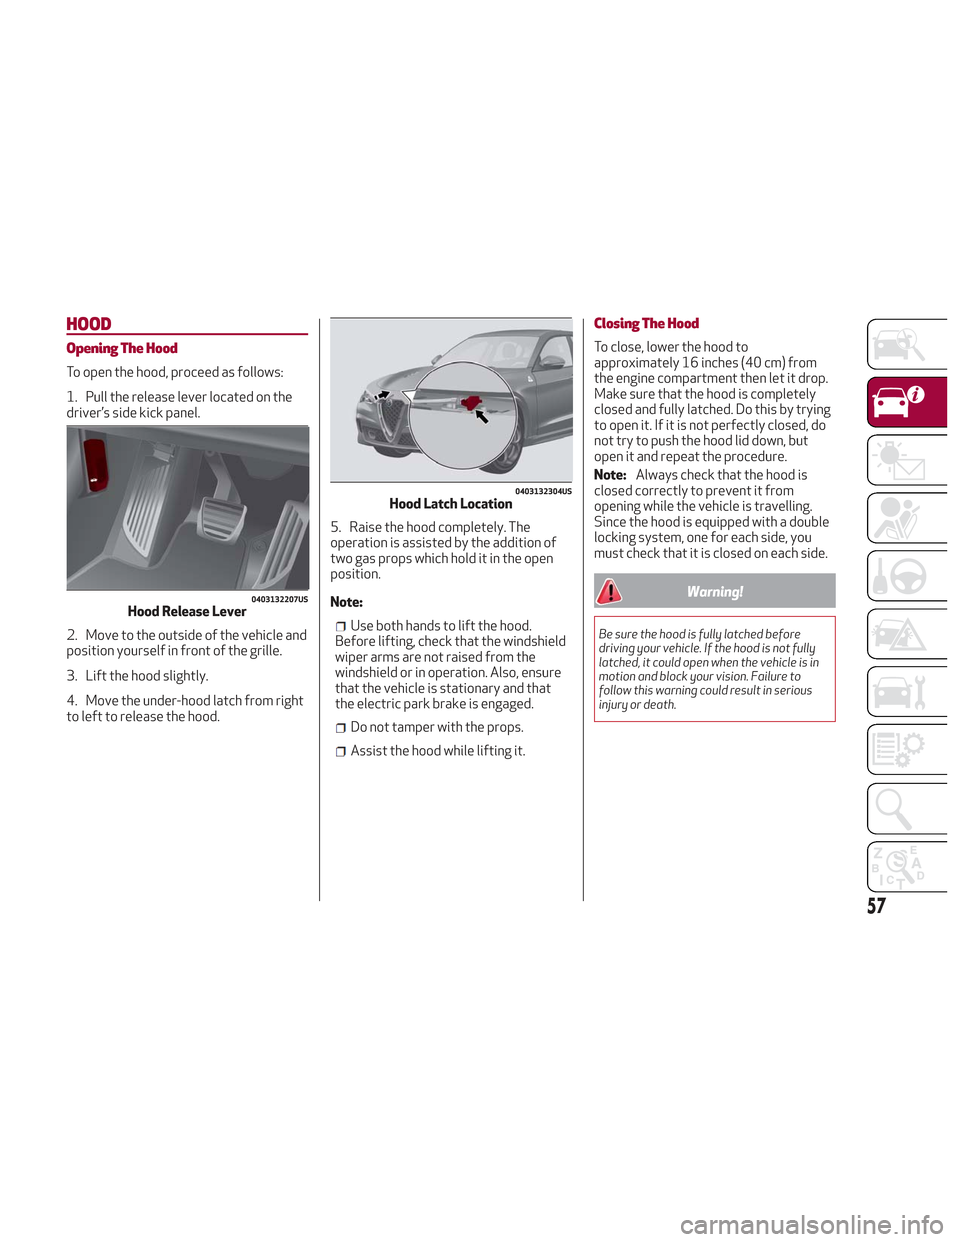
To open the hood, proceed as follows:
1. Pull the release lever located on the
driver’s side kick panel.
2. Move to the outside of the vehicle and
position yourself in front of the grille.
3. Lift the hood slightly.
4. Move the under-hood latch from right
to left to release the hood.5. Raise the hood completely. The
operation is assisted by the addition of
two gas props which hold it in the open
position.
Note:
Use both hands to lift the hood.
Before lifting, check that the windshield
wiper arms are not raised from the
windshield or in operation. Also, ensure
that the vehicle is stationary and that
the electric park brake is engaged.
Do not tamper with the props.
Assist the hood while lifting it.
Closing The Hood
To close, lower the hood to
approximately 16 inches (40 cm) from
the engine compartment then let it drop.
Make sure that the hood is completely
closed and fully latched. Do this by trying
to open it. If it is not perfectly closed, do
not try to push the hood lid down, but
open it and repeat the procedure.
Note: Always check that the hood is
closed correctly to prevent it from
opening while the vehicle is travelling.
Since the hood is equipped with a double
locking system, one for each side, you
must check that it is closed on each side.
Warning!
Be sure the hood is fully latched before
driving your vehicle. If the hood is not fully
latched, it could open when the vehicle is in
motion and block your vision. Failure to
follow this warning could result in serious
injury or death.
0403132207USHood Release Lever
0403132304USHood Latch Location
57
Page 75 of 276
Reconfigurable Display Items
1.Headlight Warning Lights
Displays the headlight warning light for
either of the following active modes:
Headlights
Automatic Headlights
2. Gear Selector Information
Displays the following information
controlled by the gear selector function:
P = PARK
R = REVERSE
N = NEUTRAL
D= DRIVE, (automatic forward speed)
AutoStick: + shifting to higher gear in
manual (sequential) driving mode –
shifting to lower gear in sequential
driving mode
3. Forward Collision, Lane Departure,
Cruise Control
Displays operations for the following
modes:
Forward Collision Warning (FCW)
Lane Departure Warning (LDW)
Cruise Control (CC) or Active Cruise
Control (ACC) (if equipped) 4.
Speed Limit Warning Light
Shows information regarding the Speed
Limiter function.
5. Compass
6. Reconfigurable Main Area
Can display the following screens:
Home
Trip A
Trip B (can be activated/deactivated
through the Information and
Entertainment System)
Performance
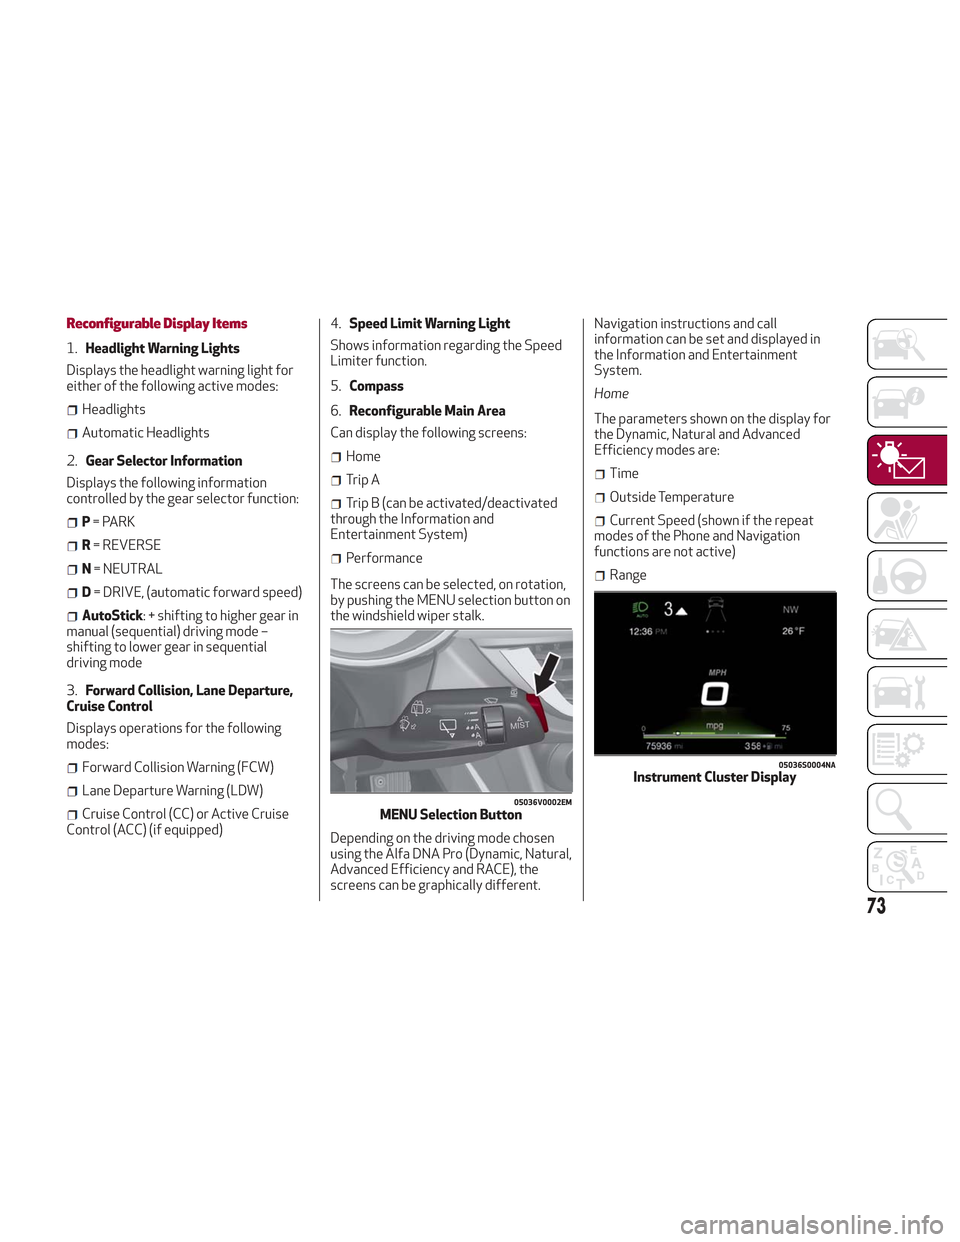
The screens can be selected, on rotation,
by pushing the MENU selection button on
the windshield wiper stalk.
Depending on the driving mode chosen
using the Alfa DNA Pro (Dynamic, Natural,
Advanced Efficiency and RACE), the
screens can be graphically different. Navigation instructions and call
information can be set and displayed in
the Information and Entertainment
System.
Home
The parameters shown on the display for
the Dynamic, Natural and Advanced
Efficiency modes are:
Time
Outside Temperature
Current Speed (shown if the repeat
modes of the Phone and Navigation
functions are not active)
Range
05036V0002EMMENU Selection Button
05036S0004NAInstrument Cluster Display
73
Page 76 of 276
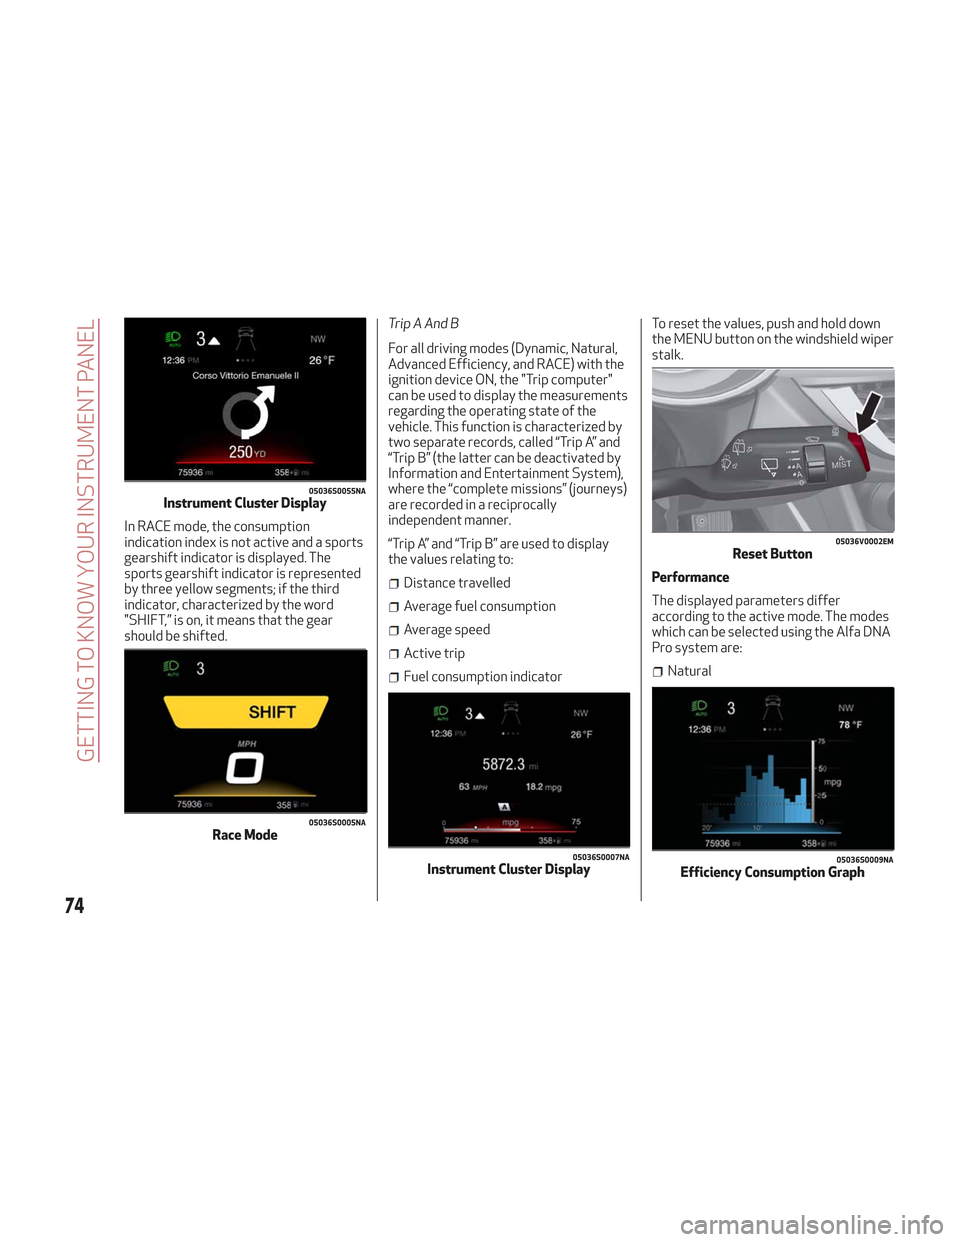
In RACE mode, the consumption
indication index is not active and a sports
gearshift indicator is displayed. The
sports gearshift indicator is represented
by three yellow segments; if the third
indicator, characterized by the word
"SHIFT,” is on, it means that the gear
should be shifted.Trip A And B
For all driving modes (Dynamic, Natural,
Advanced Efficiency, and RACE) with the
ignition device ON, the "Trip computer"
can be used to display the measurements
regarding the operating state of the
vehicle. This function is characterized by
two separate records, called “Trip A” and
“Trip B” (the latter can be deactivated by
Information and Entertainment System),
where the “complete missions” (journeys)
are recorded in a reciprocally
independent manner.
“Trip A” and “Trip B” are used to display
the values relating to:
Distance travelled
Average fuel consumption
Average speed
Active trip
Fuel consumption indicatorTo reset the values, push and hold down
the MENU button on the windshield wiper
stalk.
Performance
The displayed parameters differ
according to the active mode. The modes
which can be selected using the Alfa DNA
Pro system are:Natural
05036S0055NAInstrument Cluster Display
05036S0005NARace Mode
05036S0007NAInstrument Cluster Display
05036V0002EMReset Button
05036S0009NAEfficiency Consumption Graph
74
GETTING TO KNOW YOUR INSTRUMENT PANEL
Page 79 of 276
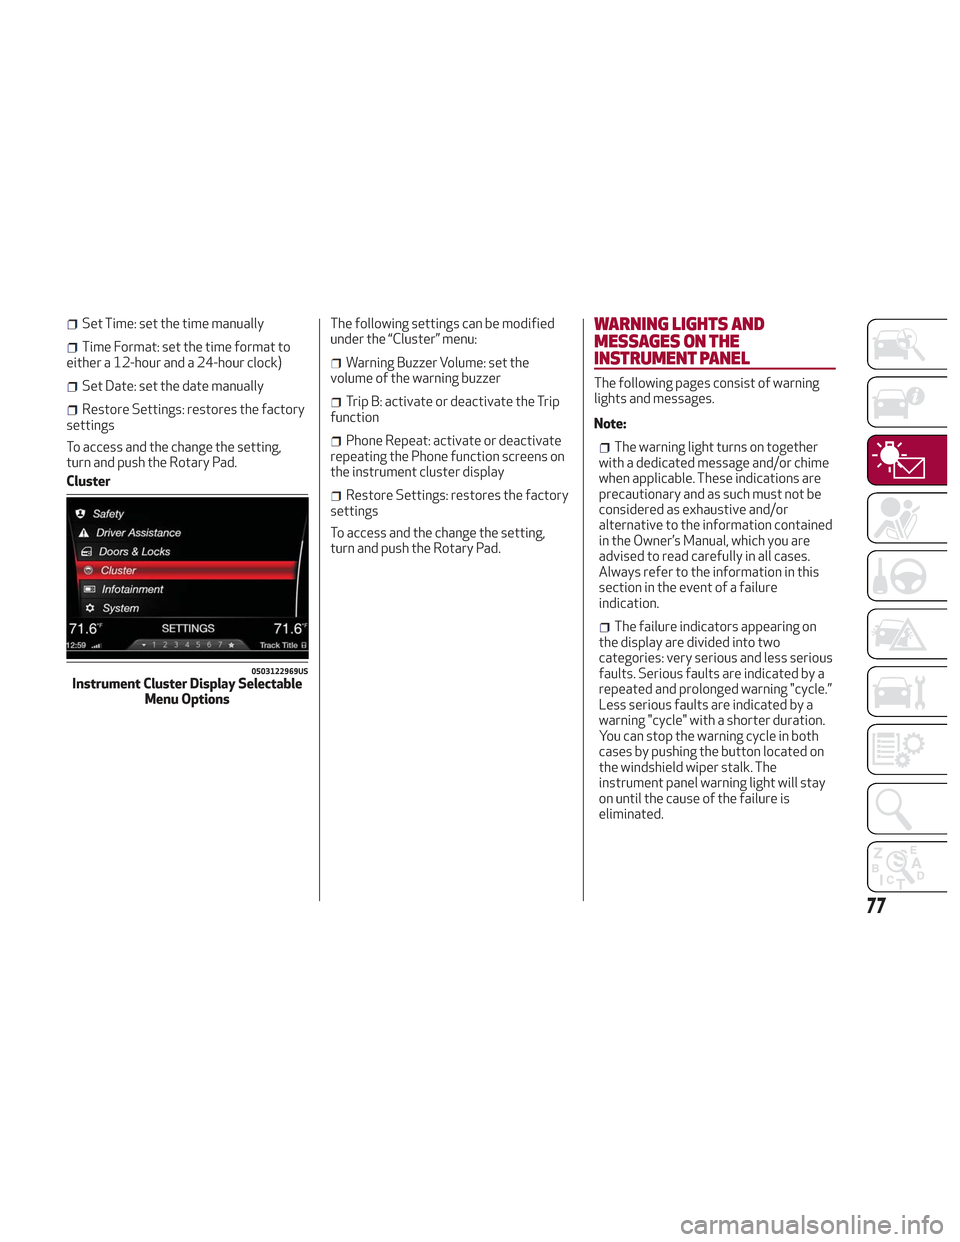
Set Time: set the time manually
Time Format: set the time format to
either a 12-hour and a 24-hour clock)
Set Date: set the date manually
Restore Settings: restores the factory
settings
To access and the change the setting,
turn and push the Rotary Pad.
Cluster The following settings can be modified
under the “Cluster” menu:
Warning Buzzer Volume: set the
volume of the warning buzzer
Trip B: activate or deactivate the Trip
function
Phone Repeat: activate or deactivate
repeating the Phone function screens on
the instrument cluster display
Restore Settings: restores the factory
settings
To access and the change the setting,
turn and push the Rotary Pad.
WARNING LIGHTS AND
MESSAGES ON THE
INSTRUMENT PANEL
The following pages consist of warning
lights and messages.
Note:
The warning light turns on together
with a dedicated message and/or chime
when applicable. These indications are
precautionary and as such must not be
considered as exhaustive and/or
alternative to the information contained
in the Owner’s Manual, which you are
advised to read carefully in all cases.
Always refer to the information in this
section in the event of a failure
indication.
The failure indicators appearing on
the display are divided into two
categories: very serious and less serious
faults. Serious faults are indicated by a
repeated and prolonged warning "cycle.”
Less serious faults are indicated by a
warning "cycle" with a shorter duration.
You can stop the warning cycle in both
cases by pushing the button located on
the windshield wiper stalk. The
instrument panel warning light will stay
on until the cause of the failure is
eliminated.
0503122969USInstrument Cluster Display Selectable Menu Options
77
Page 95 of 276
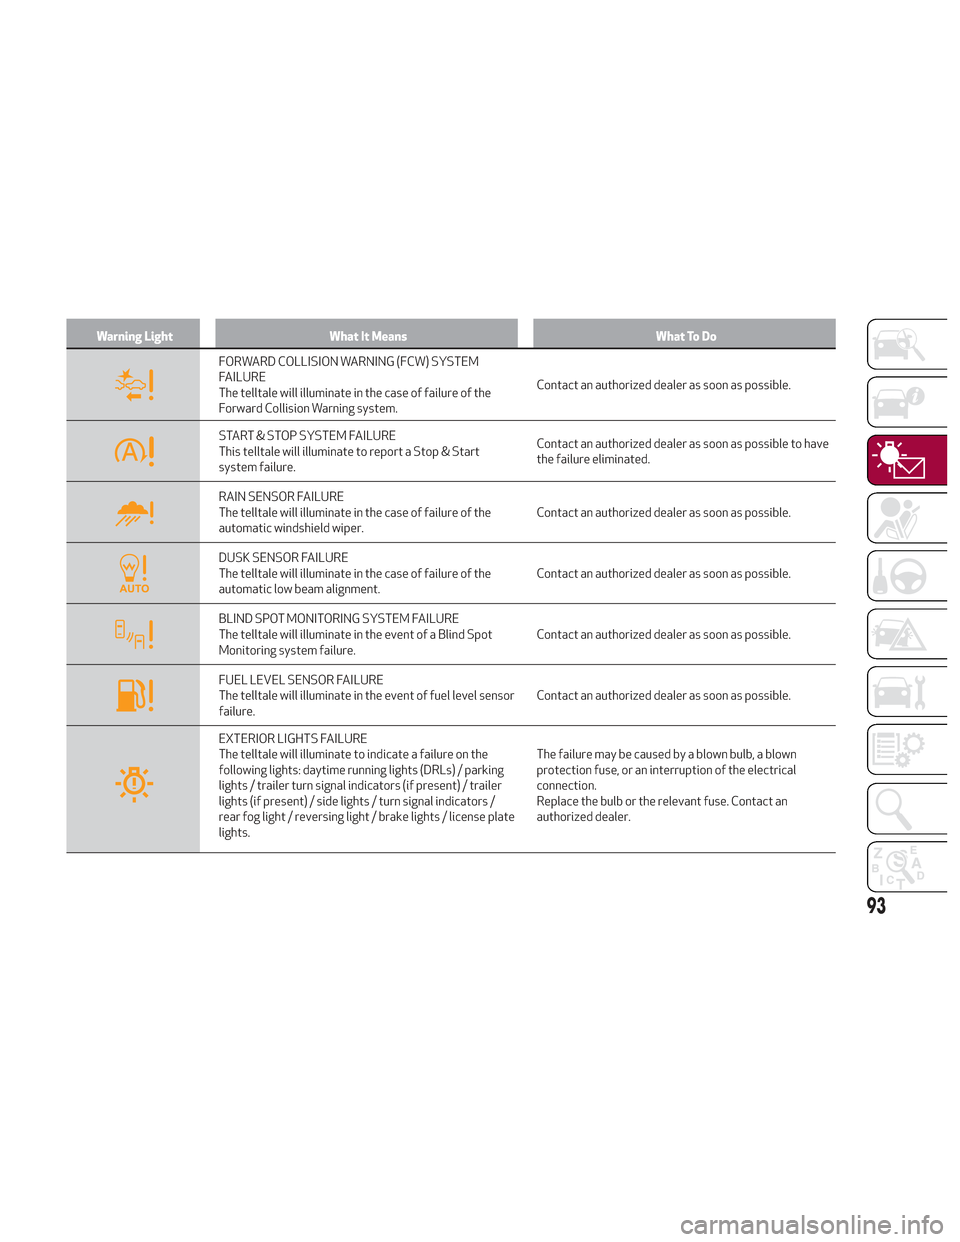
Warning LightWhat It Means What To Do
FORWARD COLLISION WARNING (FCW) SYSTEM
FAILURE
The telltale will illuminate in the case of failure of the
Forward Collision Warning system.Contact an authorized dealer as soon as possible.
START & STOP SYSTEM FAILURE
This telltale will illuminate to report a Stop & Start
system failure.Contact an authorized dealer as soon as possible to have
the failure eliminated.
RAIN SENSOR FAILURE
The telltale will illuminate in the case of failure of the
automatic windshield wiper.
Contact an authorized dealer as soon as possible.
DUSK SENSOR FAILURE
The telltale will illuminate in the case of failure of the
automatic low beam alignment.Contact an authorized dealer as soon as possible.
BLIND SPOT MONITORING SYSTEM FAILURE
The telltale will illuminate in the event of a Blind Spot
Monitoring system failure.Contact an authorized dealer as soon as possible.
FUEL LEVEL SENSOR FAILURE
The telltale will illuminate in the event of fuel level sensor
failure.Contact an authorized dealer as soon as possible.
EXTERIOR LIGHTS FAILURE
The telltale will illuminate to indicate a failure on the
following lights: daytime running lights (DRLs) / parking
lights / trailer turn signal indicators (if present) / trailer
lights (if present) / side lights / turn signal indicators /
rear fog light / reversing light / brake lights / license plate
lights.The failure may be caused by a blown bulb, a blown
protection fuse, or an interruption of the electrical
connection.
Replace the bulb or the relevant fuse. Contact an
authorized dealer.
93