remote control Alfa Romeo Stelvio 2019 Owner's Manual
[x] Cancel search | Manufacturer: ALFA ROMEO, Model Year: 2019, Model line: Stelvio, Model: Alfa Romeo Stelvio 2019Pages: 244, PDF Size: 4.95 MB
Page 15 of 244
IGNITION DEVICE
OPERATION
1) 2) 3) 4) 5)
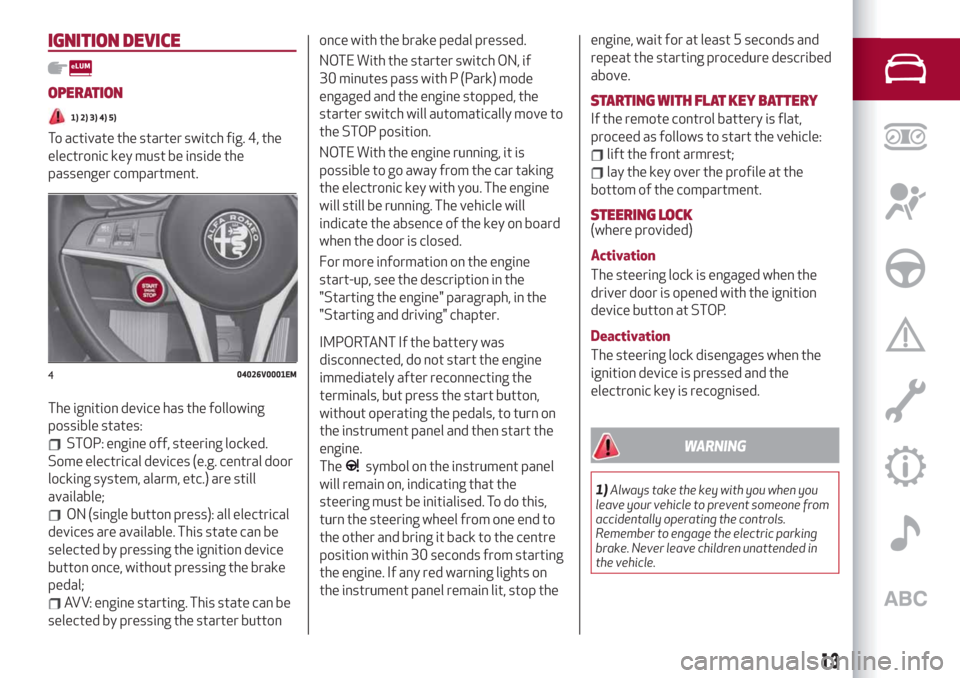
To activate the starter switch fig. 4, the
electronic key must be inside the
passenger compartment.
The ignition device has the following
possible states:
STOP: engine off, steering locked.
Some electrical devices (e.g. central door
locking system, alarm, etc.) are still
available;
ON (single button press): all electrical
devices are available. This state can be
selected by pressing the ignition device
button once, without pressing the brake
pedal;
AVV: engine starting. This state can be
selected by pressing the starter buttononce with the brake pedal pressed.
NOTE With the starter switch ON, if
30 minutes pass with P (Park) mode
engaged and the engine stopped, the
starter switch will automatically move to
the STOP position.
NOTE With the engine running, it is
possible to go away from the car taking
the electronic key with you. The engine
will still be running. The vehicle will
indicate the absence of the key on board
when the door is closed.
For more information on the engine
start-up, see the description in the
"Starting the engine" paragraph, in the
"Starting and driving" chapter.
IMPORTANT If the battery was
disconnected, do not start the engine
immediately after reconnecting the
terminals, but press the start button,
without operating the pedals, to turn on
the instrument panel and then start the
engine.
The
symbol on the instrument panel
will remain on, indicating that the
steering must be initialised. To do this,
turn the steering wheel from one end to
the other and bring it back to the centre
position within 30 seconds from starting
the engine. If any red warning lights on
the instrument panel remain lit, stop theengine, wait for at least 5 seconds and
repeat the starting procedure described
above.
STARTING WITH FLAT KEY BATTERY
If the remote control battery is flat,
proceed as follows to start the vehicle:
lift the front armrest;
lay the key over the profile at the
bottom of the compartment.
STEERING LOCK(where provided)
Activation
The steering lock is engaged when the
driver door is opened with the ignition
device button at STOP.
Deactivation
The steering lock disengages when the
ignition device is pressed and the
electronic key is recognised.
WARNING
1)Always take the key with you when you
leave your vehicle to prevent someone from
accidentally operating the controls.
Remember to engage the electric parking
brake. Never leave children unattended in
the vehicle.
404026V0001EM
13
Page 19 of 244
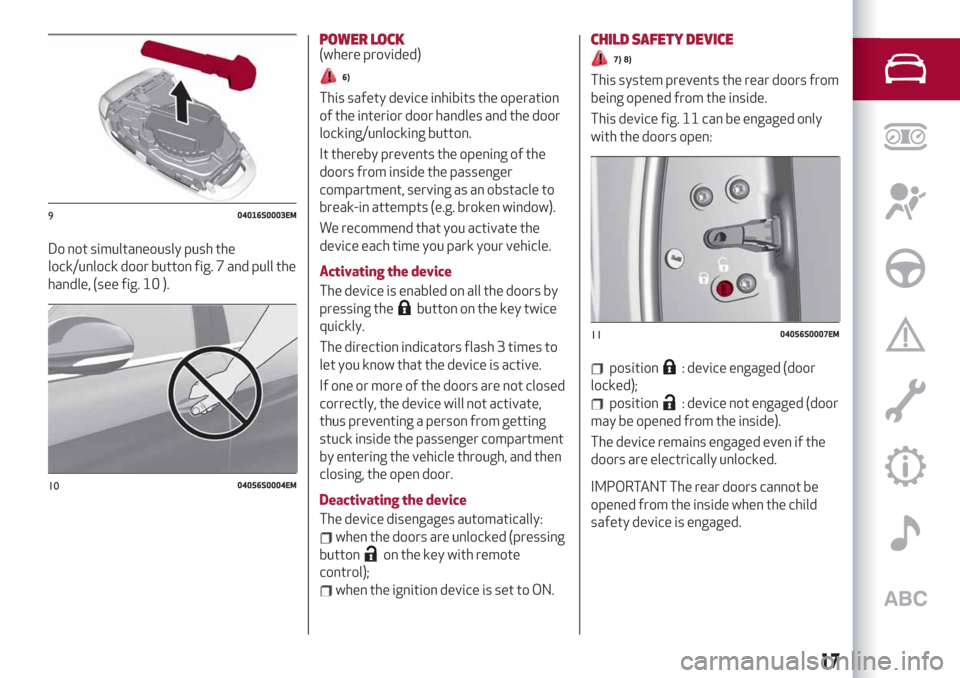
Do not simultaneously push the
lock/unlock door button fig. 7 and pull the
handle, (see fig. 10 ).
POWER LOCK(where provided)
6)
This safety device inhibits the operation
of the interior door handles and the door
locking/unlocking button.
It thereby prevents the opening of the
doors from inside the passenger
compartment, serving as an obstacle to
break-in attempts (e.g. broken window).
We recommend that you activate the
device each time you park your vehicle.
Activating the device
The device is enabled on all the doors by
pressing the
button on the key twice
quickly.
The direction indicators flash 3 times to
let you know that the device is active.
If one or more of the doors are not closed
correctly, the device will not activate,
thus preventing a person from getting
stuck inside the passenger compartment
by entering the vehicle through, and then
closing, the open door.
Deactivating the device
The device disengages automatically:
when the doors are unlocked (pressing
button
on the key with remote
control);
when the ignition device is set to ON.
CHILD SAFETY DEVICE
7) 8)
This system prevents the rear doors from
being opened from the inside.
This device fig. 11 can be engaged only
with the doors open:
position: device engaged (door
locked);
position: device not engaged (door
may be opened from the inside).
The device remains engaged even if the
doors are electrically unlocked.
IMPORTANT The rear doors cannot be
opened from the inside when the child
safety device is engaged.
904016S0003EM
1004056S0004EM
1104056S0007EM
17
Page 42 of 244
Opening from the outside
When unlocked, the tailgate can be
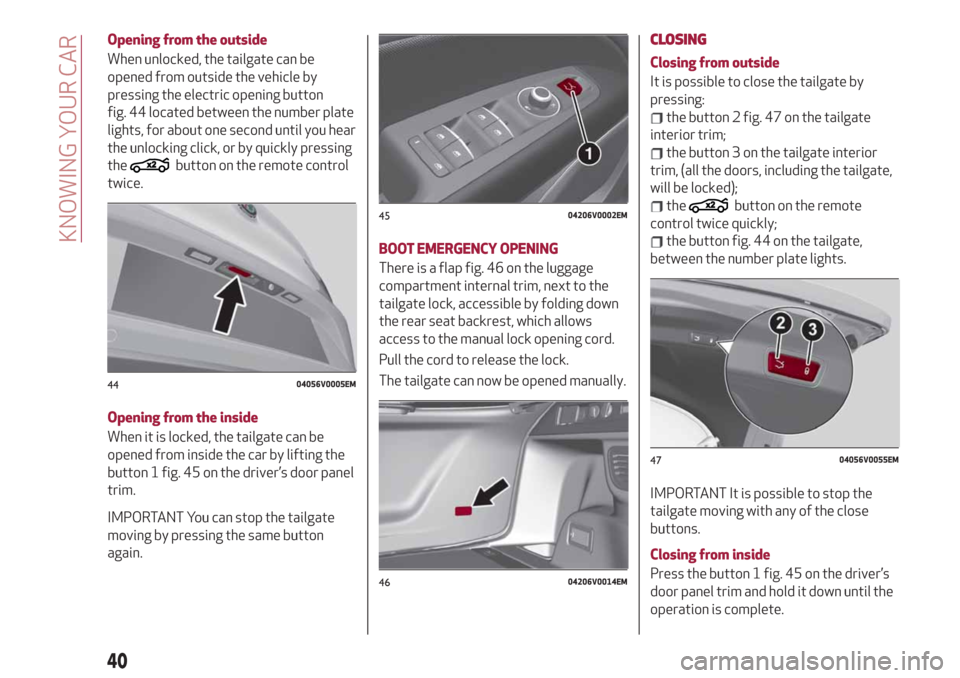
opened from outside the vehicle by
pressing the electric opening button
fig. 44 located between the number plate
lights, for about one second until you hear
the unlocking click, or by quickly pressing
the
button on the remote control
twice.
Opening from the inside
When it is locked, the tailgate can be
opened from inside the car by lifting the
button 1 fig. 45 on the driver’s door panel
trim.
IMPORTANT You can stop the tailgate
moving by pressing the same button
again.
BOOT EMERGENCY OPENING
There is a flap fig. 46 on the luggage
compartment internal trim, next to the
tailgate lock, accessible by folding down
the rear seat backrest, which allows
access to the manual lock opening cord.
Pull the cord to release the lock.
The tailgate can now be opened manually.
CLOSING
Closing from outside
It is possible to close the tailgate by
pressing:
the button 2 fig. 47 on the tailgate
interior trim;
the button 3 on the tailgate interior
trim, (all the doors, including the tailgate,
will be locked);
thebutton on the remote
control twice quickly;
the button fig. 44 on the tailgate,
between the number plate lights.
IMPORTANT It is possible to stop the
tailgate moving with any of the close
buttons.
Closing from inside
Press the button 1 fig. 45 on the driver’s
door panel trim and hold it down until the
operation is complete.
4404056V0005EM
4504206V0002EM
4604206V0014EM
4704056V0055EM
40
KNOWING YOUR CAR
Page 43 of 244
IMPORTANT It is possible to stop the
tailgate moving by releasing the button.
AUTOMATICALLY OPENING AND
CLOSING THE ELECTRICALLY
OPERATED TAILGATE IN “HANDS FREE”
MODE
(where provided)
To operate the system in “Hands free”
mode, proceed as follows:
if the doors are locked or unlocked, the
system must recognize the electronic key
fob near the tailgate;
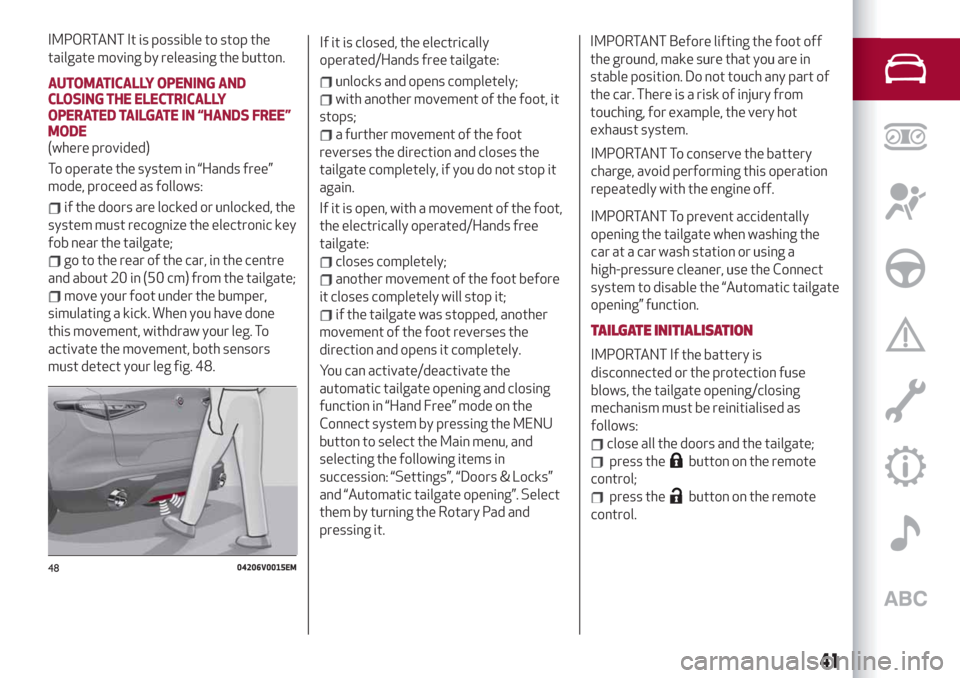
go to the rear of the car, in the centre
and about 20 in (50 cm) from the tailgate;
move your foot under the bumper,
simulating a kick. When you have done
this movement, withdraw your leg. To
activate the movement, both sensors
must detect your leg fig. 48.If it is closed, the electrically
operated/Hands free tailgate:
unlocks and opens completely;
with another movement of the foot, it
stops;
a further movement of the foot
reverses the direction and closes the
tailgate completely, if you do not stop it
again.
If it is open, with a movement of the foot,
the electrically operated/Hands free
tailgate:
closes completely;
another movement of the foot before
it closes completely will stop it;
if the tailgate was stopped, another
movement of the foot reverses the
direction and opens it completely.
You can activate/deactivate the
automatic tailgate opening and closing
function in “Hand Free” mode on the
Connect system by pressing the MENU
button to select the Main menu, and
selecting the following items in
succession: “Settings”, “Doors & Locks”
and “Automatic tailgate opening”. Select
them by turning the Rotary Pad and
pressing it.
IMPORTANT Before lifting the foot off
the ground, make sure that you are in
stable position. Do not touch any part of
the car. There is a risk of injury from
touching, for example, the very hot
exhaust system.
IMPORTANT To conserve the battery
charge, avoid performing this operation
repeatedly with the engine off.
IMPORTANT To prevent accidentally
opening the tailgate when washing the
car at a car wash station or using a
high-pressure cleaner, use the Connect
system to disable the “Automatic tailgate
opening” function.
TAILGATE INITIALISATION
IMPORTANT If the battery is
disconnected or the protection fuse
blows, the tailgate opening/closing
mechanism must be reinitialised as
follows:
close all the doors and the tailgate;
press thebutton on the remote
control;
press thebutton on the remote
control.
4804206V0015EM
41
Page 165 of 244
RUN FLAT TYRES
(where provided)
157) 158) 159)
"Run Flat" tyres allow you to maintain
control of the car after a puncture and to
continue driving safely for about 50 mi
(80 km) at a maximum speed of 50 mph
(80 km/h).
The reinforced tyre wall retains its shape
and supports the weight of the car in the
event of pressure loss.
Cars equipped with Run Flat tyres are
NOT provided with Tire Repair Kits. For
repair, contact an Alfa Romeo Dealership
as soon as possible.
WARNING
157)Do not exceed the maximum distance
or speed (80 km - 80 km/h) in the event of
pressure loss-puncture.
158)A pressure loss alters the driving
behaviour of the car, for example, causing
less directional stability when braking,
longer braking distances and altered
steering geometry. Therefore, adjust your
driving style to avoid sudden turns or
obstacles such as pavements and potholes.
159)Do not exceed 60 km/h when driving
with an especially heavy trailer.
JUMP STARTING
If the battery is flat, a jump starting can
be performed using the battery and the
cables of another vehicle, or using an
auxiliary battery. In all cases, the battery
used must have a capacity equal to or a
little higher than the flat one.
Jump starting may be dangerous if
carried out incorrectly: carefully follow
the procedures described below.
61)
IMPORTANT NOTES
Do not use an auxiliary battery or any
other source of external supply with a
voltage above 12 V: the battery, the
starter, the alternator and the electrical
system of the vehicle could be damaged.
Do not attempt jump starting if the
battery is frozen. The battery could break
and explode!
REMOTE BATTERY CONNECTION
POLES
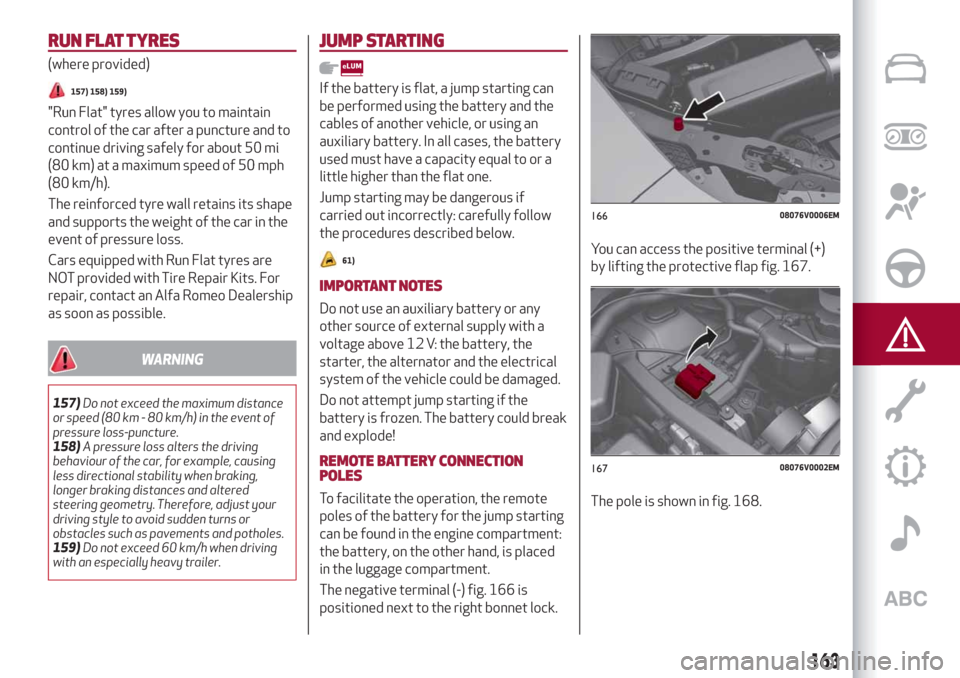
To facilitate the operation, the remote
poles of the battery for the jump starting
can be found in the engine compartment:
the battery, on the other hand, is placed
in the luggage compartment.
The negative terminal (-) fig. 166 is
positioned next to the right bonnet lock.You can access the positive terminal (+)
by lifting the protective flap fig. 167.
The pole is shown in fig. 168.
16608076V0006EM
16708076V0002EM
163
Page 228 of 244
automatic folding of the mirrors when the
doors are locked/unlocked. The default
setting is “Off”.
Restore settings
This function allows you to delete the
settings from this menu.
Access the functions and select the
setting by turning and pressing the
Rotary Pad.
Doors & Locks
To access the “Doors & Locks” function,
select it by turning the Rotary Pad and
press the control to activate it. The
following settings can be modified when
this mode is selected:
Door lock in motion;
Unlock all doors on exit;
Passive Entry (where provided);
Door Unlock On Entry (where
provided);
Horn w/Remote Start (for
versions/markets where provided);
Sound Horn with Lock (where
provided);
Auto Relock (where provided);
Electric tailgate (where provided);
Automatic tailgate opening (where
provided);
Restore settings.Control panel
To access the “Control panel” function,
select it by turning the Rotary Pad and
press the Rotary Pad to activate. The
following settings can be modified when
this mode is selected:
Warning buzzer volume;
Trip B;
Show telephone info;
Show audio info;
Show Navi info;
Restore settings.
Infotainment
To access the “Infotainment” function,
select it by turning the Rotary Pad and
press the Rotary Pad to activate. The
following settings can be modified when
this mode is selected:
Screen Off;
Splitscreen (where provided);
Audio;
Bluetooth;
Radio;
Media;
Phone;
Navigation (where provided);
Apps.
System
To access the “System” function, select it
by turning the Rotary Pad and press the
Rotary Pad to activate. The followingsettings can be modified when this mode
is selected:
Automatic activation;
Cam Delay;
Update Software;
Map update;
Clear personal data;
Restore settings.
IMPORTANT For further information
about the map update procedure, refer to
the Connect system supplement on the
uLum website.
MAP UPDATE
To ensure optimal performance, the
navigation system must be updated
periodically.
For this, the Mopar Map Care service
offers a new map update every three
months.
The updates can be downloaded from the
maps.mopar.eu website and installed
directly on the Connect system. All
updates are free of charge for 3 years
from the start of the warranty on the car.
The navigation system can also be
updated at the Alfa Romeo Dealership.
NOTE The dealer may charge for
updating the navigation system.
226
MULTIMEDIA