sensor Alfa Romeo Stelvio 2019 Owner's Manual
[x] Cancel search | Manufacturer: ALFA ROMEO, Model Year: 2019, Model line: Stelvio, Model: Alfa Romeo Stelvio 2019Pages: 244, PDF Size: 4.95 MB
Page 29 of 244
AUTO FUNCTION (Dusk sensor)
This is implemented by an infrared LED
sensor on the windscreen that works in
conjunction with the rain sensor. It is able
to detect variations in the outside light
level based on the light sensitivity set
through the Connect system.
The dusk sensor sensitivity can be
adjusted according to 3 levels: level
1=minimum sensitivity, level 2=average
sensitivity, level 3=maximum sensitivity.
The higher the sensitivity set, the lesser
is the external light variation needed to
switch the lights on (e.g. with a setting on
level 3 at sunset the headlights come on
earlier than levels 1 and 2).
Function activation
Turn the light switch to the
position.
IMPORTANT The function can only be
activated with the ignition device at ON.
Function deactivation
To deactivate the function, turn the light
switch to a position other than
.
DIPPED HEADLIGHTS
Turn the light switch toto switch on
the side lights, the lights on the
instrument panel and the dipped beam
headlights.
The
warning light switches on in the
instrument panel.
DAYTIME RUNNING LIGHTS (DRL) AND
SIDE LIGHTS (Daytime Running Lights)
(where provided)
17) 18)
With the ignition device turned to ON and
the light switch turned to position
the
daytime running lights are automatically
activated; the other lights and interior
lighting remain off.
Where provided, when the direction
indicators are activated, the
corresponding DRL will be dimmed (on
35W Bi-Xenon Headlamps, the DRL will
be turned off), until the direction
indicators are deactivated.
Where provided, the DRL can be
activated/deactivated from Connect
system, by selecting the following
functions in sequence on the main MENU:
"Settings", "Lights" and "Daytime Running
Lights".
IMPORTANT For markets where DRL use
is not required, these lights work as side
lights and they are switched on and off
jointly with the main beam headlights.
FRONT FOG LIGHTS
(where provided)
The fog light switch is integrated with the
light switch.
Press the
button to turn on the fog
lights with side lights and dipped beam
headlights on.To turn off the fog lights, press the
button again or turn the switch to the
position.
The fog lights are switched on with the
dipped beam headlights or DRL on (the
latter work as side lights) and are
switched on when switching on the main
beam headlights but not when the main
beam headlights are flashed only.
If the fog lights are not switched off
before stopping the engine, the next time
the engine is started they will switch on
again.
Cornering lights
(where provided)
The fog lights perform cornering
function. This function allows to
illuminate the road or a corner better by
lighting the corresponding fog light.
The cornering function can be
deactivated on the Connect system by
selecting the following functions in
sequence on the main menu: "Settings",
"Lights" and "Cornering Lights".
REAR FOG LIGHT
The rear fog light switch is integrated
with the light switch.
Press the
button to switch the light
on/off.
The rear fog light switches on only when
the dipped beam headlights or fog lights
27
Page 31 of 244
towards the steering wheel, the lights
remain on while you are operating the
lever.
Automatic high beam (AHB system)
headlights
(where provided)
The AHB system is used to switch the
high beam headlights on and off
automatically and to adapt the lighting
near towns.
Function enabling
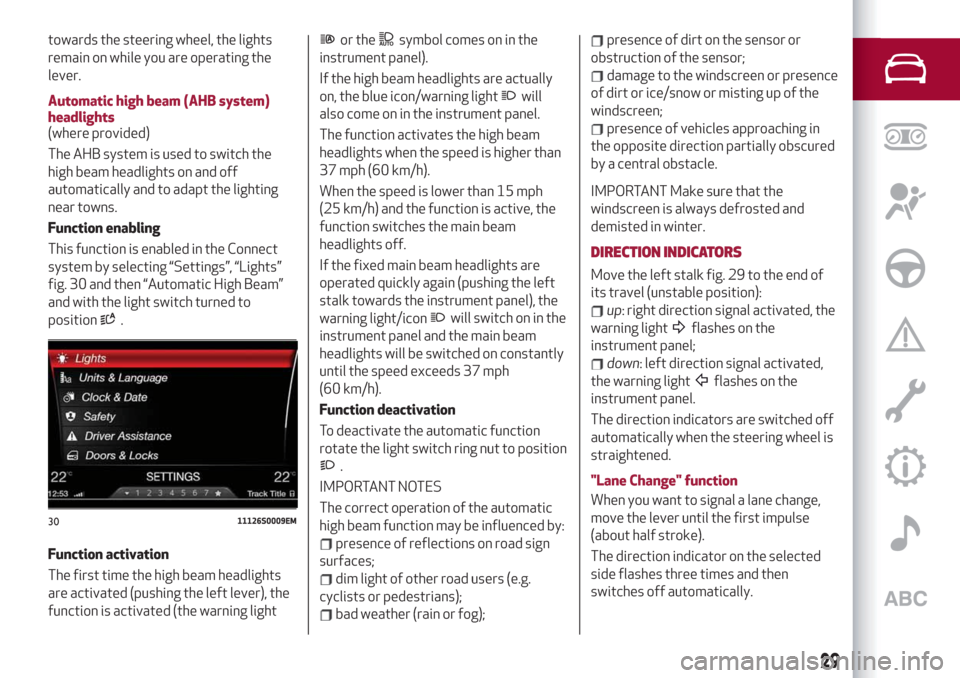
This function is enabled in the Connect
system by selecting “Settings”, “Lights”
fig. 30 and then “Automatic High Beam”
and with the light switch turned to
position
.
Function activation
The first time the high beam headlights
are activated (pushing the left lever), the
function is activated (the warning light
or thesymbol comes on in the
instrument panel).
If the high beam headlights are actually
on, the blue icon/warning light
will
also come on in the instrument panel.
The function activates the high beam
headlights when the speed is higher than
37 mph (60 km/h).
When the speed is lower than 15 mph
(25 km/h) and the function is active, the
function switches the main beam
headlights off.
If the fixed main beam headlights are
operated quickly again (pushing the left
stalk towards the instrument panel), the
warning light/icon
will switch on in the
instrument panel and the main beam
headlights will be switched on constantly
until the speed exceeds 37 mph
(60 km/h).
Function deactivation
To deactivate the automatic function
rotate the light switch ring nut to position
.
IMPORTANT NOTES
The correct operation of the automatic
high beam function may be influenced by:
presence of reflections on road sign
surfaces;
dim light of other road users (e.g.
cyclists or pedestrians);
bad weather (rain or fog);
presence of dirt on the sensor or
obstruction of the sensor;
damage to the windscreen or presence
of dirt or ice/snow or misting up of the
windscreen;
presence of vehicles approaching in
the opposite direction partially obscured
by a central obstacle.
IMPORTANT Make sure that the
windscreen is always defrosted and
demisted in winter.
DIRECTION INDICATORS
Move the left stalk fig. 29 to the end of
its travel (unstable position):
up: right direction signal activated, the
warning light
flashes on the
instrument panel;
down: left direction signal activated,
the warning light
flashes on the
instrument panel.
The direction indicators are switched off
automatically when the steering wheel is
straightened.
"Lane Change" function
When you want to signal a lane change,
move the lever until the first impulse
(about half stroke).
The direction indicator on the selected
side flashes three times and then
switches off automatically.
3011126S0009EM
29
Page 33 of 244
INTERIOR LIGHTS
FRONT CEILING LIGHT
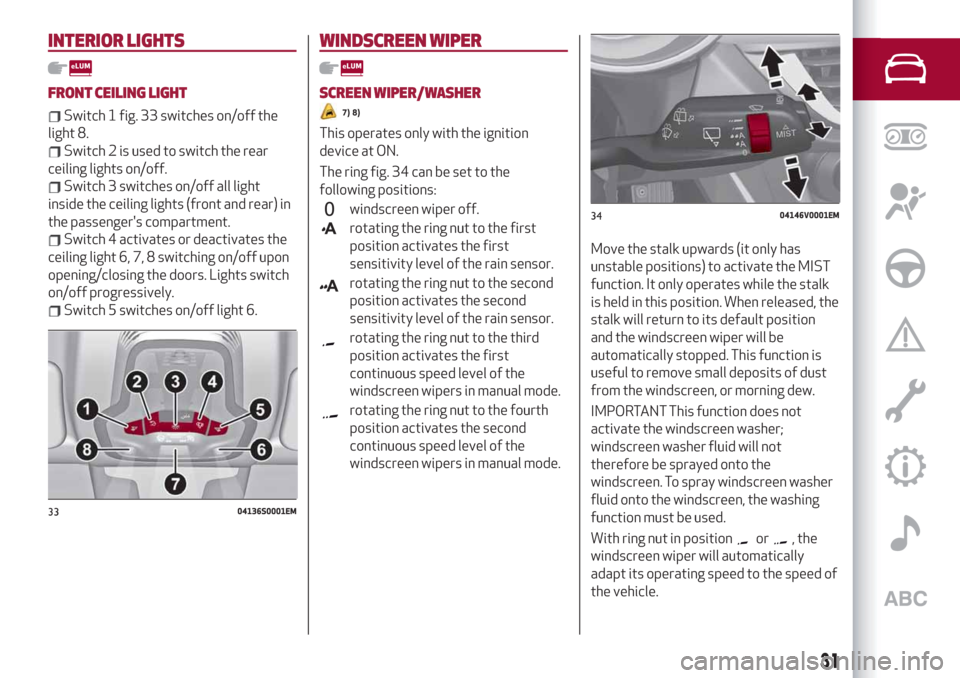
Switch 1 fig. 33 switches on/off the
light 8.
Switch 2 is used to switch the rear
ceiling lights on/off.
Switch 3 switches on/off all light
inside the ceiling lights (front and rear) in
the passenger's compartment.
Switch 4 activates or deactivates the
ceiling light 6, 7, 8 switching on/off upon
opening/closing the doors. Lights switch
on/off progressively.
Switch 5 switches on/off light 6.
WINDSCREEN WIPER
SCREEN WIPER/WASHER
7) 8)
This operates only with the ignition
device at ON.
The ring fig. 34 can be set to the
following positions:
windscreen wiper off.
rotating the ring nut to the first
position activates the first
sensitivity level of the rain sensor.
rotating the ring nut to the second
position activates the second
sensitivity level of the rain sensor.
rotating the ring nut to the third
position activates the first
continuous speed level of the
windscreen wipers in manual mode.
rotating the ring nut to the fourth
position activates the second
continuous speed level of the
windscreen wipers in manual mode.
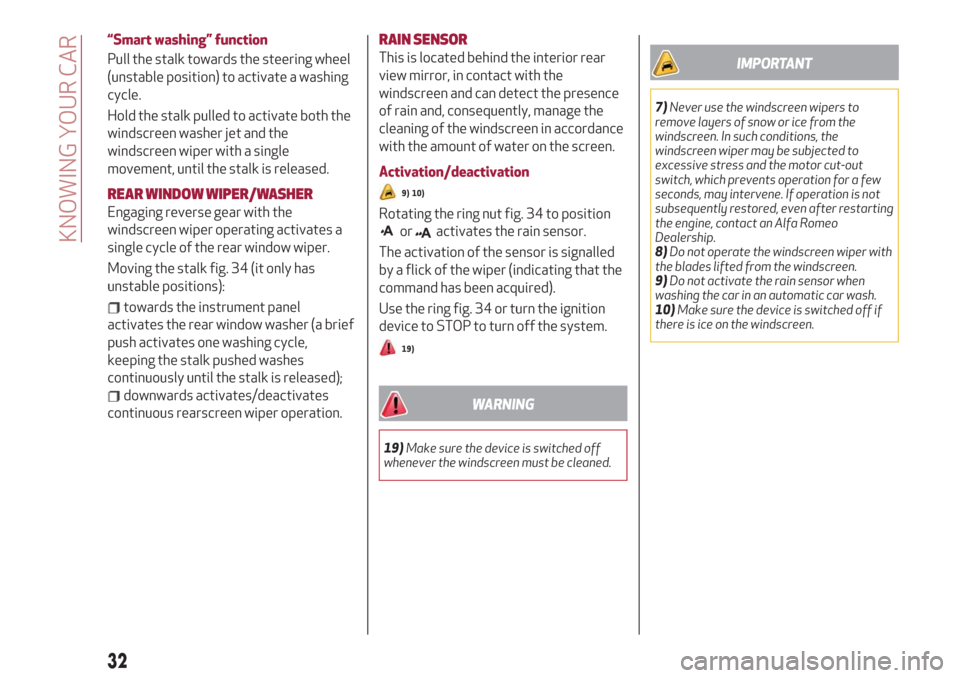
Move the stalk upwards (it only has
unstable positions) to activate the MIST
function. It only operates while the stalk
is held in this position. When released, the
stalk will return to its default position
and the windscreen wiper will be
automatically stopped. This function is
useful to remove small deposits of dust
from the windscreen, or morning dew.
IMPORTANT This function does not
activate the windscreen washer;
windscreen washer fluid will not
therefore be sprayed onto the
windscreen. To spray windscreen washer
fluid onto the windscreen, the washing
function must be used.
With ring nut in position
or, the
windscreen wiper will automatically
adapt its operating speed to the speed of
the vehicle.
3304136S0001EM
3404146V0001EM
31
Page 34 of 244
“Smart washing” function
Pull the stalk towards the steering wheel
(unstable position) to activate a washing
cycle.
Hold the stalk pulled to activate both the
windscreen washer jet and the
windscreen wiper with a single
movement, until the stalk is released.
REAR WINDOW WIPER/WASHER
Engaging reverse gear with the
windscreen wiper operating activates a
single cycle of the rear window wiper.
Moving the stalk fig. 34 (it only has
unstable positions):
towards the instrument panel
activates the rear window washer (a brief
push activates one washing cycle,
keeping the stalk pushed washes
continuously until the stalk is released);
downwards activates/deactivates
continuous rearscreen wiper operation.
RAIN SENSOR
This is located behind the interior rear
view mirror, in contact with the
windscreen and can detect the presence
of rain and, consequently, manage the
cleaning of the windscreen in accordance
with the amount of water on the screen.
Activation/deactivation
9) 10)
Rotating the ring nut fig. 34 to position
oractivates the rain sensor.
The activation of the sensor is signalled
by a flick of the wiper (indicating that the
command has been acquired).
Use the ring fig. 34 or turn the ignition
device to STOP to turn off the system.
19)
WARNING
19)Make sure the device is switched off
whenever the windscreen must be cleaned.
IMPORTANT
7)Never use the windscreen wipers to
remove layers of snow or ice from the
windscreen. In such conditions, the
windscreen wiper may be subjected to
excessive stress and the motor cut-out
switch, which prevents operation for a few
seconds, may intervene. If operation is not
subsequently restored, even after restarting
the engine, contact an Alfa Romeo
Dealership.
8)Do not operate the windscreen wiper with
the blades lifted from the windscreen.
9)Do not activate the rain sensor when
washing the car in an automatic car wash.
10)Make sure the device is switched off if
there is ice on the windscreen.
32
KNOWING YOUR CAR
Page 43 of 244
IMPORTANT It is possible to stop the
tailgate moving by releasing the button.
AUTOMATICALLY OPENING AND
CLOSING THE ELECTRICALLY
OPERATED TAILGATE IN “HANDS FREE”
MODE
(where provided)
To operate the system in “Hands free”
mode, proceed as follows:
if the doors are locked or unlocked, the
system must recognize the electronic key
fob near the tailgate;
go to the rear of the car, in the centre
and about 20 in (50 cm) from the tailgate;
move your foot under the bumper,
simulating a kick. When you have done
this movement, withdraw your leg. To
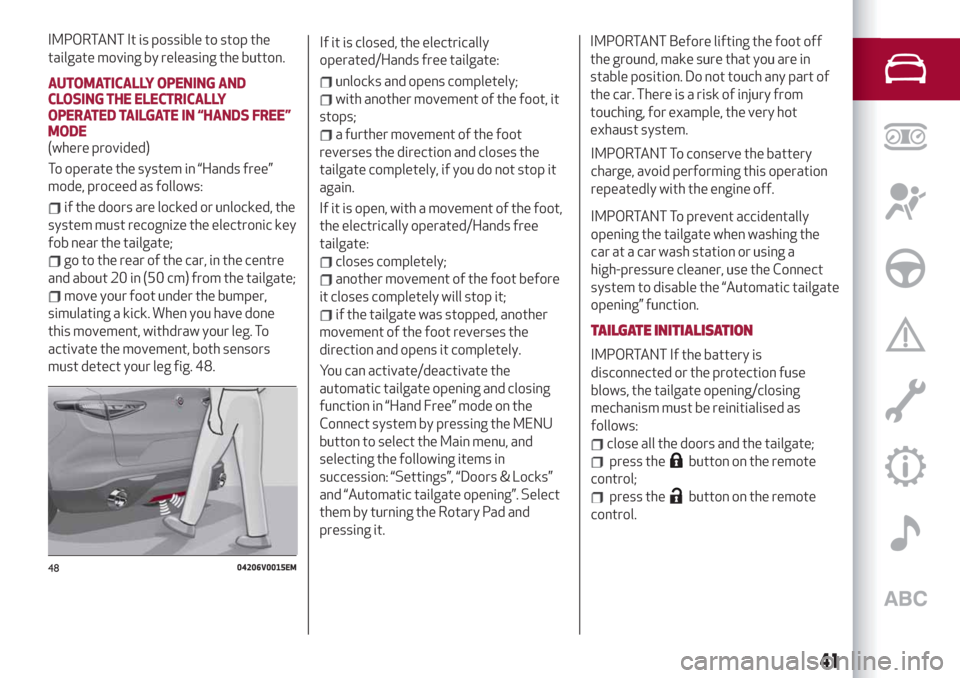
activate the movement, both sensors
must detect your leg fig. 48.If it is closed, the electrically
operated/Hands free tailgate:
unlocks and opens completely;
with another movement of the foot, it
stops;
a further movement of the foot
reverses the direction and closes the
tailgate completely, if you do not stop it
again.
If it is open, with a movement of the foot,
the electrically operated/Hands free
tailgate:
closes completely;
another movement of the foot before
it closes completely will stop it;
if the tailgate was stopped, another
movement of the foot reverses the
direction and opens it completely.
You can activate/deactivate the
automatic tailgate opening and closing
function in “Hand Free” mode on the
Connect system by pressing the MENU
button to select the Main menu, and
selecting the following items in
succession: “Settings”, “Doors & Locks”
and “Automatic tailgate opening”. Select
them by turning the Rotary Pad and
pressing it.
IMPORTANT Before lifting the foot off
the ground, make sure that you are in
stable position. Do not touch any part of
the car. There is a risk of injury from
touching, for example, the very hot
exhaust system.
IMPORTANT To conserve the battery
charge, avoid performing this operation
repeatedly with the engine off.
IMPORTANT To prevent accidentally
opening the tailgate when washing the
car at a car wash station or using a
high-pressure cleaner, use the Connect
system to disable the “Automatic tailgate
opening” function.
TAILGATE INITIALISATION
IMPORTANT If the battery is
disconnected or the protection fuse
blows, the tailgate opening/closing
mechanism must be reinitialised as
follows:
close all the doors and the tailgate;
press thebutton on the remote
control;
press thebutton on the remote
control.
4804206V0015EM
41
Page 56 of 244
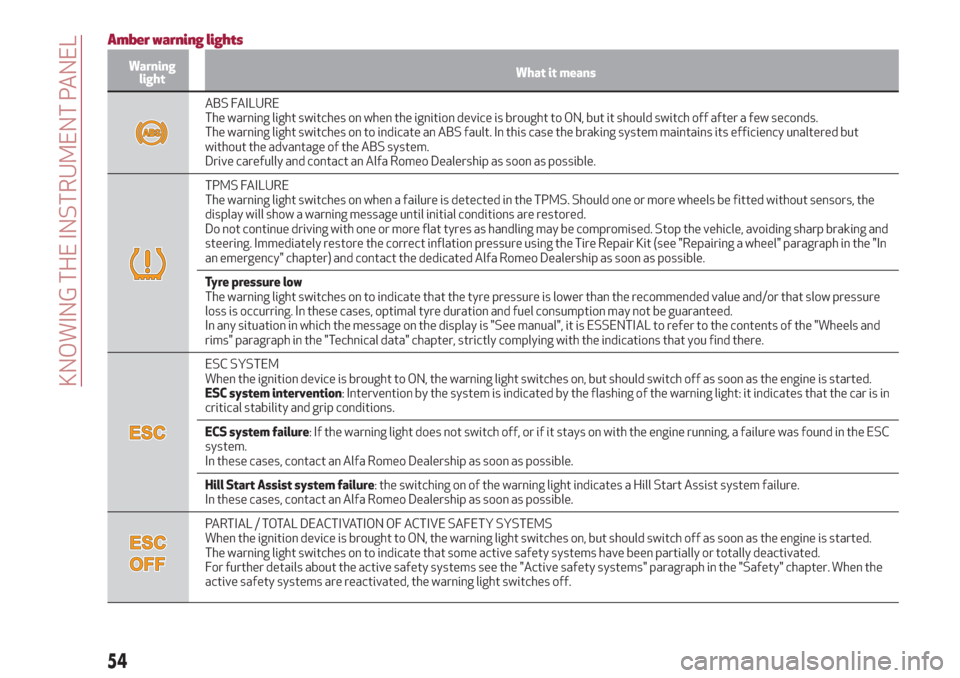
Amber warning lights
Warning
lightWhat it means
ABS FAILURE
The warning light switches on when the ignition device is brought to ON, but it should switch off after a few seconds.
The warning light switches on to indicate an ABS fault. In this case the braking system maintains its efficiency unaltered but
without the advantage of the ABS system.
Drive carefully and contact an Alfa Romeo Dealership as soon as possible.
TPMS FAILURE
The warning light switches on when a failure is detected in the TPMS. Should one or more wheels be fitted without sensors, the
display will show a warning message until initial conditions are restored.
Do not continue driving with one or more flat tyres as handling may be compromised. Stop the vehicle, avoiding sharp braking and
steering. Immediately restore the correct inflation pressure using the Tire Repair Kit (see "Repairing a wheel" paragraph in the "In
an emergency" chapter) and contact the dedicated Alfa Romeo Dealership as soon as possible.
Tyre pressure low
The warning light switches on to indicate that the tyre pressure is lower than the recommended value and/or that slow pressure
loss is occurring. In these cases, optimal tyre duration and fuel consumption may not be guaranteed.
In any situation in which the message on the display is "See manual", it is ESSENTIAL to refer to the contents of the "Wheels and
rims" paragraph in the "Technical data" chapter, strictly complying with the indications that you find there.
ESC SYSTEM
When the ignition device is brought to ON, the warning light switches on, but should switch off as soon as the engine is started.
ESC system intervention: Intervention by the system is indicated by the flashing of the warning light: it indicates that the car is in
critical stability and grip conditions.
ECS system failure: If the warning light does not switch off, or if it stays on with the engine running, a failure was found in the ESC
system.
In these cases, contact an Alfa Romeo Dealership as soon as possible.
Hill Start Assist system failure: the switching on of the warning light indicates a Hill Start Assist system failure.
In these cases, contact an Alfa Romeo Dealership as soon as possible.
PARTIAL / TOTAL DEACTIVATION OF ACTIVE SAFETY SYSTEMS
When the ignition device is brought to ON, the warning light switches on, but should switch off as soon as the engine is started.
The warning light switches on to indicate that some active safety systems have been partially or totally deactivated.
For further details about the active safety systems see the "Active safety systems" paragraph in the "Safety" chapter. When the
active safety systems are reactivated, the warning light switches off.
54
KNOWING THE INSTRUMENT PANEL
Page 64 of 244
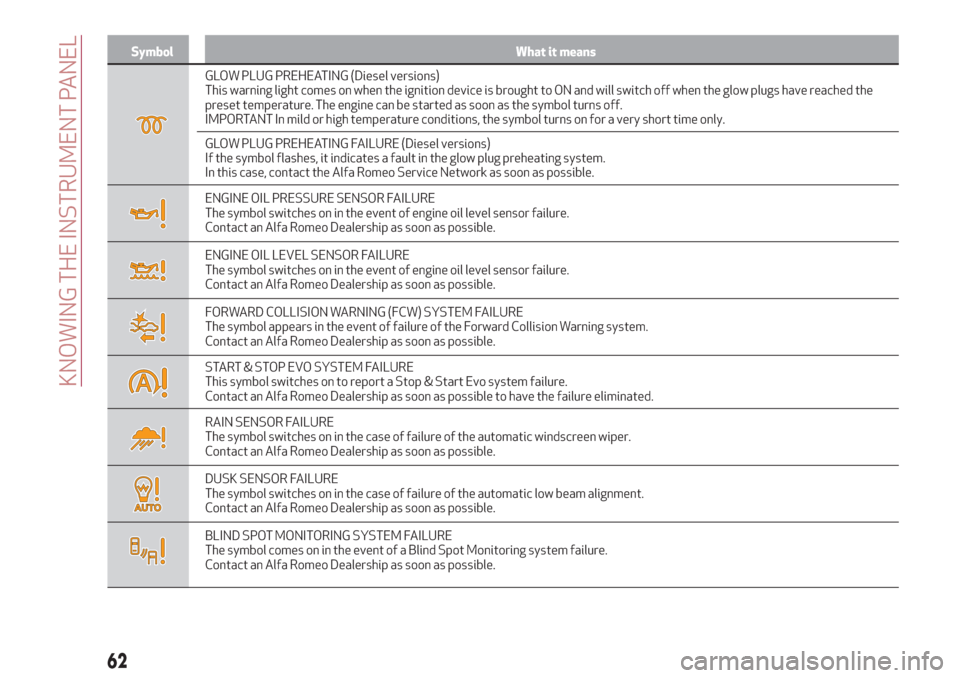
Symbol What it means
GLOW PLUG PREHEATING (Diesel versions)
This warning light comes on when the ignition device is brought to ON and will switch off when the glow plugs have reached the
preset temperature. The engine can be started as soon as the symbol turns off.
IMPORTANT In mild or high temperature conditions, the symbol turns on for a very short time only.
GLOW PLUG PREHEATING FAILURE (Diesel versions)
If the symbol flashes, it indicates a fault in the glow plug preheating system.
In this case, contact the Alfa Romeo Service Network as soon as possible.
ENGINE OIL PRESSURE SENSOR FAILURE
The symbol switches on in the event of engine oil level sensor failure.
Contact an Alfa Romeo Dealership as soon as possible.
ENGINE OIL LEVEL SENSOR FAILURE
The symbol switches on in the event of engine oil level sensor failure.
Contact an Alfa Romeo Dealership as soon as possible.
FORWARD COLLISION WARNING (FCW) SYSTEM FAILURE
The symbol appears in the event of failure of the Forward Collision Warning system.
Contact an Alfa Romeo Dealership as soon as possible.
START & STOP EVO SYSTEM FAILURE
This symbol switches on to report a Stop & Start Evo system failure.
Contact an Alfa Romeo Dealership as soon as possible to have the failure eliminated.
RAIN SENSOR FAILURE
The symbol switches on in the case of failure of the automatic windscreen wiper.
Contact an Alfa Romeo Dealership as soon as possible.
DUSK SENSOR FAILURE
The symbol switches on in the case of failure of the automatic low beam alignment.
Contact an Alfa Romeo Dealership as soon as possible.
BLIND SPOT MONITORING SYSTEM FAILURE
The symbol comes on in the event of a Blind Spot Monitoring system failure.
Contact an Alfa Romeo Dealership as soon as possible.
62
KNOWING THE INSTRUMENT PANEL
Page 65 of 244
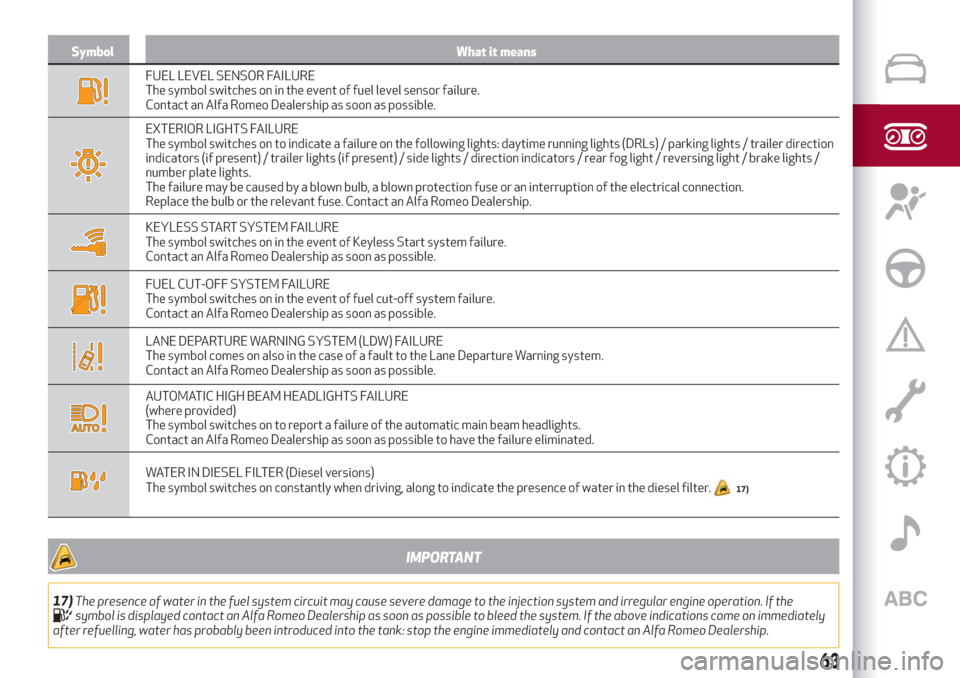
Symbol What it means
FUEL LEVEL SENSOR FAILURE
The symbol switches on in the event of fuel level sensor failure.
Contact an Alfa Romeo Dealership as soon as possible.
EXTERIOR LIGHTS FAILURE
The symbol switches on to indicate a failure on the following lights: daytime running lights (DRLs) / parking lights / trailer direction
indicators (if present) / trailer lights (if present) / side lights / direction indicators / rear fog light / reversing light / brake lights /
number plate lights.
The failure may be caused by a blown bulb, a blown protection fuse or an interruption of the electrical connection.
Replace the bulb or the relevant fuse. Contact an Alfa Romeo Dealership.
KEYLESS START SYSTEM FAILURE
The symbol switches on in the event of Keyless Start system failure.
Contact an Alfa Romeo Dealership as soon as possible.
FUEL CUT-OFF SYSTEM FAILURE
The symbol switches on in the event of fuel cut-off system failure.
Contact an Alfa Romeo Dealership as soon as possible.
LANE DEPARTURE WARNING SYSTEM (LDW) FAILURE
The symbol comes on also in the case of a fault to the Lane Departure Warning system.
Contact an Alfa Romeo Dealership as soon as possible.
AUTOMATIC HIGH BEAM HEADLIGHTS FAILURE
(where provided)
The symbol switches on to report a failure of the automatic main beam headlights.
Contact an Alfa Romeo Dealership as soon as possible to have the failure eliminated.
WATER IN DIESEL FILTER (Diesel versions)
The symbol switches on constantly when driving, along to indicate the presence of water in the diesel filter.17)
IMPORTANT
17)The presence of water in the fuel system circuit may cause severe damage to the injection system and irregular engine operation. If thesymbol is displayed contact an Alfa Romeo Dealership as soon as possible to bleed the system. If the above indications come on immediately
after refuelling, water has probably been introduced into the tank: stop the engine immediately and contact an Alfa Romeo Dealership.
63
Page 70 of 244
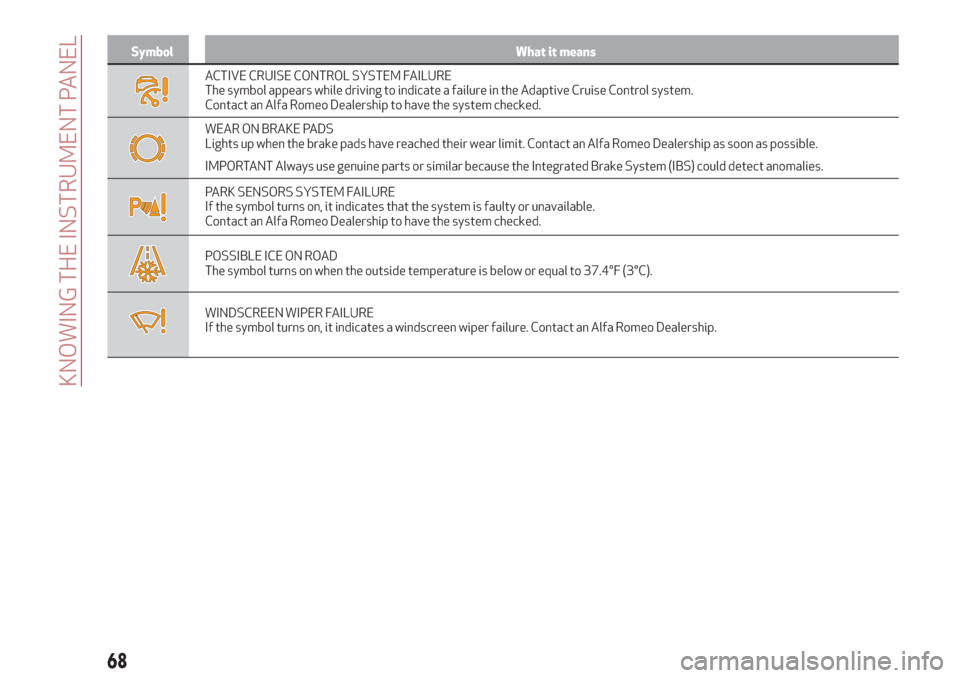
Symbol What it means
ACTIVE CRUISE CONTROL SYSTEM FAILURE
The symbol appears while driving to indicate a failure in the Adaptive Cruise Control system.
Contact an Alfa Romeo Dealership to have the system checked.
WEAR ON BRAKE PADS
Lights up when the brake pads have reached their wear limit. Contact an Alfa Romeo Dealership as soon as possible.
IMPORTANT Always use genuine parts or similar because the Integrated Brake System (IBS) could detect anomalies.
PARK SENSORS SYSTEM FAILURE
If the symbol turns on, it indicates that the system is faulty or unavailable.
Contact an Alfa Romeo Dealership to have the system checked.
POSSIBLE ICE ON ROAD
The symbol turns on when the outside temperature is below or equal to 37.4°F (3°C).
WINDSCREEN WIPER FAILURE
If the symbol turns on, it indicates a windscreen wiper failure. Contact an Alfa Romeo Dealership.
68
KNOWING THE INSTRUMENT PANEL
Page 74 of 244
ACTIVE SAFETYSYSTEMS
The vehicle may be equipped with the
following active safety devices:
ABS (Anti-Lock Brakes);
DTC (Drive Train Control);
ESC (Electronic Stability Control);
TC (Traction Control);
PBA (Panic Brake Assist);
HSA (Hill Start Assist);
AST (Alfa™ Steering Torque);
HDC (Hill Discent Control)
For the operation of the systems, see the
following pages.
ABS (Anti-lock Braking System)
This system, which is an integral part of
the braking system, prevents one or more
wheels from locking and slipping in all
road surface conditions, irrespective of
the intensity of the braking action,
ensuring that the vehicle can be
controlled even during emergency
braking and optimising stopping
distances.
The system intervenes during braking
when the wheels are about to lock,
typically in emergency braking or
low-grip conditions, when locking may be
more frequent.
The system also improves control and
stability of the vehicle when braking on a
surface where the grip of the left and
right wheels varies, or on corners.The Electronic Braking Force Distribution
(EBD) system completes the system
allowing the brake force to be distributed
between the front and rear wheels.
System intervention
The ABS equipped on this vehicle is
provided with the "Brake by wire"
(Integrated Brake System - IBS) function.
With this system, the brake pedal
command given by pressing the brake
pedal is not transmitted hydraulically but
electronically, therefore, the light
pulsation that could be felt on the pedal
with the traditional system is no longer
perceptible.29) 30) 31) 32) 33) 34)
DTC (Drive Train Control)SYSTEM(where provided)
Some versions of this vehicle are
equipped with a four-wheel drive system
(AWD), activated on request, which offers
an optimal drive for countless driving
conditions and road surfaces. The system
reduces the slipping of the tyres to a
minimum, automatically redistributing
the torque to the front and rear wheels,
as needed.
To maximize fuel savings, the car with
AWD automatically passes to rear-wheel
drive (RWD) when the road and
environmental conditions are such that
they would not cause the tyres to slip.When the road and environmental
conditions require better traction, the
vehicle automatically goes to AWD mode.
35)
IMPORTANT If the system failure symbol
switches on, after starting the engine or
while driving, it means that the AWD
system is not working properly. If the
warning message activates frequently, it
is recommended to carry out the
maintenance operations.
36)
ESC (Electronic Stability Control)
SYSTEM
The ESC system improves the directional
control and stability of the car in various
driving conditions.
The ESC system corrects the car’s
understeer and oversteer, distributing
the brake force on the appropriate
wheels. The torque supplied by the
engine can also be reduced in order to
maintain control of the vehicle.
The ESC system uses sensors installed
on the car to determine the trajectory
that the driver intends to follow and
compares it with the car’s effective
trajectory. When the real trajectory
deviates from the desired trajectory, the
ESC system intervenes to counter the
vehicle’s understeer or oversteer.
Oversteer: occurs when the car is
72
SAFETY