wheel alignment Alfa Romeo Stelvio 2019 Owner's Manual
[x] Cancel search | Manufacturer: ALFA ROMEO, Model Year: 2019, Model line: Stelvio, Model: Alfa Romeo Stelvio 2019Pages: 244, PDF Size: 4.95 MB
Page 35 of 244

CLIMATE CONTROLSYSTEM
AUTOMATIC DUAL-ZONE CLIMATE CONTROLSYSTEM
2)
Controls
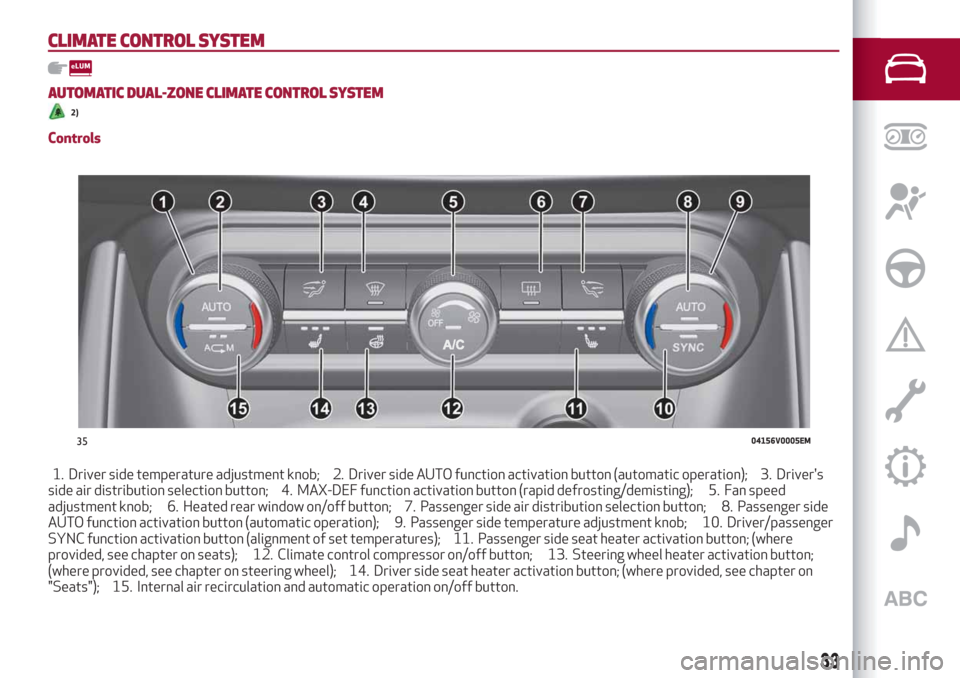
1. Driver side temperature adjustment knob; 2. Driver side AUTO function activation button (automatic operation); 3. Driver's
side air distribution selection button; 4. MAX-DEF function activation button (rapid defrosting/demisting); 5. Fan speed
adjustment knob; 6. Heated rear window on/off button; 7. Passenger side air distribution selection button; 8. Passenger side
AUTO function activation button (automatic operation); 9. Passenger side temperature adjustment knob; 10. Driver/passenger
SYNC function activation button (alignment of set temperatures); 11. Passenger side seat heater activation button; (where
provided, see chapter on seats); 12. Climate control compressor on/off button; 13. Steering wheel heater activation button;
(where provided, see chapter on steering wheel); 14. Driver side seat heater activation button; (where provided, see chapter on
"Seats"); 15. Internal air recirculation and automatic operation on/off button.
3504156V0005EM
33
Page 133 of 244

SYMBOLS AND MESSAGES ON THE
DISPLAY
If activated, the grid is positioned on the
image to highlight the width of the
vehicle and the expected reversing path
in accordance with the steering wheel
position.
A superimposed central broken line
indicates the centre of the car to
facilitate parking manoeuvres or tow
hook alignment. The various coloured
areas indicate the distance from the rear
part of the car.
The table below shows the approximate
distances for each area fig. 116:
AreaDistance from the rear
part of the car
Red 0-1ft(0–30cm)
Y
ellow 1 - 3.3 ft (30 cm-1m)
Green 3.3 ft (1 m) or more
IMPORTANT When parking, take the
utmost care over obstacles that may be
above or under the camera range.
WARNING
121)Parking and other potentially
dangerous manoeuvres are, however,
always the driver’s responsibility. While
carrying out these manoeuvres, always
make sure that no people (especially
children) or animals are in the area
concerned. The camera is an aid for the
driver, but the driver must never allow
his/her attention to lapse during potentially
dangerous manoeuvres, even those
executed at low speeds. Always keep a slow
speed, so as to promptly brake in the case of
obstacles.
IMPORTANT
53)It is vital, for correct operation, that the
camera is always kept clean and free from
any mud, dirt, snow or ice. Be careful not to
scratch or damage the camera while cleaning
it. Avoid using dry, rough or hard cloths. The
camera must be washed using clean water,
with the addition of car shampoo if
necessary. In washing stations which use
steam or high-pressure jets, clean the
camera quickly, keeping the nozzle more
than 10 cm away from the sensors. Also, do
not apply stickers to the camera.
REFUELLING THE VEHICLE
122) 123) 124)
Always stop the engine before refuelling.
PETROL ENGINES
Only use unleaded petrol with a number
of octanes (R.O.N.) not lower than 91
(EN228 specification).
DIESEL ENGINES
Only use automotive diesel fuel
(EN590 and EN16734 specifications).
REFUELLING PROCEDURE
The fuel flap is unlocked when the central
door locking system is released, while it
is automatically locked when the central
locking system is applied.
Opening the flap
To refuel proceed as follows:
open flap 2 fig. 117, pressing on the
point shown by the arrow fig. 118;
remove the closing cap 2;
put the cap 4 back in position;
introduce the dispenser in the filler
and refuel;
after refuelling, before removing the
dispenser, wait for at least 10 seconds in
order for the fuel to flow inside the tank;
then remove the dispenser from the
filler, close the cap and then close the
flap.
131
Page 240 of 244

Emergency braking..........146
HDC (system)................74
Head restraints...............23
Headlight alignment adjustment....30
Headlight alignment corrector......30
HSA (Hill Start Assist) system......73
Identification data............192
Ignition device...............13
Interior lights................31
ISOFIX child restraint system
(installation)...............95
Jump starting............163 ,164
Keys
Electronic key..............12
Lane Change................29
Lane Departure Warning System . . .129
Lifting the vehicle............187
Light bulbs
Types of bulbs.............147
Light switch.................26
Luggage compartment tailgate.....39
Main beam headlights..........28
Main beam headlights (changing a
bulb)...................149
Occupant protection systems......86
Paintwork (cleaning and
maintenance).............189
Park Sensors system..........127
Parking lights................28Parking the vehicle............111
Passive Entry (system)..........16
PBA (Panic Brake Assist) system....73
Performance (top speed)........208
Power Lock (device)............17
Pre-tensioners...............89
Load limiters..............89
Prescriptions for handling the car
at the end of its life..........210
Rain sensor.................32
RCP system.................78
Rear Back-up Camera / Dynamic
Gridlines................130
Rear seats..................21
Rear view mirrors.............24
Rear window wiper/washer.......32
Reconfigurable TFT display.......46
Refuelling.................202
Refuelling procedure..........131
Refuelling the vehicle..........131
Replacing an external bulb.......149
Rims and tyres..............195
Rims and tyres provided........196
Run Flat Tyres...............163
Saving fuel................136
SBA (Seat Belt Alert) system......88
Scheduled servicing...........170
Scheduled servicing plan (2.2 JTD
diesel engine versions)........174Screen wiper/washer...........31
Smart washing function........32
Seat belts..................86
Seats.....................19
Service schedule (2.0 T4 MAir
petrol engine versions)........171
Servicing procedures..........185
Side bag..................107
Side lights..................27
Snow chains................188
Speed Limiter . ..............118
SRS (supplementary restraint
system).................103
Start & Stop Evo.............117
Starting the engine............110
Starting with flat key battery......13
Steering lock . . ..............13
Steering wheel...............23
Steering wheel controls .........217
Suggestions for driving .........136
Symbols....................5
TC (Traction Control) system......73
TFT Display (3.5”) . ............44
TFT Display (7”)...............45
The keys...................12
Tire Repair Kit . ..............160
Topping up AdBlue® (UREA) diesel
emissions additive..........132
Towing the vehicle . ...........166
INDEX