ALFA ROMEO STELVIO 2021 Owners Manual
Manufacturer: ALFA ROMEO, Model Year: 2021, Model line: STELVIO, Model: ALFA ROMEO STELVIO 2021Pages: 280, PDF Size: 10.02 MB
Page 251 of 280
249
test wheel. Sustained high temperature
can cause the material of the tire to
degenerate and reduce tire life, and
excessive temperature can lead to
sudden tire failure. The grade C corre-
sponds to a level of performance, which
all passenger vehicle tires must meet
under the Federal Motor Vehicle Safety
Standard No. 109. Grades B and A
represent higher levels of performance
on the laboratory test wheel, than the
minimum required by law.
STORING THE VEHICLE
If the vehicle is left inactive for longer than a
month, the following precautions should be
observed:
Park the vehicle in an area that is covered
and dry, and well-ventilated if possible.
Slightly open the windows.
Check that the Electric Park Brake (EPB) is
not activated.
Carry out the “Liftgate Emergency Opening”
procedure
Ú
page 62.
Disconnect the negative battery terminal
and check the battery charge. Repeat this
check once every three months during
storage.
If the battery is not disconnected from the
electrical system, check its state of charge
every 30 days.
Clean and protect the painted parts using
protective wax.
Clean and protect the shiny metal parts using
special compounds available commercially.
Sprinkle talcum powder on the windshield
wiper rubber blades, and lift them off the
glass.
Cover the vehicle with a fabric or perforated
plastic sheet, paying particular care not to
damage the painted surface by dragging
any dust that may have accumulated on it.
Do not use compact plastic sheets, as they
do not allow humidity to evaporate from the
surface of the vehicle.
Inflate tires to +7.25 psi (+0.5 bar) above
the standard prescribed pressure and
check it periodically.
Do not drain the engine cooling system.
Any time the vehicle is left inactive for two
weeks or more, operate the air conditioning
system with engine idling for at least five minutes, setting external air and with fan
set to maximum speed. This operation will
ensure appropriate lubrication for the
system, thus minimizing the possibility of
damage to the compressor when the
system is operated again.
NOTE:
After cycling the ignition to STOP and having
closed the driver side door, wait at least one
minute before disconnecting the electrical
supply from the battery. When reconnecting
the electrical supply to the battery, make sure
that the ignition is in the STOP position and the
driver’s side door is closed.
BODYWORK
Protection Against Atmospheric Agents
The vehicle is equipped with the best available
technological solutions to protect the body -
work against corrosion.
These include:
Painting products and systems which give
the vehicle resistance to corrosion and
abrasion.
Use of galvanized (or pre-treated) steel
sheets, with high resistance to corrosion.
Spraying of plastic parts, with a protective
function in the more exposed points: under
door, inner wing, edges, etc.
WARNING!
The temperature grade for this tire is
established for a tire that is properly inflated
and not overloaded. Excessive speed,
underinflation, or excessive loading, either
separately or in combination, can cause
heat buildup and possible tire failure.
21_GU_OM_EN_USC_t.book Page 249
Page 252 of 280
SERVICING AND MAINTENANCE
250
Use of “open” boxed sections to prevent
condensation and pockets of moisture
which could favor the formation of rust
inside.
Use of special films to protect against abra-
sion in exposed areas (e.g. rear wing, doors,
etc.).
Corrosion Warranty
Your vehicle is covered by Corrosion Warranty
against perforation due to rust of any original
element of the structure or bodywork. For the
general terms of this warranty, refer to the
Warranty Booklet.
Preserving The Bodywork
Paint
Touch up abrasions and scratches immedi -
ately to prevent the formation of rust.
Maintenance of paintwork consists of washing
the vehicle: the frequency depends on the
conditions and environment where the vehicle
is used. For example, it is advisable to wash
the vehicle more often in areas with high levels
of atmospheric pollution or salted roads.
Some parts of the vehicle may be covered with
a matte paint which, in order to be maintained
intact, requires special care.
To correctly wash the vehicle, follow these
instructions:
If high pressure jets or cleaners are used to
wash the vehicle, keep a distance of at least 15 inches (40 cm) from the bodywork to
avoid damage or alteration. Build up of
water could cause damage to the vehicle in
the long term.
To make it easier to remove any dirt
deposits in the area where the blades are
normally located it is recommended to posi
-
tion the windshield wipers vertically (service
position)
Ú
page 219.
Wash the bodywork using a low pressure jet
of water if possible.
Wipe a sponge with a slightly soapy solution
over the bodywork, frequently rinsing the
sponge.
Rinse well with water and dry with a leather
chamois.
Dry the less visible parts (e.g. door frames,
hood, headlight frames, etc.) with special care,
as water may stagnate more easily in these
areas. Do not wash the vehicle after it has
been left in the sun or with the hood hot: this
may alter the shine of the paintwork.
NOTE:
Avoid parking under trees; the resin dropped
by trees makes the paintwork go opaque and
increases the possibility of corrosion.
Exterior plastic parts must be cleaned in the
same way as the rest of the vehicle. If washing the vehicle in a service that moves
the vehicle, for vehicles with automatic trans
-
missions, proceed with the following direc -
tions:
Ensure that the vehicle is on a flat surface.
Disable the automatic engagement of the
parking brake
Ú
page 90.
With the vehicle stationary, the gear in
NEUTRAL (N) and the brake pedal pressed,
push the START button.
NOTE:
The vehicle will remain in NEUTRAL (N) for
15 minutes before PARK (P) will be engaged
automatically.
Windows
Use specific detergents and clean cloths to
prevent scratching or altering the transpar -
ency.
Front Headlights
Use a soft cloth soaked in water and detergent
for washing vehicles.
CAUTION!
Wipe the rear window inside gently with a
cloth following the direction of the filaments
to avoid damaging the heating device.
21_GU_OM_EN_USC_t.book Page 250
Page 253 of 280
251
NOTE:
Never use aromatic substances (e.g. gaso-
line) or ketones (e.g. acetone) for cleaning
the plastic lenses of the headlights.
When cleaning with a pressure washer,
keep the pressure washer at least eight
inches (20 cm) away from the headlights.
Engine Compartment
At the end of every Winter, wash the engine
compartment thoroughly, taking care not to
aim the jet of water directly at the electronic
control units or at the windshield wiper
motors. Have this operation performed at a
specialized workshop
Ú
page 218.
NOTE:
The washing should take place with the engine
cold and the ignition device in the STOP posi -
tion. After the washing operation, make sure
that the various protections (e.g. rubber caps
and guards) have not been removed or
damaged.
INTERIORS
Periodically check the cleanliness of the inte -
rior, beneath the mats, which could cause
oxidation of the sheet metal.
Seats And Fabric Parts
Remove dust with a soft brush or a vacuum
cleaner. It is advised to use a moist brush on
velvet upholstery. Rub the seats with a sponge
moistened with a solution of water and neutral
detergent. Cleaning heat press images on seats — if
equipped:
Due to the color, opacity and wear-resistant
protection with which the heat press images
on some seats are made, they may be subject
to temporary scratching if they are touched by
finger nails, keys, or other hard objects. In
such cases, the visible signs do not impair the
profiled images, and can easily be removed by
wiping the affected area with a microfiber
cloth moistened with water (not dry) to restore
the seat to its original condition. The micro
-
fiber cloth must not have been previously
soaked in other substances or detergents.
Leather Seats
Remove the dry dirt with a chamois or slightly
damp cloth, without exerting too much pres -
sure.
Remove any liquid or grease stains using an
absorbent dry cloth, without rubbing. Then
clean with a soft cloth or buckskin cloth damp -
ened with water and mild soap. If the stain
persists, use specific products and observe
the instructions carefully.
NOTE:
Never use alcohol. Make sure that the
cleaning products used contain no alcohol or
alcohol derivatives, even in small quantities.
Plastic And Coated Parts
Clean interior plastic parts with a damp cloth (if
possible made from microfiber), and a solution
of water and neutral, non-abrasive detergent. To clean oily or persistent stains, use specific
products free from solvents and designed to
maintain the original appearance and color of
the components.
Remove any dust using a microfiber cloth, if
necessary moistened with water. The use of
paper tissues is not recommended as these
may leave residues.
Alcantara Parts — If Equipped
Alcantara parts maintenance procedure:
Treat the surface with a microfiber cloth
moistened with mild marseille soap and
water, taking care to apply a uniform light
pressure over the entire area (do not rub
vigorously).
Rinse and wring out the microfiber cloth,
and pass it over the entire area again.
Let it dry, and then brush gently with a soft
brush.
Genuine Leather Parts
Use only water and mild soap to clean these
parts. Never use alcohol or alcohol-based
products.
CAUTION!
Precautions have been taken to safeguard
all parts and connections however, the
pressures generated by these machines is
such that complete protection against
water ingress cannot be guaranteed.
21_GU_OM_EN_USC_t.book Page 251
Page 254 of 280
SERVICING AND MAINTENANCE
252
Before using a specific product for cleaning
interiors, make sure that it does not contain
alcohol and/or alcohol based substances.
Carbon Fiber Parts
To eliminate small scratches and marks on the
carbon, contact an authorized dealer. An
improperly performed operation may irrepa-
rably damage the carbon.
21_GU_OM_EN_USC_t.book Page 252
Page 255 of 280
253
For the enthusiasts, the technician, or those
who just want to know every detail of their
vehicle, useful information on understanding
how your vehicle works is contained in this
chapter and illustrated with data, tables, and
graphics.
VEHICLE IDENTIFICATION
NUMBER (VIN)
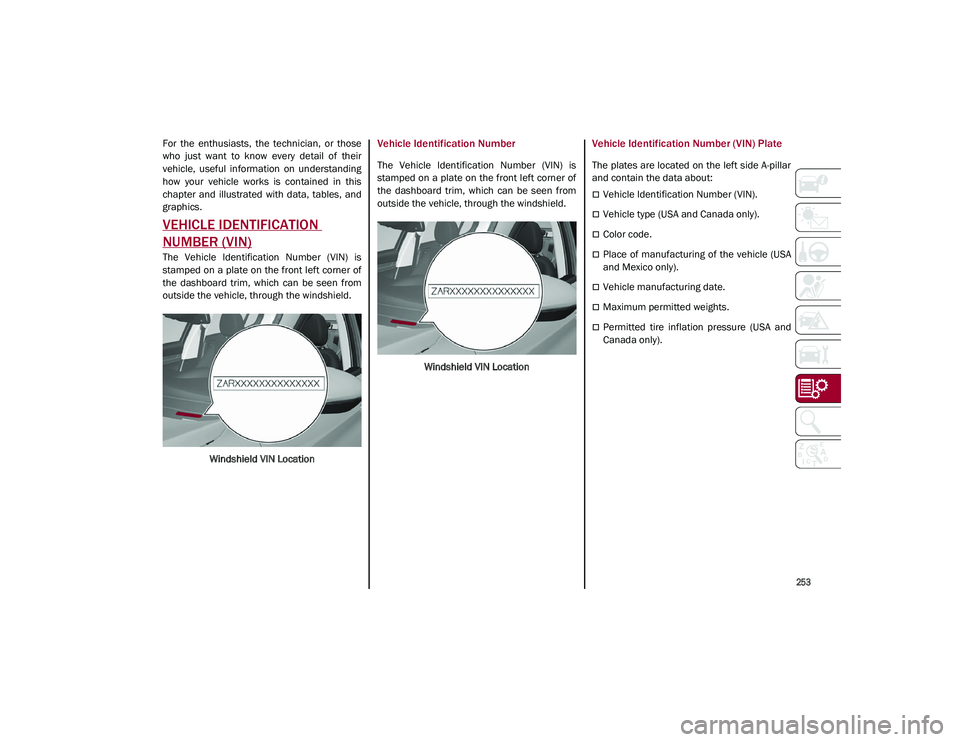
The Vehicle Identification Number (VIN) is
stamped on a plate on the front left corner of
the dashboard trim, which can be seen from
outside the vehicle, through the windshield.Windshield VIN Location
Vehicle Identification Number
The Vehicle Identification Number (VIN) is
stamped on a plate on the front left corner of
the dashboard trim, which can be seen from
outside the vehicle, through the windshield.Windshield VIN Location
Vehicle Identification Number (VIN) Plate
The plates are located on the left side A-pillar
and contain the data about:
Vehicle Identification Number (VIN).
Vehicle type (USA and Canada only).
Color code.
Place of manufacturing of the vehicle (USA
and Mexico only).
Vehicle manufacturing date.
Maximum permitted weights.
Permitted tire inflation pressure (USA and
Canada only).
21_GU_OM_EN_USC_t.book Page 253
Page 256 of 280
TECHNICAL SPECIFICATIONS
254
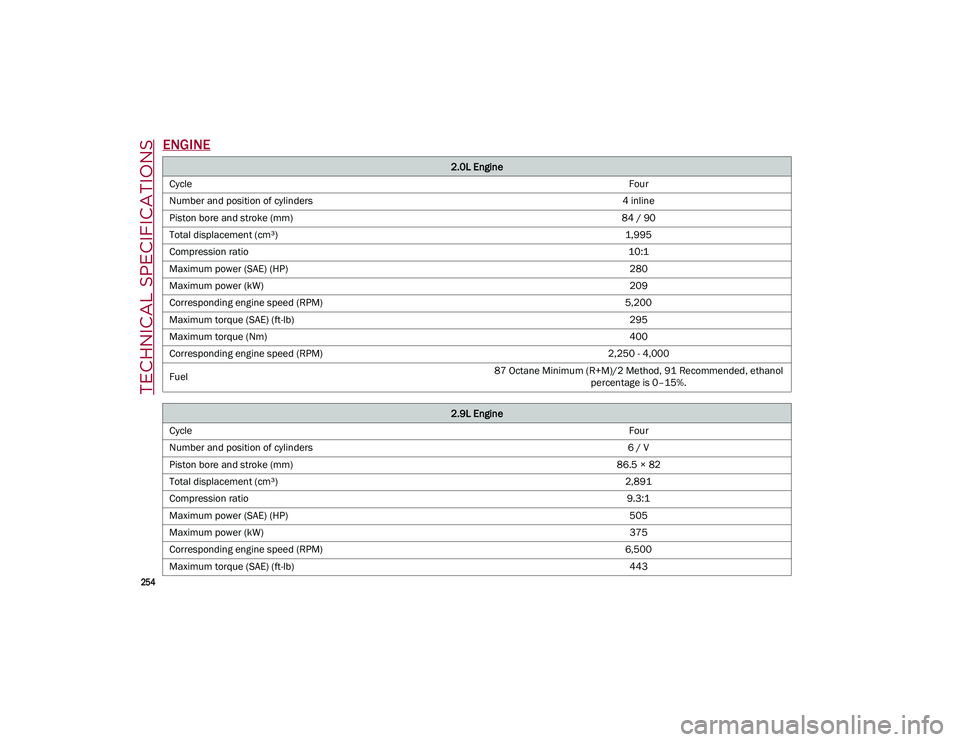
ENGINE
2.0L Engine
Cycle Four
Number and position of cylinders 4 inline
Piston bore and stroke (mm) 84 / 90
Total displacement (cm³) 1,995
Compression ratio 10:1
Maximum power (SAE) (HP) 280
Maximum power (kW) 209
Corresponding engine speed (RPM) 5,200
Maximum torque (SAE) (ft-lb) 295
Maximum torque (Nm) 400
Corresponding engine speed (RPM) 2,250 - 4,000
Fuel 87 Octane Minimum (R+M)/2 Method, 91 Recommended, ethanol
percentage is 0–15%.
2.9L Engine
Cycle Four
Number and position of cylinders 6 / V
Piston bore and stroke (mm) 86.5 × 82
Total displacement (cm³) 2,891
Compression ratio 9.3:1
Maximum power (SAE) (HP) 505
Maximum power (kW) 375
Corresponding engine speed (RPM) 6,500
Maximum torque (SAE) (ft-lb) 443
21_GU_OM_EN_USC_t.book Page 254
Page 257 of 280
255
(Continued)
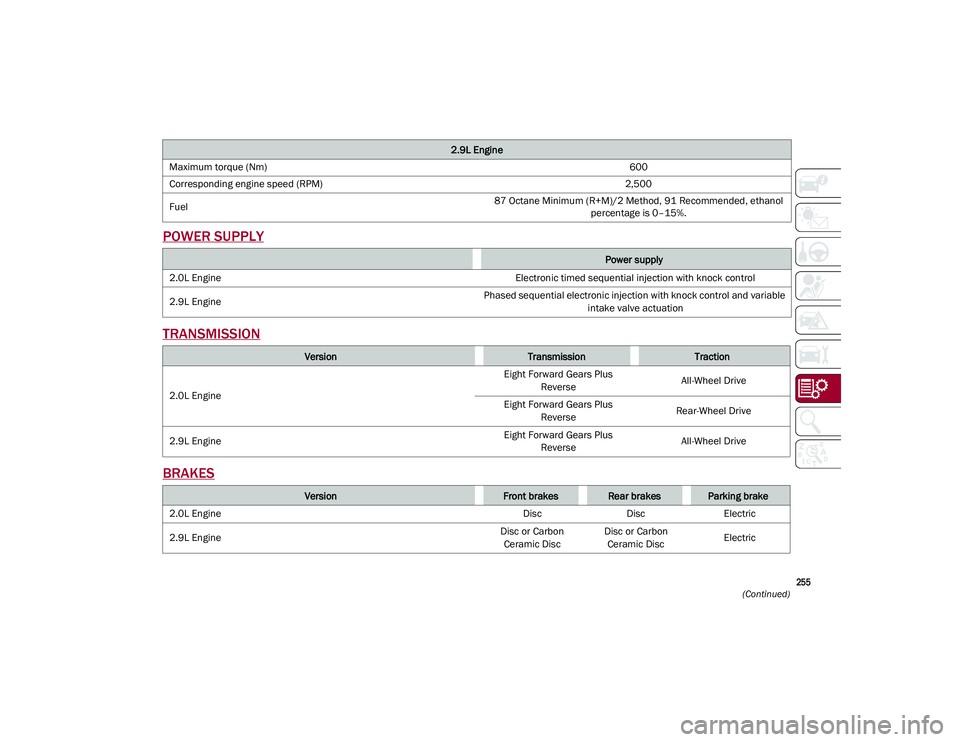
POWER SUPPLY
TRANSMISSION
BRAKES
Maximum torque (Nm) 600
Corresponding engine speed (RPM) 2,500
Fuel 87 Octane Minimum (R+M)/2 Method, 91 Recommended, ethanol
percentage is 0–15%.
Power supply
2.0L Engine Electronic timed sequential injection with knock control
2.9L Engine Phased sequential electronic injection with knock control and variable
intake valve actuation
VersionTransmissionTraction
2.0L Engine Eight Forward Gears Plus
Reverse All-Wheel Drive
Eight Forward Gears Plus Reverse Rear-Wheel Drive
2.9L Engine Eight Forward Gears Plus
Reverse All-Wheel Drive
VersionFront brakesRear brakesParking brake
2.0L Engine DiscDiscElectric
2.9L Engine Disc or Carbon
Ceramic Disc Disc or Carbon
Ceramic Disc Electric
2.9L Engine
21_GU_OM_EN_USC_t.book Page 255
Page 258 of 280
TECHNICAL SPECIFICATIONS
256
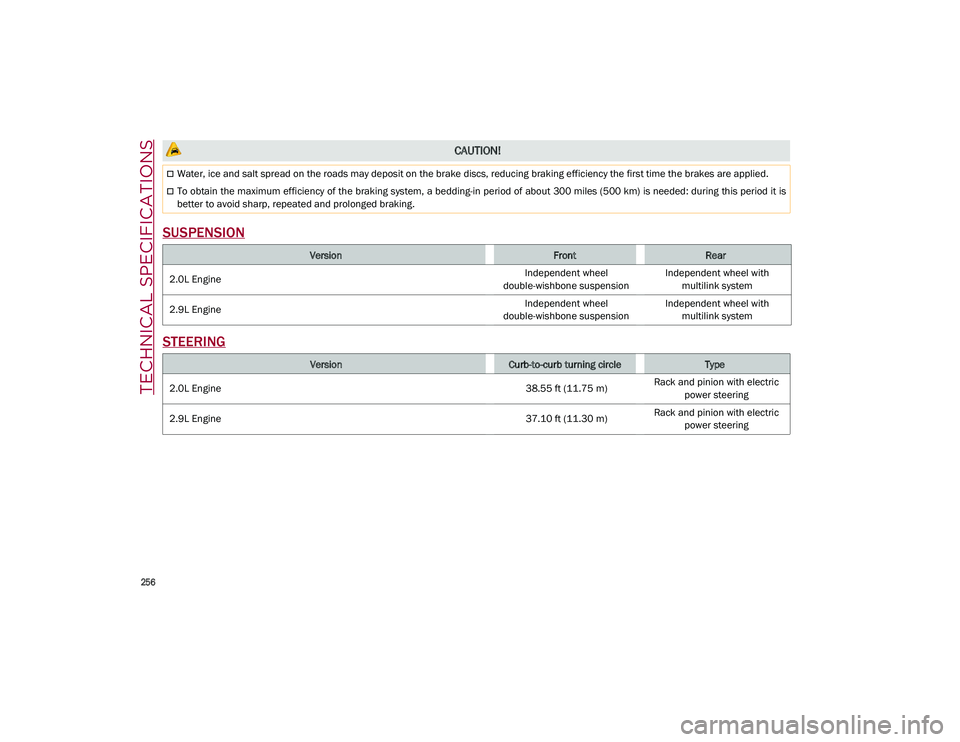
SUSPENSION
STEERING
CAUTION!
Water, ice and salt spread on the roads may deposit on the brake discs, reducing braking efficiency the first time the brakes are applied.
To obtain the maximum efficiency of the braking system, a bedding-in period of about 300 miles (500 km) is needed: during this period it is
better to avoid sharp, repeated and prolonged braking.
VersionFrontRear
2.0L Engine Independent wheel
double-wishbone suspension Independent wheel with
multilink system
2.9L Engine Independent wheel
double-wishbone suspension Independent wheel with
multilink system
VersionCurb-to-curb turning circleType
2.0L Engine 38.55 ft (11.75 m)Rack and pinion with electric
power steering
2.9L Engine 37.10 ft (11.30 m)Rack and pinion with electric
power steering
21_GU_OM_EN_USC_t.book Page 256
Page 259 of 280
257
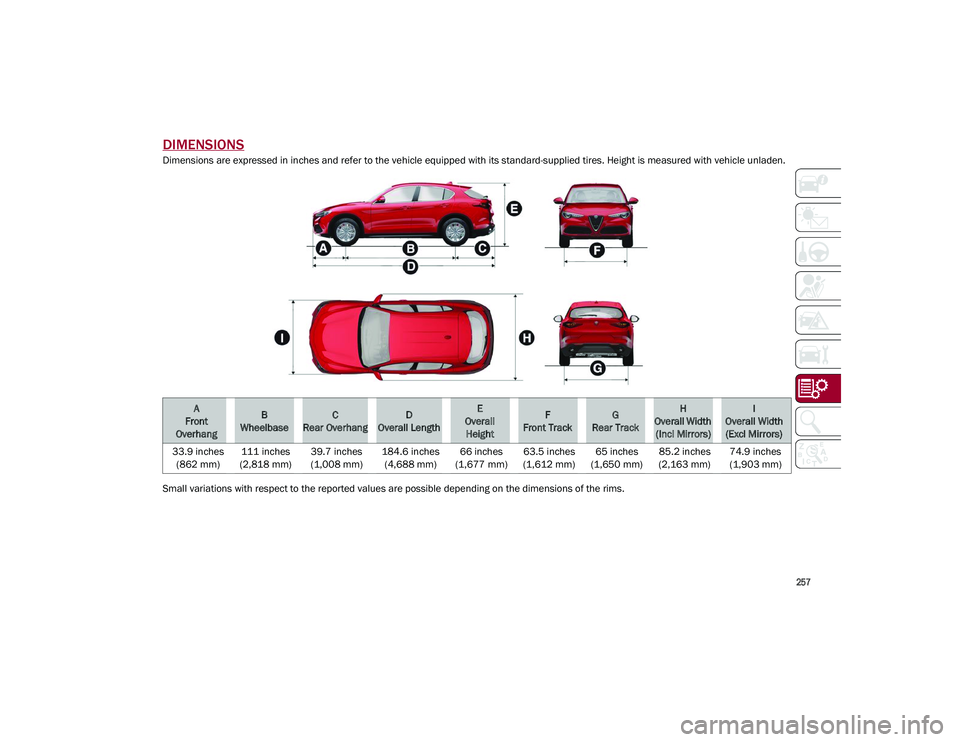
DIMENSIONS
Dimensions are expressed in inches and refer to the vehicle equipped with its standard-supplied tires. Height is measured with vehicle unladen.
Small variations with respect to the reported values are possible depending on the dimensions of the rims.
A
Front
OverhangB
WheelbaseC
Rear OverhangD
Overall LengthE
Overall HeightF
Front TrackG
Rear TrackH
Overall Width (Incl Mirrors)I
Overall Width (Excl Mirrors)
33.9 inches (862 mm) 111 inches
(2,818 mm) 39.7 inches
(1,008 mm) 184.6 inches
(4,688 mm) 66 inches
(1,677 mm) 63.5 inches
(1,612 mm) 65 inches
(1,650 mm) 85.2 inches
(2,163 mm) 74.9 inches
(1,903 mm)
21_GU_OM_EN_USC_t.book Page 257
Page 260 of 280
TECHNICAL SPECIFICATIONS
258
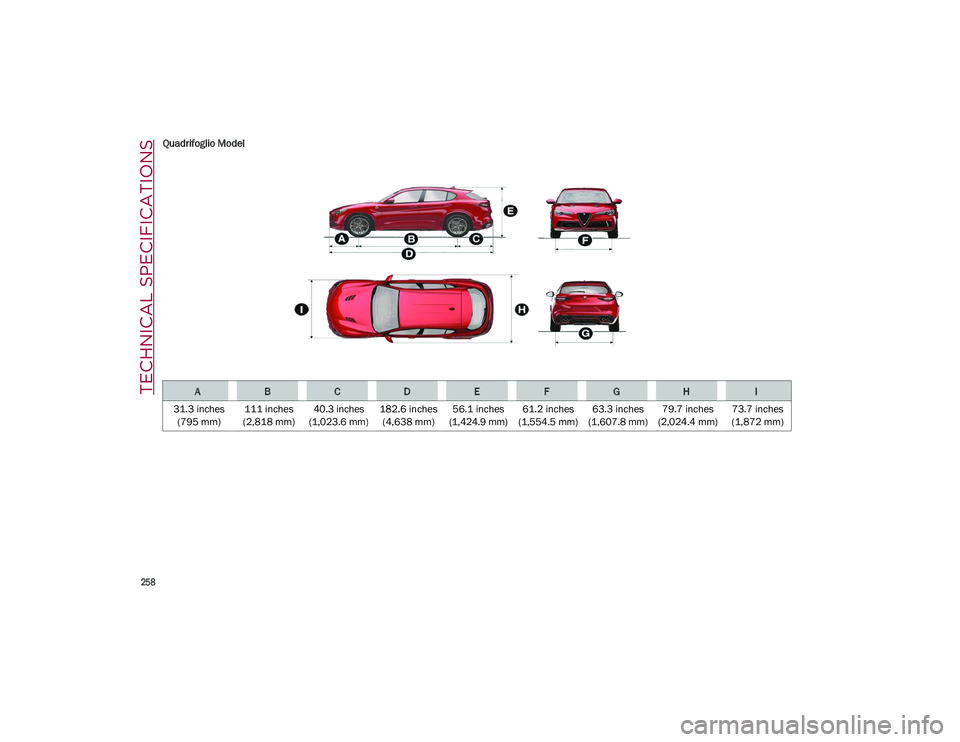
Quadrifoglio Model
ABCDEFGHI
31.3 inches (795 mm) 111 inches
(2,818 mm) 40.3 inches
(1,023.6 mm) 182.6 inches
(4,638 mm) 56.1 inches
(1,424.9 mm) 61.2 inches
(1,554.5 mm) 63.3 inches
(1,607.8 mm) 79.7 inches
(2,024.4 mm) 73.7 inches
(1,872 mm)
21_GU_OM_EN_USC_t.book Page 258