roof ALFA ROMEO STELVIO 2021 Owners Manual
[x] Cancel search | Manufacturer: ALFA ROMEO, Model Year: 2021, Model line: STELVIO, Model: ALFA ROMEO STELVIO 2021Pages: 280, PDF Size: 10.02 MB
Page 11 of 280
9
Automatic High Beam Headlights —
If Equipped ............................................. 43 Parking Lights ....................................... 44
Headlight Off Delay ................................ 44
Rear Fog Lights ...................................... 44
Adaptive Headlight System (AFS) —
If Equipped ............................................. 44 Turn Signals ........................................ 44
Lane Change Assist ............................... 44
INTERIOR LIGHTS .....................................44
Front Map Reading Lights ..................... 45
Interior Ambient Lighting ...................... 45
Rear Overhead Light ............................. 46
Instrument Panel Dimmer Control ....... 46
WINDSHIELD WIPERS AND WASHERS....46
Windshield Wiper Operation ............... 46
Rain Sensing Wipers.............................. 47
Rear Window Wiper/Washer................. 48
Headlamp Washers — If Equipped ....... 48
CLIMATE CONTROLS ................................48
Automatic Dual-Zone Climate Control
System ................................................. 49
INTERIOR STORAGE AND EQUIPMENT....55
Glove Compartment............................... 55
Center Console ...................................... 56
Rear Armrest .......................................... 56
Power Outlets ...................................... 56
Cigar Lighter And Ash Tray —
If Equipped ............................................. 57 Wireless Charging Pad — If Equipped... 57
POWER WINDOWS ................................... 58
Power Window Controls ........................ 58
Auto-Up Feature With Anti-Pinch
Protection............................................... 59 Power Window System Initialization .... 59
Wind Buffeting ...................................... 59
POWER SUNROOF — IF EQUIPPED.......... 59
Power Sunroof ....................................... 59
Opening And Closing The Sunroof ........ 60
Venting Sunroof ..................................... 60
Sunshade Operation ............................. 60
Pinch Protect Feature ........................... 60
Re-Initialization Procedure.................... 60
Sunroof Maintenance ........................... 61
HOOD ........................................................ 61
Opening The Hood ................................. 61
Closing The Hood................................... 62
POWER LIFTGATE..................................... 62
Opening .................................................. 62
Closing.................................................... 63
Liftgate Initialization .............................. 64
Cargo Area Features ............................. 64
GETTING TO KNOW YOUR INSTRUMENT
PANEL
INSTRUMENT PANEL FEATURES............. 67
Instrument Cluster ............................... 67
Instrument Cluster Descriptions .......... 68
INSTRUMENT CLUSTER DISPLAY ............69
Instrument Cluster Display
Description .............................................69 Reconfigurable Instrument Cluster
Display ....................................................69 Reconfigurable Display Items ............... 69
Customer Programmable Settings........ 72
WARNING LIGHTS AND MESSAGES
ON THE INSTRUMENT PANEL ..................74
Red Warning Lights ................................74
Amber Warning Lights............................ 75
Green Indicator Lights ...........................78
Blue Indicator Lights ..............................78
Red Symbols...........................................78
Amber Symbols ......................................80
Green Symbols .......................................84
Blue Symbols .......................................... 84
ONBOARD DIAGNOSTIC SYSTEM ............84
Onboard Diagnostic System (OBD II)
Cybersecurity .......................................... 84
EMISSIONS INSPECTION AND
MAINTENANCE PROGRAM .......................85
21_GU_OM_EN_USC_t.book Page 9
Page 38 of 280
GETTING TO KNOW YOUR VEHICLE
36
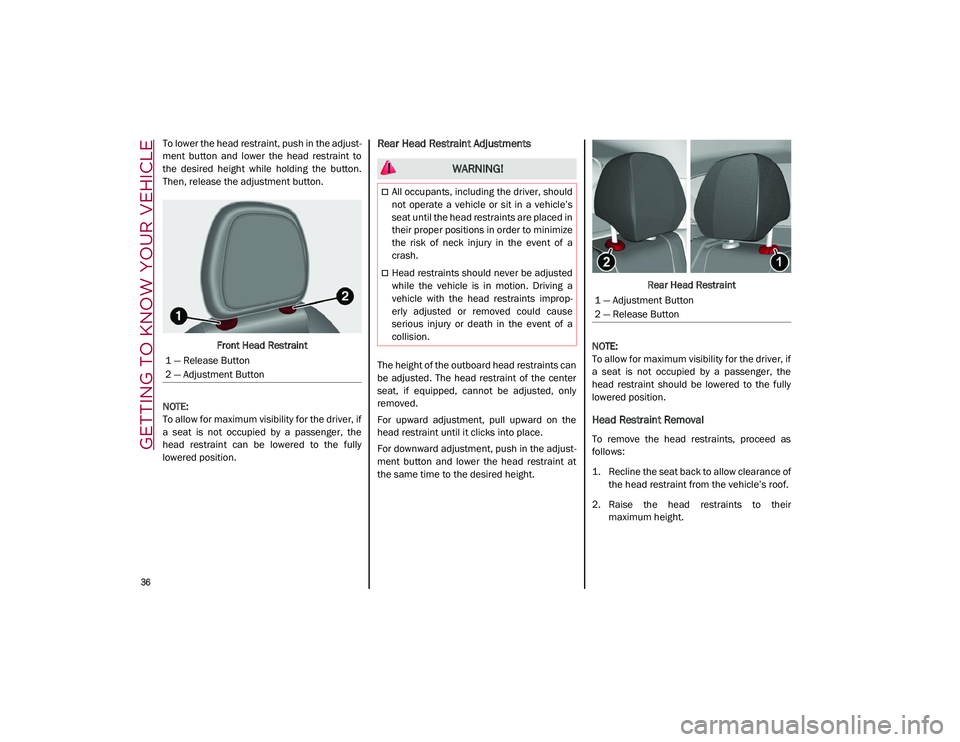
To lower the head restraint, push in the adjust-
ment button and lower the head restraint to
the desired height while holding the button.
Then, release the adjustment button.
Front Head Restraint
NOTE:
To allow for maximum visibility for the driver, if
a seat is not occupied by a passenger, the
head restraint can be lowered to the fully
lowered position.Rear Head Restraint Adjustments
The height of the outboard head restraints can
be adjusted. The head restraint of the center
seat, if equipped, cannot be adjusted, only
removed.
For upward adjustment, pull upward on the
head restraint until it clicks into place.
For downward adjustment, push in the adjust -
ment button and lower the head restraint at
the same time to the desired height. Rear Head Restraint
NOTE:
To allow for maximum visibility for the driver, if
a seat is not occupied by a passenger, the
head restraint should be lowered to the fully
lowered position.
Head Restraint Removal
To remove the head restraints, proceed as
follows:
1. Recline the seat back to allow clearance of the head restraint from the vehicle’s roof.
2. Raise the head restraints to their maximum height.
1 — Release Button
2 — Adjustment Button
WARNING!
All occupants, including the driver, should
not operate a vehicle or sit in a vehicle’s
seat until the head restraints are placed in
their proper positions in order to minimize
the risk of neck injury in the event of a
crash.
Head restraints should never be adjusted
while the vehicle is in motion. Driving a
vehicle with the head restraints improp
-
erly adjusted or removed could cause
serious injury or death in the event of a
collision.
1 — Adjustment Button
2 — Release Button
21_GU_OM_EN_USC_t.book Page 36
Page 61 of 280
59
To close the window, pull the window switch
up. To stop the window during Auto-Up opera-
tion, push or pull the window switch again.
Auto-Up Feature With Anti-Pinch Protection
The vehicle is equipped with an anti-pinch
safety device for closing the windows.
If the safety system senses any obstacle while
the window is closing, it will stop the window’s
movement and reverse it, depending on its
position.
This device is also useful if the windows are
activated accidentally by children inside the
vehicle.
The anti-pinch safety function is activated both
during the manual and the automatic opera -
tion of the window.
When the anti-pinch system is activated, the
window closing is immediately interrupted.
Then the window closing is automatically reversed and the window lowers by about
8 inches (20 cm) in relation to the first stop
position. The window cannot be operated
during this time.
NOTE:
In the event of an error, or if the anti-pinch
protection is activated three consecutive
times, the automatic closing operation of the
window will be deactivated. In order to restore
the correct operation of the system, the
window must be lowered.
Power Window System Initialization
If power supply is interrupted, the electric
window automatic operation must be reinitial
-
ized.
To perform the initialization procedure, which
must be done on each door with the doors
closed, manually fully close the window to be
initialized.
Wind Buffeting
Wind buffeting can be described as the
perception of pressure on the ears or a heli -
copter-type sound in the ears. Your vehicle
may exhibit wind buffeting with the windows
down, or the sunroof (if equipped) in certain
open or partially open positions. This is a
normal occurrence and can be minimized. If
the buffeting occurs with the rear windows
open, open the front and rear windows together to minimize the buffeting. If the
buffeting occurs with the sunroof open, adjust
the sunroof opening to minimize the buffeting
or open any window.
POWER SUNROOF — IF
EQUIPPED
Power Sunroof
The power sunroof consists of a single glass
panel and is fitted with a power sunshade the
full length of the panel.
Operation of the sunroof is only possible with
the ignition in the ACC or ON/RUN position
Ú
page 20.
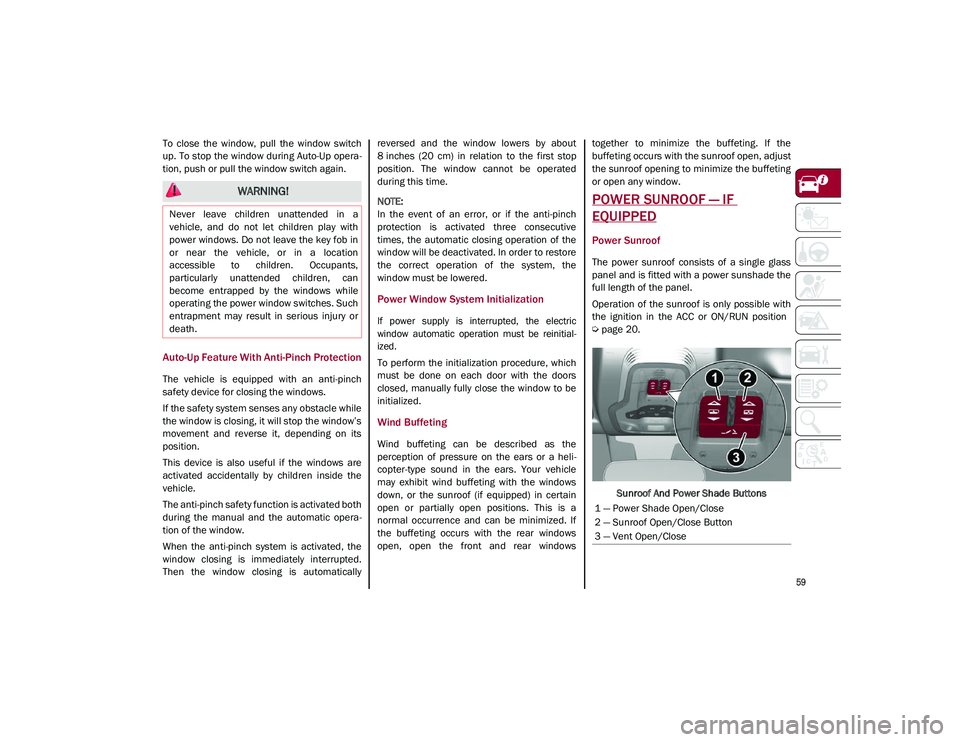
Sunroof And Power Shade Buttons
WARNING!
Never leave children unattended in a
vehicle, and do not let children play with
power windows. Do not leave the key fob in
or near the vehicle, or in a location
accessible to children. Occupants,
particularly unattended children, can
become entrapped by the windows while
operating the power window switches. Such
entrapment may result in serious injury or
death.
1 — Power Shade Open/Close
2 — Sunroof Open/Close Button
3 — Vent Open/Close
21_GU_OM_EN_USC_t.book Page 59
Page 62 of 280
GETTING TO KNOW YOUR VEHICLE
60
The sunroof has three preset positions:
Fully closed
Comfort (intermediate opening)
Fully open
NOTE:
You cannot have the sunshade closed when
the sunroof is open.
Opening And Closing The Sunroof
To open the sunroof’s front panel, push the
open/close button toward the rear of the
vehicle to open to the comfort position (half
way). Pushing the button a second time will
open to the fully open position.
To close the sunroof, push the open/close
button toward the front of the vehicle. The roof
will close completely.
The automatic motion can be interrupted in
any position by pushing the open/close button
again.
Venting Sunroof
To bring the roof into vent position, push and
release the vent button.
This type of vent opening can be activated
regardless of the position of the sunroof.
When starting with the roof in the closed posi -
tion, pushing the vent button automatically
causes the sunroof to open to the vent posi -
tion. If the roof is already open, the button
must be held until the roof reaches the
vent-opening position.
Pushing the vent button again during auto -
matic movement of the roof will stop it.
Sunshade Operation
The sunshade is power operated.
Push the Power Shade open/close button
toward the rear of the vehicle to open the sun
shade.
Push the Power Shade open/close button
toward the front of the vehicle to close the sun
shade.
The automatic motion can be interrupted in
any position by pushing the Power Shade
open/close button again.
Pinch Protect Feature
The sunroof has an anti-pinch safety system
capable of detecting the presence of an
obstacle during the closing movement. If an
obstacle is detected, the system intervenes
and the movement of the sunroof is immedi -
ately reversed.
Re-Initialization Procedure
Automatic operation of the sunroof must be
re-initialized in case of faulty sunroof opera -
tion. It may also be necessary to initialize the
sunroof after the vehicle’s battery has been
disconnected and then reconnected.
NOTE:
The anti-pinch safety device is deactivated
during the re-initialization procedure.
WARNING!
Never leave children unattended in a
vehicle, or with access to an unlocked
vehicle. Never leave the key fob in or near
the vehicle, or in a location accessible to chil -
dren. Do not leave the ignition of a vehicle
equipped with keyless ignition in the ON/
RUN mode. Occupants, particularly unat -
tended children, can become entrapped by
the power sunroof while operating the power
sunroof switch. Such entrapment may result
in serious injury or death.
In a collision, there is a greater risk of
being thrown from a vehicle with an open
sunroof. You could also be seriously
injured or killed. Always fasten your seat
belt properly and make sure all passen -
gers are also properly secured.
Do not allow small children to operate the
sunroof. Never allow your fingers, other
body parts, or any object, to project
through the sunroof opening. Injury may
result.
CAUTION!
Do not open the sun roof if a roof rack or
crossbars are fitted. Do not open the sun
roof if there is snow or ice on it: you may
damage it.
21_GU_OM_EN_USC_t.book Page 60
Page 63 of 280
61
Proceed as follows:
1. With the ignition in the ON/RUN position,make sure the sunroof glass is fully closed
(sunshade open).
2. Open the driver’s side door, and place the ignition in the OFF position.
3. Within five seconds, place the ignition in the ACC or ON/RUN position.
4. Within 10 seconds, push and hold the sunroof close switch (forward). After 8 -
10 seconds of holding the switch, the
re-initialization process will begin.
Continue to hold the switch while the
sunroof motor cycles, and the sunshade
will fully close.
5. Once the sunroof glass and the power sunshade have stopped motion, release
the sunroof close switch, then push and
hold it again within five seconds. Continue
to hold the switch while the sunshade fully
opens, the sunroof glass fully opens,
followed by the glass fully closing then the
sunshade fully closing.
6. Release the switch once all of the opera -
tions stop. Re-initialization of the sunroof
motors is now complete.
NOTE:
If the switch is released prior to full completion
of the operations described, the entire
re-initialization procedure must be repeated
from step 1. 7. Confirm express operations for the
sunroof glass and sunshade are functional
for opening and closing operations.
Sunroof Maintenance
Use only a non-abrasive cleaner and a soft
cloth to clean the glass panel. Periodically
check for and clear out any debris that may
have collected in the tracks.
HOOD
Opening The Hood
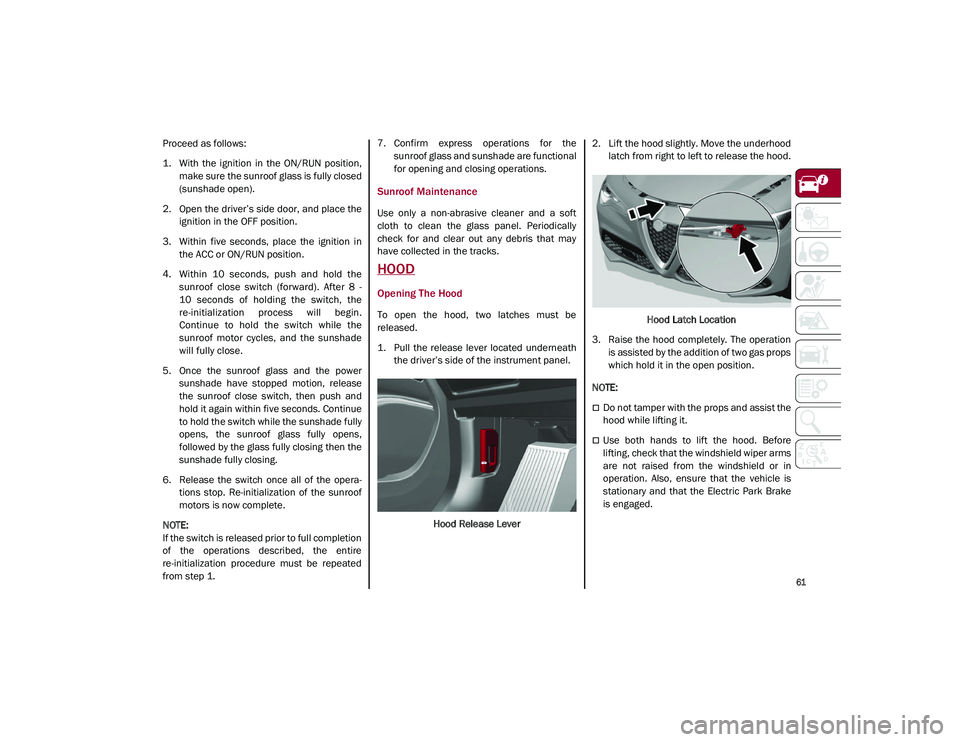
To open the hood, two latches must be
released.
1. Pull the release lever located underneaththe driver’s side of the instrument panel.
Hood Release Lever 2. Lift the hood slightly. Move the underhood
latch from right to left to release the hood.
Hood Latch Location
3. Raise the hood completely. The operation is assisted by the addition of two gas props
which hold it in the open position.
NOTE:
Do not tamper with the props and assist the
hood while lifting it.
Use both hands to lift the hood. Before
lifting, check that the windshield wiper arms
are not raised from the windshield or in
operation. Also, ensure that the vehicle is
stationary and that the Electric Park Brake
is engaged.
21_GU_OM_EN_USC_t.book Page 61
Page 128 of 280
STARTING AND OPERATING
126
(Continued)
ParkSense System Usage Precautions
NOTE:
Some conditions may influence the perfor-
mance of the ParkSense system:
Reduced sensor sensitivity could be due to
the presence of ice, snow, mud, or thick
paint on the surface of the sensor.
The sensors may detect a false obstacle
(echo interference) due to mechanical inter -
ference, for example when washing the
vehicle or in extreme weather.
The signals sent by the sensors can be
altered by the presence of ultrasonic
systems (e.g. pneumatic brake systems of
trucks or pneumatic drills) near the vehicle.
System performance can be influenced by
the position of the sensors. For example,
due to a change in the ride setting (caused
by wear to the shock absorbers or suspen -
sion), by changing tires, overloading the
vehicle or operations that require the
vehicle to be lowered.
Be sure not to place bumper stickers or
other adhesives over the sensors as this will
affect system performance.
The presence of a trailer hitch without a
trailer. This may interfere with the operation
of the parking sensors. Before using the
ParkSense system, it is recommended to remove or close the trailer hitch assembly
when the vehicle is not being used for
towing.
LANE DEPARTURE WARNING
(LDW) SYSTEM
Lane Departure Warning Operation
The Lane Departure Warning system uses a
forward looking camera located on the wind
-
shield to detect lane markings and measure
vehicle position within the lane boundaries.
When one or both lane limits are detected and
the vehicle passes over one without an acti -
vated turn signal, the system emits a visual as
well as an acoustic signal.
If the vehicle continues to go beyond the line
of the lane without any intervention from the
driver, the surpassed line will light up on the
display (left or right) to urge the driver to bring
the vehicle back into the limits of the lane.
CAUTION!
Projecting loads on the roof of the vehicle
may interfere with the correct operation of
the camera. Before starting, make sure
the load is correctly positioned in order
not to cover the camera operating range.
Do not cover the operating range of the
camera with stickers or other objects.
Do not tamper with nor operate on the
camera. Do not close the openings in the
aesthetic cover located under the interior
rearview mirror. In the event of a failure of
the camera, contact your authorized
dealer.
The camera may have limited or absent
operation due to weather conditions such
as: heavy rain, hail, thick fog, heavy snow,
formation of ice layers on the windshield.
Camera operation may also be compro -
mised by the presence of dust, condensa -
tion, dirt or ice on the windshield, by traffic
conditions (e.g. vehicles that are driving
not aligned with yours, vehicle driving in a
transverse or opposite way on the same
lane, bend with a small radius of curva -
ture), by road surface conditions and by
driving conditions (e.g. off-road driving).
Make sure the windshield is always clean.
Use specific detergents and clean cloths
to avoid scratching the windshield. The
camera operation may also be limited or
absent in some driving, traffic and road
surface conditions.
If the windshield must be replaced due to
scratches, chipping or breakage, contact
exclusively an authorized dealer. Do not
replace the windshield on your own. It is
advisable to replace the windshield if it is
damaged in the area of the camera.
CAUTION! (Continued)
21_GU_OM_EN_USC_t.book Page 126
Page 133 of 280
131
(Continued)
Changing The System Strength
The system’s strength can be set through the
radio system in the “Driver Assistance” menu.
Select “Lane Keep Assist - Settings” and then
“Strength”. Strength “Low” or “High” can be
selected.
Limited Operation Warning
If a message appears on the display, a condi-
tion limiting the LKA system operation may
have occurred. This could be an obstruction of
the camera view, or a fault in the system.
If an obstruction is detected, clean the area of
the windshield by the interior rearview mirror.
Although the vehicle can still be driven in
normal conditions, the system may not func -
tion properly.
When the conditions limiting the system are
corrected, it will go back to normal operation.
Should a fault persist, contact an authorized
dealer.
System Failure Signaling
If the system turns off and appears on the
display, it means that there is a system fault.
In this case, it is still possible to drive the
vehicle, but you are advised to contact an
authorized dealer as soon as possible. CAUTION!
Projecting loads on the roof of the vehicle
may interfere with the correct operation of
the camera. Before starting, make sure
the load is correctly positioned, in order
not to cover the camera operating range.
If the windshield must be replaced due to
scratches, chips or breakage, contact an
authorized dealer. Do not replace the
windshield on your own; there is risk of
malfunction. It is advisable to replace the
windshield if it is damaged in the area of
the camera.
Do not tamper with or operate on the
camera. Do not close the openings in the
aesthetic cover located under the interior
rearview mirror. In the event of a failure of
the camera, contact an authorized dealer
immediately.
Do not cover the operating range of the
camera with stickers or other objects. Also
pay attention to other objects on the hood
(e.g. a layer of snow) and make sure they
do not interfere with the camera.
The camera may have limited or absent
operation due to weather conditions such
as: heavy rain, hail, thick fog, heavy snow,
formation of ice layers on the windshield.
Camera operation may also be compro -
mised by the presence of dust, condensa -
tion, dirt or ice on the windshield, traffic
conditions (e.g. vehicles that are driving
not aligned with yours, vehicle driving in a
transverse or opposite way on the same
lane, bend with a small radius of curva -
ture), or road surface conditions and
driving conditions (e.g. off-road driving).
Make sure the windshield is always clean.
Use specific detergents and clean cloths
to avoid scratching the windshield. The
camera operation may also be limited or
absent in some driving, traffic and road
surface conditions.
CAUTION! (Continued)
21_GU_OM_EN_USC_t.book Page 131
Page 175 of 280
173
(Continued)
Supplemental Side Air Bag Inflatable Curtains
(SABICs)
This vehicle is equipped with Supplemental
Side Air Bag Inflatable Curtains (SABICs).
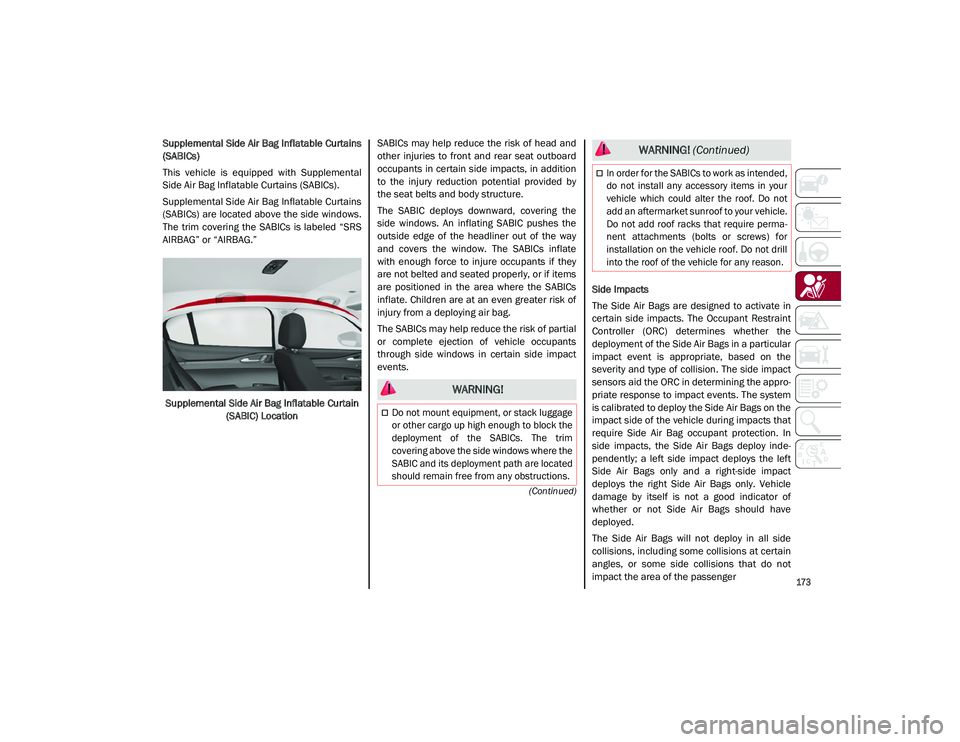
Supplemental Side Air Bag Inflatable Curtains
(SABICs) are located above the side windows.
The trim covering the SABICs is labeled “SRS
AIRBAG” or “AIRBAG.”Supplemental Side Air Bag Inflatable Curtain (SABIC) Location SABICs may help reduce the risk of head and
other injuries to front and rear seat outboard
occupants in certain side impacts, in addition
to the injury reduction potential provided by
the seat belts and body structure.
The SABIC deploys downward, covering the
side windows. An inflating SABIC pushes the
outside edge of the headliner out of the way
and covers the window. The SABICs inflate
with enough force to injure occupants if they
are not belted and seated properly, or if items
are positioned in the area where the SABICs
inflate. Children are at an even greater risk of
injury from a deploying air bag.
The SABICs may help reduce the risk of partial
or complete ejection of vehicle occupants
through side windows in certain side impact
events.
Side Impacts
The Side Air Bags are designed to activate in
certain side impacts. The Occupant Restraint
Controller (ORC) determines whether the
deployment of the Side Air Bags in a particular
impact event is appropriate, based on the
severity and type of collision. The side impact
sensors aid the ORC in determining the appro
-
priate response to impact events. The system
is calibrated to deploy the Side Air Bags on the
impact side of the vehicle during impacts that
require Side Air Bag occupant protection. In
side impacts, the Side Air Bags deploy inde -
pendently; a left side impact deploys the left
Side Air Bags only and a right-side impact
deploys the right Side Air Bags only. Vehicle
damage by itself is not a good indicator of
whether or not Side Air Bags should have
deployed.
The Side Air Bags will not deploy in all side
collisions, including some collisions at certain
angles, or some side collisions that do not
impact the area of the passenger
WARNING!
Do not mount equipment, or stack luggage
or other cargo up high enough to block the
deployment of the SABICs. The trim
covering above the side windows where the
SABIC and its deployment path are located
should remain free from any obstructions.
In order for the SABICs to work as intended,
do not install any accessory items in your
vehicle which could alter the roof. Do not
add an aftermarket sunroof to your vehicle.
Do not add roof racks that require perma -
nent attachments (bolts or screws) for
installation on the vehicle roof. Do not drill
into the roof of the vehicle for any reason.
WARNING! (Continued)
21_GU_OM_EN_USC_t.book Page 173
Page 261 of 280
259
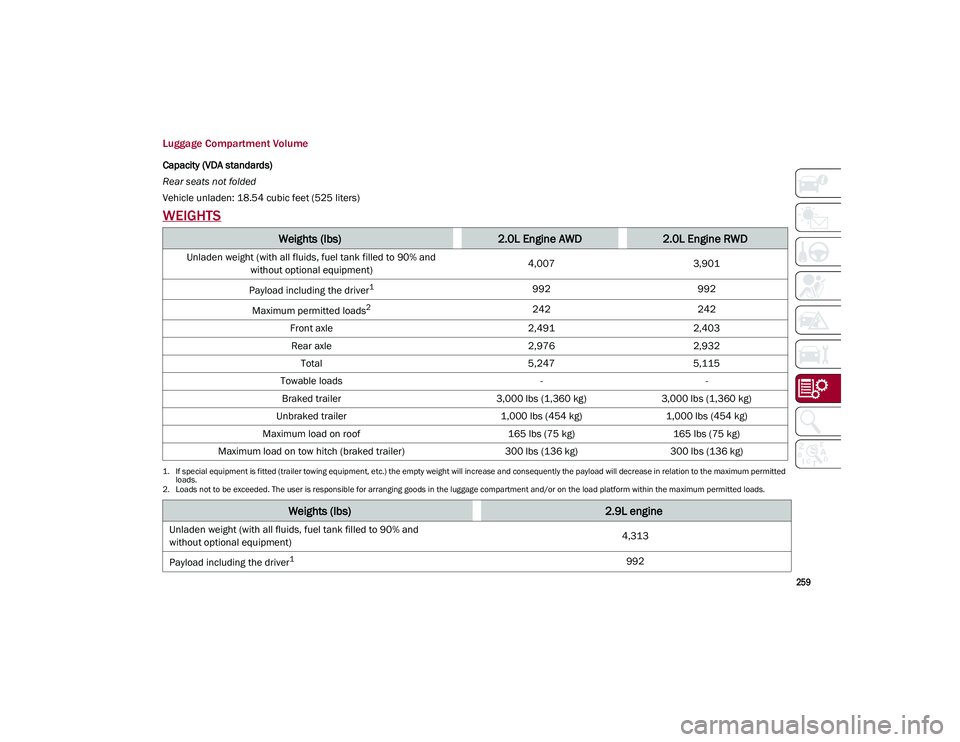
Luggage Compartment Volume
Capacity (VDA standards)
Rear seats not folded
Vehicle unladen: 18.54 cubic feet (525 liters)
WEIGHTS
Weights (lbs)2.0L Engine AWD2.0L Engine RWD
Unladen weight (with all fluids, fuel tank filled to 90% and without optional equipment) 4,007
3,901
Payload including the driver
1
1. If special equipment is fitted (trailer towing equipment, etc.) the empty weight will increase and consequently the payload will decrease in relation to the maximum permitted loads.
992 992
Maximum permitted loads
2
2. Loads not to be exceeded. The user is responsible for arranging goods in the luggage compartment and/or on the load platform within the maximum permitted loads.
242 242
Front axle 2,4912,403
Rear axle 2,9762,932
Total 5,2475,115
Towable loads --
Braked trailer 3,000 lbs (1,360 kg)3,000 lbs (1,360 kg)
Unbraked trailer 1,000 lbs (454 kg)1,000 lbs (454 kg)
Maximum load on roof 165 lbs (75 kg)165 lbs (75 kg)
Maximum load on tow hitch (braked trailer) 300 lbs (136 kg)300 lbs (136 kg)
Weights (lbs)2.9L engine
Unladen weight (with all fluids, fuel tank filled to 90% and
without optional equipment) 4,313
Payload including the driver
1992
21_GU_OM_EN_USC_t.book Page 259
Page 262 of 280
TECHNICAL SPECIFICATIONS
260
FUEL REQUIREMENTS
This engine is designed to meet all
emission regulations, and provide
satisfactory fuel economy and
performance when using
high-quality unleaded “Regular” gasoline
having a posted octane number of 87 as spec -
ified by the (R+M)/2 method. For optimal
performance the use of 91 or higher octane
“Premium” gasoline is recommended in these
engines.
While operating on gasoline with the required
octane number, hearing a light knocking
sound from the engine is not a cause for
concern. However, if the engine is heard
making a heavy knocking sound, see an
authorized dealer immediately. Use of gaso -
line with a lower than recommended octane
number can cause engine failure and may void
or not be covered by the New Vehicle Limited
Warranty. Poor quality gasoline can cause problems
such as hard starting, stalling, and hesitations.
If you experience these symptoms, try another
brand of gasoline before considering service
for the vehicle.
Reformulated Gasoline
Many areas of the country require the use of
cleaner burning gasoline referred to as “refor
-
mulated gasoline”. Reformulated gasoline
contains oxygenates and are specifically
blended to reduce vehicle emissions and
improve air quality.
The use of reformulated gasoline is recom -
mended. Properly blended reformulated gaso -
line will provide improved performance and
durability of engine and fuel system compo -
nents.
Gasoline/Oxygenate Blends
Some fuel suppliers blend unleaded gasoline
with oxygenates such as ethanol. Problems that result from using gasoline
containing more than 15% ethanol (E-15) or
gasoline containing methanol are not the
responsibility of the manufacturer and may
void or not be covered under New Vehicle
Limited Warranty.
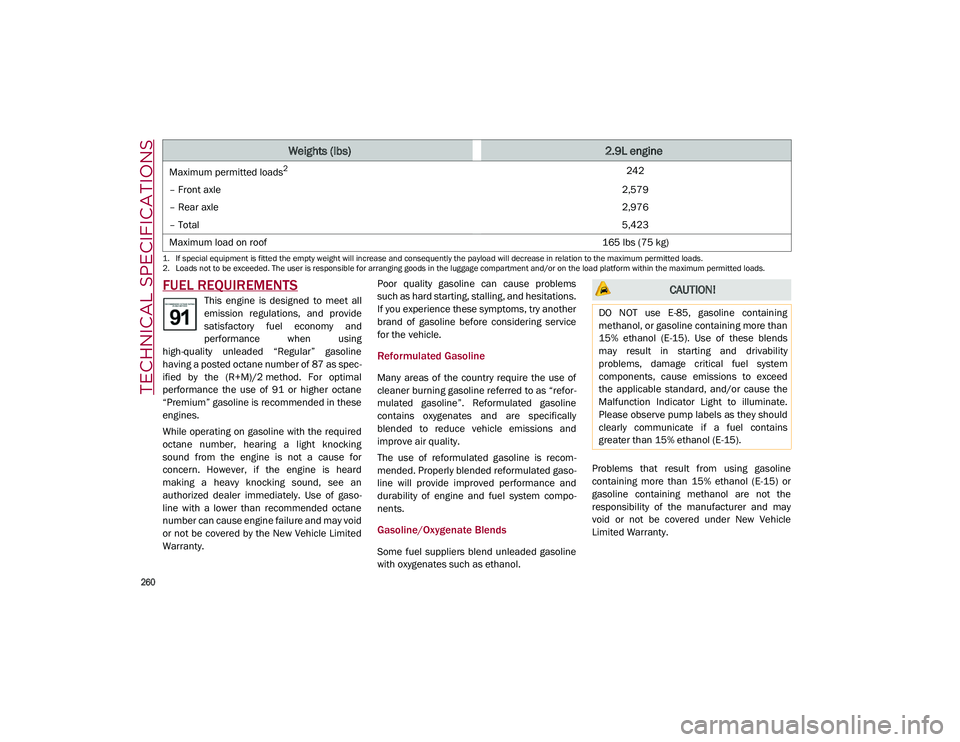
Maximum permitted loads
2242
– Front axle 2,579
– Rear axle 2,976
– Total 5,423
Maximum load on roof 165 lbs (75 kg)
1. If special equipment is fitted the empty weight will increase and consequently the payload will decrease in relation to the maximum permitted loads.
2. Loads not to be exceeded. The user is responsible for arranging goods in the luggage compartment and/or on the load platform within the maximum permitted loads.
Weights (lbs)2.9L engine
CAUTION!
DO NOT use E-85, gasoline containing
methanol, or gasoline containing more than
15% ethanol (E-15). Use of these blends
may result in starting and drivability
problems, damage critical fuel system
components, cause emissions to exceed
the applicable standard, and/or cause the
Malfunction Indicator Light to illuminate.
Please observe pump labels as they should
clearly communicate if a fuel contains
greater than 15% ethanol (E-15).
21_GU_OM_EN_USC_t.book Page 260