wheel ALFA ROMEO STELVIO 2022 User Guide
[x] Cancel search | Manufacturer: ALFA ROMEO, Model Year: 2022, Model line: STELVIO, Model: ALFA ROMEO STELVIO 2022Pages: 256, PDF Size: 10.17 MB
Page 46 of 256
GETTING TO KNOW YOUR VEHICLE
44
REAR FOG LIGHTS
The rear fog light switch is located within the
headlight switch.
Push the button, located in the center of the
headlight switch, to turn the rear fog lights on/off.
The rear fog lights turn on only when the
headlights or parking lights are also turned on.
The lights can be turned off by pushing the
button again or by turning the headlight switch to
the O (off) position.
When the engine is stopped with the rear fog
lights on, they will be off the next time the engine
is started.
ADAPTIVE HEADLIGHT SYSTEM —
I
F EQUIPPED
This is a system combined with Xenon headlights
(Bi-Xenon 35 W headlamp, if equipped) which
directs the headlights horizontally, and contin -
uously and automatically adapts them to the driving
conditions around bends or when cornering.
The system directs the headlights to light up the
road in the best way, taking into account the
speed of the vehicle and the bend or corner
angle, as well as the speed at which the steering
wheel is turned.
The adaptive lights are automatically activated
when the vehicle is started.
TURN SIGNALS
Move the multifunction lever up or down to activate
the turn signals. The arrows on each side of the
instrument cluster flash to show proper operation.
The or turn signal will blink on the
instrument panel.
LANE CHANGE ASSIST
Lightly push the lever up or down once, without
moving beyond the detent, and the turn signal will
flash five times then automatically turn off.
To turn off the flashing before the end of the
cycle, move the lever in the opposite direction
until the first click (about half way).
INTERIOR LIGHTS
Courtesy lights are turned on when the front
doors are opened or when the dimmer control is
rotated to its farthest upward position. The glove
compartment light turns on automatically when
the glove compartment is opened and turn off
when it is closed. The door courtesy lights
illuminate when one of the front doors is opened,
and turn off when it is closed. The liftgate
courtesy lights turn on automatically when the
liftgate is opened and turn off when it is closed.
All of these lights turn on and off regardless of the
ignition status.
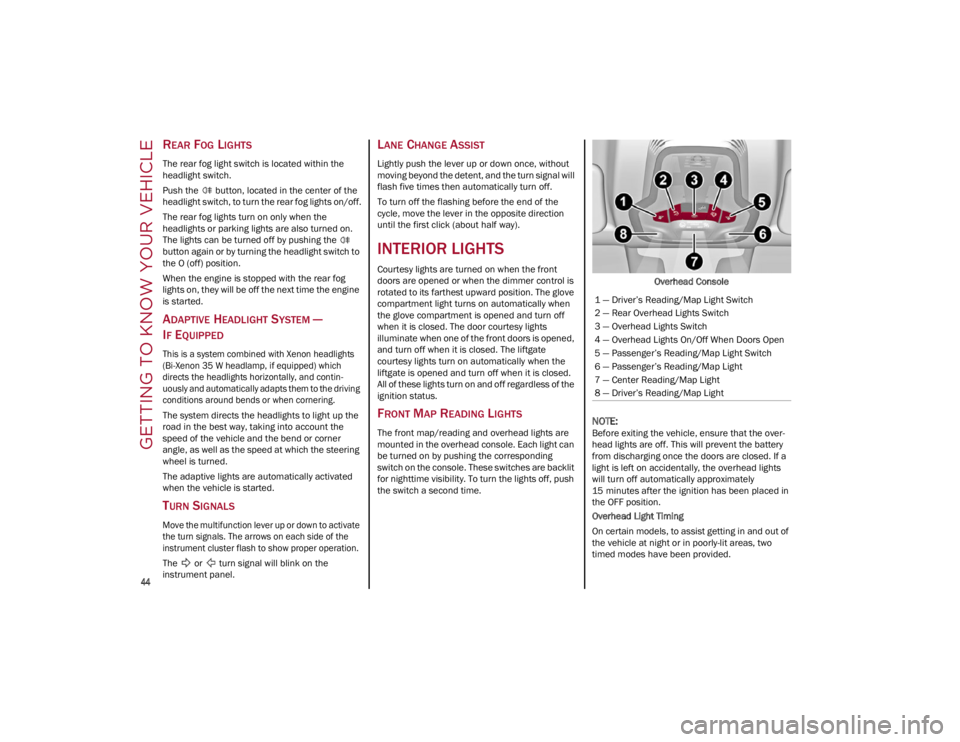
FRONT MAP READING LIGHTS
The front map/reading and overhead lights are
mounted in the overhead console. Each light can
be turned on by pushing the corresponding
switch on the console. These switches are backlit
for nighttime visibility. To turn the lights off, push
the switch a second time. Overhead Console
NOTE:
Before exiting the vehicle, ensure that the over
-
head lights are off. This will prevent the battery
from discharging once the doors are closed. If a
light is left on accidentally, the overhead lights
will turn off automatically approximately
15 minutes after the ignition has been placed in
the OFF position.
Overhead Light Timing
On certain models, to assist getting in and out of
the vehicle at night or in poorly-lit areas, two
timed modes have been provided.
1 — Driver’s Reading/Map Light Switch
2 — Rear Overhead Lights Switch
3 — Overhead Lights Switch
4 — Overhead Lights On/Off When Doors Open
5 — Passenger’s Reading/Map Light Switch
6 — Passenger’s Reading/Map Light
7 — Center Reading/Map Light
8 — Driver’s Reading/Map Light
22_GU_OM_EN_USC_t.book Page 44
Page 48 of 256
GETTING TO KNOW YOUR VEHICLE
46
WINDSHIELD WIPERS AND
WASHERS
The windshield wiper stalk is located on the right
side of the steering wheel.
The windshield wipers will only operate with the
ignition is placed in the ACC or ON/RUN position.
WINDSHIELD WIPER OPERATION
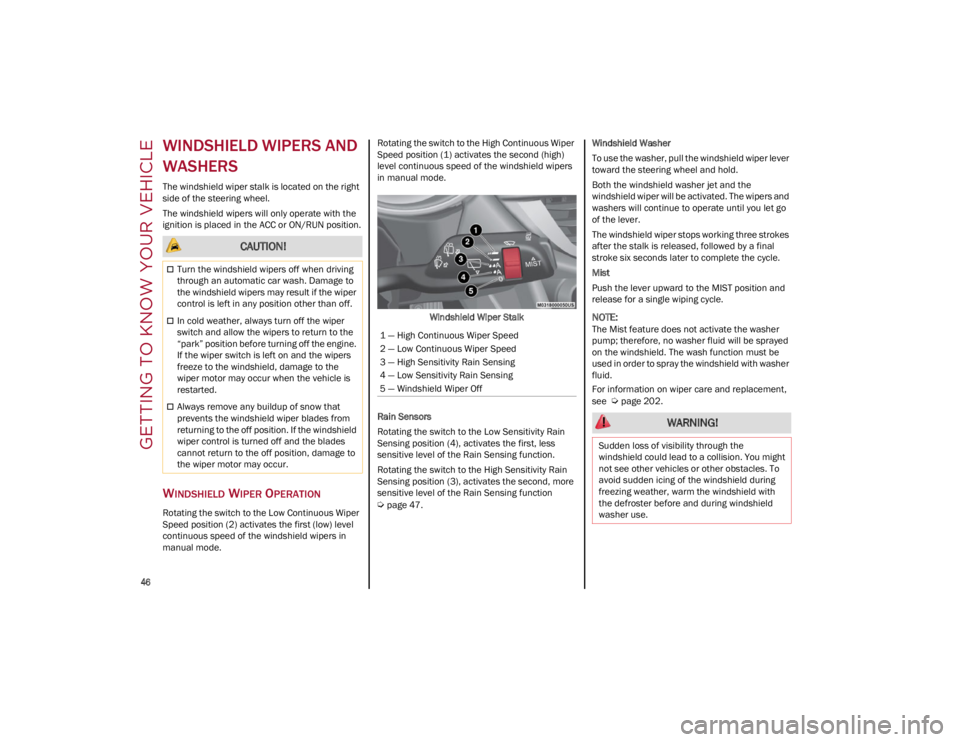
Rotating the switch to the Low Continuous Wiper
Speed position (2) activates the first (low) level
continuous speed of the windshield wipers in
manual mode.Rotating the switch to the High Continuous Wiper
Speed position (1) activates the second (high)
level continuous speed of the windshield wipers
in manual mode.
Windshield Wiper Stalk
Rain Sensors
Rotating the switch to the Low Sensitivity Rain
Sensing position (4), activates the first, less
sensitive level of the Rain Sensing function.
Rotating the switch to the High Sensitivity Rain
Sensing position (3), activates the second, more
sensitive level of the Rain Sensing function
Ú
page 47. Windshield Washer
To use the washer, pull the windshield wiper lever
toward the steering wheel and hold.
Both the windshield washer jet and the
windshield wiper will be activated. The wipers and
washers will continue to operate until you let go
of the lever.
The windshield wiper stops working three strokes
after the stalk is released, followed by a final
stroke six seconds later to complete the cycle.
Mist
Push the lever upward to the MIST position and
release for a single wiping cycle.
NOTE:
The Mist feature does not activate the washer
pump; therefore, no washer fluid will be sprayed
on the windshield. The wash function must be
used in order to spray the windshield with washer
fluid.
For information on wiper care and replacement,
see
Ú
page 202.
CAUTION!
Turn the windshield wipers off when driving
through an automatic car wash. Damage to
the windshield wipers may result if the wiper
control is left in any position other than off.
In cold weather, always turn off the wiper
switch and allow the wipers to return to the
“park” position before turning off the engine.
If the wiper switch is left on and the wipers
freeze to the windshield, damage to the
wiper motor may occur when the vehicle is
restarted.
Always remove any buildup of snow that
prevents the windshield wiper blades from
returning to the off position. If the windshield
wiper control is turned off and the blades
cannot return to the off position, damage to
the wiper motor may occur.
1 — High Continuous Wiper Speed
2 — Low Continuous Wiper Speed
3 — High Sensitivity Rain Sensing
4 — Low Sensitivity Rain Sensing
5 — Windshield Wiper Off
WARNING!
Sudden loss of visibility through the
windshield could lead to a collision. You might
not see other vehicles or other obstacles. To
avoid sudden icing of the windshield during
freezing weather, warm the windshield with
the defroster before and during windshield
washer use.
22_GU_OM_EN_USC_t.book Page 46
Page 50 of 256

GETTING TO KNOW YOUR VEHICLE
48
CLIMATE CONTROLS
The Climate Control system allows you to regulate the temperature, air flow, and direction of air circulating throughout the vehicle. The controls are located
on the touchscreen and on the instrument panel below the radio.
AUTOMATIC DUAL-ZONE CLIMATE CONTROL SYSTEM
Automatic Climate Control System
1 — Driver Temperature Adjustment Knob9 — Passenger Temperature Adjustment Knob
2 — Driver Side AUTO Button (Automatic Operation) 10 — SYNC Button (Set Temperature Alignment) Driver/Passenger Side
3 — Driver Side Air Distribution Selection Button 11 — Passenger Heated Seat Button — If Equipped
4 — Max Defrost Button 12 — Air Conditioning Button
5 — Blower Speed Adjustment Knob 13 — Steering Wheel Heater Button — If Equipped
6 — Rear Defrost Button 14 — Driver Heated Seat Button — If Equipped
7 — Passenger Side Air Distribution Selection Button 15 — Air Recirculation Button
8 — Passenger Side AUTO Button (Automatic Operation)
22_GU_OM_EN_USC_t.book Page 48
Page 54 of 256
GETTING TO KNOW YOUR VEHICLE
52
SYNC Button
Push the SYNC button (indicator illuminated) to
sync the passenger side air temperature with the
driver side air temperature.
This function makes temperature regulation
easier when the driver is traveling alone.
Turn the passenger Temperature Adjustment
Knob or push the passenger side Air Distribution
Selection Button to change the passenger side
air temperature and return to separate air
temperature management.
Blower Speed
Turn the Blower Speed Knob to increase or
decrease the blower speed. The speed is
displayed with lighted indicators in the radio
system display.
Maximum fan speed = all indicators
illuminated on the radio system display
Minimum fan speed = one indicator
illuminated on the radio system display
The fan can be turned off by rotating the Blower
Speed Knob counterclockwise to the off position
(all segments on the radio system display are
turned off).
NOTE:
To restore automatic control of the fan speed,
push the AUTO button.
Air Distribution Selection
Push the Air Distribution Selection button on the
faceplate to change the mode of air distribution.
NOTE:
In AUTO mode, the Climate Controls automati -
cally manage the air distribution. When set manu -
ally, the respective symbols on the radio system
indicate the air distribution setting.
Panel Mode
Air comes from the outlets in the
instrument panel to ventilate the chest
and face. Each of these outlets can be
individually adjusted to direct the flow of
air. The air vanes of the center outlets and
outboard outlets can be moved up and down or
side to side to regulate airflow direction. There is
a shut-off wheel located below the air vanes to
shut off or adjust the amount of airflow from
these outlets.
Bi-Level Mode
Air comes from the instrument panel
outlets and floor outlets. A slight amount
of air is directed through the defrost and
side window demister outlets.
NOTE:
Bi-Level mode is designed under comfort condi -
tions to provide cooler air out of the panel outlets
and warmer air from the floor outlets.
Floor Mode
Air comes from the floor outlets. A slight
amount of air is directed through the
defrost and side window demister
outlets. This setting heats the
passenger compartment the quickest. Mix Mode
Air is directed through the floor, defrost,
and side window demister outlets. This
setting works best in cold or snowy
conditions that require extra heat to the
windshield. This setting is good for maintaining
comfort while reducing moisture on the
windshield.
Front Defrost And Panel Mode
Air flow is distributed between the
windshield demisting/defrosting vents
and side/central dashboard vents. This
setting allows air to flow to the
windshield on sunny days.
Front Defrost And Bi-Level Mode
Air flow is distributed to all vents.
Switching The Climate Control System On/Off
To Turn Off The Climate Control System
Rotate the Air Speed Adjustment Knob
completely counterclockwise to turn off the
Climate Control system.
With the air conditioner is off:
Air recirculation is on
The A/C compressor is off
The fan is off
The heated rear window can be activated/
deactivated
NOTE:
The Climate Control system stores the previously
set temperatures and resumes operation when
any button on the system is pushed.
22_GU_OM_EN_USC_t.book Page 52
Page 73 of 256
71
(Continued)
If the light remains on when the parking brake has
been disengaged, and the fluid level is at the full
mark on the master cylinder reservoir, it indicates
a possible brake hydraulic system malfunction or
that a problem with the Brake Booster has been
detected by the Anti-Lock Brake System (ABS) /
Electronic Stability Control (ESC) system. In this
case, the light will remain on until the condition
has been corrected. If the problem is related to the
brake booster, the ABS pump will run when
applying the brake, and a brake pedal pulsation
may be felt during each stop.
The dual brake system provides a reserve braking
capacity in the event of a failure to a portion of the
hydraulic system. A leak in either half of the dual
brake system is indicated by the Brake Warning
Light, which will turn on when the brake fluid level
in the master cylinder has dropped below a
specified level.
The light will remain on until the cause is corrected.
NOTE:
The light may flash momentarily during sharp
cornering maneuvers, which change fluid level
conditions. The vehicle should have service
performed, and the brake fluid level checked.
If brake failure is indicated, immediate repair is
necessary.
Vehicles equipped with the Anti-Lock Brake
System (ABS) are also equipped with Electronic
Brake Force Distribution (EBD). In the event of an
EBD failure, the Brake Warning Light will turn on
along with the ABS Light. Immediate repair to the
ABS system is required.
Operation of the Brake Warning Light can be
checked by turning the ignition switch from the
OFF position to the ON/RUN position. The light
should illuminate for approximately two seconds.
The light should then turn off unless the parking
brake is applied or a brake fault is detected. If the
light does not illuminate, have the light inspected
by an authorized dealer.
The light also will turn on when the parking brake
is applied with the ignition switch in the ON/RUN
position.
NOTE:
This light shows only that the parking brake is
applied. It does not show the degree of brake
application.
Electronic Brake Force Distribution (EBD)
Failure
The simultaneous turning on of the
BRAKE (red) and (amber) warning
lights with the engine on indicates either
a failure of the EBD system or that the
system is not available. In this case, the rear
wheels may suddenly lock and the vehicle may
swerve when braking abruptly.
Drive very carefully to the nearest authorized
dealer to have the system inspected immediately.
Oil Temperature Warning Light
This telltale indicates engine oil
temperature is high.
Stop the vehicle and shut off the engine as soon
as possible. If the problem persists, contact an
authorized dealer.
Seat Belt Reminder Warning Light
When the ignition is first placed in the
ON/RUN position, if the driver’s seat
belt is unbuckled, a chime will sound
and the light will turn on. When driving,
if the driver or front passenger seat belt remains
unbuckled, the Seat Belt Reminder Light will flash
or remain on continuously and a chime will sound
Ú
page 151. WARNING!
The fault of the warning light is signaled by the
turning on of the icon on the instrument panel.
In this case, the warning light may not indicate
any faults with the restraint systems. Before
proceeding, contact an authorized dealer to
have the system checked immediately.
If the warning light does not turn on when the
ignition device is moved to ON or if it stays on
when driving (together with the message on the
display), there might be a fault in the restraint
systems; in this case, the air bags or preten -
sioners may not deploy in the event of an
accident or, in a lower number of cases, they
could deploy erroneously. Before proceeding,
contact an authorized dealer to have the
system checked immediately.
WARNING!
22_GU_OM_EN_USC_t.book Page 71
Page 75 of 256
73
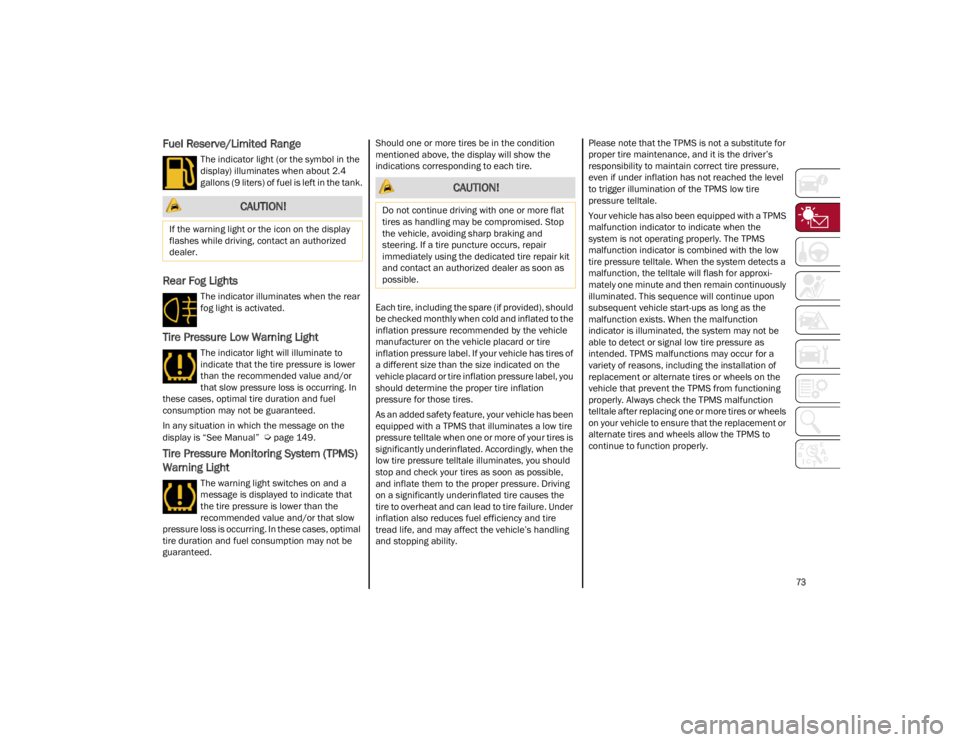
Fuel Reserve/Limited Range
The indicator light (or the symbol in the
display) illuminates when about 2.4
gallons (9 liters) of fuel is left in the tank.
Rear Fog Lights
The indicator illuminates when the rear
fog light is activated.
Tire Pressure Low Warning Light
The indicator light will illuminate to
indicate that the tire pressure is lower
than the recommended value and/or
that slow pressure loss is occurring. In
these cases, optimal tire duration and fuel
consumption may not be guaranteed.
In any situation in which the message on the
display is “See Manual”
Ú
page 149.
Tire Pressure Monitoring System (TPMS)
Warning Light
The warning light switches on and a
message is displayed to indicate that
the tire pressure is lower than the
recommended value and/or that slow
pressure loss is occurring. In these cases, optimal
tire duration and fuel consumption may not be
guaranteed. Should one or more tires be in the condition
mentioned above, the display will show the
indications corresponding to each tire.
Each tire, including the spare (if provided), should
be checked monthly when cold and inflated to the
inflation pressure recommended by the vehicle
manufacturer on the vehicle placard or tire
inflation pressure label. If your vehicle has tires of
a different size than the size indicated on the
vehicle placard or tire inflation pressure label, you
should determine the proper tire inflation
pressure for those tires.
As an added safety feature, your vehicle has been
equipped with a TPMS that illuminates a low tire
pressure telltale when one or more of your tires is
significantly underinflated. Accordingly, when the
low tire pressure telltale illuminates, you should
stop and check your tires as soon as possible,
and inflate them to the proper pressure. Driving
on a significantly underinflated tire causes the
tire to overheat and can lead to tire failure. Under
inflation also reduces fuel efficiency and tire
tread life, and may affect the vehicle’s handling
and stopping ability.
Please note that the TPMS is not a substitute for
proper tire maintenance, and it is the driver’s
responsibility to maintain correct tire pressure,
even if under inflation has not reached the level
to trigger illumination of the TPMS low tire
pressure telltale.
Your vehicle has also been equipped with a TPMS
malfunction indicator to indicate when the
system is not operating properly. The TPMS
malfunction indicator is combined with the low
tire pressure telltale. When the system detects a
malfunction, the telltale will flash for approxi
-
mately one minute and then remain continuously
illuminated. This sequence will continue upon
subsequent vehicle start-ups as long as the
malfunction exists. When the malfunction
indicator is illuminated, the system may not be
able to detect or signal low tire pressure as
intended. TPMS malfunctions may occur for a
variety of reasons, including the installation of
replacement or alternate tires or wheels on the
vehicle that prevent the TPMS from functioning
properly. Always check the TPMS malfunction
telltale after replacing one or more tires or wheels
on your vehicle to ensure that the replacement or
alternate tires and wheels allow the TPMS to
continue to function properly.
CAUTION!
If the warning light or the icon on the display
flashes while driving, contact an authorized
dealer.
CAUTION!
Do not continue driving with one or more flat
tires as handling may be compromised. Stop
the vehicle, avoiding sharp braking and
steering. If a tire puncture occurs, repair
immediately using the dedicated tire repair kit
and contact an authorized dealer as soon as
possible.
22_GU_OM_EN_USC_t.book Page 73
Page 76 of 256
GETTING TO KNOW YOUR INSTRUMENT PANEL
74
GREEN INDICATOR LIGHTS
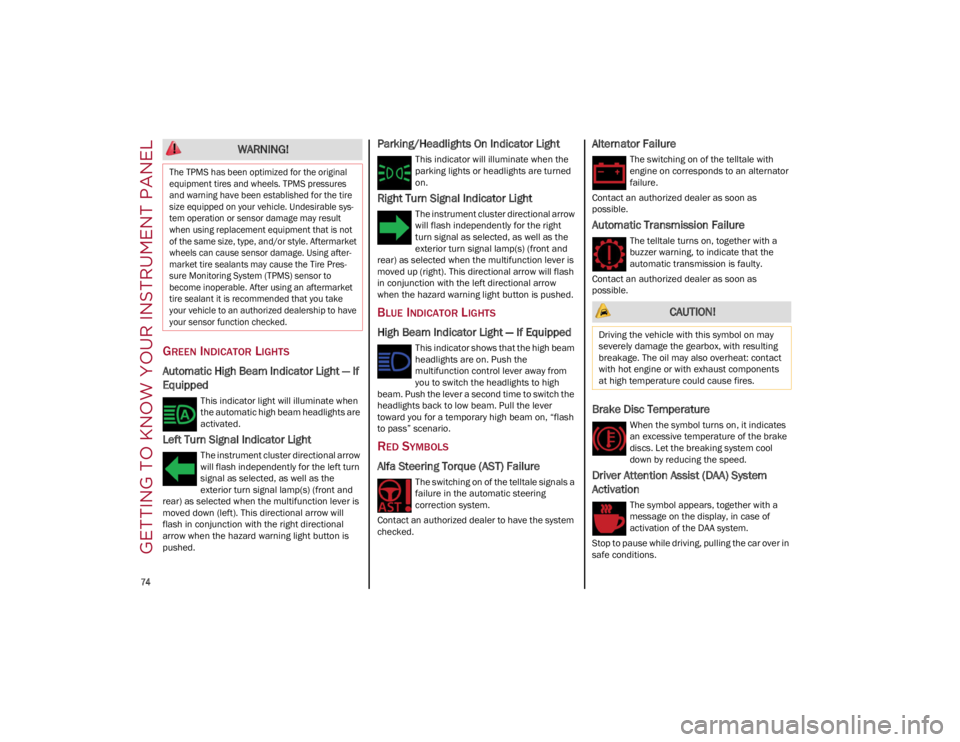
Automatic High Beam Indicator Light — If
Equipped
This indicator light will illuminate when
the automatic high beam headlights are
activated.
Left Turn Signal Indicator Light
The instrument cluster directional arrow
will flash independently for the left turn
signal as selected, as well as the
exterior turn signal lamp(s) (front and
rear) as selected when the multifunction lever is
moved down (left). This directional arrow will
flash in conjunction with the right directional
arrow when the hazard warning light button is
pushed.
Parking/Headlights On Indicator Light
This indicator will illuminate when the
parking lights or headlights are turned
on.
Right Turn Signal Indicator Light
The instrument cluster directional arrow
will flash independently for the right
turn signal as selected, as well as the
exterior turn signal lamp(s) (front and
rear) as selected when the multifunction lever is
moved up (right). This directional arrow will flash
in conjunction with the left directional arrow
when the hazard warning light button is pushed.
BLUE INDICATOR LIGHTS
High Beam Indicator Light — If Equipped
This indicator shows that the high beam
headlights are on. Push the
multifunction control lever away from
you to switch the headlights to high
beam. Push the lever a second time to switch the
headlights back to low beam. Pull the lever
toward you for a temporary high beam on, “flash
to pass” scenario.
RED SYMBOLS
Alfa Steering Torque (AST) Failure
The switching on of the telltale signals a
failure in the automatic steering
correction system.
Contact an authorized dealer to have the system
checked.
Alternator Failure
The switching on of the telltale with
engine on corresponds to an alternator
failure.
Contact an authorized dealer as soon as
possible.
Automatic Transmission Failure
The telltale turns on, together with a
buzzer warning, to indicate that the
automatic transmission is faulty.
Contact an authorized dealer as soon as
possible.
Brake Disc Temperature
When the symbol turns on, it indicates
an excessive temperature of the brake
discs. Let the breaking system cool
down by reducing the speed.
Driver Attention Assist (DAA) System
Activation
The symbol appears, together with a
message on the display, in case of
activation of the DAA system.
Stop to pause while driving, pulling the car over in
safe conditions.
WARNING!
The TPMS has been optimized for the original
equipment tires and wheels. TPMS pressures
and warning have been established for the tire
size equipped on your vehicle. Undesirable sys -
tem operation or sensor damage may result
when using replacement equipment that is not
of the same size, type, and/or style. Aftermarket
wheels can cause sensor damage. Using after -
market tire sealants may cause the Tire Pres -
sure Monitoring System (TPMS) sensor to
become inoperable. After using an aftermarket
tire sealant it is recommended that you take
your vehicle to an authorized dealership to have
your sensor function checked.
CAUTION!
Driving the vehicle with this symbol on may
severely damage the gearbox, with resulting
breakage. The oil may also overheat: contact
with hot engine or with exhaust components
at high temperature could cause fires.
22_GU_OM_EN_USC_t.book Page 74
Page 77 of 256
75
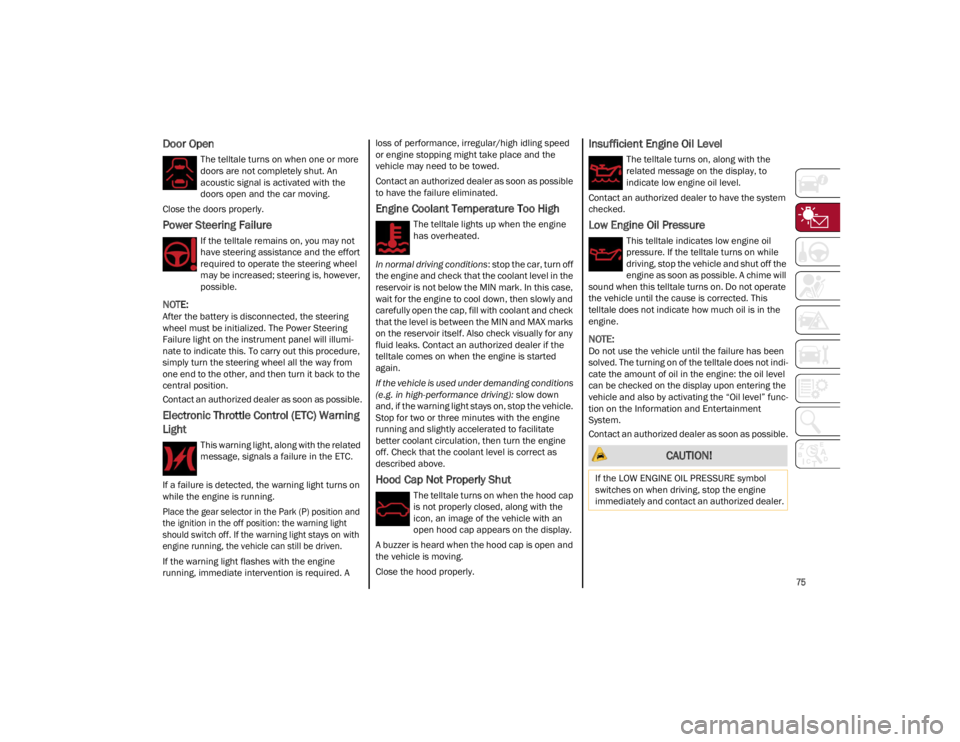
Door Open
The telltale turns on when one or more
doors are not completely shut. An
acoustic signal is activated with the
doors open and the car moving.
Close the doors properly.
Power Steering Failure
If the telltale remains on, you may not
have steering assistance and the effort
required to operate the steering wheel
may be increased; steering is, however,
possible.
NOTE:
After the battery is disconnected, the steering
wheel must be initialized. The Power Steering
Failure light on the instrument panel will illumi -
nate to indicate this. To carry out this procedure,
simply turn the steering wheel all the way from
one end to the other, and then turn it back to the
central position.
Contact an authorized dealer as soon as possible.
Electronic Throttle Control (ETC) Warning
Light
This warning light, along with the related
message, signals a failure in the ETC.
If a failure is detected, the warning light turns on
while the engine is running.
Place the gear selector in the Park (P) position and
the ignition in the off position: the warning light
should switch off. If the warning light stays on with
engine running, the vehicle can still be driven.
If the warning light flashes with the engine
running, immediate intervention is required. A loss of performance, irregular/high idling speed
or engine stopping might take place and the
vehicle may need to be towed.
Contact an authorized dealer as soon as possible
to have the failure eliminated.
Engine Coolant Temperature Too High
The telltale lights up when the engine
has overheated.
In normal driving conditions : stop the car, turn off
the engine and check that the coolant level in the
reservoir is not below the MIN mark. In this case,
wait for the engine to cool down, then slowly and
carefully open the cap, fill with coolant and check
that the level is between the MIN and MAX marks
on the reservoir itself. Also check visually for any
fluid leaks. Contact an authorized dealer if the
telltale comes on when the engine is started
again.
If the vehicle is used under demanding conditions
(e.g. in high-performance driving): slow down
and, if the warning light stays on, stop the vehicle.
Stop for two or three minutes with the engine
running and slightly accelerated to facilitate
better coolant circulation, then turn the engine
off. Check that the coolant level is correct as
described above.
Hood Cap Not Properly Shut
The telltale turns on when the hood cap
is not properly closed, along with the
icon, an image of the vehicle with an
open hood cap appears on the display.
A buzzer is heard when the hood cap is open and
the vehicle is moving.
Close the hood properly.
Insufficient Engine Oil Level
The telltale turns on, along with the
related message on the display, to
indicate low engine oil level.
Contact an authorized dealer to have the system
checked.
Low Engine Oil Pressure
This telltale indicates low engine oil
pressure. If the telltale turns on while
driving, stop the vehicle and shut off the
engine as soon as possible. A chime will
sound when this telltale turns on. Do not operate
the vehicle until the cause is corrected. This
telltale does not indicate how much oil is in the
engine.
NOTE:
Do not use the vehicle until the failure has been
solved. The turning on of the telltale does not indi -
cate the amount of oil in the engine: the oil level
can be checked on the display upon entering the
vehicle and also by activating the “Oil level” func -
tion on the Information and Entertainment
System.
Contact an authorized dealer as soon as possible.
CAUTION!
If the LOW ENGINE OIL PRESSURE symbol
switches on when driving, stop the engine
immediately and contact an authorized dealer.
22_GU_OM_EN_USC_t.book Page 75
Page 78 of 256
GETTING TO KNOW YOUR INSTRUMENT PANEL
76
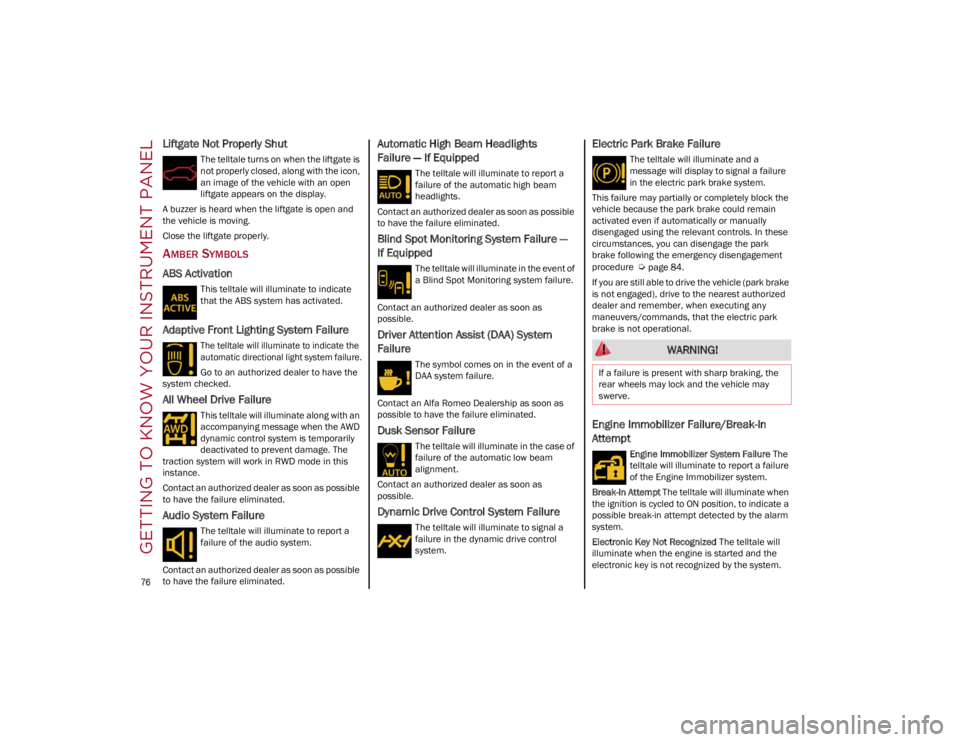
Liftgate Not Properly Shut
The telltale turns on when the liftgate is
not properly closed, along with the icon,
an image of the vehicle with an open
liftgate appears on the display.
A buzzer is heard when the liftgate is open and
the vehicle is moving.
Close the liftgate properly.
AMBER SYMBOLS
ABS Activation
This telltale will illuminate to indicate
that the ABS system has activated.
Adaptive Front Lighting System Failure
The telltale will illuminate to indicate the
automatic directional light system failure.
Go to an authorized dealer to have the
system checked.
All Wheel Drive Failure
This telltale will illuminate along with an
accompanying message when the AWD
dynamic control system is temporarily
deactivated to prevent damage. The
traction system will work in RWD mode in this
instance.
Contact an authorized dealer as soon as possible
to have the failure eliminated.
Audio System Failure
The telltale will illuminate to report a
failure of the audio system.
Contact an authorized dealer as soon as possible
to have the failure eliminated.
Automatic High Beam Headlights
Failure — If Equipped
The telltale will illuminate to report a
failure of the automatic high beam
headlights.
Contact an authorized dealer as soon as possible
to have the failure eliminated.
Blind Spot Monitoring System Failure —
If Equipped
The telltale will illuminate in the event of
a Blind Spot Monitoring system failure.
Contact an authorized dealer as soon as
possible.
Driver Attention Assist (DAA) System
Failure
The symbol comes on in the event of a
DAA system failure.
Contact an Alfa Romeo Dealership as soon as
possible to have the failure eliminated.
Dusk Sensor Failure
The telltale will illuminate in the case of
failure of the automatic low beam
alignment.
Contact an authorized dealer as soon as
possible.
Dynamic Drive Control System Failure
The telltale will illuminate to signal a
failure in the dynamic drive control
system.
Electric Park Brake Failure
The telltale will illuminate and a
message will display to signal a failure
in the electric park brake system.
This failure may partially or completely block the
vehicle because the park brake could remain
activated even if automatically or manually
disengaged using the relevant controls. In these
circumstances, you can disengage the park
brake following the emergency disengagement
procedure
Ú
page 84.
If you are still able to drive the vehicle (park brake
is not engaged), drive to the nearest authorized
dealer and remember, when executing any
maneuvers/commands, that the electric park
brake is not operational.
Engine Immobilizer Failure/Break-In
Attempt
Engine Immobilizer System Failure The
telltale will illuminate to report a failure
of the Engine Immobilizer system.
Break-In Attempt The telltale will illuminate when
the ignition is cycled to ON position, to indicate a
possible break-in attempt detected by the alarm
system.
Electronic Key Not Recognized The telltale will
illuminate when the engine is started and the
electronic key is not recognized by the system.
WARNING!
If a failure is present with sharp braking, the
rear wheels may lock and the vehicle may
swerve.
22_GU_OM_EN_USC_t.book Page 76
Page 80 of 256
GETTING TO KNOW YOUR INSTRUMENT PANEL
78
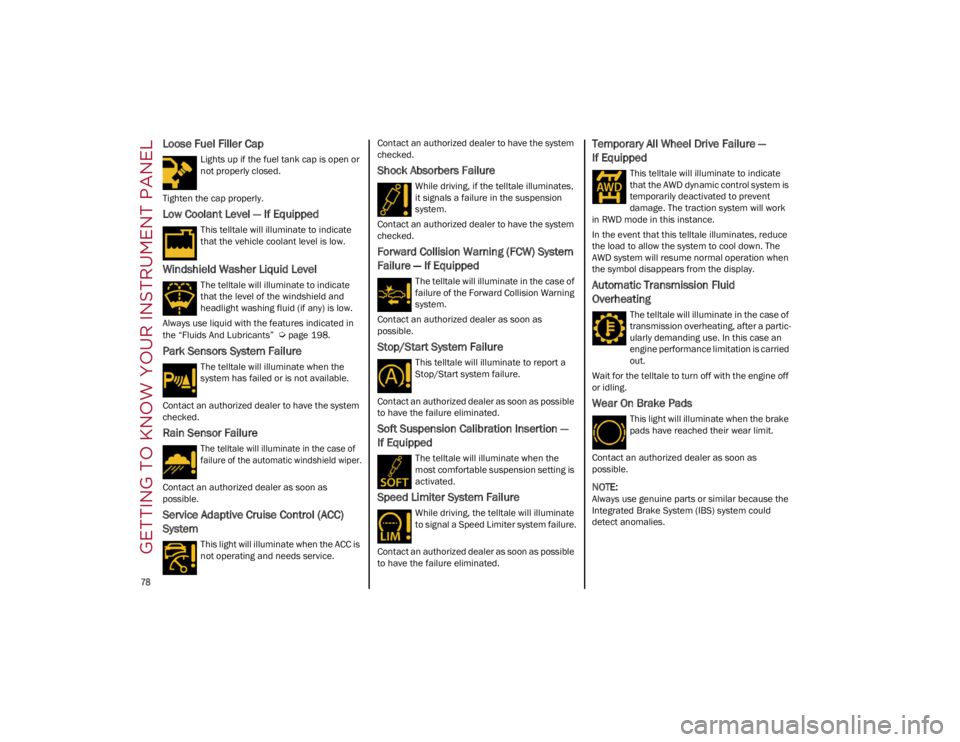
Loose Fuel Filler Cap
Lights up if the fuel tank cap is open or
not properly closed.
Tighten the cap properly.
Low Coolant Level — If Equipped
This telltale will illuminate to indicate
that the vehicle coolant level is low.
Windshield Washer Liquid Level
The telltale will illuminate to indicate
that the level of the windshield and
headlight washing fluid (if any) is low.
Always use liquid with the features indicated in
the “Fluids And Lubricants”
Ú
page 198.
Park Sensors System Failure
The telltale will illuminate when the
system has failed or is not available.
Contact an authorized dealer to have the system
checked.
Rain Sensor Failure
The telltale will illuminate in the case of
failure of the automatic windshield wiper.
Contact an authorized dealer as soon as
possible.
Service Adaptive Cruise Control (ACC)
System
This light will illuminate when the ACC is
not operating and needs service. Contact an authorized dealer to have the system
checked.
Shock Absorbers Failure
While driving, if the telltale illuminates,
it signals a failure in the suspension
system.
Contact an authorized dealer to have the system
checked.
Forward Collision Warning (FCW) System
Failure — If Equipped
The telltale will illuminate in the case of
failure of the Forward Collision Warning
system.
Contact an authorized dealer as soon as
possible.
Stop/Start System Failure
This telltale will illuminate to report a
Stop/Start system failure.
Contact an authorized dealer as soon as possible
to have the failure eliminated.
Soft Suspension Calibration Insertion —
If Equipped
The telltale will illuminate when the
most comfortable suspension setting is
activated.
Speed Limiter System Failure
While driving, the telltale will illuminate
to signal a Speed Limiter system failure.
Contact an authorized dealer as soon as possible
to have the failure eliminated.
Temporary All Wheel Drive Failure —
If Equipped
This telltale will illuminate to indicate
that the AWD dynamic control system is
temporarily deactivated to prevent
damage. The traction system will work
in RWD mode in this instance.
In the event that this telltale illuminates, reduce
the load to allow the system to cool down. The
AWD system will resume normal operation when
the symbol disappears from the display.
Automatic Transmission Fluid
Overheating
The telltale will illuminate in the case of
transmission overheating, after a partic -
ularly demanding use. In this case an
engine performance limitation is carried
out.
Wait for the telltale to turn off with the engine off
or idling.
Wear On Brake Pads
This light will illuminate when the brake
pads have reached their wear limit.
Contact an authorized dealer as soon as
possible.
NOTE:
Always use genuine parts or similar because the
Integrated Brake System (IBS) system could
detect anomalies.
22_GU_OM_EN_USC_t.book Page 78