oil level ALFA ROMEO STELVIO 2022 Owners Manual
[x] Cancel search | Manufacturer: ALFA ROMEO, Model Year: 2022, Model line: STELVIO, Model: ALFA ROMEO STELVIO 2022Pages: 256, PDF Size: 10.17 MB
Page 14 of 256
12
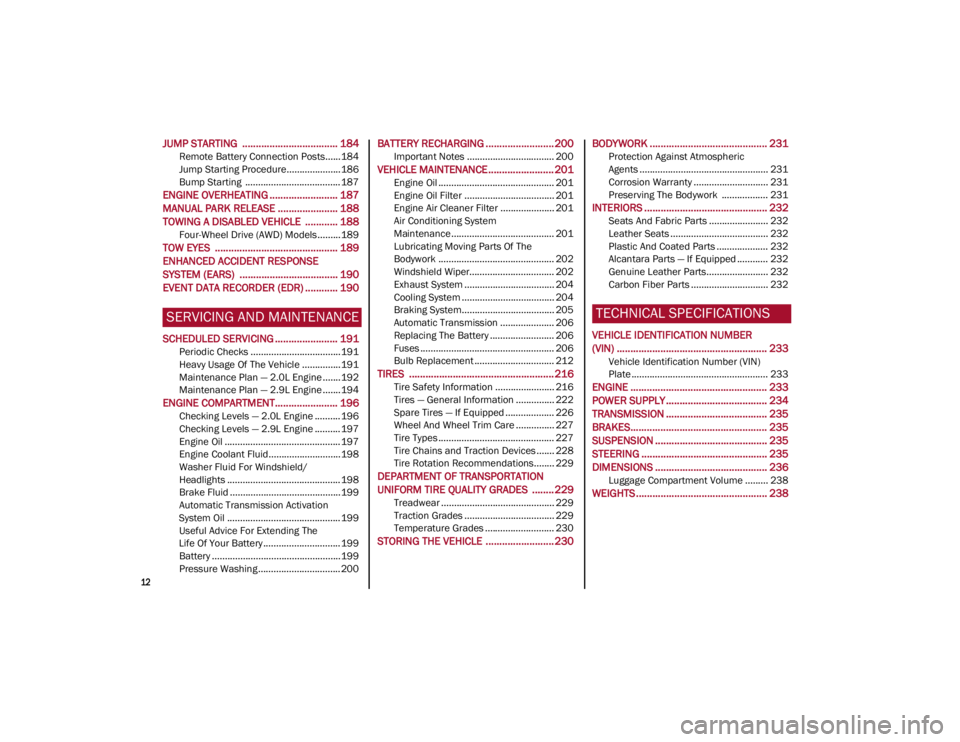
JUMP STARTING ................................... 184
Remote Battery Connection Posts......184
Jump Starting Procedure.....................186
Bump Starting ..................................... 187
ENGINE OVERHEATING ......................... 187 MANUAL PARK RELEASE ...................... 188TOWING A DISABLED VEHICLE ............ 188
Four-Wheel Drive (AWD) Models .........189
TOW EYES ............................................. 189ENHANCED ACCIDENT RESPONSE
SYSTEM (EARS) .................................... 190EVENT DATA RECORDER (EDR) ............ 190
SERVICING AND MAINTENANCE
SCHEDULED SERVICING ....................... 191
Periodic Checks ...................................191
Heavy Usage Of The Vehicle ...............191
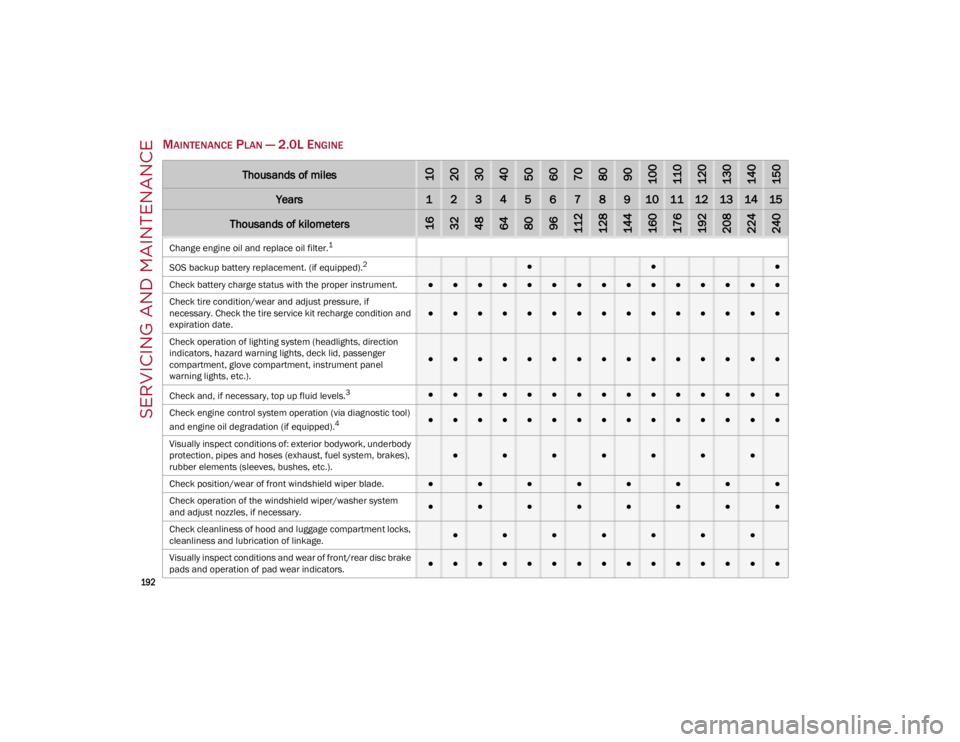
Maintenance Plan — 2.0L Engine .......192
Maintenance Plan — 2.9L Engine .......194
ENGINE COMPARTMENT....................... 196
Checking Levels — 2.0L Engine .......... 196
Checking Levels — 2.9L Engine .......... 197
Engine Oil ............................................. 197
Engine Coolant Fluid............................198
Washer Fluid For Windshield/
Headlights ............................................ 198 Brake Fluid ...........................................199
Automatic Transmission Activation
System Oil ............................................ 199 Useful Advice For Extending The
Life Of Your Battery .............................. 199 Battery ..................................................199
Pressure Washing ................................ 200
BATTERY RECHARGING ......................... 200
Important Notes .................................. 200
VEHICLE MAINTENANCE ........................ 201
Engine Oil ............................................. 201
Engine Oil Filter ................................... 201
Engine Air Cleaner Filter ..................... 201
Air Conditioning System
Maintenance........................................ 201 Lubricating Moving Parts Of The
Bodywork ............................................. 202 Windshield Wiper................................. 202
Exhaust System ................................... 204
Cooling System .................................... 204
Braking System.................................... 205
Automatic Transmission ..................... 206
Replacing The Battery ......................... 206
Fuses .................................................... 206
Bulb Replacement ............................... 212
TIRES ..................................................... 216
Tire Safety Information ....................... 216
Tires — General Information ............... 222
Spare Tires — If Equipped ................... 226
Wheel And Wheel Trim Care ............... 227
Tire Types ............................................. 227
Tire Chains and Traction Devices ....... 228
Tire Rotation Recommendations........ 229
DEPARTMENT OF TRANSPORTATION
UNIFORM TIRE QUALITY GRADES ........ 229
Treadwear ............................................ 229
Traction Grades ................................... 229
Temperature Grades ........................... 230
STORING THE VEHICLE ......................... 230
BODYWORK ........................................... 231
Protection Against Atmospheric
Agents .................................................. 231 Corrosion Warranty ............................. 231
Preserving The Bodywork .................. 231
INTERIORS ............................................. 232
Seats And Fabric Parts ....................... 232
Leather Seats ...................................... 232
Plastic And Coated Parts .................... 232
Alcantara Parts — If Equipped ............ 232
Genuine Leather Parts........................ 232
Carbon Fiber Parts .............................. 232
TECHNICAL SPECIFICATIONS
VEHICLE IDENTIFICATION NUMBER
(VIN) ....................................................... 233
Vehicle Identification Number (VIN)
Plate ..................................................... 233
ENGINE .................................................. 233
POWER SUPPLY ..................................... 234 TRANSMISSION ..................................... 235BRAKES.................................................. 235
SUSPENSION ......................................... 235
STEERING .............................................. 235
DIMENSIONS ......................................... 236
Luggage Compartment Volume ......... 238
WEIGHTS ................................................ 238
22_GU_OM_EN_USC_t.book Page 12
Page 17 of 256
15
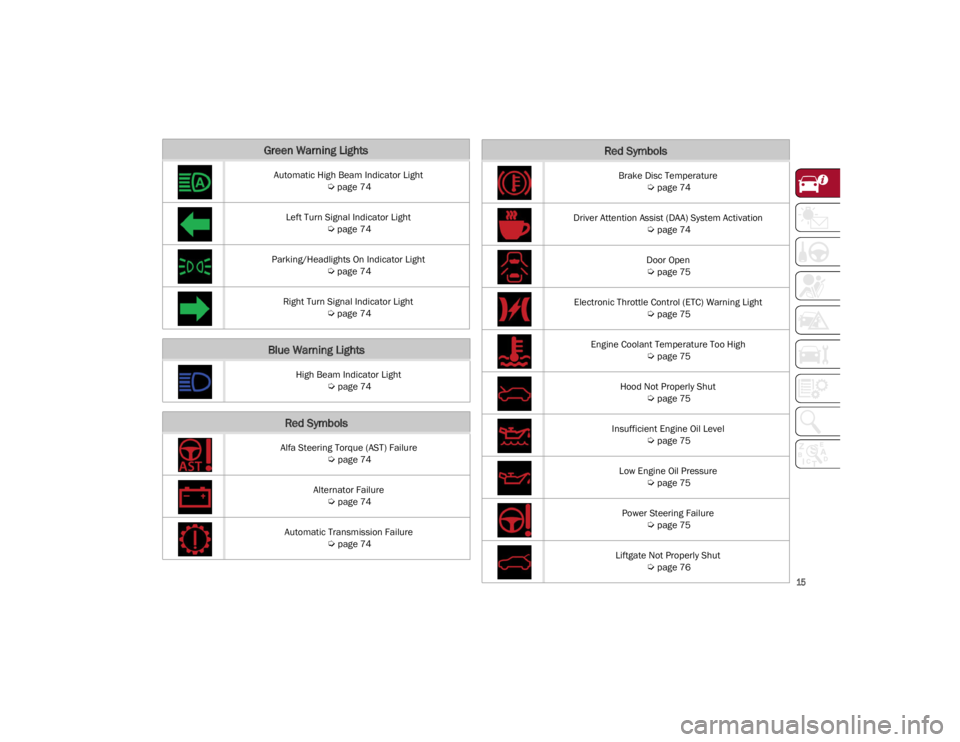
Green Warning Lights
Automatic High Beam Indicator Light
Ú
page 74
Left Turn Signal Indicator Light
Ú
page 74
Parking/Headlights On Indicator Light
Ú
page 74
Right Turn Signal Indicator Light
Ú
page 74
Blue Warning Lights
High Beam Indicator Light
Ú
page 74
Red Symbols
Alfa Steering Torque (AST) Failure
Ú
page 74
Alternator Failure
Ú
page 74
Automatic Transmission Failure
Ú
page 74
Brake Disc Temperature
Ú
page 74
Driver Attention Assist (DAA) System Activation
Ú
page 74
Door Open
Ú
page 75
Electronic Throttle Control (ETC) Warning Light
Ú
page 75
Engine Coolant Temperature Too High
Ú
page 75
Hood Not Properly Shut
Ú
page 75
Insufficient Engine Oil Level
Ú
page 75
Low Engine Oil Pressure
Ú
page 75
Power Steering Failure
Ú
page 75
Liftgate Not Properly Shut
Ú
page 76
Red Symbols
22_GU_OM_EN_USC_t.book Page 15
Page 18 of 256
SYMBOL GLOSSARY
16
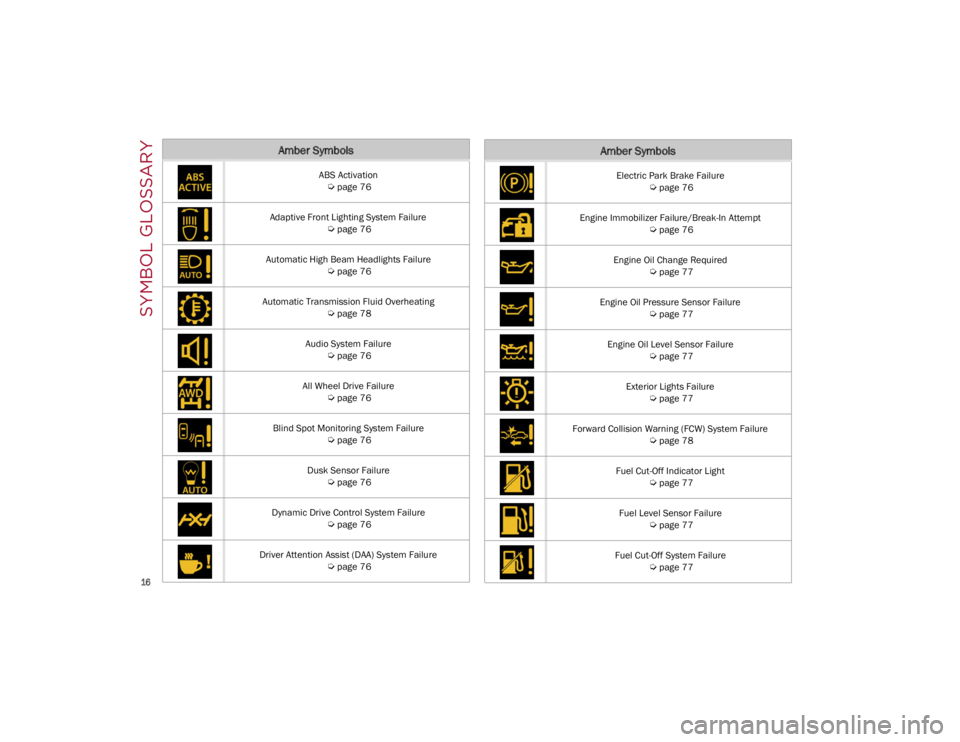
Amber Symbols
ABS Activation
Ú
page 76
Adaptive Front Lighting System Failure
Ú
page 76
Automatic High Beam Headlights Failure
Ú
page 76
Automatic Transmission Fluid Overheating
Ú
page 78
Audio System Failure
Ú
page 76
All Wheel Drive Failure
Ú
page 76
Blind Spot Monitoring System Failure
Ú
page 76
Dusk Sensor Failure
Ú
page 76
Dynamic Drive Control System Failure
Ú
page 76
Driver Attention Assist (DAA) System Failure
Ú
page 76
Electric Park Brake Failure
Ú
page 76
Engine Immobilizer Failure/Break-In Attempt
Ú
page 76
Engine Oil Change Required
Ú
page 77
Engine Oil Pressure Sensor Failure
Ú
page 77
Engine Oil Level Sensor Failure
Ú
page 77
Exterior Lights Failure
Ú
page 77
Forward Collision Warning (FCW) System Failure
Ú
page 78
Fuel Cut-Off Indicator Light
Ú
page 77
Fuel Level Sensor Failure
Ú
page 77
Fuel Cut-Off System Failure
Ú
page 77
Amber Symbols
22_GU_OM_EN_USC_t.book Page 16
Page 73 of 256
71
(Continued)
If the light remains on when the parking brake has
been disengaged, and the fluid level is at the full
mark on the master cylinder reservoir, it indicates
a possible brake hydraulic system malfunction or
that a problem with the Brake Booster has been
detected by the Anti-Lock Brake System (ABS) /
Electronic Stability Control (ESC) system. In this
case, the light will remain on until the condition
has been corrected. If the problem is related to the
brake booster, the ABS pump will run when
applying the brake, and a brake pedal pulsation
may be felt during each stop.
The dual brake system provides a reserve braking
capacity in the event of a failure to a portion of the
hydraulic system. A leak in either half of the dual
brake system is indicated by the Brake Warning
Light, which will turn on when the brake fluid level
in the master cylinder has dropped below a
specified level.
The light will remain on until the cause is corrected.
NOTE:
The light may flash momentarily during sharp
cornering maneuvers, which change fluid level
conditions. The vehicle should have service
performed, and the brake fluid level checked.
If brake failure is indicated, immediate repair is
necessary.
Vehicles equipped with the Anti-Lock Brake
System (ABS) are also equipped with Electronic
Brake Force Distribution (EBD). In the event of an
EBD failure, the Brake Warning Light will turn on
along with the ABS Light. Immediate repair to the
ABS system is required.
Operation of the Brake Warning Light can be
checked by turning the ignition switch from the
OFF position to the ON/RUN position. The light
should illuminate for approximately two seconds.
The light should then turn off unless the parking
brake is applied or a brake fault is detected. If the
light does not illuminate, have the light inspected
by an authorized dealer.
The light also will turn on when the parking brake
is applied with the ignition switch in the ON/RUN
position.
NOTE:
This light shows only that the parking brake is
applied. It does not show the degree of brake
application.
Electronic Brake Force Distribution (EBD)
Failure
The simultaneous turning on of the
BRAKE (red) and (amber) warning
lights with the engine on indicates either
a failure of the EBD system or that the
system is not available. In this case, the rear
wheels may suddenly lock and the vehicle may
swerve when braking abruptly.
Drive very carefully to the nearest authorized
dealer to have the system inspected immediately.
Oil Temperature Warning Light
This telltale indicates engine oil
temperature is high.
Stop the vehicle and shut off the engine as soon
as possible. If the problem persists, contact an
authorized dealer.
Seat Belt Reminder Warning Light
When the ignition is first placed in the
ON/RUN position, if the driver’s seat
belt is unbuckled, a chime will sound
and the light will turn on. When driving,
if the driver or front passenger seat belt remains
unbuckled, the Seat Belt Reminder Light will flash
or remain on continuously and a chime will sound
Ú
page 151. WARNING!
The fault of the warning light is signaled by the
turning on of the icon on the instrument panel.
In this case, the warning light may not indicate
any faults with the restraint systems. Before
proceeding, contact an authorized dealer to
have the system checked immediately.
If the warning light does not turn on when the
ignition device is moved to ON or if it stays on
when driving (together with the message on the
display), there might be a fault in the restraint
systems; in this case, the air bags or preten -
sioners may not deploy in the event of an
accident or, in a lower number of cases, they
could deploy erroneously. Before proceeding,
contact an authorized dealer to have the
system checked immediately.
WARNING!
22_GU_OM_EN_USC_t.book Page 71
Page 77 of 256
75
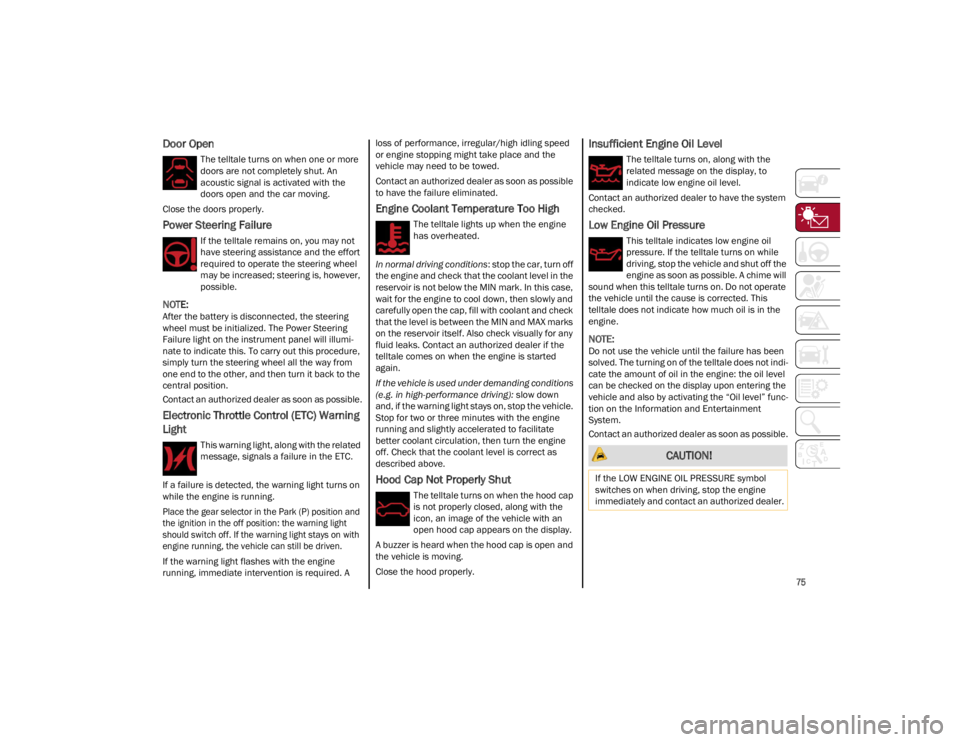
Door Open
The telltale turns on when one or more
doors are not completely shut. An
acoustic signal is activated with the
doors open and the car moving.
Close the doors properly.
Power Steering Failure
If the telltale remains on, you may not
have steering assistance and the effort
required to operate the steering wheel
may be increased; steering is, however,
possible.
NOTE:
After the battery is disconnected, the steering
wheel must be initialized. The Power Steering
Failure light on the instrument panel will illumi -
nate to indicate this. To carry out this procedure,
simply turn the steering wheel all the way from
one end to the other, and then turn it back to the
central position.
Contact an authorized dealer as soon as possible.
Electronic Throttle Control (ETC) Warning
Light
This warning light, along with the related
message, signals a failure in the ETC.
If a failure is detected, the warning light turns on
while the engine is running.
Place the gear selector in the Park (P) position and
the ignition in the off position: the warning light
should switch off. If the warning light stays on with
engine running, the vehicle can still be driven.
If the warning light flashes with the engine
running, immediate intervention is required. A loss of performance, irregular/high idling speed
or engine stopping might take place and the
vehicle may need to be towed.
Contact an authorized dealer as soon as possible
to have the failure eliminated.
Engine Coolant Temperature Too High
The telltale lights up when the engine
has overheated.
In normal driving conditions : stop the car, turn off
the engine and check that the coolant level in the
reservoir is not below the MIN mark. In this case,
wait for the engine to cool down, then slowly and
carefully open the cap, fill with coolant and check
that the level is between the MIN and MAX marks
on the reservoir itself. Also check visually for any
fluid leaks. Contact an authorized dealer if the
telltale comes on when the engine is started
again.
If the vehicle is used under demanding conditions
(e.g. in high-performance driving): slow down
and, if the warning light stays on, stop the vehicle.
Stop for two or three minutes with the engine
running and slightly accelerated to facilitate
better coolant circulation, then turn the engine
off. Check that the coolant level is correct as
described above.
Hood Cap Not Properly Shut
The telltale turns on when the hood cap
is not properly closed, along with the
icon, an image of the vehicle with an
open hood cap appears on the display.
A buzzer is heard when the hood cap is open and
the vehicle is moving.
Close the hood properly.
Insufficient Engine Oil Level
The telltale turns on, along with the
related message on the display, to
indicate low engine oil level.
Contact an authorized dealer to have the system
checked.
Low Engine Oil Pressure
This telltale indicates low engine oil
pressure. If the telltale turns on while
driving, stop the vehicle and shut off the
engine as soon as possible. A chime will
sound when this telltale turns on. Do not operate
the vehicle until the cause is corrected. This
telltale does not indicate how much oil is in the
engine.
NOTE:
Do not use the vehicle until the failure has been
solved. The turning on of the telltale does not indi -
cate the amount of oil in the engine: the oil level
can be checked on the display upon entering the
vehicle and also by activating the “Oil level” func -
tion on the Information and Entertainment
System.
Contact an authorized dealer as soon as possible.
CAUTION!
If the LOW ENGINE OIL PRESSURE symbol
switches on when driving, stop the engine
immediately and contact an authorized dealer.
22_GU_OM_EN_USC_t.book Page 75
Page 79 of 256
77
Alarm System Failure The telltale will illuminate to
report an alarm system failure.
Contact an authorized dealer as soon as possible.
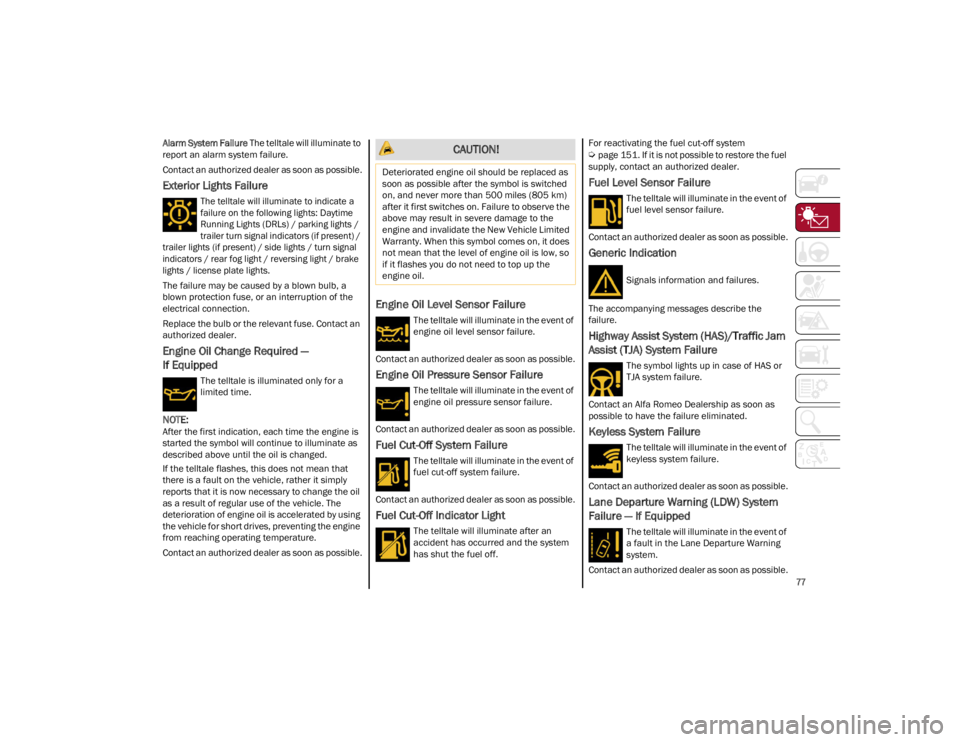
Exterior Lights Failure
The telltale will illuminate to indicate a
failure on the following lights: Daytime
Running Lights (DRLs) / parking lights /
trailer turn signal indicators (if present) /
trailer lights (if present) / side lights / turn signal
indicators / rear fog light / reversing light / brake
lights / license plate lights.
The failure may be caused by a blown bulb, a
blown protection fuse, or an interruption of the
electrical connection.
Replace the bulb or the relevant fuse. Contact an
authorized dealer.
Engine Oil Change Required —
If Equipped
The telltale is illuminated only for a
limited time.
NOTE:
After the first indication, each time the engine is
started the symbol will continue to illuminate as
described above until the oil is changed.
If the telltale flashes, this does not mean that
there is a fault on the vehicle, rather it simply
reports that it is now necessary to change the oil
as a result of regular use of the vehicle. The
deterioration of engine oil is accelerated by using
the vehicle for short drives, preventing the engine
from reaching operating temperature.
Contact an authorized dealer as soon as possible.
Engine Oil Level Sensor Failure
The telltale will illuminate in the event of
engine oil level sensor failure.
Contact an authorized dealer as soon as possible.
Engine Oil Pressure Sensor Failure
The telltale will illuminate in the event of
engine oil pressure sensor failure.
Contact an authorized dealer as soon as possible.
Fuel Cut-Off System Failure
The telltale will illuminate in the event of
fuel cut-off system failure.
Contact an authorized dealer as soon as possible.
Fuel Cut-Off Indicator Light
The telltale will illuminate after an
accident has occurred and the system
has shut the fuel off. For reactivating the fuel cut-off system
Ú
page 151. If it is not possible to restore the fuel
supply, contact an authorized dealer.
Fuel Level Sensor Failure
The telltale will illuminate in the event of
fuel level sensor failure.
Contact an authorized dealer as soon as possible.
Generic Indication
Signals information and failures.
The accompanying messages describe the
failure.
Highway Assist System (HAS)/Traffic Jam
Assist (TJA) System Failure
The symbol lights up in case of HAS or
TJA system failure.
Contact an Alfa Romeo Dealership as soon as
possible to have the failure eliminated.
Keyless System Failure
The telltale will illuminate in the event of
keyless system failure.
Contact an authorized dealer as soon as possible.
Lane Departure Warning (LDW) System
Failure — If Equipped
The telltale will illuminate in the event of
a fault in the Lane Departure Warning
system.
Contact an authorized dealer as soon as possible.
CAUTION!
Deteriorated engine oil should be replaced as
soon as possible after the symbol is switched
on, and never more than 500 miles (805 km)
after it first switches on. Failure to observe the
above may result in severe damage to the
engine and invalidate the New Vehicle Limited
Warranty. When this symbol comes on, it does
not mean that the level of engine oil is low, so
if it flashes you do not need to top up the
engine oil.
22_GU_OM_EN_USC_t.book Page 77
Page 84 of 256
82
System not disabled from previous remote
start event.
Vehicle Security System indicator flashing.
Ignition in the OFF position (if equipped with
keyless ignition system).
Fuel level meets minimum requirement.
Remote Start Comfort Systems — If Equipped
When Remote Start is activated, the heated
steering wheel and driver heated seat features
will automatically turn on in cold weather.
These features will stay on through the duration
of remote start until the ignition is placed in the
ON/RUN position.
Remote Start Windshield Wiper De–Icer
Activation — If Equipped
When remote start is active and the outside
ambient temperature is less than 39°F (4°C),
the Windshield Wiper De-Icer will be enabled.
Exiting remote start will resume previous
operation, except if the Windshield Wiper De-Icer
is active.
The Windshield Wiper De-Icer timer and
operation will continue.
COLD WEATHER OPERATION
To prevent possible engine damage while starting
at low temperatures, this vehicle will inhibit
engine cranking when the ambient temperature
is less than –22°F (–30°C) and the oil
temperature sensor reading indicates an engine
block heater has not been used. An
externally-powered electric engine block heater is
available as optional equipment or from an
authorized dealer. The message “Plug In Engine Heater” will be
displayed in the instrument cluster when the
ambient temperature is below 5°F (–15°C) at
the time the engine is shut off as a reminder to
avoid possible crank delays at the next cold start.
EXTENDED PARK STARTING
If the vehicle has not been started or driven for at
least 30 days, it is advisable to follow the
instructions below.
To start the engine, proceed as follows:
1. Briefly push the ignition button
2. If the engine does not start, wait five seconds
and let the starter cool down and then repeat
the starting procedure
3. If the engine does not start after eight attempts, let the starter cool down for at least
10 seconds, and then repeat the starting
procedure
If the problem persists, contact an authorized
dealer.
NOTE:
After prolonged vehicle inactivity, very difficult
starting, that can be noticed through rapid fatigue
of the starter, might also be due to a partially
drained battery
Ú
page 184.
IF ENGINE FAILS TO START
Starting the Engine with Key Fob Battery Run
Down or Drained
If the ignition does not respond when the button
is pushed, the key fob battery might be run down
or drained. Therefore, the system does not detect
the presence of the key fob in the vehicle, and will
display a dedicated message
Ú
page 22.
CAUTION!
Use of the recommended oil and adhering to
the prescribed oil change intervals is
important to prevent engine damage and
ensure satisfactory starting in cold conditions.
WARNING!
Never pour fuel or other flammable liquid
into the throttle body air inlet opening in an
attempt to start the vehicle. This could result
in flash fire causing serious personal injury.
Do not attempt to push or tow your vehicle to
get it started. Vehicles equipped with an
automatic transmission cannot be started
this way. Unburned fuel could enter the
catalytic converter and once the engine has
started, ignite and damage the converter
and vehicle.
If the vehicle has a discharged battery,
booster cables may be used to obtain a start
from a booster battery or the battery in
another vehicle. This type of start can be
dangerous if done improperly
Ú
page 184.
CAUTION!
To prevent damage to the starter, do not
continuously crank the engine for more than
25 seconds at a time. Wait 60 seconds before
trying again.
22_GU_OM_EN_USC_t.book Page 82
STARTING AND OPERATING
Page 86 of 256
STARTING AND OPERATING
84
ENGINE BREAK-IN
RECOMMENDATIONS
ENGINE BREAK-IN
For both engines, use the following engine
break-in recommendations:
NOTE:
A new engine may consume some oil during its
first few thousand miles (kilometers) of opera-
tion. This should be considered a normal part of
the break-in period and not interpreted as an indi -
cation of a problem. Please monitor your oil level
during the break-in period and add oil as
required.
It is recommended for the operator to observe the
following driving behaviors during the new vehicle
break-in period:
0 to 100 miles (0 to 160 km):
Do not allow the engine to operate at idle for
an extended period of time.
Press the accelerator pedal slowly and not
more than halfway to avoid rapid acceleration.
Avoid aggressive braking.
Drive with the engine speed less than
3,500 RPM.
Maintain vehicle speed below 55 mph
(88 km/h) and observe local speed limits. 100 to 300 miles (160 to 483 km):
Press the accelerator pedal slowly and not
more than halfway to avoid rapid acceleration
in lower gears (FIRST to THIRD gears).
Avoid aggressive braking.
Drive with the engine speed less than
5,000 RPM.
Maintain vehicle speed below 70 mph
(112 km/h) and observe local speed limits.
300 to 500 miles (483 to 805 km):
Exercise the full engine RPM range, shifting
manually (paddles or gear shift) at higher RPM
when possible.
Do not perform sustained operation with the
accelerator pedal at wide open throttle.
Maintain vehicle speed below 85 mph
(136 km/h) and observe local speed limits.
For the first 1,500 miles (2,414 km):
Do not participate in track events, sport driving
schools, or similar activities during the first
1,500 miles (2,414 km).
NOTE:
Monitor engine oil with every refueling and add if
necessary. Oil and fuel consumption may be
higher through the first oil change interval.
ELECTRIC PARK BRAKE
(EPB)
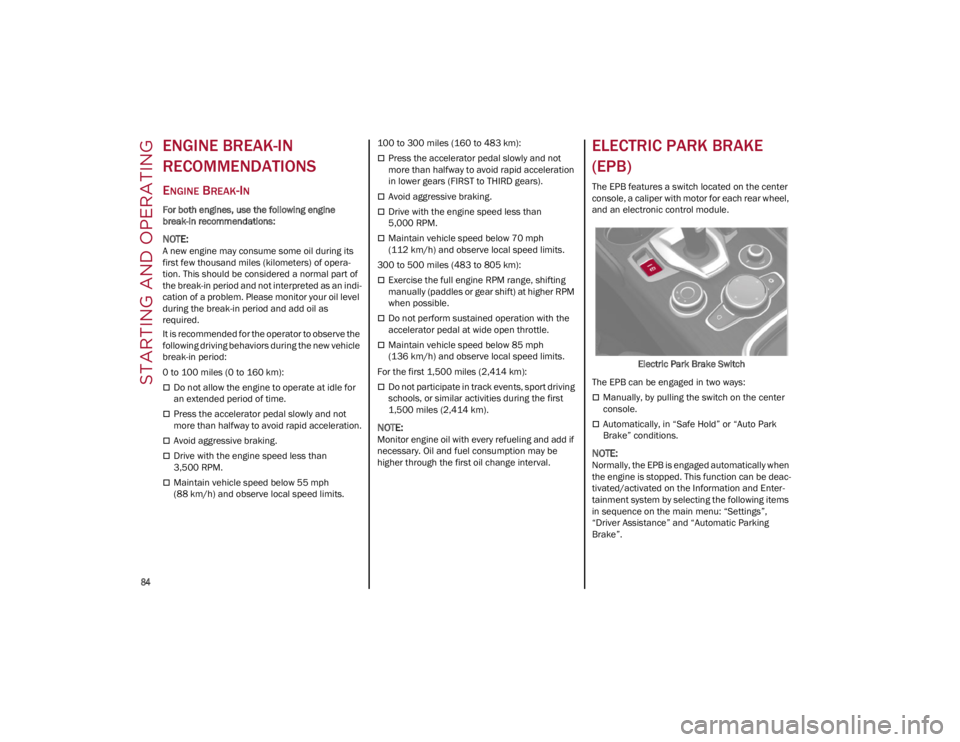
The EPB features a switch located on the center
console, a caliper with motor for each rear wheel,
and an electronic control module.
Electric Park Brake Switch
The EPB can be engaged in two ways:
Manually, by pulling the switch on the center
console.
Automatically, in “Safe Hold” or “Auto Park
Brake” conditions.
NOTE:
Normally, the EPB is engaged automatically when
the engine is stopped. This function can be deac -
tivated/activated on the Information and Enter -
tainment system by selecting the following items
in sequence on the main menu: “Settings”,
“Driver Assistance” and “Automatic Parking
Brake”.
22_GU_OM_EN_USC_t.book Page 84
Page 193 of 256
191
Correct servicing permits the performance of the
vehicle to be maintained over time, as well as
limited running costs and safeguarding the
efficiency of the safety systems.
SCHEDULED SERVICING
Correct servicing is crucial for guaranteeing a
long life for the vehicle under the best conditions.
For this reason, Alfa Romeo has planned a series
of checks and services for your vehicle at fixed
intervals based on distance and time, as
described in the Scheduled Servicing Plan.
Before each service, it is always necessary to
carefully follow the instructions in the Scheduled
Servicing Plan (e.g. periodically check level of
fluids, tire pressure, etc.).
Scheduled Servicing is offered by an authorized
dealer according to a set time schedule. If, during
each operation, in addition to the ones
scheduled, the need arises for further
replacements or repairs, these may be carried
out with the owner’s explicit consent only.
NOTE:
Scheduled Servicing intervals are required by the
manufacturer. Failure to have them carried out
may invalidate the New Vehicle Limited Warranty.
You are advised to inform an authorized dealer of
any small operating irregularities without waiting
for the next service.
PERIODIC CHECKS
Every month or every 620 miles (1,000 km) or
before long trips check and, if necessary, top off:
Engine coolant level.
Brake fluid level (if insufficient, see an
authorized dealer as soon as possible).
Windshield washer fluid level.
Tire inflation pressure and condition.
Operation of lighting system (headlights,
direction indicators, hazard warning lights,
etc.).
Operation of windshield washing/wiping
system and positioning/wear of wiper blades.
Inspect the CV/Universal joints.
Oil consumption of the engine depends on
conditions and driving style. For this reason, the
engine oil level must be checked every
1,860 miles (3,000 km), and top off if necessary;
for further information
Ú
page 197.
HEAVY USAGE OF THE VEHICLE
If the vehicle is used under one of the following
conditions:
Dusty roads.
Short, repeated journeys less than 4 miles
(7 km) at sub-zero outside temperatures.
Engine often idling or driving long distances at
low speeds or long periods of inactivity.
In the event of a long period of inactivity. The following checks must be carried out more
often than indicated in the Scheduled Servicing
Plan:
Check cleanliness of hood and liftgate locks,
cleanliness and lubrication of linkage.
Visually inspect conditions of: engine,
transmission, pipes and hoses (exhaust/fuel
system/brakes) and rubber elements
(sleeves/bushes, etc.).
Check battery charge and battery fluid level
(electrolyte).
Visually inspect conditions of the accessory
drive belts.
Check and, if necessary, change engine oil and
replace oil filter.
Check and, if necessary, replace cabin air
filter.
Check and, if necessary, replace air cleaner.
Severe Duty All Models
Change engine oil at 4,000 miles (6,500 km) if the vehicle is operated in a dusty and off-road
environment or is operated predominately at idle
or only very low engine RPM. This type of vehicle
use is considered Severe Duty.
22_GU_OM_EN_USC_t.book Page 191
Page 194 of 256
192
MAINTENANCE PLAN — 2.0L ENGINE
Thousands of miles102030405060708090100110120130140150
Years123456789101112131415
Thousands of kilometers163248648096112128144160176192208224240
Change engine oil and replace oil filter.1
SOS backup battery replacement. (if equipped).2●●●
Check battery charge status with the proper instrument.
●●●●●●●●●●●●●●●
Check tire condition/wear and adjust pressure, if
necessary. Check the tire service kit recharge condition and
expiration date.
●●●●●●●●●●●●●●●
Check operation of lighting system (headlights, direction
indicators, hazard warning lights, deck lid, passenger
compartment, glove compartment, instrument panel
warning lights, etc.).
●●●●●●●●●●●●●●●
Check and, if necessary, top up fluid levels.
3●●●●●●●●●●●●●●●
Check engine control system operation (via diagnostic tool)
and engine oil degradation (if equipped).
4●●●●●●●●●●●●●●●
Visually inspect conditions of: exterior bodywork, underbody
protection, pipes and hoses (exhaust, fuel system, brakes),
rubber elements (sleeves, bushes, etc.).
●●●●●●●
Check position/wear of front windshield wiper blade.●●●●●●●●
Check operation of the windshield wiper/washer system
and adjust nozzles, if necessary.
●●●●●●●●
Check cleanliness of hood and luggage compartment locks,
cleanliness and lubrication of linkage.
●●●●●●●
Visually inspect conditions and wear of front/rear disc brake
pads and operation of pad wear indicators.●●●●●●●●●●●●●●●
22_GU_OM_EN_USC_t.book Page 192
SERVICING AND MAINTENANCE