gas type ALFA ROMEO STELVIO 2023 Owners Manual
[x] Cancel search | Manufacturer: ALFA ROMEO, Model Year: 2023, Model line: STELVIO, Model: ALFA ROMEO STELVIO 2023Pages: 268, PDF Size: 10.36 MB
Page 15 of 268

13
TIRES ..................................................... 224
Tire Safety Information ....................... 224
Tires — General Information................ 230
Spare Tires — If Equipped ...................234
Wheel And Wheel Trim Care ..............235
Tire Types ............................................. 236
Tire Chains and Traction Devices .......236
Tire Rotation Recommendations ........237
DEPARTMENT OF TRANSPORTATION
UNIFORM TIRE QUALITY GRADES ....... 238
Treadwear ............................................ 238
Traction Grades ...................................238
Temperature Grades ...........................238
STORING THE VEHICLE ........................ 238
BODYWORK ........................................... 239
Protection Against Atmospheric
Agents ................................................... 239 Corrosion Warranty .............................. 239
Preserving The Bodywork ....................239
INTERIORS ............................................. 240
Seats And Fabric Parts ........................ 240
Leather Seats....................................... 241
Plastic And Coated Parts .....................241
Alcantara Parts — If Equipped.............241
Genuine Leather Parts ........................ 241
Carbon Fiber Parts ............................... 241
TECHNICAL SPECIFICATIONS
VEHICLE IDENTIFICATION
NUMBER (VIN) ....................................... 242
Vehicle Identification Number (VIN)
Plate ..................................................... 242
ENGINE .................................................. 242 POWER SUPPLY ..................................... 243
TRANSMISSION ..................................... 244
BRAKES .................................................. 244SUSPENSION ......................................... 245
STEERING .............................................. 245
DIMENSIONS ......................................... 246
Luggage Compartment Volume ......... 247
WEIGHTS ................................................ 248FUEL REQUIREMENTS........................... 249
Reformulated Gasoline ...................... 249
Gasoline/Oxygenate Blends ............... 249
CNG And LP Fuel System
Modifications ....................................... 250 MMT In Gasoline ................................. 250
Materials Added To Fuel ..................... 250
Fuel System Cautions ......................... 250
FLUID CAPACITIES ................................ 251
ENGINE FLUIDS AND LUBRICANTS ...... 252
CHASSIS FLUIDS AND LUBRICANTS ..... 253 PERFORMANCE ..................................... 254
CUSTOMER ASSISTANCE
SUGGESTIONS FOR OBTAINING
SERVICE FOR YOUR VEHICLE .............. 255
Prepare For The Appointment ............ 255
Prepare A List ...................................... 255
Be Reasonable With Requests ........... 255
IF YOU NEED ASSISTANCE .................... 255
Roadside Assistance ........................... 255
Alfa Romeo Customer Center ............. 256
Alfa Romeo Customer
Care (Canada) ...................................... 256 Customer Assistance For
The Hearing Or
Speech Impaired (TDD/TTY) ............... 256 Service Contract ................................. 257
WARRANTY INFORMATION ................... 257REPORTING SAFETY DEFECTS .............. 258
In The 50 United States And
Washington, D.C. ................................. 258 In Canada ............................................. 258
PUBLICATION ORDER FORMS .............. 258
GENERAL INFORMATION....................... 259
23_GU_OM_EN_USC_t.book Page 13
Page 132 of 268
STARTING AND OPERATING
130
REFUELING PROCEDURE
The fuel filler door is unlocked when the central
door locking system is unlocked. It is automat-
ically locked when the central locking system is
applied.
Opening The Fuel Filler Door
To refuel proceed as follows:
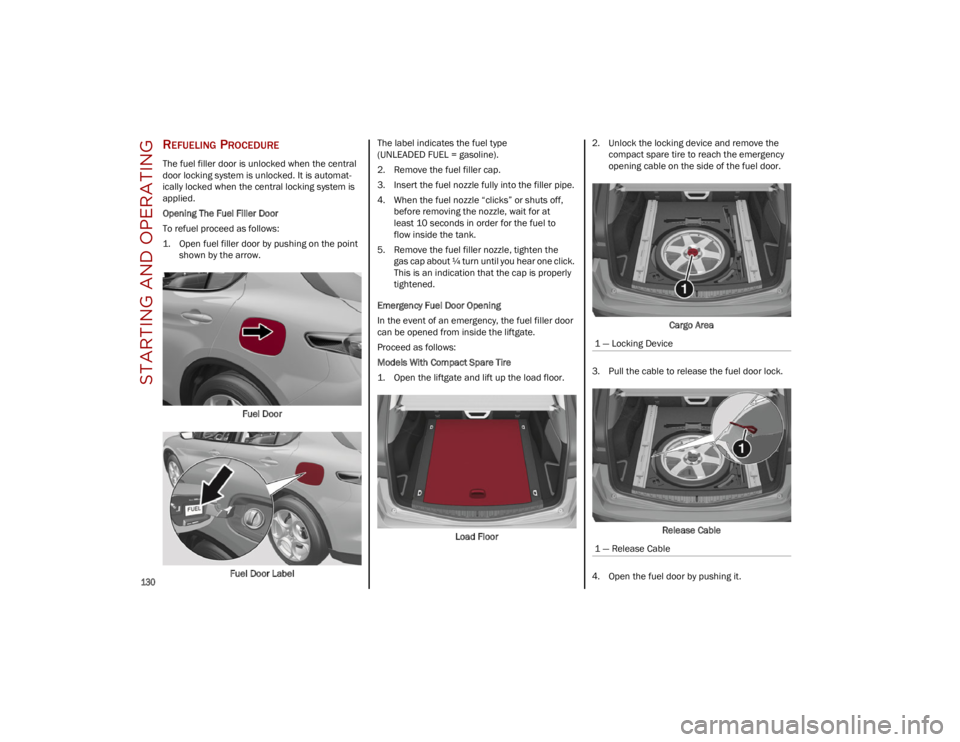
1. Open fuel filler door by pushing on the point shown by the arrow.
Fuel Door
Fuel Door Label The label indicates the fuel type
(UNLEADED FUEL = gasoline).
2. Remove the fuel filler cap.
3. Insert the fuel nozzle fully into the filler pipe.
4. When the fuel nozzle “clicks” or shuts off,
before removing the nozzle, wait for at
least 10 seconds in order for the fuel to
flow inside the tank.
5. Remove the fuel filler nozzle, tighten the gas cap about ¼ turn until you hear one click.
This is an indication that the cap is properly
tightened.
Emergency Fuel Door Opening
In the event of an emergency, the fuel filler door
can be opened from inside the liftgate.
Proceed as follows:
Models With Compact Spare Tire
1. Open the liftgate and lift up the load floor.
Load Floor 2. Unlock the locking device and remove the
compact spare tire to reach the emergency
opening cable on the side of the fuel door.
Cargo Area
3. Pull the cable to release the fuel door lock.
Release Cable
4. Open the fuel door by pushing it.
1 — Locking Device
1 — Release Cable
23_GU_OM_EN_USC_t.book Page 130
Page 167 of 268
165
Front Air Bag Operation
Front Air Bags are designed to provide additional
protection by supplementing the seat belts. Front
air bags are not expected to reduce the risk of
injury in rear, side, or rollover collisions. The front
air bags will not deploy in all frontal collisions,
including some that may produce substantial
vehicle damage — for example, some pole
collisions, truck underrides, and angle offset
collisions.
On the other hand, depending on the type and
location of impact, front air bags may deploy in
crashes with little vehicle front-end damage but
that produce a severe initial deceleration.
Because air bag sensors measure vehicle
deceleration over time, vehicle speed and
damage by themselves are not good indicators of
whether or not an air bag should have deployed.
Seat belts are necessary for your protection in all
collisions, and also are needed to help keep you
in position, away from an inflating air bag.
When the Occupant Restraint Controller (ORC)
detects a collision requiring the front air bags, it
signals the inflator units. A large quantity of
non-toxic gas is generated to inflate the front air
bags.
The steering wheel hub trim cover and the upper
passenger side of the instrument panel separate
and fold out of the way as the air bags inflate to
their full size. The front air bags fully inflate in less
time than it takes to blink your eyes. The front air
bags then quickly deflate while helping to restrain
the driver and front passenger.
Knee Impact Bolsters
The Knee Impact Bolsters help protect the knees
of the driver and front passenger, and position
the front occupants for improved interaction with
the front air bags.
Supplemental Driver And Front
Passenger Knee Air Bags
This vehicle is equipped with a Supplemental
Driver Knee Air Bag mounted in the instrument
panel below the steering column and a Supple-
mental Passenger Knee Air Bag mounted in the
instrument panel below the glove compartment.
The Supplemental Knee Air Bags provide
enhanced protection during a frontal impact by
working together with the seat belts, preten -
sioners, and front air bags.
Supplemental Side Air Bags
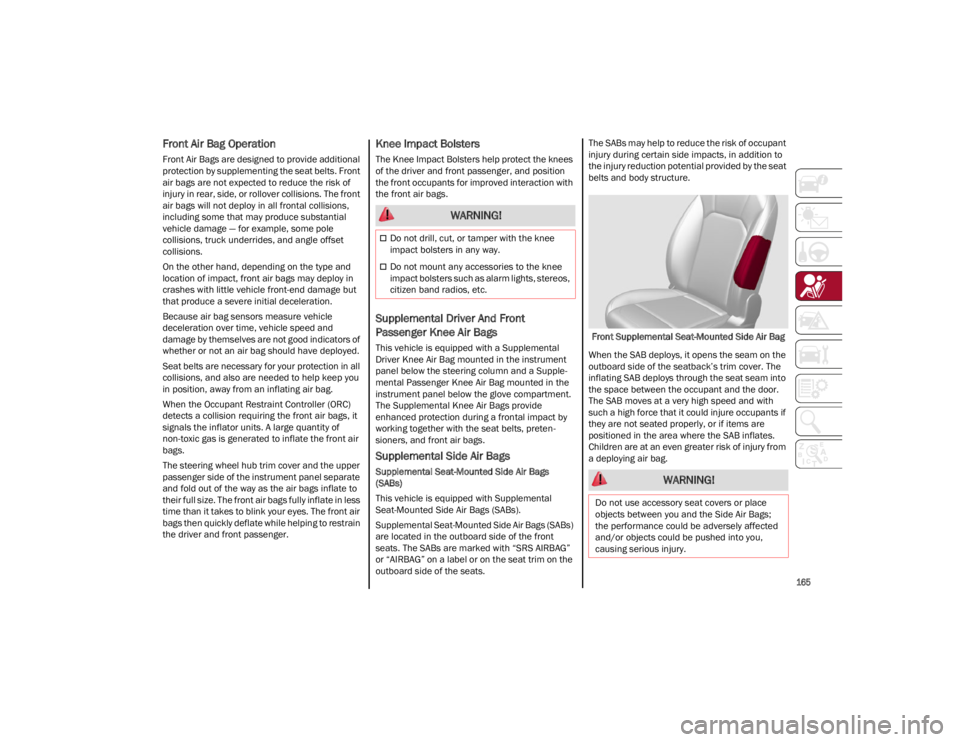
Supplemental Seat-Mounted Side Air Bags
(SABs)
This vehicle is equipped with Supplemental
Seat-Mounted Side Air Bags (SABs).
Supplemental Seat-Mounted Side Air Bags (SABs)
are located in the outboard side of the front
seats. The SABs are marked with “SRS AIRBAG”
or “AIRBAG” on a label or on the seat trim on the
outboard side of the seats. The SABs may help to reduce the risk of occupant
injury during certain side impacts, in addition to
the injury reduction potential provided by the seat
belts and body structure.
Front Supplemental Seat-Mounted Side Air Bag
When the SAB deploys, it opens the seam on the
outboard side of the seatback’s trim cover. The
inflating SAB deploys through the seat seam into
the space between the occupant and the door.
The SAB moves at a very high speed and with
such a high force that it could injure occupants if
they are not seated properly, or if items are
positioned in the area where the SAB inflates.
Children are at an even greater risk of injury from
a deploying air bag.
WARNING!
Do not drill, cut, or tamper with the knee
impact bolsters in any way.
Do not mount any accessories to the knee
impact bolsters such as alarm lights, stereos,
citizen band radios, etc.
WARNING!
Do not use accessory seat covers or place
objects between you and the Side Air Bags;
the performance could be adversely affected
and/or objects could be pushed into you,
causing serious injury.
23_GU_OM_EN_USC_t.book Page 165
Page 169 of 268
167
NOTE:
Air bag covers may not be obvious in the interior
trim, but they will open during air bag deployment.
Rollover Events
Side Air Bags and seat belt pretensioners are
designed to activate in certain rollover events.
The Occupant Restraint Controller (ORC)
determines whether deployment in a particular
rollover event is appropriate, based on the
severity and type of collision. Vehicle damage by
itself is not a good indicator of whether or not
Side Air Bags and seat belt pretensioners should
have deployed.
The Side Air Bags and seat belt pretensioners will
not deploy in all rollover events. The rollover
sensing system determines if a rollover event
may be in progress and whether deployment is
appropriate. In the event the vehicle experiences a rollover or near rollover event, and deployment
is appropriate, the rollover sensing system will
deploy the side air bags and seat belt preten
-
sioners on both sides of the vehicle.
The SABICs may help reduce the risk of partial or
complete ejection of vehicle occupants through
side windows in certain rollover or side impact
events.
Air Bag System Components
NOTE:
The Occupant Restraint Controller (ORC) monitors
the internal circuits and interconnecting wiring
associated with electrical Air Bag System
Components listed below:
Occupant Restraint Controller (ORC)
Air Bag Warning Light
Steering Wheel and Column
Instrument Panel
Knee Impact Bolsters
Driver and Front Passenger Air Bags
Seat Belt Buckle Switch
Supplemental Side Air Bags
Supplemental Knee Air Bags
Front and Side Impact Sensors
Seat Belt Pretensioners
Seat Track Position Sensors
If A Deployment Occurs
The front air bags are designed to deflate
immediately after deployment.
NOTE:
Front and/or side air bags will not deploy in all
collisions. This does not mean something is
wrong with the air bag system.
If you do have a collision which deploys the air
bags, any or all of the following may occur:
The air bag material may sometimes cause
abrasions and/or skin reddening to the
occupants as the air bags deploy and unfold.
The abrasions are similar to friction rope burns
or those you might get sliding along a carpet or
gymnasium floor. They are not caused by
contact with chemicals. They are not
permanent and normally heal quickly.
However, if you haven’t healed significantly
within a few days, or if you have any blistering,
see your doctor immediately.
As the air bags deflate, you may see some
smoke-like particles. The particles are a
normal by-product of the process that
generates the non-toxic gas used for air bag
inflation. These airborne particles may irritate
the skin, eyes, nose, or throat. If you have skin
or eye irritation, rinse the area with cool water.
For nose or throat irritation, move to fresh air.
If the irritation continues, see your doctor. If
these particles settle on your clothing, follow
the garment manufacturer’s instructions for
cleaning.
WARNING!
Side Air Bags need room to inflate. Do not
lean against the door or window. Sit upright
in the center of the seat.
Being too close to the Side Air Bags during
deployment could cause you to be severely
injured or killed.
Relying on the Side Air Bags alone could lead
to more severe injuries in a collision. The
Side Air Bags work with your seat belt to
restrain you properly. In some collisions, Side
Air Bags won’t deploy at all. Always wear your
seat belt even though you have Side Air Bags.
23_GU_OM_EN_USC_t.book Page 167
Page 222 of 268
SERVICING AND MAINTENANCE
220
BULB REPLACEMENT
General Instructions
Before replacing a bulb, check the contacts for oxidation.
Replace blown bulbs with others of the same type and power.
After replacing a headlight bulb, always check its alignment.
When a light is not working, check that the corresponding fuse is intact before changing the bulb.
NOTE:
In some particular climate conditions, such as low temperature, humidity, or after washing the vehicle, a thin condensation layer may form on the
internal surfaces of the front and rear headlights. This condensation will disappear after switching on the headlights.
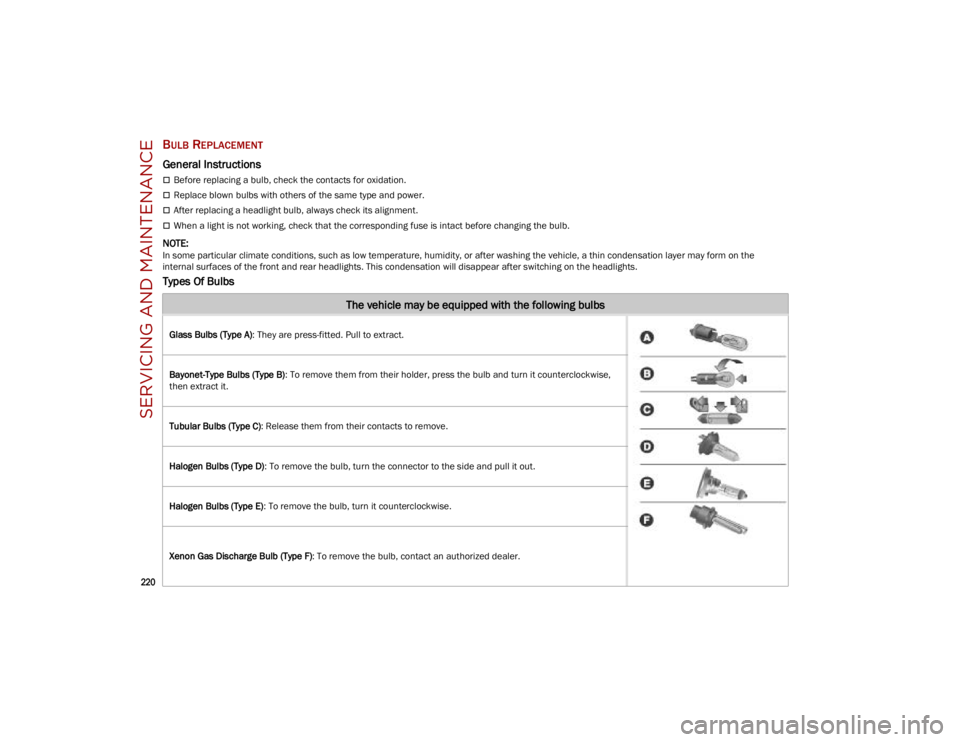
Types Of Bulbs
The vehicle may be equipped with the following bulbs
Glass Bulbs (Type A): They are press-fitted. Pull to extract.
Bayonet-Type Bulbs (Type B) : To remove them from their holder, press the bulb and turn it counterclockwise,
then extract it.
Tubular Bulbs (Type C) : Release them from their contacts to remove.
Halogen Bulbs (Type D) : To remove the bulb, turn the connector to the side and pull it out.
Halogen Bulbs (Type E) : To remove the bulb, turn it counterclockwise.
Xenon Gas Discharge Bulb (Type F) : To remove the bulb, contact an authorized dealer.
23_GU_OM_EN_USC_t.book Page 220
Page 223 of 268
221
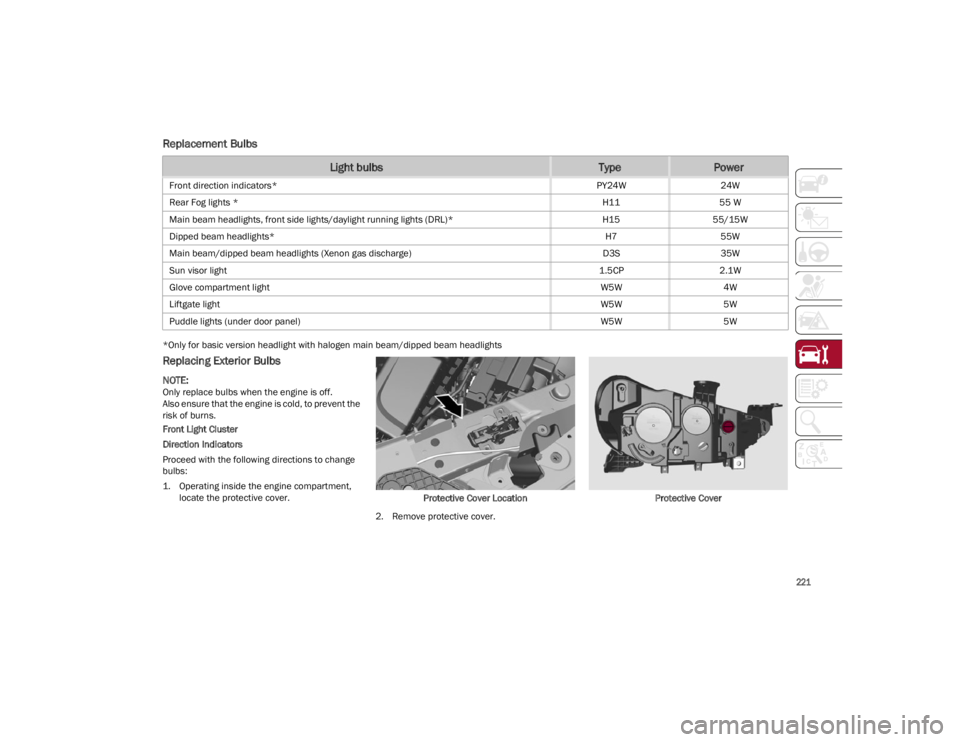
Replacement Bulbs
*Only for basic version headlight with halogen main beam/dipped beam headlights
Replacing Exterior Bulbs
NOTE:
Only replace bulbs when the engine is off.
Also ensure that the engine is cold, to prevent the
risk of burns.
Front Light Cluster
Direction Indicators
Proceed with the following directions to change
bulbs:
1. Operating inside the engine compartment, locate the protective cover. Protective Cover Location
2. Remove protective cover. Protective Cover
Light bulbsTypePower
Front direction indicators*
PY24W24W
Rear Fog lights * H1155 W
Main beam headlights, front side lights/daylight running lights (DRL)* H1555/15W
Dipped beam headlights* H755W
Main beam/dipped beam headlights (Xenon gas discharge) D3S35W
Sun visor light 1.5CP2.1W
Glove compartment light W5W4W
Liftgate light W5W5W
Puddle lights (under door panel) W5W5W
23_GU_OM_EN_USC_t.book Page 221
Page 258 of 268
CUSTOMER ASSISTANCE
256
If Unable to Contact Roadside Assistance
If you are unable to contact Roadside Assistance
or unable to provide a valid Vehicle Identification
Number (VIN), and you obtain towing services on
your own, you may submit your original receipts
from the licensed towing or service facility for
services rendered within 30 days of the
occurrence. Be sure to include your VIN,
odometer mileage at the time of service, and
current mailing address. We will process the
claim based on vehicle and service eligibility. If
eligible, we will reimburse you for the reasonable
amount actually paid, based on the usual and
customary charges for that service in the area
where they were provided. FCA US LLC’s determi-
nation relating to reimbursement is final.
Correspondence should be mailed to:
FCA US LLC Customer Assistance
P.O. Box 9145
Medford, MA 02155
Attention Claims Department
FCA US LLC reserves the right to modify the terms
or discontinue the Roadside Assistance Program
at any time. The Roadside Assistance Program is
subject to restrictions and conditions of use,
which are determined solely by FCA US LLC.
Flat Tire Service
If you are inconvenienced by a flat tire, we will
dispatch a service provider to install your
vehicle’s temporary spare tire (if equipped) as
recommended in your Owner’s Manual.
This is not a permanent flat tire repair. Out of Gas/Fuel Delivery
Drivers cannot always count on a gas station
being nearby, especially when traveling away
from home. We will dispatch a service provider to
deliver a small amount of fuel (maximum two
gallons) to get you to a nearby station. This
service is limited to two occurrences in a
12-month period.
Battery Jump Assistance
No time is a good time for a depleted battery.
With Roadside Assistance, you do not have to
worry about being stranded. We will dispatch a
service provider to provide you with a battery
jump anytime, day or night.
Lockout Service
Whether the keys are locked in your vehicle or
frozen locks are keeping you from getting on your
way, help is just a phone call away. This service is
limited to providing access to the vehicle’s
seating area. It does not cover the cost of
replacement keys.
Towing Service
Our towing service gives you peace of mind and
confidence. If your vehicle becomes disabled as a
result of a mechanical breakdown, Roadside
Assistance will dispatch a towing service to
transport your vehicle to the closest authorized
Chrysler, Dodge, Jeep®, or Ram dealer. If you
choose to go to another dealer, you will be
responsible for the cost if the extra distance
exceeds 10 miles.ALFA ROMEO CUSTOMER CENTER
P.O. Box 21–8004
Auburn Hills, MI 48321–8004
Phone: 1-844-Alfa-USA (1-844-253-2872)
ALFA ROMEO CUSTOMER CARE
(C
ANADA)
P.O. Box 1621
Windsor, Ontario N9A 4H6
Phone: 1-877-230-0563 (English)
Phone: 1-877-515-9112 (French)
CUSTOMER ASSISTANCE FOR THE
H
EARING OR SPEECH IMPAIRED
(TDD/TTY)
To assist customers who have hearing
difficulties, the manufacturer has installed
special Telecommunication Devices for the
Deaf (TDD) equipment at its customer center. Any
hearing or speech impaired customer, who has
access to a TDD or a conventional teletypewriter
(TTY) in the United States, can communicate with
the manufacturer by dialing 1-800-380-2479.
Canadian residents with hearing difficulties that
require assistance can use the special needs
relay service offered by Bell Canada. For TTY
teletypewriter users, dial 711 and for Voice
callers, dial 1-800-855-0511 to connect with a
Bell Relay Service operator.
23_GU_OM_EN_USC_t.book Page 256