stop start ALFA ROMEO STELVIO 2023 Owners Manual
[x] Cancel search | Manufacturer: ALFA ROMEO, Model Year: 2023, Model line: STELVIO, Model: ALFA ROMEO STELVIO 2023Pages: 268, PDF Size: 10.36 MB
Page 12 of 268

10
STARTING AND OPERATING
STARTING THE ENGINE ............................86
Starting Procedure................................. 86
Remote Starting System ....................... 86
Cold Weather Operation ........................ 87
Extended Park Starting.......................... 87
If Engine Fails To Start .......................... 87
After Starting — Warming Up The
Engine ..................................................... 88 Stopping The Engine.............................. 88
Turbocharger Cool Down ....................... 88
ENGINE BLOCK HEATER —
IF EQUIPPED ............................................88
ENGINE BREAK-IN
RECOMMENDATIONS ...............................89
Engine Break-In...................................... 89
ELECTRIC PARK BRAKE (EPB) .................89
Electric Park Brake (EPB)
Operating Modes ................................... 91 Safe Hold ................................................ 91
AUTOMATIC TRANSMISSION....................91
Display .................................................... 92
Gear Selector ......................................... 92
Transmission Operating Modes ............ 93
Automatic Transmission Limp
Home Mode ............................................ 95 Brake Transmission Shift
Interlock (BTSI) System ......................... 95 Important Notes ..................................... 96
ALFA DNA SELECTOR ...............................97
Alfa DNA System .................................... 97
Driving Modes ........................................ 97
ALFA ACTIVE SUSPENSION (AAS) —
IF EQUIPPED............................................. 99
STOP/START SYSTEM............................ 100
Operating Mode ................................... 100
System Manual Activation/
Deactivation ......................................... 100 Possible Reasons The Engine
Does Not Autostop .............................. 100 Engine Restarting Conditions ............. 101
Safety Functions .................................. 101
Energy Saving Function....................... 101
Irregular Operation .............................. 101
Vehicle Inactivity .................................. 101
SPEED LIMITER ...................................... 101
Description ........................................... 101
Activation ............................................. 101
Speed Limit Programming .................. 102
Exceeding The Programmed Speed ... 102
Programmed Speed Icon Flashing ..... 102
Deactivation ......................................... 102
CRUISE CONTROL SYSTEMS —
IF EQUIPPED .......................................... 102
Cruise Control ...................................... 103
Adaptive Cruise Control (ACC) ........... 105
HIGHWAY ASSIST SYSTEM (HAS) —
IF EQUIPPED........................................... 111
To Activate/Deactivate........................ 111
Operation ............................................. 112
Indications On The Display ................. 112
System Status...................................... 113
Limited System Availability/
Operation ............................................. 114
TRAFFIC JAM ASSIST (TJA) SYSTEM —
IF EQUIPPED .......................................... 114
To Activate/Deactivate ....................... 115
Operation ............................................. 115
Indications On The Display ................. 116
System Status ..................................... 116
Limited System Availability/
Operation ............................................. 117
TRAFFIC SIGN RECOGNITION (TSR)
SYSTEM — IF EQUIPPED........................ 117
To Activate/Deactivate ....................... 118
Indications On The Display ................. 118
INTELLIGENT SPEED CONTROL (ISC)
SYSTEM — IF EQUIPPED........................ 119
To Activate/Deactivate ....................... 119
Indications On The Display ................. 119
Acceptance/Rejection Of
The Suggested Speed ......................... 119
PARKSENSE FRONT/REAR PARK
ASSIST SYSTEM —
IF EQUIPPED ......................................... 120
ParkSense Sensors............................. 121
ParkSense Display .............................. 121
Enabling And Disabling
ParkSense ........................................... 122 ParkSense Warning Display ............... 122
Operation With A Trailer...................... 122
ParkSense System Usage
Precautions ......................................... 123
23_GU_OM_EN_USC_t.book Page 10
Page 19 of 268

17
Generic Indication
Ú
page 82
Highway Assist System (HAS)/Traffic Jam Assist (TJA) System Failure
Ú
page 82
Keyless System Failure
Ú
page 82
Lane Departure Warning (LDW) System Failure
Ú
page 82
Loose Fuel Filler Cap
Ú
page 82
Low Coolant Level
Ú
page 82
Park Sensors System Failure
Ú
page 82
Rain Sensor Failure
Ú
page 82
Stop/Start System Failure
Ú
page 83
Amber Symbols
Speed Limiter System Failure
Ú
page 83
Service Adaptive Cruise Control (ACC) System
Ú
page 82
Soft Suspension Calibration Insertion
Ú
page 83
Shock Absorbers Failure
Ú
page 83
Temporary All Wheel Drive Failure
Ú
page 83
Wear On Brake Pads
Ú
page 83
Windshield Wiper Failure
Ú
page 83
Windshield Washer Liquid Level
Ú
page 82
Amber Symbols
23_GU_OM_EN_USC_t.book Page 17
Page 20 of 268
SYMBOL GLOSSARY
18
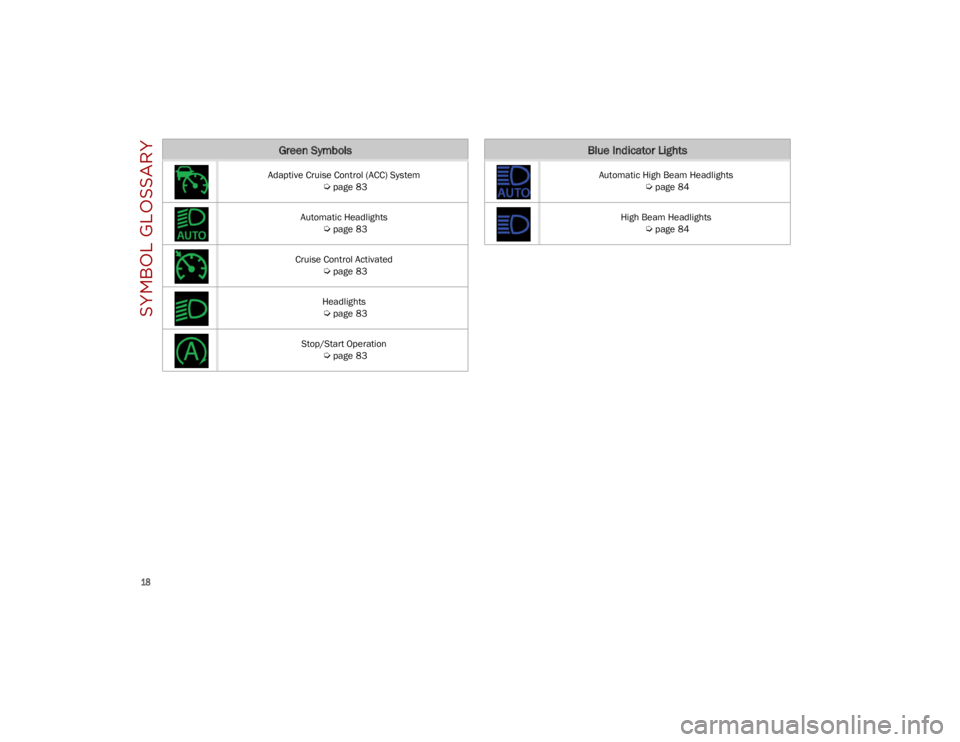
Green Symbols
Adaptive Cruise Control (ACC) System
Ú
page 83
Automatic Headlights
Ú
page 83
Cruise Control Activated
Ú
page 83
Headlights
Ú
page 83
Stop/Start Operation
Ú
page 83
Blue Indicator Lights
Automatic High Beam Headlights
Ú
page 84
High Beam Headlights
Ú
page 84
23_GU_OM_EN_USC_t.book Page 18
Page 23 of 268
21
Programming And Requesting Additional
Key Fobs
Programming the key fob may be performed by an
authorized dealer.
NOTE:
Once a key fob is programmed to a vehicle, it
cannot be repurposed and reprogrammed to
another vehicle.
Only key fobs that are programmed to the
vehicle electronics can be used to start and
operate the vehicle.Duplication of key fobs may be performed at an
authorized dealer. This procedure consists of
programming a blank key fob to the vehicle
electronics. A blank key fob is one that has never
been programmed.
NOTE:
When having the Engine Immobilizer system
serviced, bring all vehicle keys with you to an
authorized dealer.
Keys must be ordered to the correct key cut to
match the vehicle locks.
For Quadrifoglio models, if you need a
replacement key fob, contact an authorized
dealer.
ENGINE IMMOBILIZER
SYSTEM
The Engine Immobilizer system prevents
unauthorized use of the vehicle by disabling
engine starting. The system does not need to be
enabled or activated. Operation is automatic,
regardless of whether the vehicle is locked or
unlocked.
The system uses a key fob, keyless push button
ignition and a Radio Frequency (RF) receiver to
prevent unauthorized vehicle operation. Therefore, only key fobs that are programmed to
the vehicle can be used to start and operate the
vehicle. The system will shut the engine off in two
seconds if an invalid key fob is used to start the
engine.
After placing the ignition switch in the ON/RUN
position, the Vehicle Security Light will turn on for
three seconds for a bulb check. If the light
remains on after the bulb check, it indicates that
there is a problem with the electronics. In
addition, if the light begins to flash after the bulb
check, it indicates that someone used an invalid
key fob to start the engine. Either of these
conditions will result in the engine being shut off
after two seconds.
If the Vehicle Security Light turns on during
normal vehicle operation (vehicle running for
longer than 10 seconds), it indicates that there is
a fault in the electronics. Should this occur, have
the vehicle serviced as soon as possible by an
authorized dealer.
All of the key fobs provided with your new vehicle
have been programmed to the vehicle electronics
Ú
page 259.
NOTE:
A key fob that has not been programmed is also
considered an invalid key.
WARNING!
The integrated key fob contains a coin cell
battery. Do not ingest the battery; there is a
chemical burn hazard. If the coin cell battery
is swallowed, it can cause severe internal
burns in just two hours and can lead to
death.
If you think a battery may have been
swallowed or placed inside any part of the
body, seek immediate medical attention.
Keep new and used batteries away from
children. If the battery compartment does
not close securely, stop using the product
and keep it away from children.
CAUTION!
The battery replacement operation must be
done with care, in order not to damage the
key fob.
WARNING!
Always remove the key fobs from the vehicle
and lock all doors when leaving the vehicle
unattended.
Always remember to place the ignition in
the OFF position.
CAUTION!
The Engine Immobilizer system is not
compatible with some aftermarket remote
starting systems. Use of these systems may
result in vehicle starting problems and loss of
security protection.
23_GU_OM_EN_USC_t.book Page 21
Page 24 of 268
GETTING TO KNOW YOUR VEHICLE
22
IGNITION SWITCH
KEYLESS PUSH BUTTON IGNITION
This feature allows the driver to operate the
ignition switch with the push of a button as long
as the key fob is in the passenger compartment.
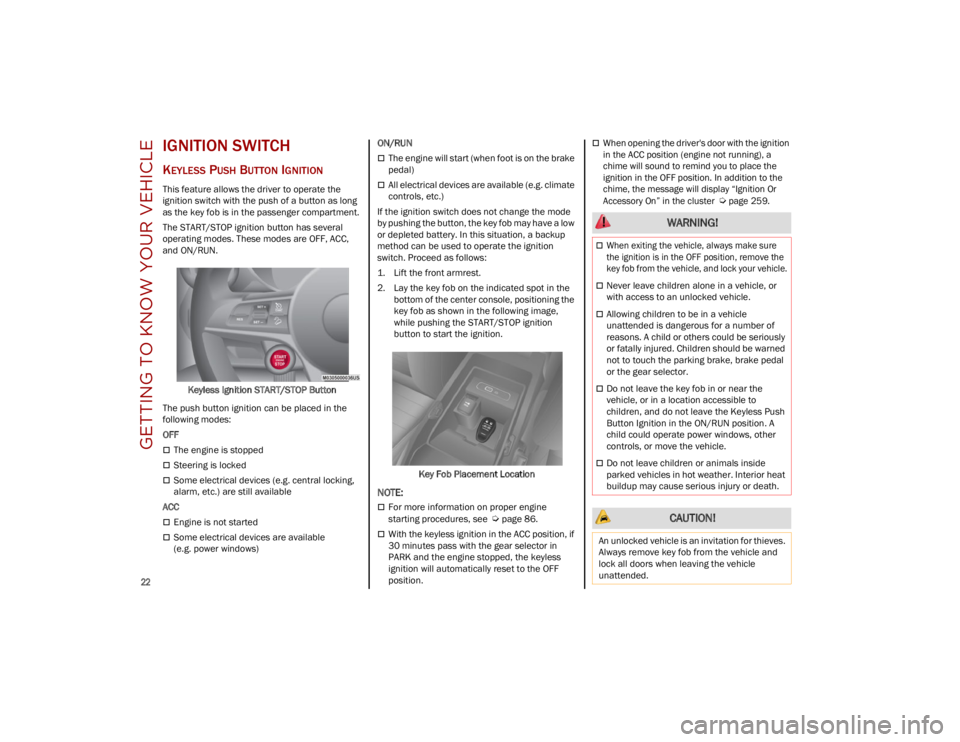
The START/STOP ignition button has several
operating modes. These modes are OFF, ACC,
and ON/RUN.Keyless Ignition START/STOP Button
The push button ignition can be placed in the
following modes:
OFF
The engine is stopped
Steering is locked
Some electrical devices (e.g. central locking,
alarm, etc.) are still available
ACC
Engine is not started
Some electrical devices are available
(e.g. power windows) ON/RUN
The engine will start (when foot is on the brake
pedal)
All electrical devices are available (e.g. climate
controls, etc.)
If the ignition switch does not change the mode
by pushing the button, the key fob may have a low
or depleted battery. In this situation, a backup
method can be used to operate the ignition
switch. Proceed as follows:
1. Lift the front armrest.
2. Lay the key fob on the indicated spot in the bottom of the center console, positioning the
key fob as shown in the following image,
while pushing the START/STOP ignition
button to start the ignition.
Key Fob Placement Location
NOTE:
For more information on proper engine
starting procedures, see
Ú
page 86.
With the keyless ignition in the ACC position, if
30 minutes pass with the gear selector in
PARK and the engine stopped, the keyless
ignition will automatically reset to the OFF
position.
When opening the driver's door with the ignition
in the ACC position (engine not running), a
chime will sound to remind you to place the
ignition in the OFF position. In addition to the
chime, the message will display “Ignition Or
Accessory On” in the cluster
Úpage 259.
WARNING!
When exiting the vehicle, always make sure
the ignition is in the OFF position, remove the
key fob from the vehicle, and lock your vehicle.
Never leave children alone in a vehicle, or
with access to an unlocked vehicle.
Allowing children to be in a vehicle
unattended is dangerous for a number of
reasons. A child or others could be seriously
or fatally injured. Children should be warned
not to touch the parking brake, brake pedal
or the gear selector.
Do not leave the key fob in or near the
vehicle, or in a location accessible to
children, and do not leave the Keyless Push
Button Ignition in the ON/RUN position. A
child could operate power windows, other
controls, or move the vehicle.
Do not leave children or animals inside
parked vehicles in hot weather. Interior heat
buildup may cause serious injury or death.
CAUTION!
An unlocked vehicle is an invitation for thieves.
Always remove key fob from the vehicle and
lock all doors when leaving the vehicle
unattended.
23_GU_OM_EN_USC_t.book Page 22
Page 25 of 268
23
REMOTE START —
IF EQUIPPED
This system uses the key fob to start the
engine conveniently from outside the
vehicle while still maintaining security.
NOTE:
Obstructions between the vehicle and key fob
may reduce this range
Ú
page 259.
HOW TO USE REMOTE START
Push the Remote Start button on the key fob
twice within five seconds. The vehicle doors will
lock, the turn signals will flash twice, and the horn
will chirp twice. Pushing the Remote Start button
a third time shuts the engine off.
NOTE:
With Remote Start, the engine will only run for
15 minutes.
Remote Start can only be used twice.
If an engine fault is present or fuel level is low,
the vehicle will start and then shut down in
10 seconds.
The parking lights will turn on and remain on
during Remote Start mode.
For security, power window and power sunroof
(if equipped) operation is disabled when the
vehicle is in the Remote Start mode.
The ignition must be placed in the ACC position
before the Remote Start sequence can be
repeated for a third cycle.
All of the following conditions must be met before
the engine will remote start:
Gear selector in PARK
Doors closed
Hood closed
Liftgate closed
Hazard switch off
Brake switch inactive (brake pedal not
pressed)
Battery at an acceptable charge level
Panic button not pushed
System not disabled from previous Remote
Start event
Vehicle Security system indicator flashing
Ignition in OFF position
Fuel level meets minimum requirement
Vehicle Security system is not signaling an
intrusion
Malfunction Indicator Light (MIL) is not
illuminated
TO EXIT REMOTE START MODE
To drive the vehicle after starting the Remote
Start system, either push and release the unlock
button on the key fob to unlock the doors, or
unlock the vehicle using Passive Entry via the
door handles, and disarm the Vehicle Security
system (if equipped). Then, prior to the end of the
15 minute cycle, push and release the START/
STOP ignition button while pressing the brake
pedal.
The Remote Start system will turn the engine off
if the Remote Start button is pushed again, or if
the engine is allowed to run for the entire
15 minute cycle.
REMOTE START COMFORT SYSTEMS —
I
F EQUIPPED
When Remote Start is activated, the heated
steering wheel and front heated seat features will
automatically activate when ambient
temperature is less than 39°F (4°C). These
features will stay on through the duration of
Remote Start.
NOTE:
This feature can be activated through the radio
system. Refer to the Information and Entertain -
ment System Owner’s Manual Supplement for
further information.
WARNING!
Do not start or run an engine in a closed
garage or confined area. Exhaust gas
contains Carbon Monoxide (CO) which is
odorless and colorless. Carbon Monoxide is
poisonous and can cause serious injury or
death when inhaled.
Keep key fobs away from children. Operation
of the Remote Start system, windows, door
locks or other controls could cause serious
injury or death.
23_GU_OM_EN_USC_t.book Page 23
Page 45 of 268
43
TROUBLESHOOTING TIPS
If you are having trouble programming
HomeLink®, here are some of the most common
solutions:
Replace the battery in the garage door opener
hand-held transmitter.
Push the LEARN button on the garage door
opener to complete the training for a rolling
code.
Did you unplug the device for programming
and remember to plug it back in?
If you have any problems, or require assistance,
please call toll-free 1-800-355-3515 or on the
Internet at
HomeLink.com
for information or
assistance.
EXTERIOR LIGHTS
HEADLIGHT SWITCH
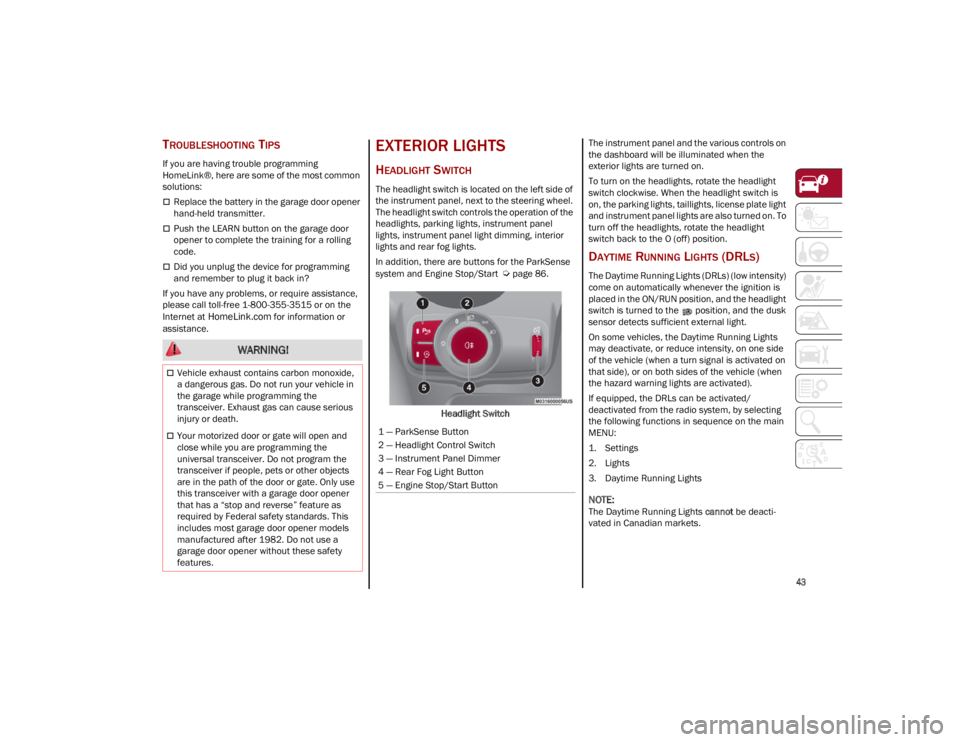
The headlight switch is located on the left side of
the instrument panel, next to the steering wheel.
The headlight switch controls the operation of the
headlights, parking lights, instrument panel
lights, instrument panel light dimming, interior
lights and rear fog lights.
In addition, there are buttons for the ParkSense
system and Engine Stop/Start
Ú
page 86.
Headlight Switch The instrument panel and the various controls on
the dashboard will be illuminated when the
exterior lights are turned on.
To turn on the headlights, rotate the headlight
switch clockwise. When the headlight switch is
on, the parking lights, taillights, license plate light
and instrument panel lights are also turned on. To
turn off the headlights, rotate the headlight
switch back to the O (off) position.
DAYTIME RUNNING LIGHTS (DRLS)
The Daytime Running Lights (DRLs) (low intensity)
come on automatically whenever the ignition is
placed in the ON/RUN position, and the headlight
switch is turned to the position, and the dusk
sensor detects sufficient external light.
On some vehicles, the Daytime Running Lights
may deactivate, or reduce intensity, on one side
of the vehicle (when a turn signal is activated on
that side), or on both sides of the vehicle (when
the hazard warning lights are activated).
If equipped, the DRLs can be activated/
deactivated from the radio system, by selecting
the following functions in sequence on the main
MENU:
1. Settings
2. Lights
3. Daytime Running Lights
NOTE:
The Daytime Running Lights
cannot be deacti -
vated in Canadian markets.
WARNING!
Vehicle exhaust contains carbon monoxide,
a dangerous gas. Do not run your vehicle in
the garage while programming the
transceiver. Exhaust gas can cause serious
injury or death.
Your motorized door or gate will open and
close while you are programming the
universal transceiver. Do not program the
transceiver if people, pets or other objects
are in the path of the door or gate. Only use
this transceiver with a garage door opener
that has a “stop and reverse” feature as
required by Federal safety standards. This
includes most garage door opener models
manufactured after 1982. Do not use a
garage door opener without these safety
features.1 — ParkSense Button
2 — Headlight Control Switch
3 — Instrument Panel Dimmer
4 — Rear Fog Light Button
5 — Engine Stop/Start Button
23_GU_OM_EN_USC_t.book Page 43
Page 47 of 268
45
PARKING LIGHTS
To turn on the parking lights and instrument
panel lights, rotate the headlight switch clockwise
to the position. All of the parking lights will turn
on for eight minutes, and opening the door
activates an audible warning.
To leave only the lights on one side (right/left)
illuminated, move the multifunction lever
(located on the left side of the steering wheel) to
the side that you want to remain on. With the
parking lights on, the indicator light on the
instrument panel will illuminate.
To turn off the parking lights, rotate the headlight
switch back to the O (off) position.
HEADLIGHT OFF DELAY
To assist when exiting the vehicle, the “Headlight
Off Delay” feature will leave the headlights on for
up to 90 seconds. This delay is initiated when the
ignition is placed in the OFF position while the
headlight switch is on, and then the headlight
switch is cycled off. Headlight delay can be
canceled by either turning on the headlights or
side lights, or by placing the ignition in the ON
position.
The function can be activated from the radio
system by selecting the following functions in
sequence on the main menu:
1. Settings
2. Lights
3. Headlight Off Delay
REAR FOG LIGHTS
The rear fog light switch is located within the
headlight switch.
Push the button, located in the center of the
headlight switch, to turn the rear fog lights on/off.
The rear fog lights turn on only when the
headlights or parking lights are also turned on.
The lights can be turned off by pushing the
button again or by turning the headlight switch to
the O (off) position.
When the engine is stopped with the rear fog
lights on, they will be off the next time the engine
is started.
ADAPTIVE HEADLIGHT SYSTEM —
I
F EQUIPPED
This is a system combined with Xenon headlights
(Bi-Xenon 35 W headlamp, if equipped) which
directs the headlights horizontally, and contin -
uously and automatically adapts them to the
driving conditions around bends or when
cornering.
The system directs the headlights to light up the
road in the best way, taking into account the
speed of the vehicle and the bend or corner
angle, as well as the speed at which the steering
wheel is turned.
The adaptive lights are automatically activated
when the vehicle is started.
TURN SIGNALS
Move the multifunction lever up or down to
activate the turn signals. The arrows on each side
of the instrument cluster flash to show proper
operation.
The or turn signal will blink on the
instrument panel.
LANE CHANGE ASSIST
Lightly push the lever up or down once, without
moving beyond the detent, and the turn signal will
flash five times then automatically turn off.
To turn off the flashing before the end of the
cycle, move the lever in the opposite direction
until the first click (about half way).
INTERIOR LIGHTS
Courtesy lights are turned on when the front
doors are opened or when the dimmer control is
rotated to its farthest upward position. The glove
compartment light turns on automatically when
the glove compartment is opened and turn off
when it is closed. The door courtesy lights
illuminate when one of the front doors is opened,
and turn off when it is closed. The liftgate
courtesy lights turn on automatically when the
liftgate is opened and turn off when it is closed.
All of these lights turn on and off regardless of the
ignition status.
23_GU_OM_EN_USC_t.book Page 45
Page 48 of 268
GETTING TO KNOW YOUR VEHICLE
46
FRONT MAP READING LIGHTS
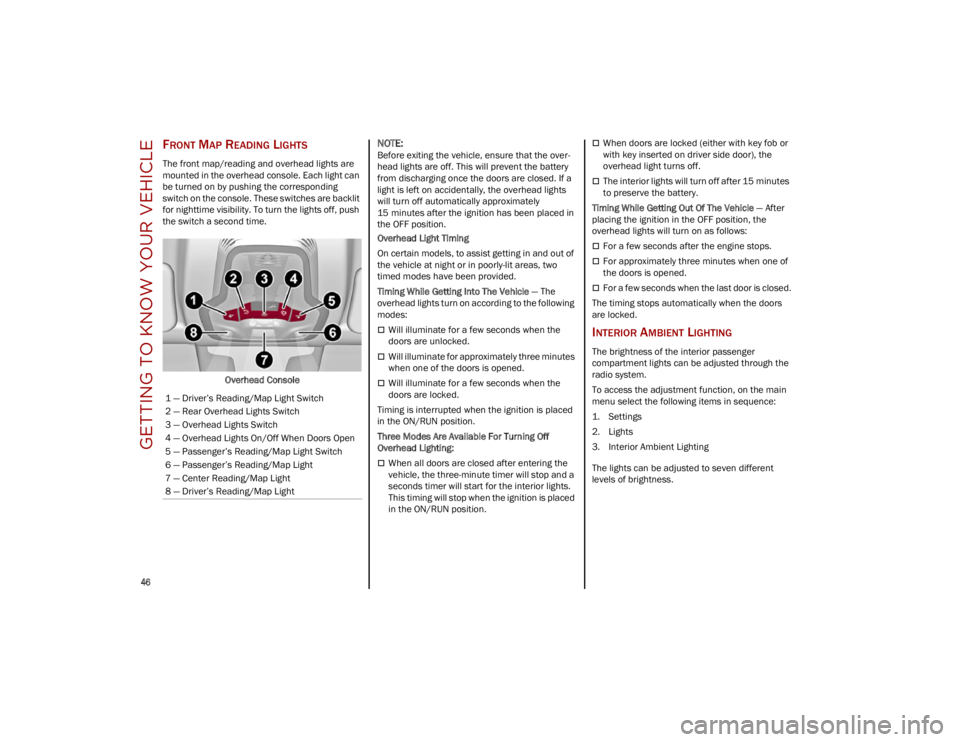
The front map/reading and overhead lights are
mounted in the overhead console. Each light can
be turned on by pushing the corresponding
switch on the console. These switches are backlit
for nighttime visibility. To turn the lights off, push
the switch a second time.Overhead Console
NOTE:
Before exiting the vehicle, ensure that the over -
head lights are off. This will prevent the battery
from discharging once the doors are closed. If a
light is left on accidentally, the overhead lights
will turn off automatically approximately
15 minutes after the ignition has been placed in
the OFF position.
Overhead Light Timing
On certain models, to assist getting in and out of
the vehicle at night or in poorly-lit areas, two
timed modes have been provided.
Timing While Getting Into The Vehicle — The
overhead lights turn on according to the following
modes:
Will illuminate for a few seconds when the
doors are unlocked.
Will illuminate for approximately three minutes
when one of the doors is opened.
Will illuminate for a few seconds when the
doors are locked.
Timing is interrupted when the ignition is placed
in the ON/RUN position.
Three Modes Are Available For Turning Off
Overhead Lighting:
When all doors are closed after entering the
vehicle, the three-minute timer will stop and a
seconds timer will start for the interior lights.
This timing will stop when the ignition is placed
in the ON/RUN position.
When doors are locked (either with key fob or
with key inserted on driver side door), the
overhead light turns off.
The interior lights will turn off after 15 minutes
to preserve the battery.
Timing While Getting Out Of The Vehicle — After
placing the ignition in the OFF position, the
overhead lights will turn on as follows:
For a few seconds after the engine stops.
For approximately three minutes when one of
the doors is opened.
For a few seconds when the last door is closed.
The timing stops automatically when the doors
are locked.
INTERIOR AMBIENT LIGHTING
The brightness of the interior passenger
compartment lights can be adjusted through the
radio system.
To access the adjustment function, on the main
menu select the following items in sequence:
1. Settings
2. Lights
3. Interior Ambient Lighting
The lights can be adjusted to seven different
levels of brightness.
1 — Driver’s Reading/Map Light Switch
2 — Rear Overhead Lights Switch
3 — Overhead Lights Switch
4 — Overhead Lights On/Off When Doors Open
5 — Passenger’s Reading/Map Light Switch
6 — Passenger’s Reading/Map Light
7 — Center Reading/Map Light
8 — Driver’s Reading/Map Light
23_GU_OM_EN_USC_t.book Page 46
Page 57 of 268
55
To Turn On The Climate Control System
To switch the Climate Control system on in
automatic mode, push the AUTO button.
Operating Mode
The Climate Control system can be activated in
different ways. It is recommended to use the
automatic function. Push the AUTO button and
set the desired temperatures.
The automatic system adjusts the temperature,
quantity, and distribution of air introduced into
the passenger compartment. It also controls air
recirculation and the activation of the air
conditioner.
At any time during automatic operation, you can
change the temperature, activate or deactivate
the Rear Defrost, activate SYNC, activate or
deactivate the air conditioner, and activate or
deactivate air recirculation. The system will
automatically adjust to the new settings.
Climate Control Display Settings
The Climate Control settings are visible on the
radio screen.
The display on the radio system is a pop up
window, which is activated by pushing the
buttons or turning the knobs on the Climate
Control system. The indicator lights located on
the buttons and knobs indicate that the selected
feature is on/off. If no operation is performed for
a predetermined time, the pop-up will close on
the display.
Humidity Sensor
The Humidity Sensor helps prevent the windows
from fogging up. The AUTO function (indicator
illuminated) must be on for the Humidity Sensor
to function.
When outside temperature is low, the system may
turn the compressor on and turn air recirculation
off for safer driving.
Stop/Start
The Stop/Start system shuts off the engine when
the vehicle speed is 0 mph (0 km/h), as a fuel
conservation measure.
In order to maintain comfort in the cabin, the
Stop/Start feature will not activate if any of the
following conditions exist:
The Climate Control system is in AUTO mode
(indicator illuminated), and the vehicle has yet
to reach the set temperature
The Climate Control system is in LO maximum
cooling
The Climate Control system is in HI maximum
heating
The Climate Control system is in the MAX-DEF
status
When the Stop/Start system is active, the engine
will restart if the inside temperature changes
significantly, or if the LO setting, or MAX-DEF
setting, is activated. With Stop/Start system on (engine is OFF), air
flow is reduced to keep the compartment comfort
conditions for longer.
Until the temperature drastically changes within
the cabin, the climate control system will
continue to maintain the temperature while the
engine is off. By deactivating the Stop/Start
system with the button (located by the
headlight switch), the climate control system
operates normally according to the settings.
NOTE:
In harsh climate conditions, limit the use of the
Stop/Start system to prevent the compressor
from continuously switching on and off. This
will cause rapid misting of the windows and the
accumulation of humidity in the passenger
compartment.
When the Stop/Start system is on, the climate
control system will always take air in from
outside, reducing the probability of the
windows fogging up.
System Maintenance
In winter months, the Climate Control system
must be turned on at least once a month for
approximately 10 minutes.
Have the system inspected at an authorized
dealer before the summer.
23_GU_OM_EN_USC_t.book Page 55