trailer ALFA ROMEO STELVIO 2023 Owners Manual
[x] Cancel search | Manufacturer: ALFA ROMEO, Model Year: 2023, Model line: STELVIO, Model: ALFA ROMEO STELVIO 2023Pages: 268, PDF Size: 10.36 MB
Page 12 of 268

10
STARTING AND OPERATING
STARTING THE ENGINE ............................86
Starting Procedure................................. 86
Remote Starting System ....................... 86
Cold Weather Operation ........................ 87
Extended Park Starting.......................... 87
If Engine Fails To Start .......................... 87
After Starting — Warming Up The
Engine ..................................................... 88 Stopping The Engine.............................. 88
Turbocharger Cool Down ....................... 88
ENGINE BLOCK HEATER —
IF EQUIPPED ............................................88
ENGINE BREAK-IN
RECOMMENDATIONS ...............................89
Engine Break-In...................................... 89
ELECTRIC PARK BRAKE (EPB) .................89
Electric Park Brake (EPB)
Operating Modes ................................... 91 Safe Hold ................................................ 91
AUTOMATIC TRANSMISSION....................91
Display .................................................... 92
Gear Selector ......................................... 92
Transmission Operating Modes ............ 93
Automatic Transmission Limp
Home Mode ............................................ 95 Brake Transmission Shift
Interlock (BTSI) System ......................... 95 Important Notes ..................................... 96
ALFA DNA SELECTOR ...............................97
Alfa DNA System .................................... 97
Driving Modes ........................................ 97
ALFA ACTIVE SUSPENSION (AAS) —
IF EQUIPPED............................................. 99
STOP/START SYSTEM............................ 100
Operating Mode ................................... 100
System Manual Activation/
Deactivation ......................................... 100 Possible Reasons The Engine
Does Not Autostop .............................. 100 Engine Restarting Conditions ............. 101
Safety Functions .................................. 101
Energy Saving Function....................... 101
Irregular Operation .............................. 101
Vehicle Inactivity .................................. 101
SPEED LIMITER ...................................... 101
Description ........................................... 101
Activation ............................................. 101
Speed Limit Programming .................. 102
Exceeding The Programmed Speed ... 102
Programmed Speed Icon Flashing ..... 102
Deactivation ......................................... 102
CRUISE CONTROL SYSTEMS —
IF EQUIPPED .......................................... 102
Cruise Control ...................................... 103
Adaptive Cruise Control (ACC) ........... 105
HIGHWAY ASSIST SYSTEM (HAS) —
IF EQUIPPED........................................... 111
To Activate/Deactivate........................ 111
Operation ............................................. 112
Indications On The Display ................. 112
System Status...................................... 113
Limited System Availability/
Operation ............................................. 114
TRAFFIC JAM ASSIST (TJA) SYSTEM —
IF EQUIPPED .......................................... 114
To Activate/Deactivate ....................... 115
Operation ............................................. 115
Indications On The Display ................. 116
System Status ..................................... 116
Limited System Availability/
Operation ............................................. 117
TRAFFIC SIGN RECOGNITION (TSR)
SYSTEM — IF EQUIPPED........................ 117
To Activate/Deactivate ....................... 118
Indications On The Display ................. 118
INTELLIGENT SPEED CONTROL (ISC)
SYSTEM — IF EQUIPPED........................ 119
To Activate/Deactivate ....................... 119
Indications On The Display ................. 119
Acceptance/Rejection Of
The Suggested Speed ......................... 119
PARKSENSE FRONT/REAR PARK
ASSIST SYSTEM —
IF EQUIPPED ......................................... 120
ParkSense Sensors............................. 121
ParkSense Display .............................. 121
Enabling And Disabling
ParkSense ........................................... 122 ParkSense Warning Display ............... 122
Operation With A Trailer...................... 122
ParkSense System Usage
Precautions ......................................... 123
23_GU_OM_EN_USC_t.book Page 10
Page 13 of 268
11
LANE DEPARTURE WARNING (LDW)
SYSTEM ................................................. 123
Lane Departure Warning
Operation ..............................................123 Turning Lane Departure Warning On
Or Off .................................................... 124 Lane Departure Warning Message.....124
Changing Lane Departure Warning
Status ................................................... 125
LANE KEEPING ASSIST (LKA) SYSTEM —
IF EQUIPPED .......................................... 125
Turning Lane Keeping
Assist On Or Off ....................................126 Lane Keeping Assist Warning
Message ...............................................126
REAR BACK UP CAMERA / DYNAMIC
GRIDLINES ............................................ 128
REFUELING THE VEHICLE ..................... 129
Refueling Capacity ............................... 129
Refueling Procedure ...........................130
VEHICLE LOADING ................................ 132
Certification Label................................ 132
TRAILER TOWING................................... 133
Common Towing Definitions ...............133
Trailer Hitch Classification .................. 134
Trailer Towing Weights
(Maximum Trailer Weight Ratings) .....134 Trailer And Tongue Weight ................. 135
Towing Requirements..........................135
Towing Tips ......................................... 137
Installing The Receiver ....................... 137
Connecting The Electrical System...... 138
Removing The Receiver ...................... 138
SUGGESTIONS FOR DRIVING................ 138
Saving Fuel .......................................... 138
Driving Style......................................... 139
Conditions Of Use................................ 139
Performance — Quadrifoglio ............... 139
SAFETY
ACTIVE SAFETY SYSTEMS ..................... 140
Anti-Lock Brake System (ABS) ........... 140
Active Torque Vectoring (ATV)
System — If Equipped ......................... 140 Dynamic Steering Torque (DST)
System ................................................. 141 Drive Train Control (DTC) System....... 141
Electronic Stability Control (ESC)
System ................................................. 141 Hill Descent Control (HDC) System —
If Equipped .......................................... 142 Hill Start Assist (HSA) System ............ 143
Panic Brake Assist (PBA) System ....... 143
Traction Control System (TCS)............ 144
AUXILIARY DRIVING SYSTEMS .............. 144
Blind Spot Monitoring (BSM) System —
If Equipped ........................................... 144 Active Blind Spot Assist (ABSA)
System — If Equipped ......................... 146 Driver Attention Assist (DAA) System —
If Equipped ........................................... 149 Forward Collision Warning
Plus (FCW+) System —
If Equipped .......................................... 151 Tire Pressure Monitoring
System (TPMS) .................................... 155
OCCUPANT RESTRAINT SYSTEMS ....... 157
Occupant Restraint Systems
Features .............................................. 157 Important Safety Precautions............. 157
Seat Belt Systems .............................. 158
Supplemental Restraint
Systems (SRS) ..................................... 162 Child Restraints ................................... 170
SAFETY TIPS .......................................... 180
Transporting Passengers .................... 180
Transporting Pets ............................... 180
Connected Vehicles ............................. 180
Safety Checks You Should Make
Inside The Vehicle .............................. 180 Periodic Safety Checks You
Should Make Outside The Vehicle ..... 182 Exhaust Gas ......................................... 182
Carbon Monoxide Warnings................ 182
23_GU_OM_EN_USC_t.book Page 11
Page 83 of 268
81
Blind Spot Monitoring System Failure —
If Equipped
The telltale will illuminate in the event of
a Blind Spot Monitoring system failure.
Contact an authorized dealer as soon as possible.
Driver Attention Assist (DAA) System
Failure
The symbol comes on in the event of a
DAA system failure.
Contact an authorized dealer as soon as possible.
Dusk Sensor Failure
The telltale will illuminate in the case of
failure of the automatic low beam
alignment.
Contact an authorized dealer as soon as possible.
Dynamic Drive Control System Failure
The telltale will illuminate to signal a
failure in the dynamic drive control
system.
Electric Park Brake Failure
The telltale will illuminate and a
message will display to signal a failure
in the electric park brake system.
This failure may partially or completely block the
vehicle because the park brake could remain
activated even if automatically or manually
disengaged using the relevant controls. In these
circumstances, you can disengage the park brake
following the emergency disengagement
procedure
Ú
page 89. If you are still able to drive the vehicle (park brake
is not engaged), drive to the nearest authorized
dealer and remember, when executing any
maneuvers/commands, that the electric park
brake is not operational.
Engine Immobilizer Failure/Break-In
Attempt
Engine Immobilizer System Failure
The
telltale will illuminate to report a failure
of the Engine Immobilizer system.
Break-In Attempt The telltale will illuminate when
the ignition is cycled to ON position, to indicate a
possible break-in attempt detected by the alarm
system.
Electronic Key Not Recognized The telltale will
illuminate when the engine is started and the
electronic key is not recognized by the system.
Alarm System Failure The telltale will illuminate to
report an alarm system failure.
Contact an authorized dealer as soon as possible.
Exterior Lights Failure
The telltale will illuminate to indicate a
failure on the following lights: Daytime
Running Lights (DRLs) / parking lights /
trailer turn signal indicators (if present) /
trailer lights (if present) / side lights / turn signal
indicators / rear fog light / reversing light / brake
lights / license plate lights.
The failure may be caused by a blown bulb, a
blown protection fuse, or an interruption of the
electrical connection.
Replace the bulb or the relevant fuse. Contact an
authorized dealer.
Engine Oil Change Required —
If Equipped
The telltale is illuminated only for a
limited time.
NOTE:
After the first indication, each time the engine is
started the symbol will continue to illuminate as
previously described until the oil is changed.
If the telltale flashes, this does not mean that
there is a fault on the vehicle, rather it simply
reports that it is now necessary to change the
oil as a result of regular use of the vehicle. The
deterioration of engine oil is accelerated by
using the vehicle for short drives, preventing the
engine from reaching operating temperature.
Contact an authorized dealer as soon as possible.
WARNING!
If a failure is present with sharp braking, the
rear wheels may lock and the vehicle may
swerve.
CAUTION!
Deteriorated engine oil should be replaced as
soon as possible after the symbol is switched
on, and never more than 500 miles (805 km)
after it first switches on. Failure to observe the
above may result in severe damage to the
engine and invalidate the New Vehicle Limited
Warranty. When this symbol comes on, it does
not mean that the level of engine oil is low, so
if it flashes you do not need to top up the
engine oil.
23_GU_OM_EN_USC_t.book Page 81
Page 96 of 268
STARTING AND OPERATING
94
REVERSE (R)
Select this mode only with the vehicle at a
standstill.
NEUTRAL (N)
Use this range when the vehicle is standing for
prolonged periods with the engine running. The
engine may be started in this range. Apply the
EPB and shift the transmission into PARK (P) if
you must leave the vehicle.DRIVE (D)
Use this mode in normal driving conditions.
Shifting from DRIVE (D) to PARK (P) or REVERSE
(R) modes must take place only after releasing
the accelerator pedal, with vehicle at a standstill
and brake pedal pressed.
This mode ensures automatic engagement of the
most suitable gears for driving needs and
maximum fuel economy in terms of consumption.
In this position, the transmission shifts the gears
automatically, selecting the most suitable for
forward driving among those available as you go.
In this way the vehicle's optimal driving character
-
istics are provided for all conditions.
AutoStick
In the case of frequent shifting (e.g. for sport
driving, when the vehicle is driven with a heavy
load, on slopes, when towing heavy trailers), it is
recommended to use the AutoStick (sequential
shifting) mode to select and keep a lower fixed
ratio.
In these conditions, the use of a lower gear
improves vehicle performance and prevents
overheating.
It is possible to shift from DRIVE (D) mode to
AutoStick mode regardless of vehicle speed.
Activation
Starting from DRIVE (D) mode, to activate the
sequential drive mode, move the gear selector to
the left (– and + indication of the trim). The gear
engaged will be shown on the display. Shifting is made by moving the gear selector
forward, toward symbol – or backward, toward
symbol +.
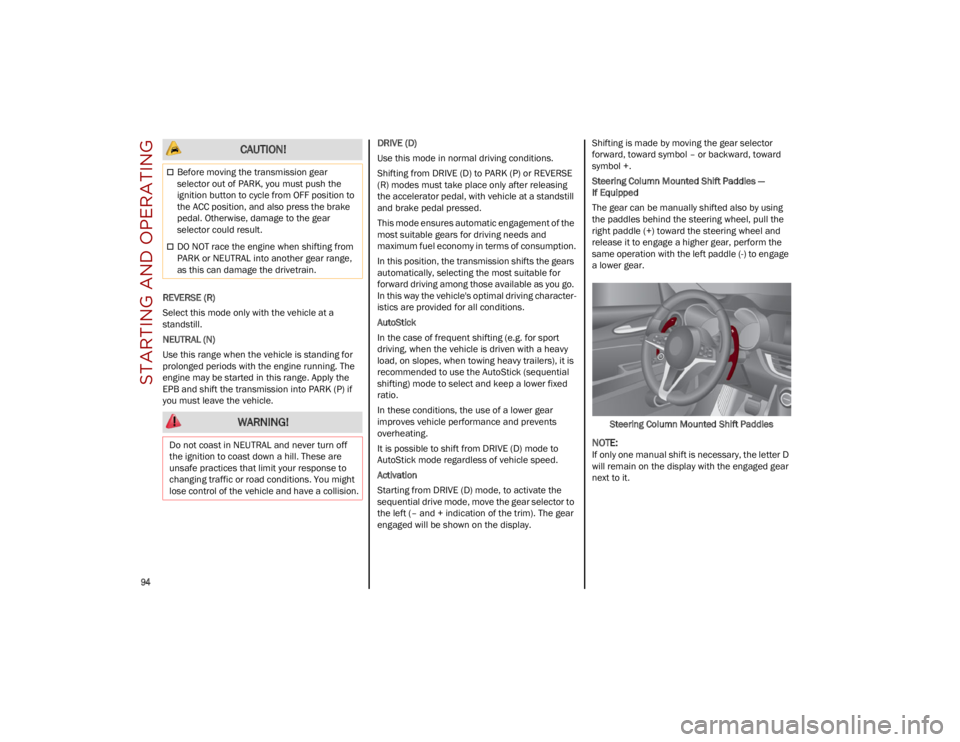
Steering Column Mounted Shift Paddles —
If Equipped
The gear can be manually shifted also by using
the paddles behind the steering wheel, pull the
right paddle (+) toward the steering wheel and
release it to engage a higher gear, perform the
same operation with the left paddle (-) to engage
a lower gear.
Steering Column Mounted Shift Paddles
NOTE:
If only one manual shift is necessary, the letter D
will remain on the display with the engaged gear
next to it.
CAUTION!
Before moving the transmission gear
selector out of PARK, you must push the
ignition button to cycle from OFF position to
the ACC position, and also press the brake
pedal. Otherwise, damage to the gear
selector could result.
DO NOT race the engine when shifting from
PARK or NEUTRAL into another gear range,
as this can damage the drivetrain.
WARNING!
Do not coast in NEUTRAL and never turn off
the ignition to coast down a hill. These are
unsafe practices that limit your response to
changing traffic or road conditions. You might
lose control of the vehicle and have a collision.
23_GU_OM_EN_USC_t.book Page 94
Page 107 of 268
105
(Continued)
ADAPTIVE CRUISE CONTROL (ACC)
The Adaptive Cruise Control (ACC) is a driver
assist system that combines the Cruise Control
functions with controlling the distance from the
vehicle ahead. ACC will adjust the vehicle speed
up to the preset speed to maintain a distance
with the vehicle ahead. ACC increases the driving
convenience provided by Cruise Control while
traveling on highways and major roadways.
However, it is not a safety system and not
designed to prevent collisions. The Cruise Control
function performs differently
Ú
page 103.
ACC will allow you to keep Cruise Control engaged
in light to moderate traffic conditions without the
constant need to reset your Cruise Control. ACC
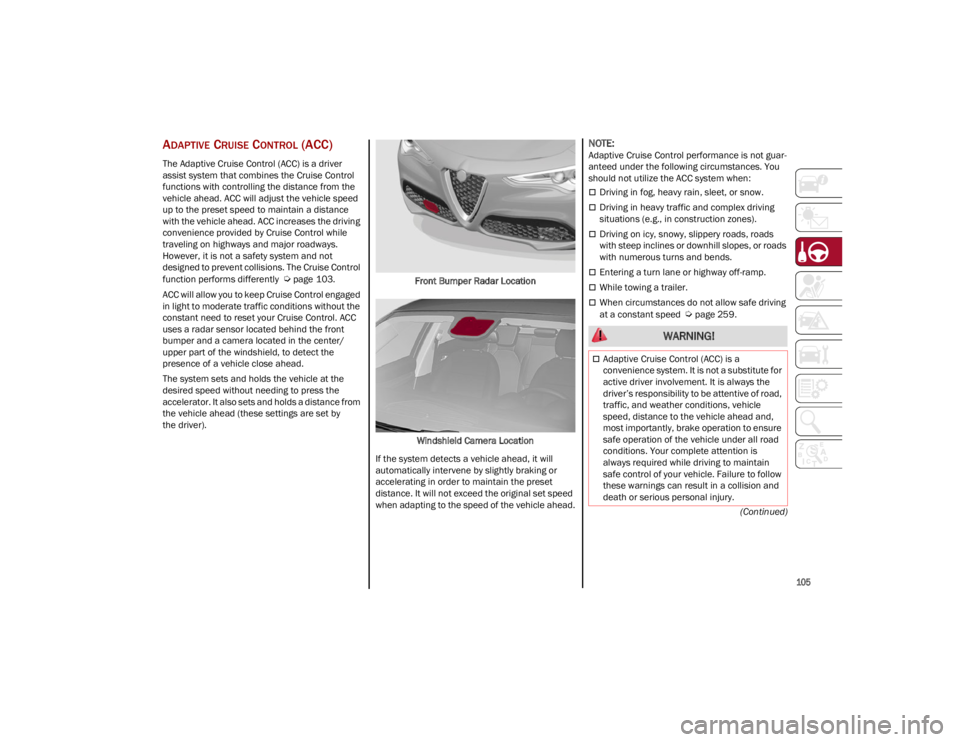
uses a radar sensor located behind the front
bumper and a camera located in the center/
upper part of the windshield, to detect the
presence of a vehicle close ahead.
The system sets and holds the vehicle at the
desired speed without needing to press the
accelerator. It also sets and holds a distance from
the vehicle ahead (these settings are set by
the driver). Front Bumper Radar Location
Windshield Camera Location
If the system detects a vehicle ahead, it will
automatically intervene by slightly braking or
accelerating in order to maintain the preset
distance. It will not exceed the original set speed
when adapting to the speed of the vehicle ahead.
NOTE:
Adaptive Cruise Control performance is not guar -
anteed under the following circumstances. You
should not utilize the ACC system when:
Driving in fog, heavy rain, sleet, or snow.
Driving in heavy traffic and complex driving
situations (e.g., in construction zones).
Driving on icy, snowy, slippery roads, roads
with steep inclines or downhill slopes, or roads
with numerous turns and bends.
Entering a turn lane or highway off-ramp.
While towing a trailer.
When circumstances do not allow safe driving
at a constant speed
Ú
page 259.
WARNING!
Adaptive Cruise Control (ACC) is a
convenience system. It is not a substitute for
active driver involvement. It is always the
driver’s responsibility to be attentive of road,
traffic, and weather conditions, vehicle
speed, distance to the vehicle ahead and,
most importantly, brake operation to ensure
safe operation of the vehicle under all road
conditions. Your complete attention is
always required while driving to maintain
safe control of your vehicle. Failure to follow
these warnings can result in a collision and
death or serious personal injury.
23_GU_OM_EN_USC_t.book Page 105
Page 108 of 268
STARTING AND OPERATING
106
Activating Adaptive Cruise Control (ACC)
The minimum set speed for the ACC system is
19 mph (30 km/h) and the maximum is 110 mph
(180 km/h).
The system cannot be activated:
When pressing the brake pedal.
When the brakes are overheated.
When the Electric Park Brake has been
operated.
When either PARK, REVERSE or NEUTRAL is
engaged.
When the engine RPM is above a maximum
threshold.
When the vehicle speed is not within the
operational speed range.
When the Electronic Stability Control (ESC)
(or Anti-Lock Brake System (ABS) or other
stability control systems) are operating or
have just operated.
When the ESC system is off.
When the Forward Collision Warning system
(if equipped) is braking automatically.
In the event of a system failure.
When the engine is off.
In case of obstruction of the radar sensor (in
this case the bumper area where it is located
must be cleaned).
If the system is set, the conditions described
above also cause a cancellation or deactivation
of the system. These situations may vary
according to the conditions.
NOTE:
The system will not be deactivated when speeds
higher than those set are reached by pressing the
accelerator pedal above 110 mph (180 km/h). In
these situations, the system may not work
correctly and it is recommended to deactivate it.
The driver should always obey traffic laws and
speed limits. Never drive above applicable speed
limit restrictions.
To Activate/Deactivate
The system has four operating states:
Enabled (speed not set)
Activated (speed set)
Paused
Deactivated
To Activate
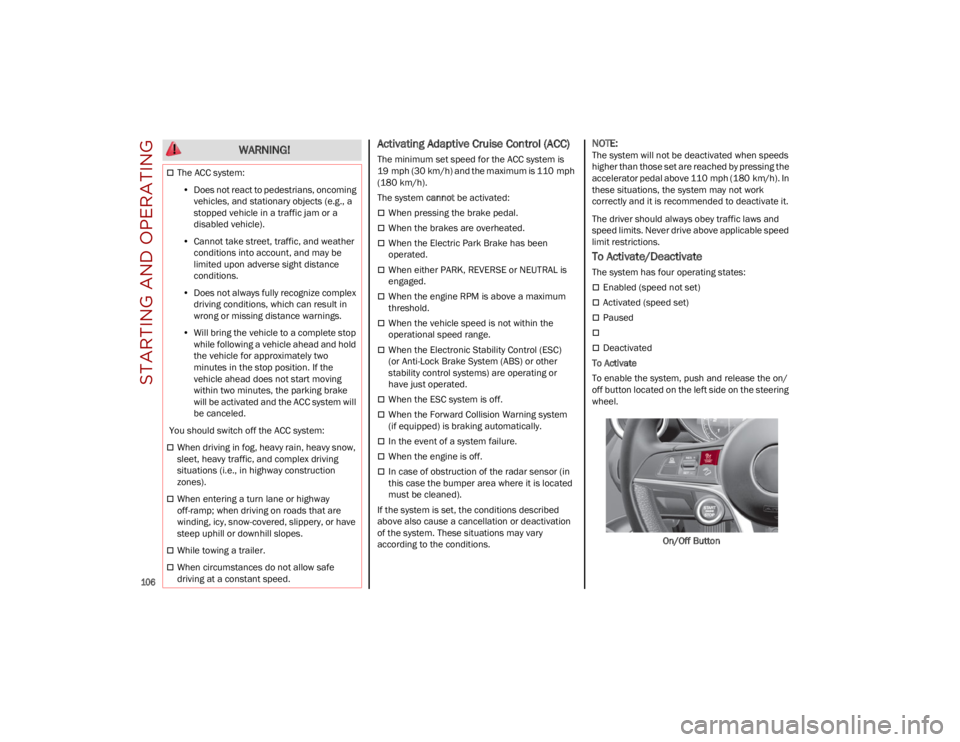
To enable the system, push and release the on/
off button located on the left side on the steering
wheel.
On/Off Button
The ACC system:• Does not react to pedestrians, oncoming
vehicles, and stationary objects (e.g., a stopped vehicle in a traffic jam or a disabled vehicle).
• Cannot take street, traffic, and weather
conditions into account, and may be limited upon adverse sight distance conditions.
• Does not always fully recognize complex
dri ving conditions, whi c
h can result in
wrong or missing distance warnings.
• Will bring the vehicle to a complete stop
while following a vehicle ahead and holdthe vehicle for approximately twominutes in the stop position. If thevehicle ahead does not start movingwithin two minutes, the parking brakewill be activated and the ACC system will be canceled.
You should switch off the ACC system:
When driving in fog, heavy rain, heavy snow,
sleet, heavy traffic, and complex driving
situations (i.e., in highway construction
zones).
When entering a turn lane or highway
off-ramp; when driving on roads that are
winding, icy, snow-covered, slippery, or have
steep uphill or downhill slopes.
While towing a trailer.
When circumstances do not allow safe
driving at a constant speed.
WARNING!
23_GU_OM_EN_USC_t.book Page 106
Page 111 of 268
109
Overtake Aid
When driving with ACC engaged and following a
vehicle at a speed greater than 45 mph
(70 km/h), the system will provide an additional
acceleration up to the ACC set speed to assist in
passing the vehicle. This additional acceleration
is triggered when the driver utilizes the left turn
signal and will only be active when passing on the
left hand side.
The system detects the direction of traffic
automatically when the vehicle passes from left
hand traffic to right hand traffic. In this case, the
overtaking assist function is only active when the
reference vehicle is overtaken on the right. The
additional acceleration is deactivated when the
driver uses the right direction indicator and
returns to the original lane.
Stop And Go Function
The Stop and Go operating strategy allows you to
maintain a safe distance from the vehicle ahead
until the vehicle has completely stopped.
In the event that the ACC system brings your
vehicle to a standstill while following the vehicle
in front, if the vehicle in front starts moving within
two seconds of your vehicle coming to a
standstill, your vehicle will resume motion without
the need for any driver action.If the vehicle in front does not start moving within
two seconds of your vehicle coming to a
standstill, the driver will have to push the RES/
SET switch upward to restart.
Deactivation
The system is deactivated and the set speed is
canceled if:
The on/off button is pushed (when the system
is on or paused)
The ignition is placed in the OFF position
RACE mode is activated (Quadrifoglio models)
The system is canceled (the set speed and
distance are stored):
When the system is paused
Ú
page 106
When the conditions shown in the “Activating
Adaptive Cruise Control (ACC)” section occur
Ú
page 106
Limited Operation Warning
If the dedicated message is shown on the display,
a condition limiting the Adaptive Cruise Control
operation may have occurred.
This could be due to an obstruction of the
vehicle’s sensor or camera. It could also be due to
a fault in the system. If an obstruction is detected,
clean the area of the windshield opposite the
interior rearview mirror, where the camera is located, as well as the area of the front fascia/
bumper where the sensor is located. Then check
that the message has disappeared.
When the conditions limiting the system
functions end, normal operation will resume.
Should the fault persist, contact an authorized
dealer.
Precautions While Driving With ACC
In certain driving situations, ACC may have
detection issues. In these cases, ACC may brake
late or unexpectedly. The driver needs to stay
alert and may need to intervene. The following
are examples of these types of situations:
Towing A Trailer
Towing a trailer is not recommended when using
ACC.
Offset Driving
ACC may not detect a vehicle in the same lane
that is offset from your direct line of travel, or a
vehicle merging in from a side lane. There may
not be sufficient distance to the vehicle ahead.
The offset vehicle may move in and out of the line
of travel, which can cause your vehicle to brake or
accelerate unexpectedly.
Turns And Bends
When driving on a curve with ACC engaged, the
system may increase or decrease the vehicle
speed for stability, with no vehicle ahead
detected. Once the vehicle is out of the curve, the
system will resume your original set speed. This is
a part of normal ACC system functionality.
NOTE:
On tight turns ACC performance may be limited.
The driver is fully responsible for holding a
safe distance from the vehicle ahead
respecting the highway code in force in the
respective country.
WARNING!
WARNING!
When the ACC system is resumed, the driver
must ensure that there are no pedestrians,
vehicles or objects in the path of the vehicle.
Failure to follow these warnings can result in a
collision and death or serious personal injury.
23_GU_OM_EN_USC_t.book Page 109
Page 124 of 268
STARTING AND OPERATING
122
ENABLING AND DISABLING PARKSENSE
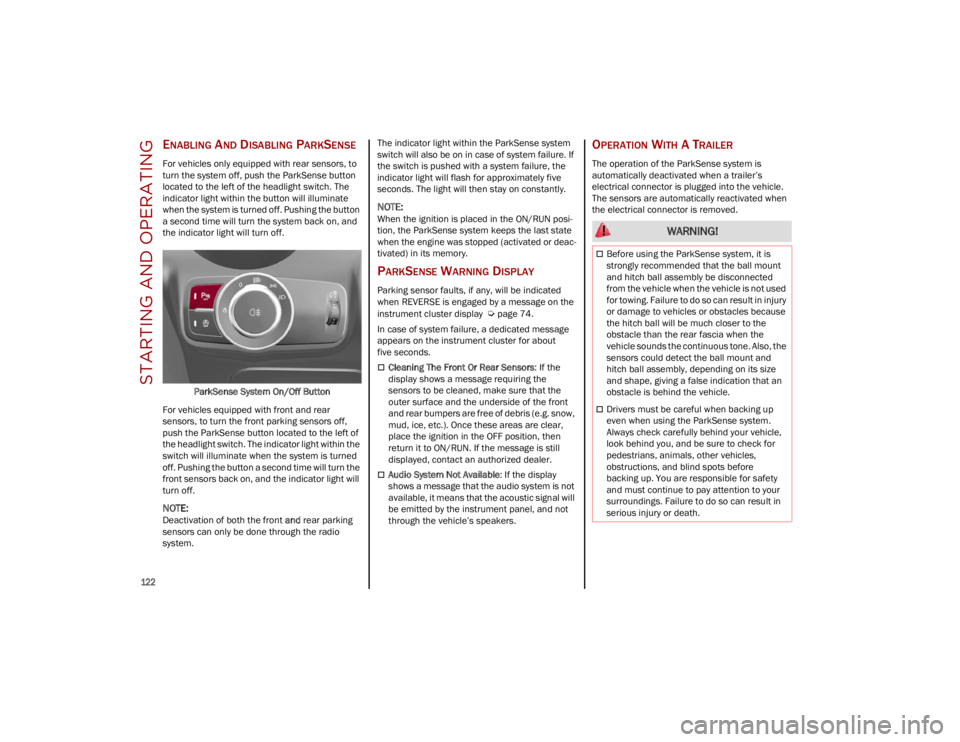
For vehicles only equipped with rear sensors, to
turn the system off, push the ParkSense button
located to the left of the headlight switch. The
indicator light within the button will illuminate
when the system is turned off. Pushing the button
a second time will turn the system back on, and
the indicator light will turn off.ParkSense System On/Off Button
For vehicles equipped with front and rear
sensors, to turn the front parking sensors off,
push the ParkSense button located to the left of
the headlight switch. The indicator light within the
switch will illuminate when the system is turned
off. Pushing the button a second time will turn the
front sensors back on, and the indicator light will
turn off.
NOTE:
Deactivation of both the front and rear parking
sensors can only be done through the radio
system. The indicator light within the ParkSense system
switch will also be on in case of system failure. If
the switch is pushed with a system failure, the
indicator light will flash for approximately five
seconds. The light will then stay on constantly.
NOTE:
When the ignition is placed in the ON/RUN posi
-
tion, the ParkSense system keeps the last state
when the engine was stopped (activated or deac -
tivated) in its memory.
PARKSENSE WARNING DISPLAY
Parking sensor faults, if any, will be indicated
when REVERSE is engaged by a message on the
instrument cluster display
Ú
page 74.
In case of system failure, a dedicated message
appears on the instrument cluster for about
five seconds.
Cleaning The Front Or Rear Sensors : If the
display shows a message requiring the
sensors to be cleaned, make sure that the
outer surface and the underside of the front
and rear bumpers are free of debris (e.g. snow,
mud, ice, etc.). Once these areas are clear,
place the ignition in the OFF position, then
return it to ON/RUN. If the message is still
displayed, contact an authorized dealer.
Audio System Not Available : If the display
shows a message that the audio system is not
available, it means that the acoustic signal will
be emitted by the instrument panel, and not
through the vehicle’s speakers.
OPERATION WITH A TRAILER
The operation of the ParkSense system is
automatically deactivated when a trailer’s
electrical connector is plugged into the vehicle.
The sensors are automatically reactivated when
the electrical connector is removed.
WARNING!
Before using the ParkSense system, it is
strongly recommended that the ball mount
and hitch ball assembly be disconnected
from the vehicle when the vehicle is not used
for towing. Failure to do so can result in injury
or damage to vehicles or obstacles because
the hitch ball will be much closer to the
obstacle than the rear fascia when the
vehicle sounds the continuous tone. Also, the
sensors could detect the ball mount and
hitch ball assembly, depending on its size
and shape, giving a false indication that an
obstacle is behind the vehicle.
Drivers must be careful when backing up
even when using the ParkSense system.
Always check carefully behind your vehicle,
look behind you, and be sure to check for
pedestrians, animals, other vehicles,
obstructions, and blind spots before
backing up. You are responsible for safety
and must continue to pay attention to your
surroundings. Failure to do so can result in
serious injury or death.
23_GU_OM_EN_USC_t.book Page 122
Page 125 of 268
123
(Continued)
PARKSENSE SYSTEM USAGE
P
RECAUTIONS
NOTE:
Some conditions may influence the performance
of the ParkSense system:
Reduced sensor sensitivity could be due to the
presence of ice, snow, mud, or thick paint on
the surface of the sensor.
The sensors may detect a false obstacle (echo
interference) due to mechanical interference,
for example when washing the vehicle or in
extreme weather.
The signals sent by the sensors can be
altered by the presence of ultrasonic systems
(e.g. pneumatic brake systems of trucks or
pneumatic drills) near the vehicle.
System performance can be influenced by the
position of the sensors. For example, due to a
change in the ride setting (caused by wear to
the shock absorbers or suspension), by
changing tires, overloading the vehicle or
operations that require the vehicle to be
lowered.
Be sure not to place bumper stickers or other
adhesives over the sensors as this will affect
system performance.
The presence of a trailer hitch without a trailer.
This may interfere with the operation of the
parking sensors. Before using the ParkSense
system, it is recommended to remove or close
the trailer hitch assembly when the vehicle is
not being used for towing.
LANE DEPARTURE
WARNING (LDW) SYSTEM
LANE DEPARTURE WARNING OPERATION
The Lane Departure Warning system uses a
forward looking camera located on the
windshield to detect lane markings and measure
vehicle position within the lane boundaries.
When one or both lane limits are detected and
the vehicle passes over one without an activated
turn signal, the system emits a visual as well as
an acoustic signal.
If the vehicle continues to go beyond the line of
the lane without any intervention from the driver,
the surpassed line will light up on the display
(left or right) to urge the driver to bring the vehicle
back into the limits of the lane.
CAUTION!
Projecting loads on the roof of the vehicle
may interfere with the correct operation of
the camera. Before starting, make sure the
load is correctly positioned in order not to
cover the camera operating range.
Do not cover the operating range of the
camera with stickers or other objects.
Do not tamper with nor operate on the
camera. Do not close the openings in the
aesthetic cover located under the interior
rearview mirror. In the event of a failure of
the camera, contact an authorized dealer.
The camera may have limited or absent
operation due to weather conditions such as:
heavy rain, hail, thick fog, heavy snow, or
formation of ice layers on the windshield.
Camera operation may also be compromised
by the presence of dust, condensation, dirt
or ice on the windshield, by traffic conditions
(e.g. vehicles that are driving not aligned with
yours, vehicle driving in a transverse or
opposite way on the same lane, bend with a
small radius of curvature), by road surface
conditions and by driving conditions (e.g.
off-road driving). Make sure the windshield is
always clean. Use specific detergents and
clean cloths to avoid scratching the
windshield. The camera operation may also
be limited or absent in some driving, traffic
and road surface conditions.
If the windshield must be replaced due to
scratches, chipping or breakage, contact
exclusively an authorized dealer. Do not
replace the windshield on your own. It is
advisable to replace the windshield if it is
damaged in the area of the camera.
CAUTION!
23_GU_OM_EN_USC_t.book Page 123
Page 131 of 268
129
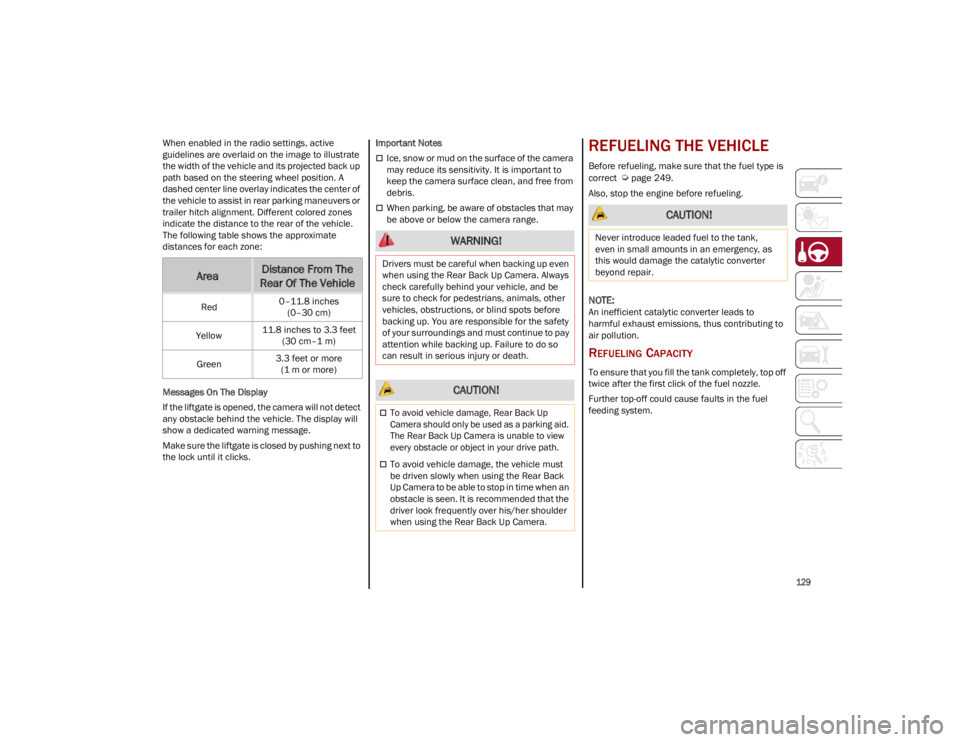
When enabled in the radio settings, active
guidelines are overlaid on the image to illustrate
the width of the vehicle and its projected back up
path based on the steering wheel position. A
dashed center line overlay indicates the center of
the vehicle to assist in rear parking maneuvers or
trailer hitch alignment. Different colored zones
indicate the distance to the rear of the vehicle.
The following table shows the approximate
distances for each zone:
Messages On The Display
If the liftgate is opened, the camera will not detect
any obstacle behind the vehicle. The display will
show a dedicated warning message.
Make sure the liftgate is closed by pushing next to
the lock until it clicks.Important Notes
Ice, snow or mud on the surface of the camera
may reduce its sensitivity. It is important to
keep the camera surface clean, and free from
debris.
When parking, be aware of obstacles that may
be above or below the camera range.
REFUELING THE VEHICLE
Before refueling, make sure that the fuel type is
correct
Ú
page 249.
Also, stop the engine before refueling.
NOTE:
An inefficient catalytic converter leads to
harmful exhaust emissions, thus contributing to
air pollution.
REFUELING CAPACITY
To ensure that you fill the tank completely, top off
twice after the first click of the fuel nozzle.
Further top-off could cause faults in the fuel
feeding system.
AreaDistance From The
Rear Of The Vehicle
Red 0–11.8 inches
(0–30 cm)
Yellow 11.8 inches to 3.3 feet
(30 cm–1 m)
Green 3.3 feet or more
(1 m or more)
WARNING!
Drivers must be careful when backing up even
when using the Rear Back Up Camera. Always
check carefully behind your vehicle, and be
sure to check for pedestrians, animals, other
vehicles, obstructions, or blind spots before
backing up. You are responsible for the safety
of your surroundings and must continue to pay
attention while backing up. Failure to do so
can result in serious injury or death.
CAUTION!
To avoid vehicle damage, Rear Back Up
Camera should only be used as a parking aid.
The Rear Back Up Camera is unable to view
every obstacle or object in your drive path.
To avoid vehicle damage, the vehicle must
be driven slowly when using the Rear Back
Up Camera to be able to stop in time when an
obstacle is seen. It is recommended that the
driver look frequently over his/her shoulder
when using the Rear Back Up Camera.
CAUTION!
Never introduce leaded fuel to the tank,
even in small amounts in an emergency, as
this would damage the catalytic converter
beyond repair.
23_GU_OM_EN_USC_t.book Page 129