ECU ARIEL ATOM 2 2006 Owners Manual
[x] Cancel search | Manufacturer: ARIEL, Model Year: 2006, Model line: ATOM 2, Model: ARIEL ATOM 2 2006Pages: 79, PDF Size: 2.5 MB
Page 36 of 79

30
ELECTRICAL SPECIFICATIONS
Spark Plugs in GM Engines
Gap: 0.045 in. (1.14mm)
Recommended torque: 15 ft-lbs (20 Nm)
Service: Inspect before every track event and change i f necessary.
Type: LTR5GP NGK PK16PR-P11 ND LTR51X-11 NGK
PT16VR13 ND
(or equivalent)
Spark Plugs in Honda Engines
Gap: 0.039 – 0.043 in. (1.0 – 1.1mm)
Recommended torque: 15 ft-lbs (20 Nm)
Service: Inspect before every track event and change i f necessary.
Type: NGK: 1FR7G11K, 1FR7G11KS DENSO: SK22PR-M11, SK22PR-M11S
Ignition Timing and Battery (both engines)
Set by the processor and/or the ECU. Not adjustable.
Page 39 of 79

33
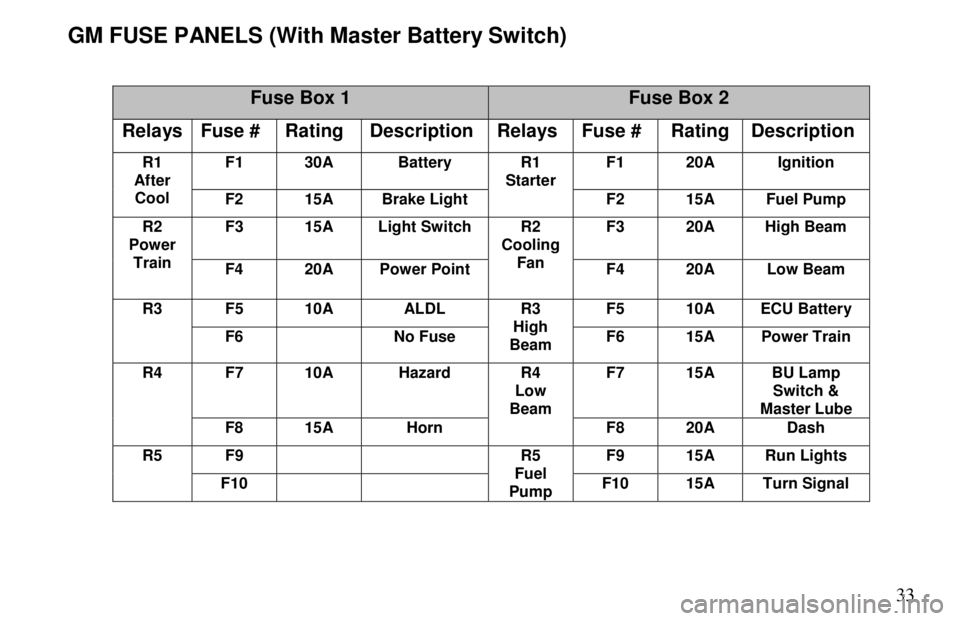
GM FUSE PANELS (With Master Battery Switch)
Fuse Box 1
Fuse Box 2
Relays
Fuse # Rating Description Relays
Fuse # Rating Description
F1 30A Battery F1 20A Ignition
R1
After Cool F2 15A Brake Light R1
Starter
F2 15A Fuel Pump
F3 15A Light Switch F3 20A High Beam
R2
Power Train F4 20A Power Point R2
Cooling Fan F4 20A Low Beam
F5 10A ALDL F5 10A ECU Battery
R3
F6 No Fuse R3
High
Beam F6 15A Power Train
F7 10A Hazard F7 15A BU Lamp
Switch &
Master Lube
R4
F8 15A Horn R4
Low
Beam
F8 20A Dash
F9 F9 15A Run Lights
R5
F10 R5
Fuel
Pump F10 15A Turn Signal
Page 47 of 79

41
ADDING & CHANGING ENGINE COOLANT CONTINUED
7. Once the engine has been shut down, squeeze the coolant hose above the transaxle repeatedly for a while
and watch for air bubbles to enter the coolant exchange tank.
8. Add more coolant as you are able to coax air bubbl es out of the coolant hose.
9. Repeat this startup / shutdown procedure as many ti mes as necessary until the bubbles cease, and the
upper hose is hot to the touch.
At some point in this process, the engine will “burp”, a nd the coolant gauge will begin to read properly. When
you are certain that this has occurred:
10. Release the pressure
VERY SLOWLY
at the tank.
11. Fill the tank again to the center seam level.
12. Check the copper air bleed fitting at the radiator to be sure the radiator is full.
13. Tighten everything up.
14. Run the engine until the fan turns on, off, then on again.
15. Switch off engine and allow it to cool completely.
16. Fill the tank to its proper level for the last ti me.
For vehicles with GM engines, the aftercooler fill locat ion is accessed by moving the seats to their forward mos t
position. In the center of the engine bulkhead is a tr iangular cover secured by Philips head screws. Removing
these screws reveals a semi-transparent port with a thre aded cap.
NOTE: Honda engines do not require an aftercooler coolant .
Page 51 of 79

45
AIR FILTER REMOVAL & INSTALLATION
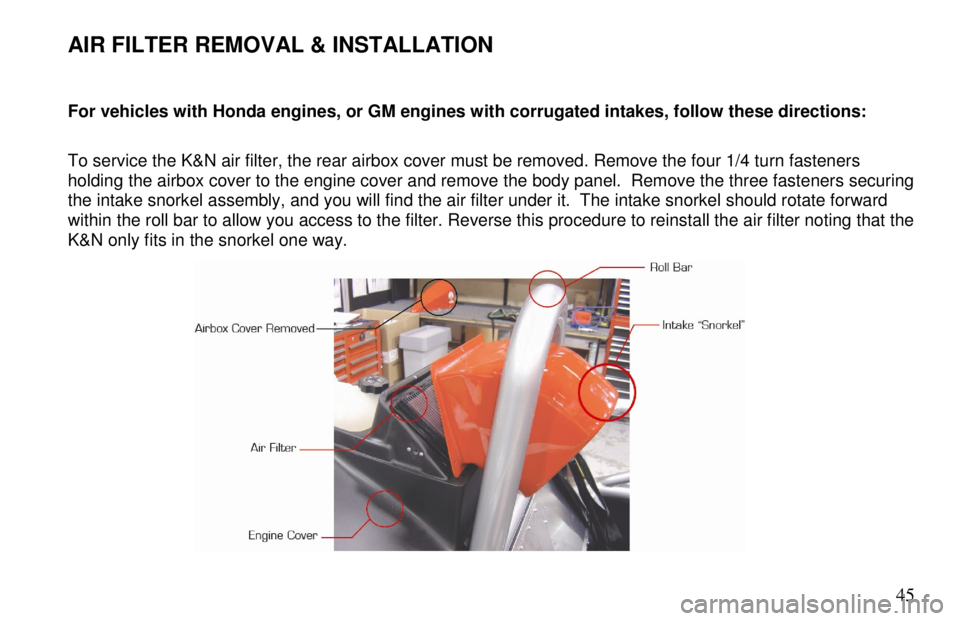
For vehicles with Honda engines, or GM engines with corrugated intakes, follow these directions:
To service the K&N air filter, the rear airbox cover m ust be removed. Remove the four 1/4 turn fasteners
holding the airbox cover to the engine cover and remo ve the body panel. Remove the three fasteners securing
the intake snorkel assembly, and you will find the air filter under it. The intake snorkel should rotate forward
within the roll bar to allow you access to the filter. Reverse this procedure to reinstall the air filter noti ng that the
K&N only fits in the snorkel one way.
Page 54 of 79

48
A-ARM ADJUSTMENT
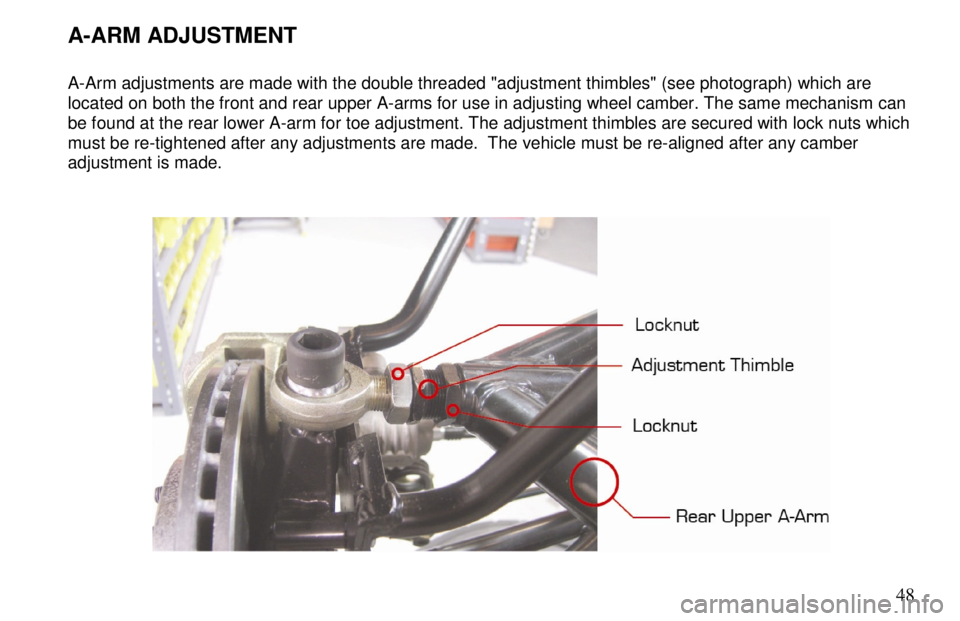
A-Arm adjustments are made with the double threaded "adjustment thimbles" (see photograph) which are
located on both the front and rear upper A-arms for u se in adjusting wheel camber. The same mechanism can
be found at the rear lower A-arm for toe adjustment . The adjustment thimbles are secured with lock nuts whi ch
must be re-tightened after any adjustments are made. The vehicle must be re-aligned after any camber
adjustment is made.