light ASTON MARTIN DB AR1 Q 2003 Owners Guide
[x] Cancel search | Manufacturer: ASTON MARTIN, Model Year: 2003, Model line: DB AR1 Q, Model: ASTON MARTIN DB AR1 Q 2003Pages: 279, PDF Size: 3.77 MB
Page 152 of 279

F - Owner Maintenance
1-F-43
Headlight Main Beam Bulb Replacement
1. Lift the bonnet.
2. Turn the lamp rear cap anti-clockwise and release it.
3. Pull off the two electrical leads from the headlight bulb connectors.
4. Pinch the bulb retaining clip and release it.
5. Withdraw the headlight bulb, noting the bulb orientation.
6. Hold the new bulb in a clean cloth or paper towel. Orientate the new
bulb correctly in the headlight bulb holder and secure it with the spring
clip.
7. Connect the two electrical leads.
8. Refit and secure the lamp rear cover.
Page 153 of 279

F - Owner Maintenance
1-F-44
Headlight Dipped Beam Bulb Replacement
The dipped beam lights are accessed through panels in the wheel arch liners.
1. Turn the steering to the opposite lock to the defective light (i.e. full right
lock to access the left dipped beam light and vice versa).
2. Using a screwdriver from the tool kit, release the quarter turn fastener on
the access cover in the wheel arch liner and remove the cover.
3. Remove and replace the bulb following the instructions for the main
beam on the previous page.
4. Refit and secure the access cover.
Page 154 of 279

F - Owner Maintenance
1-F-45
On Board Headlight Aiming (where fitted)
The headlight assemblies (main and dipped beam lights) are factory set to
give correct forward illumination under average load conditions. Should
your headlight aiming require adjustment, it may be corrected as follows:
1. Ensure that the tyres are inflated to the specified pressures.
2. Fill the car with fuel.
3. Park the car on level ground.
NOTE: Any error in ground level will adversely influence the accuracy of the
vertical beam alignment check
4. Have an adult person sit in the drivers seat.
5. Load the boot with the normal items you carry.
6. Open the bonnet.
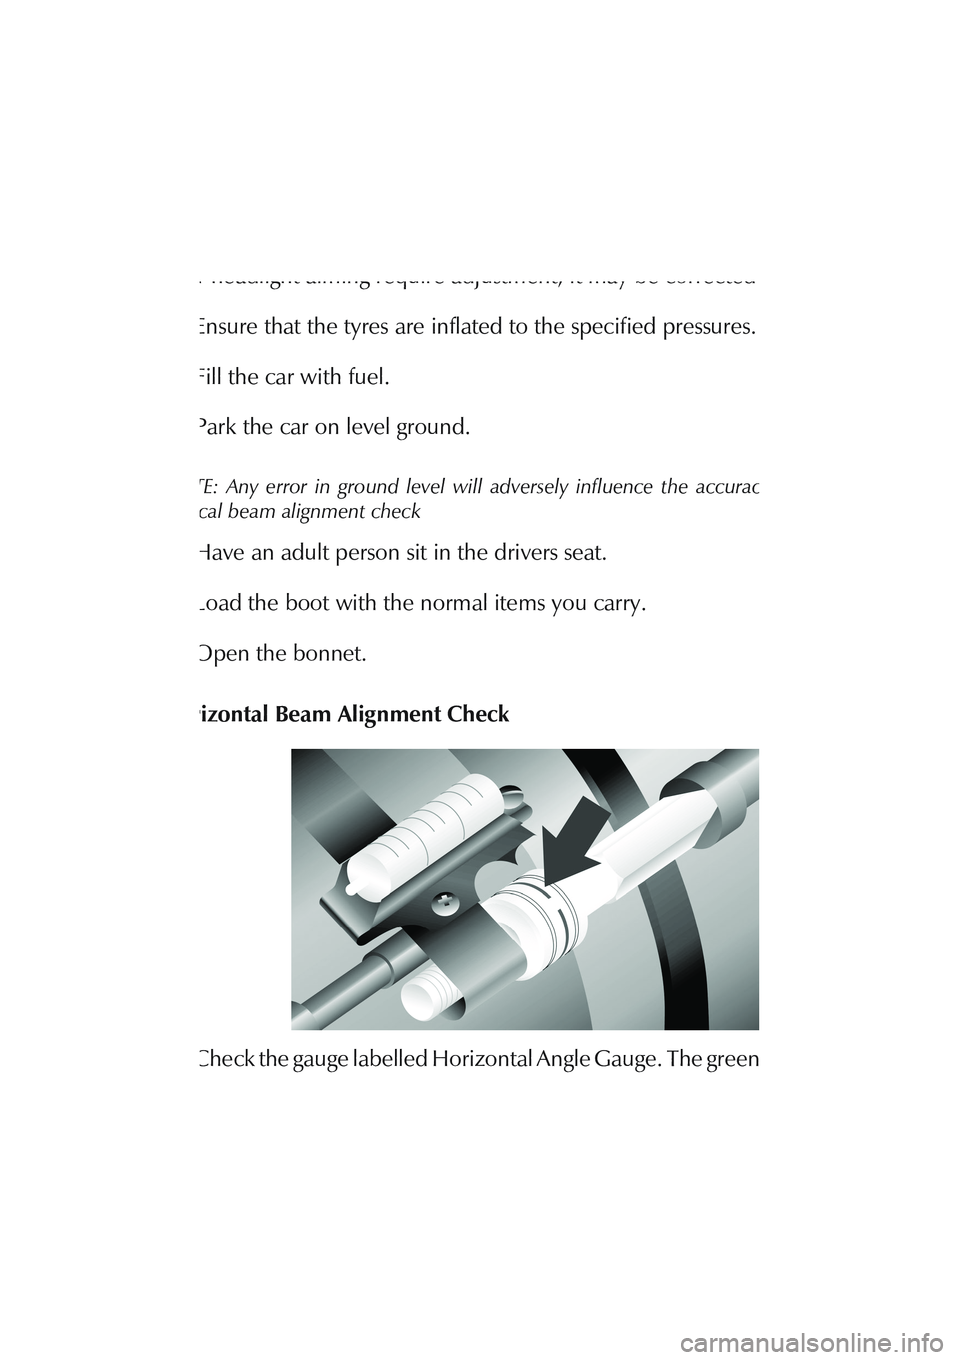
Horizontal Beam Alignment Check
1. Check the gauge labelled Horizontal Angle Gauge. The green line on the
collar must be aligned with the pointer at the side of the spirit level. If
adjustment is required, rotate the screw and collar until the green line
is aligned with the pointer.
Page 156 of 279

F - Owner Maintenance
1-F-47
Front Indicator Lights / Front Fog Lights / Front Parking Lights
1. Using the screwdriver from the tool kit, remove three screws and remove
the lamp assembly from the front apron.
2. If preparing to replace the front fog lamp (C), release the rubber seal from
the lamp housing.
3. Turn the appropriate bulb holder (Indicator - A, Parking Lamp - B, Fog
Lamp - C) a quarter turn anticlockwise and remove it.
4. Pull the defective bulb from the bulb holder and fit the replacement
bulb.
5. Refit the bulb holder to the lamp assembly and, if necessary, refit the
rubber seal to the fog lamp
6. Refit the lamp assembly to the car and secure with three screws.
Page 157 of 279

F - Owner Maintenance
1-F-48
Side Repeater Lamps
1. Taking care to protect the paint work,
push the side repeater lamp and rotate a
quarter of a turn anticlockwise. Withdraw
from the front wing.
Note: Take care not to let the bulb holder fall
into the front wing.
2. Holding the bulb holder, rotate the lens
a quarter of a turn anticlockwise.
Withdraw the lens. Replace bulb and
reassemble the side repeater lamp.
3. Push the side repeater lamp to the wing and rotate a quarter of a turn
clockwise.
Side Marker Lights
1.Taking care to protect the paint work, push the side marker light and rotate
a quarter of a turn anti-clockwise. Withdraw from front wing.
NOTE: Take care not to let the bulb holder fall into the front wing.
2. Holding the bulb holder, pull the lens complete with bulb from the bulb
holder. Replace bulb and re-assemble the side marker light.
3. Push the side marker light to the wing and rotate a quarter of a turn
clockwise.
Page 158 of 279

F - Owner Maintenance
1-F-49
Rear Lights - (Indicators, Stop/Rear)
The indicators and stop/rear lights are contained in two clusters, one either
side of the car. The replacement technique for all rear light bulbs is similar.
1. Remove the boot trim panel.
2. Remove two knurled nuts and withdraw the blub holder.
3. Push and rotate the blub a quarter of a turn anti-clockwise. Withdraw
from bulb holder.
NOTE: The stop/rear light bulb has two filaments and offset bayonet pins. Ensure
correct orientation when fitting.
4. Insert the new bulb. Push and rotate bulb a quarter of a turn clockwise.
5. Place the bulb holder back to the light cluster and secure with the two
knerled nuts. Install the boot trim.
Page 159 of 279

F - Owner Maintenance
1-F-50
Rear Lights - (Reversing)
1. Remove outer trim panel (three allen key head bolts).
2. Each bulb holder is held in place with three screws. Remove the bulb
holder containing the defective bulb.
3. Replace bulb. Refit bulb holder and outer trim panel.
Number Plate Lights
1. Lever / Unscrew the light unit from the bumper. Be carefull not to
damage paint work.
2. Pull the defective bulb form its holder and replace with a new one.
3. Replace the number plate light unit
Page 160 of 279

F - Owner Maintenance
1-F-51
Rear Interior Quarter Lights
1.Insert a small screwdriver into the
lever slot in the light lens and lever
out the lens assembly.
2.Remove the defective bulb from its
clips and replace with a new one.
3.Press the light lens assembly back
into its housing until it clips into
position.
Front Interior Lights
1. Release the quarter turn fastener on the front interior light assembly and
lower the assembly from the roof liner.
2. To replace an interior light festoon bulb, pull the defective bulb from its
clips and insert a new one.
3. To replace a map reading light bulb, swing the bulb contact away from
the bulb. Lift out the defective bulb and fit a replacement. Swing the bulb
contact back to its original position.
4. Refit the light assembly to the roof lining and secure by turning the
quarter turn fastener clockwise.
Page 161 of 279

F - Owner Maintenance
1-F-52
Door Edge Lights
1. Taking care to protect the paint
work, use a screwdriver to lever the
light assembly from its location in
the lower door edge.
2. Remove the bulb from the light
assembly and fit a replacement bulb.
3. Refit the assembly to the door,
pushing firmly until it clips into place.
Central High Mounted Stop Lamp
The high mounted stop lamp is fitted in the boot lid. It is recommended that
your have your dealer change the high mounted stop lamp if necessary.
Electric Window Reset Procedure
If either the battery or the window controllers are disconnected, the window
controller will lose its memory of the window maximum up and down
positions. The window controller memory may be checked and reset as
follows:
Page 163 of 279

F - Owner Maintenance
1-F-54
Bodywork and Fittings
Checks and Maintenance
Door hinges should be lubricated and door drain holes cleaned regularly
as follows:
• Door hinges should be lubricated with grease.
• Wipe away any excess lubricant to avoid contaminating clothing.
• Check the drain holes in the bottom face of each door periodically and
clear if necessary with a short length of wire.
Caution: Do not lubricate door or ignition locks. They are greased during manufacture
and should not need regular service.
Caution: Automatic car washes and power-operated mops are not recommended,
since prolonged use will cause fine scratches in the paint surface.
Vehicle Cleaning
Paintwork
Washing
For best results, do not wash the vehicle in strong sunlight. Allow the vehicle
to cool before washing. Do not use household soaps or detergents. Do not
direct hoses at full force around the door or boot seals.
When washing the vehicle use plenty of clean, cold or luke warm water.
Remove dust or mud from the paintwork by brushing in a gentle flow of
water from a hose.