radio ASTON MARTIN DB AR1 Q 2003 Owners Guide
[x] Cancel search | Manufacturer: ASTON MARTIN, Model Year: 2003, Model line: DB AR1 Q, Model: ASTON MARTIN DB AR1 Q 2003Pages: 279, PDF Size: 3.77 MB
Page 15 of 279

A - Before Driving
1-A-3
The Security System and Door Locks
Your DB AR1 is fitted with sophisticated security systems which protect your
car against theft. The alarm system is linked to the central locking system.
The following two pages describe the basic operations required to turn on
or off the alarm and at the same time to lock or unlock the car. The systems
are fully described in section 'E - Security Systems'.
Alarm Key Fob
Basic alarm functions are controlled using the alarm key fob which sends
radio signals to the alarm unit aerial near the rear window when either the
left or right key fob button is pressed.
The left button is used for turning the alarm system on/off and locking/
unlocking the car. The right button is used for unlocking the boot.
The key fob has a range of about 10 metres (30 feet) when operating with
no intervening obstructions.
Page 53 of 279

B - Controls
1-B-17 The centre console contains the following controls:
• Clock and PATS Status Light
• Heating, Ventilation and Air-Conditioning Controls
• Fog Lamp, Screen Heater and Seat Heater Switches
• Radio Cassette Player (Control for the CD autochanger)
• Hazard Light Switch
• Starter Button
• Traction Control Switch
• Window Lift Switches
• Boot Release Switch
• Cigar Lighter and Ashtray
The Heating, Ventilation and Air-Conditioning Systems are fully described
in the Air-Conditioning section of this Owner's Guide.
Clock
The clock in the centre of the air conditioning control panel is set using the
buttons on the clock panel.
The left button is used to retard the time and the
right button to advance the time.
The small light between the time set buttons is the
PATS Status Light which is described in the Security
section of this Owner's Guide.
ASTON MARTIN
Page 55 of 279

B - Controls
1-B-19 Seat Heater Switches
Press to switch on the heater. Press the button a second
time to switch off the heater. The heater is thermostatically
controlled and maintains a constant seat temperature until
either the heater is switched off or the ignition is switched
off.
Boot Release Switch
Press to open the boot at any time when the alarm system
is switched off and the ignition is switched on.
Radio/Cassette/CD Player
The radio/cassette player is located beneath the console switch panel. The
CD changer is fitted in the boot (trunk). Manufacturers operating instructions
for the in-car entertainment system are included with this Owner's Guide.
Hazard Warning Lights
The hazard warning light switch is located beside the
radio cassette player. When pressed, the external indicator
lights and side repeater lights will flash in unison.
Press the switch again to turn off the hazard lights.
Caution: Observe local laws on the use of hazard lights
Page 56 of 279

B - Controls
1-B-20
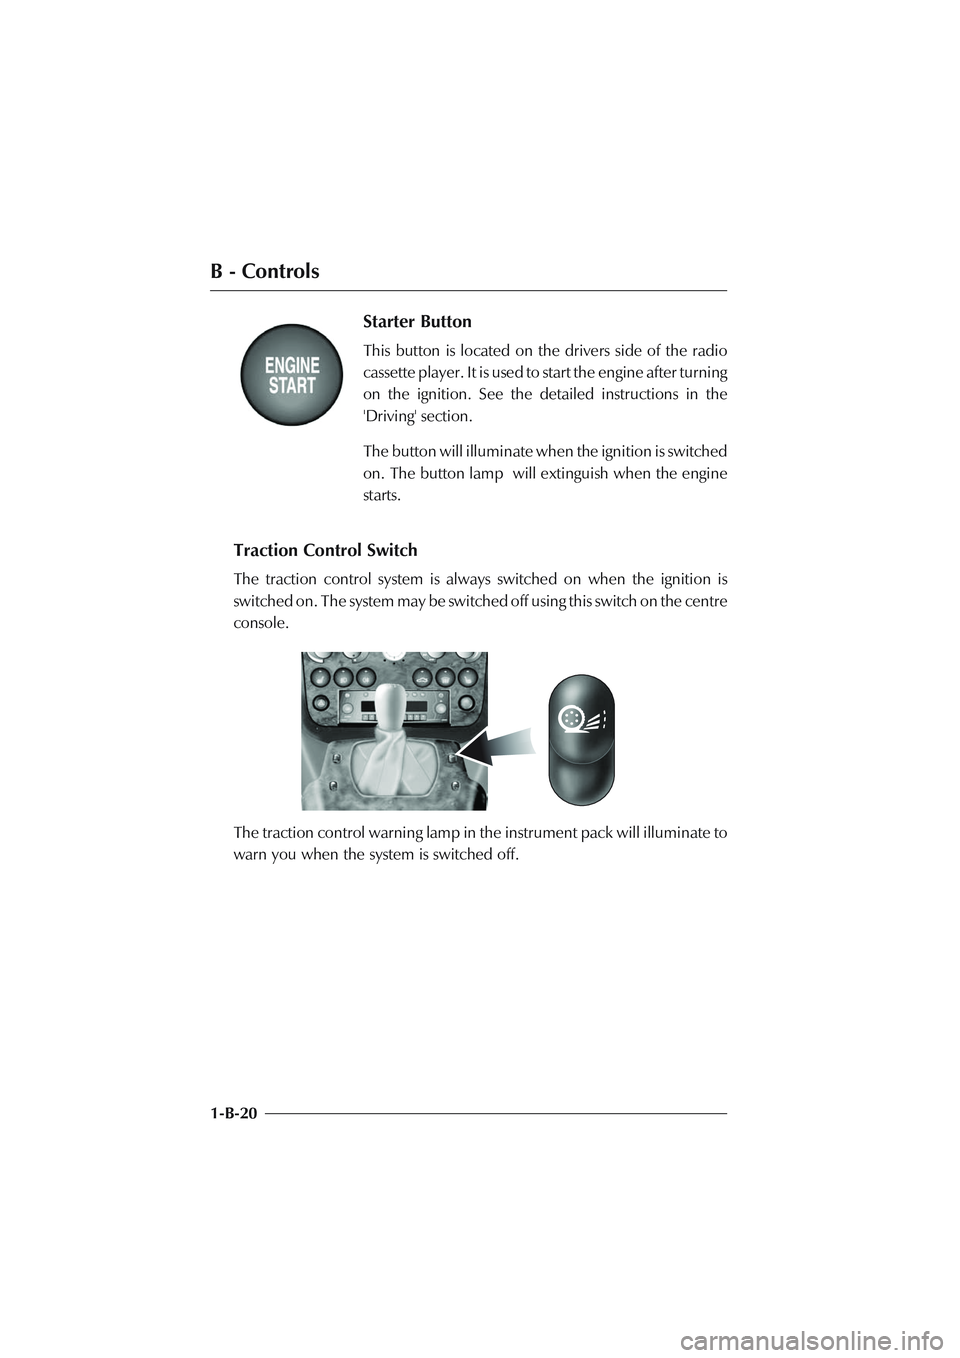
Starter Button
This button is located on the drivers side of the radio
cassette player. It is used to start the engine after turning
on the ignition. See the detailed instructions in the
'Driving' section.
The button will illuminate when the ignition is switched
on. The button lamp will extinguish when the engine
starts.
Traction Control Switch
The traction control system is always switched on when the ignition is
switched on. The system may be switched off using this switch on the centre
console.
The traction control warning lamp in the instrument pack will illuminate to
warn you when the system is switched off.
Page 70 of 279

C - Driving
1-C-5
The Ignition Lock
The Ignition Lock, located on the right side of the steering column, performs
the following functions:
• Steering Lock
• Ignition Switch
The switch has three positions:
Position OAll systems off, steering lock engaged.
Position IAuxiliaries on (e.g. radio), steering lock released. Use this
position if the vehicle is being towed.
Position IIIgnition and all other electrical systems on. This is the
normal running position.
Page 148 of 279

F - Owner Maintenance
1-F-39
Fuse Lists
Passenger Footwell Fusebox - Right Hand
F1 5A Passive Anti-Theft Module
F2 20A Cigar Lighter
F3 10A Diagnostic Sockets, Radio, Air Conditioning, Driver's
Door Mirror and Window
F4 5A Seat Switches and Heaters
F5 10A Indicator Flasher
F6 10A Ignition Coils 1-6
F7 10A Interior Lamp Cluster
F8 10A Ignition Coils 7-12
F9 20A RHS Seat Heater Relay, RHS Seat Module
F10 10A Dimmer, Passive Anti-Theft Module, Radio
F11 10A Door Mirrors
F12 5A Diagnostic Sockets
F13 25A Not used
F14 10A Hazard Flasher Unit
F15 20A Wiper Logic Module and Wiper Stalk
F16 30A ABS Control Unit
F17 20A Wiper Motor, Logic Module and Wiper Stalk
F18 30A ABS Control Unit
F19 10A Air Conditioning LH Blower Motor
F20 5A Gearshift Interlock Module, Traction Control Switch,
Interior, Map & Courtesy Lamps
F21 10A Air Conditioning RH Blower Motor
F22 10A Powertrain and Transmission control Modules - Keep
Alive Memory
Page 150 of 279

F - Owner Maintenance
1-F-41 Boot Fusebox
F1 10A Reverse Light Relay
F2 20A Security System & Tilt Sensors
F3 5A +12V Ignition
F4 5A Boot Switch Logic Relay, Security System Control Unit
F5 30A Accessory Terminal
F6 5A RH Fog Lamp, Powertrain Control Modules
F7 20A Fuel Pump 2, Secondary Powertrain Control Module
F8 10A HM Stop Light, LH Stop Light
F9 10A Boot Lamps, Radio Aerial Motor
F10 10A Accessory Socket
F11 20A Not Used
F12 20A Not Used
F13 10A Airbag Control Unit
F14 30A Not Used
F15 20A Fuel Pump 1, Primary Powertrain Control Module
F16 10A Rear Fog Light Relay
F17 10A Manual Gearbox Cooling Pump
F18 10A Accessory Terminal
F19 10A RH Tail, Side, Side Marker and
Number Plate Lamps
F20 20A Premium ICE Amplifier
F21 10A LH Tail, Side, Side Marker and
Number Plate Lamps
F22 20A Manual - Exhaust By-pass System
Automatic - Not Used
Page 178 of 279

G - Specifications
1-G-7
Exterior Features
Laminated front windscreen with heating element
Heated and electrically operated powerfold rear view door mirrors
Electrically operated door windows
Interior Features
Hand-crafted leather trim
Optional interior trim details: Oak, Elm, Walnut, Maple, Carbon Fibre and
body colour painted
Electrically operated front seats
Air-conditioning
Six speaker stereo radio cassette
CD autochanger
Megamos alarm system interacting with the central locking system
PATs security immobiliser system
Page 190 of 279

2-A-5
A - Service Schedules
Pre-delivery Inspection (PDI)
Before you receive your DB AR1, it will undergo a comprehensive pre-
delivery inspection at the Dealer's premises to ensure that it meets Aston
Martin's quality standards. The following checks will be made:
Levels and Leaks
Engine oil
Power steering oil
Brake Fluid
Clutch fluid (manual only)
Engine coolant level
Engine coolant specific gravity
Windscreen washer fluid
Fuel system
Gearbox oil/Auto transmission fluid
Rear axle oil - Differential
Battery
Mechanical Functions
Auto transmission
Selection and P & N functions
Manual gear selection
Clutch operation (manual only)
Throttle pedal operation
Parking brake operation
Steering column adjustment and lock
operation
Seat adjuster rails
Bonnet (Hood) release and catch
Door operation and locks
Storage compartments
Rear view mirror
Wheels and Tyres
Road wheel nuts
Tyre pressures
Front wheel tracking
Electrical Checks
Battery condition
Heated windscreen
Windscreen washers
Windscreen wipers
Air-conditioning controls
Gauges and warning lights
Radio/Cassette/CD player
Navigation (where fitted)
All speakers
Electric aerial
Inertia switch
Window mechanisms
Side and headlights (main and dip)
Front fog lights
Rear fog lights (where fitted)
Hazard warning lights
Instrument illumination and dimmer
Air conditioning panel illumination
Auto Trans. PRNDL illumination
Horns
Interior/map lights
Cigar lighter
Seat adjustment - all functions
Door mirror adjustments
Reset clock (if necessary)
Door / boot courtesy lights
Central locking system
Filler flap lock operation
Seat belt operation
Seat belt warning system
Security system / Remote control
Clutch pedal start inhibit
Interrogate DTC codes (not N.
America)
Record battery open-circuit voltage
Page 194 of 279

2-A-9
A - Service Schedules
x - x Check and if necessary adjust headlight
alignment
x x x Check operation of all lights
x x x Check operation of ABS warning lamp
x x x Check operation of all warning indicators
x x x Check audible warnings including
security system
x x x Check operation of the horns
x x x Check operation of the windscreen wipers
x x x Check operation of the windscreen washers
x x x Clean the radio aerial mast
x x x Check exterior rear view mirrors for security and
function
x x x Interrogate DTC P codes (not N. America)
x x x Check man. transmission cooling pump (PDU)
Wheels and Tyres Checks
1000mls 7500mls 15000mls
1500km 12000km 24000km
3 months 6 months 12 months
x x x Check for correct tyre size, type and rotation
x x x Check and report tyre tread depth
x x x Check tyres for uneven / excessive
wear or damage
x x x Check / adjust the tyre pressures(including spare)
to comfort or high speed pressures as required
x x x Check torque of road wheel nuts
x x x Check road wheel rims for inner
and outer damage
Final Checks
1000mls 7500mls 15000mls
1500km 12000km 24000km
3 months 6 months 12 months
- x x Degrease windscreen
x x x Carry out road test
x x x Check ABS and Traction Control operation
x x x Check operation of all seat belts and buckles
x x x Check that fuel filler bowl rain drain is clear