engine coolant ASTON MARTIN DB7 1997 Workshop Manual
[x] Cancel search | Manufacturer: ASTON MARTIN, Model Year: 1997, Model line: DB7, Model: ASTON MARTIN DB7 1997Pages: 421, PDF Size: 9.31 MB
Page 129 of 421
Electrics
Relay Location Index - 97 MY 5^^?
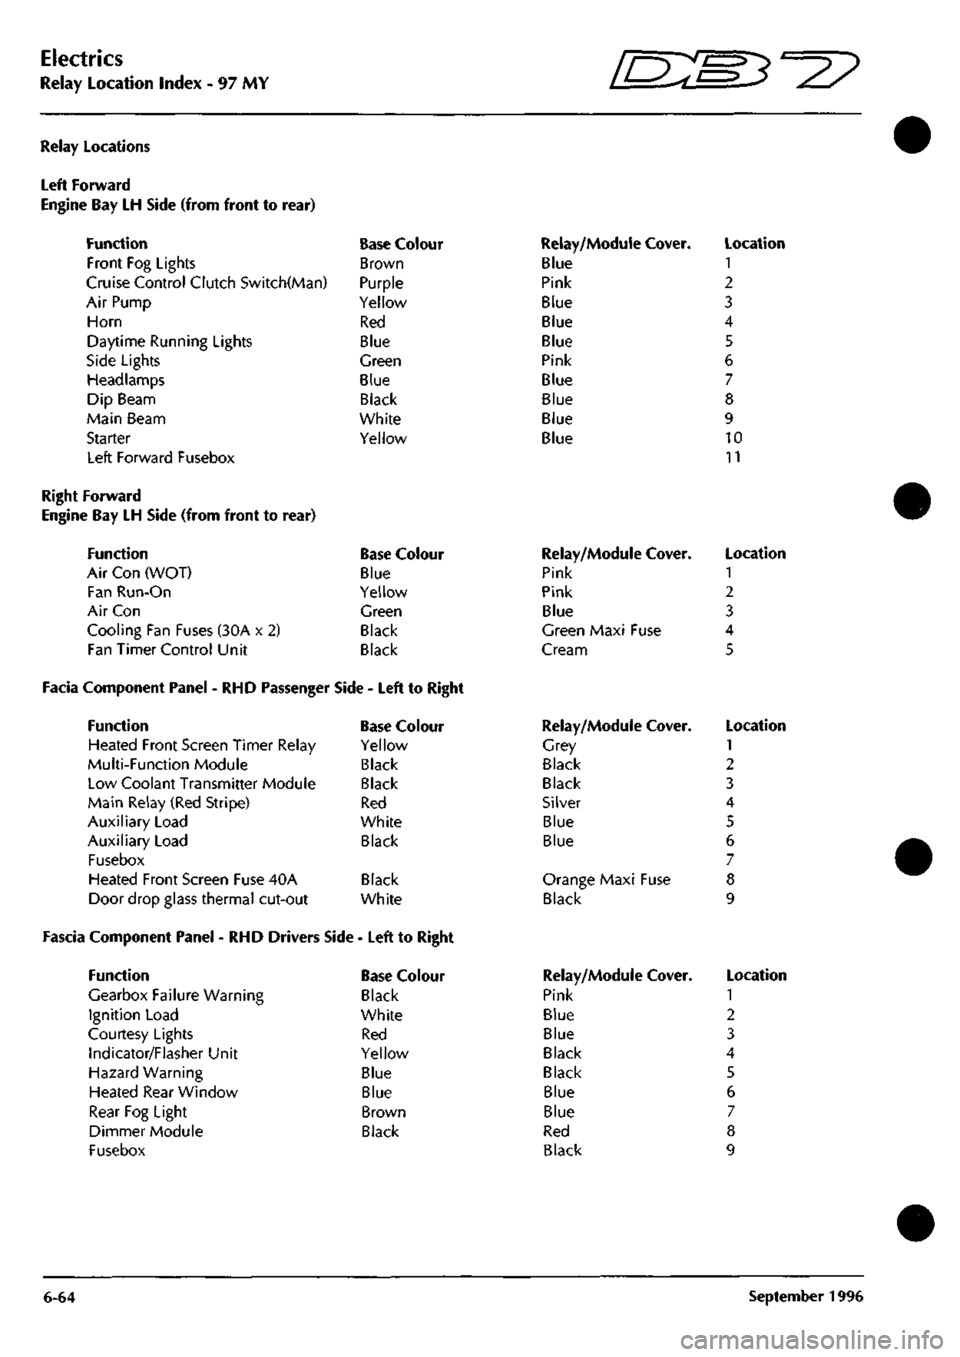
Relay Locations
Left Forward
Engine Bay LH Side (from front to
Function
Front Fog Lights
rear)
Cruise Control Clutch Switch(Man)
Air Pump
Horn
Daytime Running Lights
Side Lights
Headlamps
Dip Beam
Main Beam
Starter
Left Forward Fusebox
Base Colour
Brown
Purple
Yellow
Red
Blue
Green
Blue
Black
White
Yellow
Relay/Module Cover.
Blue
Pink
Blue
Blue
Blue
Pink
Blue
Blue
Blue
Blue
Location
1
2
3
4
5
6
7
8
9
10
11
Right Forward
Engine Bay LH Side (from front to rear)
Function Base Colour
Air Con (WOT) Blue
Fan Run-On Yellow
Air Con Green
Cooling Fan Fuses (30A x 2) Black
Fan Timer Control Unit Black
Facia Component Panel - RHD Passenger Side - Left to Right
Function Base Colour
Heated Front Screen Timer Relay Yellow
Multi-Function Module Black
Low Coolant Transmitter Module Black
Main Relay (Red Stripe) Red
Auxiliary Load White
Auxiliary Load Black
Fusebox
Heated Front Screen Fuse 40A Black
Door drop glass thermal cut-out White
Fascia Component Panel - RHD Drivers Side - Left to Right
Function
Gearbox Failure Warning
Ignition Load
Courtesy Lights
Indicator/Flasher Unit
Hazard Warning
Heated Rear Window
Rear Fog Light
Dimmer Module
Fusebox
Base Colour
Black
White
Red
Yellow
Blue
Blue
Brown
Black
Relay/Module
Pink
Pink
Blue
Cover.
Green Maxi Fuse
Cream
Relay/Module
Grey
Black
Black
Silver
Blue
Blue
Cover.
Orange Maxi Fuse
Black
Relay/Module
Pink
Blue
Blue
Black
Black
Blue
Blue
Red
Black
Cover.
Location
1
2
3
4
5
Location
1
2
3
4
5
6
7
8
9
Location
1
2
3
4
5
6
7
8
9
6-64 September 1996
Page 305 of 421
Air Conditioning
Vacuum System •^^
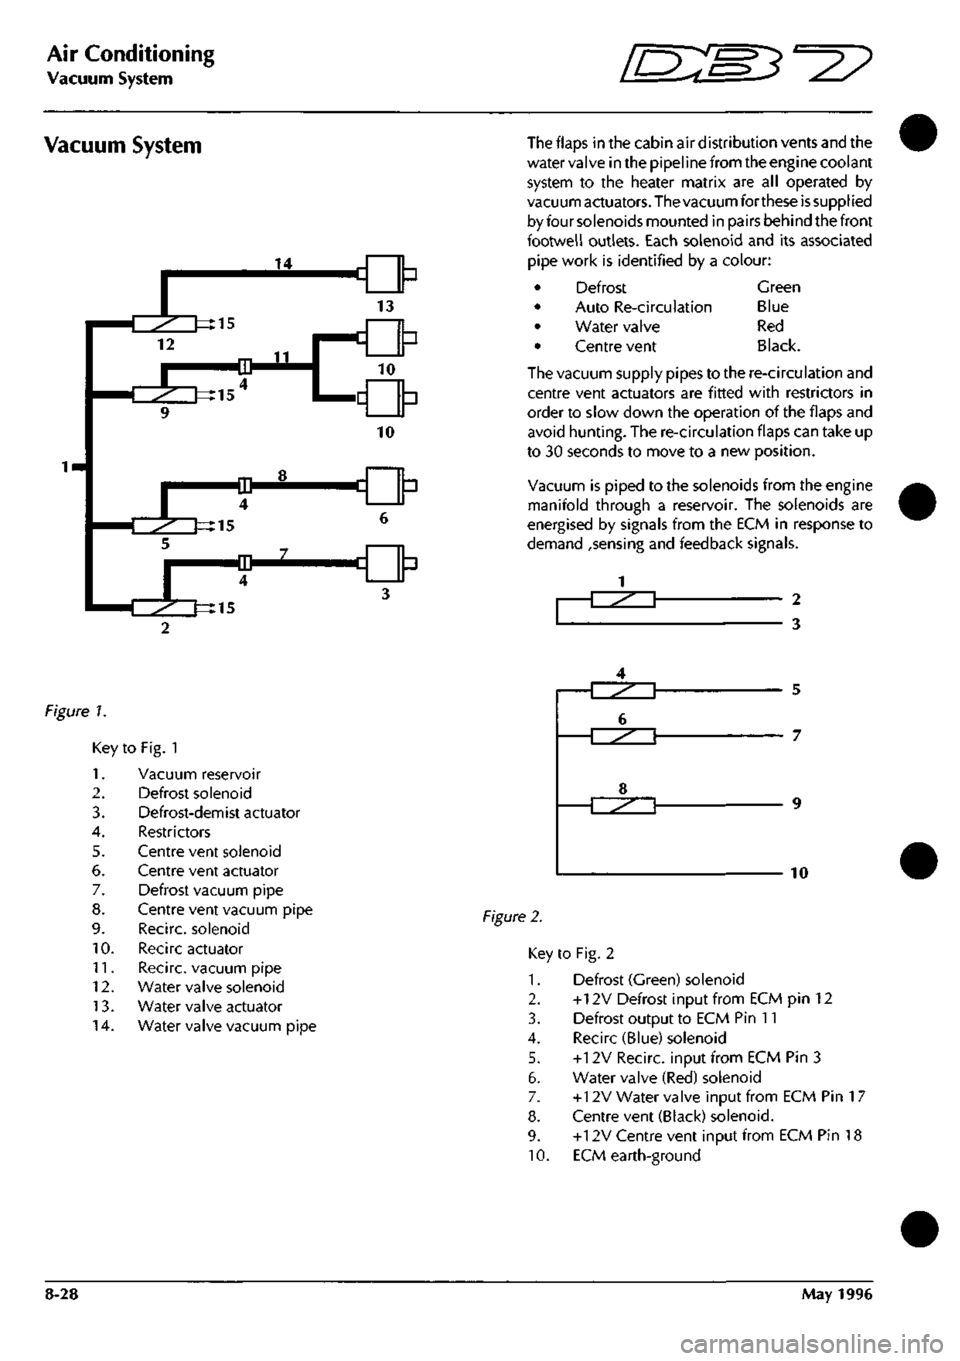
Vacuum System The flaps in the cabin air distribution vents and the
water valve in the pipeline from the engine coolant
system to the heater matrix are all operated by
vacuum actuators. The vacuum forthese
is
supplied
by four solenoids mounted in pairs behind the front
footwell outlets. Each solenoid and its associated
pipe work is identified by a colour:
Defrost
Auto Re-circulation
Water valve
Centre vent
Green
Blue
Red
Black.
The vacuum supply pipes to the re-circulation and
centre vent actuators are fitted with restrictors in
order to slow down the operation of the flaps and
avoid hunting. The re-circulation flaps can take up
to 30 seconds to move to a new position.
Vacuum is piped to the solenoids from the engine
manifold through a reservoir. The solenoids are
energised by signals from the ECM in response to
demand ,sensing and feedback signals.
-T^^^T 2
3
figure 7.
Key
1.
2.
3.
4.
5.
6.
7.
8.
9.
10.
11.
12.
13.
14.
to Fig. 1
Vacuum reservoir
Defrost solenoid
Defrost-demist actuator
Restrictors
Centre vent solenoid
Centre vent actuator
Defrost vacuum pipe
Centre vent vacuum pipe
Recirc. solenoid
Recirc actuator
Recirc. vacuum pipe
Water valve solenoid
Water valve actuator
Water valve vacuum pipe
Figure 2.
5
7
10
Key to Fig. 2
1.
Defrost (Green) solenoid
2.
+12V Defrost Input from ECM pin 12
3. Defrost output to ECM Pin 11
4.
Recirc (Blue) solenoid
5. +12V Recirc. input from ECM Pin 3
6. Water valve (Red) solenoid
7. +12V Water valve input from ECM Pin
1
7
8. Centre vent (Black) solenoid.
9. +12V Centre vent input from ECM Pin 18
10.
ECM earth-ground
8-28 May 1996
Page 320 of 421
^2?
Air Conditioning
System Checking with the Manifold Gauge Set
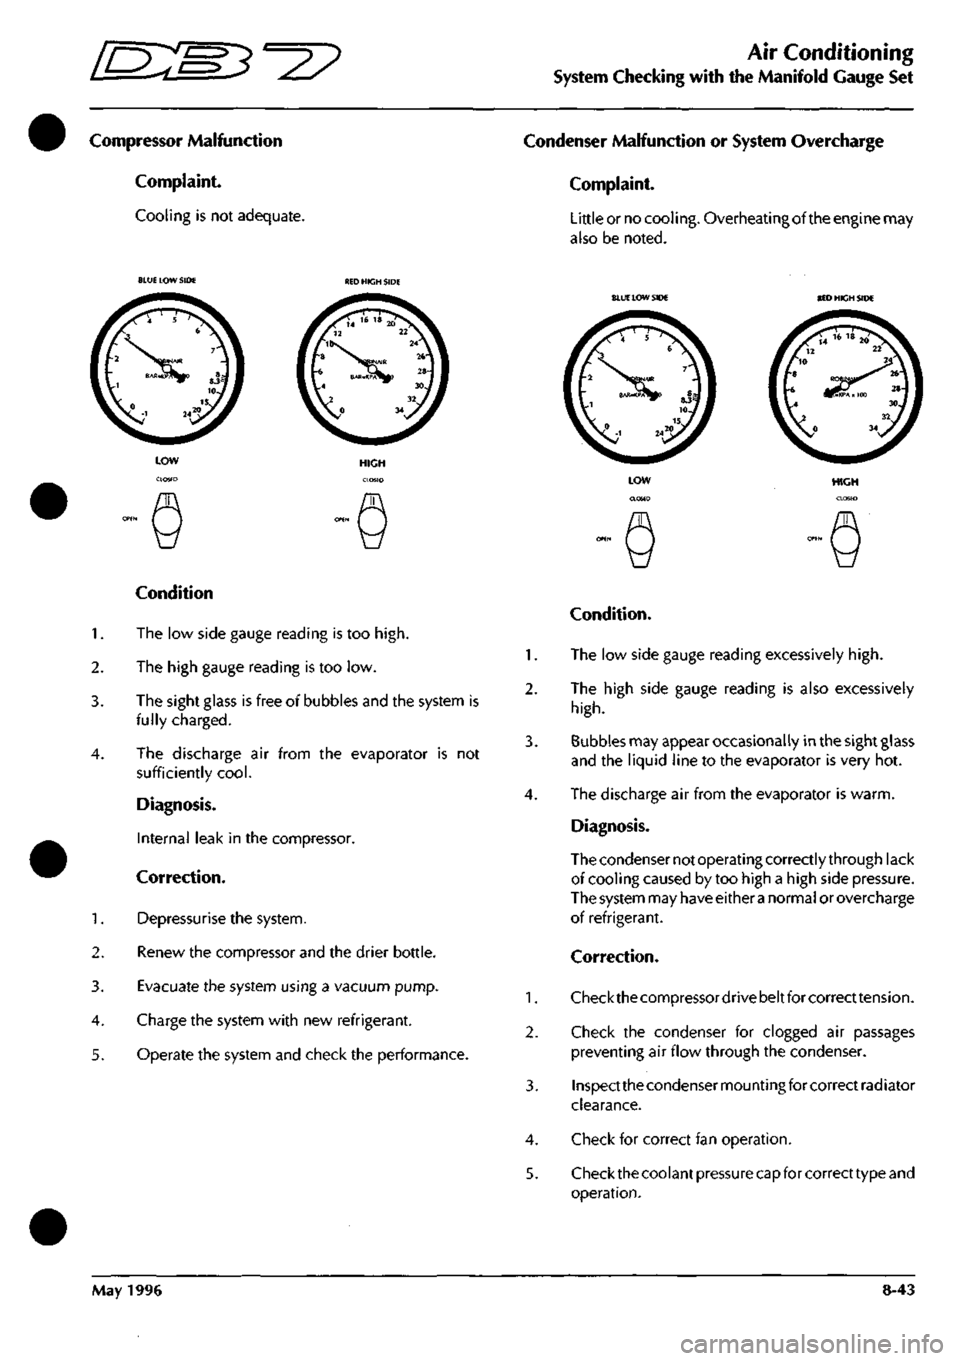
Compressor Malfunction
Complaint.
Cooling is not adequate.
Condenser Malfunction or System Overcharge
Complaint.
Little or no cooling. Overheating of the engine may
also be noted.
BLUE LOW SIDE
BLUE
LOW SIDE BED HICH SIDE
Condition
1.
The low side gauge reading is too
high.
2.
The high gauge reading is too low.
3. The sight glass is free of bubbles and the system is
fully charged.
4.
The discharge air from the evaporator is not
sufficiently
cool.
Diagnosis.
Internal leak in the compressor.
Correction.
1.
Depressurise the system.
2.
Renew the compressor and the drier bottle.
3. Evacuate the system using a vacuum pump.
4.
Charge the system with new refrigerant.
5. Operate the system and check the performance.
HIGH
Condition.
1.
The low side gauge reading excessively
high.
2.
The high side gauge reading is also excessively
high.
3. Bubbles may appear occasionally in the sight glass
and the liquid line to the evaporator is very hot.
4.
The discharge air from the evaporator is warm.
Diagnosis.
The condenser not operating correctly through lack
of cooling caused by too high a high side pressure.
The system may have either
a
normal or overcharge
of refrigerant.
Correction.
1.
Checkthecompressordrivebeltforcorrecttension.
2.
Check the condenser for clogged air passages
preventing air flow through the condenser.
3. Inspect the condenser mounting for correct radiator
clearance.
4.
Check for correct fan operation.
5. Check the coolant pressure capfor correct type and
operation.
May 1996 8-43
Page 332 of 421
^2?
Air Conditioning Repair Procedures
Hose - Compressor to Evaporator/Air-Con Unit Renew
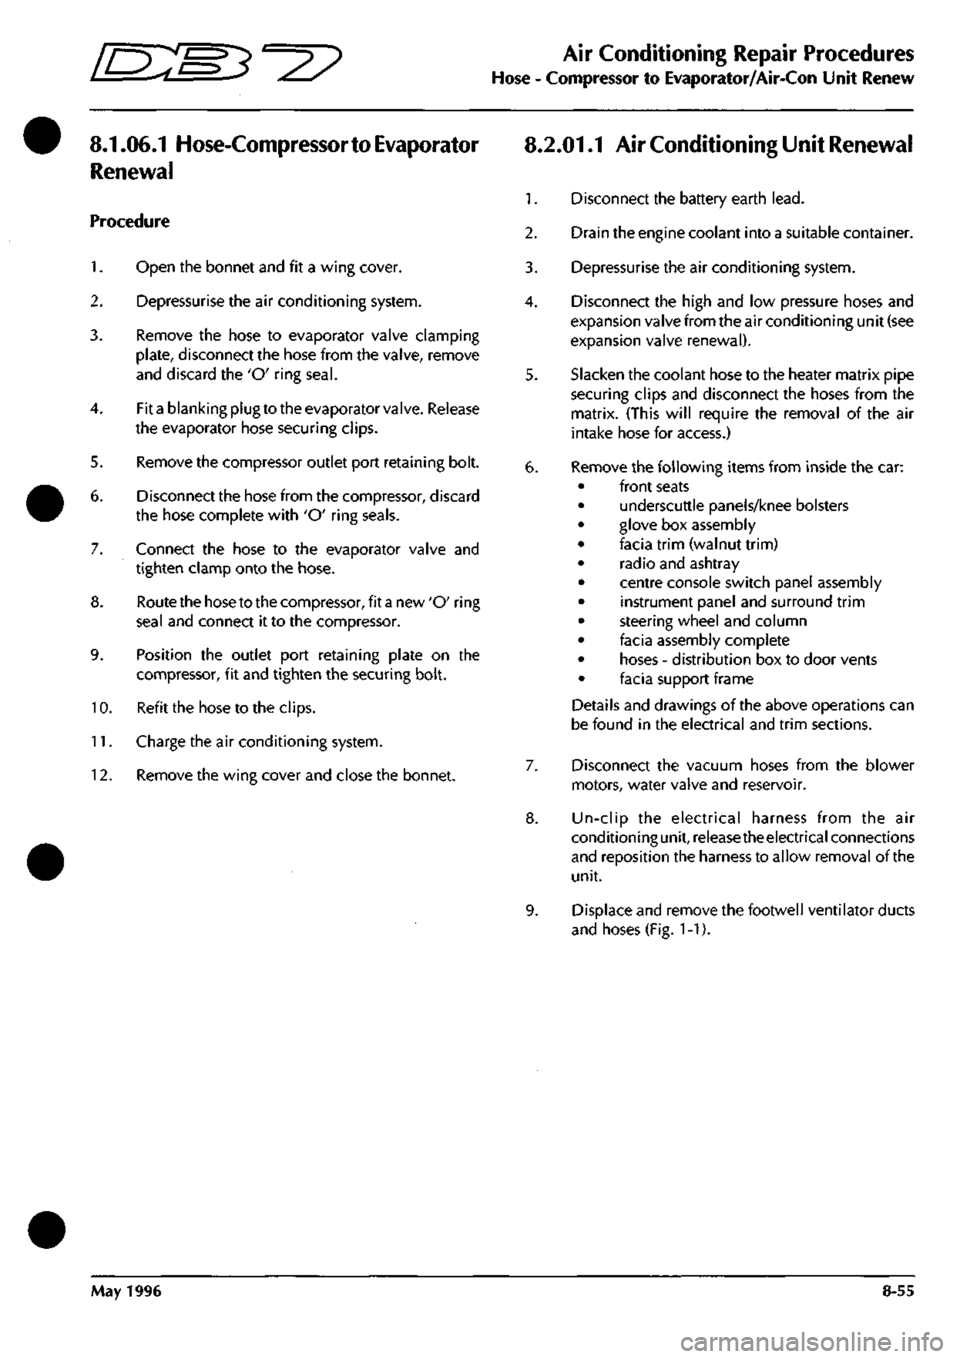
8.1.06.1 Hose-Compressor
to
Evaporator
Renewal
Procedure
1.
Open the bonnet and fit a wing cover.
2.
Depressurise the air conditioning systenn.
3. Remove the hose to evaporator valve clamping
plate,
disconnect the hose from the valve, remove
and discard the 'O' ring
seal.
4.
Fit a blanking plug to the evaporator valve. Release
the evaporator hose securing clips.
5. Remove the compressor outlet port retaining bolt.
6. Disconnect the hose from the compressor, discard
the hose complete with 'O' ring seals.
7. Connect the hose to the evaporator valve and
tighten clamp onto the hose.
8. Route the hose to the compressor, fit a new 'O' ring
seal and connect it to the compressor.
9. Position the outlet port retaining plate on the
compressor, fit and tighten the securing bolt.
10.
Refit the hose to the clips.
11.
Charge the air conditioning system.
12.
Remove the wing cover and close the bonnet.
8.2.01.1 Air Conditioning Unit Renewal
1.
Disconnect the battery earth
lead.
2.
Drain the engine coolant into a suitable container.
3. Depressurise the air conditioning system.
4.
Disconnect the high and low pressure hoses and
expansion valve from the air conditioning unit (see
expansion valve renewal).
5. Slacken the coolant hose to the heater matrix pipe
securing clips and disconnect the hoses from the
matrix. (This will require the removal of the air
intake hose for access.)
6. Remove the following items from inside the car:
front seats
underscuttle panels/knee bolsters
glove box assembly
facia trim (walnut trim)
radio and ashtray
centre console switch panel assembly
instrument panel and surround trim
steering wheel and column
facia assembly complete
hoses - distribution box to door vents
facia support frame
Details and drawings of the above operations can
be found in the electrical and trim sections.
Disconnect the vacuum hoses from the blower
motors, water valve and reservoir.
Un-clip the electrical harness from the air
conditioningunit, release theelectrical connections
and reposition the harness to allow removal of the
unit.
Displace and remove the footwell ventilator ducts
and hoses (Fig. 1-1).
May 1996 8-55
Page 333 of 421
Air Conditioning Repair Procedures
Air-Conditioning Unit Renew ^^?
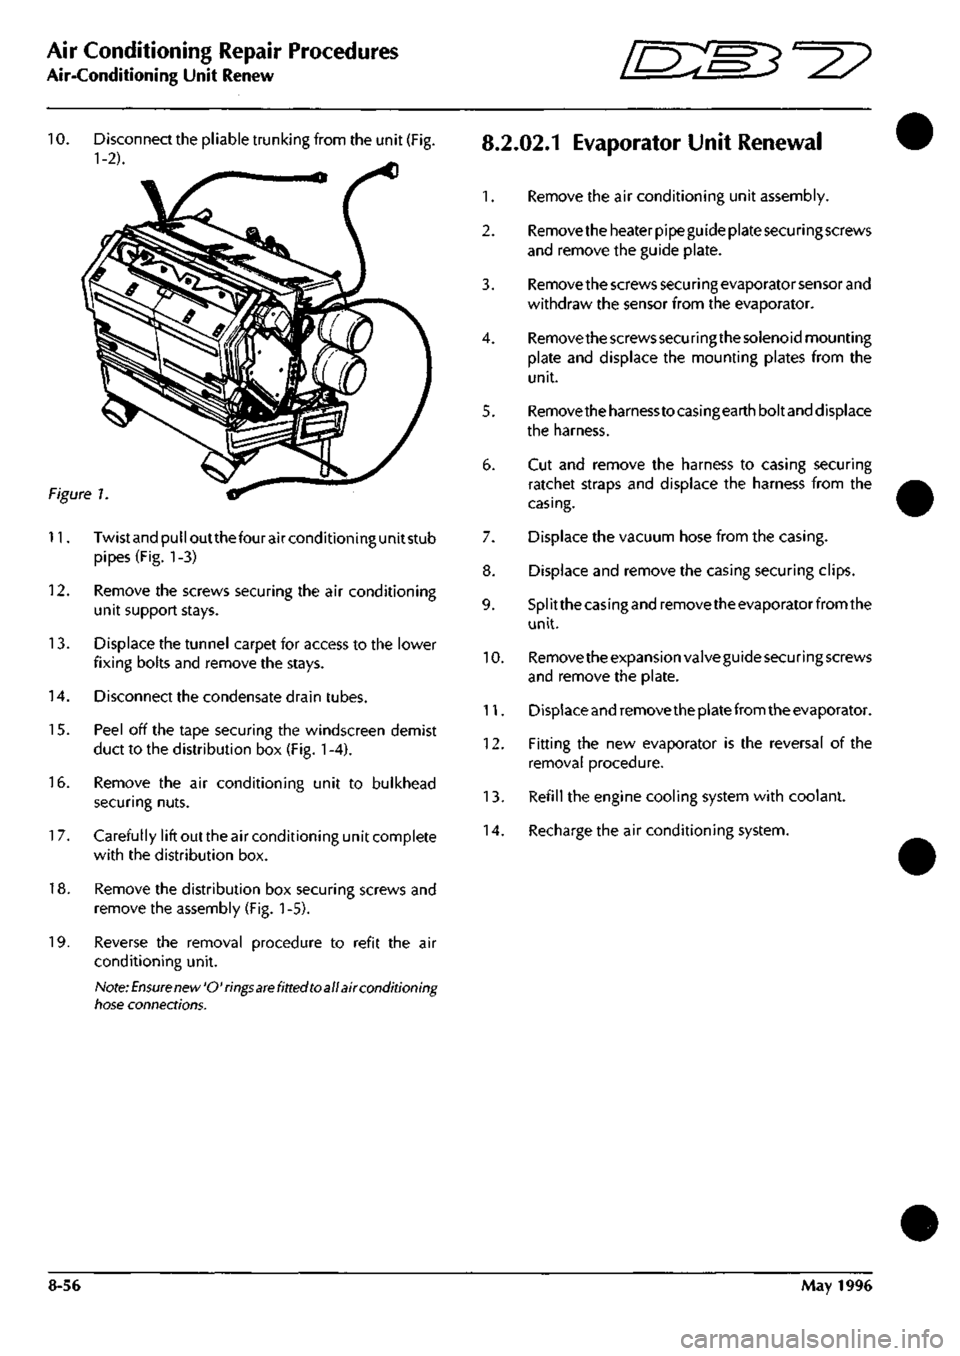
10.
Disconnect the pliable trunking from the unit (Fig.
8.2.02.1
EvaporatOr Unit Renewal
1-2). ^
1.
Remove the air conditioning unit assembly.
2.
Remove the heater pipe guide plate securing screws
and remove the guide plate.
3. Remove the screws secu ri ng evaporator sensor and
withdraw the sensor from the evaporator.
4.
Remove the screws securing the solenoid mounting
plate and displace the mounting plates from the
unit.
5. Removetheharnesstocasingearthboltand displace
the harness.
6. Cut and remove the harness to casing securing
ratchet straps and displace the harness from the
casing.
7. Displace the vacuum hose from the casing.
8. Displace and remove the casing securing clips.
9. Splitthecasingandremovetheevaporatorfromthe
unit.
10.
Remove the expansion valve guide securing screws
and remove the plate.
11.
Displace and remove the plate from the evaporator.
12.
Fitting the new evaporator is the reversal of the
removal procedure.
13.
Refill the engine cooling system with coolant.
14.
Recharge the air conditioning system.
Figure 1
11.
Twistandpulloutthefourairconditioningunitstub
pipes (Fig. 1-3)
12.
Remove the screws securing the air conditioning
unit support stays.
13.
Displace the tunnel carpet for access to the lower
fixing bolts and remove the stays.
14.
Disconnect the condensate drain tubes.
15.
Peel off the tape securing the windscreen demist
duct to the distribution box (Fig.
1
-4).
16.
Remove the air conditioning unit to bulkhead
securing nuts.
1
7. Carefully lift out the air conditioning unit complete
with the distribution box.
18.
Remove the distribution box securing screws and
remove the assembly (Fig.
1
-5).
19.
Reverse the removal procedure to refit the air
conditioning unit.
Note:
Ensure new'O'rings
are
fitted toall air conditioning
tiose connections.
8-56 May 1996
Page 340 of 421
^>
Air Conditioning Repair Procedures
Electronic Control Module/Vacuum Solenoid Renewal
8.2.14.1 Electronic Control Module
Renew
8.3.01.1 Vacuum System Solenoid
Renewal
1.
Disconnect the battery earth
lead.
2.
Remove the right hand underscuttle casing.
3. (On left hand cars) Removethe glove box assembly.
3. (On right hand cars) Remove the instrument pack
and surround
trim.
4.
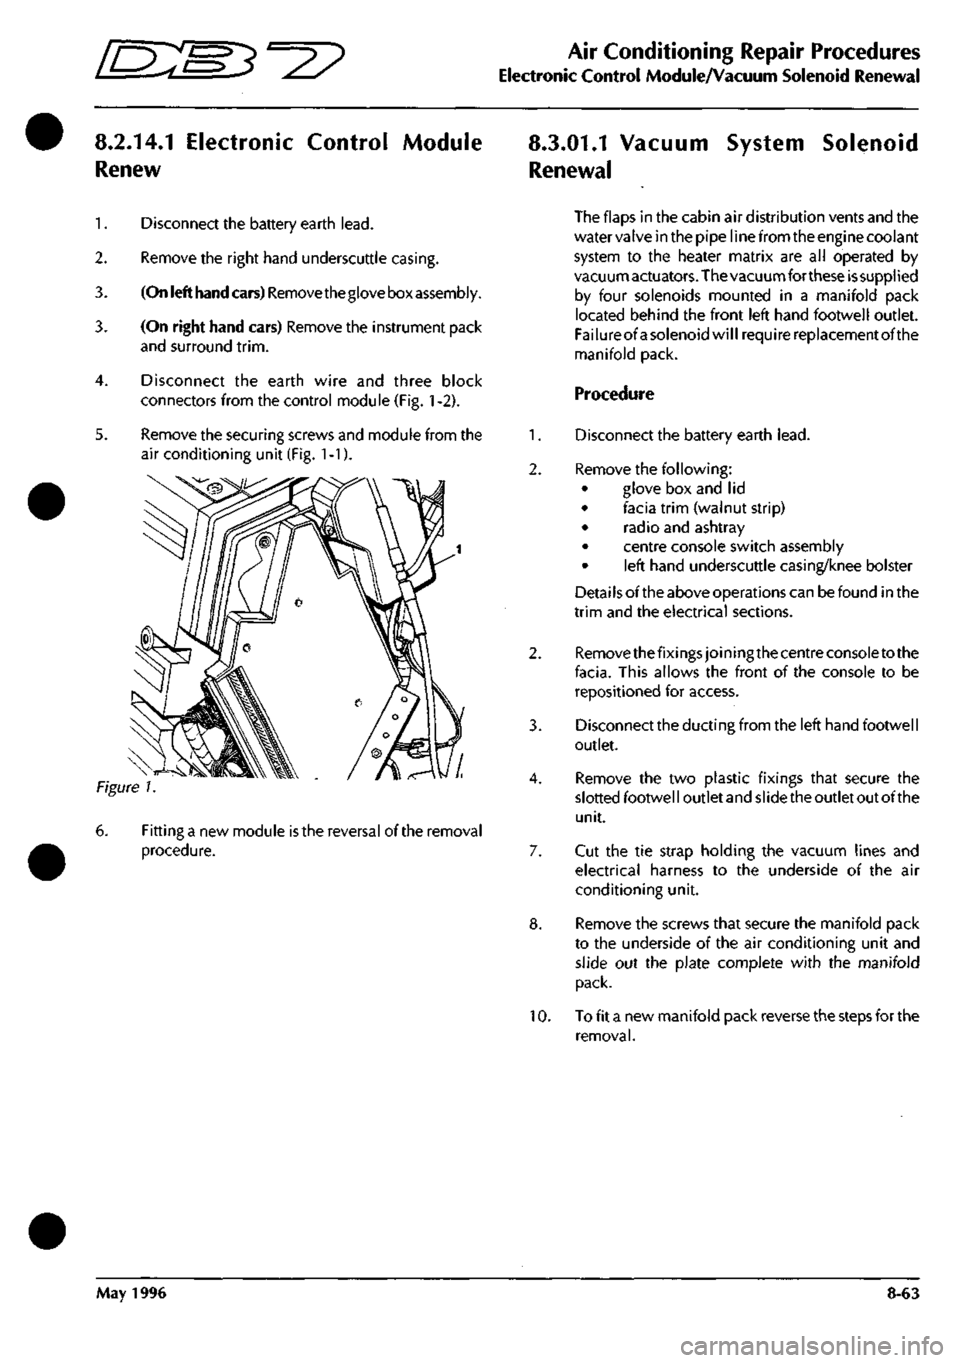
Disconnect the earth wire and three block
connectors from the control module (Fig.
1
-2).
5. Remove the securing screws and module from the
air conditioning unit (Fig. 1-1).
Fitting a new module
is
the reversal of the removal
procedure.
The flaps in the cabin air distribution vents and the
water valve in the pipe line from the engine coolant
system to the heater matrix are all operated by
vacuumactuators.The vacuumfor these issupplied
by four solenoids mounted in a manifold pack
located behind the front left hand footwell outlet.
Failureof a solenoid will require replacement of the
manifold pack.
Procedure
1.
Disconnect the battery earth
lead.
2.
Remove the following:
• glove box and lid
• facia trim (walnut strip)
• radio and ashtray
• centre console switch assembly
• left hand underscuttle casing/knee bolster
Detai
Is
ofthe above operations can be found in the
trim and the electrical sections.
2.
Remove thefixings joining the centre console to the
facia.
This allows the front of the console to be
repositioned for access.
3. Disconnect the ducting from the left hand footwell
outlet.
4.
Remove the two plastic fixings that secure the
slotted footwel
I
outlet and
si
ide the outlet out ofthe
unit.
7. Cut the tie strap holding the vacuum lines and
electrical harness to the underside of the air
conditioning unit.
8. Remove the screws that secure the manifold pack
to the underside of the air conditioning unit and
slide out the plate complete with the manifold
pack.
10.
To fit a new manifold pack reverse the steps for the
removal.
May 1996 8-63
Page 384 of 421
^27
The Aston Martin Lagonda Diagnostic System
Users Guide
Engine Diagnostics - 97 MY
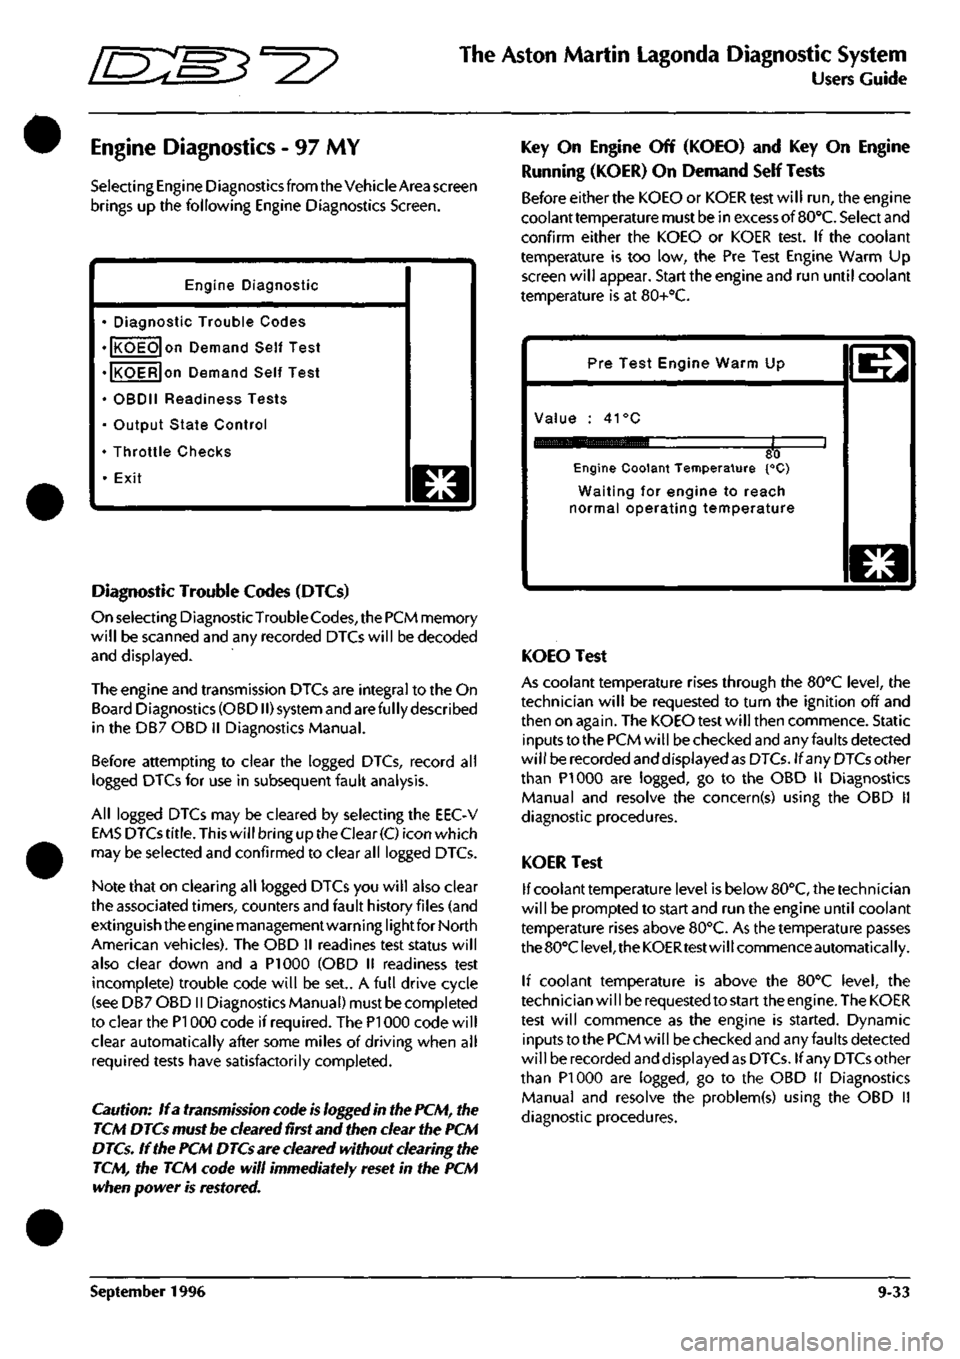
Selecting Engine Diagnostics from the Vehicle Area screen
brings up the following Engine Diagnostics Screen.
Engine Diagnostic
• Diagnostic Trouble Codes
• KOEO on Demand Self Test
• KOER on Demand Self Test
• OBDII Readiness Tests
• Output State Control
• Throttle Checks
• Exit
o
Diagnostic Trouble Codes (DTCs)
On selecting DiagnosticTrouble
Codes,
the PCM memory
will be scanned and any recorded DTCs will be decoded
and displayed.
The engine and transmission DTCs are integral to the On
Board Diagnostics (OBDII) system and are ful ly described
in the DB7 OBD II Diagnostics Manual.
Before attempting to clear the logged DTCs, record all
logged DTCs for use in subsequent fault analysis.
All logged DTCs may be cleared by selecting the EEC-V
EMS DTCs
title.
This will bring up the Clear
(C)
icon which
may be selected and confirmed to clear all logged DTCs.
Note that on clearing all logged DTCs you will also clear
the associated timers, counters and fault history files (and
extinguish the engine management warning lightfor North
American vehicles). The OBD II readines test status will
also clear down and a PI 000 (OBD II readiness test
incomplete) trouble code will be set.. A full drive cycle
(see DB7 OBD II Diagnostics Manual) must be completed
to clear the PI 000 code if required. The PI 000 code will
clear automatically after some miles of driving when all
required tests have satisfactorily completed.
Caution: If a transmission code is logged in the PCM, the
TCM DTCs must be cleared first and then clear the PCM
DTCs. If the PCM DTCs are cleared without clearing the
TCM, the TCM code will immediately reset in the PCM
when power is restored.
Key On Engine Off (KOEO) and Key On Engine
Running (KOER) On Demand Self Tests
Before either the KOEO or KOER test will run, the engine
coolant temperature must be in excess of
BO'C.
Select and
confirm either the KOEO or KOER test. If the coolant
temperature is too low, the Pre Test Engine Warm Up
screen will appear. Start the engine and run until coolant
temperature is at 80+°C.
Pre Test Engine Warm Up
Value : 41°C
80 Engine Coolant Temperature {°C)
Waiting for engine to reach
normal operating temperature
o
KOEO Test
As coolant temperature rises through the BO'C level, the
technician will be requested to turn the ignition off and
then on again. The KOEO test will then commence. Static
inputs to the PCM will be checked and any faults detected
will be recorded and displayed as DTCs. If any DTCs other
than PI 000 are logged, go to the OBD II Diagnostics
Manual and resolve the concern(s) using the OBD 11
diagnostic procedures.
KOER Test
If coolant temperature level is below 80°C, the technician
will be prompted to start and run the engine until coolant
temperature rises above 80°C. As the temperature passes
the 80°C
level,
the KOERtest will commence automatically.
If coolant temperature is above the 80°C level, the
technician wi
11
be requested to start the engine. The KOER
test will commence as the engine is started. Dynamic
inputs to the PCM will be checked and any faults detected
will be recorded and displayed as DTCs. If any DTCs other
than PI 000 are logged, go to the OBD 11 Diagnostics
Manual and resolve the problem(s) using the OBD II
diagnostic procedures.
September 1996 9-33
Page 387 of 421
The Aston Martin Lagonda Diagnostic System
Users Guide ffi:S5'=2?
Engine Datalogger
The datalogger software is designed to aid the technician in identifying permanent or intermittent faults in the DB7's
electrical and electronic systems. It can provide a recorded view of selected signals over a chosen time period. This
recording may be captured in a static, rolling road or road test situation. Data recorded during such tests may then be
analysed on completion of the test or printed out for later analysis.
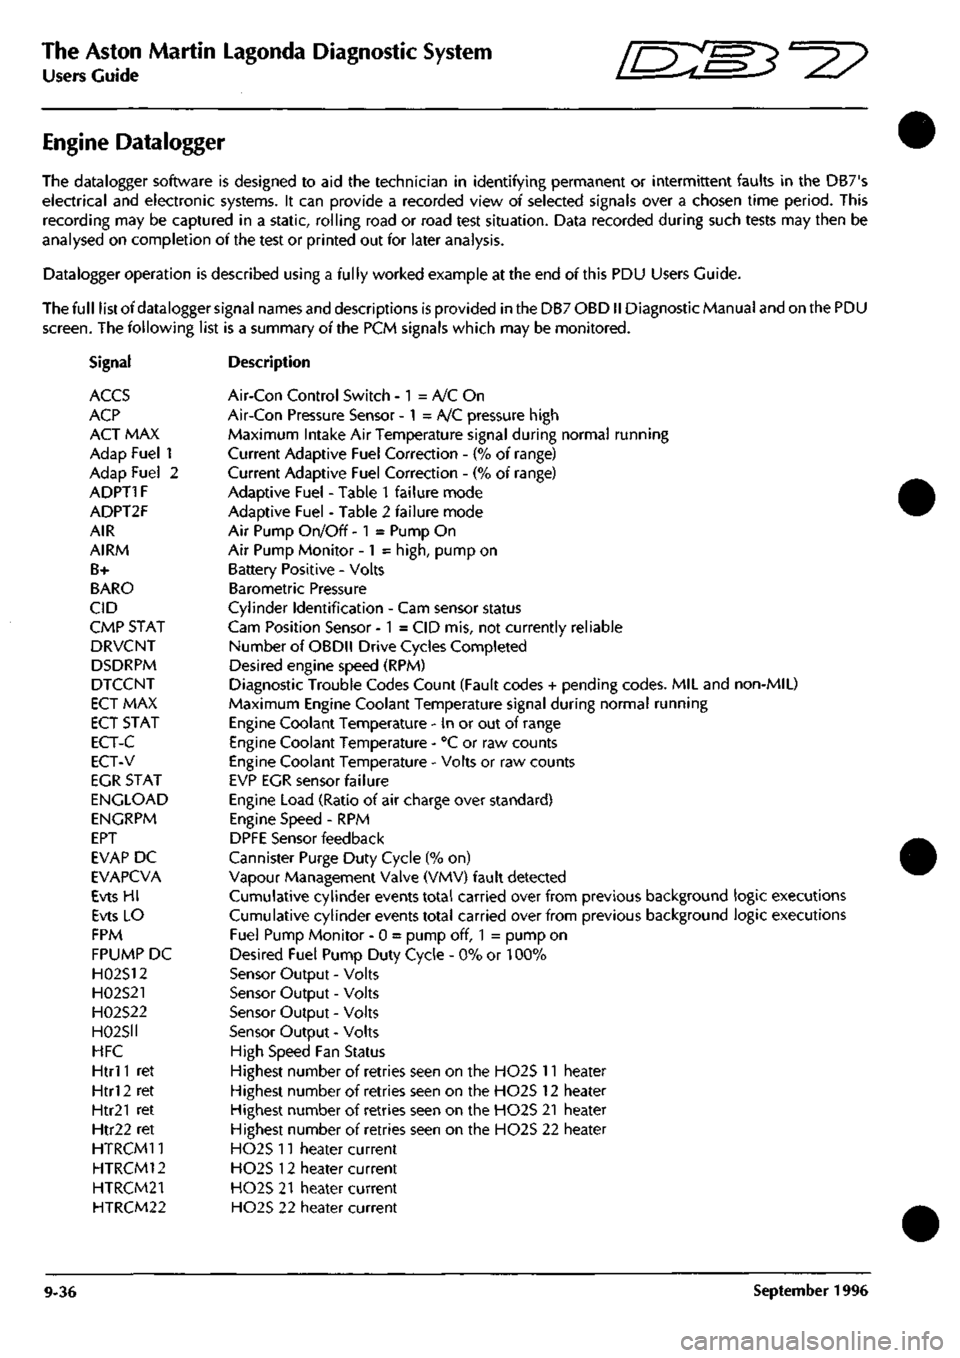
Datalogger operation is described using a fully worked example at the end of this PDU Users Guide.
The full list of datalogger signal names and descriptions is provided in the DB7 OBDII Diagnostic Manual and on the PDU
screen.
The following list is a summary of the PCM signals which may be monitored.
Signal Description
ACCS Air-Con Control Switch - 1 = A/C On
ACP Air-Con Pressure Sensor - 1 = A/C pressure high
ACT MAX Maximum Intake Air Temperature signal during normal running
Adap Fuel 1 Current Adaptive Fuel Correction - (% of range)
Adap Fuel 2 Current Adaptive Fuel Correction - (% of range)
ADPT1F Adaptive Fuel - Table 1 failure mode
ADPT2F Adaptive Fuel - Table 2 failure mode
AIR Air Pump On/Off - 1 = Pump On
AIRM Air Pump Monitor -1 =
high,
pump on
B+ Battery Positive - Volts
BARO Barometric Pressure
CID Cylinder Identification - Cam sensor status
CMP STAT Cam Position Sensor -1 = CID mis, not currently reliable
DRVCNT Number of OBDll Drive Cycles Completed
DSDRPM Desired engine speed (RPM)
DTCCNT Diagnostic Trouiale Codes Count (Fault codes + pending codes. MIL and non-MIL)
ECT MAX Maximum Engine Coolant Temperature signal during normal running
ECT STAT Engine Coolant Temperature - in or out of range
ECT-C Engine Coolant Temperature - "C or raw counts
ECT-V Engine Coolant Temperature - Volts or raw counts
EGR STAT EVP EGR sensor failure
ENGLOAD Engine Load (Ratio of air charge over standard)
ENGRPM Engine Speed - RPM
EPT DPFE Sensor feedback
EVAP DC Cannister Purge Duty Cycle (% on)
EVAPCVA Vapour Management Valve (VMV) fault detected
Evts HI Cumulative cylinder events total carried over from previous background logic executions
Evts LO Cumulative cylinder events total carried over from previous background logic executions
FPM Fuel Pump Monitor - 0 = pump off, 1 = pump on
FPUMP DC Desired Fuel Pump Duty Cycle - 0% or 100%
H02S12 Sensor Output - Volts
H02S21 Sensor Output - Volts
H02S22 Sensor Output - Volts
H02S1I Sensor Output - Volts
HFC High Speed Fan Status
Htrl
1
ret Highest number of retries seen on the H02S 11 heater
Htrl 2 ret Highest number of retries seen on the H02S 12 heater
Htr21 ret Highest number of retries seen on the H02S 21 heater
Htr22 ret Highest number of retries seen on the H02S 22 heater
HTRCM11 H02S n heater current
HTRCM12 H02S 12 heater current
HTRCM21 H02S 21 heater current
HTRCM22 H02S 22 heater current
9-36 September 1996
Page 410 of 421
^^?
The Aston Martin Lagonda Diagnostic System
Users Guide
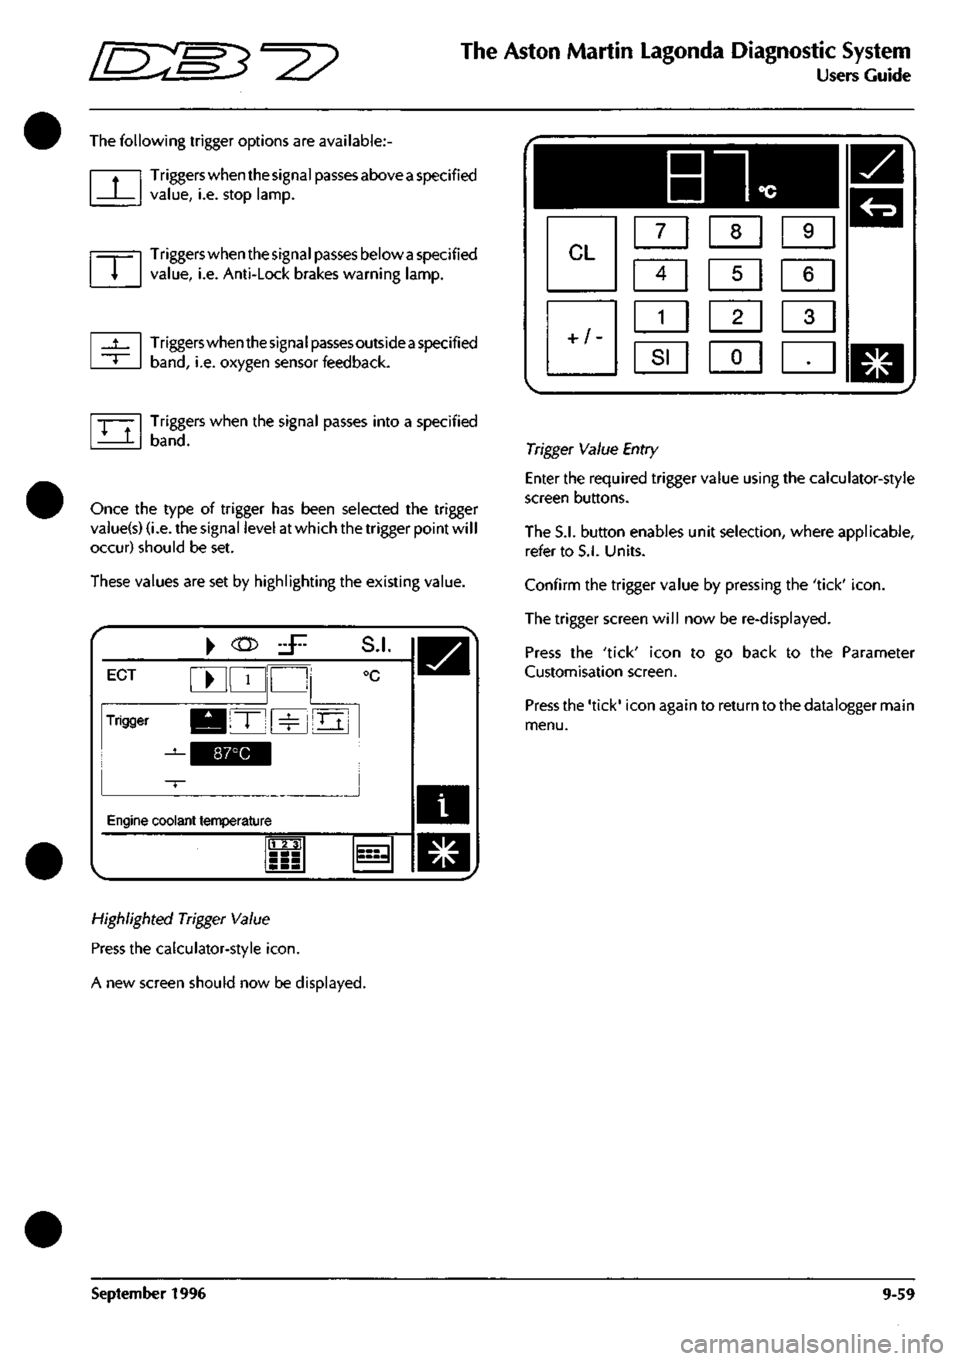
The following trigger options are available:
Triggers when the signal passes above
a
specified
value,
i.e. stop lamp.
Triggers when the signal passes below
a
specified
value,
i.e. Anti-Lock brakes warning lamp.
Triggers when the signa
I
passes outside
a
specified
band,
i.e. oxygen sensor feedback.
Triggers when the signal passes into a specified
band.
Once the type of trigger has been selected the trigger
vaiue(s) (i.e. the signal level at which the trigger point wil
I
occur) should be set.
These values are set by highlighting the existing value.
i
ECT ^ 1
Trigger KBIT" ^
^^^^1
S.I.
°c
Oj
Engine coolant temperature
m
^
Highlighted Trigger Value
Press the calculator-style
icon.
A new screen should now be displayed.
Trigger Value Entry
Enter the required trigger value using the calculator-style
screen buttons.
The S.I. button enables unit selection, where applicable,
refer to S.I. Units.
Confirm the trigger value by pressing the 'tick'
icon.
The trigger screen will now be re-displayed.
Press the 'tick' icon to go back to the Parameter
Customisation screen.
Press the 'tick' icon again to return to the datalogger main
menu.
September 1996 9-59
Page 417 of 421
The Aston Martin Lagonda Diagnostic System
Users Guide =2?
Training
The training programme incorporated into the PDU
software is designed to cover the needs of new users and
those who have basic PDU skills but require further
training on the DMM and Datalogger functions.
Select 'Training' from the PDU main menu to bring up the
training menu.
New User Training
The new user training program takes the student through
a structured sequence of activities to learn the meaning
and use of the basic screen icons. The traineemay then
work through programmed exercises to learn the digital
multi-meter and then the datalogger functions.
Existing User Training Menu
in this program the existing user may select training from
the following list:
• User Screen Controls
• Digital Multi-Meter
• Datalogger
OBD II Scan Tool (Not 95 MY)
The OBD II Scan Tool is designed to access the memories
of the engine and transmission control units to monitor
and extract data relative to emissions control.
The following types of data may be accessed:
Current Powertrain Data
Monitor Freeze Frame Data
Request Trouble Codes
Clear Trouble Codes
Request Oxygen Sensor Test Results
Monitor Oxygen Sensors
Display Pending Trouble Codes
Request On-Board Monitoring Test Results
Examine Readiness Tests
Malfunction Lamp Status
The data to be monitored is selected from the OBD
11
main
menu.
For example if Monitor Freeze Frame Data is selected, the
system will display up to 11 parameters which are always
recorded when a fault code is logged. The parameters are
as follows:
0 : SUPP Supported
2 : FCFF Fault Causing Freeze Frame
3 : FSS Fuel System Status
4 : CLV Calculated Load Value
5 : ECT Engine Coolant Temperature
6 : STFT-B1 Short Term Fuel Trim - bank 1 (Cyl
1
-3)
7 : LTFT-B1 Long Term Fuel Trim - bank
1
(Cyl 1-3)
8 : STFT-B2 Short Term Fuel Trim - bank 2 (Cyl 4-6)
9 : LTFT-B2 Long Term Fuel Trim - bank 2 (Cyl 4-6)
12:RPM .Engine Speed
13:VS Vehicle Speed
•'••) ••