engine ASTON MARTIN V8 VANTAGE 2010 Workshop Manual
[x] Cancel search | Manufacturer: ASTON MARTIN, Model Year: 2010, Model line: V8 VANTAGE, Model: ASTON MARTIN V8 VANTAGE 2010Pages: 947, PDF Size: 43.21 MB
Page 443 of 947

Shock Absorber System (04.03)
Suspension (04.00)
May 2007 Workshop Manual 4-3-3
Front Spring-Pair-Renew
Removal
1. Raise vehicle on ramp.
2. Remove road wheel(s).
3. Disconnect ABS sensor multiplug (see Fig. 1).
4. Release sensor harness clips (x3) from upper suspension arm and vertical link (see Fig. 2).
5. Remove Torx bolts (x4) from LH and RH side securing engine cross brace and remove cross brace. 6. Remove nuts and bolts (x2 each side) from upper
suspension arm to body (see Fig. 3).
7. Position suspension arm aside (see Fig. 4).
Repair Operation Time (ROT)
Fig. 3
Allow the upper suspension arm and vertical link to fall
back, giving access to remove the spring and damper assembly
Fig. 4
Caution
Ensure that the brake flex hose is not over stretched.
Page 444 of 947

Shock Absorber System (04.03)
Suspension (04.00)4-3-4 Workshop Manual May 2007
8. Remove nuts (x3 each side) from damper top mounting and remove engine cross br ace support (see Fig. 5).
9. Remove nuts and bolts (each side) from damper lower mountings (see Fig. 6).
10. Remove spring and damper assembly.
11. Position spring compressor to spring and compress spring.
12. Hold damper shaft and remove top mounting retaining nut.
13. Remove top mounting and spring assembly.
14. Remove spring compressor from spring.
Installation
1. Clean spring and top mounting.
2. Position spring compressor to new spring and compress spring.
3. Install spring and top mounting and install and torque tighten retaining nut.
4. Remove spring compressor. 5. Install spring and damper assembly and install engine
cross brace support.
6. Install top mounting nuts (x3) each side (do not torque tighten).
7. Align damper to lower mounting and install bolts and nuts each side (do not torque tighten).
8. Position upper suspension arm and install bolts and nuts (x2) each side (do not torque tighten).
9. Connect ABS sensor multiplug and install harness clips in upper suspension ar m and vertical link.
10. Install road wheel(s).
11. Lower vehicle on ramp.
12. Torque tighten upper arm nuts and bolts.
13. Torque tighten top mounting nuts (x3) and lower mounting nut and bolt.
14. Align engine cross brace and install Torx bolts (x2).
15. Tighten Torx bolts (x4) to correct torque.
Front Damper-Pair-Renew
Removal
1. Raise vehicle on ramp.
2. Remove road wheel(s).
3. Disconnect ABS sensor multiplug.
4. Release sensor harness clips (x3) from upper suspension arm and vertical link.
5. Remove Torx bolts (x4) from LH and RH side securing
engine cross brace and remove cross brace.
6. Remove nuts and bolts (x2 each side) from upper suspension arm to body and position suspension arm
aside.
Fig. 5
Fig. 6
If removed, place the engine ba
y cross brace, complete with
mounts, in position.
Caution
Ensure that the brake flex hose is not over stretched.
Caution
Final tightening of suspen sion components must be
carried out with the suspension arms at normal ride
height. Failure to do this wi ll over stress the suspension
bushes when the suspension is deflected to maximum
upward travel.
Repair Operation Time (ROT)
ItemCode
Front Damper-Pair-Renew 04.03.AC
If removing both spring and damper units - the engine bay
cross brace will be released.
Allow the upper suspension arm and vertical link to fall back, giving access to remo ve the spring and damper
assembly.
Caution
Ensure that the brake flex hose is not over stretched.
Page 445 of 947

Shock Absorber System (04.03)
Suspension (04.00)
May 2007 Workshop Manual 4-3-5
7. Remove nuts (x3 each side) from damper top mounting and remove engine cross brace support.
8. Remove nuts and bolts each side from damper lower mountings.
9. Remove spring and damper assembly.
10. Position spring compresso r to spring and compress
spring.
11. Hold damper shaft, and remove top mounting retaining nut.
12. Remove top mounting and spring assembly.
13. Remove dust shield from rebound bumper and spring seat flange.
Installation
1. Clean spring , spring seat flange, bumper, dust shield and top mounting .
2. Install spring seat flange, rebound bumper and dust shield onto damper.
3. Install spring and top mounting and install and tighten retaining nut.
4. Remove spring compressor.
5. Install spring and damper assembly and install engine cross brace support.
6. Install top mounting nuts (x3) each side (do not torque tighten).
7. Align damper to lower mounting and install bolts and nuts each side (do not torque tighten).
8. Position upper suspension arm and install bolts and nuts (x2) each side (do not torque tighten).
9. Connect ABS sensor multiplug and install harness clips in upper suspension arm and vertical link.
10. Install road wheel(s).
11. Lower vehicle on ramp.
12. Tighten upper arm nuts an d bolts to correct torque.
13. Torque tighten top mounting nuts (x3) and lower mounting nut and bolt.
14. Align engine cross brace, install Torx bolts (x2) and
tighten Torx bolts (x4) to correct torque.
Rear Spring and Damper Assembly-Pair-
Renew
Removal
1. Open fuel filler lid and remove fuel filler cap.
2. Raise vehicle on ramp.
3. Remove road wheel(s).
4. Remove LH rear wheel arch liner (see Workshop Manual procedure 01.02.HB Wheel Arch Liner - Rear -
RH - Renew).
5. Remove RH wheel arch liner (see Workshop Manual procedure 01.02.JB Wheel Arch Liner - Rear - LH -
Renew).
6. Remove bolt securing fuel filler pipe bracket to shock
absorber mounting bracket.
7. Remove nut securing fuel fille r pipe to body and tie filler
pipe aside (see Fig. 1).
8. Disconnect ABS sensor multiplug (see Fig. 2).
If removed, place the engine
bay cross brace, complete with
mounts, in position.
Caution
Ensure that the brake flex hose is not over stretched.
Caution
Final tightening of suspension components must be
carried out with the suspensi on arms at normal ride
height. Failure to do this wi ll over stress the suspension
bushes when the suspension is deflected to maximum upward travel.
Repair Operation Time (ROT)
Page 453 of 947
Road Wheels and Tyres (04.04)
Suspension (04.00)
May 2007 Workshop Manual 4-4-3
Maintenance
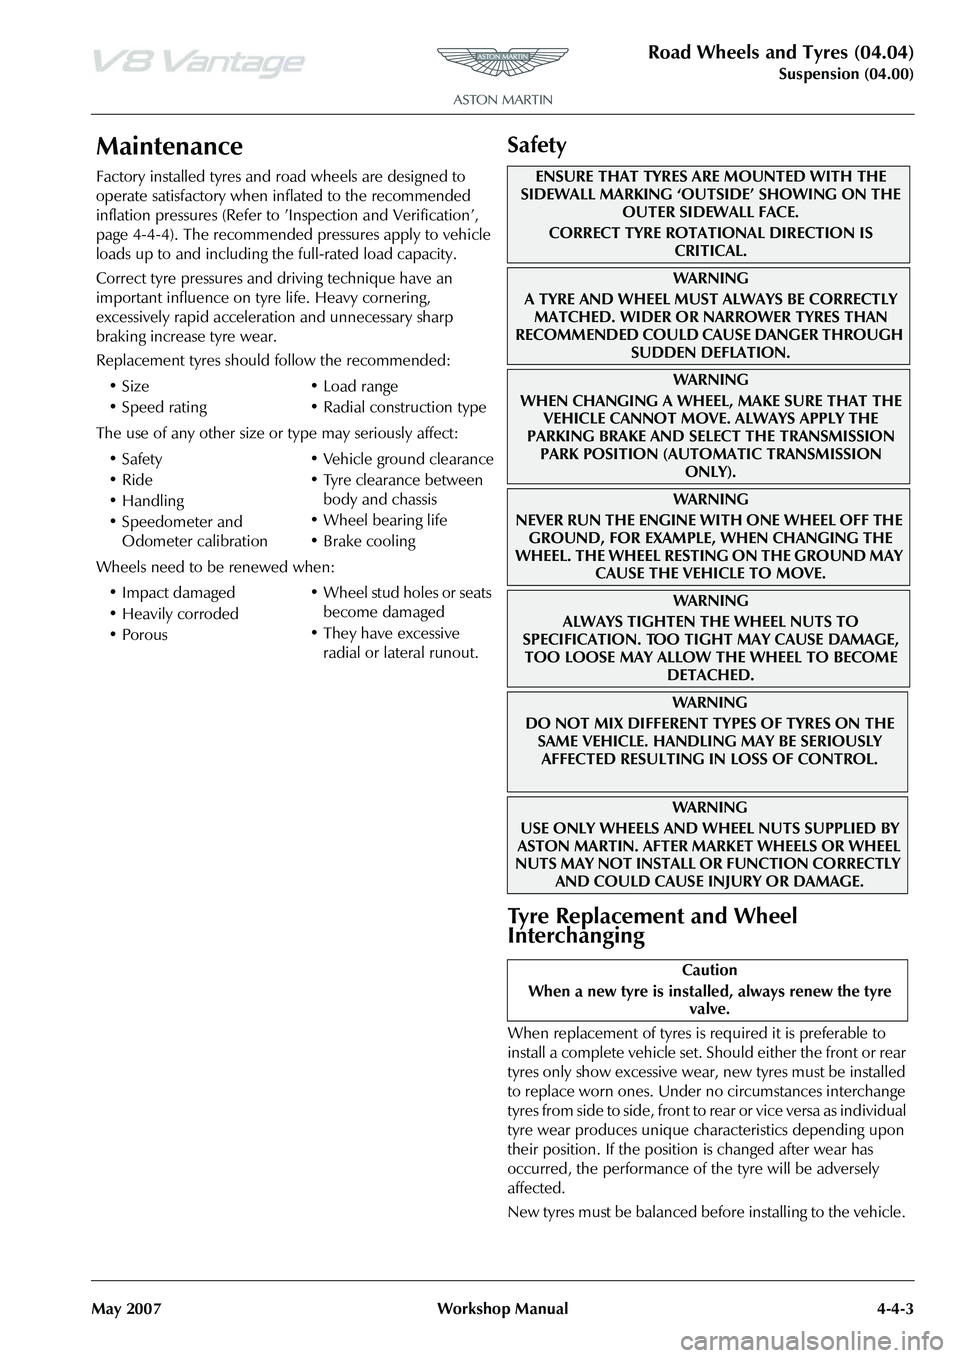
Factory installed tyres and road wheels are designed to
operate satisfactory when inflated to the recommended
inflation pressures (Refer to ’Inspection and Verification’,
page 4-4-4). The recommended pressures apply to vehicle
loads up to and including the full-rated load capacity.
Correct tyre pressures and driving technique have an
important influence on tyre life. Heavy cornering,
excessively rapid acceleration and unnecessary sharp
braking increase tyre wear.
Replacement tyres should follow the recommended:
The use of any other size or type may seriously affect:
Wheels need to be renewed when:
Safety
Tyre Replacement and Wheel
Interchanging
When replacement of tyres is required it is preferable to
install a complete vehicle set. S hould either the front or rear
tyres only show excessive wear, new tyres must be installed
to replace worn ones. Under no circumstances interchange
tyres from side to side, front to re ar or vice versa as individual
tyre wear produces unique characteristics depending upon
their position. If the position is changed after wear has
occurred, the performance of the tyre will be adversely
affected.
New tyres must be balanced before installing to the vehicle.
•Size
•Speed rating
•Load range
• Radial construction type
•Safety
•Ride
•Handling
• Speedometer and Odometer calibration • Vehicle ground clearance
• Tyre clearance between
body and chassis
• Wheel bearing life
• Brake cooling
• Impact damaged
• Heavily corroded
• Porous • Wheel stud holes or seats
become damaged
• They have excessive radial or lateral runout.
ENSURE THAT TYRES ARE MOUNTED WITH THE
SIDEWALL MARKING ‘OUTSIDE’ SHOWING ON THE
OUTER SIDEWALL FACE.
CORRECT TYRE ROTATIONAL DIRECTION IS CRITICAL.
WA R N I N G
A TYRE AND WHEEL MUST ALWAYS BE CORRECTLY MATCHED. WIDER OR NARROWER TYRES THAN
RECOMMENDED COULD CAUSE DANGER THROUGH
SUDDEN DEFLATION.
WA R N I N G
WHEN CHANGING A WHEEL, MAKE SURE THAT THE VEHICLE CANNOT MOVE. ALWAYS APPLY THE
PARKING BRAKE AND SELE CT THE TRANSMISSION
PARK POSITION (AUTOMATIC TRANSMISSION ONLY).
WA R N I N G
NEVER RUN THE ENGINE WITH ONE WHEEL OFF THE GROUND, FOR EXAMPLE, WHEN CHANGING THE
WHEEL. THE WHEEL RESTING ON THE GROUND MAY CAUSE THE VEHICLE TO MOVE.
WA R N I N G
ALWAYS TIGHTEN THE WHEEL NUTS TO
SPECIFICATION. TOO TIGHT MAY CAUSE DAMAGE,
TOO LOOSE MAY ALLOW TH E WHEEL TO BECOME
DETACHED.
WAR NI NG
DO NOT MIX DIFFERENT TY PES OF TYRES ON THE
SAME VEHICLE. HANDLING MAY BE SERIOUSLY AFFECTED RESULTING IN LOSS OF CONTROL.
WAR NI NG
USE ONLY WHEELS AND WHEEL NUTS SUPPLIED BY
ASTON MARTIN. AFTER MARKET WHEELS OR WHEEL
NUTS MAY NOT INSTALL OR FUNCTION CORRECTLY
AND COULD CAUSE INJURY OR DAMAGE.
Caution
When a new tyre is installe d, always renew the tyre
valve.
Page 455 of 947
Road Wheels and Tyres (04.04)
Suspension (04.00)
May 2007 Workshop Manual 4-4-5
Road Test
A tyre vibration diagnostic proc edure always begins with a road test. The road test and customer interview (if available)
will provide much of the information neede d to find the source of a vibration.
During the road test, drive the vehicle on a road that is smoot h and free of undulations. If vibration is apparent, note and
record the following:
• The speed at which the vibration occurs
• What type of vibration occurs in each speed range
• How the vibration is affected by changes in the following types of vibration-sensitivity:
Torque Sensitive - This means that the condition may be improved or made worse by accelerating, decelerating, coasting,
maintaining a steady vehicle speed or applying engine torque.
Vehicle Speed Sensitive - This means that the vibration always occurs at the same vehicle speed and is not affected by
engine torque, engine speed or the transmission gear selected.
Engine Speed Sensitive - This means that the vibration occurs at varyin g vehicle speeds when a different transmission
gear is selected. It may sometimes be isolated by increasing or decreasing engine speed with the transmission in NEUTRAL
or by stall testing with the transmission in gear. If the condition is engine speed sensitive, the cause is probably not relate d
to the tyres.
If the road test indicates that there is tyre whine, but no sh ake or vibration, the noise originates with the contact between
the tyre and the road surface.
A thumping noise usually means that the tyre has a flat or soft spot making a noise as they slap the roadway. Tyre whine
may be distinguished from axle noise. Tyre whine remains the same over a range of speeds.
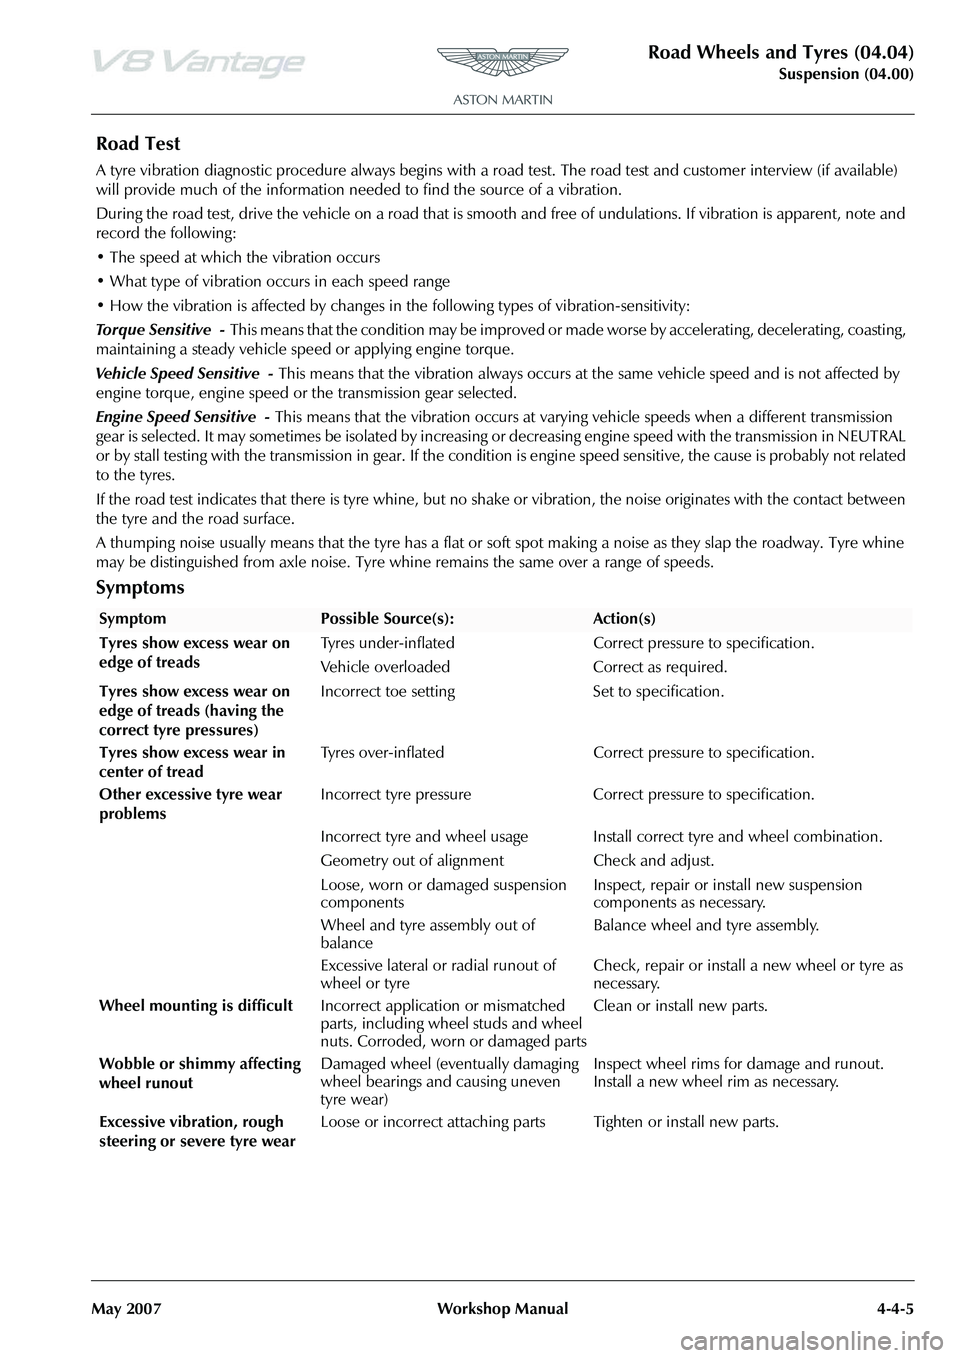
Symptoms
SymptomPossible Source(s):Action(s)
Tyres show excess wear on
edge of treads Tyres under-inflated Correct pressure to specification.
Vehicle overloaded Correct as required.
Tyres show excess wear on
edge of treads (having the
correct tyre pressures) Incorrect toe setting Set to specification.
Tyres show excess wear in
center of tread Tyres over-inflated Correct pressure to specification.
Other excessive tyre wear
problems Incorrect tyre pressure Correct pressure to specification.
Incorrect tyre and wheel usage Install correct tyre and wheel combination.
Geometry out of alignm
ent Check and adjust.
Loose, worn or damaged suspension
components Inspect, repair or install new suspension
components as necessary.
Wheel and tyre assembly out of
balance Balance wheel and tyre assembly.
Excessive lateral or radial runout of
wheel or tyre Check, repair or install a new wheel or tyre as
necessary.
Wheel mounting is difficult Incorrect application or mismatched
parts, including wheel studs and wheel
nuts. Corroded, worn or damaged parts Clean or install new parts.
Wobble or shimmy affecting
wheel runout Damaged wheel (eventually damaging
wheel bearings and causing uneven
tyre wear) Inspect wheel rims for damage and runout.
Install a new wheel rim as necessary.
Excessive vibration, rough
steering or severe tyre wear Loose or incorrect attaching parts Tighten or install new parts.
Page 456 of 947
Road Wheels and Tyres (04.04)
Suspension (04.00)4-4-6 Workshop Manual May 2007
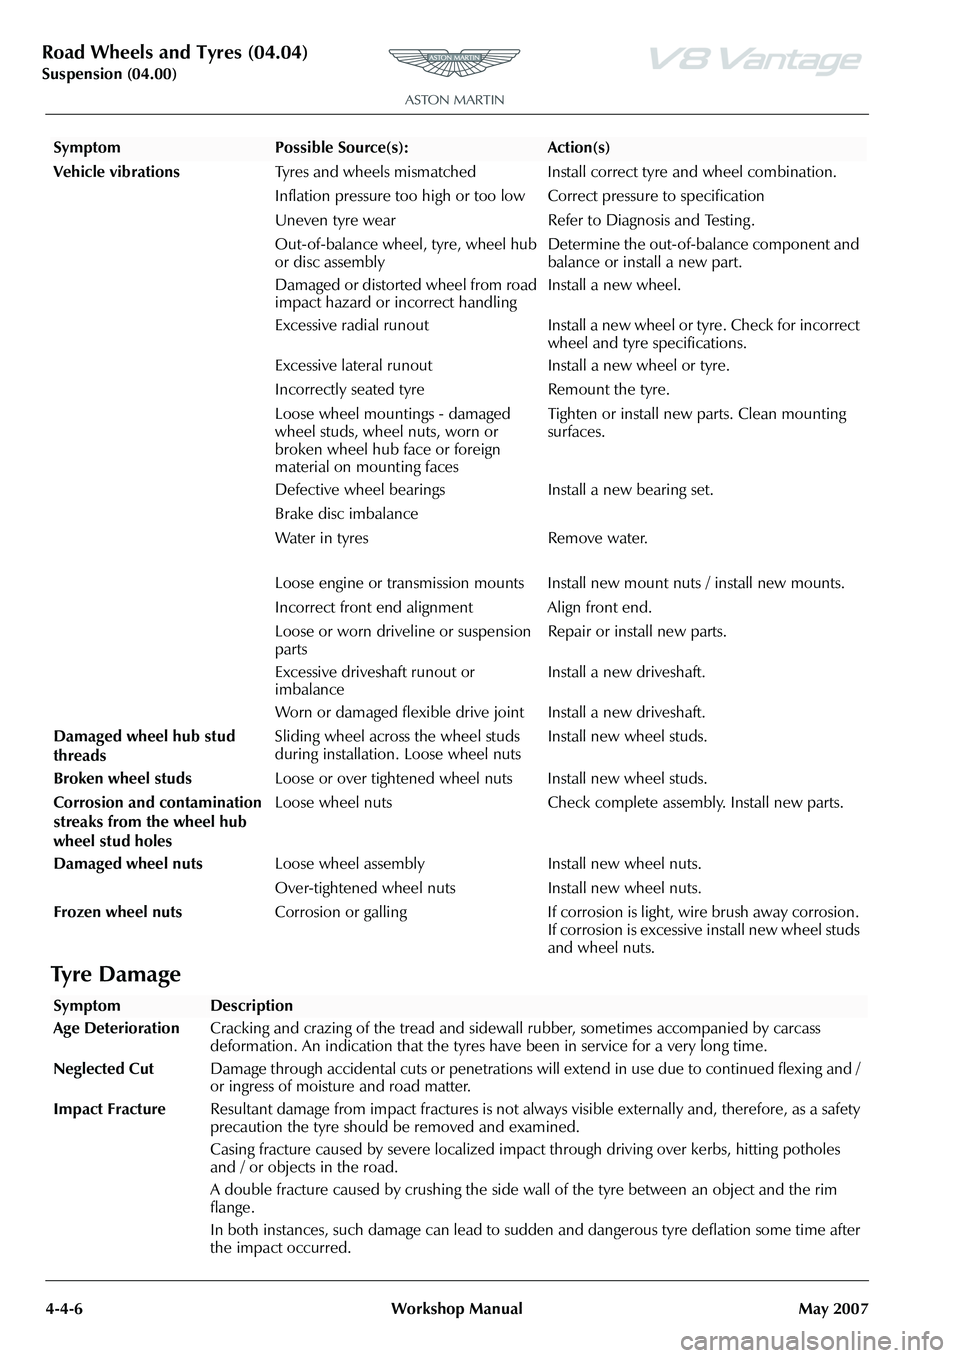
Ty r e D a m a g e
Vehicle vibrations Tyres and wheels mismatched Install correct tyre and wheel combination.
Inflation pressure too high or too lo w Correct pressure to specification
Uneven tyre wear Refer to Diagnosis and Testing .
Out-of-balance wheel, tyre, wheel hub
or disc assembly Determine the out-of-balance component and
balance or install a new part.
Damaged or distorted wheel from road
impact hazard or incorrect handling Install a new wheel.
Excessive radial runout Install a new wheel or tyre. Check for incorrect wheel and tyre specifications.
Excessive lateral runout Install a new wheel or tyre.
Incorrectly seated tyre Remount the tyre.
Loose wheel mountings - damaged
wheel studs, wheel nuts, worn or
broken wheel hub face or foreign
material on mounting faces Tighten or install new parts. Clean mounting
surfaces.
Defective wheel bearings Install a new bearing set.
Brake disc imbalance
Water in tyres Remove water.
Loose engine or transmission mounts Install new mount nuts / install new mounts.
Incorrect front end alignment Align front end.
Loose or worn driveline or suspension
parts Repair or install new parts.
Excessive driveshaft runout or
imbalance Install a new driveshaft.
Worn or damaged flexible drive joint Install a new driveshaft.
Damaged wheel hub stud
threads Sliding wheel across the wheel studs
during installation. Loose wheel nuts
Install new wheel studs.
Broken wheel studs Loose or over tightened wheel nuts Install new wheel studs.
Corrosion and contamination
streaks from the wheel hub
wheel stud holes Loose wheel nuts Check complete assembly. Install new parts.
Damaged wheel nuts Loose wheel assembly Install new wheel nuts.
Over-tightened wheel nuts Install new wheel nuts.
Frozen wheel nuts Corrosion or galling If corrosion is light, wire brush away corrosion.
If corrosion is excessive install new wheel studs
and wheel nuts.
SymptomPossible Source(s):Action(s)
SymptomDescription
Age Deterioration Cracking and crazing of the tread and side wall rubber, sometimes accompanied by carcass
deformation. An indication that the tyres have been in service for a very long time.
Neglected Cut Damage through accidental cuts or penetrations will extend in use due to continued flexing and /
or ingress of moisture and road matter.
Impact Fracture Resultant damage from impact fractures is not always visible externally and, therefore, as a safety
precaution the tyre should be removed and examined.
Casing fracture caused by severe localized impact through driving over kerbs, hitting potholes
and / or objects in the road.
A double fracture caused by crushing the side wall of the tyre between an object and the rim
flange.
In both instances, such damage can lead to sudd en and dangerous tyre deflation some time after
the impact occurred.
Page 464 of 947
Driveshaft (05.01)
Driveline (05.00)5-1-2 Workshop Manual May 2007
Driveline (05.00)
Driveshaft (05.01)
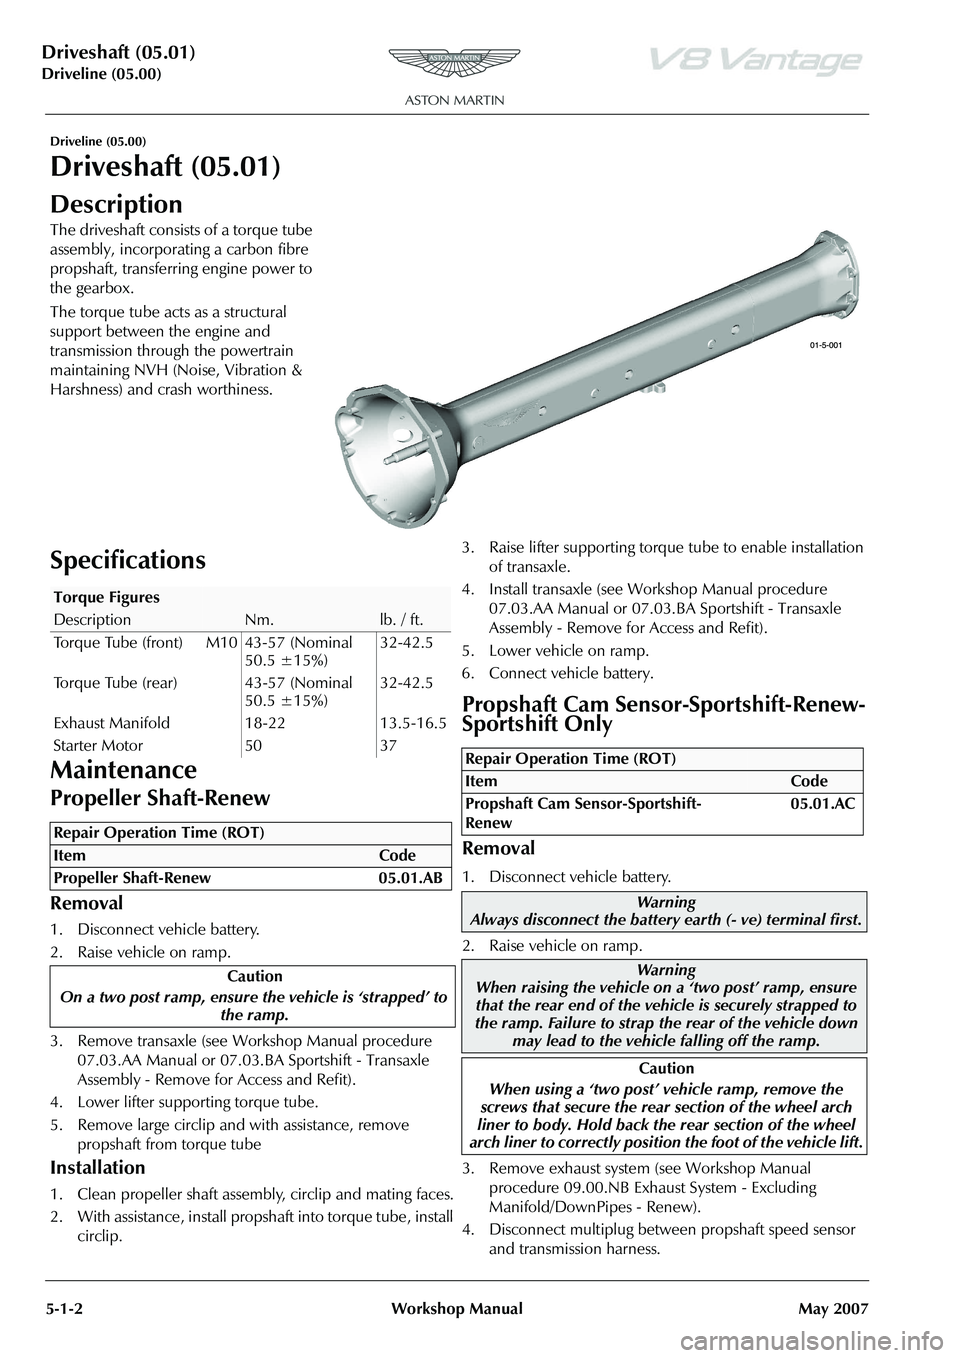
Description
The driveshaft consists of a torque tube
assembly, incorporating a carbon fibre
propshaft, transferring engine power to
the gearbox.
The torque tube acts as a structural
support between the engine and
transmission through the powertrain
maintaining NVH (Noise, Vibration &
Harshness) and crash worthiness.
Specifications
Maintenance
Propeller Shaft-Renew
Removal
1. Disconnect vehicle battery.
2. Raise vehicle on ramp.
3. Remove transaxle (see Workshop Manual procedure 07.03.AA Manual or 07.03.BA Sportshift - Transaxle
Assembly - Remove for Access and Refit).
4. Lower lifter supporting torque tube.
5. Remove large circlip and with assistance, remove propshaft from torque tube
Installation
1. Clean propeller shaft assembly, circlip and mating faces.
2. With assistance, install propshaft into torque tube, install circlip. 3. Raise lifter supporting torque tube to enable installation
of transaxle.
4. Install transaxle (see Workshop Manual procedure 07.03.AA Manual or 07.03.BA Sportshift - Transaxle
Assembly - Remove for Access and Refit).
5. Lower vehicle on ramp.
6. Connect vehicle battery.
Propshaft Cam Sensor-Sportshift-Renew-
Sportshift Only
Removal
1. Disconnect vehicle battery.
2. Raise vehicle on ramp.
3. Remove exhaust system (see Workshop Manual procedure 09.00.NB Exhaust System - Excluding
Manifold/DownPipes - Renew).
4. Disconnect multiplug between propshaft speed sensor and transmission harness.
Torque Figures
DescriptionNm.lb. / ft.
Torque Tube (front) M10 43-57 (Nominal 50.5 ±15%)32-42.5
Torque Tube (rear) 43-57 (Nominal 50.5 ±15%)32-42.5
Exhaust Manifold 18-22 13.5-16.5
Starter Motor 50 37
Repair Operation Time (ROT)
Repair Operation Time (ROT)
ItemCode
Propshaft Cam Sensor-Sportshift-
Renew 05.01.AC
Warning
Always disconnect the battery earth (- ve) terminal first.
Warning
When raising the vehicle on a ‘two post’ ramp, ensure
that the rear end of the vehi cle is securely strapped to
the ramp. Failure to strap th e rear of the vehicle down
may lead to the vehicl e falling off the ramp.
Caution
When using a ‘two post’ vehicle ramp, remove the
screws that secure the rear section of the wheel arch
liner to body. Hold back the rear section of the wheel
arch liner to correctly position the foot of the vehicle lift.
Page 467 of 947
Driveshaft (05.01)
Driveline (05.00)
May 2007 Workshop Manual 5-1-5
18. Remove bolt securing propshaft speed sensor to torque tube and remove sensor.
19. Release clips (x5) securing transmission harness to torque tube.
20. Remove bolts (x4) securing exhaust mountings to torque tube.
Installation
1. Secure exhaust mountings to torque tube using bolts.
2. Secure transmission harness to torque tube using clips.
3. Secure propshaft speed sensor to torque tube using bolt.
4. Connect multiplug between propshaft speed sensor and transmission harness.
5. Install slave cylinder and spacer to torque tube.
6. Secure slave cylinder to torque tube using bolts.
7. Secure clutch position sensor to slave cylinder using bolts.
8. Secure clutch position sensor harness to side of torque
tube using clips.
9. Secure clutch position sensor harness to top of torque tube using clip.
10. Connect multiplug between clutch position sensor and transmission harness.
11. Install clutch pipe to torque tube.
12. Secure clutch pipe to transmission harness using clips.
13. Secure transmission harness to clutch pipe mounting bracket using clip.
14. Install clip and install clutch pipe to slave cylinder adaptor.
15. Install grommet sealing clutch pipe to torque tube.
16. Install clip and refit bleed pi pe to slave cylinder adaptor.
17. Install grommet sealing clutch bleed pipe to torque tube.
18. Install torque tube assembly (see Workshop Manual procedure 05.01.CA Torque Tube - Remove for Access
& Refit).
19. Connect vehicle battery.
20. Bleed clutch hy draulics (see Workshop Manual
procedure 08.00.AE Clutch Hydraulic System -
Sportshift - Bleed).
21. Lower vehicle on ramp.
Torque Tube-Remove for Access/Refit
Remove
1. Disconnect vehicle battery.
2. Raise vehicle on ramp. 3. Remove transaxle (see Workshop Manual procedure
07.03.AA Transaxle Assembly - Manual - Remove for
Access and Refit).
4. Remove LH exhaust manifo ld (see Workshop Manual
procedure 09.00.CB Manifold - Exhaust - LH - Renew).
5. Allow torque tube to lower until engine is balanced.
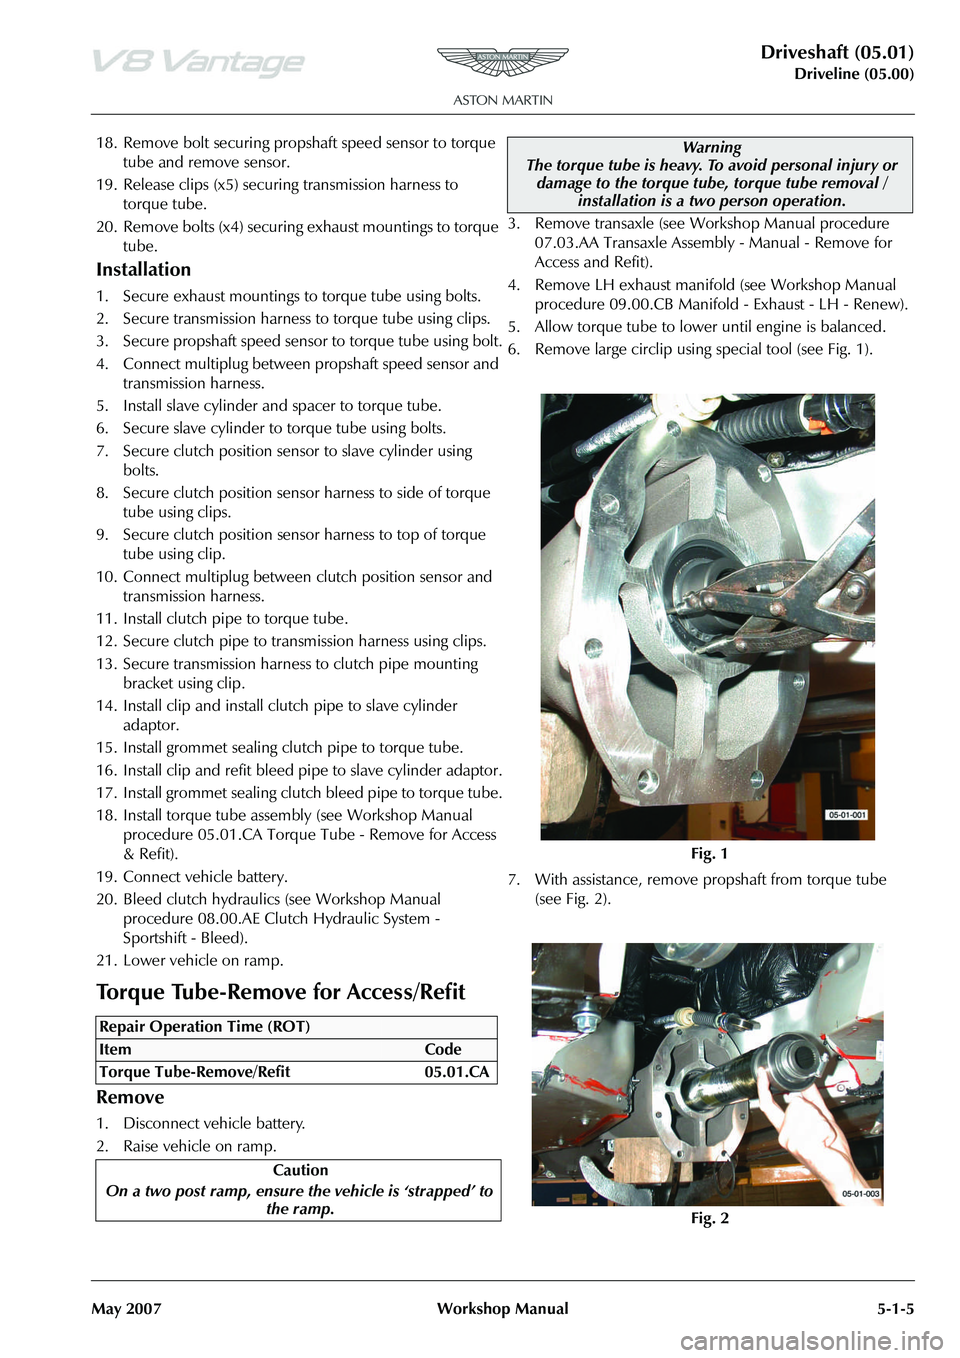
6. Remove large circlip using special tool (see Fig. 1).
7. With assistance, remove propshaft from torque tube (see Fig. 2).
Repair Operation Time (ROT)
Warning
The torque tube is heavy. To avoid personal injury or
damage to the torque tube, torque tube removal / installation is a two person operation.
Fig. 1
Fig. 2
Page 468 of 947
Driveshaft (05.01)
Driveline (05.00)5-1-6 Workshop Manual May 2007
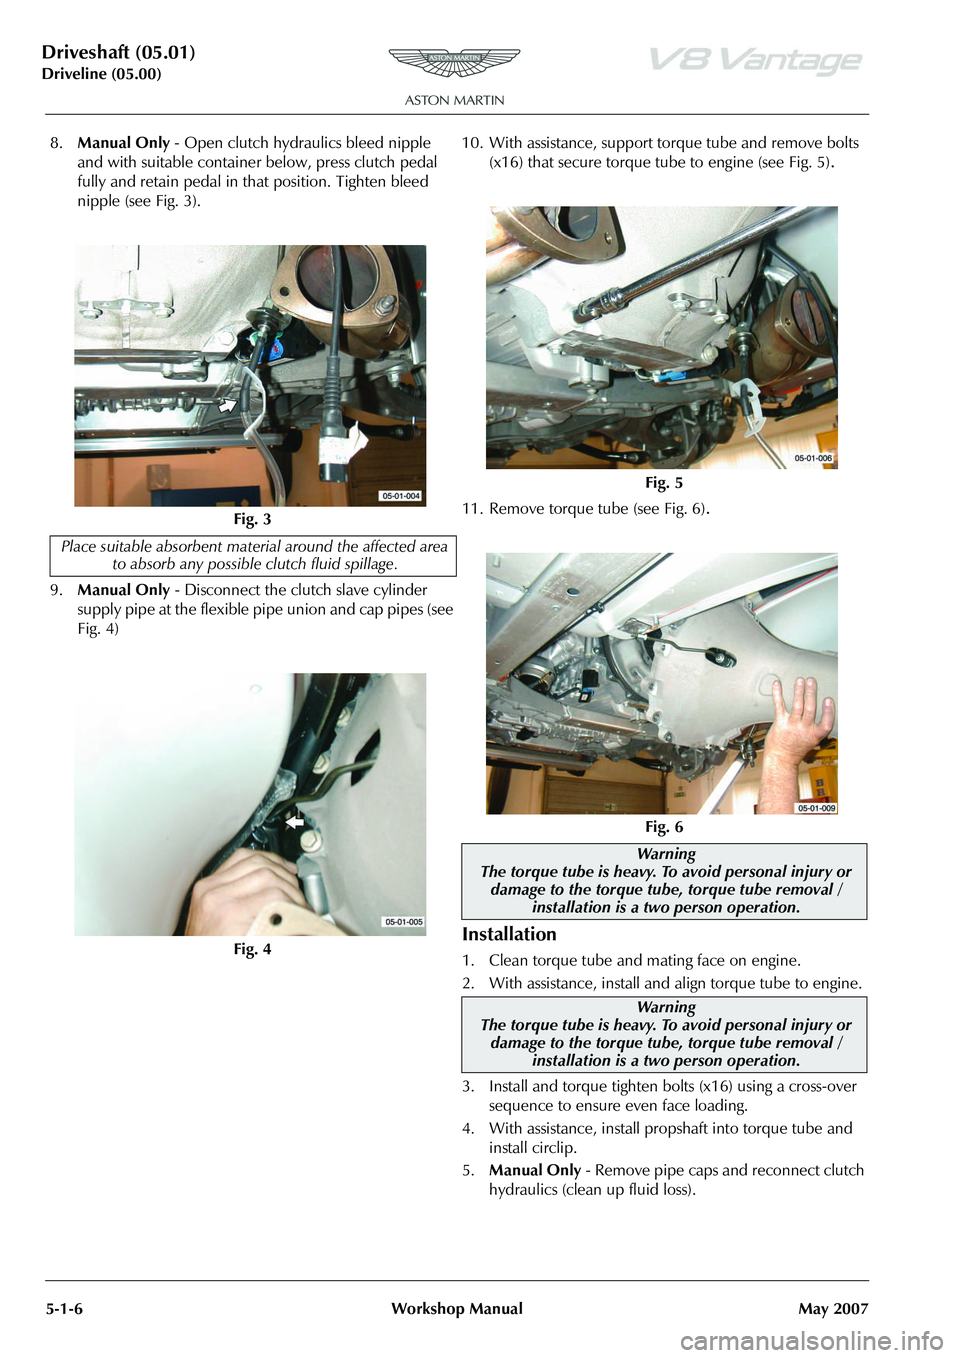
8. Manual Only - Open clutch hydraulics bleed nipple
and with suitable container below, press clutch pedal
fully and retain pedal in that position. Tighten bleed
nipple (see Fig. 3).
9. Manual Only - Disconnect the clutch slave cylinder
supply pipe at the flexible pipe union and cap pipes (see
Fig. 4) 10. With assistance, support torque tube and remove bolts
(x16) that secure torque tube to engine (see Fig. 5)
.
11. Remove torque tube (see Fig. 6).
Installation
1. Clean torque tube and mating face on engine.
2. With assistance, install and align torque tube to engine.
3. Install and torque tighten bolts (x16) using a cross-over sequence to ensure even face loading.
4. With assistance, install propshaft into torque tube and install circlip.
5. Manual Only - Remove pipe caps and reconnect clutch
hydraulics (clean up fluid loss).
Fig. 3
Place suitable absorbent material around the affected area to absorb any possible clutch fluid spillage.
Fig. 4
Fig. 5
Fig. 6
Warning
The torque tube is heavy. To avoid personal injury or damage to the torque tube, torque tube removal / installation is a two person operation.
Warning
The torque tube is heavy. To avoid personal injury or damage to the torque tube, torque tube removal /
installation is a two person operation.
Page 473 of 947
Version 6, March 2010 Workshop Manual 6-3-1
Brake System (06.00)
Contents
Front Disc Brake (06.03)........................................ 6-3-2Description ............................................................. 3-2
Specifications.......................................................... 3-2
Maintenance ........................................................... 3-3Front Brake Disc Set - Renew ................................. 3-3
Front Caliper-Renew .............................................. 3-4
Front Pad Kit - Renew ............................................ 3-5
Front Brake Hose Assembly - Renew ...................... 3-5
Rear Disc Brakes (06.04) ....................................... 6-4-1 Description ............................................................. 4-1
Specifications.......................................................... 4-1
Maintenance ........................................................... 4-2Rear Brake Disc Set-Renew .................................... 4-2
RH/LH Rear Caliper-Renew ................................... 4-2
Rear Pad Kit-Renew ............................................... 4-3
Rear Brake Hose Assembly-Renew ......................... 4-4
Hand Brake (06.05) ................ ............................... 6-5-1
Description ............................................................. 5-1
Specifications.......................................................... 5-1
Maintenance ........................................................... 5-2 RH/LH Handbrake Caliper-Re new ......................... 5-2
Handbrake Lever Assembly-Renew ........................ 5-2
Handbrake Pad Set-Renew .................................... 5-2
Handbrake Cable Assembly-Adjust......................... 5-3
Handbrake Cable Assembly-Vehicle Set-Renew ..... 5-3
Brake Actuation System (06.06)............................. 6-6-1 Description ............................................................. 6-1
Tandem Master Cylinder ........................................ 6-1
Specifications.......................................................... 6-1
Maintenance ........................................................... 6-2Pedal Box Assembly - Renew ................................. 6-2
Installation ............................................................. 6-2
RHD-Brake Master Cylinder Assembly-Renew........ 6-2
LHD-Brake Master Cylinder Assembly-Renew ........ 6-3
Clutch Master Cylinder Assembly-Renew ............... 6-3
RH/LH Front Caliper Hose Assembly-Renew .......... 6-4
RH/LH Rear Brake Caliper Tube Assembly-Renew . 6-5
Brake Master Cylinder to Modulator Secondary
Tube Assembly-Renew ........................................... 6-6
Brake Master Cylinder to Modulator Primary
Tube Assembly-Renew ........................................... 6-7
Rear Wheel Brake Front to Rear Tube Assembly
-Renew .................................................................. 6-8
RH Front Caliper to Modulator Tube Assembly
-Renew .................................................................. 6-9
Rear Wheel Brake Tube Assembly-Renew ............ 6-10
Dynamic Stability Control Module-Renew............ 6-11
Power Brake System (06.07) .................................. 6-7-1 Brake Booster ......................................................... 7-1
Emergency Brake Assist .......................................... 7-1
Specifications.......................................................... 7-2
Maintenance ........................................................... 7-2Brake Booster-RHD-Renew.................................... 7-2
Brake Booster-LHD-Renew .................................... 7-2 Brake Fluid Reservoir-Renew ................................. 7-3
Brake Bleeding - AMDS ......................................... 7-3
Brake Master Cylinder and Vacuum Booster
-Renew .................................................................. 7-4
Brake Master Cylinder-Renew ................................ 7-5
Anti-lock Braking System (ABS) (06.09)................. 6-9-1 Dynamic Stability Control ...................................... 9-1Concept ................................................................ 9-1
System Overview ................................................... 9-2
Operation Summary .............................................. 9-2
Traction Control ..................................................... 9-2 Functional Description ........................................... 9-2
Engine Intervention ................................................ 9-3
Brake Intervention ................................................. 9-3
ABS / DSC Circuit .................................................. 9-3
Specifications ......................................................... 9-3 Maintenance ......................................................... 9-4
ABS Modulator - Remove and Install ...................... 9-4