lock ASTON MARTIN V8 VANTAGE 2010 Owner's Guide
[x] Cancel search | Manufacturer: ASTON MARTIN, Model Year: 2010, Model line: V8 VANTAGE, Model: ASTON MARTIN V8 VANTAGE 2010Pages: 947, PDF Size: 43.21 MB
Page 233 of 947
Issue 5, January 2010 Workshop Manual 3-0-1
Engine System (03.00)
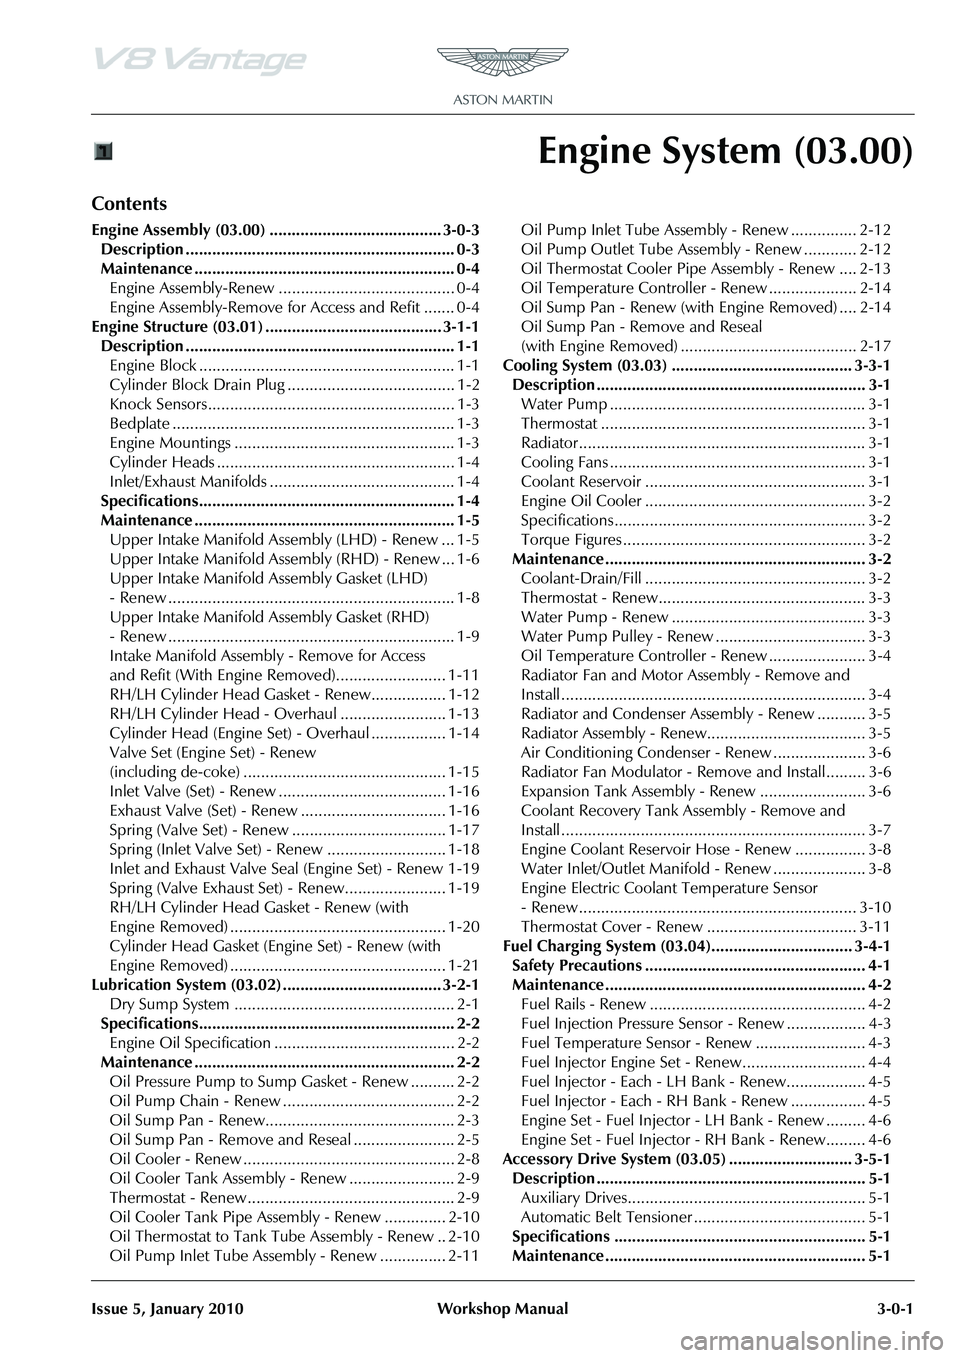
Contents
Engine Assembly (03.00) ....................................... 3-0-3Description ............................................................. 0-3
Maintenance ........................................................... 0-4Engine Assembly-Renew ........................................ 0-4
Engine Assembly-Remove for Access and Refit ....... 0-4
Engine Structure (03.01) ........................................ 3-1-1 Description ............................................................. 1-1Engine Block .......................................................... 1-1
Cylinder Block Drain Plug ...................................... 1-2
Knock Sensors........................................................ 1-3
Bedplate ................................................................ 1-3
Engine Mountings .................................................. 1-3
Cylinder Heads ...................................................... 1-4
Inlet/Exhaust Manifolds .......................................... 1-4
Specifications.......................................................... 1-4
Maintenance ........................................................... 1-5 Upper Intake Manifold Assembly (LHD) - Renew ... 1-5
Upper Intake Manifold Asse mbly (RHD) - Renew ... 1-6
Upper Intake Manifold Assembly Gasket (LHD)
- Renew ................................................................. 1-8
Upper Intake Manifold Assembly Gasket (RHD)
- Renew ................................................................. 1-9
Intake Manifold Assembly - Remove for Access
and Refit (With Engine Removed)......................... 1-11
RH/LH Cylinder Head Gasket - Renew................. 1-12
RH/LH Cylinder Head - Overhaul ........................ 1-13
Cylinder Head (Engine Set) - Overhaul ................. 1-14
Valve Set (Engine Set) - Renew
(including de-coke) .............................................. 1-15
Inlet Valve (Set) - Renew ...................................... 1-16
Exhaust Valve (Set) - Renew ................................. 1-16
Spring (Valve Set) - Renew ................................... 1-17
Spring (Inlet Valve Set) - Renew ........................... 1-18
Inlet and Exhaust Valve Seal (Engine Set) - Renew 1-19
Spring (Valve Exhaust Set) - Renew....................... 1-19
RH/LH Cylinder Head Gasket - Renew (with
Engine Removed) ................................................. 1-20
Cylinder Head Gasket (E ngine Set) - Renew (with
Engine Removed) ................................................. 1-21
Lubrication System (03.02) .. .................................. 3-2-1
Dry Sump System .................................................. 2-1
Specifications.......................................................... 2-2 Engine Oil Specification ......................................... 2-2
Maintenance ........................................................... 2-2 Oil Pressure Pump to Sump Gasket - Renew .......... 2-2
Oil Pump Chain - Renew ....................................... 2-2
Oil Sump Pan - Renew........................................... 2-3
Oil Sump Pan - Remove and Reseal ....................... 2-5
Oil Cooler - Renew ................................................ 2-8
Oil Cooler Tank Assembly - Renew ........................ 2-9
Thermostat - Renew ............................................... 2-9
Oil Cooler Tank Pipe Assembly - Renew .............. 2-10
Oil Thermostat to Tank Tube Assembly - Renew .. 2-10
Oil Pump Inlet Tube Assemb ly - Renew ............... 2-11 Oil Pump Inlet Tube Assembly - Renew ............... 2-12
Oil Pump Outlet Tube Asse
mbly - Renew ............ 2-12
Oil Thermostat Cooler Pipe Assembly - Renew .... 2-13
Oil Temperature Controller - Renew .................... 2-14
Oil Sump Pan - Renew (with Engine Removed) .... 2-14
Oil Sump Pan - Remove and Reseal
(with Engine Removed) ........................................ 2-17
Cooling System (03.03) ......................................... 3-3-1 Description ............................................................. 3-1Water Pump .......................................................... 3-1
Thermostat ............................................................ 3-1
Radiator................................................................. 3-1
Cooling Fans .......................................................... 3-1
Coolant Reservoir .................................................. 3-1
Engine Oil Cooler .................................................. 3-2
Specifications......................................................... 3-2
Torque Figures ....................................................... 3-2
Maintenance ........................................................... 3-2 Coolant-Drain/Fill .................................................. 3-2
Thermostat - Renew............................................... 3-3
Water Pump - Renew ............................................ 3-3
Water Pump Pulley - Renew .................................. 3-3
Oil Temperature Controller - Renew ...................... 3-4
Radiator Fan and Motor Assembly - Remove and
Install ..................................................................... 3-4
Radiator and Condenser Assembly - Renew ........... 3-5
Radiator Assembly - Renew.................................... 3-5
Air Conditioning Condenser - Renew ..................... 3-6
Radiator Fan Modulator - Remove and Install......... 3-6
Expansion Tank Assembly - Renew ........................ 3-6
Coolant Recovery Tank Assembly - Remove and
Install ..................................................................... 3-7
Engine Coolant Reservoir Hose - Renew ................ 3-8
Water Inlet/Outlet Manifold - Renew ..................... 3-8
Engine Electric Coolant Temperature Sensor
- Renew ............................................................... 3-10
Thermostat Cover - Renew .................................. 3-11
Fuel Charging System (03.04)................................ 3-4-1 Safety Precautions .................................................. 4-1
Maintenance ........................................................... 4-2Fuel Rails - Renew ................................................. 4-2
Fuel Injection Pressure Sensor - Renew .................. 4-3
Fuel Temperature Sensor - Renew ......................... 4-3
Fuel Injector Engine Set - Renew............................ 4-4
Fuel Injector - Each - LH Bank - Renew.................. 4-5
Fuel Injector - Each - RH Bank - Renew ................. 4-5
Engine Set - Fuel Injector - LH Bank - Renew ......... 4-6
Engine Set - Fuel Injector - RH Bank - Renew......... 4-6
Accessory Drive System (03.05) ............................ 3-5-1 Description ............................................................. 5-1Auxiliary Drives...................................................... 5-1
Automatic Belt Tensioner ....................................... 5-1
Specifications ......................................................... 5-1
Maintenance ........................................................... 5-1
Page 234 of 947

3-0-2 Workshop Manual Issue 5, January 2010
Drive Belt-Renew ...................................................5-1
Engine Drive Belt and Bracket Assembly Oil Pump
Tensioner-Renew ...................................................5-1
Idler Pulley-Renew .................................................5-2
Engine Drive Belt Idler Assembly-Renew ................5-2
Engine Cranking System (03.06) ........................... 3-6-1 Maintenance ...........................................................6-1 Starter Motor-Renew ..............................................6-1
Ignition System (03.07) ......................................... 3-7-1 Maintenance ...........................................................7-1 Coil Assembly-Engine Set - LH-Renew ....................7-1
Emission Control (03.08) ...................................... 3-8-1 Maintenance ...........................................................8-1 Vacuum Outlet Hose Assemb ly-Renew ..................8-1
Secondary Air Injection Pump Tube-Renew............8-1
Vacuum System Reservoir and Bracket Assembly
- Renew .................................................................8-1
Oil Tank Breather Hose-Renew ..............................8-1
Air Cleaner to Rocker Cover Hose-Renew ..............8-1
Oil Separator Tube Assembly-Renew ......................8-1
Oil Separator Assembly-Renew...............................8-2
Emissions Separator Hose-Renew ...........................8-2
Secondary Air Injection Pump and Bracket
Assembly-Renew ....................................................8-2
PCV Valve Assembly-Renew ...................................8-2
Crank Vent Hose-Renew ........................................8-3
Exhaust Valve to Exhaust Manifold Tube Assembly
- Renew .................................................................8-3
Oil Separator to Inlet Manifold Hose- Renew .........8-3
EGR Module-Renew...............................................8-3
Valve Train (03.09)................................................ 3-9-1 Specifications ..........................................................9-1
Maintenance ...........................................................9-1 Left Side Timing Chain Arm Assembly - Remove
and Install ..............................................................9-1
Right Side Timing Chain Arm Assembly - Remove
and Install ..............................................................9-8
RH/LH Secondary Tensioner Assembly - Remove
and Install ............................................................9-14
Right and Left Intake Camshaft - Remove
and Install ............................................................9-15
Right and Left Exhaust Camshaft - Remove
and Install ............................................................9-17
RH/LH Secondary Timing Chain-Renew ...............9-18
RH/LH Secondary Tensioner Assembly-Renew
(with Engine Removed).........................................9-19
RH/LH Intake Camshaft Renew With Engine
Removed .............................................................9-20
RH/LH Exhaust Camshaft-Renew (with Engine
Removed) ............................................................9-22
RH/LH Secondary Timing Chain-Renew (with
Engine Removed) .................................................9-24
RH/LH Intake Camshaft Sprocket and Housing Assembly-
Renew......................................................................9-25 Left Side Primary Chain - Re move and Install).......9-26
RH/LH Intake Camshaft Sprocket and Housing
Assembly-Renew (with Engine Removed) .............9-29
Engine Sealing (03.10) ........................................ 3-10-1 Specifications ........................................................10-1 Maintenance ......................................................... 10-1
Engine Timing Cover - Renew .............................. 10-1
Left Side Cam Cover - Remove and Install ............ 10-4
Left Side Cam Cover Gasket - Renew ................... 10-5
Right Side Cam Cover Gasket - Renew ................. 10-6
Cylinder Head Gasket - Renew (Engine Set) ......... 10-6
Right Side Cam Cover - Remove and Install .......... 10-9
Cam Cover - Vehicle Set - Remove and Install .... 10-10
Engine Timing Cover- Renew (with Engine
Removed) .......................................................... 10-11
John Guest Cartridge in the Engine Timing Cover
- Repair .............................................................. 10-14
Power Conversion (03.11) ...................................3-11-1 Maintenance ......................................................... 11-1 Connecting Rod Bearing-Renew (Engine Set) ........ 11-1
Crankshaft Main Bearing-Renew (Engine Set)........ 11-1
Crankshaft Assembly-Renew................................. 11-4
Piston-Renew (Engine Set) .................................... 11-7
Piston-Renew ..................................................... 11-12
Additional Piston-Renew (E ach) .......................... 11-17
Piston Ring-Renew (Engine Set) .......................... 11-18
Piston Ring-One Piston Se t-Renew ..................... 11-23
Piston Ring Set-Additional -Renew (Each) ............ 11-28
Connecting Rod-Renew (Engin e Set) .................. 11-29
Crankshaft Damper Pulley Assembly-Renew ....... 11-34
Crankshaft Front Oil Seal-R enew ........................ 11-35
Rear Oil Crankshaft Seal-Renew ......................... 11-36
Cylinder Block-Renew........................................ 11-36
Crankshaft Damper Pulley Assembly-Renew
(with Engine Removed) ...................................... 11-37
Crankshaft Front Oil Seal-Renew (with
Engine Removed) ............................................... 11-37
Crankshaft Rear Oil Seal-Renew (with
Engine Removed) ............................................... 11-38
Air Charging (03.12) .......... ..................................3-12-1
Maintenance ......................................................... 12-1 Clean Air Duct - Remove and Install ..................... 12-1
Engine Air Filter - Remove and Install ................... 12-1
Engine Air Cleaner Assembly - Remove
and Install ............................................................ 12-2
Evaporative Emissions (03.13 ) .............................3-13-1
Description ........................................................... 13-1 System Operation ................................................ 13-1
Engine Management System (03.14) ...................3-14-1 Maintenance ......................................................... 14-1 Right Engine Control Module - Renew.................. 14-1
LH Front Lower Heated Exhaust Gas Oxygen
(HEGO) Sensor - Renew....................................... 14-1
LH Front Upper Heated Exhaust Gas Oxygen
(HEGO) Sensor - Renew....................................... 14-1
RH Front Upper Heated Exhaust Gas Oxygen
(HEGO) Sensor - Renew....................................... 14-2
RH Rear Lower Heated Exhaust Gas Oxygen
(HEGO) Sensor - Renew....................................... 14-2
Left Side Powertrain Control Module (PCM)
(Coupe Only) - Remove and Install....................... 14-3
Left Side Powertrain Control Module (PCM)
(Roadster Only) - Remove and Install.................... 14-4
Page 249 of 947
Engine Structure (03.01)
Issue 4, November 2008Workshop Manual 3-1-1
Engine (03.00)
Engine Structure (03.01)
Description
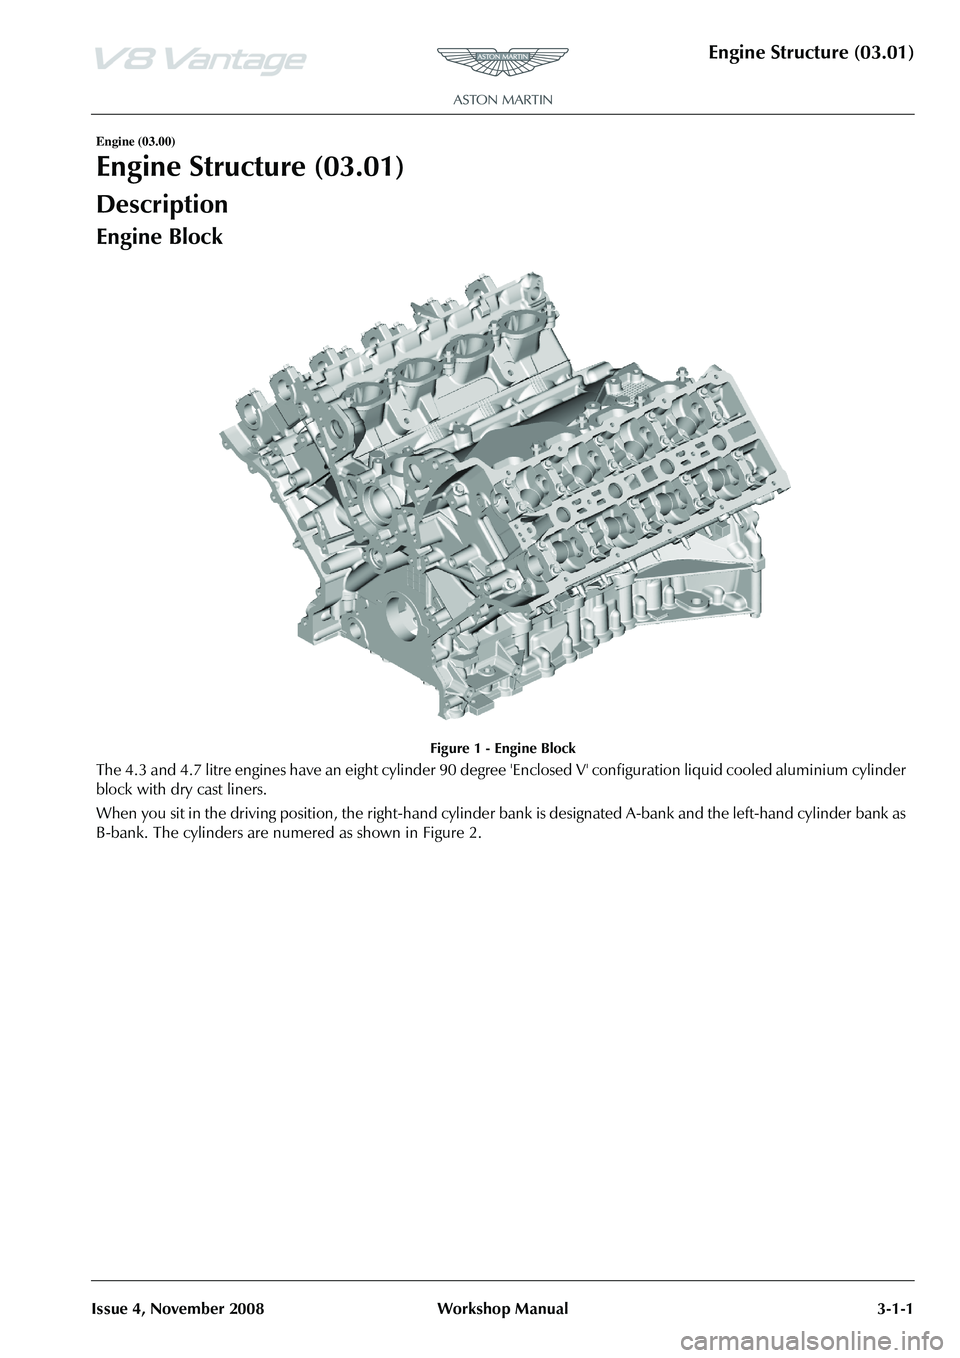
Engine Block
Figure 1 - Engine Block
The 4.3 and 4.7 litre engines have an eight cylinder 90 degree 'Enclosed V' configuration liquid cooled aluminium cylinder
block with dry cast liners.
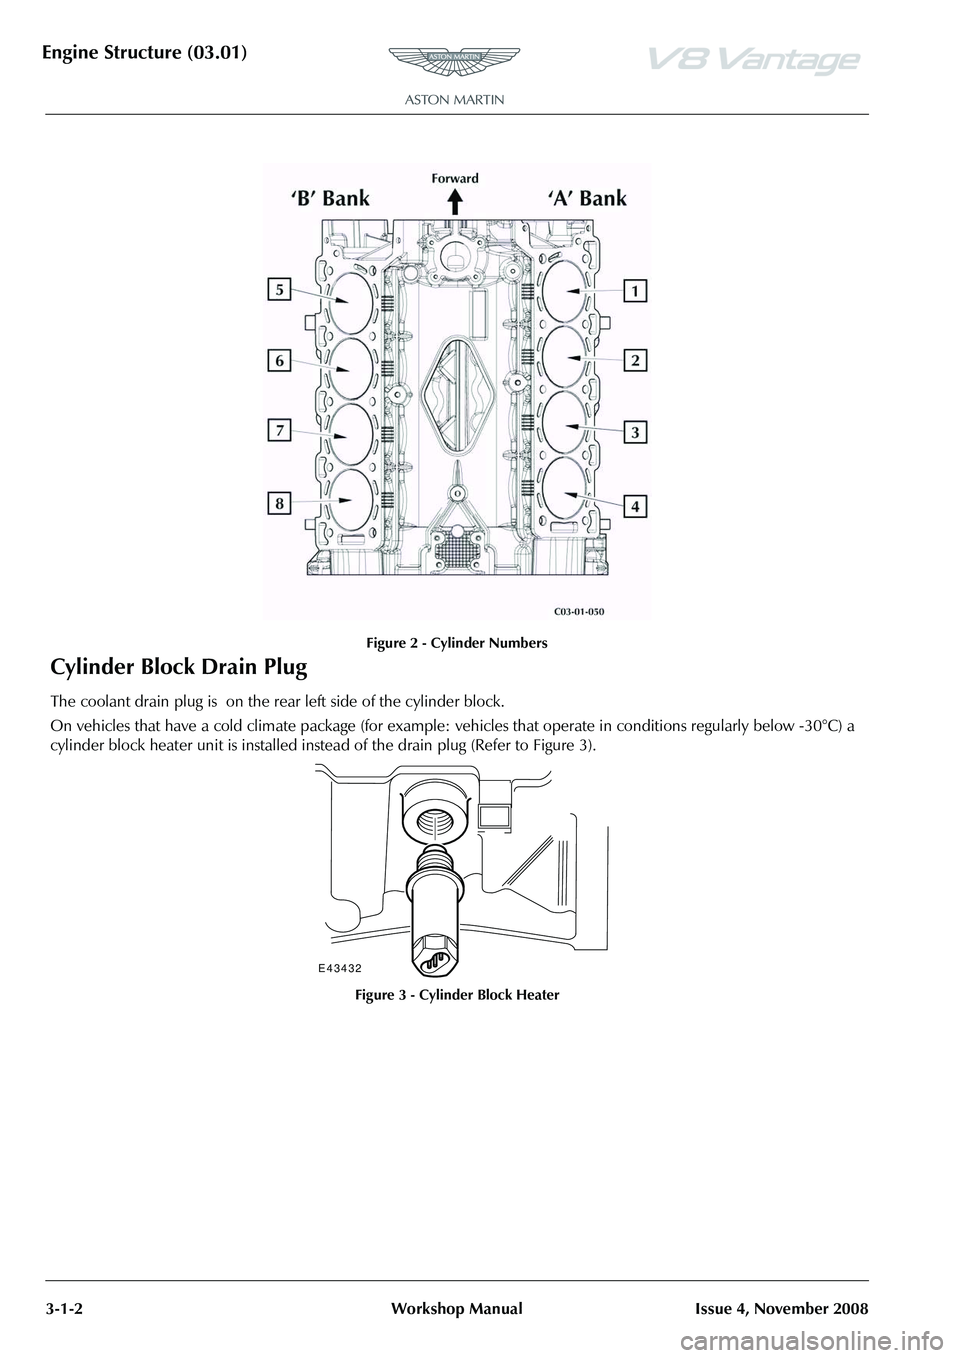
When you sit in the driving position, the right-hand cylinder bank is designated A-bank and the left-hand cylinder bank as
B-bank. The cylinders are numered as shown in Figure 2.
Page 250 of 947
Engine Structure (03.01)
3-1-2Workshop ManualIssue 4, November 2008
Figure 2 - Cylinder Numbers
Cylinder Block Drain Plug
The coolant drain plug is on the rear left side of the cylinder block.
On vehicles that have a cold climate package (for example: vehicles that operate in conditions regularly below -30°C) a
cylinder block heater unit is installed instead of the drain plug (Refer to Figure 3).
Figure 3 - Cylinder Block Heater
E 43432
Page 251 of 947

Engine Structure (03.01)
Issue 4, November 2008Workshop Manual 3-1-3
Knock Sensors
Two knock sensors (1) are installed into the cylinder block on the inboard side of each of the two cylinder banks. The
electrical connector of each sensor is secured to th e left-hand engine cover bracket (Refer to Figure 4).
These piezo-electric sensors send inputs to the ECM to indicate the detection and location of detonation during
combustion.
Bedplate
This is a structural casting that is attached with bolts to the bottom
of the cylinder block t attach the crankshaft and to further
improve overall rigidity.
Main bearing clearance changes due to expansion are minimized
by means of iron inserts cast into the bedplate main bearing
supports.
Two hollow dowels align the bedplate with the cylinder block and
the joint is sealed by a continuous bead of sealant.
Engine Mountings
The engine is mounted at two points. At the front, on ea ch side of the engine, there is a mounting bracket with a
Hydramount mounted to the subframe.
E 43437
Page 252 of 947
Engine Structure (03.01)
3-1-4Workshop ManualIssue 4, November 2008
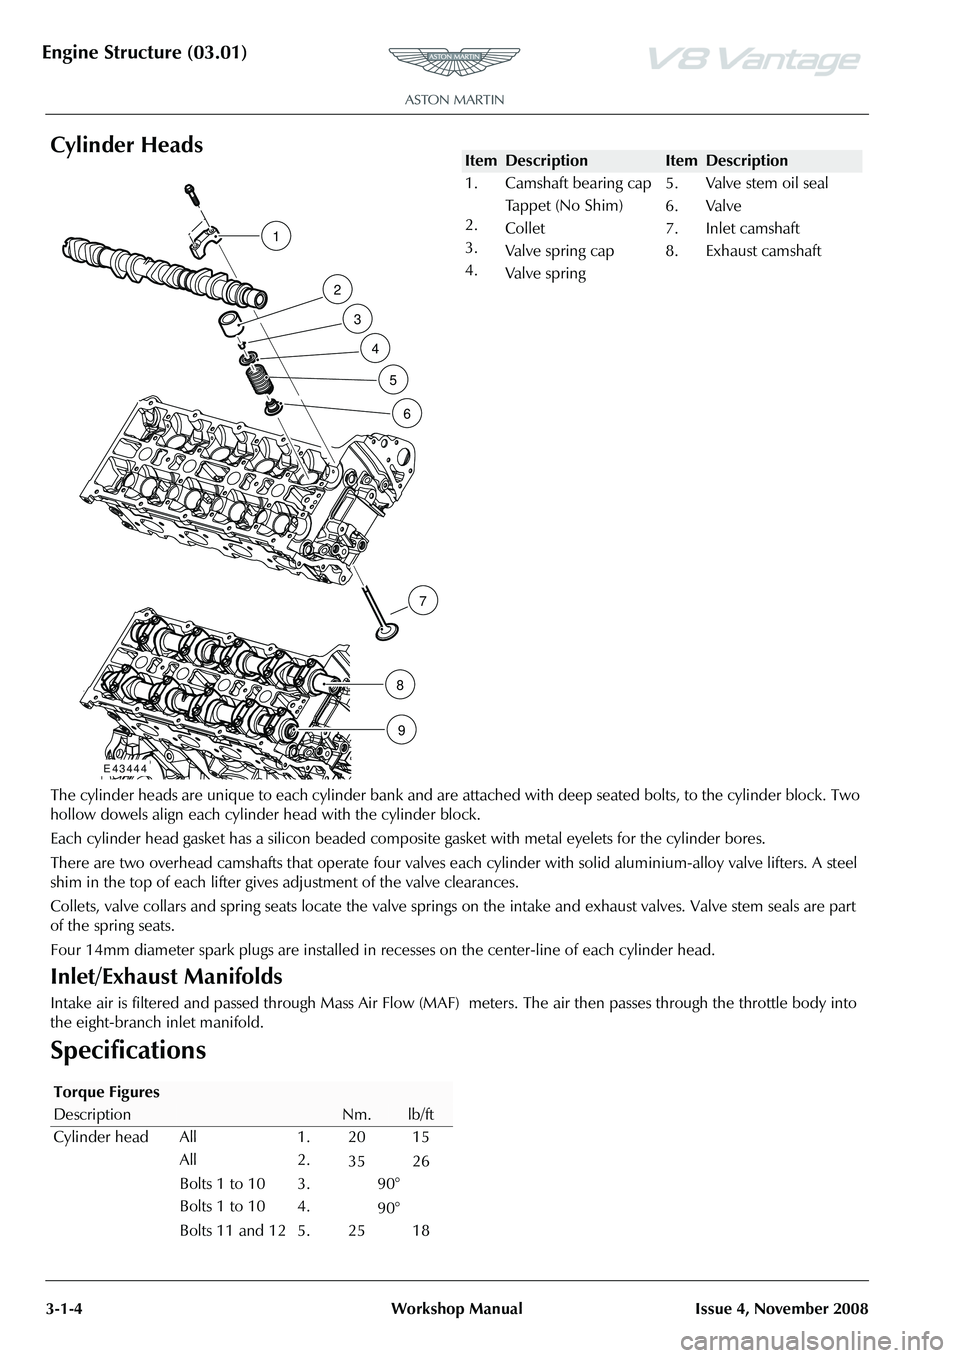
Cylinder Heads
The cylinder heads are unique to each cylinder bank and are attached with deep seated bolts, to the cylinder block. Two
hollow dowels align each cylinder head with the cylinder block.
Each cylinder head gasket has a silicon beaded compos ite gasket with metal eyelets for the cylinder bores.
There are two overhead camshafts that operate four valves each cylinder with solid aluminium-alloy valve lifters. A steel
shim in the top of each lifter gives adjustment of the valve clearances.
Collets, valve collars and spring seats locate the valve springs on the intake and exhaust valves. Valve stem seals are part
of the spring seats.
Four 14mm diameter spark plugs are installed in recesses on the center-line of each cylinder head.
Inlet/Exhaust Manifolds
Intake air is filtered and passed through Mass Air Flow (MAF) meters. The air then passes through the throttle body into
the eight-branch inlet manifold.
Specifications
8
9
7
2
3
4
5
6
1
E 43444
ItemDescriptionItemDescription
1.
2.
3.
4. Camshaft bearing cap
Tappet (No Shim)
Collet
Valve spring cap
Va l v e s p r i n g 5.
6.
7.
8.
Valve stem oil seal
Va l v e
Inlet camshaft
Exhaust camshaft
Torque Figures
DescriptionNm.lb/ft
Cylinder head All All1.
2.20
35 15
26
Bolts 1 to 10
Bolts 1 to 10 3.
4.90°
90°
Bolts 11 and 12 5. 25 18
Page 254 of 947
Engine Structure (03.01)
3-1-6Workshop ManualIssue 4, November 2008
Removal Manifold Parts
47. Remove EGR valve (bolts x2) and gasket.
48. Remove IAT sensor.
49. Remove throttle body (bolts x4) and gasket.
50. Remove fuel rail (bolts x4) with injectors.
Installation
1. Install fuel rail (bolts x4) with injectors. (fit new O-rings
to injectors).
2. Install throttle body (bolts x4) and new gasket.
3. Install IAT sensor.
4. Install EGR valve and new gasket.
Installation Manifold to Vehicle
5. Install new gaskets to cylinder block (glue in place).
6. Install manifold (allowing access to install bolt for purge line P-clip).
7. Install manifold bolts (x 10) (torque and tightening
sequence).
8. Install bolts (x2) bracket to manifold (rear).
9. Connect EGR pipe union.
10. Connect EGR vacuum hose.
11. Connect air cleaner duct (clip x1).
12. Connect breather pipe quickf its (x2) to air cleaner duct.
13. Connect throttle body multiplug and harness clip.
14. Connect manifold heating hoses (x2).
Installation RH Side
15. Connect EGR vacuum pipe to sensor and manifold.
16. Install coolant pipe bracket (bolt x2, nut x2).
17. Connect EGR (x1), fuel rail pressure sensor (x1) and injector multiplugs (x4).
18. Refit harness to coolant pipe bracket (fir tree x3).
19. Connect heater hose to pipe (quick fit).
20. Refit heater hose (clipx2) and EGR vacuum lines (clips
x2) to bracket.
21. Install fuel feed pipe.
22. Install purge pipe P-clip.
23. Install harness bracket to engine.
24. Feed harness into inner wing area.
25. Install fusebox to bracket.
26. Install earth lead to fusebox.
27. Install battery lead to fusebox (1x nut and rubber cover).
28. Install multiplugs to fuse box.
29. Install fusebox bracket fixings.
30. Refit harness fir tree clips to cylinder head.
31. Refit engine breather hose.
32. Install VVT solenoid multiplug, position coil and CMP harness (1x edge clip).
33. Install ECM (see Workshop Manual procedure 03.14.BB Engine Control Module - RH - Renew).
34. Install coil cover.
Installation LH Side
35. Connect breather hose to manifold (quickfit). 36. Connect IAT multiplug.
37. Unclip injector harness from cam cover (x2).
38. Connect injector multiplugs (x4).
39. Install pipe support bracket (nuts x2, bolts x2).
40. Install harness support bracket (bolt x1, nut x2) release
harness clips (fir tree x3).
41. Connect booster hose to manifold and support clip.
42. Connect heater hose from pipe (quick fit).
43. Install heater hose (x2) and throttle body hose (x2) from support bracket.
44. Connect purge line to manifold and into support clip.
45. Connect breather hoses (x2) to cam cover.
46. Install coil cover.
47. Install corner cross brace (torque bolts with vehicle on level ground).
48. Refill coolant (see Workshop Manual procedure 03.03.AD Coolant - Drain and Refill).
49. Install cross brace. (torque bolts with vehicle on level
ground).
Upper Intake Manifold Assembly (RHD)
- Renew
Removal
1. Depressurise fuel rail (see Workshop Manual procedure 10.01.EK Fuel System - Depressurise).
2. Coolant drain (see Workshop Manual procedure 03.03.AD Coolant - Drain and Refill).
3. Remove cross brace (bolts x4).
Removal RH Side
4. Remove coil cover.
5. Remove corner cross brace.
6. Disconnect breather hose (quick fit) move aside.
7. Remove purge pipe P-clip (bolt x1) and move pipe
aside.
8. Remove harness bracket from engine (bolts x2, nut x1).
9. Release fuel feed hose from rail (clip x1) and move aside.
10. Disconnect heater hose from pipe (quick fit).
11. Release heater hose (clips x2) and EGR vacuum line (clips x2) from bracket.
12. Release harness from coolant pipe bracket (fir tree x3).
13. Disconnect EGR (x1), fuel rail pressure sensor (x1) and injector (x4) multiplugs, move harness aside.
14. Remove coolant pipe bracke t (nuts x2 and bolts x2).
15. Disconnect EGR vacuum pipe from sensor and
manifold, move aside. Note: The installation is not handed
Repair Operation Time (ROT)
ItemCode
Upper Intake Manifold Assembly-
Renew RHD
03.01.BE
Page 255 of 947
Engine Structure (03.01)
Issue 4, November 2008Workshop Manual 3-1-7
Removal LH Side
16. Remove coil cover.
17. Disconnect breather hoses from cam cover (x2) for
access.
18. Release harness fir tree clips (x3) from cylinder head and move aside.
19. Remove fuse box bracket fixings (bolt and nut) (allows movement).
20. Remove ECM (see Workshop Manual procedure 03.13.ND Module - Powe r Train Control - RHD -
Renew).
21. Remove battery lead (1x nut and rubber cover) from fuse box (2x leads).
22. Remove multiplugs (x10) from fusebox.
23. Disconnect purge line from manifold (quickfit) and
support clip for access.
24. Remove earth terminal (1x nut and rubber cover) from fusebox.
25. Remove fuse box from bracket (bolt x2).
26. Release harness fir tree clips (x3) from engine bracket.
27. Feed harness from inner wing and over engine.
28. Disconnect heater hose from pipe (quick fit).
29. Release heater hose (x2) and throttle body hose (x2) from support bracket.
30. Remove booster hose from manifold and support clip.
31. Remove harness support bracket (bolt x1, nut x2)
release harness clips (fir tree x3).
32. Release pipe support bracket (nuts x2, bolts x2) move aside.
33. Disconnect injector multiplugs (x4).
34. Unclip injector harness from cam cover (x2).
35. Disconnect IAT multiplug.
36. Disconnect breather hose from manifold (quickfit).
Removal Manifold from Vehicle
37. Remove booster hose from support bracket.
38. Disconnect manifold heating hoses (x2).
39. Disconnect throttle body multiplug and harness clip.
40. Disconnect breather pipe qu ickfits (x2) from air cleaner
duct.
41. Disconnect air clea ner duct (clip x1).
42. Disconnect EGR vacuum hose.
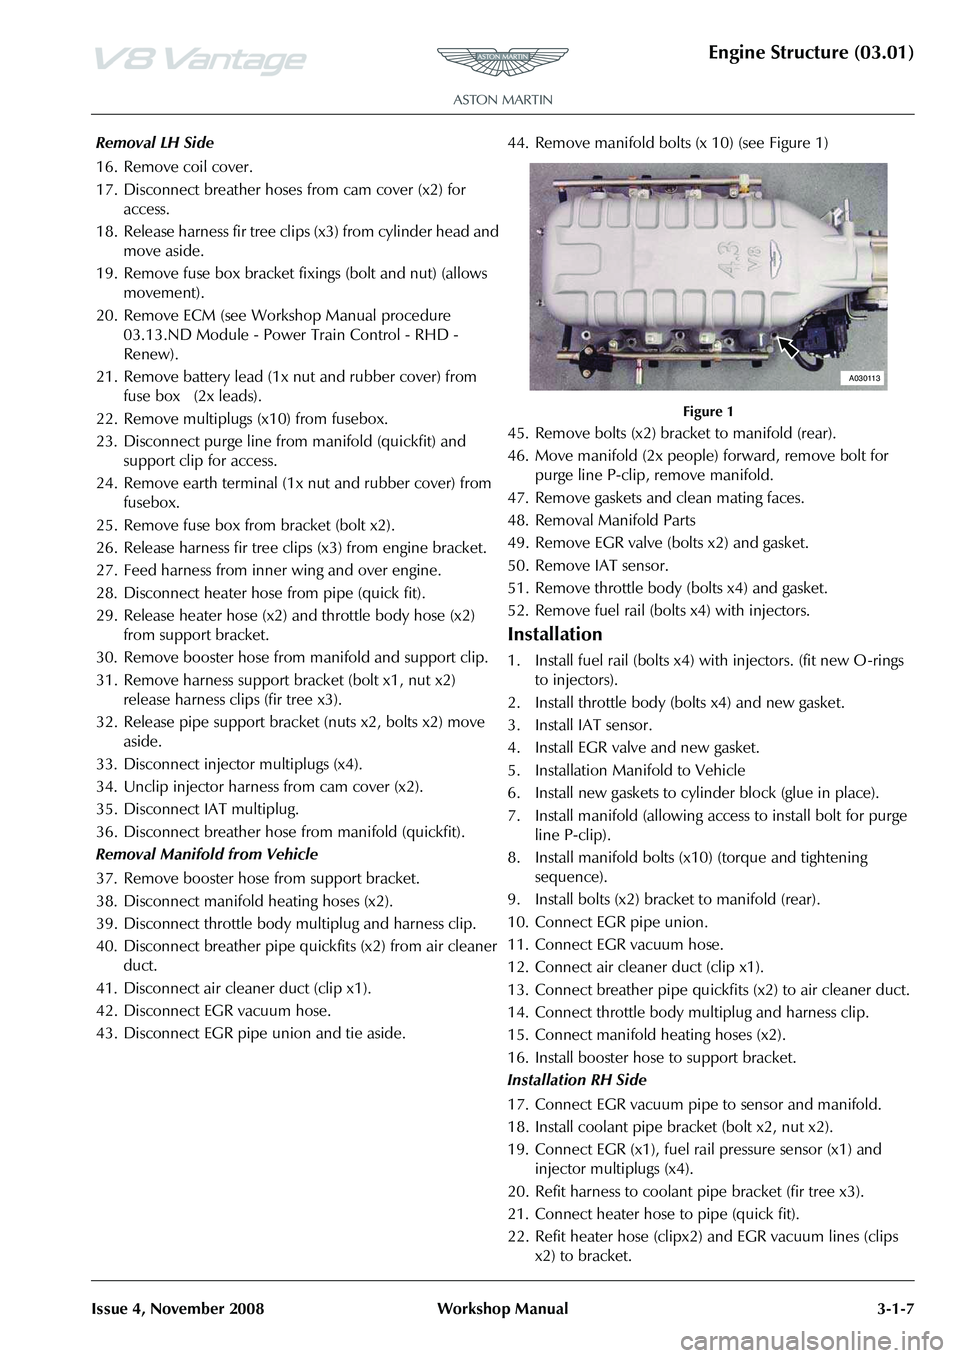
43. Disconnect EGR pipe union and tie aside. 44. Remove manifold bolts (x 10) (see Figure 1)
Figure 1
45. Remove bolts (x2) bracket to manifold (rear).
46. Move manifold (2x people) forward, remove bolt for
purge line P-clip, remove manifold.
47. Remove gaskets and clean mating faces.
48. Removal Manifold Parts
49. Remove EGR valve (bolts x2) and gasket.
50. Remove IAT sensor.
51. Remove throttle body (bolts x4) and gasket.
52. Remove fuel rail (bolts x4) with injectors.
Installation
1. Install fuel rail (bolts x4) wi th injectors. (fit new O-rings
to injectors).
2. Install throttle body (bolts x4) and new gasket.
3. Install IAT sensor.
4. Install EGR valve and new gasket.
5. Installation Manifold to Vehicle
6. Install new gaskets to cyli nder block (glue in place).
7. Install manifold (allowing access to install bolt for purge line P-clip).
8. Install manifold bolts (x10) (torque and tightening sequence).
9. Install bolts (x2) bracket to manifold (rear).
10. Connect EGR pipe union.
11. Connect EGR vacuum hose.
12. Connect air cleaner duct (clip x1).
13. Connect breather pipe quickf its (x2) to air cleaner duct.
14. Connect throttle body multiplug and harness clip.
15. Connect manifold heating hoses (x2).
16. Install booster hose to support bracket.
Installation RH Side
17. Connect EGR vacuum pipe to sensor and manifold.
18. Install coolant pipe bracket (bolt x2, nut x2).
19. Connect EGR (x1), fuel rail pressure sensor (x1) and
injector multiplugs (x4).
20. Refit harness to coolant pipe bracket (fir tree x3).
21. Connect heater hose to pipe (quick fit).
22. Refit heater hose (clipx2) and EGR vacuum lines (clips x2) to bracket.
A030113
Page 257 of 947
Engine Structure (03.01)
Issue 4, November 2008Workshop Manual 3-1-9
Removal Manifold
37. Disconnect manifold heating hoses (x2).
38. Disconnect throttle body multiplug and harness clip.
39. Disconnect breather pipe qu ickfits (x2) from air cleaner
duct.
40. Disconnect air clea ner duct (clip x1).
41. Disconnect EGR vacuum hose.
42. Disconnect EGR pipe union and tie aside.
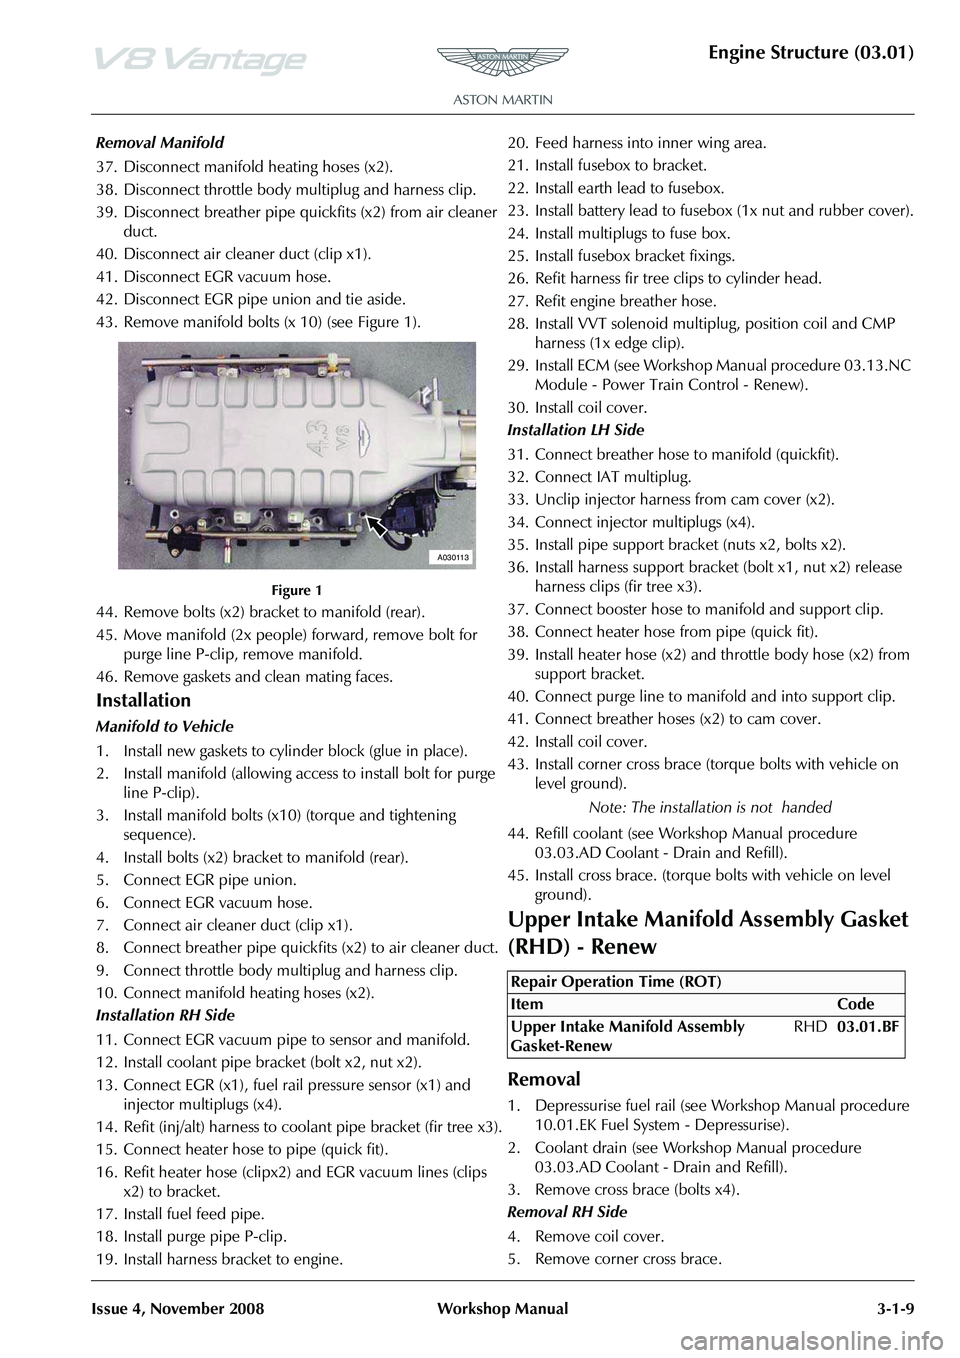
43. Remove manifold bolts (x 10) (see Figure 1).
Figure 1
44. Remove bolts (x2) bracket to manifold (rear).
45. Move manifold (2x people) forward, remove bolt for purge line P-clip, remove manifold.
46. Remove gaskets and clean mating faces.
Installation
Manifold to Vehicle
1. Install new gaskets to cylinder block (glue in place).
2. Install manifold (allowing access to install bolt for purge line P-clip).
3. Install manifold bolts (x10) (torque and tightening sequence).
4. Install bolts (x2) bracket to manifold (rear).
5. Connect EGR pipe union.
6. Connect EGR vacuum hose.
7. Connect air cleaner duct (clip x1).
8. Connect breather pipe quickf its (x2) to air cleaner duct.
9. Connect throttle body multiplug and harness clip.
10. Connect manifold heating hoses (x2).
Installation RH Side
11. Connect EGR vacuum pipe to sensor and manifold.
12. Install coolant pipe bracket (bolt x2, nut x2).
13. Connect EGR (x1), fuel rail pressure sensor (x1) and
injector multiplugs (x4).
14. Refit (inj/alt) harness to coolant pipe bracket (fir tree x3).
15. Connect heater hose to pipe (quick fit).
16. Refit heater hose (clipx2) and EGR vacuum lines (clips x2) to bracket.
17. Install fuel feed pipe.
18. Install purge pipe P-clip.
19. Install harness bracket to engine. 20. Feed harness into inner wing area.
21. Install fusebox to bracket.
22. Install earth lead to fusebox.
23. Install battery lead to fusebox (1x nut and rubber cover).
24. Install multiplugs to fuse box.
25. Install fusebox bracket fixings.
26. Refit harness fir tree clips to cylinder head.
27. Refit engine breather hose.
28. Install VVT solenoid multip
lug, position coil and CMP
harness (1x edge clip).
29. Install ECM (see Workshop Manual procedure 03.13.NC Module - Power Train Control - Renew).
30. Install coil cover.
Installation LH Side
31. Connect breather hose to manifold (quickfit).
32. Connect IAT multiplug.
33. Unclip injector harness from cam cover (x2).
34. Connect injector multiplugs (x4).
35. Install pipe support bracket (nuts x2, bolts x2).
36. Install harness support bracket (bolt x1, nut x2) release harness clips (fir tree x3).
37. Connect booster hose to manifold and support clip.
38. Connect heater hose from pipe (quick fit).
39. Install heater hose (x2) and throttle body hose (x2) from support bracket.
40. Connect purge line to manifold and into support clip.
41. Connect breather hoses (x2) to cam cover.
42. Install coil cover.
43. Install corner cross brace (t orque bolts with vehicle on
level ground).
44. Refill coolant (see Workshop Manual procedure 03.03.AD Coolant - Drain and Refill).
45. Install cross brace. (torque bolts with vehicle on level
ground).
Upper Intake Manifold Assembly Gasket
(RHD) - Renew
Removal
1. Depressurise fuel rail (see Workshop Manual procedure 10.01.EK Fuel System - Depressurise).
2. Coolant drain (see Workshop Manual procedure 03.03.AD Coolant - Drain and Refill).
3. Remove cross brace (bolts x4).
Removal RH Side
4. Remove coil cover.
5. Remove corner cross brace.
A030113
Note: The installation is not handed
Repair Operation Time (ROT)
Page 258 of 947

Engine Structure (03.01)
3-1-10Workshop ManualIssue 4, November 2008
6. Disconnect breather hose (quick fit) move aside.
7. Remove purge pipe P-clip (bolt x1) and move pipe
aside.
8. Remove harness bracket from engine (bolts x2, nut x1).
9. Release fuel feed hose from rail (clip x1) and move aside.
10. Disconnect heater hose from pipe (quick fit).
11. Release heater hose (clips x2) and EGR vacuum line (clips x2) from bracket.
12. Release harness from coolant pipe bracket (fir tree x3).
13. Disconnect EGR (x1), fuel rail pressure sensor (x1) and injector (x4) multiplugs, move harness aside.
14. Remove coolant pipe bracket (nuts x2 and bolts x2).
15. Disconnect EGR vacuum pipe from sensor and manifold, move aside.
Removal LH Side
16. Remove coil cover.
17. Disconnect breather hoses from cam cover (x2) for access.
18. Release harness fir tree clips (x3) from cylinder head and move aside.
19. Remove fuse box bracket fixings (bolt and nut) (allows movement).
20. Remove ECM (see Workshop Manual procedure 03.13.ND Module - Power Train Control - RHD -
Renew).
21. Remove battery lead (1x nu t and rubber cover) from
fuse box (2x leads).
22. Remove multiplugs (x10) from fusebox.
23. Disconnect purge line from manifold (quickfit) and support clip for access.
24. Remove earth terminal (1x nut and rubber cover) from fusebox.
25. Remove fuse box from bracket (bolt x2).
26. Release harness fir tree clips (x3) from engine bracket.
27. Feed harness from inner wing and over engine.
28. Disconnect heater hose from pipe (quick fit).
29. Release heater hose (x2) and throttle body hose (x2) from support bracket.
30. Remove booster hose from manifold and support clip.
31. Remove harness support bracket (bolt x1, nut x2) release harness clips (fir tree x3).
32. Release pipe support brack et (nuts x2, bolts x2) move
aside.
33. Disconnect injector multiplugs (x4).
34. Unclip injector harness from cam cover (x2).
35. Disconnect IAT multiplug.
36. Disconnect breather hose from manifold (quickfit).
Removal Manifold from Vehicle
37. Remove booster hose from support bracket.
38. Disconnect manifold heating hoses (x2).
39. Disconnect throttle body multiplug and harness clip. 40. Disconnect breather pipe qu
ickfits (x2) from air cleaner
duct.
41. Disconnect air cleaner duct (clip x1).
42. Disconnect EGR vacuum hose.
43. Disconnect EGR pipe union and tie aside.
44. Remove manifold bolts (x 10) (see Figure 1)
Figure 1
45. Remove bolts (x2) bracket to manifold (rear).
46. Move manifold (2x people) forward, remove bolt for purge line P-clip, remove manifold.
47. Remove gaskets and clean mating faces.
Installation
1. Install new gaskets to cylinder block (glue in place).
2. Install manifold (allowing access to install bolt for purge line P-clip).
3. Install manifold bolts (x 10) (torque and tightening
sequence).
4. Install bolts (x2) bracket to manifold (rear).
5. Connect EGR pipe union.
6. Connect EGR vacuum hose.
7. Connect air cleaner duct (clip x1).
8. Connect breather pipe quickfits (x2) to air cleaner duct.
9. Connect throttle body multiplug and harness clip.
10. Connect manifold heating hoses (x2).
11. Install booster hose to support bracket.
Installation RH Side
12. Connect EGR vacuum pipe to sensor and manifold.
13. Install coolant pipe bracket (bolt x2, nut x2).
14. Connect EGR (x1), fuel rail pressure sensor (x1) and injector multiplugs (x4).
15. Refit harness to coolant pipe bracket (fir tree x3).
16. Connect heater hose to pipe (quick fit).
17. Refit heater hose (clipx2) and EGR vacuum lines (clips
x2) to bracket.
18. Install fuel feed pipe.
19. Install purge pipe P-clip.
20. Install harness bracket to engine.
21. Refit harness fir tree clips to cylinder head.
22. Refit engine breather hose.
A030113