wheel bolts ASTON MARTIN V8 VANTAGE 2010 Manual Online
[x] Cancel search | Manufacturer: ASTON MARTIN, Model Year: 2010, Model line: V8 VANTAGE, Model: ASTON MARTIN V8 VANTAGE 2010Pages: 947, PDF Size: 43.21 MB
Page 571 of 947

Silencer Assembly (09.01)
Exhaust (09.00)9-1-6 Workshop Manual Issue 5, January 2010
2. Clean silencer and mating faces on rear pipes.
3. Remove Rear RH wheel arch liner (refer to Workshop Manual procedure 01.02.HB Wheel Arch Liner - Rear -
RH - Renew).
4. Remove rear undertray (refer to Workshop Manual procedure 01.02.PB Undertray - Rear - Renew).
5. Apply a proprietary exhaust sealant around all clamp joints
6. Remove Allen bolts (x2), loosen Allen bolts (x2), bumper diffuser to mounting brackets and remove diffuser.
7. Position silencer on lifter.
8. Install silencer, position rear hangers to body, install and torque tighten bolts (x4).
9. Remove Rear LH wheel arch liner.
10. Disconnect both by-pass valve vacuum lines.
11. Remove Allen bolts (x2), loosen Allen bolts (x2), bumper diffuser to mounting brackets and Remove diffuser.
12. Position front mountings to subframe, install and torque tighten bolts (x4).
13. Loosen clamp nuts (x2), remove stub pipes (x2).
14. Disconnect both by-pass valve vacuum lines.
15. Align silencer to rear pipes, install springs onto bolts (x4), install and torque tighten bolts (x4).
16. Remove bolts (x4), rear exha ust pipes to silencer. Collect
springs from bolts.
17. Loosen clamp nuts (x2), remove stub pipes (x2).
18. Install stub pipes (x2), centralise stub pipes to exhaust trim finisher. Torque ti ghten clamp nuts (x2).
19. Remove bolts (x4), securing LH and RH silencer rear
hanger brackets to body.
20. Remove bolts (x4), rear exhaust pipes to silencer and collect springs from bolts.
21. Check silencer to rear pipes for correct alignment and clearances.
22. Remove bolts (x4), silencer front mountings to subframe.
23. Remove bolts (x4), securing LH and RH silencer rear
hanger brackets to body.
24. Connect lines to both by-pass vacuum valves.
25. Position suitable lifter to support weight of silencer.
With assistance, remove silencer.
26. Remove bolts (x4), silencer front mountings to subframe.
27. Install rear bumper diffuser and install and tighten Allen
bolts (x4).
28. Install Rear RH wheel arch liner (refer to Workshop Manual procedure 01.02.HB Wheel Arch Liner - Rear -
RH - Renew).
Installation
1. Position suitable lifter to su pport weight of silencer. With
assistance, remove silencer.
2. Clean silencer and mating faces on rear pipes.
3. Install Rear LH wheel arch liner.
4. Apply a proprietary exhaust sealant around all clamp joints 5. Lower vehicle on ramp.
6. Position silencer on lifter. Install silencer, position rear
hangers to body, install and torque tighten bolts (x4).
7. Position front mountings to subframe, install and torque tighten bolts (x4).
8. Align silencer to rear pipes, install springs onto bolts (x4), install and torque tighten bolts (x4).
9. Install stub pipes (x2), centralise stub pipes to exhaust trim finisher and torque tighten clamp nuts (x2).
10. Check silencer to rear pipes for correct alignment and clearances.
11. Connect lines to both by-pass vacuum valves.
12. Install rear bumper diffuser and install and tighten Allen bolts (x4).
13. Install rear undertray (r efer to Workshop Manual
procedure 01.02.PB Undertray - Rear - Renew).
14. Lower vehicle on ramp.
Silencer and Bypass Valve Assembly-
Renew
Removal
1. Raise vehicle on ramp.
2. Coupe Only - Remove rear undertray (refer to
Workshop Manual procedure 01.02.PB Undertray -
Rear - Renew).
3. Roadster Only - Remove RH rear wheel arch liner (refer
to Workshop Manual procedure 01.02.HB Wheel Arch
Liner - Rear - RH - Renew).
4. Roadster Only - Remove LH rear wheel arch liner.
5. Remove Allen bolts (x2, loosen Allen bolts (x2), securing bumper diffuser to mounting brackets. Remove diffuser.
6. Disconnect both by-pass valve vacuum lines.
7. Loosen clamp nuts (x2), remove stub pipes (x2).
8. Remove bolts (x4), rear exha ust pipes to silencer. Collect
springs from bolts.
9. Remove bolts (x4), securing LH and RH silencer rear
hanger brackets to body.
10. Remove bolts (x4), muffler front mountings to subframe. Remove mountings from silencer.
Repair Operation Time (ROT)
ItemCode
Silencer and Bypass Valve Assembly-
Renew 09.00.KB
WAR NI NG
THE EXHAUST SYSTEM WILL BE VERY HOT AFTER
OPERATION. LET THE EXHA UST COOL BEFORE YOU
DO WORK. IF YOU DO NO T, PESONAL INJURY CAN
OCCUR.
WAR NI NG
GET THE AID OF ONE MORE PERSON WHEN YOU
REMOVE THE REAR EXHAUST SILENCER.
THE SILENCER IS HEAVY .
Page 572 of 947
Silencer Assembly (09.01)
Exhaust (09.00)
Issue 5, January 2010 Workshop Manual 9-1-7
11. Position suitable lifter to support weight of silencer.
With assistance, remove silencer.
12. Remove both rear rubber mountings and hanger brackets from silencer.
Installation
1. Clean silencer and mating faces on rear pipes and stub pipes.
2. Install both rear rubber mountings and hanger brackets to silencer.
3. Position silencer on lifter . Install silencer, position
hangers, install and tighten bolts (x4).
4. Install front mountings to silencer, install and tighten bolts (x4).
5. Align silencer to rear pipes. Install springs (x4), and torque tighten bolts (x4).
6. Install and align stub pipes (x2) to silencer and trims in bumper. Align and tighten clamp bolts.
7. Check silencer to rear pipes for correct alignment and clearances.
8. Install stub pipes (x2), insta ll clamps (x2), centralise stub
pipes to exhaust trim finisher, torque tighten clamp nuts
(x2).
9. Check silencer to rear pipes for correct alignment and clearances.
10. Connect lines to both by-pass vacuum valves.
11. Install rear bumper diffuse r. Install and tighten Allen
bolts (x4).
12. Roadster Only - Install RH rear wheel arch liner (refer to
Workshop Manual procedure 01.02.HB Wheel Arch
Liner - Rear - RH - Renew).
13. Roadster Only - Install LH rear wheel arch liner.
14. Coupe Only - Install rear undertray (refer to Workshop
Manual procedure 01.02.PB Undertray - Rear - Renew).
15. Lower vehicle on ramp.
Exhaust Rear Silencer Mounting Rubber-
Renew
Removal
1. Raise vehicle on ramp. 2. Remove Allen bolts (x4), bumper diffuser to mounting
brackets. Remove diffuser, collect mounting brackets.
3. Remove bolts (x2), securing silencer rear hanger brackets to body.
4. Release/remove rubber mounting and hanger bracket from silencer bracket.
5. Remove rubber mounting from hanger bracket.
Installation
1. To aid assembly, apply liquid soap to rubber mounting .
2. Install rubber mounting on hanger bracket.
3. Install rubber mounting on muffler bracket.
4. Align hanger bracket to body, install and torque tighten bolts (x2).
5. Position mounting brackets, install bumper diffuser, install and torque tighten Allen bolts (x4).
6. Lower vehicle on ramp.
Exhaust System-Renew
1. Disconnect vehicle battery.
2. Raise vehicle on ramp.
3. Remove RH exhaust manifold.
4. Remove RH front wheel arch liner (refer to Workshop Manual procedure 01.02.GB Wheel Arch Liner - Front -
RH - Renew).
5. Remove LH front wheel arch liner (refer to Workshop
Manual procedure 01.02.FB Wheel Arch Liner - Front -
LH - Renew).
6. Remove heatshield deflector, front floor (refer to Workshop Manual procedure 09.04.AA Heatshield -
Front Floor - Renew).
7. Loosen EGR pipe in valve.
8. Remove (nuts x2) EGR pipe from manifold, discard
gasket and tie aside.
WA R N I N G
GET THE AID OF ONE MORE PERSON WHEN YOU INSTALL THE REAR EXHAUST SILENCER.
THE SILENCER IS HEAVY .
Ensure correct alignment of exhaust pipes and silencer before tightening of fixing clamps.
Repair Operation Time (ROT)
WA R N I N G
THE EXHAUST SYSTEM WILL BE VERY HOT AFTER
OPERATION. LET THE EXHAUST COOL BEFORE YOU DO WORK. IF YOU DO NO T, PESONAL INJURY CAN
OCCUR.
Repair Operation Time (ROT)
Page 573 of 947

Silencer Assembly (09.01)
Exhaust (09.00)9-1-8 Workshop Manual Issue 5, January 2010
9. Remove nut (x8) securing RH exhaust manifold to cylinder head (refer to Fig. 1).
10. Remove nut (x2) on RH engine mounting.
11. Raise engine by approximately 25mm.
12. Remove RH exhaust manifold from vehicle and discard
gasket.
13. Remove heatshield from manifold (bolts x4)
14. Remove nuts (x8) securing LH exhaust manifold to
cylinder head.
15. Remove exhaust manifold, remove and discard gasket.
Installation
1. Clean LH exhaust manifold and mating face on cylinder head. Install new manifold gasket.
2. Install LH exhaust manifold to cylinder head.
3. Install and torque tighten nuts (x8) securing exhaust manifold to cylinder head.
4. Clean exhaust manifold and mating face on engine. Install new gasket to engine.
5. Install heatshield to manifold (bolts x4)
6. Install RH exhaust mani fold to cylinder head.
7. Install nut (x8) securing manifold to cylinder head
(torque).
8. Lower engine.
9. Install nuts (x2) on engine mounts (torque).
10. Install (nuts x2) EGR pipe from manifold, clean mating face and fit new gasket (torque).
11. Install heatshield deflector, front floor (refer to Workshop Manual procedure 09.04.AA Heatshield -
Front Floor - Renew).
12. Tighten EGR pipe in valve (torque).
13. Install RH front wheel arch liner (refer to Workshop Manual procedure 01.02.GB Wheel Arch Liner - Front -
RH - Renew
14. Install LH wheel arch liner (refer to Workshop Manual procedure 01.02.FB Wheel Arch Liner - Front - LH -
Renew).
15. Lower vehicle on ramp. 16. Connect vehicle battery.
Exhaust System (Excluding Manifold/
Downpipes)-Renew
Removal
1. Raise vehicle on ramp.
2. Remove undertrays - vehicle set (refer to Workshop
Manual procedure 01.02.PD Undertrays - Vehicle Set -
Renew).
3. Remove Allen bolts(x4), bumper diffuser to mounting brackets. Remove diffuser
4. Disconnect both by-pass valve vacuum lines.
5. Remove bolts (x4), securing LH and RH silencer rear
hanger brackets to body. Remove hanger brackets.
6. Remove bolts (x4), rear exha ust pipes to silencer. Collect
springs from bolts
7. Remove bolts (x4), silencer front mountings to subframe. Remove mountings from silencer.
8. Position suitable lifter to support weight of silencer. with assistance, remove silencer.
9. Mark rear stub pipes to si lencer for assembly purposes.
10. Loosen clamps (x2), rear stub pipes to silencer. Remove stub pipes and clamps.
11. Remove bolts (x4), remove rear subframe cross brace.
12. Loosen clamps (x2), release RH and LH rear pipes from centre pipe.
13. Remove rear pipes through subframe.
14. Loosen clamps (x2), centre pipe to LH and RH catalysts.
15. Coupe Only - Release centre pipe from mountings, LH
and RH catalysts, remove centre pipe.
16. Roadster Only - Remove centre exhaust mounting bolts
(x4).
17. Release LH and RH catal ysts, remove centre pipe.
18. Disconnect multiplugs (x4), from each catalyst.
19. Coupe Only - Secure sufficient lengths of string to
HEGO sensor multiplugs for assembly purposes.
Figure 1
A090069
Repair Operation Time (ROT)
ItemCode
Exhaust System (Excluding Manifold/
Downpipes)-Renew 09.00.NB
WAR NI NG
TO AVOID PERSONAL INJURY, I.E. SEVERE BURNS TO
THE SKIN, ALLOW EXHAUS T SYSTEM TO COOL
DOWN BEFORE REMOVING EXHAUST SYSTEM COMPONENTS.
WAR NI NG
GET THE AID OF ONE MORE PERSON WHEN YOU
REMOVE THE REAR EXHAUST SILENCER.
THE SILENCER IS HEAVY .
Attach lengths of string to th e HEGO sensor multiplugs. This
enables routing the HEGO sensor harness behind the exhaust heat shield on assembly.
Page 577 of 947

Pipes and Supports (09.03)
Exhaust System (09.00)9-2-2 Workshop Manual May 2007
5. Install centre pipe to both catalysts and centre mountings. Do not torque clamp nuts at this stage.
6. Install pipe assembly exha ust rear - LH (refer to
Workshop Manual procedure 09.00.JB Pipe Assembly -
Exhaust - Rear - LH - Renew).
7. Install pipe assembly exhaust rear - RH (refer to Workshop Manual procedure 09.00.HB Pipe Assembly
- Exhaust - Rear - RH - Renew).
8. Align and torque tighten exhaust system nuts/bolts.
9. Lower vehicle on ramp.
RH Exhaust Manifold-Renew
Removal
1. Disconnect vehicle battery.
2. Raise vehicle on ramp.
3. Remove RH front wheel arch liner (refer to Workshop Manual procedure 01.02.GB Wheel Arch Liner - Front -
RH - Renew).
4. Loosen EGR pipe in valve.
5. Remove heatshield deflector, front floor (refer to Workshop Manual procedure 09.04.AA Heatshield -
Front Floor - Renew).
6. Remove (nuts x2) EGR pipe from manifold, discard
gasket and tie aside.
7. Remove nut (x8) securing manifold to cylinder head
(refer to Fig. 1).
8. Remove nut (x2) on engine mountings.
9. Raise engine by approximately 25mm. 10. Remove exhaust manifold from vehicle and discard
gasket.
11. Remove heatshield from manifold (bolts x4)
Installation
1. Clean exhaust manifold and mating face on engine. Install new gasket to engine.
2. Install heatshield to manifold (bolts x4)
3. Install manifold to engine.
4. Install nut (x8) securing manifold to cylinder head.
5. Lower engine.
6. Install nuts (x2) on engine mounts.
7. Install (nuts x2) EGR pipe from manifold, clean mating face and fit new gasket (torque).
8. Install heatshield deflector, front floor (refer to Workshop Manual procedure 09.04.AA Heatshield -
Front Floor - Renew).
9. Tighten EGR pipe in valve (torque).
10. Install RH front wheel arch liner (refer to Workshop
Manual procedure 01.02.GB Wheel Arch Liner - Front -
RH - Renew).
11. Lower vehicle on ramp.
12. Connect vehicle battery.
LH Exhaust Manifold-Renew
Removal
1. Disconnect vehicle battery.
2. Raise vehicle on ramp.
3. Remove heatshield deflec tor, front floor (refer to
Workshop Manual procedure 09.04.AA Heatshield -
Front Floor - Renew).
4. Remove LH front wheel arch liner (refer to Workshop Manual procedure 01.02.FB Wheel Arch Liner - Front -
LH - Renew).
Repair Operation Time (ROT)
A090069
Repair Operation Time (ROT)
ItemCode
Exhaust Manifold-Renew LH09.00.CB
WAR NI NG
TO AVOID PERSONAL INJURY, I.E. SEVERE BURNS TO
THE SKIN, ALLOW EXHAUS T SYSTEM TO COOL
DOWN BEFORE REMOVING EXHAUST SYSTEM COMPONENTS.
Page 601 of 947
Steering Gear (11.01)
Steering (11.00)11-1-2 Workshop Manual Issue 5, January 2010
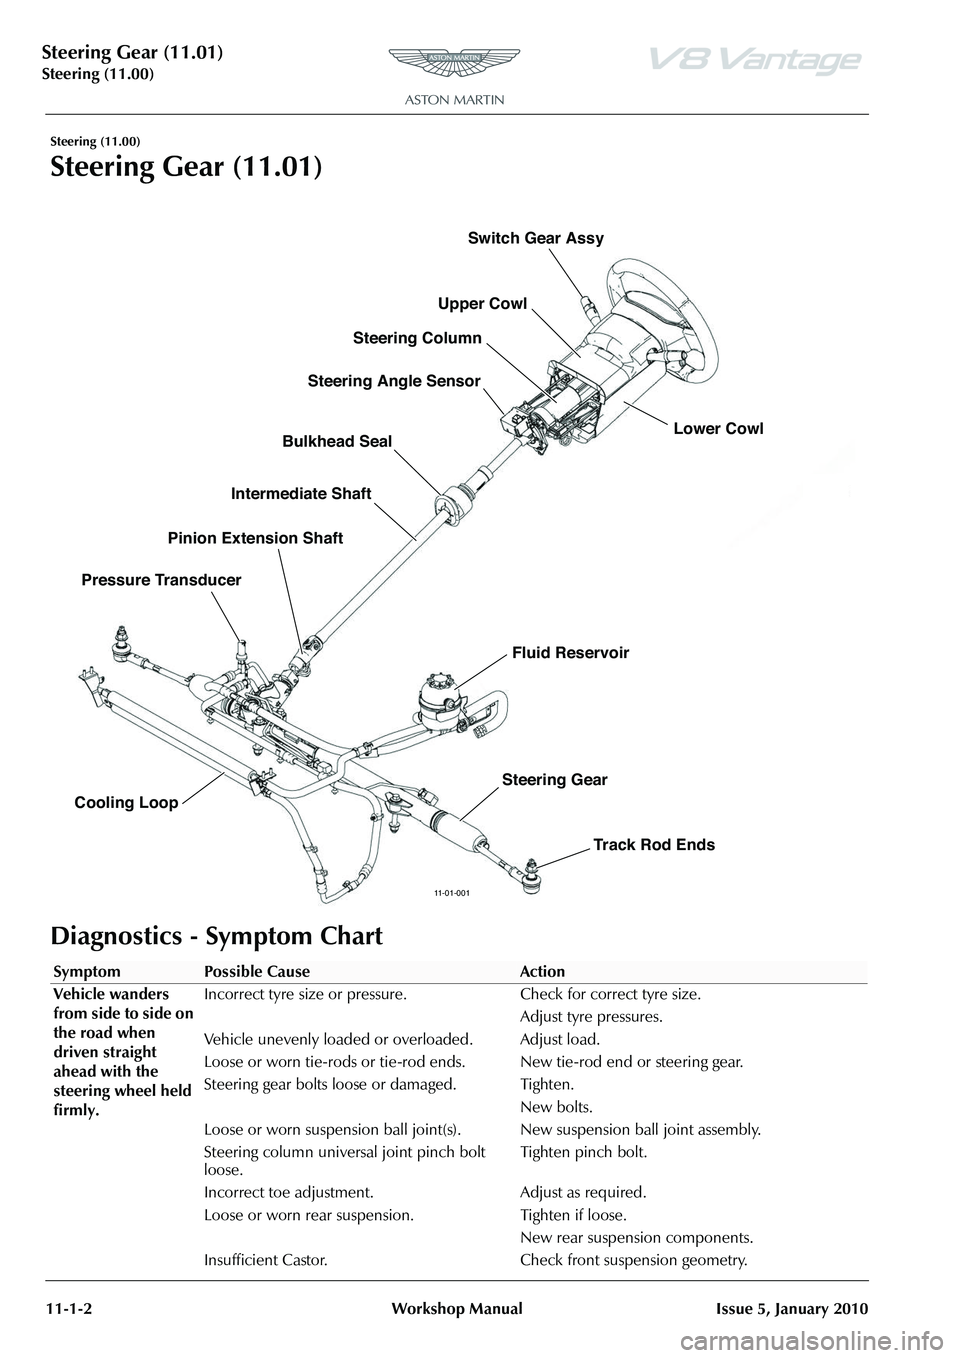
Steering (11.00)
Steering Gear (11.01)
Diagnostics - Symptom Chart
11-01-001
Upper Cowl Lower Cowl
Steering Column
Steering Angle Sensor
Bulkhead Seal
Intermediate Shaft
Pressure Transducer Pinion Extension Shaft
Cooling Loop Switch Gear Assy
Fluid Reservoir
Steering Gear Track Rod Ends
SymptomPossible CauseAction
Vehicle wanders
from side to side on
the road when
driven straight
ahead with the
steering wheel held
firmly. Incorrect tyre size or pressure. Check for correct tyre size.
Adjust tyre pressures.
Vehicle unevenly loaded or overloaded. Adjust load.
Loose or worn tie-rods or tie-rod ends. New tie-rod end or steering gear.
Steering gear bolts loose or damaged. Tighten. New bolts.
Loose or worn suspension ball joint(s). New suspension ball joint assembly.
Steering column universal joint pinch bolt
loose. Tighten pinch bolt.
Incorrect toe adjustment. Adjust as required.
Loose or worn rear suspension. Tighten if loose. New rear suspension components.
Insufficient Castor. Check fr ont suspension geometry.
Page 602 of 947
Steering Gear (11.01)
Steering (11.00)
Issue 5, January 2010 Workshop Manual 11-1-3
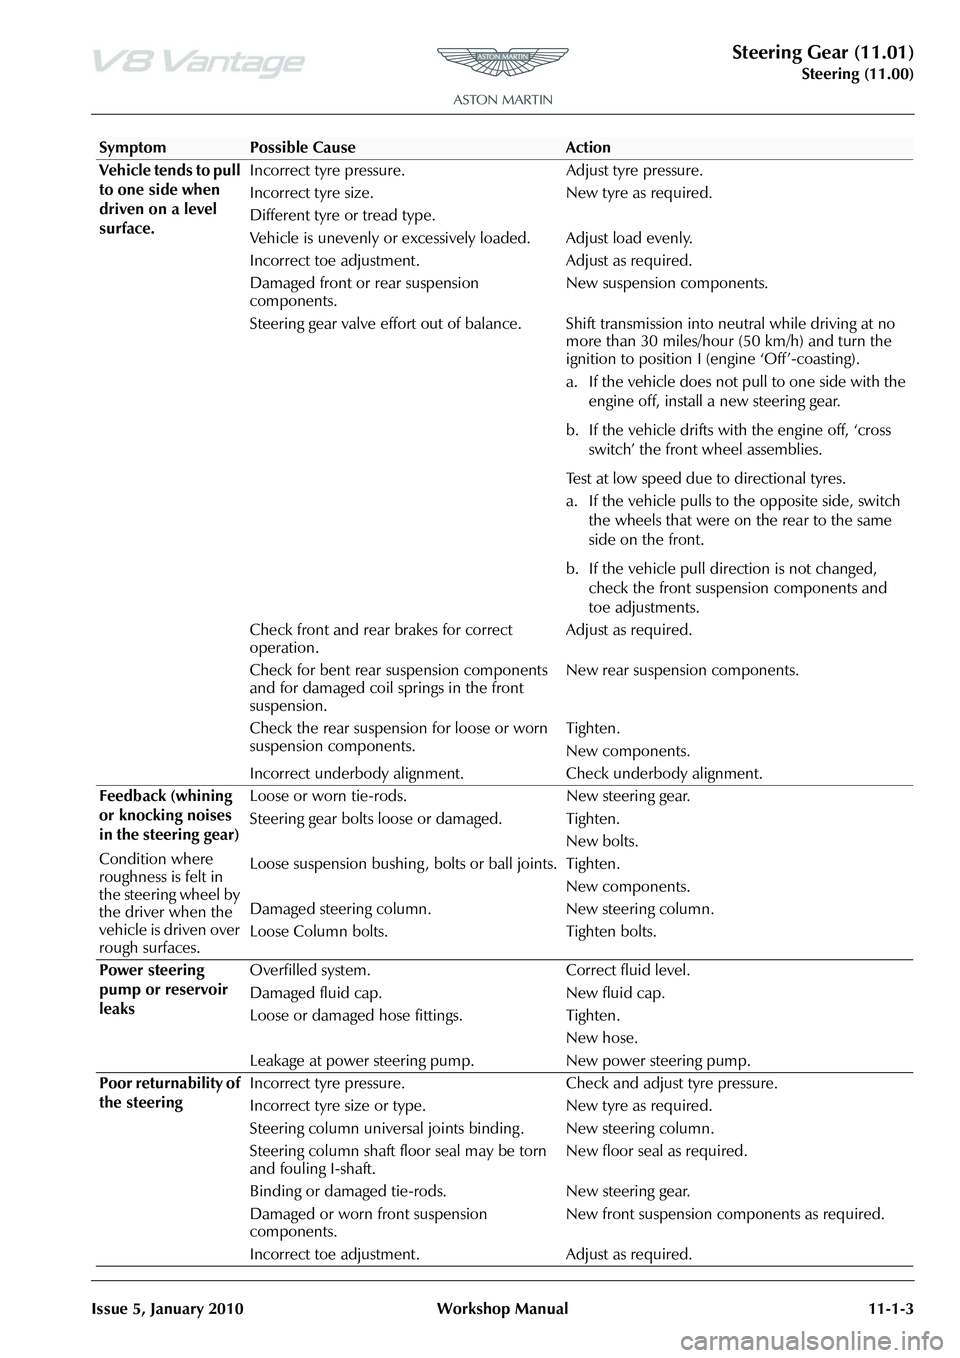
Vehicle tends to pull
to one side when
driven on a level
surface. Incorrect tyre pressure. Adjust tyre pressure.
Incorrect tyre size.
Different tyre or tread type.
New tyre as required.
Vehicle is unevenly or excessively loaded. Adjust load evenly.
Incorrect toe adjustment. Adjust as required.
Damaged front or rear suspension
components. New suspension components.
Steering gear valve effort out of balance. Shift transmission into neutral while driving at no more than 30 miles/hour (50 km/h) and turn the
ignition to position I (engine ‘Off’-coasting).
a. If the vehicle does not pull to one side with the
engine off, install a new steering gear.
b. If the vehicle drifts with the engine off, ‘cross switch’ the front wheel assemblies.
Test at low speed due to directional tyres.
a. If the vehicle pulls to the opposite side, switch the wheels that were on the rear to the same
side on the front.
b. If the vehicle pull direction is not changed, check the front suspension components and
toe adjustments.
Check front and rear brakes for correct
operation. Adjust as required.
Check for bent rear suspension components
and for damaged coil springs in the front
suspension. New rear suspension components.
Check the rear suspension for loose or worn
suspension components. Tighten.
New components.
Incorrect underbody alignment. Check underbody alignment.
Feedback (whining
or knocking noises
in the steering gear)
Condition where
roughness is felt in
the steering wheel by
the driver when the
vehicle is driven over
rough surfaces. Loose or worn tie-rods. New steering gear.
Steering gear bolts loose or damaged. Tighten.
New bolts.
Loose suspension bushing , bolts or ball joints. Tighten.
New components.
Damaged steering column.
Loose Column bolts. New steering column.
Tighten bolts.
Power steering
pump or reservoir
leaks Overfilled system. Correct fluid level.
Damaged fluid cap. New fluid cap.
Loose or damaged hose fittings. Tighten.
New hose.
Leakage at power steering pump. New power steering pump.
Poor returnability of
the steering Incorrect tyre pressure. Check
and adjust tyre pressure.
Incorrect tyre size or ty pe. New tyre as required.
Steering column universal joints binding . New steering column.
Steering column shaft floor seal may be torn
and fouling I-shaft. New floor seal as required.
Binding or damaged tie-rods. New steering gear.
Damaged or worn front suspension
components. New front suspension components as required.
Incorrect toe adjustment. Adjust as required.
SymptomPossible CauseAction
Page 605 of 947
Power Steering (11.02)
Steering (11.00)11-2-2 Workshop Manual Issue 5, January 2010
Maintenance
Power Steering System - Bleed
Procedure
1. Do a check of the fluid level in the PAS fluid reservoir. Add fluid if necessary.
2. Start the engine and let it idle for 20 seconds.
3. Operate the steering fully to the left and then the right through three cycles.
4. Stop the engine.
5. Wait for five minutes then do a check of the fluid level in the PAS fluid reservoir again.
6. Add fluid if necessary.
7. Install the PAS fluid reservoir cap.
Power Steering Pump-Renew
Removal
1. Remove A/C compressor (see Workshop Manual procedure 03.05.BE Compre ssor - Air Conditioning -
Renew).
2. Coolant drain (see Workshop Manual procedure 03.03.AD Coolant - Drain & Refill).
3. Remove PAS fluid from reservoir.
4. Disconnect HP union from PAS pump pipe.
5. Remove bolt P-clip suction hose to body.
6. Remove bolt (x1) HP pump pipe to engine.
7. Remove bolts (x3) PAS pump to engine.
8. Disconnect bottom hose and move aside.
9. Unclip (x1) harness from cylinder head for access.
10. Manouvre pump forward and up.
11. Disconnect suction hose (cut off clip) and remove pump.
12. Remove HP union pipe from pump (mark position on
pump).
Installation
1. Install HP union pipe to pump (align correctly), fit new O-ring.
2. Install pump to vehicle connect suction pipe to PAS pump, align timing marks and fit new clip.
3. Manouvre pump into position.
4. Install bolts (x3) PAS pump to engine (torque).
5. Install bolt (x1) HP pump pipe to engine (torque).
6. Connect bottom hose.
7. Clip (x1) harness from cylinder head for access. 8. Install bolt P-clip suction hose to body (torque).
9. Connect HP union to PAS pump pipe, replace O-ring
(torque).
10. Coolant refill (see Workshop Manual procedure 03.03.AD Coolant - Drain & Refill).
11. Install A/C compressor (see Workshop Manual procedure 03.05.BE Compre ssor - Air Conditioning -
Renew).
12. Top-up PAS fluid.
13. Start and run engine, operate steering lock to lock x2.
14. Top-up PAS fluid.
Power Assisted Steering (PAS) Rack -
Remove and Install
Removal
1. Disconnect the battery ground cable.
2. Remove the front undertray (refer to Workshop Manual Procedure 01.02.NB - Front Undertray).
3. Remove the front wheels and tyres (refer to Workshop Manual Procedure 04.04.ED - Wheel and Tyre - Pair).
4. Remove the front right side wheel-arch liner (refer to Workshop Manual Procedure 01.02.GB - Front Right
Side Wheel-Arch Liner).
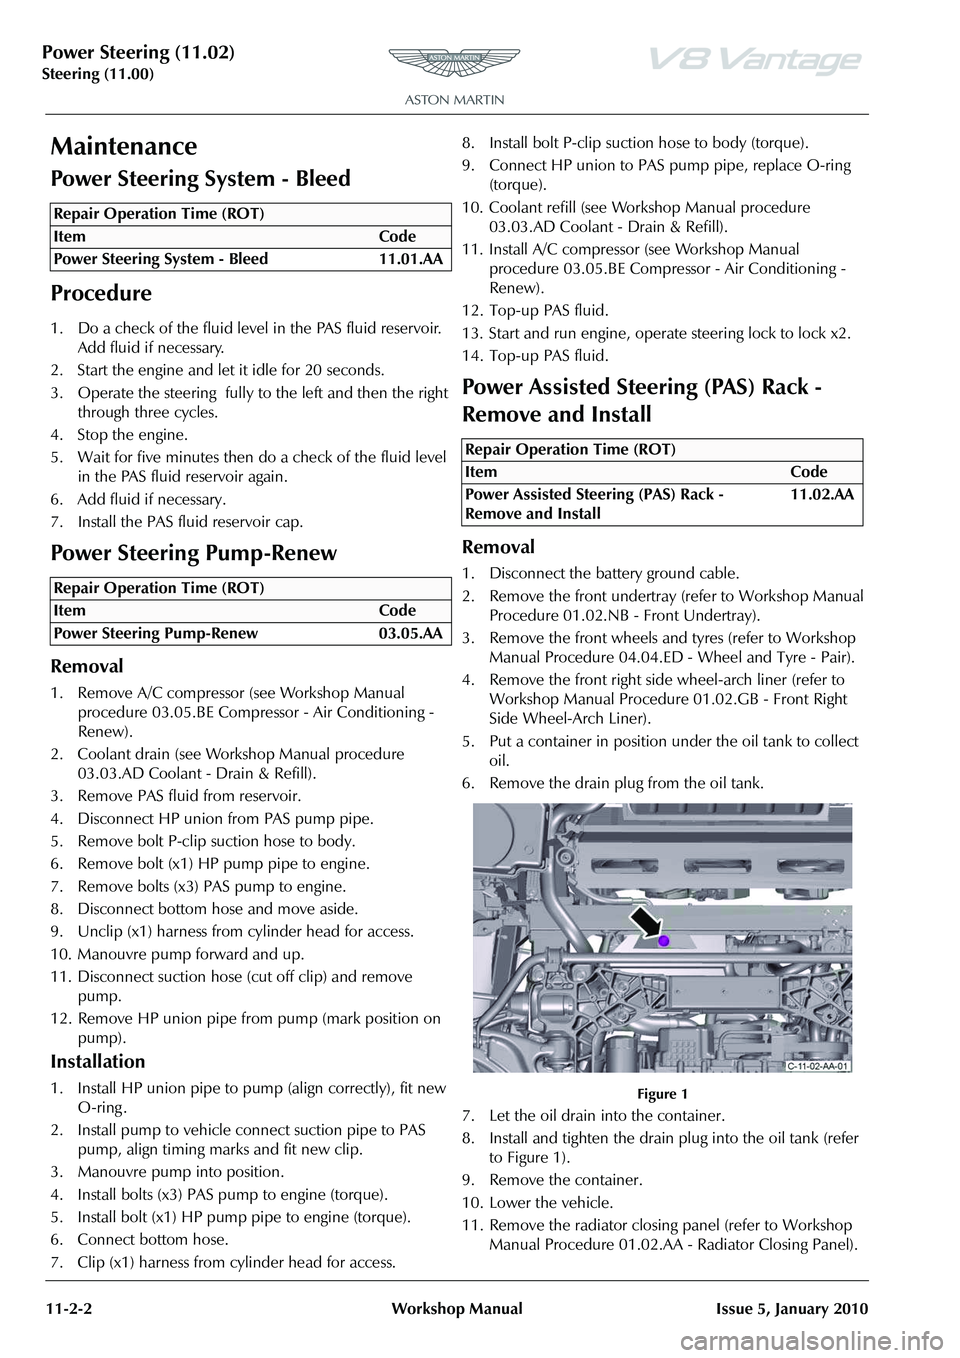
5. Put a container in position under the oil tank to collect oil.
6. Remove the drain plug from the oil tank.
Figure 1
7. Let the oil drain into the container.
8. Install and tighten the drain plug into the oil tank (refer to Figure 1).
9. Remove the container.
10. Lower the vehicle.
11. Remove the radiator closing panel (refer to Workshop Manual Procedure 01.02.AA - Radiator Closing Panel).
Repair Operation Time (ROT)
Repair Operation Time (ROT)
Repair Operation Time (ROT)
ItemCode
Power Assisted Steering (PAS) Rack -
Remove and Install 11.02.AA
Page 608 of 947
Power Steering (11.02)
Steering (11.00)
Issue 5, January 2010 Workshop Manual 11-2-5
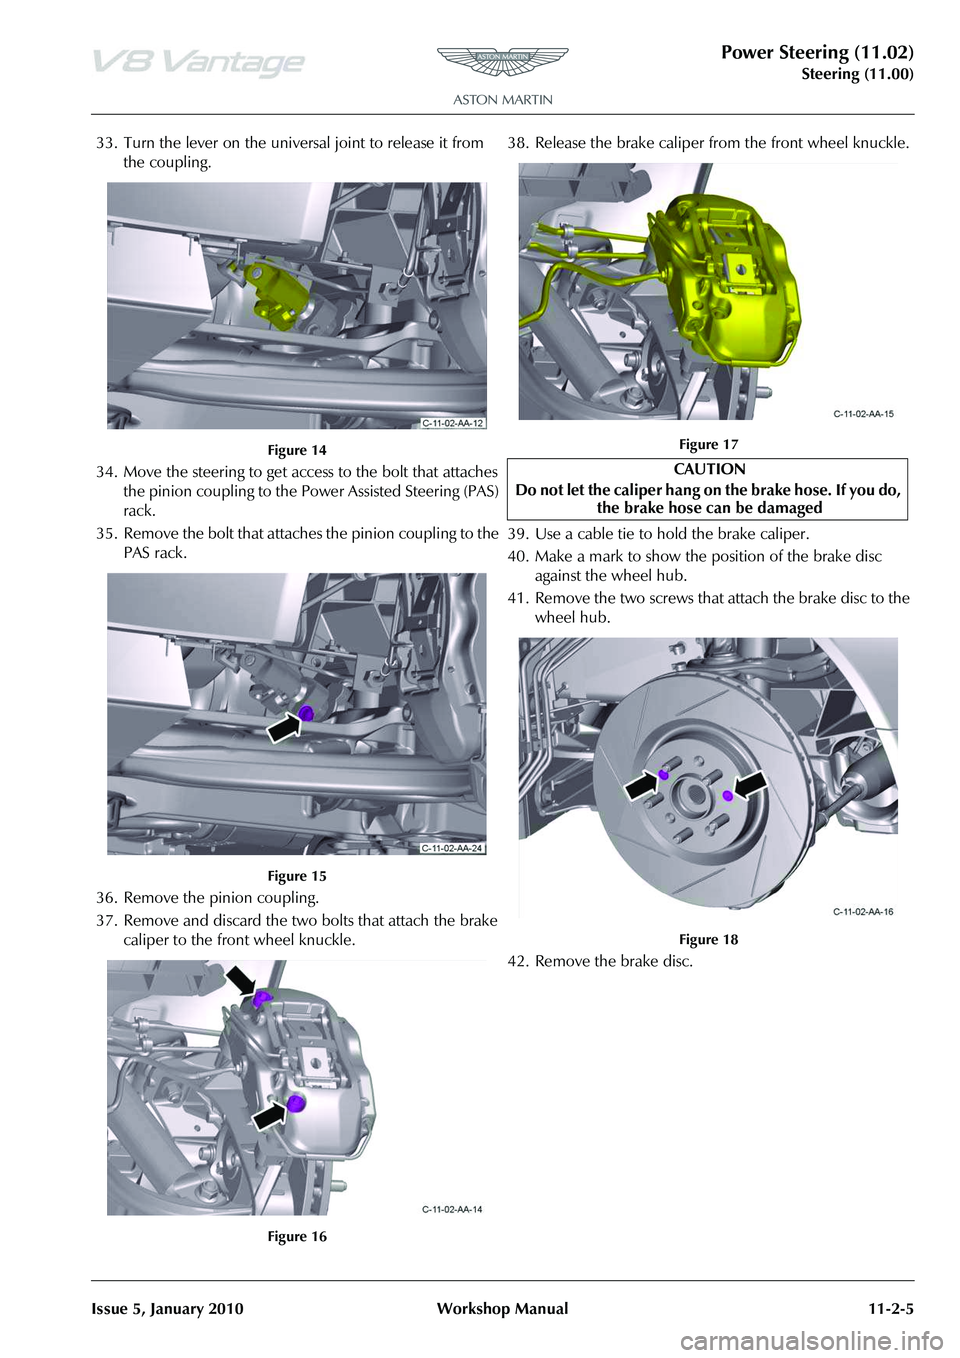
33. Turn the lever on the universal joint to release it from the coupling.
Figure 14
34. Move the steering to get access to the bolt that attaches the pinion coupling to the Po wer Assisted Steering (PAS)
rack.
35. Remove the bolt that attaches the pinion coupling to the PAS rack.
Figure 15
36. Remove the pinion coupling.
37. Remove and discard the two bolts that attach the brake caliper to the front wheel knuckle.
Figure 16
38. Release the brake caliper from the front wheel knuckle.
Figure 17
39. Use a cable tie to hold the brake caliper.
40. Make a mark to show the position of the brake disc
against the wheel hub.
41. Remove the two screws that attach the brake disc to the wheel hub.
Figure 18
42. Remove the brake disc.
CAUTION
Do not let the caliper hang on the brake hose. If you do, the brake hose can be damaged
Page 611 of 947

Power Steering (11.02)
Steering (11.00)11-2-8 Workshop Manual Issue 5, January 2010
9. At the left side, install the track rod end onto the front wheel knuckle, and install and torque the nut.
Figure 31
10. Install and tighten the front bolt that attaches the brake backplate to the front wheel knuckle.
Figure 32
11. Install the brake disc.
12. Install and tighten the two screws that attach the brake disc to the wheel hub.
Figure 33
13. Remove and discard the cable tie to release the brake caliper. 14. Put the brake caliper in position on the front wheel
knuckle.
Figure 34
15. Install and tighten the two new bolts that attach the brake caliper to the front wheel knuckle.
Figure 35
16. Do steps 9 to 15 for the right side.
17. Install the pinion coupling.
Figure 36
18. Turn the steering to get access to install the bolt that attaches the pinion coupling to the PAS rack.
19. Install and torque the bolt that attaches the pinion coupling to the PAS rack.
Page 617 of 947
Steering Column (11.04)
Steering (11.00)11-4-2 Workshop Manual Issue 4, November 2008
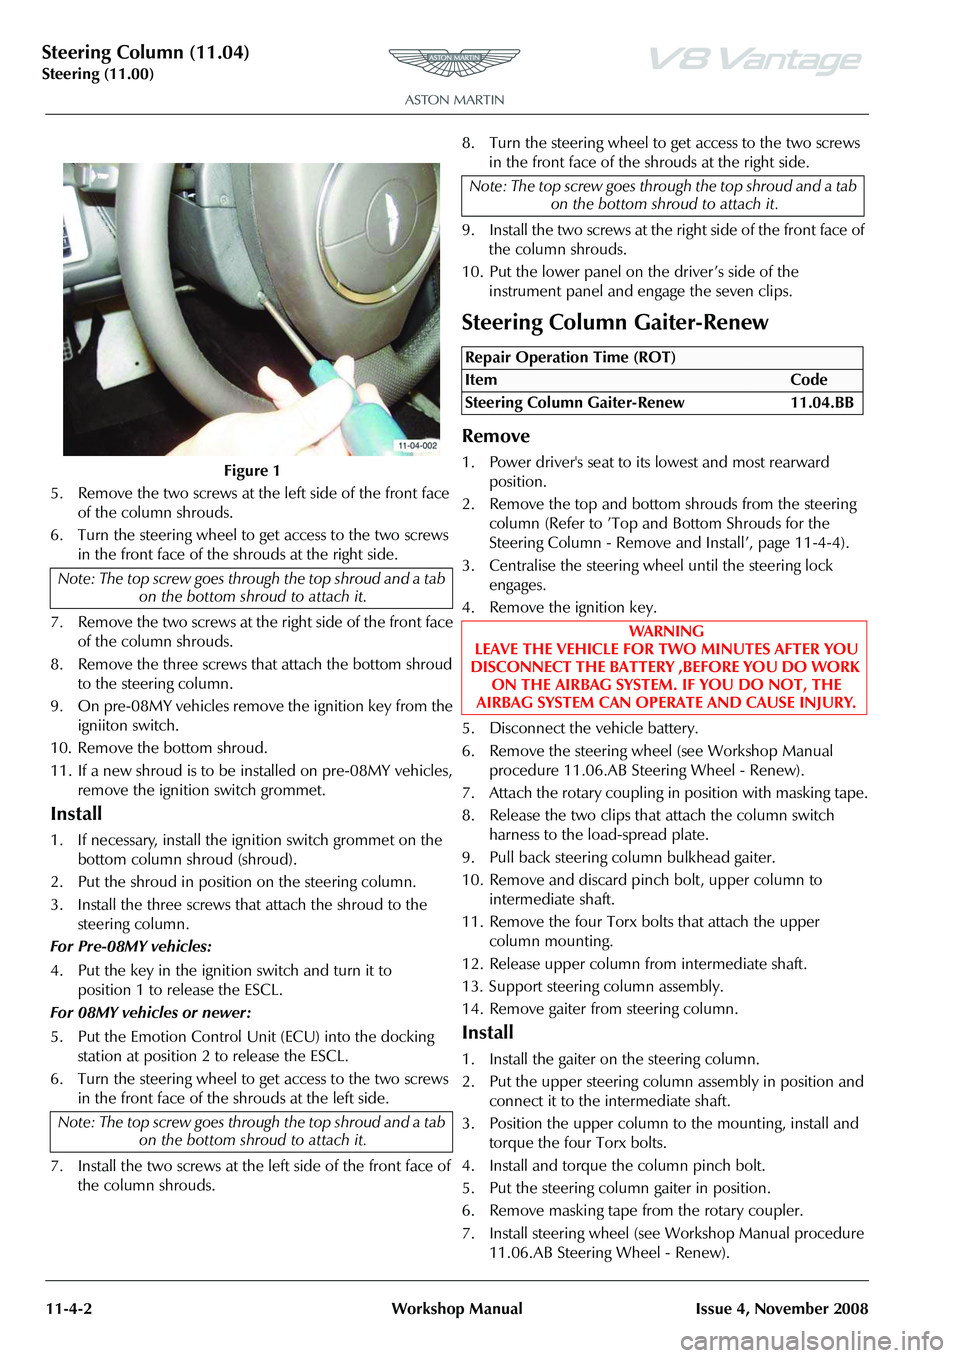
5. Remove the two screws at the left side of the front face of the column shrouds.
6. Turn the steering wheel to get access to the two screws in the front face of the shrouds at the right side.
7. Remove the two screws at the right side of the front face of the column shrouds.
8. Remove the three screws that attach the bottom shroud to the steering column.
9. On pre-08MY vehicles remove the ignition key from the igniiton switch.
10. Remove the bottom shroud.
11. If a new shroud is to be installed on pre-08MY vehicles, remove the ignition switch grommet.
Install
1. If necessary, install the ignition switch grommet on the bottom column shroud (shroud).
2. Put the shroud in position on the steering column.
3. Install the three screws that attach the shroud to the steering column.
For Pre-08MY vehicles:
4. Put the key in the ignition switch and turn it to position 1 to release the ESCL.
For 08MY vehicles or newer:
5. Put the Emotion Control Unit (ECU) into the docking station at position 2 to release the ESCL.
6. Turn the steering wheel to get access to the two screws in the front face of the shrouds at the left side.
7. Install the two screws at the left side of the front face of the column shrouds. 8. Turn the steering wheel to get access to the two screws
in the front face of the shrouds at the right side.
9. Install the two screws at the right side of the front face of the column shrouds.
10. Put the lower panel on the driver’s side of the instrument panel and engage the seven clips.
Steering Column Gaiter-Renew
Remove
1. Power driver's seat to its lowest and most rearward position.
2. Remove the top and bottom shrouds from the steering column (Refer to ’Top and Bottom Shrouds for the
Steering Column - Remove and Install’, page 11-4-4).
3. Centralise the steering whee l until the steering lock
engages.
4. Remove the ignition key.
5. Disconnect the vehicle battery.
6. Remove the steering wheel (see Workshop Manual procedure 11.06.AB Steering Wheel - Renew).
7. Attach the rotary coupling in position with masking tape.
8. Release the two clips that attach the column switch harness to the load-spread plate.
9. Pull back steering column bulkhead gaiter.
10. Remove and discard pinch bolt, upper column to intermediate shaft.
11. Remove the four Torx bolts that attach the upper column mounting.
12. Release upper column from intermediate shaft.
13. Support steering column assembly.
14. Remove gaiter from steering column.
Install
1. Install the gaiter on the steering column.
2. Put the upper steering column assembly in position and connect it to the intermediate shaft.
3. Position the upper column to the mounting, install and torque the four Torx bolts.
4. Install and torque the column pinch bolt.
5. Put the steering column gaiter in position.
6. Remove masking tape from the rotary coupler.
7. Install steering wheel (see Workshop Manual procedure 11.06.AB Steering Wheel - Renew).
Figure 1
Note: The top screw goes thro ugh the top shroud and a tab
on the bottom shroud to attach it.
Note: The top screw goes thro ugh the top shroud and a tab
on the bottom shroud to attach it.
Note: The top screw goes thro ugh the top shroud and a tab
on the bottom shroud to attach it.
Repair Operation Time (ROT)
ItemCode
Steering Column Gaiter-Renew 11.04.BB
WAR NI NG
LEAVE THE VEHICLE FOR TWO MINUTES AFTER YOU
DISCONNECT THE BATTERY ,BEFORE YOU DO WORK ON THE AIRBAG SYSTEM. IF YOU DO NOT, THE
AIRBAG SYSTEM CAN OPERATE AND CAUSE INJURY.