tow AUDI A3 2008 8P / 2.G Quick Reference Guide
[x] Cancel search | Manufacturer: AUDI, Model Year: 2008, Model line: A3, Model: AUDI A3 2008 8P / 2.GPages: 6, PDF Size: 0.33 MB
Page 2 of 6

Downloaded from www.Manualslib.com manuals search engine Page 2
1
2
36
5
4
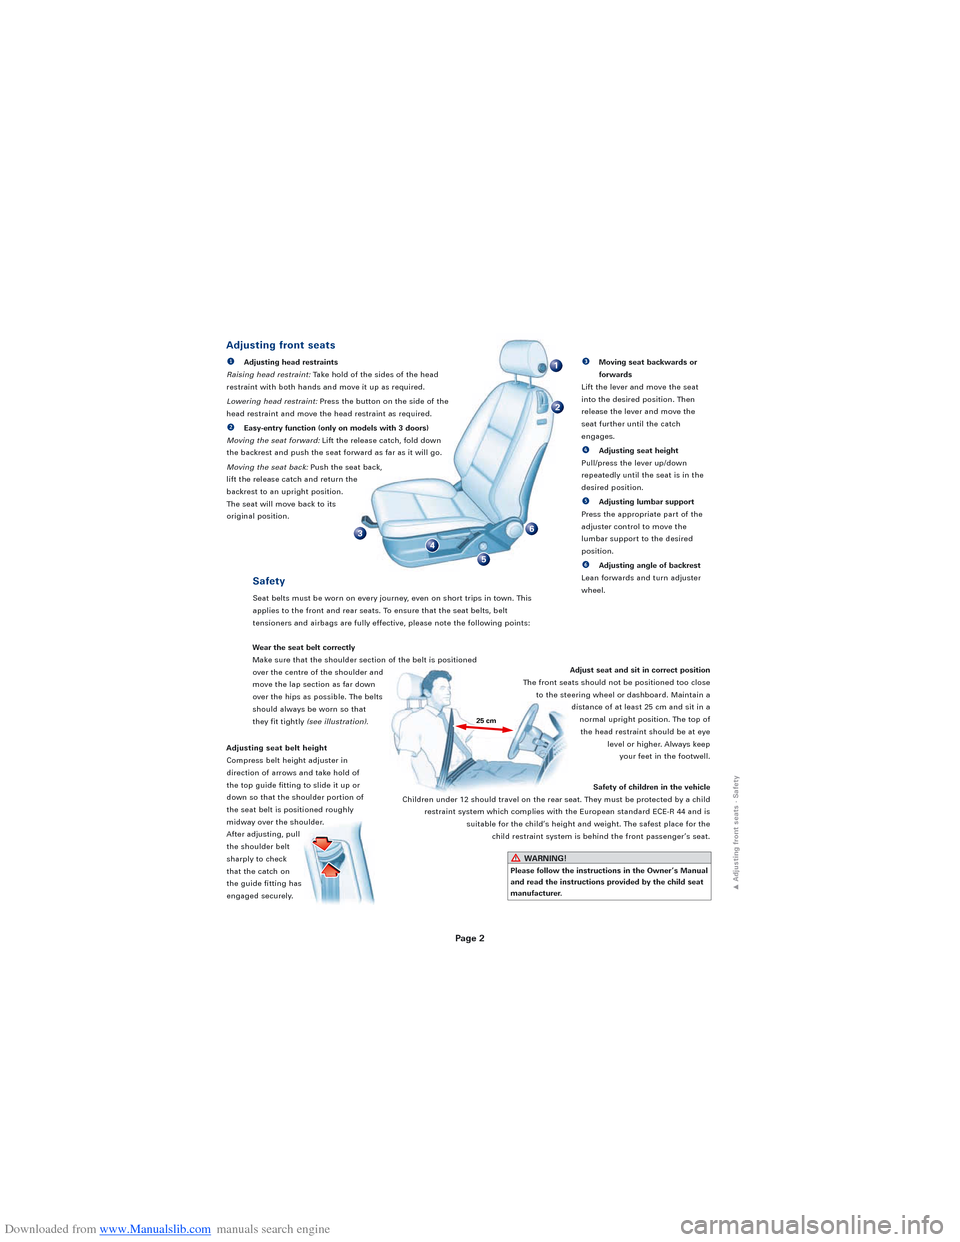
Adjusting seat belt height
Compress belt height adjuster in
direction of arrows and take hold of
the top guide fitting to slide it up or
down so that the shoulder portion of
the seat belt is positioned roughly
midway over the shoulder.
After adjusting, pull
the shoulder belt
sharply to check
that the catch on
the guide fitting has
engaged securely.Adjust seat and sit in correct position
The front seats should not be positioned too close to the steering wheel or dashboard. Maintain a distance of at least 25 cm and sit in anormal upright position. The top ofthe head restraint should be at eye level or higher. Always keepyour feet in the footwell.
Wear the seat belt correctly
Make sure that the shoulder section of the belt is positioned
over the centre of the shoulder and
move the lap section as far down
over the hips as possible. The belts
should always be worn so that
they fit tightly
(see illustration).25 cm
Safety
Seat belts must be worn on every journey, even on short trips in town. This
applies to the front and rear seats. To ensure that the seat belts, belt
tensioners and airbags are fully effective, please note the following points:
Safety of children in the vehicle
Children under 12 should travel on the rear seat. They must be protected by a child restraint system which complies with the European standard ECE-R 44 and is suitable for the child’s height and weight. The safest place for the child restraint system is behind the front passenger’s seat.
WARNING!
Please follow the instructions in the Owner’s Manual
and read the instructions provided by the child seat
manufacturer.
Adjusting front seats
e
Adjusting head restraints
Raising head restraint: Take hold of the sides of the head
restraint with both hands and move it up as required.
Lowering head restraint: Press the button on the side of the
head restraint and move the head restraint as required.
rEasy-entry function (only on models with 3 doors)
Moving the seat forward: Lift the release catch, fold down
the backrest and push the seat forward as far as it will go.
Moving the seat back: Push the seat back,
lift the release catch and return the
backrest to an upright position.
The seat will move back to its
original position.
tMoving seat backwards or
forwards
Lift the lever and move the seat
into the desired position. Then
release the lever and move the
seat further until the catch
engages.
uAdjusting seat height
Pull/press the lever up/down
repeatedly until the seat is in the
desired position.
iAdjusting lumbar support
Press the appropriate part of the
adjuster control to move the
lumbar support to the desired
position.
oAdjusting angle of backrest
Lean forwards and turn adjuster
wheel.
1Adjusting front seats · Safety
Page 6 of 6
![AUDI A3 2008 8P / 2.G Quick Reference Guide Downloaded from www.Manualslib.com manuals search engine 1
0
2
3
4
B
C
A
5
76
[9] Control lever for windscreen wipers/washer and on-board computer
Windscreen:Off
eBrief wipe
rTo activate intermittent AUDI A3 2008 8P / 2.G Quick Reference Guide Downloaded from www.Manualslib.com manuals search engine 1
0
2
3
4
B
C
A
5
76
[9] Control lever for windscreen wipers/washer and on-board computer
Windscreen:Off
eBrief wipe
rTo activate intermittent](/img/6/857/w960_857-5.png)
Downloaded from www.Manualslib.com manuals search engine 1
0
2
3
4
B
C
A
5
76
[9] Control lever for windscreen wipers/washer and on-board computer
Windscreen:Off
eBrief wipe
rTo activate intermittent wipe/rain sensor: Move control to set sensitivity level of rain sensor (wiper delay intervals).
tSlow wiper speed
uFast wiper speed
iAutomatic wash and wipe: Pull lever towards you and hold.
Rear window:
oIntermittent wipe: Press lever towards dashboard.
pAutomatic wash and wipe: Press lever as far as it will go towards
dashboard and hold.
Controls for on-board computer
Press the top or bottom of rocker switch repeatedly to display the various
computer functions in turn. Press and hold RESET button to return the current
display to zero.
RESET button
Press RESET button repeatedly to select the on-board computer, thenavigation
system
and themain menu displaysin turn.
[17] Selector lever for automatic gearbox
Selector lever positions P Parking lock RReverse gear
N Neutral DDrive
S Sport
To move the selector lever out of position Por N, or into
position P or R, press the interlock button on the selector
lever handle and the brake pedal simultaneously.
Note: Use the foot brake to hold the vehicle when
stationary with the engine running (in all selector lever
positions other than P).
Manual gear selection (tiptronic)
The tiptronic program enables you to change gear manually. Move the selector lever
out of position D into the tiptronic gate on the right. Press the selector lever forwards
briefly to shift up a gear, or push the lever back to shift down a gear.
Note: If you wish, you can select gears manually via the controls on the multi-function
steering wheel.
WARNING!
Do not move the selector lever to positions P or R
when the vehicle is moving.
[13] Air conditioner
Control on left:
Temperature selection for left side.
Control on right:
Temperature selection for right side.
Automatic mode
(set the desired temperature and
press the button)
Changing the blower speed
(switches in the middle)
Economy mode
ECON
AUTO
[24] Control lever for cruise control system
Please refer to the Owner’s Manual for operating
instructions.
[7] Control buttons for
multi-function steering wheel
The multi-function steering wheel offers
fast and simple control of the
sound system and telephone system. Please refer to the Owner’s Manual.
Page 6