warning light AUDI A3 2011 Owner´s Manual
[x] Cancel search | Manufacturer: AUDI, Model Year: 2011, Model line: A3, Model: AUDI A3 2011Pages: 320, PDF Size: 75.79 MB
Page 46 of 320
Opening and closing
in. WARNING
Always read and heed WARNING~ & in "General description" on
page 40. •
Locking and unlocking the vehicle from
inside
The vehicle can be locked or unlock ed from the inside
usin g the power locking swi tches located i n the driver's
and the front passen ger 's door .
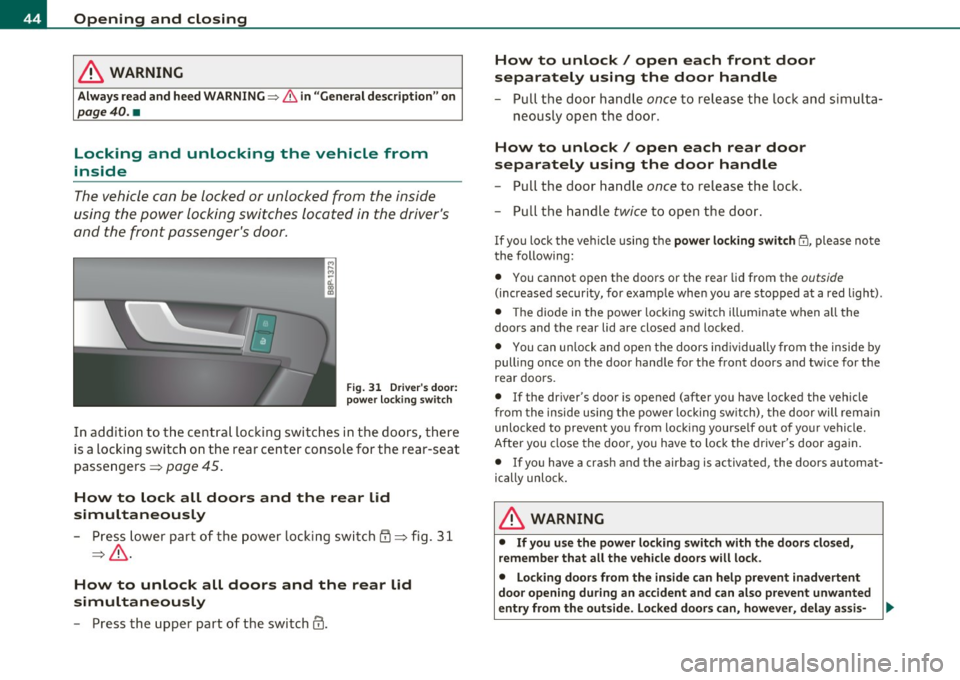
Fig . 3 1 Driv er's do or:
p ower locking switch
In add ition to the ce ntra l loc kin g swi tches in the doors , the re
is a locking switc h on the rear center console for the rear-seat
passe ngers=>
page 45 .
How to lock all doors and the rear lid
simultaneously
- Press lower pa rt of t he po wer locking sw itch {D ::::> fig. 3 1
=> & .
How to unlock all doors and the rear lid
simultaneously
- P ress the upper part o f th e swi tch@.
How to unlock/ open each front door
separately using the door handle
- Pull the doo r handle once to release th e lock and sim ult a-
neo usly o pen the door.
How to unlock/ open each rear door
separately using the door handle
- Pull t he door handle once to release the loc k.
- Pull the ha ndle
twice to o pen t he doo r.
If you lo ck the ve hicl e using t he power loc king switch 1'.I!, please note
the following:
• You cannot o pen the doors or the rear lid from the
outside
(increased security, for examp le whe n you a re stopped at a red light) .
• Th e diode in the power loc king switch illuminate when a ll the
doors and the rear lid are closed and loc ked.
• You can un lo ck and open t he doors in dividually from the inside by
pulling once o n the door hand le for the front doors and twice for t he
rea r doors.
• If the driver's door is opened (after yo u have locked the vehicle
fro m the inside using the power locking sw itch), the door will rem ain
unlocked to preve nt you from locki ng yourse lf out of yo ur vehicle.
After you close the doo r, you have to lo ck the drive r's door aga in .
• If you have a crash and the airbag is activated, the doors automat
ically unlo ck.
& WARNING
• If you use the power locking switch with the door s closed,
remember that all the vehicle doors will lock.
• Locking doors from the inside can help prevent inadvertent
doo r opening during an accident and can also prevent unwanted
entry from the outside . Locked door s can, however, delay assi s- .,,.
Page 52 of 320
Open ing and closing
- By briefly pressing/pulling the switch again, the down
ward travel of the window can be stopped in any position
:::::, & in "Controls" .
Closing the windows
Pull the switch up to the first stop and hold it there until
the window has risen to the desired position.
- Pull the switch quickly to the
sec ond po sit ion : the window
will automatically close all the way:::::,
& in "Controls".
- By briefly pressing/pulling the switch again, the upward travel of the window can be stopped in any position=:>
&
in "Controls".
Activating/deactivating re ar windows
- Push the switch to the depressed position to acti vate the
rear windows -the light in the switch will go out .
- Briefly press the switch to
deacti vate the rear windows -
the switch will return to the safety position and the light
~ will illuminate.
The safety switch ©::::> page 49, fig. 40 in the armrest on the driver's
door turns off the rear power windows. Only when the safety switch
is depressed can the rear windows be opened or closed . The symbol in
the safety switch illuminates when the power windows in the rear
doors are switched off (button NOT dep ressed) . This featu re has been
prov ided for the safety of small children rid ing in the rear of the
vehicle.
[ i ] Tips
T he windows can still be opened and closed for about ten min utes
after the ign ition has been turned off. The power windows are not
shut off unti l one of the front doors is opened .•
Convenience close/open feature
You can close or open the windows from outside when you
lock or unlock your car with the key.
Convenience open feature
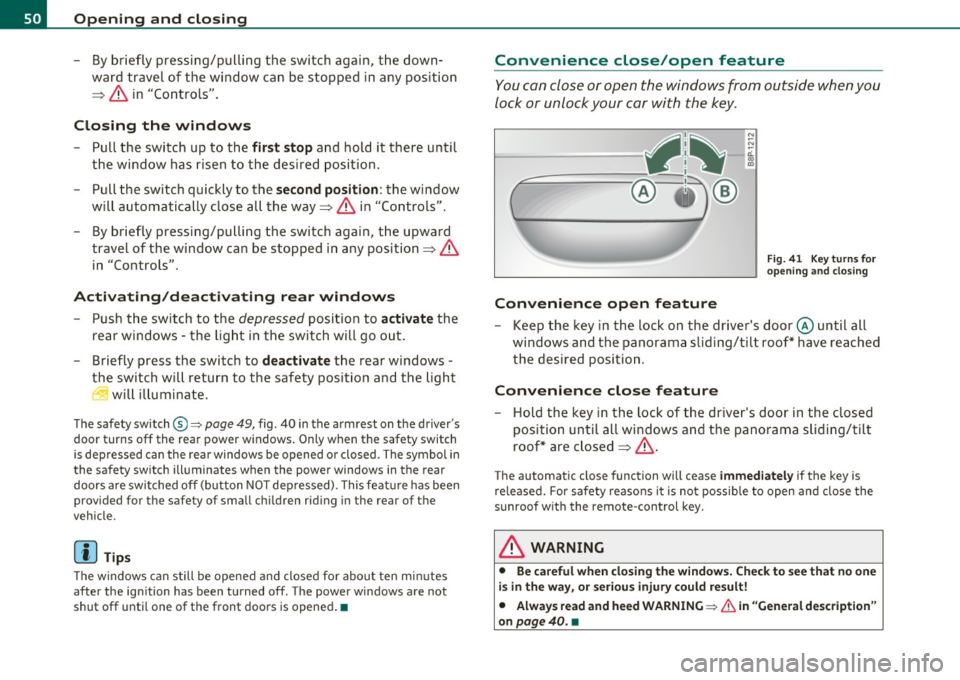
Fi g. 41 K ey turn s fo r
openi ng and closi ng
Keep the key in the lock on the driver's door @until all
windows and the panorama sliding/tilt roof * have reached
the desired position.
Convenience close feature
- Hold the key in the lock of the driver's door in the closed
position until all windows and the panorama sliding/t ilt
roof* are closed :::::,
&.
The automatic close function will cease immed iatel y if the key is
re leased. For safety reasons it is not possib le to open and close the
sunroof with the remote-control key.
& WARNING
• Be c areful when cl osing t he window s. C heck to see that no one
i s in the w ay, or seriou s injur y could re sult !
• Alwa ys read and h eed WARNING =>
& in "Gener al d esc ription "
on
pag e 40. •
Page 54 of 320
Opening and closing
Opening manually (manual operation)
- Press the switch (D => page 51, fig. 42, starting from the
"lift position" until the roof has reached the desired posi
tion.
Closing completely
- Press the switch @=> page 51, fig. 42 until the roof is
completely closed=>& .
Closing partially
- Press the switch @=> page 51, fig. 42 until the roof has
reached the desired position =>& . If the roof is almost
closed and you interrupt the operation, the roof opens
automatically to a minimum setting; this is the smallest
possible opening that can be set.
If you pa rk your vehicle in the su n, we recommend that you close the
sun blind . You should especially make certain that the panoramic
sliding sunroof is closed when the sun blind is closed when parked or
if there is a sudden rain shower.
The sun blind has two positions: comp letely open or completely
closed. The sun blind is manually operated.
& WARNING
Never close the panoramic sliding sunroof carelessly or without
watching -the re is a risk of personal injury. For this reason, always
remove the ignition key when leaving the vehicle.
[ i ] Tips
• When you park your vehicle , we generally recommend closing the
panoramic sliding sunroof and the sun blind . •
When the vehicle is parked, a wet roof should be dried lightly with
a soft cloth
before it is opened so that water does not drip into the
interior .
• In an emergency, the panoramic sliding sunroof can be closed
manually=>
page 53, "Emergency mechan ical closing for the
panoramic slidi ng sunroof". •
Appli es to vehicles : wit h pa norami c sli ding s unroo f
Comfort closing
The open roof can also be closed from the outside.
-Hold the key in the driver's door lock in the lock position
until the roof is closed=> &.
& WARNING
Never close the panoramic sliding sunroof carelessly or without
watching -there is a risk of personal injury.•
Page 55 of 320
Emergency mechanical closing for
the panoramic sliding sunroof
Ap plie s to vehicl es: w ith panor am ic sli d ing sunr oof
Uncovering the light unit
In an emergency, the panoramic sliding sun roof can be
closed manually. Removal of the light unit requires some
dexterity .
i d.
co
m
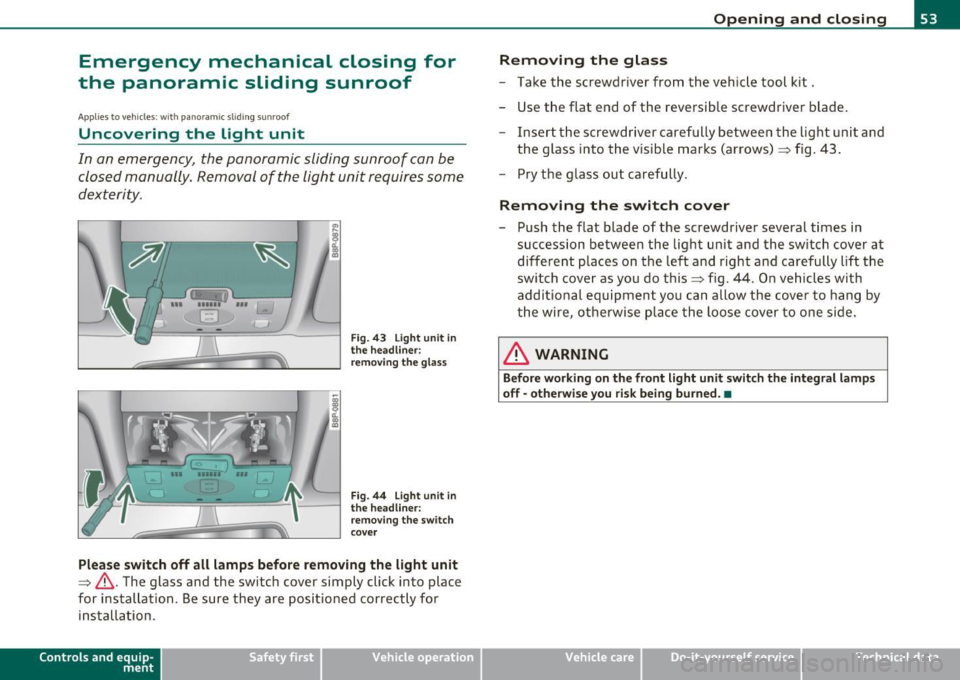
F ig . 4 3 Li ght unit in
the h eadliner :
re mov ing the gla ss
Fi g. 44 Light un it in
th e headliner :
r em oving th e switch
cove r
Please sw itch off all lamps before removing the light unit
~ & .The glass and the switch cover simply click into place
for i nstal lation . Be sure they are positioned correct ly for
installation .
Control s and equ ip
m ent Vehicle
OP-eration
Opening and closing
Removing the glass
- Take t he sc rewdriver from the vehicle tool kit.
- Use the flat end of the reversib le screwdriver blade.
- Inse rt th e screwdriver carefully between the light un it and
the glass into the v isible marks (arrows)~ fig. 43 .
- Pry the glass out care fu lly.
Removing the switch cover
- Push the flat blade o f the screwdriver several times in
succession between the light unit and the switch cover at
different places on the left and righ t and carefu lly lift the
switch cove r as you do this~ fig . 44. O n ve hicles with
additio nal equipment you can allow the cover to hang by
the wire, otherw ise plac e th e loose cov er to one side.
& WARNING
Before working on th e front light unit switch th e integr al lamp s
off -otherwi se yo u risk being burned. •
Vehicle care Do-it-yourselt service iTechnical data
Page 59 of 320
brightness increases again, the low beams are turned off again auto
matically =>& .
In the
AUTO position the low beams are switched off automatically
when the ignition is turned off.
Light Sensor Malfunction*
In the event of a light sensor ma lfunct ion, the driver is notified in the
instrument cluster display:
Automatic headlights/automatic wipers defective
For safety reasons the low beams are turned on permanently with t he
switch in
AUTO*. H owever, you can continue to turn the lights on and
off using the light switch. Have the light sensor checked as soon as
possible at a dealership.
Coming home/leaving home function*
The function is sw itched on when the sw itch is in the AUTO* position
and the function is shown as active in the driver information system.
The
coming home funct ion illuminates the area around the vehicle
when the ign it ion is switched
off and the driver's door is opened. The
length of time the lights rema in on can be set in the menu display
( Illumination > Exterior lights > coming home ).
The leaving home function illuminates the area around the vehicl e
when u nlocking it .
& WARNING
• Never use daytime running lights to see where you are going.
They are not bright enough and will not let you see far enough
ahead for safety, especially at dusk or when it is dark. Always
switch on the low beams at dusk or when it is dark.
• Automatic headlights are only intended to assist the driver .
They do not relieve the driver of his respon sibility to check the
headlights and to turn them on manually according to the current
light and visibility conditions. For example, fog and rain cannot be
Controls and equip
ment Safety first
Clear vision
& WARNING
(continued )
detected by the light sensors. So always switch on the headlights
under these weather conditions and when driving
in the dark io.
• Crashes can happen when you cannot see the road ahead and
when you cannot be seen by other motorists.
- Always turn on the headlights so that you can see ahead and
so that others can see your car from the back.
(I) Tips
• With the switch in AUTO front fog lights cannot be turned on in
addition.
• Th e light senso r for headlight control is located in the rear view
mirror mount . Do not apply any stickers to the windshield in this area
to prevent malfunctions or fail ures .
• Some exterior lighting functions can be adjusted in the driver
information system => page 22 ,
• If you remove the ignition from t he ignition lock whi le the head
lights are still on, a buzzer will sound as long as the driver's door is
open to remind you to turn off the lights .
• Always observe the specific local regulat ions for your area as to
when to use your lights.
• With automatic headlights, the high-beam funct ion is also avail
able, but with one restr iction:
If you have not switched the high
beams back to low beams during automatic headlig ht operation (for
example, after driving through a tunnel), only the low beams come
on the next time automatic headlights are switched on . To use the
high beams, you first have to pull the high beam lever back and then
push the lever forwa rd again .
• In cool or damp weather, the inside of the headlights, turn signa ls
and ta il lights can fog over due to the temperature difference
between the inside and outside. They will clear shortly after switching
them on. This does not affect the serv ice life of the light ing . _,,
Vehicle care Technical data
Page 66 of 320

Clear vision
Applies to veh icles : w ith automat ically dimm ing inside mirror
Automatically dimming inside mirror
The automatic dimming function can be turned on and
off if required .
Disabling auto dimming
Fig . 60 I nside rea r
v ie w mirror
- Press butt on @ ~ fig . 60 brie fly, -the green indic ator
light ® goes out.
Activating/reactivating auto dimming
- Press button @ briefly, -the green indicator ligh t® goes
on.
Automat ic dimming function
The automatic dimming function is activated every time the ignition
is turned on. The g ree n indicator light is lit to indica te auto d imming
is active.
W hen dimm ing is act ivated, the inside mir ror w ill darke n
automati
cally
in response to the amou nt of light striking the mirror (such as
head lights from rearward approaching vehicles). Even in d imming
mode, the mirror surface turns br ight when:
• the interior light is switched on
• reverse gear is engaged.
& WARNING
Broken glass of automatic dimming mirror can cause electrolyte
fluid leakage . Electrolyte fluid can irritate skin , eyes, and respira
tory system .
• Repeated or p rolonged expo sur e to electrolyte can cau se irrita
tion to the resp iratory system, esp ecially among people with
asthma or other r espiratory conditions. Get fre sh air immediately
by le aving the vehicl e or, if that is not po ssible , open window s and
doors all the wa y.
• If ele ctrolyte gets into the eye s, flush them thoroughly with
large am ount s of clean water f or at lea st 15 minute s; medical
attention is re commended .
• If electrolyte contacts skin , flush affected area with clean
water for at l east 15 minutes and then wash aff ected area with
s oap and water; medical attention is rec ommended . Thoroughly
wash affected clothing and shoe s before reu se.
• If swallowed and person i s con sciou s, rinse mouth with water
for at least 15 minutes. Do not induce vomit ing unle ss instru cted
to do so by medical profe ssional. Get medical attenti on immedi
ate ly .
0 Note
Liquid e lectrolyte leaked from a broken mir ror g lass will damage any
plastic surfaces it comes in contact with. Clean up spi lled electrolyte
immediately with clear wate r and a sponge.
[I) Tips
• Check to make su re t he re are no obje cts preventing light from
reac hing the inside mirror.
• Do not attach any st ick er s to the w indshield in front of the light
sensor, as this would interfere with the a utomatic operation of the
head lights and the a utomat ic dimming of the inside mir ror. •
Page 68 of 320
Clear vision High wiper speed
- Move the lever up to posi tion ® ·
One-touch wiping
- Move the lever to position 0, when you want to wipe the
w indsh ie ld
briefly .
Automatic wiper/washer
-Pull t he lever to posi tion ® (t oward t he s tee ring w heel)
and hold.
- R elease t he lever . T he washer stops and the wipers keep
goi ng for about four seco nds .
Turning off the wipers
- Move the lever bac k to posi tion ®·
The w indshield wipe rs an d washer only wo rk when the igni tion is
tur ned on. If you switch off t he ig nition w ith the winds hield wiper
lever st ill in the inte rval wipe pos it ion and then come back a wh ile
later and drive off , the ra in sensor wi ll reactivate itself after the
vehicle speed has exceeded 4 mph (6 km/ h).
The r ain senso r* is only activated with the wipe r lever set to position
@ . When it starts to rain, the rain sensor will automatically act ivate
t he in term itte nt w ip ing mode .
To red uce the sensit iv ity of the sensor, move sw itch @dow n. To
increase the sensitivity, move the switch up. The higher you adjust the
sensitivity, the faster the sensor will react when it senses moistu re on
the windshield .
Th e rain senso r wipe r inte rvals dep end on the sensi tivi ty set ting a s
well as veh icle speed. During brief stops , wiper motion will ad just in
re lation to the amoun t of rain on the w indshield.
Automatic wiper/was her: To eliminate water droplets, the wind
shield wiper pe rforms one afterwipe operation after severa l secon ds w
hile driv ing. You can switch this funct ion off by moving the lever to
posi tion ® within 10 seco nds of the afterw ipe o per ation . T he afte r
w ipe funct ion is reactivated the next time the ignition is switc h.
When the ignition is turned on, the washer jets are heated *.
& WARNING
• Wiper bl ades are crucial for safe driving! Only when they are in
good condition are they able to cl ear the windows properly to
pro vide uncompromised vi sibility. Worn or damaged wiper bl ade s
are a safety hazard=>
page 69, "Replacing front w iper blades"!
• The light/rain sensor* is only designed to assist and support
the driver. It remains entirely th e driver's responsibility to
monitor outs ide weather condit ions and to manually ac tivate the
wip ers as soon as rain or dr izzle reduces visibility through the
windshield.
• The windshield must not be treated with water-repellent
mater ial s. They can increase glare under poor visibility conditions
such as wetness, darkness, or when the sun is low on the horizon.
In addition , they can cause the windshield wipers to chatter.
0 Note
• In the case of frost, check whether the windshield wiper blades are
fro zen to the windsh ie ld. Switching on t he w indshield wipe rs can
damage the wiper blades!
• Do not use the wipers to clear a frosted w indow . Using the wipe rs
as a convenient ice scraper will destroy the wiper blades.
• Prior to us ing a car was h, the winds hield wiper system must be
sw itched off (lever in posit io n 0). This helps to prevent unintentional
switching on and demage to t he windshield woper sys tem. ..,.
Page 75 of 320
Seats and storage
General recommendations
Why is your seat adjustment so important?
The safety belts and the airbag system can only provide
maximum protection if the front seats are correctly
adju sted.
Th ere are several dif ferent ways you can ad just the d river's sea t and
t he front passenger's seat so that it confo rms to your body size .
It is
especially important t hat the seat be adjusted properly so that:
• you can easily and quickly reach a ll the switc hes and contro ls in the
ins trumen t pa nel
• your body is properly supported thus reducing phys ica l stress and
fatigue
• the safety be lts and airbag system can offer maximum protection
=>
page 145
In the follow ing chapters, you will see exactly how you can best adjust
your sea ts .
Th ere are special regulations a nd instr uctions for install ing a child
safety seat on the front passenger 's seat. Always heed the informa
tion regarding child safety p rovided in=>
page 167, "Child Safety ".
& WARNING
Incorrect seating posit ion of the driver and all other passengers
can result in seriou s personal injury.
• Always keep your feet on the floor when the vehicle is in
motion -never put your feet on top of the instrument panel, out
of the window or on top of the seat cushion! This applies especially
to the passengers. If your seating po sition is incorrect you
increase the ri sk of injury in the case of sudden braking or an acci-
Controls and equip
ment Safety first
Seats and storage
& WARNING
(con tinu ed)
dent . If the airbag inflates and the seating position is incorrect
this could result in per sonal injury or even death .
• It is important for both the dri ver and front passenger to keep
a distance of at least 10 inches (25 cm) between themselves and
the steer ing whee l and /or instrument panel. If you're sitting any
closer than this , the airbag system cannot protect you properly. In
addition to thi s, the front seats and head restraints must be
adjusted to your body height so that they can give you maximum
protection .
• Always try to keep as much distance as possible between your
self and the steering wheel or instrument panel.
• Do not adjust the driver's or front passenger 's seat while the
vehicle is moving. Your seat may move unexpectedly, causing
sudden loss of vehicle control and personal injury . If you adjust
your seat while the vehicle is moving, you are out of position. •
Driver's seat
The correc t sea t posi tion is import an t f or sa fe and
rel axed dri ving.
We recomm end that you a djust th e d rive r's sea t in the
fo llowing man ner:
- Ad just the sea t in f ore and a ft dire ct io n so that y ou can
e asily pus h the pe dals to the floor while keep in g you r
kne es slightly bent=>
& in "W hy is yo ur seat a djust m en t
so imp ort an t?".
- Adj ust the sea tbac k so tha t when yo u sit wi th y our back
agai nst the se atba ck, you can sti ll gra sp th e to p of t he
s te er ing w hee l. _..
Vehicle care Technical data
Page 85 of 320
Applies to veh icles : w ith cargo net
Elastic cargo net
The cargo net prevents light objects from sliding around
in the luggage compartment.
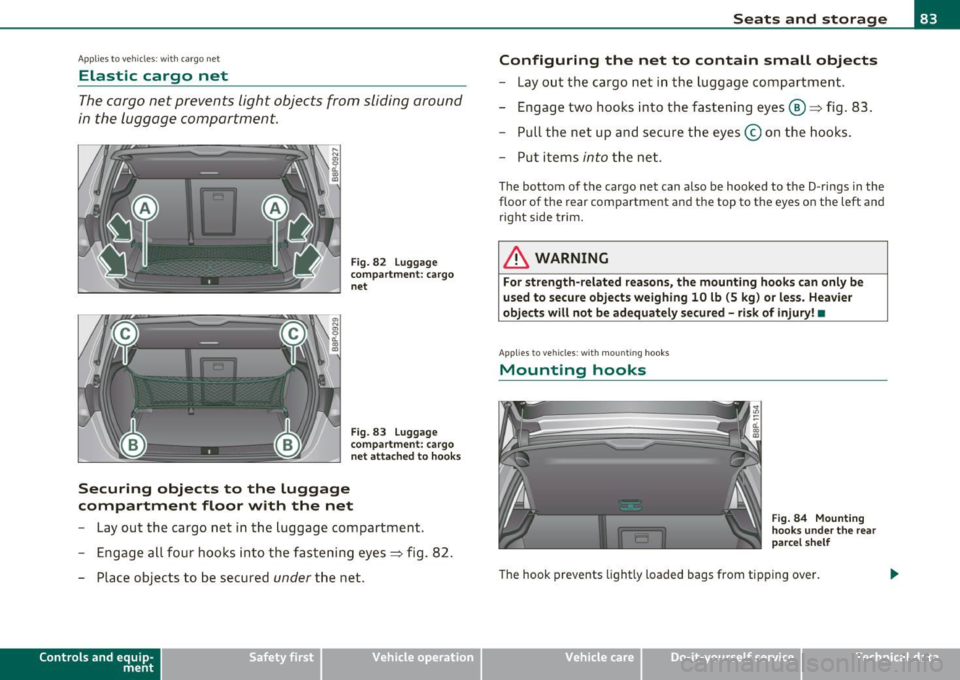
Fig. 82 Luggage
compartme nt: cargo
ne t
Fig. 83 Luggag e
compartme nt: cargo
n et at tached to h ooks
Securing objects to the luggage
compartment floor with the net
- Lay out the cargo net in the luggage compartment .
- Engage all four hooks into the fastening eyes=> fig. 82 .
- Place objects to be secured
under the net .
Contro ls a nd e quip
m en t Vehicle
OP-eration
Seats and storage
Configuring the net to contain small objects
- Lay out the cargo net in the luggage compartment .
- Engage two hooks into the fastening eyes®=> fig. 83 .
- Pull the net up and secure the eyes © on the hooks.
Put items
into the net .
The bottom of the cargo net can also be hooked to the 0 -rings in the
floor of the rear compartment and th e top to th e ey es on the left and
right side trim.
& WARNING
For strength-related reasons, the mounting hooks can only be
used to secure objects weighing 10 lb (5 kg) or less. Heavier
objects will not be adequately secured -risk of injury! •
Applies to vehicles : w ith mount in g hook s
Mounting hooks
Fig. 84 Mounting
h ooks under the rear
parcel shelf
The hook preven ts lightly loaded bags from tipping over .
Vehicle care Do-it-yourselt service iTechnical data
Page 86 of 320
Seats and storage
& WARNING
For strength-related reasons , heavy objects must not be hung on
the hook s. Heavy objects are not adequately secured -thi s
increase s the risk of injury. •
Retractable luggage compartment cover
The luggage compa rtment cover keeps lugga ge or o ther
objects out o f view.
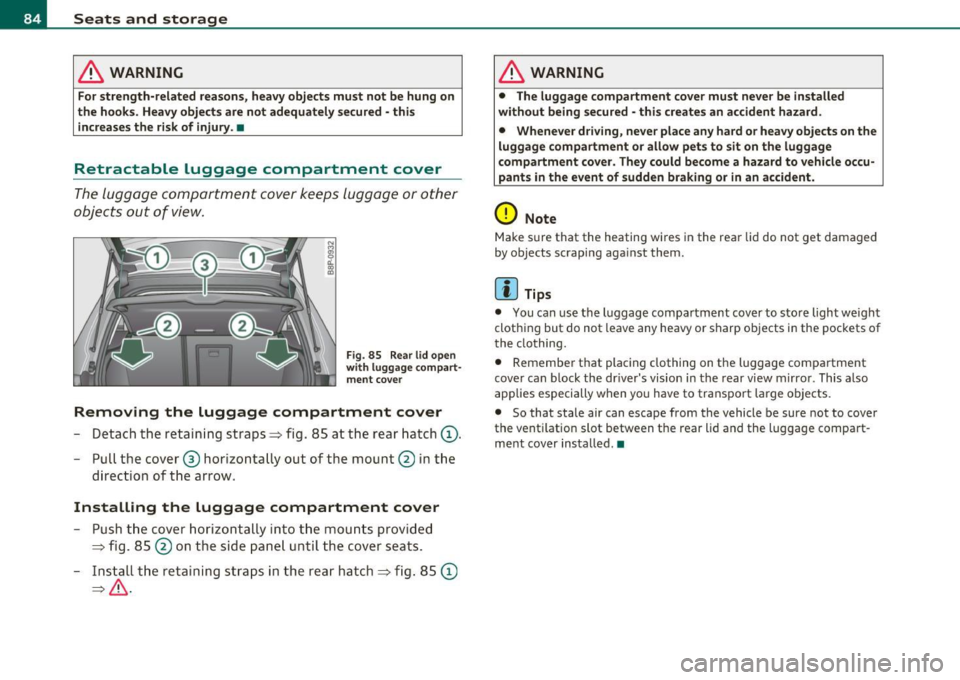
Fig. 85 Rea r lid ope n
w ith luggag e com part
me nt co ver
Removing the luggage compartment cover
- Detach the retaining stra ps => fig. 85 a t the rear hatch (D .
- Pull the cover ® hor izonta lly out of the mount @ in the
d irection of t he arrow.
Installing the luggage compartment cover
- Push t he cover hori zontally into t he m ounts pr ovid ed
=> fig. 85 @ on t he sid e panel u ntil t he cover seats.
- Ins tall t he re ta ining st ra ps in the rea r hatc h=> fig. 85
©
=> & .
& WARNING
• The luggag e compartment cover must never be insta lled
without being secured -this creates an accident hazard.
• Whenever dri ving , neve r place any hard or heavy objects on the
luggage compartment or allow pet s to sit on the luggage
compartment cover . They could become a hazard to vehicle occu
pants in the event of sudden braking or in an accident.
0 Note
M ake s ure that the heating wi res in the rear lid do not get damaged
by objects scrap ing aga inst them.
(I) Tips
• You can use the luggage compa rtment cov er to sto re light we igh t
cloth ing but do not leave any heavy or sharp objects i n the pockets of
the clothing.
• Remembe r th at plac ing clothing on t he luggage compa rtment
cove r can block the dr iver's vision in the rear view m irro r. This also
app lies especially when yo u have to trans po rt large objects.
• So that state air can escape from the vehicle be sure not to cover
the vent ilatio n slot between the rear lid and the luggage compart
m en t cover insta lled .•