automatic transmission AUDI A3 2011 Owner´s Manual
[x] Cancel search | Manufacturer: AUDI, Model Year: 2011, Model line: A3, Model: AUDI A3 2011Pages: 320, PDF Size: 75.79 MB
Page 109 of 320
_________________________________________________ O_ n_ t_ h_ e_ r _o_ a_d _ __.fflll
Starting and stopping the engine
Starting the engine
The engine can only be started with your original Audi
key.
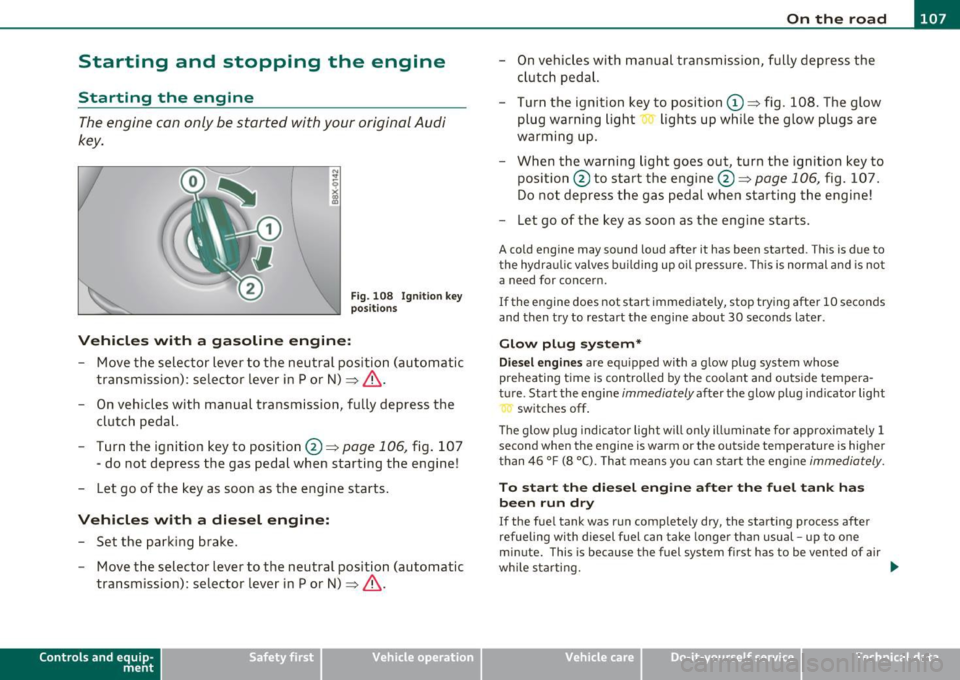
N ... q
i
Vehicles with a gasoline engine:
Fig . 10 8 Ignition key
p osit ion s
- Move the selector lever to the neutra l position (automatic
transmission): selector lev er in P or N) =>
& .
- On vehicles with manual transmission, fully depress the
clutch pedal.
- Turn the ignition key to position@ =>
page 106, fig. 10 7
- do not depress the gas pedal when star ting t he engine!
- Let go of the key as soon as the engine starts .
Vehicles with a diesel engine:
- Set the park ing b rake .
- Move the selector lever to the neutral position (automatic
transmission): selector lever in P or N) =>
& .
Con tro ls a nd e quip
m en t Vehicle
OP-eration
- On vehicles with manual transmission , fu lly depress the
cl utch peda l.
- Turn the ignition key to posi tion
(D => fig . 108. The g low
plug warning light lights up whi le the glow plugs are
warming u p.
- When the warning light goes out, turn the ig nition key to
posi tion @to start the engine @ =>
page 106, fig. 107 .
Do not depress t he gas pedal when starting t he engine!
- Let go o f the key as soon as the engi ne starts.
A cold engine may sound loud after it has been started . Th is is due to
t he hydra ulic valves buil ding up oil p ress ure. This is normal and is not
a need for concern.
If the engine does not start immediately, stop try ing after 10 seconds
and then try to restart the engine about 30 seconds later .
Glow plug system*
Diesel engines are equipped with a glow p lug system whose
preheating t ime is con trolled by the coo la nt and outs ide tempera
t u re . Start the engine
immediately af ter the glow p lug ind icator light
sw itches off .
Th e g low pl ug indica tor light w ill only ill uminate fo r approximately 1
second when the engine is warm or the outs ide temperature is higher
than 46 °F (8 °C). Tha t means yo u ca n sta rt the engi ne
immediately.
To start the diesel engine after the fuel tank has
been run dry
If the fue l tank was run complete ly dry, the start ing process after
refueling with diesel fuel can take longe r than usual -up to one
minute. This is because the fuel system first has to be vented of air
wh ile starting. _,.
Vehicle care Do-it-yourselt service Technical data
Page 111 of 320

_________________________________________________ O_ n_t_ h _ e_ ro_ a_d __ _
Releasing the parking brake
- Pull th e parking brak e leve r u p sligh tly and pr ess the
r ele ase b utt on at t he sam e tim e:::::;,
page 108, fig. 10 9
-a rrow-.
- Keep the release button pressed and lower the par kin g
brake:::::;, &,.
If you should drive off w ith the park ing brake still set, a warning tone
wi ll sou nd and t he following will appear in t he ins trumen t cluster to
remind you to release the parking brake:
Parking brake set
Th e p arking br ake wa rning comes on on ly af ter you have d riven for
longer than 3 seconds and faster than 5 mph (5 km/h).
T he pa rk in g bra ke wa rning ligh t Brake (U SA)/
(CD) (C DN) i lluminates
w hen the park ing b rake is set and you sw itch on the ign ition.
& WARNING
Always release the parking brake completely. A partially engaged
brake will overheat the rear brakes , reduce their effectiveness and
cause excessive wear. This could lead to brake failu re and an acci
dent.
0 Note
O nly a fter the vehicle has co me to comp lete stop, sho uld you firmly
se t the par king brake and either move the gearshift lever into 1st .
gear (manual t ransm iss ion) or
move the se lector leve r into "P" (Auto
matic transm ission). •
Controls and equip
ment Safety first
Parking
To p
reven t a parked ve hic le fr om rolli ng away, th ere a re
a fe w thing s yo u s hould do.
Wh en you par k yo ur vehic le, do t he foll owing:
- Stop the veh ic le usi ng the brake pedal.
- Set t he parking bra ke firmly .
- Mov e th e s ele ctor lev er i nto the
P p osi tio n (automatic
transmission)
or mo ve the g ears hift leve r i nto 1st . gear
(manual transmission) :::::;, &,.
- Swit ch o ff t he eng ine and rem ove the igniti on key fr om
t he ign ition l ock .
What else you should do when parking your vehicle
on an incline or decline
T u rn t he st eer ing whee l so tha t if the vehicle s hould start to roll, it
will roll into t he curb.
If you are par king on a
decline (the front of your ve hicl e facing down
hill), turn the fron t w heels to t he rig ht so t hat they point
toward the
curb.
If you are pa rking o n an incline (t he fon t of yo ur vehi cle facing uphill),
turn the front wheels to the left so that they point
away from the
curb.
Move the se lector lev er into the P p os it ion (automatic transmission)
or move the gearsh ift lever i nto 1st . gear (manual transmis sion ).
& WARNING
This is how you can reduce the risk of injury when leaving your
vehicle.
• Never park the vehicle where it can come in contact with dry
grass, spilled fuel or any other flammable materials.
Vehicle care Technical data
Page 118 of 320
lffllL--_T.:...:.. r.:::a :..:.n.:.. s=-.:.. ":..:':..:. is = s:..:.io .::...;. n_;__ __________________________________________________ _
& WARNING
• Neve r place the select or lever in the R or P position while the
vehicle is moving · ris k of an accident!
• With the eng ine running, it is necessary to hold the vehicle
with th e fo ot brake in all selector lever position s (exc ept P and N),
because e ven at idle speed the transfer of power is never
completely interrupted -the vehicle " creep s". If the vehicle is
stationary and th e transmission is engaged, the engine shou ld
never be speeded up unintentionall y (e.g . manuall y from under
the hood ). Otherwise the vehicle will immediate ly start to mov e -
sometimes e ven if the parking brake is firml y applied -risk of an
accident!
• Before you or other person s open the hood and work on a
running engine , the selector lever must be moved to P and the
parking brake applied firmly -risk of an accident! Follow the
warning stickers~
page 218, "Engine c ompartment ".
W Tips
If you have inadve rtently shifting into N w hil e the vehicle is moving,
you should remove your foot from the accelerator and wait until the
eng ine speed has dropped to idle be fore shifti ng back to Dor 5 . •
A ppli es to veh icles : wi th S tron ic ®
Selector lever lock
The selector lever lock prevents a gear from being
engaged accidentally and unintention ally setting the
vehicle in motion.
.. ... 0 'i'
i
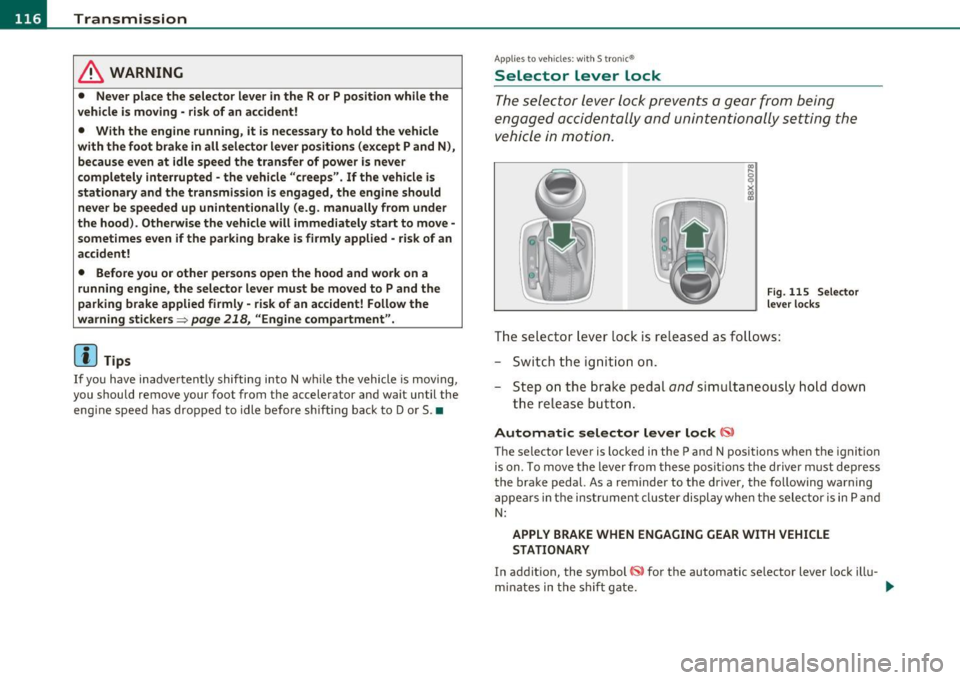
Fi g. 11 5 Se lector
le ver l ocks
The selector lever lock is re leased as fo llows:
- Switc h th e ign it io n on.
- Step o n the brak e peda l
and simult aneous ly ho ld down
th e relea se b utto n.
Automatic selector lever lock
The selector lever is locked in the P and N positions when the ignition
is on. To move the lever from these posit ions the d river must dep ress
the bra ke pedal. As a reminder to the driver, the fo llowing warning
a ppea rs in the instrument cluster display when the selector is in P and
N:
APPLY BRAKE WHEN ENGAGING GEAR WITH VEHICLE
STATIONARY
I n addit ion, the symbol for the automatic se lector lever lock ill u-
mi nates in the s hift gate. .,_
Page 122 of 320

1111..__T_ r _a_ n_s_ m_ i_ s _s_ i_ o _ n _________________________________________________ _
Applies to veh icles : with S tro nic® and with Tiptron ic controls on the stee ring whee l
Steering wheel with Tiptronic ® controls
The selector paddles allow the driver to keep both hands
on the steering wheel when shifting gears.
Shifting up
Fig. 119 Sport
steering wheel with
selector paddles
-Pull the right paddle, marked G) => fig. 119 briefly
towards you .
Shifting down
-Pull the left paddle, marked O=> fig. 119 briefly towards
you.
The selector paddles on the steering wheel are activated when the
selector lever on the center console is in
D, S, or in the manual posi
tion (Tiptron ic mode).
You can also shift gears in the Tiptronic mode using the selector lever
on the center console.
[ i ] Tips
With the gear selector lever in either "D" or "S" the transmission will
switch back to the automatic mode if you do not use the paddles
within approx. 30 seconds .•
Applies to veh icles : with S tro nic®
Kick-down feature
The kick -down feature allows maximum acceleration.
If you depress the accelerator pedal fully beyond the full-thrott le
position, the transmission automatically downshifts one gear,
depending on vehicle speed and engine rpm. The upsh ift in to the next
higher gear takes place as soon as the maximum specified engine
speed is reached.
& WARNING
Please note that the drive wheel s can spin if the kick-down is u sed
on a smooth slippery road -risk of skidding! •
Applies to veh icles: w ith Lau nch Control an d S tron ic® and Gasoline engine only
Launch Control Program
The Launch Control Program permits maximum accelera
tion.
In order to use Launch Control, the ASR (Anti-Slip Regula
tion) must be disabled. When ASR is disabled, the ESP
warning/indicator light in the instrument cluster illumi
nates. So that Launch Control can be used, the engine must
be at operating temperature and the steering wheel must
not be turned.
- With the engine running, briefly press the ESP button. The
message "ASR off' appears in the instrument cluster
display.
- Shift the gear lever to "S" or the tiptronic ® posit ion.
- Step on the brake peda l with your left foot and keep the
brake pedal fully depressed for at least one second . _,,,
Page 207 of 320
Parking on a slope
Do not park with a trailer on a slope. If it cannot be
avoided, do so only after doing the following:
When parking:
-Apply the foot brake.
- Have someone place chocks under both the vehicle and the
trailer wheels.
- With chocks in place, slowly release the brakes until wheel
blocks absorb the load.
- Turn the wheels towards the curb.
- Apply the parking brake.
- Place an automatic transmission in
P, respectively a
manual transmission in first or reverse gear.
When restarting after parking:
- Start the engine .
- Shift transmission into gear .
- Release the parking brake and slowly pull out and away from the wheel blocks .
- Stop and have someone retrieve the wheel blocks.
[I] Tips
If you move the selector lever of the automatic transmiss ion to P
before applying the parking brake and before blocking the wheels,
you may have to use more force later to move the leve r out of the
P
position. •
Controls and equip ment Safety first Vehicle operation
Vehicle care Do-it-yourself service Technical data
Page 228 of 320

___ C_ h_ e_c _k _i _ n _g ~ a_n _d_ f_il _l_in _ g _________________________________________ _
Closing the engine hood
- Pull the hood down until the pressure from the strut is
reduced.
- Let the hood
drop down and latch in place . Do not try to
push it shut;
it may fail to engage=> &.
& WARNING
A hood that is not completely latched could fly up and block your
view while driving.
• When you close the engine hood, check it to make sure the
safety catch has properly engaged. The hood should be flush with
the surrounding vehicle body parts.
• If you notice while driving that the hood is not secured prop
erly, stop at once and close it. •
Working in the engine compartment
Be especially careful whenever you work in the engine
compartment!
Whenever you must perform any work in the engine compartment,
for example checking and filling different fluids, there is a risk of
injury, burns and accidents. To prevent personal injury always
observe the following WARNINGS. The engine compartment of any
vehicle is a hazardous area!~
&
& WARNING
To help avoid injury, before you check anything under the hood :
• Turn off the engine.
• Remove the ignition key.
• Set the parking brake fully.
& WARNING (continued)
• Move selector lever of automatic transmission to "P" (Park);
put manual transmission in Neutral.
• Always let the engine cool down. Hot components will burn
skin on contact.
• To reduce the risk of being burned, never open the hood if you
see or hear steam or coolant escaping from the engine compart
ment. Wait until no steam or coolant can be seen or heard before
carefully opening the hood.
• Keep children away from the engine compartment.
• Never spill fluids on hot engine components. They can cause a
fire.
• Never touch the radiator fan. The auxiliary electric fan is
temperature controlled and can switch on suddenly.
• Never open the coolant reservoir cap when the engine is still
warm. The coolant system is pressurized and hot coolant could
spray out!
• Protect your face, hands and arm from steam or hot engine
coolant by placing a thick rag over the cap when you open the
coolant reservoir.
• If work on the fuel system or the electrical system is necessary:
-Always disconnect the battery .
- Never smoke or work near heaters or open flames. Fluids in
the engine compartment could start a fire.
- Keep an approved fire extinguisher immediately available.
• To avoid electrical shock and personal injury while the engine is
running or being started, never touch:
- Ignition cables
- Other components of the high voltage electronic ignition
system.
• If you must perform a check or repair with the engine running: .,_
Page 248 of 320
-~_T_ ir_e_ s_ a_ n_ d_ w_ h_e_ e_ ls _______________________________________________ _
& WARNING (conti nu ed )
• Tire s age even if they are not being used and can fail suddenly ,
especially at high speeds . Tires that are more than 6 year s old can
only be used in an emergency and then with special care and at low
s peed .
Glossary of tire and loading terminology
Accessory weight
means the combined we ight (in excess of those sta nda rd items which
may be rep lace d) of automatic transmission, power steering, power
bra kes, powe r w indows , power seats, radio, and heater, to the extent
that these items are avai lab le as factory- installed equipment
(w het he r i nsta lled or no t).
Aspect ratio
me ans the ratio of t he he ight to t he w id th of the tir e in percent .
Numbe rs of 55 o r lower indicate a low sidewa ll for improved steer ing
respo nse an d be tter overa ll handling on dry p avemen t.
Bead
means the part o f the tire that is made of stee l w ires , wrap ped o r
re in forced by ply cords and that is shaped to fit the rim.
Bead separation
means a brea kdown of the bon d between components in the bead .
Cord
means the st rands forming the plies in the tire.
& W ARNING (continued )
• Never mount used tire s on your vehicle if you are not sure of
their "previous hi story ." Old used tires may have been damaged
eventhoughthedamagecannotbeseenthatcanleadtosudden
tire failure and lo ss of vehicle control.
• If you notice unu sual vibration or if the vehicle pull s to one side
when driving, alway s stop as soon as it is safe to do so and check
the wheels and tires for damage. •
Cold tire inflation pressure
means the tire pressure recommended by the vehicle ma nufa cturer
for a tire of a des ignated size t hat has not been driven for more than
a couple of m iles ( kilomete rs) a t low speeds in the t hree ho ur period
before the tire pressure is measured or ad justed.
Curb weight
mea ns the weig ht of a motor vehicle wit h standard equ ipment
including the max imum cap aci ty of f ue l, oil, and coo lan t, air condi
tioning and additiona l weight of optional equipment.
Extra load tire
means a t ire designe d to operate at higher loads and at higher infla
t ion p ressures than the co rrespo nd ing standard t ire. Ext ra load tires
my be identif ied as "XL", "xl", "EXTRA LOAD", or "RF" on the sidewa ll.
Gross Axle Weight Rating ( "GAWR ")
means the load -ca rry ing capacity of a s ingle ax le system, measured at
t he t ire-grou nd inte rfaces .
Gross Vehicle Weight Rating ("GVWR")
means the max imum total loaded we ight of the vehicle .
Page 275 of 320
What do I do now? -________________ Vflll
- Move selector lever to position Pon an automatic trans
mission; put manual transmission in
first gear=> &.
-If you are towing a trailer: unhitch the trailer from your
vehicle.
- Take the
tool and the spare tire=> page 270 out of the
luggage compartment.
& WARNING
You or your passengers could be injured while changing a wheel if
you do not follow these safety precautions:
• If you have a flat tire, move a safe distance off the road. Turn
off the engine, turn the emergency flasher on and use other
warning devices to alert other motorists.
• Make sure that passengers wait in a safe place away from the
vehicle and well away from the roadway and traffic.
• To help prevent the vehicle from moving suddenly and possibly
slipping off the jack, always fully set the parking brake and block
the wheel diagonally opposite the wheel being changed. When one front wheel is lifted off the ground, placing the automatic
transmission in "P" (Park), or engaging a gear in a manual trans
mission will
not prevent the vehicle from moving.
• Before you change a wheel, be sure the ground is level and
firm. If necessary, use a sturdy board under the jack .
• After installing the spare wheel, make sure that you remount
the flat tire/wheel in its storage area properly and tighten the
knurled retaining screw securely. •
Safety first
Changing a wheel
When you change a wheel, follow the sequence described
below step-by-step and exactly in that order.
1. Remove the decorative wheel cover*. For more details see
also =>
page 274, "Decorative wheel covers" or
=> page 275, "Wheels with cap-covered wheel bolts".
2. Loosen the
wheel bolts=> page 276.
3. Locate the proper mounting point for the jack and align the jack below that point=>
page 276.
4.
Lift the car with the jack=> page 2 76.
5. Take the
flat wheel off and then put the spare on
=> page 278.
6. Tighten all wheel bolts lightly.
7.
Lower the vehicle with the jack.
8. Use the wheel bolt wrench and
firmly tighten all wheel
bolts=>
page 276.
9. Put the decorative
wheel cover* back on.
& WARNING
Always read and head all WARNINGS and information~ & in
"Raising the vehicle" on
page 276 and~ page 279. •
After changing a wheel
A wheel change is not complete without the following
actions.
- Store and secure the replaced wheel in the spare wheel
well. .,._
Vehicle care Do-it-yourself service Technical data
Page 285 of 320
_______________________________________________ F_u _s_ e_ s_ a_ n_ d_ b_u _ l_ b _ s __ _
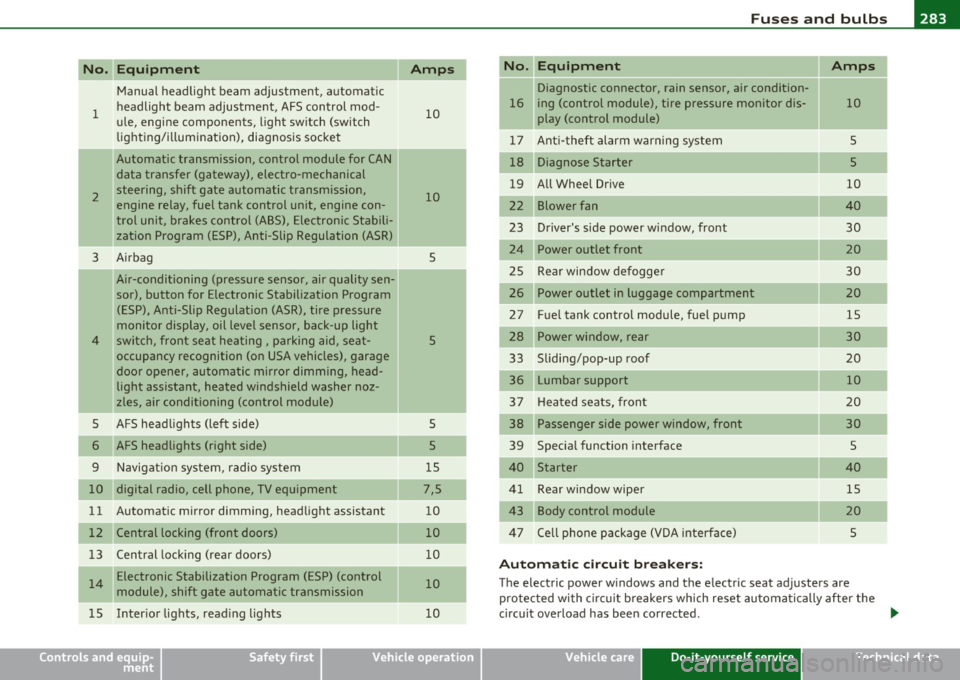
Equipment No. II Equipment
Amps
Manual headlight beam adjustment, automatic Diagnostic connector, rain sensor, air condition-
headlight beam adjustment, AFS control mod-
16 ing (control module), tire pressure monitor dis-10
1 ule, engine components, light switch (switch 10 play (control module)
-lig hti ng/i llum i nation), diagnosis socket 1 7 Ant i-theft alarm warning system 5
Automatic transmission, control module for CAN 18 Diagnose Starter 5
data transfer (gateway), electro-mechanical
19 All Whee l Drive 10 steering, shift gate automatic transmission, 2 10 engine relay, fuel tank control unit, engine con-22 Blower fan 40
trol unit, brakes control (ABS), Electronic Stabili-23 Driver's side power window, front 30 zation Program (ESP), Anti-Slip Regulation (ASR)
3 Airbag 5 24 Power outlet front 20
Air-conditioning (pressure sensor, air quality sen-25 Rear window defogge r 30
sor), button for Electronic Stabilization Program 26 Power outlet in luggage compartment 20
(ESP), Anti-Slip Regulation (ASR), tire pressure 27 Fuel tank control module, fuel pump 15
monitor display, oil level sensor, back-up light
28 Power window, rear 30 4 switch, front seat heating, parking aid, seat-s
occupancy recognition (on USA vehicles), garage 33 Sliding/pop-up roof 20
door opener, automatic mirror dimming, head-
Lumbar support
10 light assistant, heated windshield washer noz-
zles, air conditioning (control module)
3 7 Hea ted seats, front 20
--
5 AFS headlights (left side) 5 38 Passenger side power window, front 30
AFS headlights (right side) 5 39 Specia l function interface 5
9
Navigat ion system, radio system 15 40 Starter 40
digital radio, cell phone, TV equipment 7,5 Rear window wiper 15
11
Automatic mirror dimming, headlight assistant 10 Body control module 20
12 Central locking (front doors) 10 47 Ce ll phone package (VDA interface) 5
13
Central locking (rear doors) 10
A uto m atic c ircu it bre ake rs :
14 Electronic Stabilization Program (ESP) (control 10 The electric power w indows and the electric seat adjusters are
module), shift gate automatic transmission protected with circuit b reakers which reset automatically after the
1 5 Inter ior lights, read ing lights 10 circuit overload has been corrected . ...
Safety first Vehicle care Do-it-yourself service Technical data
Page 288 of 320
111.___E_ m_ e_r-= g=- e_ n_c-= y'-- s_ i_t _u _a_ t_ i_ o _ n_ s ____________________________________________ _
Emergency situations
General
This chapter is intended for trained emergency crew s and working
pe rsonnel who have the necessary tool s and equipment to perform
the se operation s. •
Starting by pushing or towing
0 Note
Veh icles with an automatic transmission cannot be started by
pushing or towing .•
Starting with jumper cables
J umper c able : Note the manufacturer 's information .
If the battery is discha rged, another ve hicle can p rovide sta rting
assistance. For this yo u require a jumper cab le. Bot h batter ies m ust
h ave the s ame vo lt a ge (V) and a sim ila r cap acity (Ah).
Jumper cables Use
only jumpe r cables o f sufficiently la rge cross section to safely
carry the starter current. Refer to the man ufact urer's spec ificat ions.
Use only j umpe r ca bles with
isola ted t ermin al cl am ps and pro p erl y
marked for distinct ion:
plu s(+) cable in most cases co lored red
minus( ·) cable i n most cases colo red black .
T he w ire cross sect ion must be at least 0.038 in
2 (25 mm2
) for gaso
line engines and a t least 0. 054 in
2 (3 5 mm2
) for diese l engines.
& WARNING
Batterie s contain el ectricity, acid, and gas . Any of the se can cause
very serious or fatal injury. Follow the inst ructions below for safe
handling of your vehicle 's battery.
• Always shield your eyes and avoid leaning over the battery
whenev er po ssible .
• A discharged battery can alre ady freeze at temperatures just
below 32 °F (0 °C) . Never attempt to provide starting assistance
on a frozen or thawed out battery- Danger of explosion and chem
ical burns! Replace a battery if it has been frozen.
• Do not allow battery acid to contact eyes or skin. Flush any
contacted area with water immediately .
• Improper u se of a booste r battery to start a vehicle m ay cause
an explosion .
• Vehicle batteries generate explosive gases . Keep sparks, flame
and lighted cigarettes away from batteries .
• Do not try to jump start any vehicle with a low acid level in the
battery .
• The voltage of the booster battery mu st also have a 12 -Volt
rating. The capacity (Ah) of the booster battery should not be
lower than that of the discharged battery . Use of batteries of
different voltage or substantially different "Ah" rating may cause
an explosion and personal injury.
• Never charge a frozen battery . Gas t rapped in the ice may cause
an explosion .
• Never charge or use a b attery that has been frozen. The battery
case may have be weakened.
• Use of batteries of different voltage or substantially different
capacity (Ah) rating may cause an explosion and injury. The
capacity (Ah) of the booster battery should not be lower than that
of the di scharged battery .
~