snow chains AUDI A3 2011 Owner´s Manual
[x] Cancel search | Manufacturer: AUDI, Model Year: 2011, Model line: A3, Model: AUDI A3 2011Pages: 320, PDF Size: 75.79 MB
Page 196 of 320
Intelligent technologyL _______________________________________ _
• If the power steering system is not funct ioning properly, contact
your au thori zed A ud i dea le r i mmediately. •
Applies to ve hicl es: wit h A ll Whe el D rive
Driving with your quattro®
With All Wheel Drive, all four wheels are driven.
General information
With All Wheel Drive, power is distributed to all fo ur whee ls. This
happens automatically depending on you r driving s tyle a nd the road
conditions at the time. See also =>
page 189, "Electronic differential
lo ck (E DL)".
W inter tires
W hen d riving in the winter, your vehicle with A ll Whee l Drive has an
advantage, even with reg ular t ires . In winter road cond it ions it may
be advisab le to mou nt w inte r ti res (or all-se aso n t ires) for imp roved
dr iveability and braking: these tires must be mounted on
all four
wheel s.
See also => page 261, "Win ter tires".
Snow chains
W he re snow c ha ins are mand atory on certain roads, this norm ally
also app lies to veh icles with all-wheel drive=>
page 262, "Snow
c hains".
Replacing wheels/tires
Veh icles with All Wheel Drive m ust always have t ires of the same s ize.
Also avoid tires with different tread depths. For details see page
=>
page 257, " N ew tires and replac ing ti res and wheels".
Off-Road driving?
Your Audi does not have enough ground clearance to be used as a n
off-road vehicle. It is therefore best to avoid rough tracks and uneven
te rrain as much as poss ib le. Also refe r to=>
page 199.
& WARNING
Always adjust your driving to road and traffic conditions . Do not
let the extra safety afforded by the all-wheel drive tempt you into
taking extra risk s.
• Although the quattro ®all -wheel drive is very effective, always
remember that braking capacity is limited by t ire traction. You
should therefore not drive at exce ssive speed s on icy or slippery
road surfaces .
• On wet road surfa ces, be careful not to drive too fast becau se
the front wheels could begin to slide on top of the water (hydro
planing ). If this should occur, you will have no warning from a
sudden increase in engine speed as with a front -wheel drive
vehicle. Always dr ive at speed s which are adjusted to the road
conditions -risk of crash! •
Energy management
Starting ability is optimized
Energy managemen t controls the distribution of elec
trical energy and thus optimizes the availability of elec
t r ical ene rgy for s tarting the en gin e.
If a vehicle w ith a convent ional energy sys tem is not d riven fo r a long
period of time, t he battery is discha rged by idling cur rent consumers
(e .g. immob ilizer). In ce rtain c ircumstances it can result i n there
being insufficient energy availab le to start the engine .
Inte lligent ene rgy m anageme nt in yo ur vehicle h andles the dis tribu
tion of electrical energy. Starting ability is markedly improved and
t he life of the bat tery is ex tende d.
Bas ically, energy management consis ts of
battery d iagnosis, idling
current management
and dynamic energy management . ~
Page 264 of 320
.,,.___T_ ir_e_ s _ a_ n _ d_ w_ h_e_ e_ ls _______________________________________________ _
Winter tires lose their effectiveness when the tread is worn down to
a dep th o f 0. 15 7 inch (4 m m).
Only drive w it h w inte r tir es under w inte r co nd it io ns. S u mmer t ires
hand le better w hen there is no s now or ice on t he roads a nd the
t em pe ra ture i s above 4 5
°F (7 ° ( ).
If you have a flat tire, see notes on spare wheel~ page 257.
Please always remember that winter tires may have a lower speed
rating than t he t ires originally installed on yo ur ve hicle at the time it
was ma nufact ured . Please see~
page 259, "Speed rat ing ( letter
c ode)" fo r a listing of the speed rating le tte r codes a nd t he maximu m
speed at which the tires can be dr ive n.
Th e spee d rat ing le tt er code( ~
page 259 ) is on the side w all of the
t ire~
page 257 .
& WARNING
Winter tires have ma ximum speed limits that may be lower than
your vehicle's maximum speed. Always know the maximum speed
before driving off. Never drive faster than the speed perm itted fo r
your specific winter tires . This will cause damage to the tire s
leading to an accident and serious personal injury to you and your
passengers.
& WARNING
Driving faster than the maximum speed for which the winter tires
on your vehicle were des igned can cause ti re failure includ ing a
blowout and sudden deflation, lo ss of control, crashes and serious
personal injuries . Have worn or damaged tires replaced immedi
ately.
• Winter t ires have maximum speed rat ing that may be lower
than your vehicle's maximum speed .
• Never drive faster than the speed for which the winter or other
tires installed on your vehicle are rated.
& WARNING
Always adjust your driving to the road and traffic conditions.
Never let the good acceleration of the winter tires and all-wheel
drive tempt you into taking extra risks. Always remember :
• When braking , an all-wheel drive vehicle handles in the same
way as a front drive vehicle .
• Drive carefully and reduce your speed on icy and slippery roads,
even winter tires cannot help under black ice conditions.
do not wear as quickly and reduce fuel consum ption .•
Snow chains
Snow chains may be fit te d on ly to the fr ont w heels, and only to
certain t ire sizes . Ask yo ur aut horized Audi dealer on which tire sizes
snow chains can be used .
If you are go ing to use snow c ha ins, then you must insta ll th em on t he
front wheels at least .
Th e sn ow chain s mus t have low-pr ofile li nks and m ust no t be th icker
than 0 .53 inc h (13.5 mm), including the lock.
R emove wheel cente r covers an d trim discs before putti ng snow
chains on your vehicle~
0. For safety reaso ns cove r caps m ust the n
be fitted over the whee l bo lts. These are availab le from a utho rized
Audi dealers.
& WARNING
Using the wrong snow chains for your veh icle or installing them
incorrectly can incre ase the risk of loss of control leading to
serious personal injury .
~
Page 265 of 320
________________________________________________ T_i_re _ s_ a _ n_d_ w_ h_ e_ e_l_s __ _
& WARNING (co ntinued )
• Snow chain s are available in different sizes. Always make sure
to follow the instructions provi ded by the snow chain manufac
turer.
• Wh en driving with snow cha in s never drive fa ster than the
speed permitted for your specific snow chains .
• Always observe local regulations.
0 Note
• Remove snow chains before d riving on roads not cove red w it h
snow to avoid damaging t ires and wearing t he snow chains down
unnecessar ily .
• Snow chains, which come into direct contact wi th the wheel rim,
can scratch or damage it . The refore, make s ure that the snow chai ns
are sui tably covered. Chec k the pos it ion o f the snow cha ins afte r
driving a few yards and correct if necessary . Follow the instructions
from t he snow chain man ufacturer when doing so .
[ i] Tips
• Where snow chains are mandatory on certa in roads, this normally
also app lies to ve hicles wi th A ll W hee l Dr ive.
• If snow chains are installed, the tire p ress ures s houl d not be
sto red in the tire pressure moni to ring system (TPMS) . Otherwise the
system could malfunction ~
page 267. •
Wheel bolts
Wheel bolts must al ways be tight ened to the c orrect
torqu e.
The desig n of whee l bolts is matc he d to the fa ct ory in stalled rims. If
different r ims are fitted, the cor rect wheel bo lts wi th t he r igh t length
and correctly s haped bolt hea ds must be used . Thi s ensures that
Safety first
wheels are fitted securely and that the brake system funct ions
cor rectly .
I n certa in circumstances, yo u may not use wheel bo lts from a
different vehicle -even if it is the same mo del.
& WARNING
Improperly tightened or maintained wheel bolts can be come
loose causing loss of control, a collision and serious personal
injury.
• Always keep the wheel bolts and the threads in the wheel hubs
clean so the wheel bolt s can turn easily and be properly tightened .
• Never grease or oil the wheel bolts and the th reads in the wheel
hub s. They can become loose while driving if greased or oiled, even
if tightened to the specified torque.
• Only use wheel bolt s that belong to the rim being installed .
• Never use different wheels bolts on your vehicle .
• Always maintain the correct tightening torque for the wheel
bolts to reduce the risk of a wheel loss. If the tightening torque of
the wheel bolts is too low, they can loo sen and come out when the
vehicle is moving . If the tightening torque is too high , the wheel
bolt s and thread s can be damaged and the wheel can become
loose.
0 Note
T he specified torq ue for the wheel bo lts is 90 ft lb (120 Nm) with a
t o le rance of ± 7,4 ft lb( ± 10 N m). Tor qu e wheel bo lts diagonally.
After cha nging a wheel, the torque must be checked as soon as
pos sible wi th a t orque w rench -prefer ably by an auth oriz e d Aud i
dealer or qualified workshop .•
Vehicle care Technical data
Page 269 of 320
________________________________________________ T_ i_ re _ s_ a_ n_d_ w_ h_ e_ e_l _s _ ....... fflll
Applies to vehicles : with tir e pressure monitor ing syste m
Reset tire pressure monitoring system
(Stepl)
If the tire pressure is adjusted, wheels are rotated or
changed, the TP MS must be reset in the menu display.
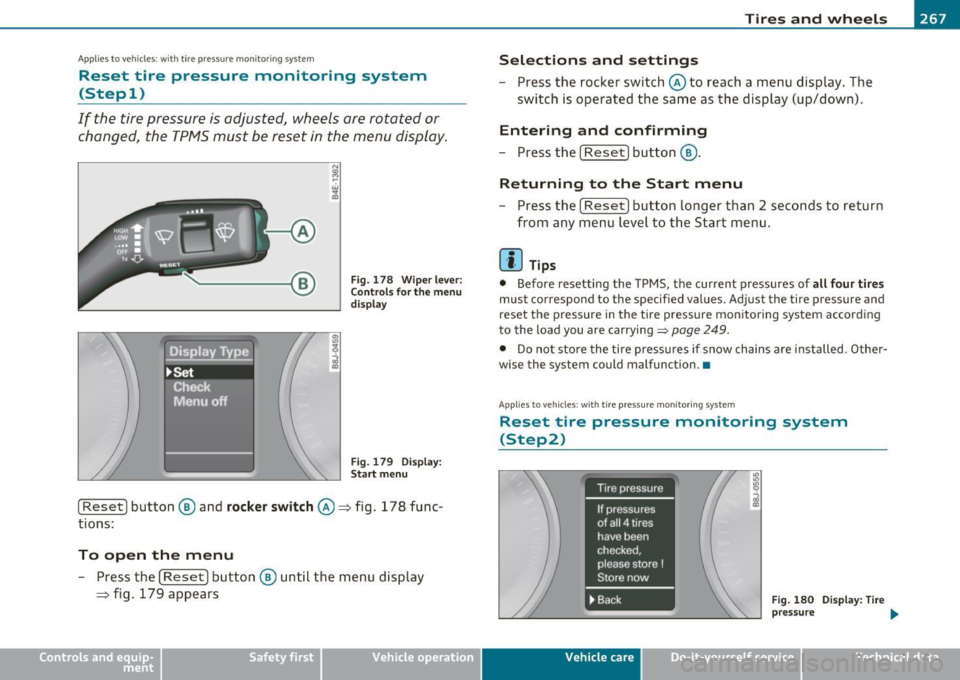
Fig. 1 78 Wip er l ev er:
C ont rol s f or the m enu
display
Fi g. 17 9 Disp la y:
Sta rt me nu
[ Reset) button ® and rocke r switch @=> fig. 178 func
tions:
To open the menu
- Press the (Reset] button ® until the menu disp lay
=> fig. 179 appears
Vehicle OP-eration
Selections and settings
-Press the rocker switch @ to reach a menu display. The
swi tch is operated the sa me as the display (up/down).
Entering and confirming
- Press the [ Reset) button®·
Returning to the Start menu
- Press the [Reset) b ut ton longer than 2 seconds to return
f rom any m enu lev el to th e Start menu .
[ i ] Tips
• Before resetting the TPMS, t he cur rent pressures of a ll four tires
must correspond to the specified values. Adjust the tire pressure and
reset the p ressure in the tire pressure mon ito ring system according
to the load you are carrying=>
page 249.
• Do not sto re the ti re press ures if snow chains are i nstalled . Othe r
wise the system could malfunction .•
App lies to vehicles : w ith t ire pressure monitoring system
Reset tire pressure monitoring system
(Step2)
Fig . 18 0 D ispla y: Ti re
p ress ure
Vehicle care Do-it-yourselt service iTechnical data
Page 273 of 320

What do I do now? -
------------------
& WARNIN G (con tinued )
• Always make sure the spare tire and e ven a flat tire are secured
in place and not loo se , otherwi se they could fly forward , causing
personal injury to pa ssengers in the veh icle in an accident or
s udden maneu ver .
• Never use the jack suppl ied with your Audi on another vehicle ,
particularly on a heavier one . The jack is only suitable for use on
the vehicle it came with .•
A pp lies to vehicles: with compact s pare wheel
Compact spare wheel
The compact spore wheel is only intended to be used for
a short time.
Fig . 184 Compact
sp are w hee l In t he
wh eel well
You w ill find the compa ct spa re wheel unde r the floo r in the luggage
compartment . It is secured with a large nut.
Using the compact spare wheel
The compact spare wheel is on ly intended for emergencies until you
c an rea ch a repair shop . Rep lace it as quick ly as poss ible w ith a normal
wheel.
T here are some restrictions on the use of the compact spare wheel
=> & -The compact spare w heel has been developed especially for
Vehicle OP-eration your type of vehicle.
It must not be exc
hanged for the compact spare
w heel from ano ther type of ve hicle.
No rma l summer or winter tires m ust no t be insta lled on the compact
spare wheel rim.
Snow chains
F or technical reasons, the use of snow chains on t he compact spare
wheel is
not permitted .
If
you do have to drive wit h snow chains and have a tire fail ure on a
front wheel, in stall the spa re whee l in pla ce of a rear wheel. In stall
the snow chains on the rear whee l and use it to replace the defective
front wheel.
Using the spare wheel
Th e spar e whee l is o nly inte nded fo r eme rge ncies unti l you ca n rea ch
a repair shop. Replace it as quick ly as possible with a norma l wheel.
Th ere are some restr ictions on the use of a spare wheel~
&-The
spare whee l has bee n developed especially for your type of vehicle .
It
must not be exchanged for the spare whee l from another type of
vehicle.
Norma l summer or winter tires must not be installed on the spare
wheel r im .
Snow tires
For technical reasons, the use of snow chains on the spare wheel is
not permitted .
If
you do have to drive w it h snow chain s and have a tire fa ilure on a
front wheel, insta ll the spare wheel in place of a rear wheel. Install
the snow chai ns o n the rear whee l and use i t to replace the defec tive
front wheel.
& WARNING
Always store jacking equipment, spare wheel in the luggage compa rtment. Tighten screw for the spare wheel securely. Under ._
Vehicle care Do-it-yourself service iTechnical data
Page 274 of 320
-What do I do now? Pllf...__ ______________ _
& WARNING (continued)
no circumstances should you store the spare wheel or jack and
tools uns ecured in the passenger compartment. Thi s could cause
serious personal injury to passengers in the vehicle in case of a
c ollision.
• The compact spare ti re is for temporary use only and is so
marked on the sidewalls .
• Do not d riv e at speeds e xceeding 50 mph (80 km/h ) with the
compact spare wheel mounted . Also rapid acceleration, hard
braking and hard corne ring must be avoided to help prevent loss
of vehicle control.
• Any continuous road use of the compact spare tire may result
in tire failure, los s of vehicle control and injury to vehicle occu
pants.
• Do not put a snow chain on your compact spare tire. Due to the
smaller tire size, the chain will not fit properly and can thus
damage your vehicle. You could also lose th e chain, as well as
control of the vehicle .
• If you have a flat front tire in road cond itions which require
snow chains , first remove the undamaged rea r wheel and mount
the compact spare wheel in its place . Then remove the damag ed
front wheel, take the snow chains off it and attach them to the
wheel taken from the rear. Thi s wheel can now be mounted on the
front with its snow chains. Check and adjust tire pressure
promptly.
• Never use two or more compact spare tires at the same time .
0 Note
When using the compact spare wheel, note the following:
• After i nstalling the compact spare w heel, the t ire inflation pres
sure should be checked and, if necessary, increased to 60 ps i
(4.2
bar). •
The load carry ing capac ity is marked on t he tire sidewalls and
mus t not be excee ded.
• After installing the compact spare wheel, make sure that yo u
remoun t the fla t ti re in its sto rage are a properly.
• The compact spare tire should be properly remo unted in its
st ora ge area as soo n as th e s tand ard road ti re c an be repla ced.
• Beca use the compact spare tire was specif ically des igned for your
veh icle, it must not be use d on any other veh icle . Likew ise, compact
spare wheels from other vehicles m ust not be used on your vehicle.
• Th e compac t spare tire must not be mounted on any other w heels,
nor m ust standard t ires, snow tires, wheel covers or tr im rings be
used w ith the compact spa re wheel.
If suc h use is a ttempted, damage
to these items or othe r vehicle components may occur.
[ i ] Tips
Check the inflation p ress ure o f the compact spare tire (60 psi/4.2
bar) pe riodic ally to kee p t he ti re read y for use. •
Wheel change
Before changing a wheel
Observe the f oll owing pre cautions for your own and your
passenger's safety when changing a whee l.
- After you exper ience a t ire fa ilure, pu ll t he ca r well away
from movin g traf fic and try to reach
level grou nd before
you stop => & .
- All p asse ngers s hou ld
leave the car a nd move to a safe
locat ion (for instance, beh ind th e guardrai l) => & .
- Apply the
parking brake fi rmly=> &.
Page 316 of 320
-Alphabetical inde x -~ =-.::..::..:.==.:.....:.:...:.=.=.:.: ___________________ _
Seats
Number of seats
135
Selector lever positions
Automatic transmission . . . . . . . . . . .
115
Service and disposal
Safety belt pretensioner .. .........
144
Service interval display .. .............. 27
Service position fo r windshield wipers ... 68
Set menu .................. ... .. .. . 25
Setting
Date display ................. .. .. ..
9
Digital clock .............. ... .. .. .. 9
Side airbags
Description . ....................
161
How they work .................. 162
Side curtain airbags .... .. .. .. .. ..... 164
Description .. .. ................. 164
How they work . .. ...... ......... 165
Safety instructions ............ ... 166
S ide marker lights ..... .............. 56
Ski sack .. .. .... .. .. ................ 85
Snow chains 262
90
Sockets .. .. .. .. .. .. .. .... .. .. .. ... .
Sound system Rep lacing . ... ..... ..............
302
Sound system display . .. ... ........ .. . 18
Sources of information about child restraints
and their use ........... ...... ..
186
Spare tire .. .................... ... 271
Spare wheel
See Spare tire ............ .... ... 271
Speed rating letter code .... .. ... .... 259
Speed warning ... .. ..... ..... ..... .. 35
Speed wa rning system ......... ... .. .. 28
Speedometer . . . . . . . . . . . . . . . . . . . . . . . 10
Starting assistance ........... .. .. ... 288
Starting on hills
H ill hold assist ........... .. .. .. .
110
Starting the engine .......... .. . 106, 107
What should I do if the engine does not
start? ....... .... .. .... .......
107
Steel wheels ................ .. .... . 212
Steering ................... .. .... . 105
Locking the steeringi ........ ...... 106
See also Electro-mechanical power assist .
17,193
Steering wheel column
Ad'
t' JUS rng .... .... .. .. .. .... .... .
Steps for determining correct load limit
Stopping the engine ... ............. .
Storage ............. ... ... . ... ... . .
105
254
108
91
Compartments in the door trims ..... 93
Cup holder rear center armrest .... .. 89
Glove compartment ....... .. .... .. 92
Small objects ......... .... .. .... .. 92
Storage compartment
Increasing size ..... .... .... .. .. ..
81
Sun visors .......................... 63
Sunroof
See panoramic sliding sunroof ..... .. 51
Switches
Emergency flasher ........ .. .. .. ..
59
Switching the air conditioner (automatic)
on/off ......... ... .. .... ........
97
Symbols
T
Red symbols in the center display 30
Yellow symbols in the center display .. 30
Tachometer . . . . . . . . . . . . . . . . . . . . . . . . . 8
Tailgate
See Rear lid .. .. .. .. .............. 45
Technical modificat ions . ....... .. .. .. 302
Temperature
Climate controls . . . . . . . . . . . . . . . . . .
98
Setting for the driver's and front passen-
' 'd ger s s1 e ..... ... ............... 98
Tether anchors .. .... .. ............. 184
Tether strap ........... .. .... .... .. 184
Th e first 1,000 miles (1,500 km) and
afterwards ... .......... ... . ...
197
Tie-downs .............. ........ 82, 132
Tips for the environment
Saving fuel ...... .. .. .. ......... .
89
Tire pressure .... ....... ...... .... .. 252
T ir e pressure monitoring system ..... . 264
Loss of air pressure ............ 13, 265
Malfunction ... .... ............. . 265
Resetting tire pressures .. ......... 267
Warning light ............. .. . ... . 36
Ti re service life .. .. .. .. .............
Tires .................. ... .. .. ' .. .
Replacing .. ............ .... .... .
Service life . .... .. .. .. .. ..... .. . .
speed rating letter code .......... .
Tir e manufacturing date .. ........ .
256
245
257
256
259
259
Page 317 of 320
Alphabetical index -________________ fWI
Tire specifications ........ .. .. ... . 258 Transmission Vehicle Identification Number (VIN) ... . 294
Tread depth ....... .............. 256 6-speed . .. ................ ... .. 114
Vehicle jack .. ............... .. 270,276
Uniform t ire quality grading ....... . 260 Manual transmission .............. 114
Vehicle literature ... .......... ...... .. 4
Winter tires ..................... 261 S tronic transmission . ............. 115
Vehicle-care products .. .. ..... .... .. . 206
Tires and vehicle load limits ........... 253 Transport Canada ................... 133
Tir es and wheels Tread Wea r Indicator (T WI) .. .. ....... 256
w
Checking tire pressure ............. 252
Trip computer ......... .............. 21
Cold tire inflation pressure ......... 249
Trip odometer ... .... .. .............. 10 Warning light
Dimensions .... .... .. .. ......... 257
What does it mean when dEF appears in Tire pressure monitoring
system ... .. 36
General notes ........... .... .. .. . 245
the trip odometer disp lay? .. .. .. .. . 10 Wa
rning lights . ...... ............. 8 , 11
Glossary of tire and loading terminology .
246
New tir es and wheels .......... .. . 257 Turn
sign als ... .. ... ........ ...... ... 59
Warning/indicator lights ........ .. . 14 Red symbols in the center display
.. .. 30
Yellow symbols in the center display . . 30
Warning/indicator l ights
Replacing .............. ...... .. . 258
Snow chains .............. .. .. ... 262
Tires and vehicle load limits .. .. .... 253
Wheel bolts ................ .. ... 263
Winter tires ..................... 261
u
Undercoating ... .... .... ........... 213
Unfastening safety belts ............. 142
Unidirect iona l tires ...... ... ......... 245 Airbag system ......
.......... .. .. 15
Anti -lock brake system (ABS) ........ 16
Brake system ..................... 15
Cruise control .................... 14
Electronic power control ... ......... 13
Tires/Wheels
Low aspect ratio tires ............. 264
Tir e pressure mon itoring system 13, 264
Torn or frayed safety belts ......... .. . 138 Uniform tire quality grading
.... ...... 260
Unlocking Power locking switch ............ .. . 44
Rear lid ................. .. .... ... 45 E
lectronic stabilization program (ESP) 14
Engine malfunction (diesel engine) ... 13
Generator . .. .... .. .... ........... 15
Glow plug system .. ............... 13
Touch-up paint ................ .. .. . 210
Remote control .. ... .... .......... 42 High beam
.. ..................... 14
T owing
Front eyelet ..................... 290 Using the fo
ld-out key .. .. .......... 43 Malfunction
Indicator Lamp (MIL) .... 14
Parking brake .. ...... .... ... . ... .. 15
Rear eyelet ...................... 290
T ow truck procedures ... .......... 289
V
Safety belt ................ ....... 15
Tire pressure monitoring system . .. .. 13
TPMS Vanity mirror ................
.... ... . 63 T
urn s ignals .............. ...... .. 14
Tire pressure monitoring system .... 265 Vehicle battery Warranty coverages
................. 299
Trailer towing ............. ...... .. . 202 Stationary .
.. .. ...... ........... 239 Washer
reservo ir ............ ... .. .. . 243
Operating instructions ......... .. . 203 Vehicle electrical system .. ............ 15 Wash
ing .................... ... ... 206
Tech nical requirements ....... 202, 203
Vehicle identification ........ .. .... .. 294 Automatic car wash
.......... ..... 207
Trailer towing tips .... ... .. .. ... .. 204
Vehicle identification label ............ 294 by hand .........
.. .. ...... .. .. . 207
Controls and equip
ment Safety first Vehicle operation
Vehicle care Do-it-yourself service Technical data