heating AUDI A3 2012 Owner´s Manual
[x] Cancel search | Manufacturer: AUDI, Model Year: 2012, Model line: A3, Model: AUDI A3 2012Pages: 280, PDF Size: 70.11 MB
Page 170 of 280
168 Intelligent technology
If starting capability is jeopa rdized due to en
ergy consumption, a message appears in the
driver information disp lay.
You have to start the eng ine to charge the
battery.
With the engine running
A lthough electrical energy is generated when
the vehicle is be ing driven, the battery can be
come discha rged. This happens mos tly when
little e nergy is be ing generated and a great
dea l consumed and the battery's state o f
charge is not optima l.
To br ing the energy balance back into equili
brium, cons umers which require especia lly
l arge amo unts of energy are temporari ly c ut
back or switched off. Heating systems in par
ticular requ ire a great dea l of energy. If you
notice, for example, that the heated seats* or
the heated rear window are not heating, they have been temporar ily cut back or switched
off. These systems will be ava ilable again as
soon as the energy ba lance has bee n restored.
You will a lso notice that engine idle speed has
been increased s lightly . This is norma l and not
a cause fo r co ncern . By increas ing engine idle
speed the add itiona l ene rgy required is gene r
ated and the ba tte ry is charged.
Driver notification in the instrument
cluster display
If batte ry power drops into the range w here it
can limit the ab ility of the engine to start, th is
is shown in the instrument cluster display
with the following driver message:
(•) Low batter y charge : batte ry will be
charged while dr iving
This notif ication reminds you tha t the s tarti ng
capability of the engine may be limited. As
soon as you start d riving again, the battery
will be recharged and the notification wi ll go
out.
Driver notification appears and goes out
again
If this driver notif ication appears after the ig
nition is t urned on or whi le driving and it goes
out again after a while, the battery has been
adequately recharged.
Driver notification appea rs and doe s not
go out again
If this driver notif ication appears after the ig
nition is turned on or whi le driving and does
not go out again, the battery 's state of charge
is not in the optima l range. Starting ab ility is
rest ricted . H ave t he battery chec ked as soon
as possib le by an autho rized Aud i dea le r o r
qualified wo rks hop.
Page 172 of 280
170 Driving and en vironm ent
Driving through water on roads
Note the following to avoid vehicle damage
when dr iv ing t hrough water, for example on
flooded roads:
- The water must not be any higher than the
bottom of the vehicle body.
- Do not drive faster than walking speed.
A WARNING
After d riving through wate r, mud, slush,
etc., the brakes may be slow to take effect
because o f wet brake ro tors and pads. Dry
the brakes f irst by bra king carefully to re
store the full braking effect .
({D Note
Vehicle components such as the engine,
t ransmiss ion, suspens ion or elect rical sys
tem can be severely damaged by driving
through wate r.
(D Tips
-Che ck the depth of the water before dr iv
i ng through it.
- Do no t stop the veh icle, dr ive in reverse
or switch the engine off when d riving
th rough water.
- Keep in mind that oncoming vehicles
may c reate waves that raise the wate r
l evel and make it too deep for yo ur vehi
cle to drive th rough safely .
- Avoid driving thro ugh salt water because
i t can ca use corrosion.
Catalytic converter
-
It is very important that your emission con
trol system (catalytic converter) is function
ing properly to ensure that your vehicle is run
ning in an environmentally sound manner .
"' Always use lead-free gasoline¢ page 189,
Fuel supply.
"' Never run the tank down a ll the way to
empty .
"' Never put too much motor oil in your en
gine ¢
page 200, ~ Adding engine oil .
"' Never try to push -or tow-start you r vehicle .
T he ca talytic converter is an efficient "clean
u p" dev ice bui lt into the exhaust system of
the vehicle . The cata lytic conve rter bu rns
many of the pollutants in the ex ha u st gas be
fore they are re leased into the atmosphere.
T he exclusive use of unleaded f uel is c rit ically
important for the life o f the catalyt ic convert
er and prope r function ing of the engine .
A WARNING
-Do not park or operate the vehicle in
areas where the hot exhaust system may
come in contact with dry grass, brush,
fue l spill or other material wh ich can
cause a fire .
- Do not app ly additional undercoating or
rustp roofing on or near the exhaust
manifold, exhaust pipes, catalytic con
verter or heat shields. Dur ing driv ing, the
substance used fo r under coating could
overhe at and cause a fire.
((0 Note
-Be aware that just one tank filling with
leaded fuel w ill alr eady ser iously de
grade the performance of the catalytic
converte r.
- Do not exceed t he cor rect engine oil level
¢page 200.
-Do not dr ive until t he fuel tank becomes
completely empty. The engine cou ld mis
fire. Unburned fuel could also get in to
the exhaust system and th is co uld cause
t he catalytic converter to overheat .
- Do not tu rn off the igni tion while the ve
hicle is mov ing.
- Do not continue to ope rate your veh icle
under these conditions, as ot herwise fuel
can reach the catalytic converter. This
cou ld resu lt in overheating of the con
verter, requir ing its replacement.
- To assu re efficient operation of the Emis -
sion Control System : ..,.
Page 189 of 280

(D Note
- Never use chemical solvents (e.g . lighter
flu id, turpentine), waxes, shoe polish or
s imilar products on Alcantara ® surfaces.
- To avoid damage, have stubborn stains
removed by a commercia l cleaning spe
cialist.
- Do not use brushes, stiff sponges or sim
ilarly abrasive cleaning aids.
Safety belts
Only well-maintained safety belts work relia
bly when needed.
.. Keep belts clean .
.. For cleaning, use a mi ld soap and water sol
ution . Let be lts dry thoroughly and away
from direct sunlight.
.,. Do not allow inertia reel safety belts to re
tract before they are completely dry.
.,. Check the condition of your safety belts
reg
ularly .
Heavily soiled safety belts may not retract
properly .
A WARNING
Damaged safety belts can break in a crash.
- Anything that might damage your safety
belts could mean that you and your pas
sengers wou ld not be adequately pro
tected in an acc ident.
- Safety belt performance depends on cor
rect installation. Never remove belts
from the vehicle to clean them.
- Do not use chemical cleaning agents,
bleach o r dyes. They have corros ive prop
erties whi ch weaken the webbing.
- When cleaning your safety belts, inspect
them for damage.
If you discover dam
age, see your a uthorized Audi dea ler.
- Always read and heed all WARN INGS and
other information
Q page 178.
l ) Use o nly the correct cleaning sol utions. Neve r use gas
oline or d iese l fuel.
Cleaning and protec tion
Engine compartment
Be especially careful when cleaning the en
gine compartment.
A lw ays switch o ff the ign it ion before cle an
i ng the eng ine
c> ,& .
Plenum pan el
Remove leaves from the plenum panel in front
of the windshield under the engine hood. This
prevents the water drain holes from becoming
blocked, and it prevents debris from enter ing
the vehicle interior through the heating and
vent ilat ion ducts.
Co rro sio n protect ion
The engine compartment and transmission
have been corrosion-protected at the factory.
Good anti -corrosion treatment is very impor
tant, partic ularly in the winter.
If the vehicle
is frequently driven on salt treated roads, the
entire engine compartment and p lenum panel
should be thoroughly cleaned at the end of
winter and retreated to prevent salt damage.
At the same time, the underside of the vehicle
shou ld be washed as well.
If the engine compartment is cleaned at any
time with grease remov ing solutions
1> , or if
you have the engine washed, the anti-corro
s ion treatment is almost always removed as
well.
It i s therefo re essentia l to have a long
lasti ng cor rosion pro tect ion reapplied to all
surfaces, seams, joints and components in the
engine compartment .
A WARNING
Be aware: The engine compartment of any
motor vehicle is a potentially hazardous
area.
- Before work ing in the engine compart
ment, be sure to read the information
c>page 194.
- Before reaching into the front plenum
panel, a lways remove the ignit ion key.
187
•
•
Page 193 of 280
Winter operation
At temperatures below 20° F (-7° C), Diesel
fuel No.
2 loses its fluidity due to wax separa
tion, which may clog the fuel filter or tank fil
ter and keep the engine from running .
To help the filter from being clogged by wax,
the fuel filter in your vehicle is automatically
preheated. Preheating the fuel filter makes
operation of your vehicle possible with Diesel
fuel No . 2 down to -10° F (-24° C).
If you expect temperatures below
5° F
(-15° C)
ask your fuel dealer whether their
Diese l fuel No.
2 is sufficiently winterized for
the prevailing and expected temperatures.
If not winterized or insufficiently winterized
d iesel fue l has already thickened to the extent
that the engine will not start, warm the vehi
cle up by leaving it in a heated garage.
It is normal that the engine noise leve l (die
seling) is louder during the warm-up period in
winter.
It is also norma l when whitish-blue
smoke comes out of the tailpipe after start ing
and during warm-up . The amount of smoke
depends on the outs ide temperature.
Do not let your diesel engine idle unnecessari
ly after a cold start. Driving off slowly will
shorten the warm-up period .
A WARNING
-Never use "starting assist fluids." They
may be potent ially explosive or cause a
"run-away" engine condition. This could
result in serious engine damage and per
sonal injury.
- Never use fuel line anti-freeze offered for
gasoline engines .
0 Note
- Your diesel engine has been specifically
designed to operate only on Ultra Low
Sulfur Diesel fuel. Therefore, never use
home heating oil or regular gasol ine. Th e
properties of these fuels may cause seri
ous damage to the fuel injection system
and to the engine. Using these fuels can
-
Fuel supply and filling your fuel tank 191
cause expensive engine repai rs and will
also adversely affect your New Vehicle
Limited Warranty.
- If diesel fuel should get on any rubber
hose, it must be wiped off immediately.
Then wash the contaminated hose por
tion with soap and warm water. Do not
allow diesel fuel to remain on connecting
hoses. They may develop leaks and cause
ser ious damage.
Fuel tank
Fuel filler neck
The fuel filler neck is located on the right rear
side panel behind the fuel filler flap.
If the power locking system should fail, you
can still open the flap manually -for detailed
instructions see
¢ page 193.
You can find the fuel tank capacity of your ve
hicle in
Technical Data ¢page 257 .
The labe l on the inside of the fuel fi ller flap
tells you the correct fuel for your vehicle. For
more information about fuel specifications,
see
¢ page 189.
Your vehicle fuel tank has an on-board refuel
ling vapor recovery system. This feature helps
to prevent fuel vapors from escaping from the
tank and polluting the environment while you refue l your vehicle. In order to fi ll the tank
properly while protecting the environment,
please follow this refueling procedure careful
ly.
A WARNING
Under normal operating conditions, never
carry addit ional fuel conta iners in your car .
Gas canisters and other containers used to
transport fuel can be dangerous. Such con
tainers, full or empty, may leak and could
cause a fire in a collision. If you must
transport fuel to use for your lawn mower,
snow b lower, etc., be very careful and al
ways observe loca l and state laws regard
ing the use, transportation and storage of
such fuel containers. Make certain the
~
•
•
Page 205 of 280
luggage compartment. Make sure the
container is securely stored and mount
ed.
0 Note
-If you use engine oil that does not ex
pressly conform to Audi oil specification
VW 507 00, very serious and very expen
sive damage to your vehicle 's engine will
occur . Engine damage caused by using
the wrong engine oil is not covered by
your New Vehicle limited Warranty .
- Not all commercially available oils con
form to this very rigid Audi oil quality
standard even though they may be syn
thetic-based and have the same viscosi
ty.
Engine cooling system
Coolant
T he engine coolant performs two functions: it
keeps the engine from overheating and it pro
tects the engine from freezing in the winter.
The cooling system is sealed and generally re
quires little attention.
The cooling system has been filled at the fac
tory with a permanent coolant which does not need to be changed. The coolant consists of a
mixture of water and the manufacturer's gly
col-based coolant additive Gl2++ antifree ze
with anticorrosion additives (50% for USA models; 60% for Canadian models). This mix
ture both assures the necessary frost protec
tion and protects metal components in the
engine 's cooling system from corrosion and
scaling.
It also raises the boiling point of the
coolant.
Do not reduce the concentration of the cool
ant in the summer by adding plain water.
The
proportion of coolant additive must be at
least 50% but not more than 60%
to main
tain antifreeze protection and cooling efficien
cy. If the coolant frost protection is too low,
the coolant could freeze and damage the vehi
cle heating and engine cooling system.
Checking and filling 203
For year-round driving, antifreeze is added at
the factory for temperatures down to:
--31°F(-35°C)USA
- - 40 °F ( - 40 °C) Canada.
You can mix the Gl2 ++ coolan t additive with
other additives Gl2 + or Gl2. Always check
with your authorized Audi dealer .
A WARNING
-
Before you check anything in the engine
compartment, always read and heed all
WARNINGS~
& in Working in the engine
comportment on page 194.
(D Note
- Before winter sets in, have the coolant
checked to see if the coolant additive in
your vehicle is sufficient to meet the cli
mate conditions. This is especially impor
tant if you live in a region where the
win
ter is extremely cold. If necessary, in
crease the proportion of coolant additive
to 60% .
- When adding coolant additive to your
cooling system, remember :
- We recommend using only coolant ad
ditive G 12++ (check the label) for your
vehicle. This coolant additive is availa
ble at authorized Audi dealers. Other
types of antifreeze can significantly re
duce corrosion protection. The result
ing corrosion can cause a loss of cool
ant and serious engine damage.
- Do not add any type of radiator leak seal
ant to your vehicle's engine coolant.
Adding radiator repair fluid may adverse ly affect the function and performance of
your cooling system and could result in
damage not covered by your New Vehicle
Limited Warranty.
•
•
Page 206 of 280
204 Checking and filling
Checking the engine coolant level
The engine coolant level can be checked with
a quick glance .
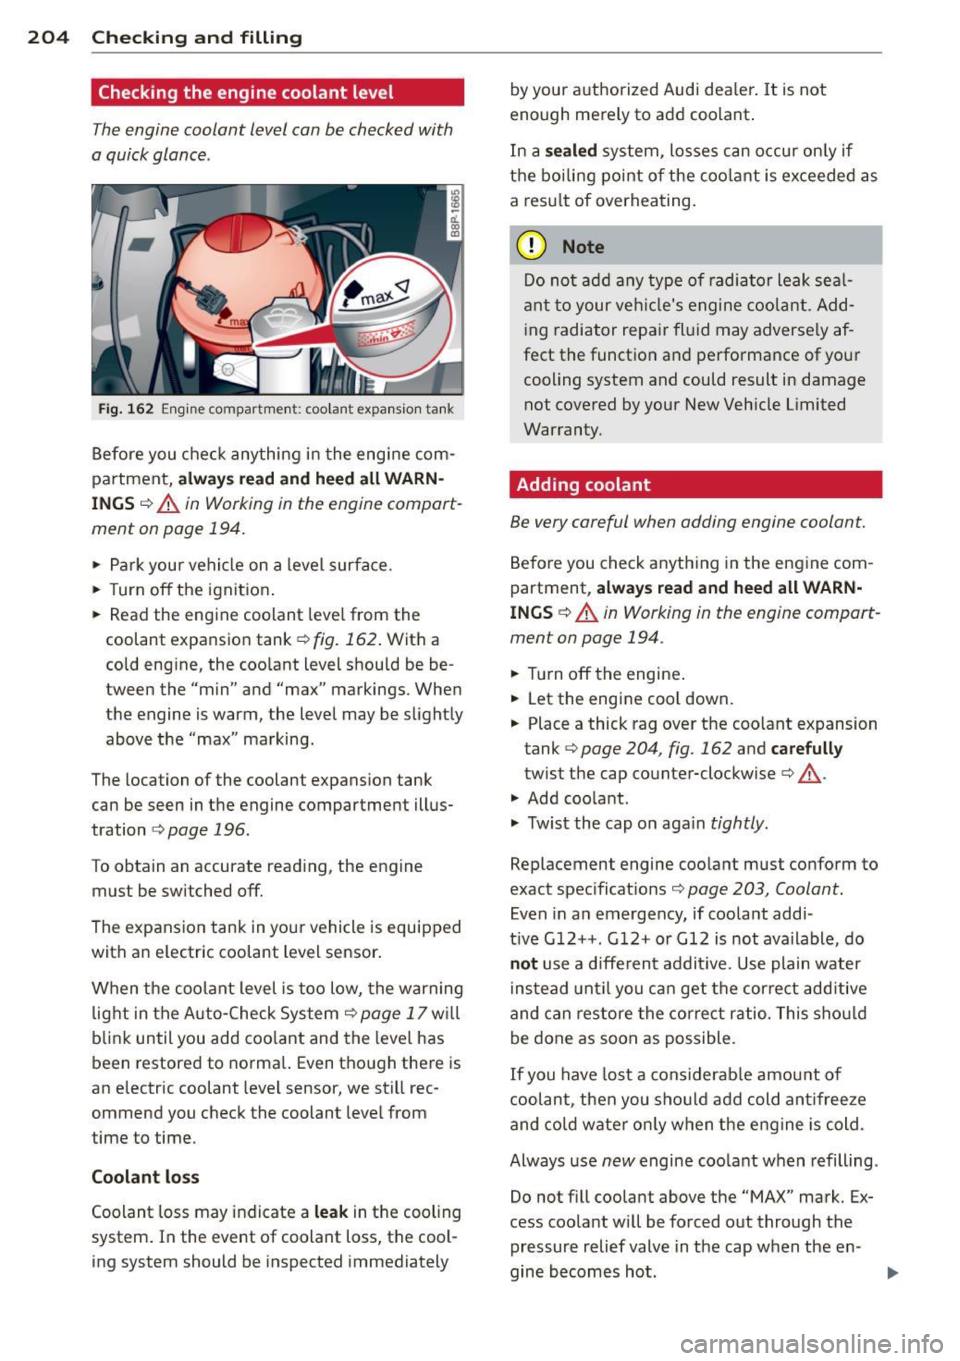
Fig. 162 Engine compartme nt: coo lant expansio n tank
Before you check anything i n the eng ine com
partment,
a lw ays rea d and h eed all WARN
ING S ¢&. in Working in the engine compart
ment on page 194.
.. Park your vehicle on a level surface.
.. Turn
off the ignit ion .
.. Read the eng ine coolant leve l from the
coolant expansion tank<=>
fig. 162 . With a
cold eng ine, the coo lant level should be be
tween the "min" and "max" markings . When
the engine is warm, the level may be slightly above the "max" marking.
The location of the coolant expansion tank
can be seen in the engine compartment illus
tration
i:> page 196.
To obtain an accurate read ing, the engine
must be switched
off.
The expansion tank in yo ur vehicle is equipped
with an e lectric coolant level sensor .
When the coolant level is too low, the warning light in the Auto -Check System
c> page 17 w ill
blink until you add coo lant and the level has
been restored to norma l. Even though there is
an electric coolant level sensor, we still rec
ommend you check the coolant level from
time to time.
Coolant lo ss
Coolant loss may indicate a le ak in the cooling
system . In the event of coolant loss, the cool
ing system should be inspected immediately by your authorized Audi dea
ler .
It is not
enough merely to add coolant .
In a
se aled system, losses can occur on ly if
the boiling point of the coo lant is exceeded as
a res ult of overheating.
(D Note
Do not ad d any type of radiator leak sea l
ant to your veh icle's engine coolant . Add
i ng radiator repair fl uid may adverse ly af
fect the funct ion and performance of your
cooling system and could result in damage not covered by your New Veh icle Limited
Warranty .
Adding coolant
Be very careful when adding engine coolant.
Before you check anything in the eng ine com
partment,
a lw ays re a d and heed all WARN
INGS c::> A in Working in the engine compart
ment on page 194 .
.. Turn off the engine .
.. Let the engine cool down.
.. Place a thick rag over the coolant expansion
tank
c::> page 204, fig . 162 and ca refull y
twist the cap counter-clockwise c::> A.
.. Add coo lant .
.. Twist the cap on aga in
tightly .
Replacement engine coolant must conform to
exact spec ificat ions
c::> page 203, Coolant.
Even in an emergency, if coolant addi-
t ive G12++ . G 12+ or G12 is not ava ilable, do
n ot use a d iffe rent addit ive. Use plain water
instead unt il you can get the correct add itive
and can restore the correct ratio. This shou ld
be done as soon as possible .
If you have lost a considerab le amou nt of
c oolant, then you sho uld add cold ant ifree ze
and co ld wate r on ly when the engine is cold.
Always use
new engine coo lant when refilling .
Do not f ill coolant above the
"MAX" mark. Ex
cess coolant will be forced out through the
pressure relief valve in the cap when the en -
gine becomes hot .
Iii>
Page 248 of 280
246 Fuses and bulbs
I
I
I
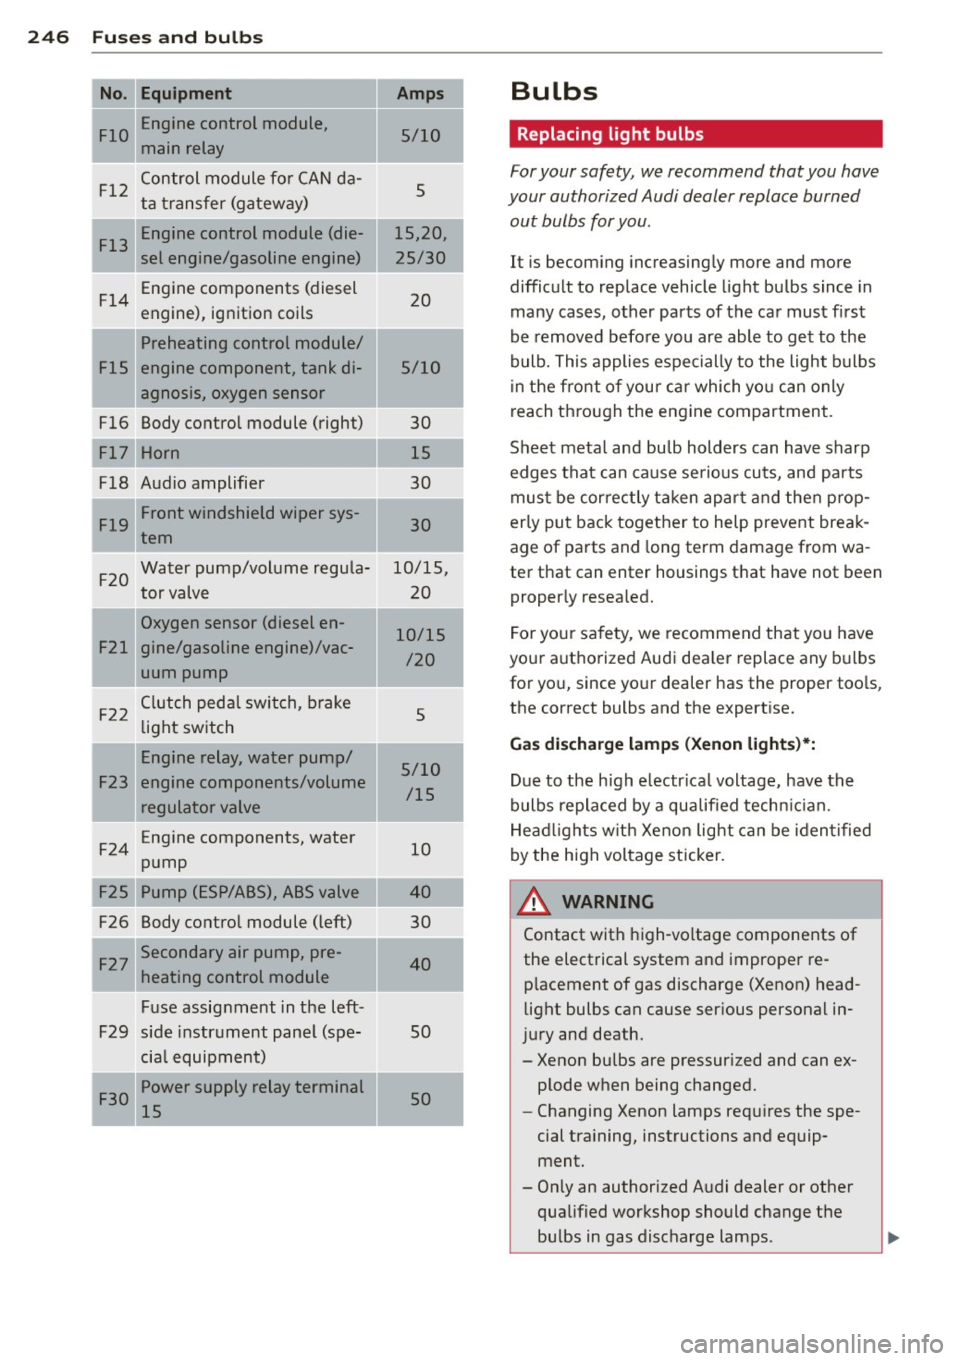
No. Equipment
FlO Engine control module,
main relay
Control module for CAN da
F12 ta transfer (gateway)
F13 Engine control module (die
sel engine/gasoline engine)
Fl 4 Engine components (diesel
engine), ignition coils
FlS
F16
F17
F18 Preheating control module/
engine component, tank di
agnosis, oxygen sensor
Body control module (right)
Horn
Audio amplifier
Flg Front windshield wiper sys
tem
F 2 0
Water pump/volume regula
tor valve
F22
F23
F24
F25
F26 Oxygen sensor (diesel en
gine/gasoline engine)/vac
uum pump
C
lutch pedal switch, brake
light switch
Engine relay, water pump/
engine components/volume regulator valve
Eng ine components, water
pump
Pump (ESP/ABS), ABS valve
Body control module (left)
-Amps
5/10
5
15,20,
25/30
20
5/10 30 15
--30
30
10/15, 20
10/15 /20
5
5/10
/15
10
40
-·-- --·-
30
40
F27 Secondary
air pump, pre-
heating control module
__ , ..
F29 Fuse assignment in the left
side instrument pane l (spe-
cia l equipment)
Power supply relay terminal
15 so
so
Bulbs
Replacing light bulbs
For your safety, we recommend that you have
your authorized Audi dealer replace burned
out bulbs for you.
It is becoming increasingly more and more
difficult to replace vehicle light bulbs since in
many cases, other parts of the car must first
be removed before you are able to get to the
bulb. This applies especially to the light bulbs
in the front of your ca r which you can only
reach through the engine compartment.
Sheet metal and bulb holders can have sharp
edges that can cause serious cuts, and parts
must be cor rectly taken apart and then prop
erly put back together to help prevent break
age of parts and long term damage from wa
ter that can enter housings that have not been
properly re sea led.
For your safety, we recommend that you have
your authorized Audi dea ler replace any bulbs
for you, since your dealer has the proper tools,
the correct bulbs and the expertise.
Gas discharge lamp s (Xenon lights)*:
Due to the high e lectr ica l voltage, have the
bulbs replaced by a qualified techn ic ian.
Head lights with Xenon light can be identified
by the high voltage sticker.
_& WARNING ~
Contact with high-vo ltage components of
the electrical system and improper re
placement of gas discharge (Xenon) head
light bulbs can cause serious personal in
jury and death.
- Xenon bulbs are pressur ized and can ex
plode when being changed.
- Changing Xenon lamps requires the spe
cial tra ining, instructions and equip
ment.
- On ly an authorized Audi dealer or other
qualified workshop should change the bulbs in gas discharge lamps .
Page 252 of 280

250 Emergency sit uat ions
2. Otherwise apply the hand brake and shift
into idle gear if your vehicle has manua l
transmission, and put the selector lever
into P position if your vehicle has auto
matic transmission.
3 . For both vehicles switch off all consumers
and the ig nition .
Connectin g/disco nn ecting th e jumper
cable
4 . Connect one end of the red jumper cable
to the positive term inal
(D ¢ fig . 193 of
the discharged battery @ ¢0
in General
information of starting assistance on
page 249 .
5. Connect the other end of the red jumper
cab le to the positive termina l@ of the
booster battery @.
6 . Connect one end of the black jumper ca
b le, preferably at the ground point. Other
wise, connect it to the negative terminal
@ of the booster battery @.
7 . Connect the other end of the black jumper
cab le to the
ground po int (bolt head )©
in your v ehi cle @ .
8. Route the jumper cables so that they can
not catch in any rotating parts in the en
gine compartment.
Starting the engine
9 . Start the engine of the vehicle provid ing
assistance and allow it to run at idle .
10. Now start the eng ine o f the vehicle w ith
the discharged battery, wa it for two to
three minutes unti l the engine "runs"
smoothly .
11. If the engine does not start: Stop trying
after
10 seconds and then try again after
about
30 seconds.
12 . In the veh icle that has received start as
sistance, turn on the heater blower and
the rea r window heat ing to eliminate any
voltage peaks when disconnecting. Driv
ing lights must be swi tched off!
13. Disconnect the cable whi le the engine is
running exact ly in
reverse order to that
described in¢
page 250, Connecting/dis
connecting the jumper cable.
When do ing so, make sure that the cable cannot con
tact rotating engine parts.
14. Turn the heater b lower and the rear w in-
dow heating off again .
The battery is vented to the outside to prevent gases from entering the vehicle interior .
Make sure that the jumper clamps are we ll
connected with thei r
metal ports in full con
tact
with the battery terminals .
A WARNING
To avoid serious personal injury and dam
age to the vehicle, heed all warnings and
instructions of the jumper cable manufac
turer. If in doubt, call for road service.
- Jumper cables must be long enough so
that the veh icles do not touch.
- When connecting jumper cables, make sure that they cannot get caught in any
mov ing parts in the engine compart
ment.
- Before you check anything in the engine
compartment, always read and heed all
WARNINGS ¢page 187, Engine com
partment.
{CT) Note
Improperly connected jumper cab les can
damage or destroy the generator .
- Do not use the battery negative terminal
for jump start ing or a malfunct ion could
occur in the vehicle electrical system.
- Always connect POSITIVE(+) to POSI-
TIVE(+), and NEGATIVE(-) to NEGATIVE
( - ) term inal.
- Check that all screw p lugs on the battery
cells are screwed in firm ly . If not, tighten
plugs prior to connecting clamp on nega
tive batte ry term inal.
- Please note that the procedure for con
necting a jumper cable as described
above applies specifically to t he case of
your vehicle being jump st arted. When
yo u are g iving a jump sta rt to another ve
hicle, do
not connect the minus( -) cable
to the minus (-) terminal on the dis
charged battery@¢fig.193 . Instead,
Page 270 of 280

268 Index
Eme rgency towing ......... .. .. .... . 251
E ne rgy management ........... .. ... 167
Ba ttery power ........... .... .. .. . 168
Dr iver notific ation ...... .. .. .. .. .. . 16 8
Eng ine
4-cylinder diesel (140 hp) ....... .... 197
4-cyl ind er g asoline (200 hp) .. .. .. ... 196
Coolant .. ... ............ .. .. .. .. . 203
H ood .. ...... ........... .. .. .... . 194
Pr ehea ter . . . . . . . . . . . . . . . . . . . . . . . . . 86
Start ing . . . . . . . . . . . . . . . . . . . . . . 89, 90
Starting with j umper cab les . ..... .. . 248
Stopping . . . . . . . . . . . . . . . . . . . . . . . . . . 91
E ng ine compartmen t ................ 196
Safety instruc tions .......... .. .... . 194
Working in the engine compar tment .. 194
Eng ine coolant system ........... .... 203
Adding coo lant ............ ... .. .. . 204
Chec king coolan t leve l ..... .. .. .... . 204
Che cking the eng ine coolant leve l ..... 204
M alfunct ion . . . . . . . . . . . . . . . . . . . . . . . 17
Radiator fan . .. .. ..... ... .. .. .... . 205
E ng ine coolant temperature
Gauge ... .. ................ ... .. .. 11
Eng ine data .. ............... ...... . 257
Engine fault Warning light .. .. ..... ... .. .. .... .. 20
E ng ine hood
C lo sing .. .. ............. .. .. .. .. . 194
Release lever . ........... .... .... . 194
Releasing and open ing . ... .. ... ... . 194
Eng ine malfunction (diesel engine)
War ning light ............ .. .. .... .. 20
Eng ine oil . ............... .. .. .... . 197
Adding .. .. ............... .... .. . 200
Addit ives . .. ................ ... ... 200
C hanging .. ... .... ...... ... ... .. . 20 1
Chec king the eng ine o il level .. .. .. .. . 200
Di ese l eng ine ............ .. .. .... . 20 2
I ndications and con ditions req uiring ex-
tra check ing . .. .. ..... ... .. .. .... . 200
Oil consumption .. ..... ... .. .. .... . 199
Oi l grades . .... . ...... ... .. .. .... . 197
Recommended oil check intervals ..... 200
Specification and viscos ity .... .. .... . 197
Specifications Diesel engine .. .... ... 202
Specifications gasoline engine .. .. ... 197
Tempe ratu re d isplay ...... .. .. .. .. . . 31 E
ngine oi l leve l . . . . . . . . . . . . . . . . . . . . . . 20
E ngine o il pressu re (malfunction) ....... 16
Engine oil sensor defective ............ 20
En gine preheate r .................... 86
C onnect ing . ..... .. ... ..... ... .. .. . 86
E ngine speed limitation . . . . . . . . . . . . . . . 20
Environment Break-in per iod . .. ............. .... 169
Catalytic converter ............. .... 170
Diesel particulate f ilter ............ . 171
D ispos ing of your veh icle battery ... .. 210
D riv ing at high speeds .............. 172
D riving to minimize pollution and noise 171
F uel ............................. 192
F uel economy . . . . . . . . . . . . . . . . . . . . . 171
Leaks under your vehicle ..... ... .. .. 194
Letting the vehicle stand and warm up . 172
Proper d isposal of drained bra ke fluid . 206
Proper disposal of drained eng ine cool-
ant ............................. 204
Proper d isposal of drained eng ine
o il . . . . . . . . . . . . . . . . . . . . . . . . . 200, 201
Recycling used engine oil ............ 200
U nleaded fuel . ... ................ . 189
Wha t shou ld I do w ith an o ld b att ery? . 210
EPC
refer to E lect ron ic power co ntrol ... .. . 19
Event Data Recorder (EDR) ........ .... 161
E xh aus t tai l pipes
Cleaning .. .... .. ............. .... 183
Expansion tank .. .. ................ . 204
Exterior mirrors Adjusting . . . . . . . . . . . . . . . . . . . . . . . . . 53
Dimming .......................... 54
Heating ........................... 53
F
Fahrenheit
Switching between Fa hrenhe it and Centi-
grade ....... .... .... ........... .. 83
F an
Adjusting the fan speed ...... .... . .. . 83
Climate controls ............... .. .. . 83
Radiator ......................... 205
Page 272 of 280
270 Index
Heated
exterior mirrors . . . . . . . . . . . . . . . . . . . . 53
rear w indow . . . . . . . . . . . . . . . . . . . . . . . 85
H eated washe r jets
W iper and washer system .. .. .. .... .. 55
H eavy clothing and safety belts .... .... 116
High beam ... ... . ...... ... .. .. .. 47, SO
H igh voltage warn ing label .. .. .. .... . 255
H ill Descen t A ss ist .. ........... .. .. .. 99
H ill hold assist
Starting on hills .. ..... ... .. .. .... .. 92
hood
refer to Engine hood .. .... .. .. .... . 194 Installing the upper te
ther st rap on the
anchorage . ..... .. .. ... .. ..... ... .. 159
Instrument pane l
Illum ina tion ... .. ....... ..... ... .. . 49
Instrument panel and controls .. .. .. .. . 10
Inst ruments and controls
Gen era l illustration . . . . . . . . . . . . . . . . . . 8
Interior light
Re ar . .. .. .. .. .. .. ....... ...... .. . 52
Interior light s . . . . . . . . . . . . . . . . . . . . . . . S 1
Amb ient lig hti ng . . . . . . . . . . . . . . . . . . . 52
luggage compartment . . . . . . . . . . . . . . 53
H ood re le as e ... ... ..... ..... .. .. .. . 194
J
Horn ..... .. ... .. ..... ... .. .. .... .. . 8
H ow are child restra int system anchors re-
l ated to child safety . ....... .. .. .. .. . 155
H ow m any airb ags doe s my veh icle h ave? 129
H ow often sho uld I check my tire pres -
su res? .... .. ... .. ..... ... .. .. .... . 219
H ow safety belt pretensione rs wo rk . .. . 120
Hydroplaning .. .... .... ..... .. .. .. . 223
I
Ignit ion key . . . . . . . . . . . . . . . . . . . . . . . . . 89
I gnition lock . . . . . . . . . . . . . . . . . . . . . . . . 89
Ign ition lock po sit ions . . . . . . . . . . . . . . . . 89
I mmobilizer .... .. ..... ... .. .. .... .. 1 2
I mportant informat ion for veh icles w ith
D iese l eng ine when add ing o r changing en -
g ine oi l ... .. .... .. .. ... .. .. .. .. .. . 20 2
Important thing s to do before driving .. 103
I mproperly worn safety be lts ... .. .... . 119
I ndicator light
A irbag sys tem .... .... .... ... .. .. . 133
Audi magnetic ride ........ .. .. .... .. 2 2
C lutch ove rheating ... ... .. .. .. .. .. . 10 1
P ASSENGER A IR BAG OFF . ... .. .... . 133
Indicator lights . . . . . . . . . . . . . . . . . . 10, 13
Red symbol s in the center d isp lay .. .... 13
Yellow symbols in the cen ter disp lay . .. 14
also refer to Warn ing/ indicator lights . . 13
Infant seats ................... .... 148
Install ing chi ld safety s eats
Safety belts . . . . . . . . . . . . . . . . . . . . . . 1S2 Jack and tools
Jump-starting
234
248
Jumper cables . .. .. ... .. .. .. .. .. .. .. 249
Jump s ta rt ing . .. .. .... ... .. .. .. .. .. 249
K
Key ... .. ... .. .. .. .. .... .. .... ... .. . 34
Batte ry replacement .... ....... .... . 35
Coded se ttings . ...... ... .. .. .. .. .. . 84
Co nvenience openi ng and clos ing of win -
dows . ....... ... .................. 44
Key r eplacement . . . . . . . . . . . . . . . . . . . 34
Master key . . . . . . . . . . . . . . . . . . . . . . . . 34
Vale t key . . . . . . . . . . . . . . . . . . . . . . . . . . 34
Key-coded settings Climate co ntrols . . . . . . . . . . . . . . . . . . . . 84
Kick-down Automat ic transmiss ion . ....... .... 101
L
LATCH ... .. .... .. ... .. ..... .... . .. 155
D esc ription . ..... .. ... ..... ... .. .. 156
I ns talling a c hild re stra int ....... .... 157
location .. .. .. .. ....... ..... ..... 156
Mounting and releasing the anchorage
hook ........ ... ................ . 157
La unch Control Prog ram . ..... ... .. .. 101
L eathe r . . . . . . . . . . . . . . . . . . . . . . . . . . . 185
Cleaning .. .. .. .. ....... ...... .. .. 186
leav ing home ... .. ... .. .. ... ..... .. . 48
Lifting/raisi ng the vehicle ..... ... .. .. 252