tow AUDI A3 2012 Owner´s Manual
[x] Cancel search | Manufacturer: AUDI, Model Year: 2012, Model line: A3, Model: AUDI A3 2012Pages: 280, PDF Size: 70.11 MB
Page 73 of 280
¢ fig. 81 -Arrow-and tilt the pass-through
forward.
~ Remove the sack from the luggage com
partment and unfold it.
~ Place the empty sack in the hatch so that
the end with the zip fastener is in the lug
gage compartment .
~ Load objects from the luggage compart
ment into the ski sack.
Securing
~ Insert the ski sack strap¢ fig. 82@ into
the center seat belt buckle @.
~ With skiing items, place the strap in the
middle between the bindings ¢,&. .
~ Pull the loose end of the strap tight in the
direction of the arrow.
Opening the safety strap buckle
~ Take the long sides of safety strap buckle
between thumb and forefinger¢
fig. 82 @ .
~ Squeeze the buckle and pull it away from
the cargo.
Stowing
~ Raise the pass-through until it is securely
latched. It is secu re when you can no longer
see the red mark on the latch in the luggage
compartment .
~ Carefully fold up the empty (dry) ski sack.
~ Stow the ski sack in the lu ggage compart
ment so that it cannot slide around .
A WARNING
-After loading, the ski sack must be se
cured with the strap.
- The safety strap must fit tightly around
the cargo.
- Make certain that the safety strap lies in
the middle between the bindings of the
ski equipment (refer also to printed mes
sage on the ski sack).
(D Tips
- Place skis with the tips pointing forward,
snowboards and ski poles with tip to the
rear in the ski sack.
Seats and storage 71
-If there are several pai rs of skis in the sk i
sack, make certain that the bindings are
at the same level.
- Be sure not to fold up or sto re the sack
when it is still damp.
Roof rack* installation
First things first
A roof rack can be used to carry additional
luggage on the roof There are two different
roof rack systems .
Separate roof racks are needed for vehicles
without roof rails . Vehicles with standard roof
rails* need add itional cross bars to carry car
go . Both types of add itiona l equipment are
available at your authorized Audi dealer.
~ Always read and follow the instructions pro
vided by the roof rack manufacturer when
the roof rack system must be installed.
If a roof rack or s imilar luggage carrying
equipment is to be installed, please note the
fo llow ing :
Vehicles without roof rails
- Your vehicle has aerodynam ic rain gutters
molded into the roof. That is why only roof
racks specially designed for the roof can be
used . We recommend using roof racks from
the Audi original accessories program .
- These roof racks are the basis for a complete
roof rack system . For safety reasons, some
additional attachments are necessary to
transport luggage, bicycles , surf boards,
skis and small boats safely. A ll these com
ponents are available at your authorized Au
di dea ler .
Vehicle with roof rails
-The vehicle is equipped with integrated roof
railings,
which can be covered into roof rack
by ins tal ling c ross bars . Only install cross
bars specifica lly designed for this vehicle.
- These bars are the basis for a complete roof
rack system . Additional attachments are ..,.
Page 90 of 280
88 On the road
On the road
Steering
Adjustable steering wheel
The height and reach of the steering wheel
can be adjusted .
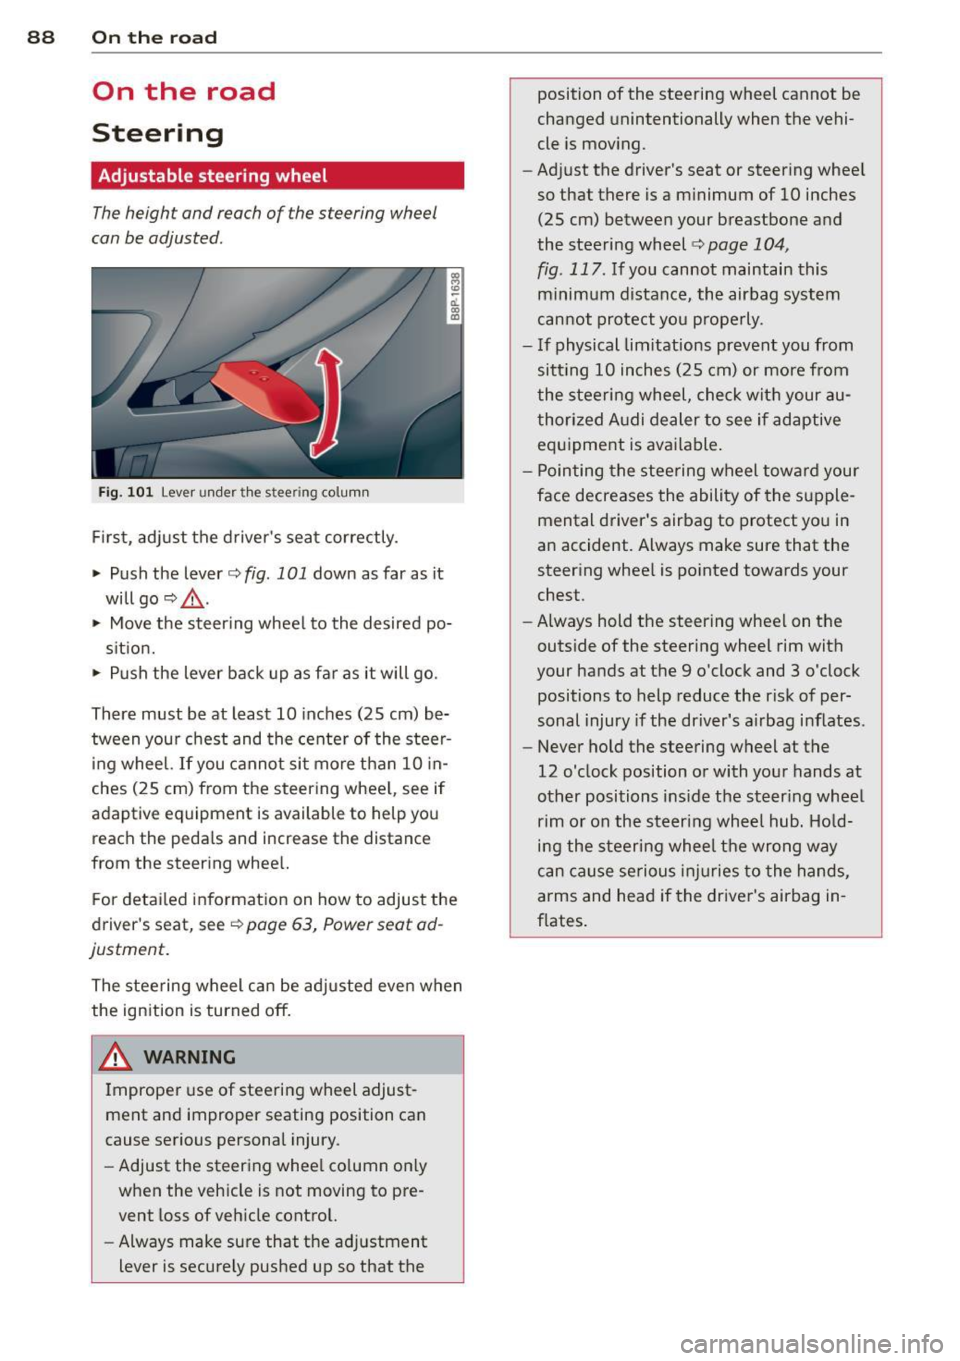
Fig. 101 Lever under the steering column
First, adjust the driver's seat correctly.
• Push the lever
c:> fig . 101 down as far as it
will go
c:> & .
• Move the steer ing whee l to the desired po-
s it ion.
• Push the lever back up as far as it will go.
There must be at least 10 inches (25 cm) be tween your chest and the center of the steer
i ng wheel. If you cannot si t more than 10 in
ches (25 cm) from the steering whee l, see if
adaptive equipment is available to help you
reach the pedals and increase the distance
from the steering whee l.
F or detai led information on how to adjust the
driver's seat, see
c:> page 63, Power seat ad
justment.
The stee ring wheel can be adjusted even when
the ignition is turned off.
8_ WARNING
Improper use of steering wheel adjust
ment and improper seating position can
cause serious personal injury .
- Adjust the steering whee l co lumn on ly
when the vehicle is not moving to pre
vent loss of veh icle control.
- Always make sure that the ad justment
lever is securely pushed up so that the
-
position of the steering wheel cannot be
changed unintentionally when the vehi
cle is mov ing.
- Adj ust the driver's seat or steering whee l
so that there is a minimum of 10 inches
(25 cm) between your breastbone and
the steering wheel
c:> page 104,
fig. 117.
If you cannot maintain this
minim um distance, the airbag system
cannot protect you properly.
- If physical limitations prevent you from sitt ing 10 inches (25 cm) or more from
the steering wheel, check wit h your au
thorized A udi dealer to see if adaptive
equipment is available .
- Pointing the steering wheel toward your
face decreases the ability of the s upple
mental driver's airbag to protect you in
an accident. Always make sure that the
steer ing whee l is po inted towards your
chest.
- Always hold the steering wheel on the
outside of the steering wheel rim with
your hands at the 9 o'clock and 3 o'clock
positions to help reduce the risk of per
sonal injury if the driver's a irbag inflates .
- Never hold the steering wheel at the
12 o'clock position or with your hands at
other positions inside the steer ing wheel
rim or on the steering wheel hub. Ho ld
ing the steering whee l the wrong way
can cause se rious inj uries to the hands,
arms and head if the driver's airbag in
f lates .
Page 92 of 280

90 On the road
Starting and stopping
the engine
Starting the engine
The engine can only be started with your orig
inal Audi key.
Fig. 10 3 Igni tio n key pos itio ns
Vehicles with a gasoline eng ine:
.. Move the selector lever to the neut ral posi
t ion (a utomatic transmission): se lector lever
in Por
N) c> .&_ .
.. On vehicles with manual transmission, fully
depress t he clu tch pedal.
.,. Turn the ig nition key to position @
¢ page 89, fig. 102 -do not d epress th e gas
peda l when start ing the e ngine!
.. Let go of the key as soon as the eng ine
s tar ts.
Vehicles with a diesel engine:
.. Set the parking bra ke .
.. Move t he sele cto r lever to the neut ral posi
t ion (a utomat ic tr ansm iss ion): se lecto r lever
i n
P or N) c> .&_ .
.. On vehicles wi th m anu al transm is s ion, fully
depress the clutch pedal.
.. Turn the ignition key to position
(D
¢ fig . 103 . The glow plug warning light II
lights up while the glow plugs are warming
up .
.. When the warning light goes out, tur n the
i gnition key to posi tion @to s tart the en
gine
c> page 89, fig . 102 . Do no t depress t he
gas pedal when s tart ing the engine!
.. Let go of the key as soon as t he eng ine
sta rts . A cold engine may sound lo
ud after it has
been started . This is due to the hydraulic
valves b uilding up o il pressure. This is normal
and is not a need for co ncern .
If the engine does not start immediate ly, stop
t rying after 10 seconds and then try to restart
t h e engine about
30 seconds later.
Glow plug system*
Diesel engines are e quipped w ith a glow pl ug
system whose prehe ating time is co ntrolled
by the coo la nt an d ou tside temperature . Sta rt
the engine
immediately after the g low plug
i ndicator light
II switches off.
T he glow plug indica to r ligh t will only illumi
nate fo r approximate ly 1 second w hen t he en
gine is warm or the outside temperature is
higher than
46 °F (8 °(). That means yo u can
start the eng ine
immedia tely .
To start the diesel eng ine after the fuel
tank has been run dry
If the fuel tank was r un comp lete ly dry, the
starting process after refue ling with diesel
fuel can take longer than usua l - up to one mi
nute . This is because the fue l system first has
to be vented of a ir wh ile s tarting .
A WARNING
-Neve r sta rt or l et the eng in e r un in a con-
fi ned o r encl ose d area. Exhaus t fumes
fr om the e ngine co ntain ca rbo n m onoxide ,
a colorless and odorless g as. Ca rbon mo n
oxi de can be fatal if inhaled .
- N ever le ave the engi ne id ling una tten d
ed . An unat tende d veh icle w ith a run ning
e ng ine poses a dan ger of personal injury
or theft .
(D Note
-Av oid high engine spee ds, fast a cceler a
t ion or heavy engine loa ds w hile the en
gine is st ill co ld. This could damage the
eng ine .
- The e ngine cannot be starte d by pushing
or towing t he vehicle . .,.
Page 94 of 280

92 On the road
On ly afte r th e ve hic le has come to com
plete stop, shou ld you f irm ly set t he park
ing b rake and either move the gea rshift
lever into 1st. gear (manual transm iss ion)
or move the selector lever into "P" (Auto
mat ic transm ission).
Parking
To prevent a parked vehicle from rolling
away, there are a few things you should do.
When you park your ve hicle, do the following:
• Stop the vehicle using the brake pedal.
• Set the parking brake firmly.
• Move the selector lever into the
P position
( automatic transmi ssion ) or move the gear
shift lever into 1st. gear
( manual t ransmi s
s ion )<=:> .&,. .
• Switch off the eng ine and remove the igni-
t ion key from the ignit ion lock.
What else you shou ld do when p ark ing
your vehicl e on an incline or decline
Turn the stee ring wheel so that if the vehicle
should start to ro ll, it will roll into the curb.
If you are parking on a
decl ine (the front of
your ve hicle facing downhill), turn the front
wheels to the right so that they point
toward
the curb .
If you are parking on an incline (the font of
your ve hicle facing up hill), turn the front
wheels to the left so that they po int
away
from the curb.
Move the selector lever into the P pos ition
( automatic transmiss ion ) or move the gear
sh ift lever into 1st . gear
(manua l tran smis
sion) .
A WARNING
This is how yo u can red uce the risk of i n
jury whe n leaving your veh icle.
- N ever park the v ehicle whe re it can come
in co ntac t wi th dry grass, sp illed f uel or
any ot her flammable m ater ials.
-
- Never a llow anyone -espec ially sma ll
children -to remain in the veh icle when
it is locked. Locked doors make it more
difficult for rescue rs to access t he pas
senger compartment in t he event of an
emergency . Danger to life!
- Never leave children unsuperv ised in the
veh icle. Children could release t he pa rk
i n g b rake or move the gearsh ift leve r out
of gear. The vehicle cou ld start to ro ll
a way an d ca use an acc ident.
- No matte r what the season is, the tem
pe rat ure in a par ked veh icle can reach
d angerous leve ls .
Starting on hills
App lies to vehicles : wi th hill ho ld assist
Hill hold assist makes it easier to start on
hills .
Requirement: The dr iver's door m ust be
cl osed, the seat bel t m ust be buckled and the
engine m ust be running.
The system is activated w hen the brake peda l
is dep ressed
for a few se cond s.
After releasing the brake pedal, the brake
power is held for a
brief moment to p revent
the ve hicl e from rolling back when starting. At
t hi s time, you ca n easi ly beg in to move your
vehicle.
A WARNING
= -
- If you di d no t begin moving immed iate ly
after releasing the brake pedal , under
certain ci rcumstances, the vehicle would
begin to ro ll backward. Depress the
brake peda l immediately or engage the
hand brake.
- Sh ould the engine sta ll, depress the
brake peda l immediately or engage the
hand brake .
- In order to prevent the vehicle from roll
i n g back unintentionally when starting in
stop-and-go traffic, keep the brake pedal
depressed fo r a few seconds before driv-
ing off.
Ii),
Page 97 of 280
Presetting your speed
You can preset your desired speed while the
vehicle is not moving .
.,. Turn on the ignition.
.,. Pull lever into position ©
c:> page 94,
fig . 105 .
"" Press the lever in the 0 or O direction to
increase or decrease yo ur speed .
.,. Re lease the lever to save that speed.
This function makes it possible, for example,
to save the speed you want before driving on
the highway . Once on the highway, activate
the cruise control by pulling the leve r toward
® ·
Switching the system off
Temporary deactivation
.,. Press the brake pedal, or
.,. Keep the clutch pedal pressed down
longer,
or
.,. Press the lever into pos ition @ (not clicked
into place)
c:> page 94, fig. 105, or
.,. Drive for longer than 5 minutes at more
than 5 mph (10 km/h) above the stored
speed.
Switching off completely
.,. Press lever into position@(clicked into
place), or
.,. Switch the ign ition off .
The system retains the saved speed if you de activate the cruise control temporarily. To re
sume the saved speed, release the brake or
clutch pedal and pull the lever to position
(D.
Switching the ignition off erases the saved
speed.
A WARNING
You should only return to the saved speed
if it is not too fast for the current traffic
conditions -risk of an accident!
On the road 95
Audi magnetic ride
Applies to vehicles: with magnetic ride
Damping can be adjusted to the driver's pref
erence and it adapts automatically to the cur
rent driving situation .
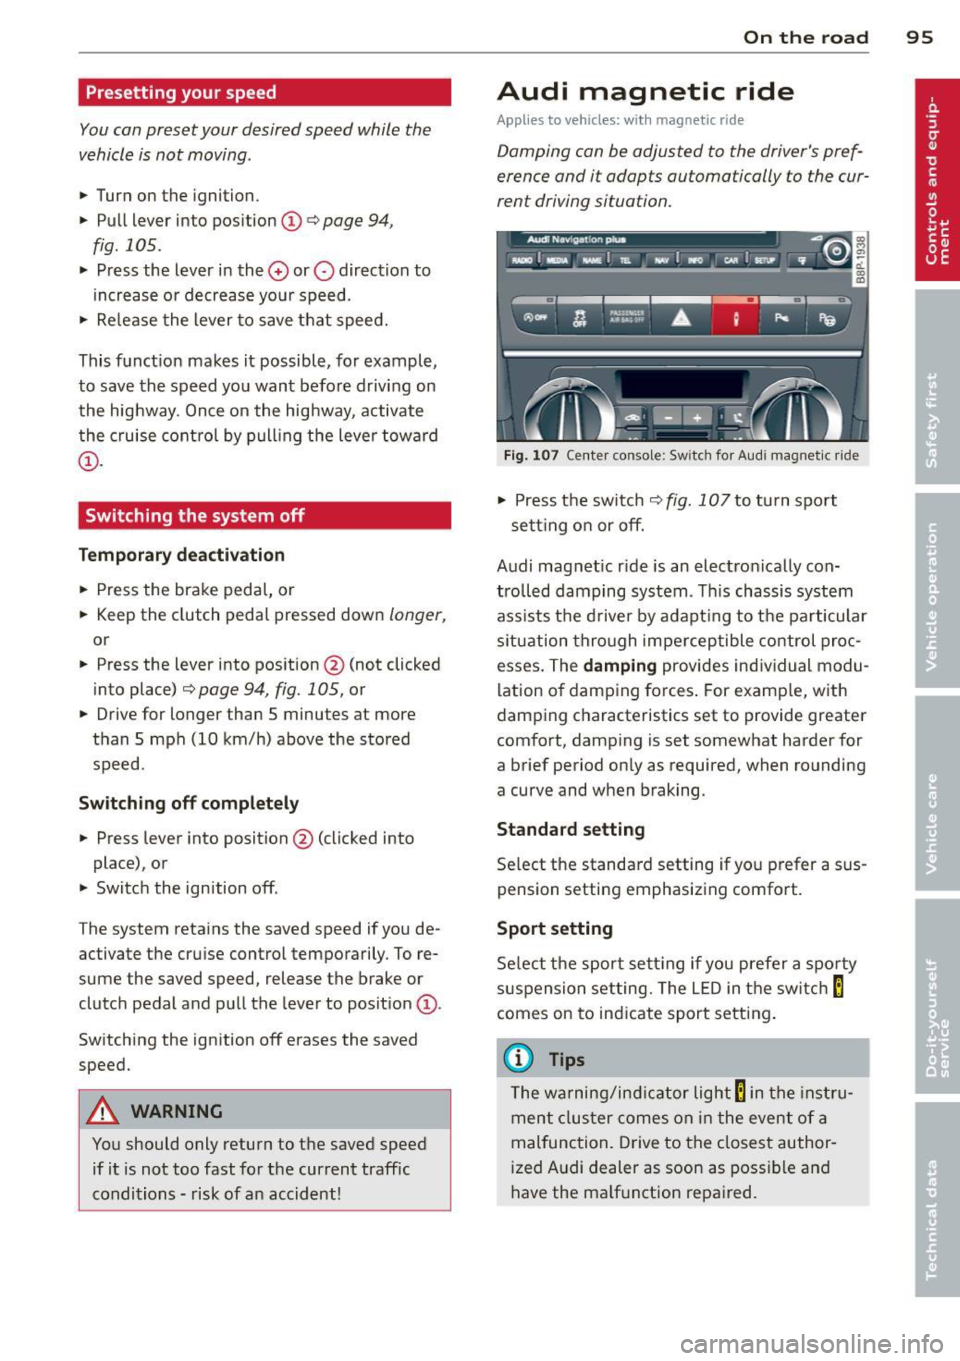
Fig. 107 Center console: Sw itch for Aud i magnet ic ride
.,. Press the switch c:> fig. 10 7 to turn sport
sett ing on or off.
Audi magnet ic r ide is an electronically con
trolled damping system . This chassis system
ass ists the driver by adapting to the particular
s ituat ion through imperceptible control proc
esses. The
damping provides individual modu
lation of damping forces. For example, with
damping characteristics set to provide greater
comfort, damping is set somewhat harder for
a brief period on ly as required, when rounding
a curve and when braking.
Standard setting
Select the standard setting if you prefer a sus
pension setting emphasizing comfort.
Sport setting
Select the sport setting if you prefer a sporty
suspension setting. The L ED in the switch
E
comes on to ind icate sport setting .
(D Tips
The warning/indicator light E in the instr u
ment cluster comes on in the event of a
malfunction. Drive to the closest author
i zed Audi dealer as soon as possible and
have the ma lfunction repa ired.
Page 102 of 280
100 Transmi ssion
& WARNING
Hill Descent Assist cannot overcome phys i
cal lim itations, so it may not be possible to
ma intain a constant vehicle speed under
all circumstances. Always be ready to ap
ply the b rakes.
tiptronic operation
Applies to vehicles: with S tronic®
Tiptronic allows the driver to shift gears man
ually .
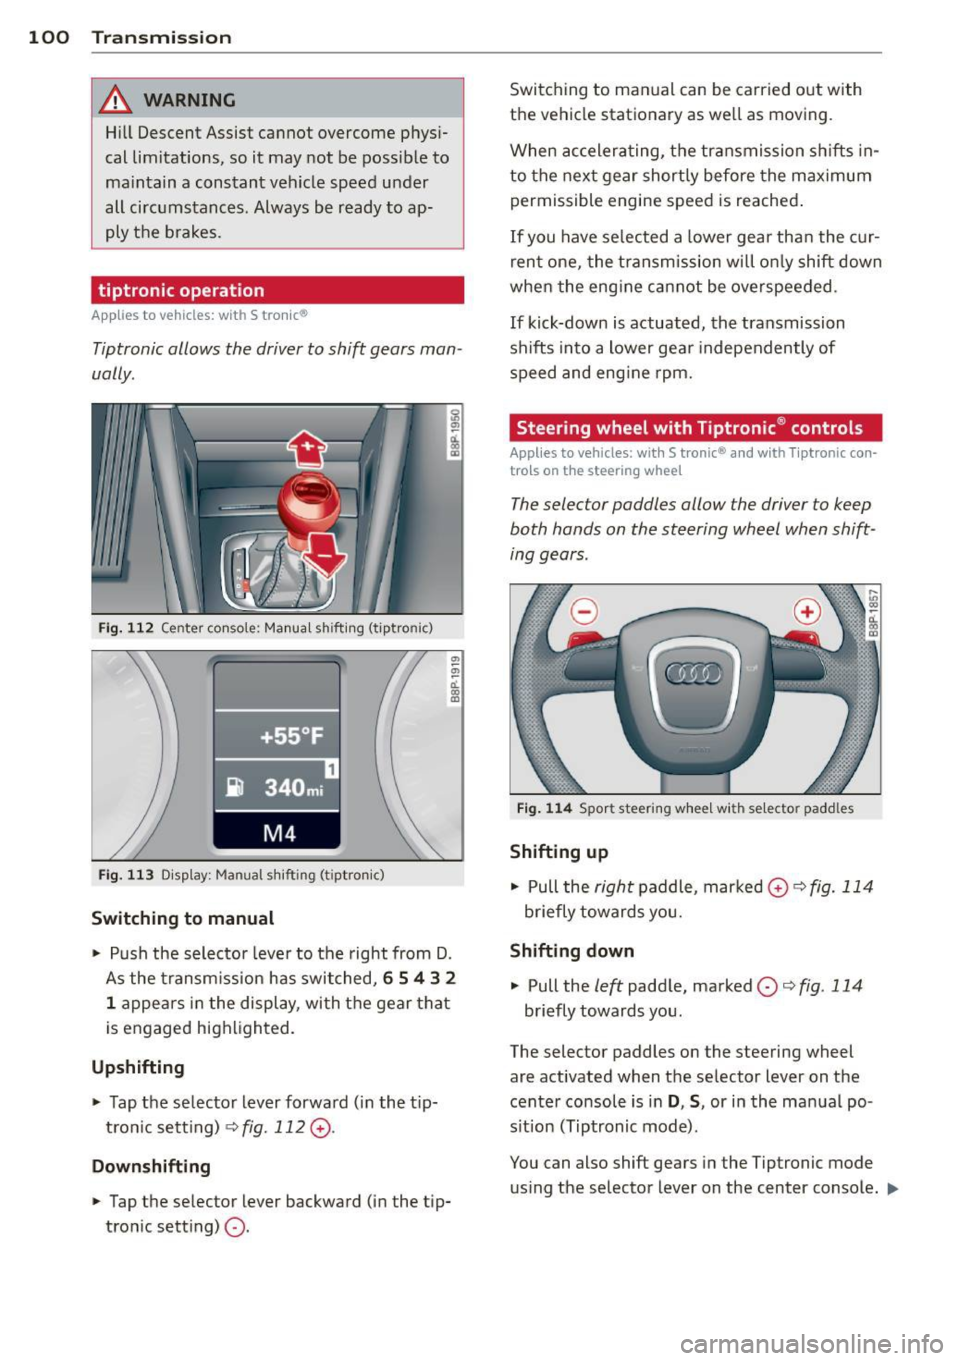
Fig. 112 Center console: Manua l shift ing (tiptronic)
Fig. 113 Disp lay: Manual shifting (t iptro nic)
Switching to manual
~
"' d. .. m
• Push the selector leve r to the right from D .
As the transm ission has switched,
6 5 4 3 2
1 appea rs in the display, with t he gear that
is engaged highlighted.
Upshifting
• Tap the selector lever forwa rd (in the t ip
t ron ic sett ing)
Q fig. 112 G).
Down shifting
• Tap the selector lever backward (in the t ip
tronic sett ing)
0 -
Switching to manual can be carried out with
the vehicle stationary as we ll as moving.
When accelera ting, the transmission sh ifts in
to the next gear shortly before the maximum
permissible engine speed is reached .
If you have selected a lower gear than the cur
ren t one, the t ransmission w ill on ly shift down
when the eng ine ca nnot be overspeeded.
If kick-down is actuated, the transmission
shifts into a lower gear independently of
speed and eng ine rpm.
Steering wheel with Tiptronic ® controls
Applies to vehicles: with 5 tronic® and with T iptronic con
trols on the steering wheel
The selector paddles allow the driver to keep
both hands on the steering wheel when shift
ing gears .
Fig . 1 14 Sport steering whee l w ith selector paddles
Shifting up
• Pull the right paddle, marked 0 ¢ fig. 114
briefly towards you.
Shifting down
• Pull the left padd le, marked 0 ¢ fig. 114
briefly towards you .
The selector paddles on the steering wheel
are activated when the selector lever on the
center console is in
D , S , or in the manual po
s ition (Tiptronic mode).
You can also shift gears in the Tiptronic mode
us ing the selector lever on the center console . ..,.
Page 104 of 280

102 Transmi ssion
the warning does not turn off, do not continue
driving . See your authorized Audi dealer or
qua lified repair fac ility for assistance. Other
wise serious transmission damage could re
sult. Once the indicator light has turned off,
drive to your authorized Audi dealer or quali
fied repair fac ility immediately to have t he
malfunction corrected.
Emergency release for selector lever
Appl ies to vehicles: with S tro nic®
If the vehicle's power supply fails, the selec
tor lever can be released in an emergency.
Fig. 115 Selector lever: Remove selector lever sleeve
Fig . 1 16 Selecto r lever : emerge ncy release from the
Park pos it io n
The emergency release mechanism is located
on the right front under the selector lever
shift gate. The release procedure requ ires pro
fess iona l dexterity . We recommend that you
seek assistance .
Removing the selector lever boot
.,. Engage the parking brake .
.,. Remove the screwdriver from the vehicle
tool kit . Use the flat side of the reversib le
screwdriver blade¢
page 234 .
.,. Carefully pry the cover out w ith the sc rew
dr ive r and pull it¢
fig. 115 towa rd the shift- er
knob in the direction of the arrow . The
screwdriver must grip at the lower edge of
the cover to loosen it .
Emergency rel ease for selector lev er
.,. Press t he ye llow release lever in the direc
tion of the arrow ¢
fig. 116 and hold it in
that position.
.,. Press t he re lease button in the selector lev-
er @ and move the lever into the N position.
.,. Clip the s hift boot back into the shift gate.
If the vehicle has to be pushed or towed if the
power supply fai ls (e.g. battery is discharged),
the selector lever must be moved to the N po
s ition using the emergency locking device.
A WARNING
-The selector must only be shifted from the
P position if the handbrake is firmly ap
p lied. Otherwise the vehi cle wou ld start
moving unexpe ctedly on a grade when the
se lec tor lever is s hifted from the P pos ition
- increasing the risk of an accide nt.
Page 107 of 280
~ Always keep both feet in the footwell so
that you are in control of the vehicle at all
times.
For detailed information on how to adjust the
driver's seat, see ¢
page 62, Adjusting front
seats manually
or ¢ page 63, Adjusting the
power seat .
A WARNING
Drivers who are unbelted, out of position
or too close to the airbag can be seriously
injured by an airbag as it unfolds. To help
reduce the risk of serious personal injury:
- Always adjust the driver's seat and the
steering wheel so that there are at least
10 inches (25 cm) between your breast
bone and the steering wheel.
- Always hold the steering wheel on the
outside of the steering wheel rim with
your hands at the 9 o'clock and 3 o'clock positions to help reduce the risk of per
sonal injury if the driver's airbag inflates.
- Never hold the steering wheel at the
12 o'clock position or with your hands at
other positions inside the steering wheel
rim or on the steering wheel hub. Hold
ing the steering wheel the wrong way
can cause serious injuries to the hands,
arms and head if the driver's airbag de
ploys .
- Pointing the steering wheel toward your
face decreases the ability of the supple mental driver's airbag to protect you in a
collision .
- Always sit in an upright position and nev
er lean against or place any part of your
body too close to the area where the air
bags are located.
- Before driving, always adjust the front
seats and head restraints properly and
make sure that all passengers are prop
erly restrained.
- Never adjust the seats while the vehicle
is moving . Your seat may move unexpect
edly and you could lose control of the ve
hicle.
Driving Safely 105
- Never drive with the backrest reclined or
tilted far back! The farther the backrests
are tilted back, the greater the risk of in
jury due to incorrect positioning of the safety belt and improper seating posi
tion .
- Children must always ride in child safety
seats ¢
page 143. Special precautions
apply when installing a child safety seat
on the front passenger seat¢
page 122.
Proper seating position for the front
passenger
The proper front passenger seating position
is important for safe, relaxed driving.
For your own safety and to reduce the risk of
injury in the event of an accident, we recom
mend that you adjust the seat for the front
passenger to the following position:
~ Adjust the angle of the seatback so that it is
in an upright position and your back comes
in full contact with it whenever the vehicle is
moving.
~ Adjust the head restraint so the upper edge
is as even as possible with the top of your
head. If that is not possible, try to adjust
the head restraint so that it is as close to
this position as possible
¢page 107.
~ Keep both feet flat on the floor in front of
the front passenger seat .
~ Fasten and wear safety belts correctly
¢page 116.
For detailed information on how to adjust the
front passenger's seat, see ¢
page 61.
A WARNING
Front seat passengers who are unbelted,
out of position or too close to the airbag
can be seriously injured or killed by the air
bag as it unfolds. To help reduce the risk of
serious personal injury:
- Passengers must always sit in an upright
position and never lean against or place
any part of their body too close to the
area where the airbags are located.
-
•
•
Page 111 of 280
trapped under the brake pedal and accel
erator pedal causing a loss of vehicle
control.
Stowing luggage
Loading the luggage compartment
All luggage and other objects must be prop
erly stowed and secured in the luggage com
partment.
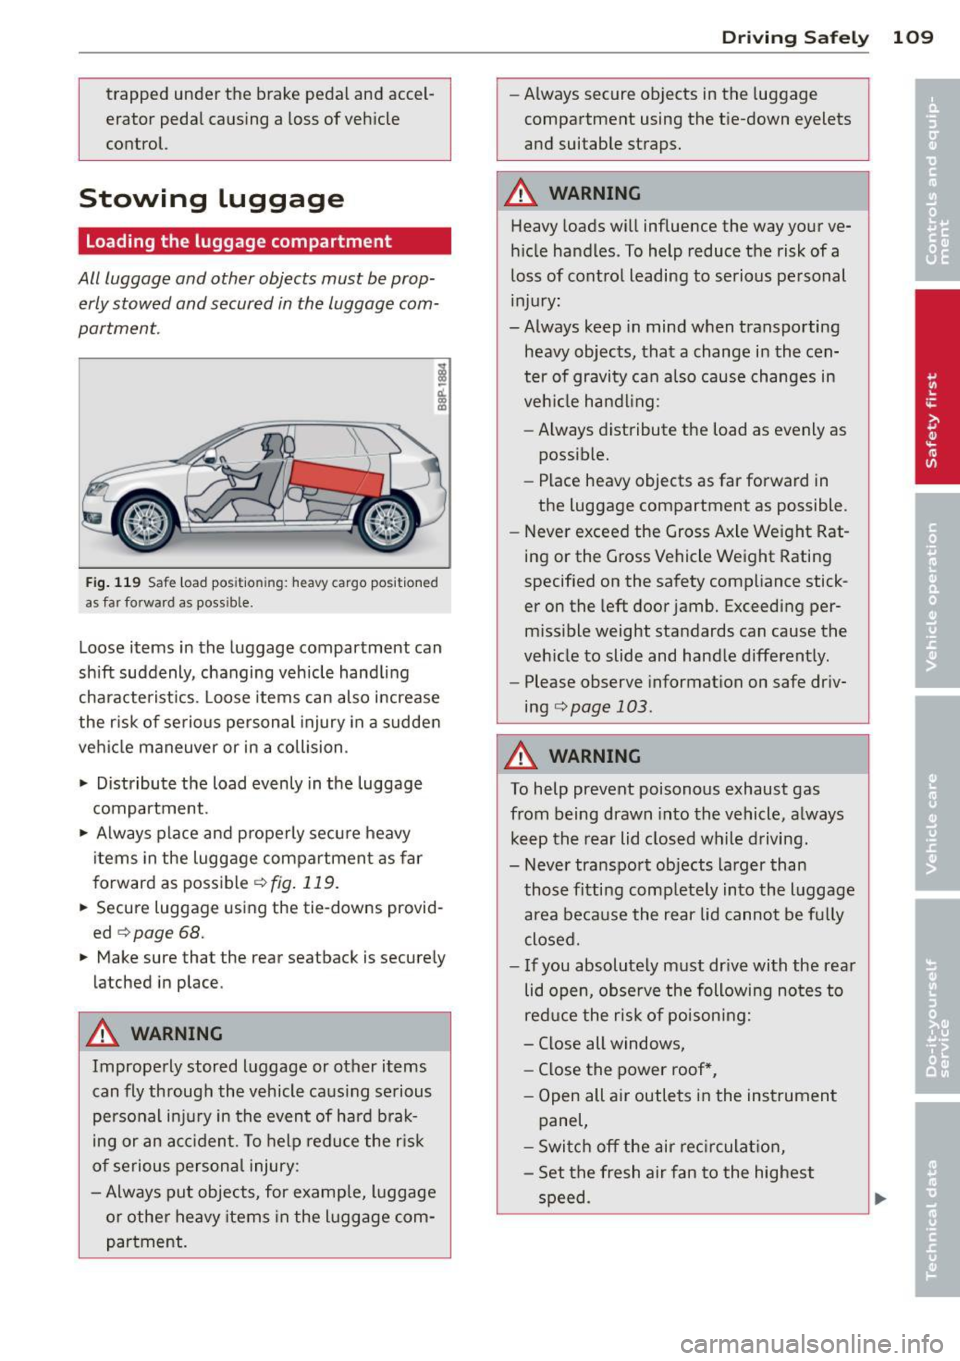
F ig . 119 Safe load position ing: heavy cargo positioned
as far forward as poss ib le.
Loose items in the luggage compartment can
shift suddenly, changing vehicle handling
characterist ics. Loose items can also increase
the r isk of serio us personal injury in a sudden
vehicle maneuver or in a collision .
.,. Distribute the load evenly in the luggage
compartment .
.,. Always place and properly secure heavy
items in the luggage compartment as far
forward as poss ible
¢ fig . 119.
.,. Secure luggage using the tie-downs provid
ed
¢ page 68.
.,. Make sure that the rear seatback is secure ly
latched in place.
A WARNING
Improperly stored luggage or other items
can fly through the vehicle caus ing se rious
personal injury in the event of hard b rak
ing or an ac cident. To help redu ce the r isk
o f serious persona l injury:
- Always put objects, for examp le, luggage
or other heavy items in the l uggage com
partment.
Dr ivin g Sa fely 109
-Always secure objects in the luggage
compartment using the t ie-down eyelets
and suitable straps.
A WARNING
Heavy loads w ill influence the way your ve
hicle handles. To help reduce the risk of a
loss of control leading to serious personal
injury:
-Always keep in mind when transporting
heavy objects, that a change in the cen
ter of gravity can also cause changes in
veh icle hand ling:
- Always distribute the load as evenly as
possible.
- Place heavy objects as far forward in
the luggage compartment as possible.
- Never exceed the Gross Axle We ight Rat
ing or the G ross Vehicle Weight Rating
specif ied on the safety compliance stick
er on the left door jamb. Exceeding per
miss ible weight standards can cause the
veh icle to slide and handle different ly.
- Please
observe informat ion on safe driv
ing¢
page 103.
A WARNING
To help prevent poisonous exhaust gas
from being drawn into the vehicle, always
ke ep the rear lid clos ed w hile driving.
- Never transport objects larger than
those fitting completely into the luggage area because the rear lid cannot be fu lly
closed .
- I f you absolutely must dr ive with the rea r
lid open, o bserve the following no tes to
red uce the risk of poison ing:
- Close all windows,
- Close the power roof*,
- Open all air outlets in the instrument
panel,
- Swi tc h off the air rec irculat ion,
- Set the fresh air fan to the highest
speed.
Page 113 of 280
Reporting Safety
Defects
Applicable to U.S.A.
If you believe that your vehicle
has a defect which could cause
a crash or could cause injury or
death, you should immediately
inform the National Highway
Traffic Safety Administration (NHTSA) in addition to notify-
ing Audi of America, Inc.
If NHTSA receives similar com-
plaints, it may open an investi-
gation, and if it finds that a
safety defects exists in a group
of vehicles, it may order a recall
and remedy campaign. Howev-
er, NHTSA cannot become in-
volved in individual problems between you, your dealer, or
Audi of America, Inc.
To contact NHTSA, you may call
the Vehicle Safety Hotline toll
free at:
Tel.: 1-888-327-4236 (TTY: 1-800-424-915 3)
or write to:
Administrator NHTSA 1200 New Jersey Avenue, SE
Washington, D.C. 20590
Driving Safely 111
You can also obtain other infor-
mation about motor vehicle
safety from:
http://www.safercar.gov
Applicable to Canada
Canadian customers who wish
to report a safety-related de-
feet to Transport Canada, De-
feet Investigations and Recalls, may telephone the toll free hot-
line:
Tel.: 1-800-333-0371 or
Tel.: 1-613-998-8616 if you are in the Ottawa area
TTY for hearing impaired:
1-888-67 5-6863
email comments/questions to: [email protected]
or contact Transport Canada by mail at:
Road Safety and Motor Vehicle
Regulation Directorate
Transport Canada
Tower C, Place de Ville, 330 Sparks Street
Ottawa, Ontario KlA ON5
For additional road safety infor
mation, please visit the Road
Safety website at:
•
•
'