open hood AUDI A3 2012 Owner´s Manual
[x] Cancel search | Manufacturer: AUDI, Model Year: 2012, Model line: A3, Model: AUDI A3 2012Pages: 280, PDF Size: 70.11 MB
Page 14 of 280
12 Instrum ents a nd warning /indic ato r li ghts
coolant temperature is too high, or the cool
ant
level is too low ¢ page 17.
.&_ WARNING
- Always observe the warning in
¢ page 187, Engine compartment be
fore opening the engine hood and check
ing the engine coo lant level.
- Never open the engine hood if you see or
hear steam, or if you see engine coolant
dr ipping from the eng ine compartment.
You could burn yourself . Let the engine
cool off first so that you cannot hear or
see any steam or engine coolant .
0 Note
-Mounting additional l ights or accesso ries
i n front of the a ir inlets reduces the cool
i ng effect of the rad iator. At h igh outside
temperatures or high eng ine load, the
engine could overheat.
- The front spo ile r has been designed to
properly distrib ute the cooling air when
the veh icle is moving.
If the spoiler is
damaged, this cou ld reduce the cooling
effect and the engine could then over
heat. Ask your authorized Audi dea ler for
assistance.
Fuel gauge
The fuel gauge works only when the ignition is
on.
When the needle reaches the red area, the
warning light in the instrument cluster will il
lum inate <=>
page 21 lil This means you
have approximately
1.8 gallons (7 liters) of
fuel left in the tank .
Time to re fu el!
The total tank capacity of your vehicle is listed
in¢
page 257, Data.
(D Note
Never run the tank completely dry! An ir
regular supply of fuel can cause eng ine
m isfiring and fuel could enter into the ex
haust system. The catalyt ic converte r
could then overheat and be damaged.
Speedometer with odometer
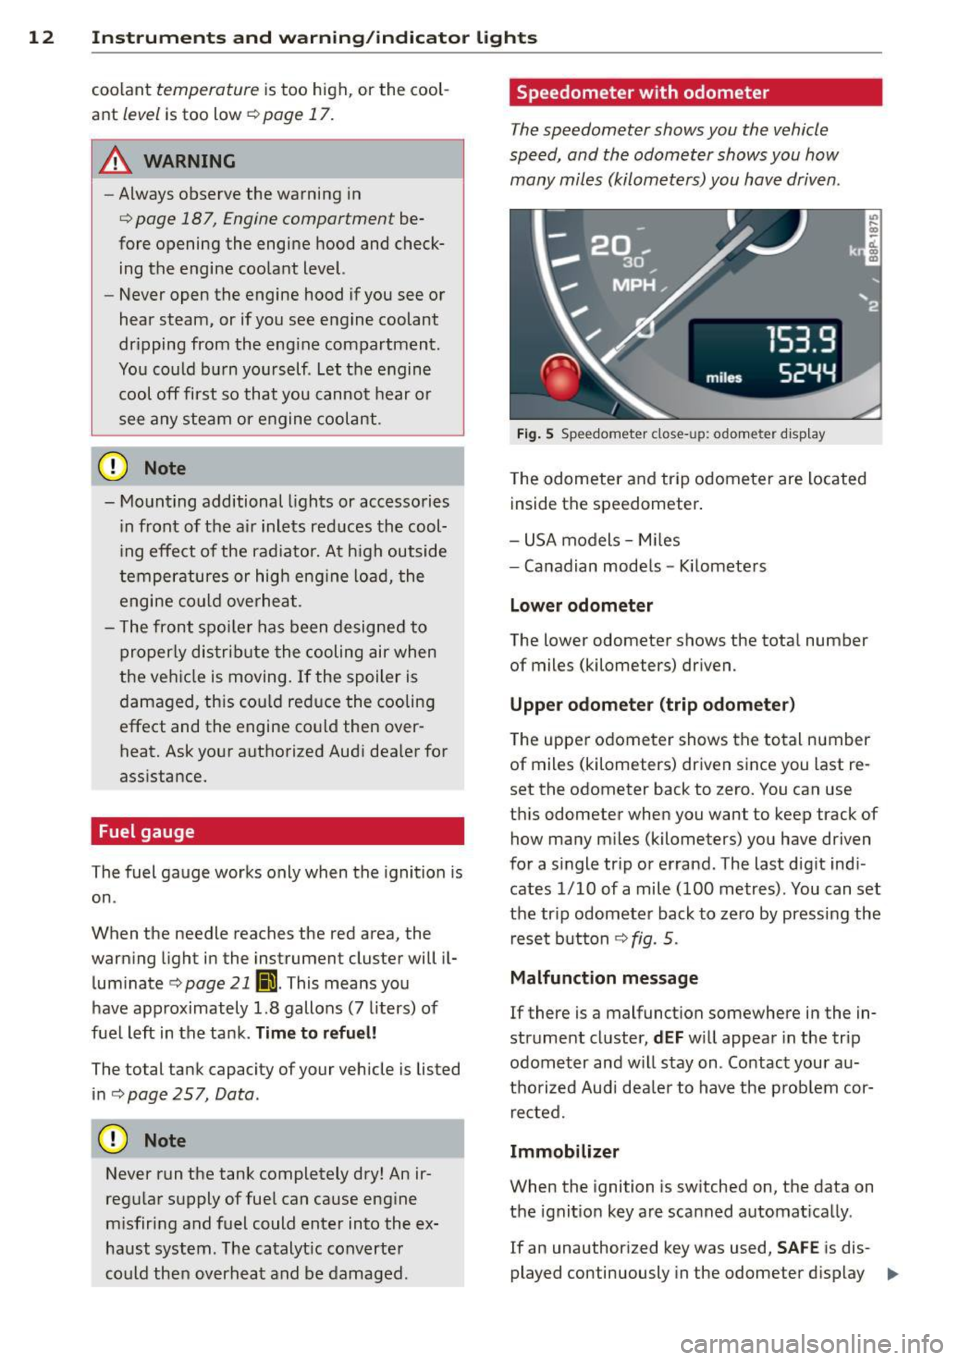
The speedometer shows you the vehicle
speed, and the odometer shows you how
many miles (kilometers) you have driven.
F ig . S Speedometer close- up: odom eter display
The odometer and trip odometer are located
inside the speedometer .
- USA models -Miles
- Canadian models -Kilometers
Lower odometer
The lower odometer shows the total number
of miles (kilometers) driven.
Uppe r odometer (trip odome ter)
The upper odometer shows the total number
of miles (kilometers) driven since you last re
set the odometer back to zero. You can use
th is odometer when you want to keep track of
how many miles (kilometers) you have driven
for a single tr ip or errand. The last digit ind i
cates 1/10 of a mile (100 metres) . You can set
the tr ip odomete r back to zero by pressing the
rese t button
c:> fig. 5.
Malfunct ion me ssage
If there is a malfunct ion somewhere in the in
strument cluster,
dEF w ill appear in the trip
odometer and w ill stay on . Contact your au
thorized Audi dea ler to have the problem cor
rected.
Immobilizer
When the ignition is sw itched on, the data on
the ignit ion key are scanned automat ically .
If an unauthorized key was used,
SAFE is dis
played continuously in the odometer d isplay
II>
Page 15 of 280
Instrument s and warnin g/indic ator ligh ts 13
field. The vehicle cannot be operated
¢page 36.
@ Tips
-The dig ital clock and the odometer a re
turned on for abo ut 30 seconds when
the driver's door is opened .
- When the ignition is turned off, the od
ometer reading and the d igita l clock with
date display can be switched on for
abo ut 30 seconds by pressing the knob
¢ page 10, fig. 3@ .
Warning/indicator
lights
Description
T he indicator lights in the instrument cluster
blink or turn on. They indicate functions or
malfunct ions ¢.&, .
Messages may appear with some indicator
lights. The messages turn off after a short
time. To d isp lay a message aga in, pres s the
Set/Check button¢
page 10, fig. 3@ . If
there is more than one malfunction , the ind i
cator lights will turn on one after the other for
approximate ly two seconds each .
Some ind icators lights in the display can turn
on in several colors .
A WARNING
-Failure to heed warning lights and other
important vehi cle i nfo rmation may result
in serious persona l injury o r vehicle dam
age.
- Whe never sta lled or stopped for repa ir,
move the vehicle a safe dis tance off the
road, stop the engine, and turn on the
emergency flasher¢
page 50.
- The engine compartment of any motor
vehicle is a poten tially ha zardous a rea.
Before you check anything in the engine
compartment, stop the engine and let it
cool down. Always exercise extreme cau
t io n when working under the hood
¢ page 187, Engine compartment
(D Tips
Malfunctions or fau lts will be identified ei
the r with a red symbol (priority 1 -Dan
ger!) or with a yellow symbol (priority 2 -
Warning) .
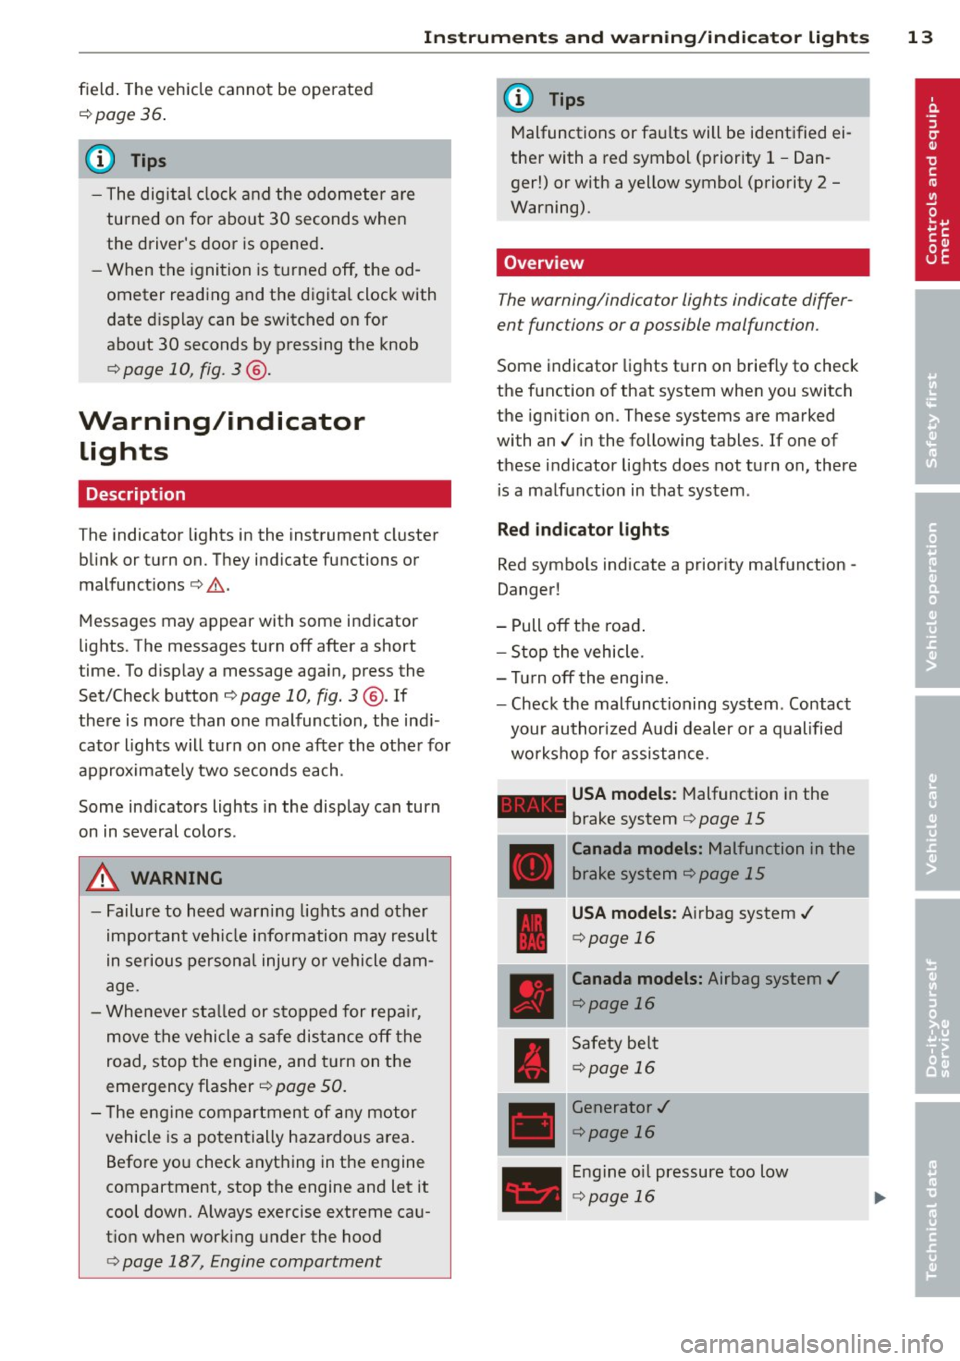
Overview
The warning/indicator lights indicate differ
ent functions or a possible malfunction .
Some indicator lights turn on briefly to check
the function of that system when you switch
the ignit ion on. These systems are marked
with an./ in the following tables. If one of
these indicator lights does not turn on , there
i s a malfunction in that system.
R ed ind icator lights
Red symbo ls indicate a prior ity ma lfunction -
Danger!
- Pull off the road .
- Stop the vehicle .
= Tu rnoff the engi ne.
- Check the malfunctioning system . Contact
your author ized Audi dealer or a qualified
wo rkshop fo r ass istance .
- USA models: Malfunction in the
brake system
<=> page 15
---· Canada models: Malfunction in the
b rake sys tem
<=>page 15
USA models: A irbag system ./
<=>page 16
Canada models: Airbag system./
<=>page 16
Safety be lt
¢page 16
Generator ./
<=>page 16
Engine o il pressure too low
¢ page 16
Page 17 of 280
Instruments and warning/indicator lights 15
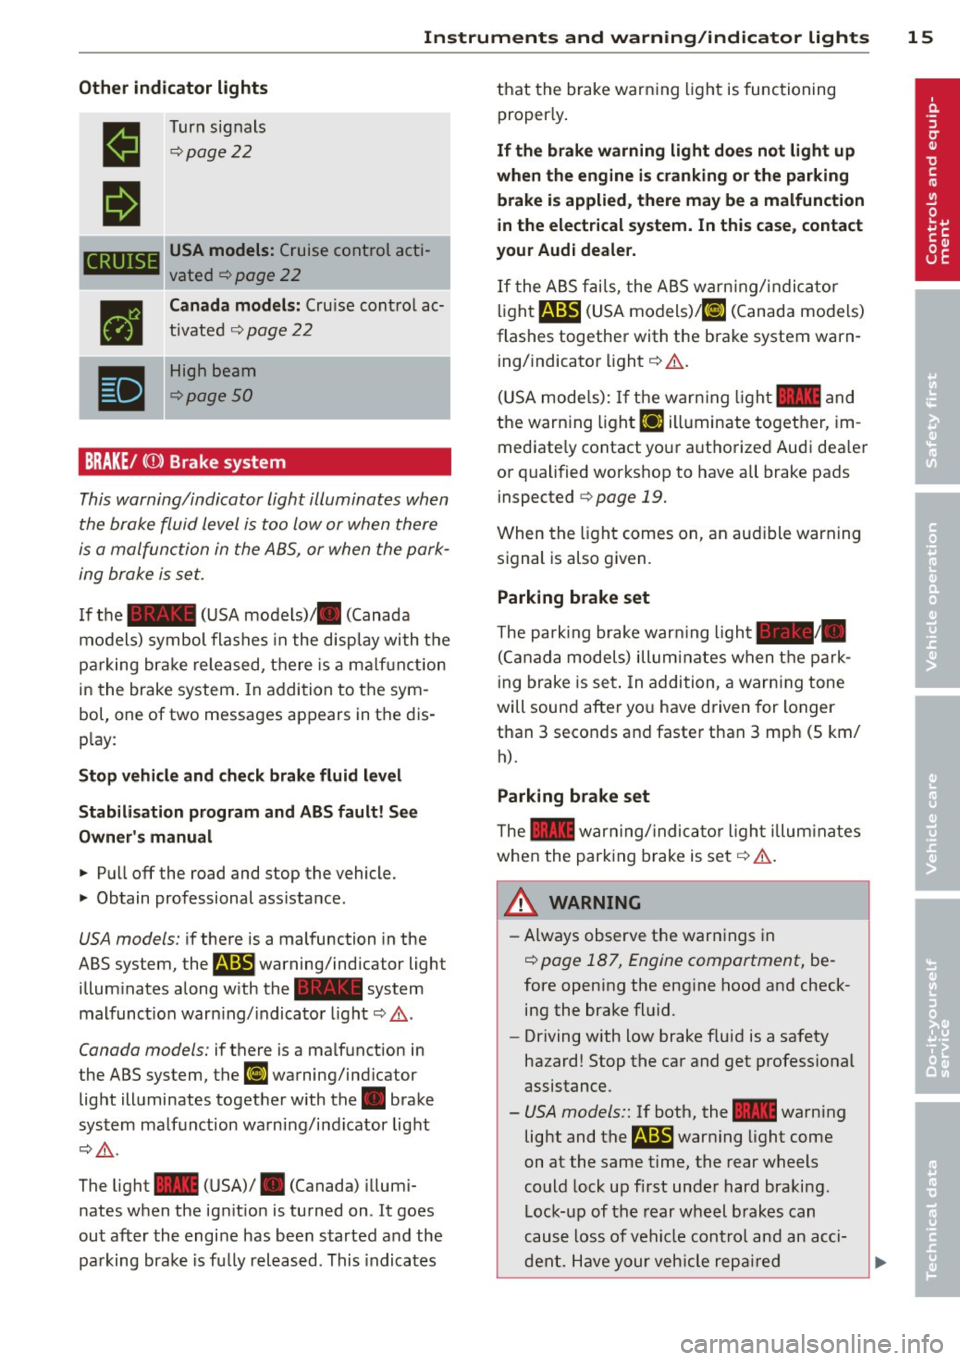
Other indicator lights
•
II
CRUISE
•
•
Turn signals
¢page22
USA models: Cruise control acti
vated
¢ page 22
Canada models: Cruise cont rol ac
tivated
q page 22
High beam
¢page 50
BRAKE/
the brake fluid level is too low or when there
is a malfunction in the ABS, or when the park
ing brake is set.
If the - (USA models)/ . (Canada
models) symbol flashes in the disp lay with the
parking brake released, there is a ma lfuncti on
in the brake system . In addition to the sym
bol, one of two messages appears in the dis
play:
Stop vehicle and check brake fluid level
Stabilisation program and ABS fault! See
Owner's manual
.. Pull off the road and stop the vehicle.
.. Obtain professional ass istance.
USA models: if there is a malfunction in the
ABS system, the
r.1il warning/indicator light
illuminates along with the - system
malfunct ion warn ing/ indicator light
q ,&..
Canada models: if there is a malf unction in
the ABS system, the
ll] warning/ind icator
light illuminates together with the. brake
system malfunction warning/indicator light
c::>,&. .
The light - (USA)/ . (Canada) illumi
nates when the ign ition is turned on . It goes
out after the engine has been started and the
parking brake is fu lly released . This indicates that the brake
warning light is functioning
properly.
If the brake warning light does not light up
when the engine is cranking or the parking
brake is applied, there may be a malfunction
in the electrical system. In this case, contact
your Audi deale r.
If the ABS fails, the ABS warn ing/ indicator
light
r.1il (USA models) /ll] (Canada models)
flashes together with the brake system warn ing/ indicator light
i:::> .&..
(USA mode ls): If the warn ing light - and
the warning light
EiJ illuminate together, im
mediate ly contact your authorized Audi dea ler
or qualified workshop to have all brake pads
inspected
i:::> page 19.
When the light comes on, an audible warning
signal is also given.
Parking brake set
The parking brake war ning ligh t-·
(Canada models) illuminates when the park
ing brake is set. In addition, a warning tone
will sound after you have driven for longer
than 3 seconds and faster than 3 mp h (S km/
h).
Parking brake set
The - warning/ indicator light illuminates
when the parking brake is set
i:::> .&. .
A WARNING
-Always observe the warnings in
¢page 187, Engine comportment, be
fore opening the engine hood and check
ing the brake fluid.
- Driving with low brake fluid is a safety
hazard! Stop the car and get profess ional
assistance.
- USA models:: If both, the 1111 warning
light and
the m warning light come
on at the same time, the rear wheels
could lock up first under hard braking.
Lock-up of the rear wheel brakes can
cause loss of vehicle cont rol and an acci
dent. Have your vehicle repaired
Page 44 of 280
42 Opening and clo sing
Child safety lock
The child saf ety lock t prev ents th e re ar
doors from being opened from the inside .
Fig. 38 Rear doors : child safety lock
The rear doors are equipped wi th a ch ild safe
ty lock.
It is operated w ith the vehicle key. The
child safety lock is only visible when the door
is open.
• To
switch on the child safe ty lo ck , tu rn the
i gnition key in the direct ion of the arrow .
• To
switch off the child safety loc k, t urn the
ignition key in the opposite direction of the
arrow.
The c hild safety lock prevents the doors from
being opened from the inside when you have
small children sitt ing in the rear.
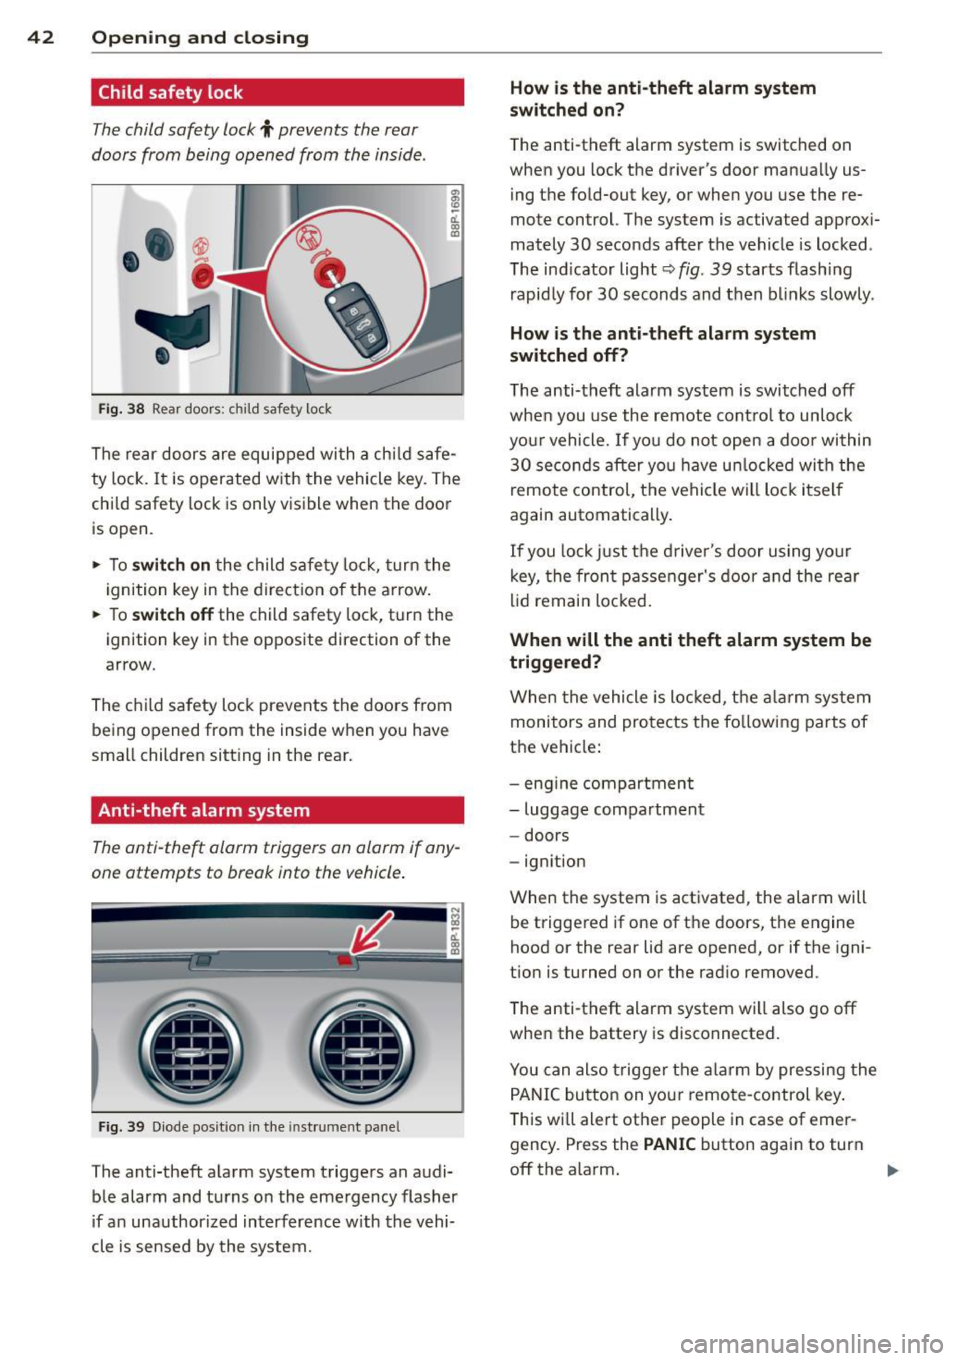
Anti-theft alarm system
The anti -theft alarm triggers an alarm if any
one attempts to break into the vehicle .
Fig. 39 Diode pos it ion in th e in st ru men t pane l
The anti-theft a larm system triggers an audi
ble alarm and tu rns o n the emergency flasher
if a n unauthori zed interference w ith the vehi
cle is sensed by the system.
How is the anti -theft alarm system
switched on?
T he anti -theft alarm system is switched on
when you lock the driver's door manua lly us
ing t he fo ld-out key, or when you use the re
mote control. The system is activated approx i
mately 30 seconds after the vehicle is locked .
The ind icator light¢
fig. 39 starts flash ing
rapid ly for 30 s econds and then blinks slowly.
How is the anti-theft alarm sy stem
switched off?
T he anti-theft alarm system is switched off
when you use the remote cont ro l to unlock
yo ur vehicle.
If you do not open a doo r wi thin
30 se co nds after yo u have u nlocked wi th the
remote control, t he vehicle will loc k it se lf
again automatically .
If you lock just t he d river's door using your
k ey, the fron t passenger's door and the re ar
li d remai n locked.
When will the anti th eft alarm system be
triggered?
When the vehicle is lo cked, t he alar m sys tem
monitors and pro te cts the fo llowi ng parts of
the ve hicle :
- eng ine compartmen t
- luggage compartmen t
- doors
- ignition
When the system is activated, the alarm will be triggered if one of t he doors, t he engine
hood or the rear lid are opened, or if the igni
t ion is turned on or the rad io removed .
The anti-theft alarm system wi ll also go off
whe n the battery is disconnected.
You can also trigge r the alarm by pressing the
P ANIC button on you r remo te-control key .
T his wi ll ale rt ot her people in case of emer
gency . Press the
PANIC button again to turn
off the alarm.
Page 45 of 280
How is the anti-theft alarm switched off
when triggered?
The alarm system is switched off when you
un lock the vehicle using the remote-control
key or when the ignition is switched on. The
alarm will also switch itself off when it comes
to the end of its cycle .
Emergency flasher
The emergency flasher will blink briefly when
the doors, engine hood and rear lid are prop
erly closed .
If the emergency flashers do not blink, check
the doors, engine hood and rear lid to make
sure they are properly closed. If you close a
door, the hood or the rear lid with the anti
theft alarm switched on, the emergency flash
ers will blink only after you have closed the
door or lid .
(D Tips
For the anti-theft alarm system to func
tion properly, make sure all vehicle doors
and windows are closed before leaving the
veh icle.
Power windows
Controls
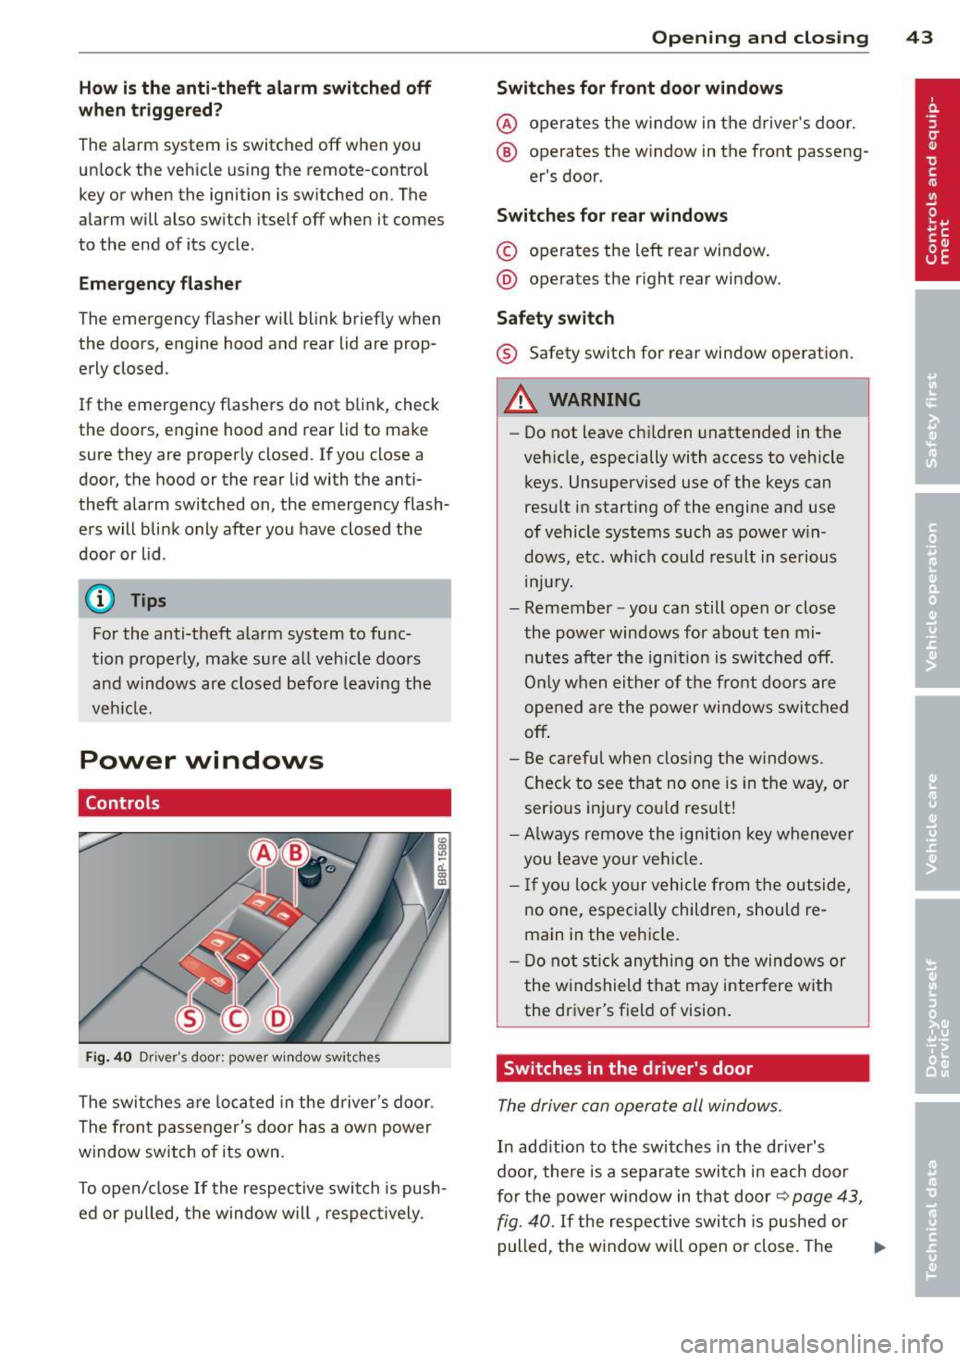
Fig. 40 Dr iver 's door: powe r w ind ow sw itches
The switches are located in the driver's door.
The front passenger's door has a own power
window switch of its own.
To open/close If the respective switch is push
ed or pulled, the window will, respectively.
Opening and closing 43
Switches for front door windows
@ operates the window in the driver's door.
® operates the window in the front passeng -
er 's door.
Switches for rear windows
© operates the left rear window.
@ operates the right rear window.
Safety switch
® Safety switch for rear window operation .
A WARNING
-Do not leave chi ldren unattended in the
veh icle, especially with access to vehicle
keys. Unsupervised use of the keys can
result in starting of the engine and use
of vehicle systems such as power win
dows, etc. wh ich could result in serious
mJury.
- Remember -you can still open or close
the power windows for about ten mi nutes after the ign ition is switched off.
On ly when either of the front doors are
opened are the power windows switched
off .
- Be careful when clos ing the windows .
Check to see that no one is in the way, or
serious injury could result!
-Always remove the ignition key whenever
you leave your vehicle .
- If you lock your vehicle from the outside,
no one, especially children, should re
main in the vehicle.
- Do not stick anything on the windows or
the windshield that may interfere with
the driver's field of vision.
Switches in the driver's door
The driver can operate all windows .
In addition to the switches in the driver's
door, there is a separate switch in each door
for the power window in that door~
page 43,
fig. 40.
If the respective switch is pushed or
pulled, the window will open or close. The
Ill>
Page 61 of 280
-You cannot activate the service position
when the hood is open.
- The front wiper blades a re different
l engths; the blade on the driver's side is
l onger.
Changing the rear wiper blade
F ig . 6 1 Insta lling/re moving wiper blade
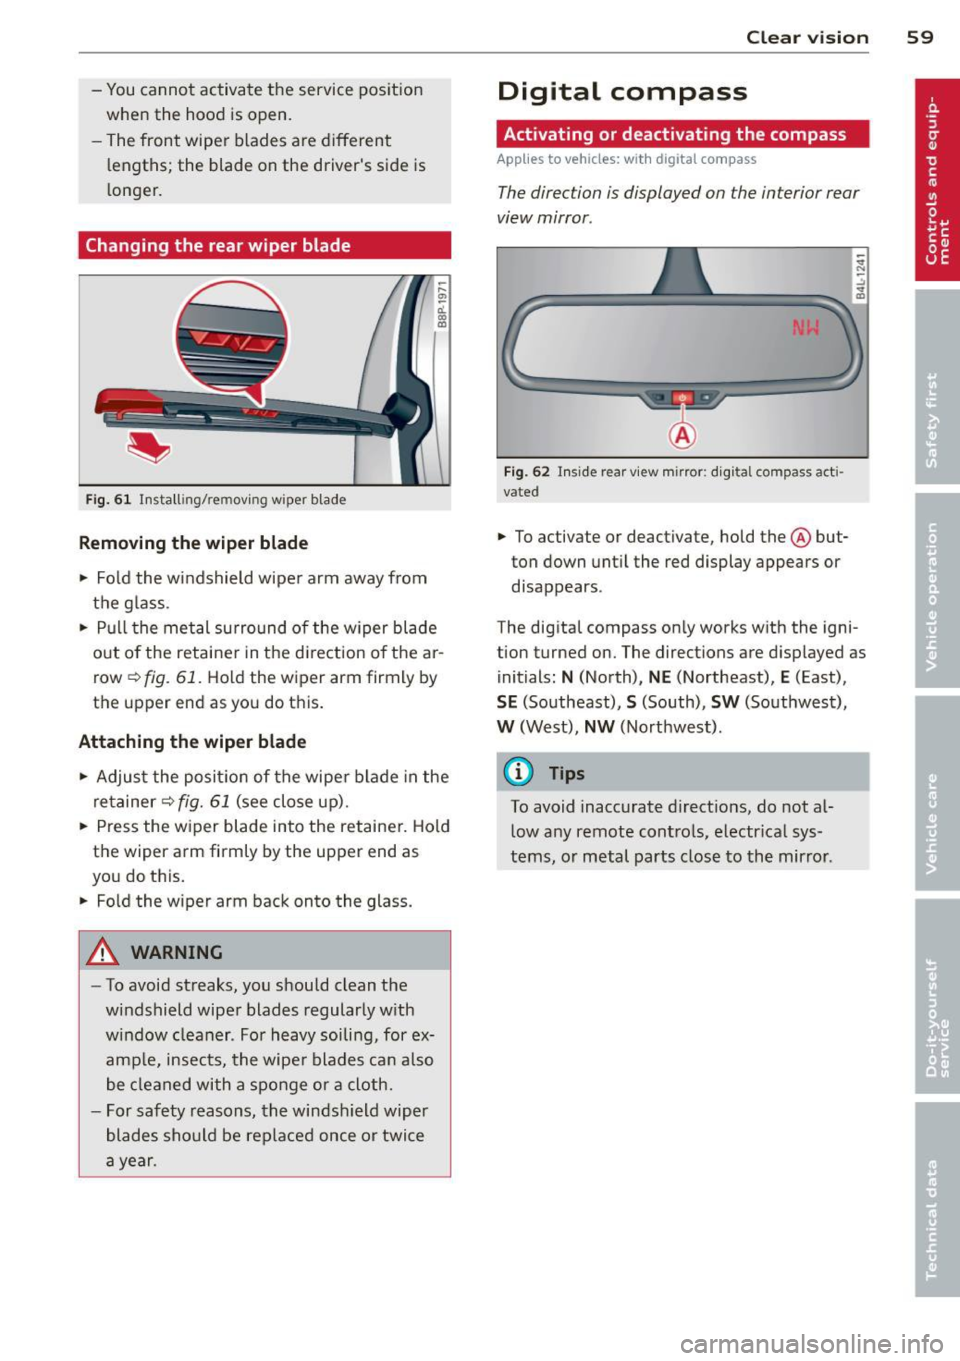
Removing the wiper b lade
.. Fo ld the windshield wipe r arm away from
the g lass .
.. Pull the met al surround of the w iper blade
out o f the retaine r in the d irection o f the ar
row
r=> fig. 61. Hold the wiper arm firmly by
the upper end as you do this.
Attaching the wiper blade
.. Adjus t the posi tion of the wipe r blade in the
retainer
r=> fig. 61 (see close up).
.. Press the w iper blade into the retainer. Hold
t h e wiper arm firmly by the upper end as
you do this .
.. Fo ld the wiper arm back onto the glass.
A WARNING
- To avoid streaks, you should clean the
windshield wiper blades regular ly w ith
w indow cleaner. Fo r heavy soiling, for ex
ample, insects, the wipe r blades can also
be cleaned with a sponge or a cloth.
- For safety reasons, the windsh ield wiper
blades sho uld be replaced once or twice
a year .
Clear vision 59
Digital compass
Activating or deactivating the compass
App lies to vehicles: wi th digi tal co mpass
The direction is displayed on the interior rear
view mirror .
Fig. 62 Inside rear v iew mirror : d ig ita l compass act i
vated
.. To activate or deactivate, hold the@ but
ton down unt il the red display appears or
disappears .
The dig ital compass only works w ith the igni
tion turned on. The directions are displayed as
initials :
N (North), NE (Northeast), E (East),
SE (So utheast), S (South), SW (Southwest),
W (West), NW (Northwest) .
(0 Tips
To avoid inaccurate d irect io ns, do not al
l ow any remote contro ls, electr ica l sys
tems, o r metal parts close to the mir ror.
Page 99 of 280
The park lock must only be engaged with the
vehicle
stationary c::> &.
To engage P and to remove the lever from th is
position, you must depress the release b utton
(button in the selector lever handle)
and si
multaneously you must step on the brake
pedal.
R · re vers e
I n th is position, reverse is engaged.
Reverse gear must only be engaged with the
veh icle
stationary and the eng ine runn ing at
id le speed
c::> ,&. .
To engage R, you have to depress the release
button
and s imultaneously step on the brake
pedal. In the R position, the back-up lights il
lum inate with the ign ition on.
N • N eutra l
The transmission is in neutral in this position .
D -Norm al po sition f or d riving forwa rd
In this position, the forward gears are auto matica lly shifted up and down, depending on
engine load and vehicle speed.
To engage S from N, the brake pedal must be
depressed at speeds be low S km/h or when
the vehicle is stationary
c::> & .
In certain circumstances (driving in the moun
tains for examp le) it can be beneficial to
switch temporarily to the manua l shift pro
gram
c::> page 100 in order to adjust the gear
ratios to driving cond itions
manually.
S -Sport setting
The S se tt ing shou ld be selected for sporting
d riving . The power reserves of the engine can
be fu lly exp loited through later upshifts.
To engage S from N, the brake pedal must be depressed at speeds be low S km/h or when
the vehicle is stationary
c::> & .
Tra n sm iss io n 9 7
A WARNING
- Never p lace the selector lever in the R or
P posit ion while the veh icle is moving -
risk of an accident!
- With the engine running, it is necessary
to hold the vehicle with the foot brake in all se lector lever positions (except P and
N), because even at idle speed the trans
fe r of power is never completely inter
rupted -the vehicle "creeps". If the vehi
cle is stationary and the transm ission is
engaged, the engine should never be
speeded up unintentionally (e .g. manual
ly from under the hood). Otherwise the
veh icle w ill immediately start to move -
sometimes even if the park ing brake is
firmly applied -risk of an accident!
- Before you or other persons open the
hood and work on a running engine, the
selecto r lever must be moved to P and
the park ing brake applied f irmly - risk of
an accident! Follow the warning sticke rs
c::> page 187, Engine compartment.
(D Tips
If you have inadvertently shift ing into N
while the vehicle is moving, you shou ld re
move you r foot from the accelerator and
wait unt il the engine speed has dropped to
idle before shifting back to Dor S .
Selector lever lock
Applies to vehicl es: with S tronic®
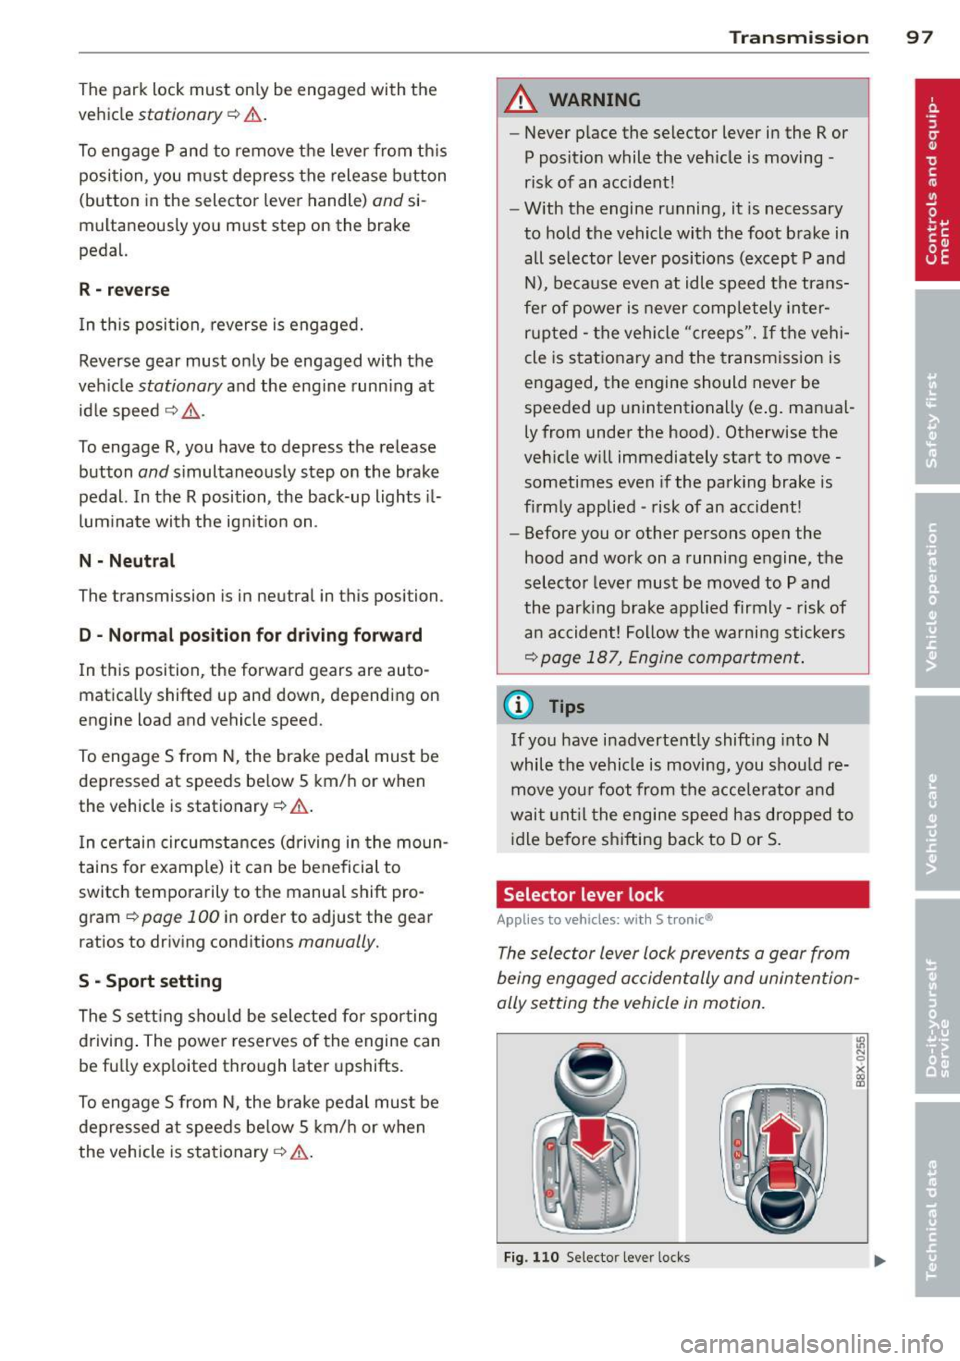
The selector lever lock prevents a gear from
being engaged accidentally and unintention
ally setting the vehicle in motion.
F ig. 110 Selector lever locks
Page 196 of 280

194 Checking and filling
Checking and filling
Engine hood
Releasing the engine hood
The engine hood is released from inside the
vehicle .
Fig. 155 Driver' s side footwe ll: e ngin e hood release
lever
.. Open the driver's door.
.. Pull the release lever on the left under the
instrument panel
c> fig . 155 in direction of
the a rrow .
The hood pops up slight ly under spring pres
sure.
Opening the engine hood
Fig . 156 Engine hood releas e le ve r
Before opening the eng ine hood, make sure
that the windshie ld wipers are folded flat
against the windshield . Otherwise, they could
damage the paint on the hood.
.. Pull the release lever
r=;,fig . 156 in the direc
tion indicated by the arrow . This release the
hook under the hood .
.. Open the hood all the way.
A WARNING
-Hot engine coolant can burn you!
- To reduce the risk of being burned, never
open the hood if you see or hear steam
or coo lant escaping from the eng ine
compartment . Wait unt il no steam or
coolant can be seen or heard before care
fu lly opening the hood.
Closing the engine hood
.. Pull the hood down until the pressure from
the strut is reduced .
.. Let the hood
drop down and latch in p lace.
Do not try to push it shut; it may fail to en
gage
c> .&, .
A WARNING
--
A hood that is not completely latched
could fly up and b lock your view while dr iv
i ng.
- When you close the engine hood, check it
to make sure the safety catch has properly engaged . The hood shou ld be flush
with the surrounding vehicle body parts.
- If you notice while dr iv ing that the hood
is not secured properly, stop at once and
close it .
Working in the engine compartment
Be especially careful whenever you work in
the engine compartment!
Whene ve r you must pe rform any wo rk in the
eng ine compartment, for e xample chec king
and filling differ ent fluid s, the re i s a risk of
injury , burns and accident s. T o pr event p er
s onal injury alwa ys observe the foll owing
WARNING S. Th e engin e c ompartm ent of an y
v e hicl e is a hazardou s area!
r=;, .&.
A WARNING
To help avoid injury, before yo u check any
thing under the hood:
- Turn off the engine .
- Remove the ignition key.
Page 197 of 280
-Set the parking brake fully.
- Move selector lever of automatic trans-
mission to "P" (Park); put manual trans
mission in Neutral.
- Always let the engine cool down . Hot
components will burn skin on contact.
- To reduce the risk of being burned, never
open the hood if you see or hear steam
or coolant escaping from the engine
compartment . Wait until no steam or
coolant can be seen or heard before care
fully opening the hood .
- Keep children away from the engine com
partment .
- Never spill fluids on hot engine compo
nents. They can cause a fire.
- Never touch the radiator fan. The auxili
ary electric fan is temperature controlled
and can switch on suddenly.
- Never open the coolant reservoir cap
when the engine is still warm. The cool
ant system is pressurized and hot cool ant could spray out!
- Protect your face, hands and arm from
steam or hot engine coolant by placing a
thick rag over the cap when you open the
coolant reservoir .
- If work on the fuel system or the electri
cal system is necessary:
-Always disconnect the battery.
- Never smoke or work near heaters or
open flames. Fluids in the engine com
partment could start a fire.
- Keep an approved fire extinguisher im
mediately available.
- To avoid electrical shock and personal in
jury while the engine is running or being
started, never touch:
- Ignition cables
- Other components of the high voltage
electronic ignition system.
- If you must perform a check or repair
with the engine running:
- First, fully apply the parking brake,
move selector lever of automatic trans-
Checking and filling 195
mission to "P" (Park); put manual
transmission in Neutral.
- Always use extreme caution to prevent
clothing, jewelry, or long hair from get
ting caught in the radiator fan, V-belts
or other moving parts, or from contact
ing hot parts . Tie back hair before
starting, and do not wear clothing that
will hang or droop into the engine .
- Minimize exposure to emission and
chemical hazards~&. .
A WARNING
California Proposition 65 Warning:
- Engine exhaust, some of its constituents,
and certain vehicle components contain
or emit chemicals known to the State of
California to cause cancer and birth de
fects and reproductive harm. In addition,
certain fluids contained in vehicles and
certain products of component wear con
tain or emit chemicals known to the State of California to cause cancer and
birth defects or other reproductive harm.
- Battery posts, terminals and related ac
cessories contain lead and lead com
pounds, chemicals known to the State of
California to cause cancer and reproduc
tive harms. Wash hands after handling.
Q) Note
When adding fluids, always make sure that
they are poured into the proper container
or filler opening, otherwise serious dam
age to vehicle systems will occur .
@ For the sake of the environment
To detect leaks in time, inspect the vehicle
floor pan from underneath regularly . If
you see spots from oil or other vehicle flu ids, have your vehicle inspected by an au
thorized Audi dealer. •
•
Page 270 of 280

268 Index
Eme rgency towing ......... .. .. .... . 251
E ne rgy management ........... .. ... 167
Ba ttery power ........... .... .. .. . 168
Dr iver notific ation ...... .. .. .. .. .. . 16 8
Eng ine
4-cylinder diesel (140 hp) ....... .... 197
4-cyl ind er g asoline (200 hp) .. .. .. ... 196
Coolant .. ... ............ .. .. .. .. . 203
H ood .. ...... ........... .. .. .... . 194
Pr ehea ter . . . . . . . . . . . . . . . . . . . . . . . . . 86
Start ing . . . . . . . . . . . . . . . . . . . . . . 89, 90
Starting with j umper cab les . ..... .. . 248
Stopping . . . . . . . . . . . . . . . . . . . . . . . . . . 91
E ng ine compartmen t ................ 196
Safety instruc tions .......... .. .... . 194
Working in the engine compar tment .. 194
Eng ine coolant system ........... .... 203
Adding coo lant ............ ... .. .. . 204
Chec king coolan t leve l ..... .. .. .... . 204
Che cking the eng ine coolant leve l ..... 204
M alfunct ion . . . . . . . . . . . . . . . . . . . . . . . 17
Radiator fan . .. .. ..... ... .. .. .... . 205
E ng ine coolant temperature
Gauge ... .. ................ ... .. .. 11
Eng ine data .. ............... ...... . 257
Engine fault Warning light .. .. ..... ... .. .. .... .. 20
E ng ine hood
C lo sing .. .. ............. .. .. .. .. . 194
Release lever . ........... .... .... . 194
Releasing and open ing . ... .. ... ... . 194
Eng ine malfunction (diesel engine)
War ning light ............ .. .. .... .. 20
Eng ine oil . ............... .. .. .... . 197
Adding .. .. ............... .... .. . 200
Addit ives . .. ................ ... ... 200
C hanging .. ... .... ...... ... ... .. . 20 1
Chec king the eng ine o il level .. .. .. .. . 200
Di ese l eng ine ............ .. .. .... . 20 2
I ndications and con ditions req uiring ex-
tra check ing . .. .. ..... ... .. .. .... . 200
Oil consumption .. ..... ... .. .. .... . 199
Oi l grades . .... . ...... ... .. .. .... . 197
Recommended oil check intervals ..... 200
Specification and viscos ity .... .. .... . 197
Specifications Diesel engine .. .... ... 202
Specifications gasoline engine .. .. ... 197
Tempe ratu re d isplay ...... .. .. .. .. . . 31 E
ngine oi l leve l . . . . . . . . . . . . . . . . . . . . . . 20
E ngine o il pressu re (malfunction) ....... 16
Engine oil sensor defective ............ 20
En gine preheate r .................... 86
C onnect ing . ..... .. ... ..... ... .. .. . 86
E ngine speed limitation . . . . . . . . . . . . . . . 20
Environment Break-in per iod . .. ............. .... 169
Catalytic converter ............. .... 170
Diesel particulate f ilter ............ . 171
D ispos ing of your veh icle battery ... .. 210
D riv ing at high speeds .............. 172
D riving to minimize pollution and noise 171
F uel ............................. 192
F uel economy . . . . . . . . . . . . . . . . . . . . . 171
Leaks under your vehicle ..... ... .. .. 194
Letting the vehicle stand and warm up . 172
Proper d isposal of drained bra ke fluid . 206
Proper disposal of drained eng ine cool-
ant ............................. 204
Proper d isposal of drained eng ine
o il . . . . . . . . . . . . . . . . . . . . . . . . . 200, 201
Recycling used engine oil ............ 200
U nleaded fuel . ... ................ . 189
Wha t shou ld I do w ith an o ld b att ery? . 210
EPC
refer to E lect ron ic power co ntrol ... .. . 19
Event Data Recorder (EDR) ........ .... 161
E xh aus t tai l pipes
Cleaning .. .... .. ............. .... 183
Expansion tank .. .. ................ . 204
Exterior mirrors Adjusting . . . . . . . . . . . . . . . . . . . . . . . . . 53
Dimming .......................... 54
Heating ........................... 53
F
Fahrenheit
Switching between Fa hrenhe it and Centi-
grade ....... .... .... ........... .. 83
F an
Adjusting the fan speed ...... .... . .. . 83
Climate controls ............... .. .. . 83
Radiator ......................... 205