key AUDI A3 2015 User Guide
[x] Cancel search | Manufacturer: AUDI, Model Year: 2015, Model line: A3, Model: AUDI A3 2015Pages: 288, PDF Size: 71.46 MB
Page 38 of 288
36 Opening and closing
anyone beh ind in the vehicle, es pecially
children.
(D Tips
Your vehicle is lo ck ed aut om atically at a
spee d of 9 mph (15 km/ h)
c> page 31. Yo u
can unloc k the vehicle a gain us ing the
open ing funct ion in the power l ock ing sys
tem sw itch.
Setting central locking
App lies to vehicles: with driver informat ion system
Va rious settings can be adjusted in the MMI :
Adjusting door unlocking
You can dete rm ine which doo rs s hou ld unl ock
when opening the vehicle .
.. Se lect :
System control butt o n or Car sys
tems
> Vehicle settings > Central locking >
Door unlocking .
Selecting All and pres sing th e ~ button on
the remote cont ro l key un lo ck s the en tire ve
hi cle .
S elec ting
On /Driver and pres sing th e ~ but
ton o n the rem ote co ntrol k ey once unlocks
on ly the driver 's doo r. In vehicles wi th a con
ve nience key, only the front doo r whose han
dl e you pull will u nloc k. If you press the~
button twice , the enti re vehicle will unlock . If
you press the~ button, t he ent ire vehicle will
a lways lock.
Adjusting Auto Lock
.. Se lect : Systems contro l button or Car sys
tems
> Vehicle settings > Lock when driv ·
ing.
If yo u selec t On, the en tire vehicle will lock
automatically when the speed reaches 9 m ph
(15 km/h) .
Folding the exterior mirrors
.. Se le ct: Sy stems con tro l b utt on or Car Sys
tems
> Vehicle settings > Central locking >
l ) Thi s func tion is not available in all co untr ies.
Fold mirrors . Fo r more information, see
c::> page 48, Adjusting the exterior mirrors .
If yo u se le ct On , the ou tside mir ro rs will fo ld
in aut omaticall y when you press the~ button
o n the remote cont ro l key
c::> page 48 .
Tone when locking
.,. Sele ct: Systems control butto n or Car sys
tems > Vehicle settings > Central locking
>
Tone when lo cking .
When ch ecked off./, a to ne will sound w hen
yo u loc k the vehicle .
If you p ress the
I@ b utton twice, the entire ve
hicle will loc k. There is a lock ing tone at the
same t ime
1> .
Electronic immobilizer
T he immobilizer helps to prevent unauthor
ized use of your vehicle .
A compute r chi p in side your key automatically
deact ivates the elect ro ni c immobilizer when
t h e key is ins ide the veh icle . W hen you remove
the key from the vehicle , the elect ron ic immo
bili zer is au toma tically acti vated once ag ain.
_&. WARNING
-
Alw ays t ake the key wi th you whe n you
l e ave the vehicle. The key can d is ar m the
e lectronic en gine immobilize r and permi t
an una uthorized person t o start the engi ne
and enable o peration of the vehicle sys
tems such as power w indow o r power su n
r oof leading to se rious pe rsonal injury .
(D Tips
- The ve hicl e cannot be started if an una u
thorized key is used . The vehicle may not
start i f anot he r radio device s uch as a k ey
f o r another ve hicle o r a transponder is
located on t he key rin g.
- Fo r Declaration of Comp liance to Unite d
States FCC and Ind ustry Canada reg ula
t io ns, see
c> pag e 2 71 .
Page 39 of 288
Safety central locking
Applies to vehicles: with safety central lock ing
Safety central locking provides the possib ility,
to only unlock the driver's door and the fuel
fil ler door. The rest of the vehicle remains
lock ed.
Unlocking the driver's door and the fuel
filler door
.,. Press the remote contro l key or convenience
key ~ button
once or turn th e key once in
the opening direction.
Unlocking all doors , the luggage
compartment lid and the fuel filler door
.,. Press the remote control key or convenience
key ~ button
twice within five seconds or
turn the key
twice within five seconds in the
opening direction.
When unlocking just the driver's door, the an
ti-theft alarm system* is also immediat ely de
activated .
I n vehicles with an MMI, you can directly ad
just the safety central locking
~ page 36.
Front passenger's door and rear doors
emergency locking
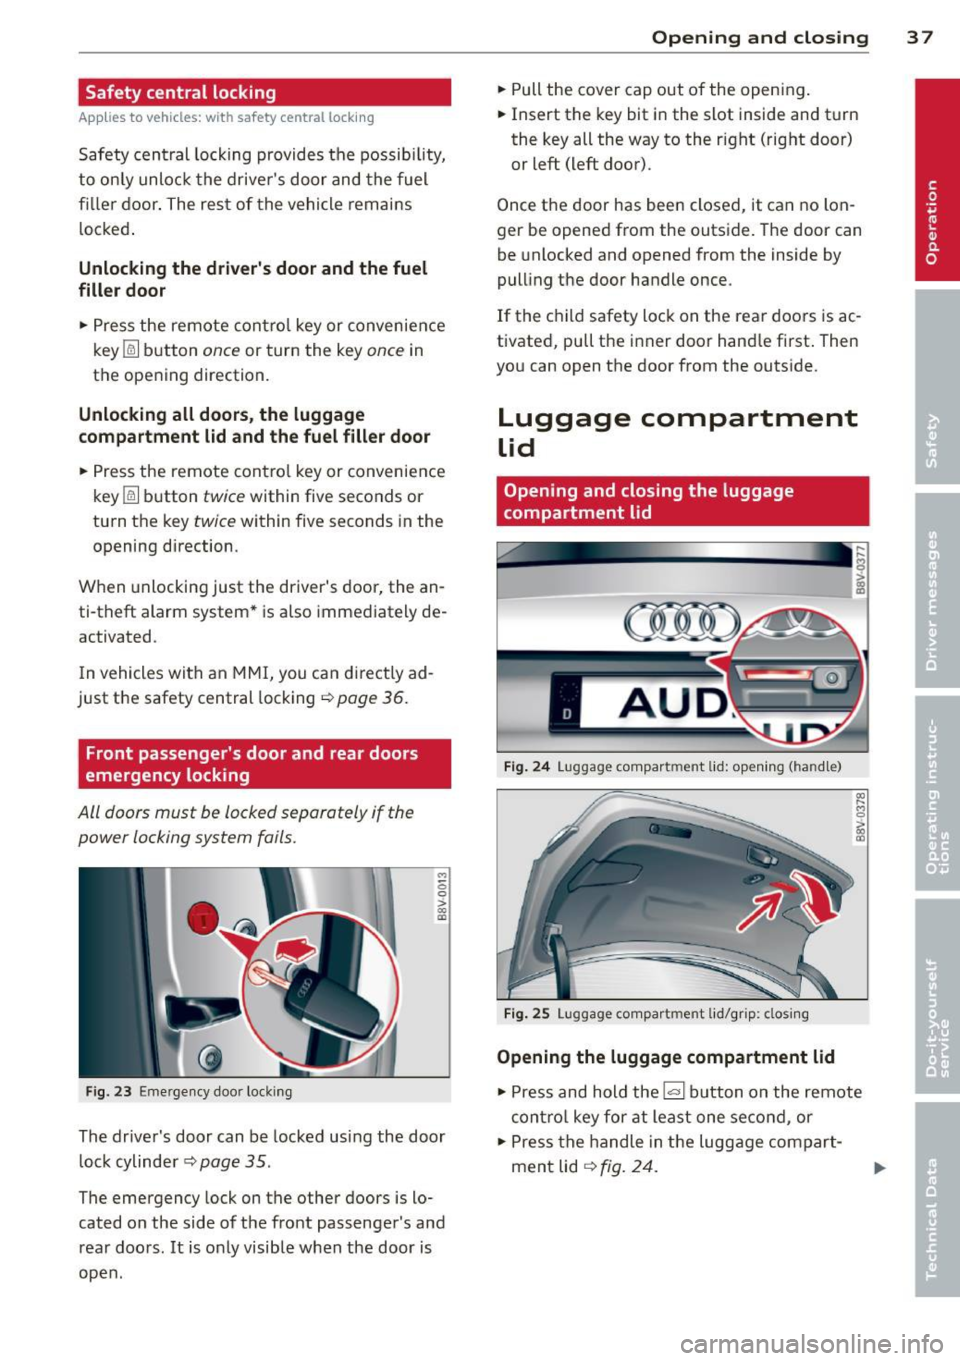
All doors must be locked separately if the
power locking system fails.
Fig. 23 Emergency door locking
..,
0 0 >
::l
The drive r's door can be locked using the door
lock cylinder ~
page 35.
The emergency lock on the other doors is lo
cated on the side of the front passenger's and rear doors. It is only visible when the door is
open .
Opening and closing 3 7
.,. Pull the cover cap out of the opening.
.,. Insert the key bit in the slot inside and turn
the key all the way to the right (right door)
or left (left door).
Once the door has been closed, it can no lon
ger be opened from the outside. The door can
be unlo cked and opened from the inside by
pulling the door handle once .
If the child safety lock on the rear doors is ac
tivated, pull the inner door handle first. Then
you can open the door from the outside.
Luggage compartment
Lid
Opening and closing the luggage
compartment lid
Fig. 24 Luggage compart ment lid: opening (ha ndl e)
Fig. 25 Luggage compartment lid/grip: clos ing
Opening the luggage compartment lid
.., 0 > co a:,
.,. Press and hold the l= I button on the remote
contro l key for at least one second, or
.,. Press the handle in the luggage compart
ment lid
q fig. 24.
Page 40 of 288
38 Openin g and clo sing
Clo sing th e lugg ag e compartm ent lid
.,. Use the inside grip to pull the l uggage com
partment lid down and allow it to drop
gently to close it ¢
fig. 25 ¢ A.
,& WARNING
-After closing the luggage compartment
lid, make sure that it is latched. Other
wise the luggage compartment lid could
suddenly open when driving, which in
creases the risk of an accident.
- Never drive with the luggage compart
ment lid ajar or open, because po isonous
gases can enter the veh icle interior and
create the risk of asphyxiation.
- Never leave you r vehicle unattended, es
pecially with the luggage compartment
lid left open. A child could crawl in to the
car thro ugh t he luggage compartment
and pull the lid shut, becom ing trapped
and unab le to get out. To reduce the risk
of personal injury, never let children play
in or around your vehicle. A lways keep
the rear lid as well as the vehicle doors
closed when not in use.
-Always ensure that no one is w ith in
range of the rear lid when it is moving, in
particular close to the h inges -fingers or
hands can be pinched .
@ Tips
-When the vehicle is locked, the luggage
compartment lid can be unlocked sepa
rately by pressing the~ button on the
remote control key. When the luggage
compartment lid is closed aga in, it locks
automatically.
- In case of an emergency or a faulty han
dle, the luggage compartment lid can be
opened from the inside¢
page 246.
Child safety Lock
Child safety lock
Applies to vehicles: with mechanical child safety lock
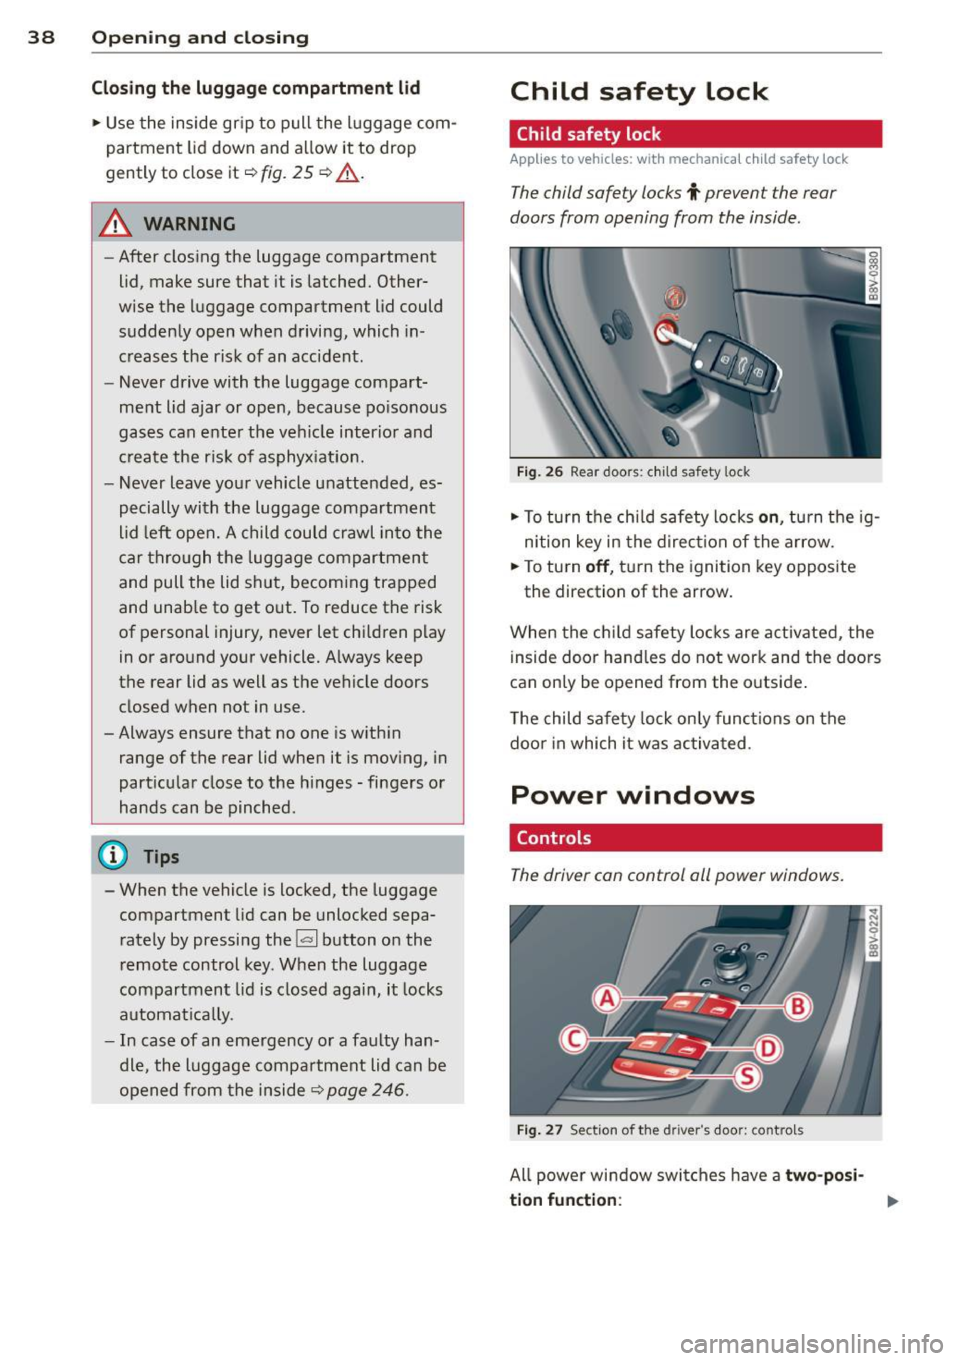
The child safety locks t prevent the rear
doors from opening from the inside .
Fig. 26 Rear doors: chi ld safety lock
.,. To tu rn t he chi ld safety locks o n, turn the ig
n ition key in the d irec tion of the arrow.
.,. To turn
off , turn the ignition key opposite
the direction of the arrow.
When the ch ild safety locks are activated, the
i nside door hand les do not work and the doors
can only be opened from the outside .
The child safety lock only functions on the
doo r in which it was activated .
Power windows
Controls
The driver con control all power windows.
Fig. 27 Sect ion of the dri ver ·s doo r: co ntro ls
All power window switches have a two- posi
ti on f unc tion:
Page 41 of 288
Opening th e windows
"' Press the sw itch to the fir st sto p and hold i t
until the window reaches the desi red posi
tion .
"' Press the switch briefly to the
se cond stop
to automatic ally open the window .
Clos ing th e windows
"' Pull the swi tch to t he fir st sto p and hold it
until the window reaches the desi red posi
tion .
"' Pull the switch briefly to the
sec on d s top to
automatica lly close the window .
Pow er wi nd ow switch es
@ Sw itch c::> fig. 2 7 f or the window in the
driver's door.
@ Sw itch for the window in the fron t pas
senger 's door .
© Switch for the window in the left rear
door.
@ Sw itch for the window in the r ight re ar
door.
® Safety bu tton* .
Child safe ty lock
When the safety button® c::> fig. 2 7 is press
ed, the~ symbol in the button lights up . The
power w indow switches in the rear doors are
switched off.
A WARNING
- Always remove the ignition key when you
leave your vehicle, even for a short peri
od of time . This applies particularly when
children remain in the vehicle . Otherwise
the chi ldren could start the engine or op
erate electrical equ ipment such as power
windows. The power windows continue
to function unt il the driver 's door or
front passenger's door has been opened .
- Pay carefu l attent ion when closing the
window . It could cause injury by pinch
ing.
- When locking the veh icle from outs ide,
the vehicle must be unoccupied s ince the
Opening and clo sin g 39
windows can no longer be opened in an
emergency.
(D Tips
After turning the ignition off you can s till
open and close the windows for approxi mately 10 seconds. The power windows
are not switched off until the driver's door
or front passenger's door has been
opened .
Convenience opening/closing
With the convenience open ing/closing func
tion, you can centrally and eas ily ope n the
windows and the pano rama sunroof* from the
o utside.
Convenienc e opening
"' Press the open button~ on the remote con
trol key u ntil all w indows and the panorama
sunroof* have reached the desired position,
or
"' First unlock the vehicle using the open but
ton
Im on the remote cont ro l key and then
keep the key in the lock on the driver's door
until a ll windows and the and the panorama
sunroof* have reached the desired position .
Conven ience closing
"' Hold the key in the lock on the drive r's door
i n the closed position unt il a ll windows and
the panorama sunroof * are closed.
Adjusting the convenience opening in the
MMI
"' Select: !MENU I > button System s contro l
button or
Car s ystems > Vehicle settings >
C entral locking > Open windows b y press
ing long
or > F ront windo ws on /off or Roof
on /off *.
A WARNING
- Be careful when clos ing the windows and
panorama sunroof* - the re is a risk of in-
Jury.
li1'-
•
Page 42 of 288
40 Opening and clo sing
- For security reasons, the windows can
only be opened with the remote control
key at a maximum distance of 2 meters
from the vehicle .
- Pay attention when using the lock cylin
der to close the windows and the panora
ma sunroof* so that no one is pinched.
Clos ing stops when the key is moved into
the starting pos ition.
Correcting power window malfunctions
After disconnecting the vehicle battery, the
one-touch up and down feature must be acti
vated again .
.. Pull the power window sw itch until the w in
dow is comp lete ly raised.
.,. Release the switch and pull it again for at
least one seco nd.
Panorama sunroof
Description
Applies to vehicles: with pa norama sunroo f
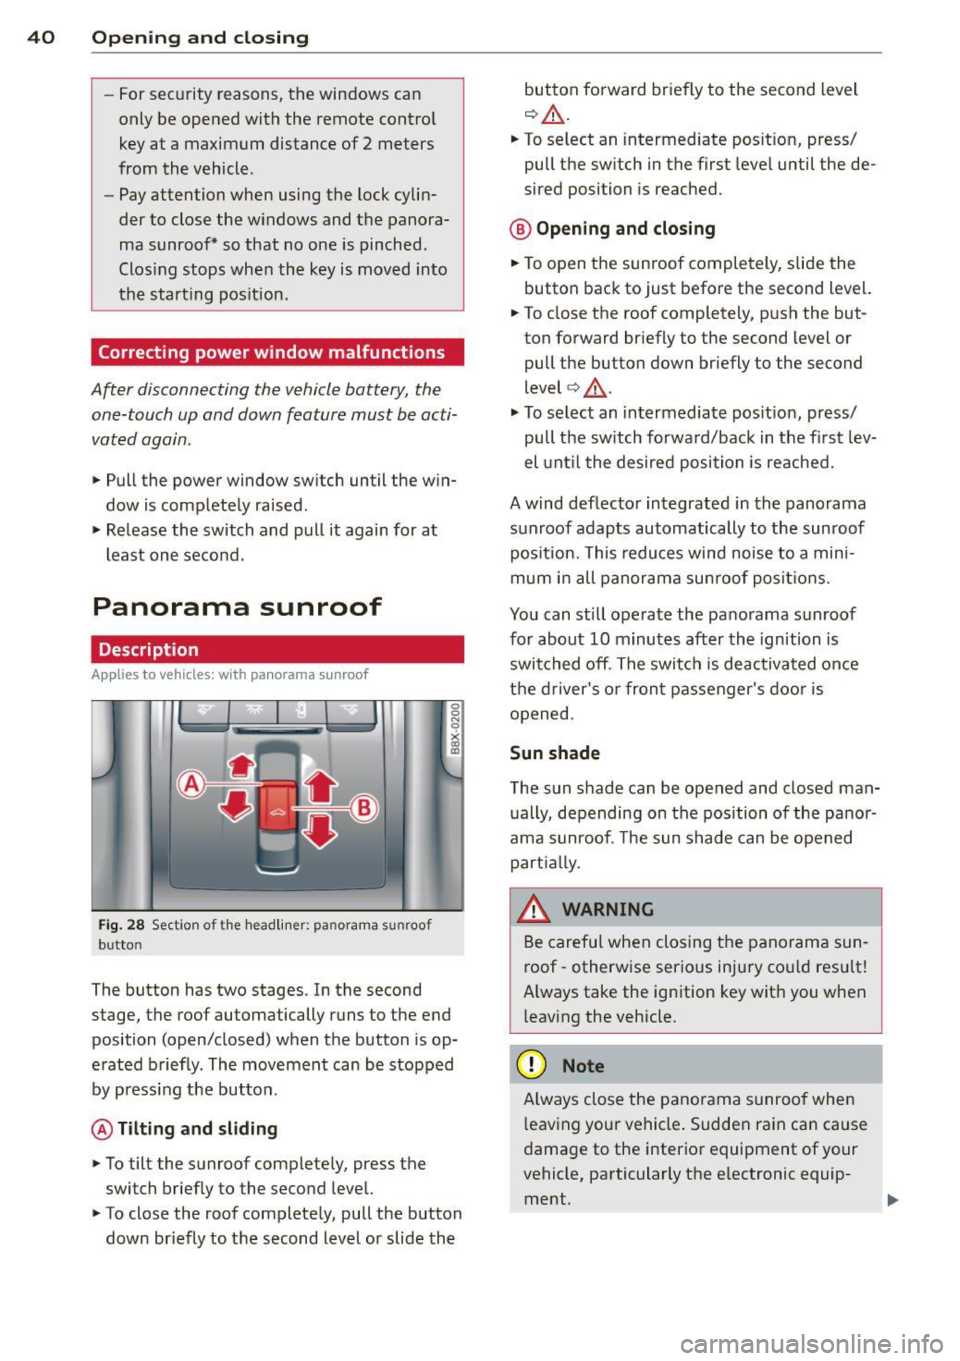
Fig. 28 Section of the head liner: panorama s unroo f
butto n
The button has two stages. In the second
stage, the roof automatically runs to the end
position (open/closed) when the button is op
e rated b riefly. The movement can be stopped
by pressing the button .
@ Tilting and sliding
.. To tilt the sunroof complete ly, press the
switch brief ly to the second leve l.
.. To close the roof complete ly, pull the button
down briefly to the second lev el or slide the button forward br
iefly to the second level
¢ .&_ .
.. To select an intermediate pos it ion, press/
pull the sw itch in the first leve l until the de
sired position is reached.
® Op ening and closing
.. To open the sunroof completely, slide the
button bac k to just before the second level.
.. To close the roof completely, p ush the but
ton forward briefly to the second level or
pull the button down briefly to the second
level ¢.&_ .
.,. To se lect an in termediate pos it ion, press/
pull the sw itch forwa rd/back in the fi rst lev
el unt il the desired po sit ion is reached .
A wind deflector integrated in the panorama
s u nroof adapts automatically to the sunroof
pos ition. This reduces wind noise to a mini
mum i n all panorama sunroof pos itions.
You can still operate the pa no rama s unroof
for about 10 minutes aft er th e ignition is
switched off . T he swi tch is deactivated once
t h e dr iver's o r fron t passenger's door is
opened.
Sun shade
T he sun shade can be opened and closed man
u ally, depending on the position of the panor
ama sunroof. The sun s hade can be opened
part ia lly.
_& WARNING
=
B e carefu l when closing t he pano rama sun -
r oof -otherw ise serio us in ju ry co uld resu lt!
A lways take the ign ition key wit h you when
l eaving the vehicle.
(D Note
A lways close t he panor ama s unroo f whe n
l eav ing your ve hicle . Sudde n rain can cause
d amage to the interio r equipment of your
vehicle, particularly the e lectronic equip-
ment .
ll>
Page 47 of 288
Canada models: The function cannot be
turned
off. It is activated automatical ly each
time the ignition is switched on .
Interior lighting
Front and rear interior light ing f ront
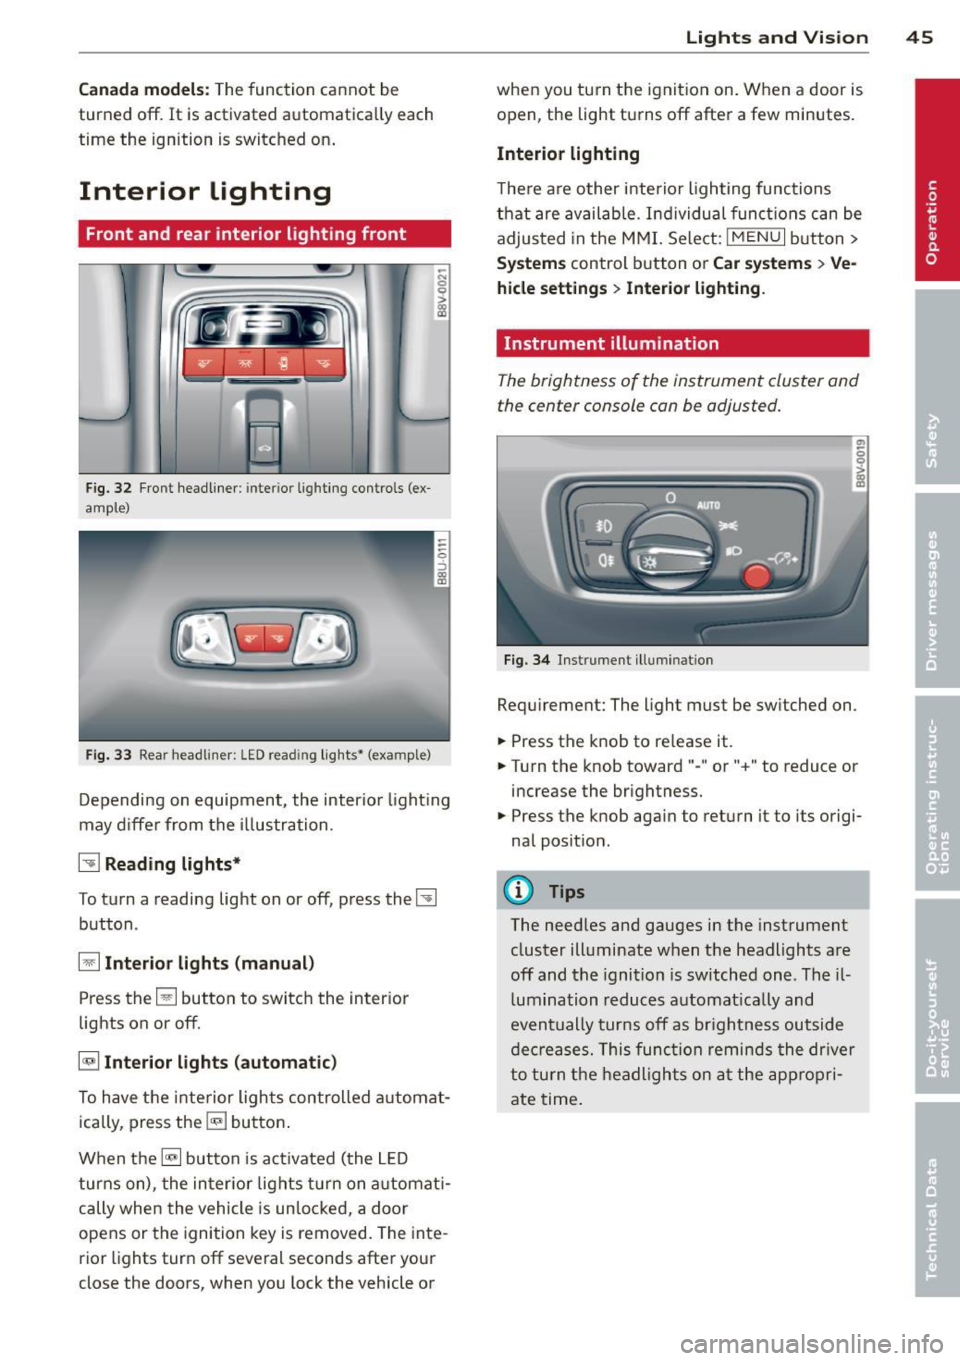
Fig. 32 Fr ont headliner : inter io r lighting controls (ex
ample)
Fig. 33 Rear headliner: LED read ing lights~ (example)
-N 0 0
i
Depending on equipment, the interior lighting
may differ from the illustration .
~ Reading lights*
To turn a reading light on or off, press the~
button .
§J Interior lights (manual)
Press the El button to switch the interior
lights on or
off.
§] Interior lights (automatic)
To have the interior lights controlled automat
ically, press the§] button .
When the§] button is activated (the LED
turns on), the interior lights turn on automat i
cally when the vehicle is un locked, a door
opens or the ignition key is removed. The inte
rior lights turn
off several seconds after your
close the doors, when you lock the vehicle or
Lights and Vision 45
when you turn the ignit ion on. When a door is
open, the light turns
off after a few minutes.
Interior lighting
T here are other interior lighting functions
that are available. Individual functions can be
adjusted in the MMI. Select:
IMENUI button>
Systems control button or Car systems > Ve
hicle settings> Interior lighting.
Instrument illumination
The brightness of the instrument cluster and
the center console con be adjusted.
Fig. 34 Instrument illuminat ion
Requirement: The light must be switched on .
.. Press the knob to release it.
.. Turn the knob toward"-" or"+" to reduce or
increase the brightness.
.. Press the knob again to return it to its origi
nal position .
(!} Tips
The needles and gauges in the instrument
cluster illuminate when the headlights are
off and the ignition is switched one. Theil
lumination reduces automatically and
eventually turns
off as brightness outside
decreases. This function reminds the driver
to turn the headlights on at the appropri
ate time.
Page 50 of 288

48 Lig hts an d Vi sion
paint on the hood or th e windshield wip
er motor.
- You should not drive your vehicle or
press the windshield wiper lever when
the wiper arms are folded away from the
windshield . The windshield wipers would
move back into their original position
and could damage the hood and w ind
shield .
- To help preven t damage to the wiper sys
tem , always loosen blades which are fro
zen to the windsh ield before ope rat ing
wipers .
- To he lp prevent damage to w iper blades,
do not use gasoline, ke rosene, pa int
th inner, or other so lvents on or near the
wiper blades.
- To he lp prevent damage to the wiper
arms or other components , do not at
tempt to move the wipers by hand .
(D Tips
-Commercial hot waxes applied by auto
matic car washes affe ct the cleanability
of the wi ndshield .
- You can also use the servic e pos ition, for
example , if you want to pro tect the
winds hield from i cing by using a cover .
- You cannot activate the service posit ion
when the hood is open.
Mirrors
Adjusting the exterior mirrors
F ig. 38 Driver's door: knob for th e exteri or mirro rs (e x·
amp le )
Turn the knob to the desired position : Q/P
-In this pos ition, yo u can adjust the
driver 's and front passenger 's exter ior mi rrors
by turning the knob in the desi red d irection.
4ill -The m irrors a re heated* depending on the
outside temperature and driv ing speed.
8 -The exter io r mir rors a re fo lded in* .
Front passenger's exterior mirror tilt
function*
T o he lp you see the curb when backing into a
parking space, the surface of the mir ror can
be ti lted s light ly. The knob must be in the P
pos ition for this to happen.
You can adjust the tilted m irror surface by
tu rning the knob in the desired d irect ion.
When you move out of reverse and into anoth
er ge ar, the new m irror position is s tored and
assigned to the key you a re using.
T he m irror goes ba ck into its orig inal position
once you drive forward fas te r than 9 mph
(15 km/h) o r turn the ignition off .
Folding mirrors in and out
To fold the mir ro rs in with the knob, turn the
k nob in the 8 position .
To fold the m irrors ou t, turn the knob in the
Q or P or O pos ition .
Applies to vehicles with MMI: You can adjust if
t h e mirrors fold when locking the vehicle
c> page 36. When you lock the vehicle, the
mir rors fo ld in. When you start the ignition,
t h e mirrors fold out .
A WARNING
-Curved mirror surfaces (convex o r asph e-
r ic *) enlarge the field of v is ion. However,
they ma ke objec ts in the mirror appe ar
smaller and fart her away . Your may es ti
mate incorrect ly when you use t hese mir
rors to gauge yo ur distance from the
vehicles beh ind yo u when changing lanes -
accident r isk!
Page 56 of 288
54 Seats and storage
maximum protection when the backrest
is upright and the safety belts are prop
erly positioned on the body. The more
the backrest is reclined, the greater the
risk of personal injury from an incorrect
seating position and improperly posi
tioned safety belts.
Power seat adjustment
Appl ies to vehicles: with power a djustable seats
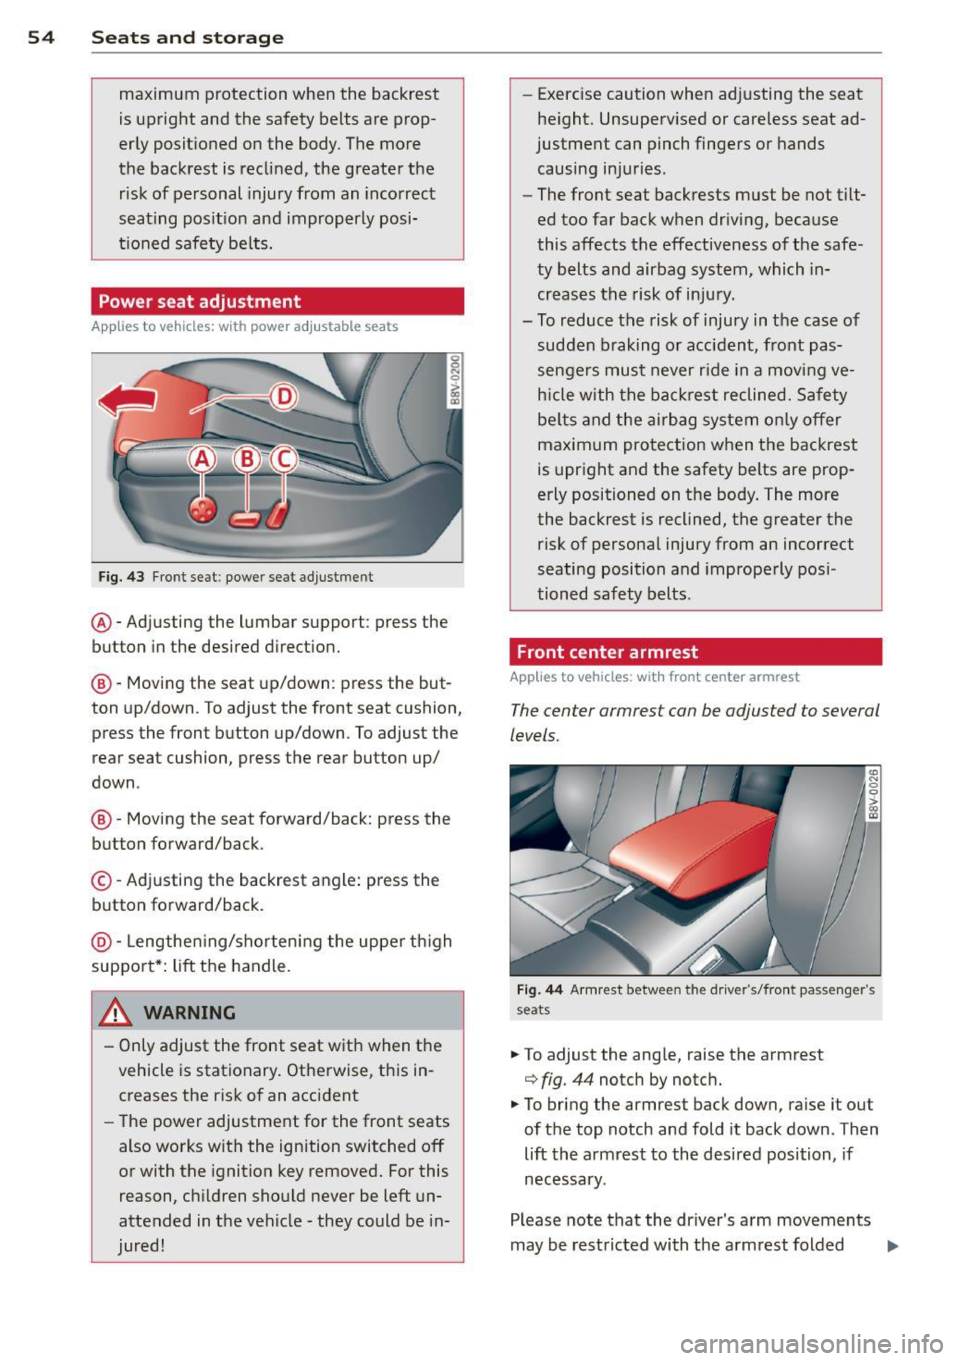
Fig. 43 Front seat: power seat adjustment
@-Adjusting the lumbar support: press the
button in the desired direction.
@-Moving the seat up/down: press the but
ton up/down . To adjust the front seat cushion,
press the front button up/down. To adjust the
rear seat cushion, press the rear button up/
down .
@-Moving the seat forward/back: press the
button forward/back.
©-Adjusting the backrest angle: press the
button forward/back.
@-Lengthening/shortening the upper thigh
support*: lift the handle.
.&_ WARNING
- Only adjust the front seat with when the
vehicle is stationary. Otherwise, this in
creases the risk of an accident
- The power adjustment for the front seats
also works with the ignition switched off
or with the ignition key removed. For this
reason, children should never be left un
attended in the vehicle -they could be in
jured! -
Exerc ise caution when adjusting the seat
height. Unsupervised or careless seat ad
justment can pinch fingers or hands
causing injuries .
- The front seat backrests must be not tilt
ed too far back when driving, because
this affects the effectiveness of the safe
ty belts and airbag system, which in
creases the risk of injury.
- To reduce the risk of injury in the case of sudden braking or accident, front pas
sengers must never ride in a moving ve
hicle with the backrest reclined. Safety
belts and the airbag system only offer
maximum protection when the backrest
is upright and the safety belts are prop
erly positioned on the body. The more
the backrest is reclined, the greater the
risk of personal injury from an incorrect
seating position and improperly posi
tioned safety belts.
Front center armrest
App lies to vehicles: wit h front cente r armrest
The center armrest con be adjusted to several
levels.
Fig. 44 A rmr est between the driver's/fro nt passenger's
seats
.. To adjust the ang le, raise the armrest
¢ fig. 44 notch by notc h.
.. To bring the armrest back down, raise it out
of the top notch and fold it back down . Then
lift the armrest to the desired position, if
necessary .
Please note that the driver 's arm movements
may be restricted with the armrest folded
Ill>
Page 59 of 288
unattended in the vehicle with the vehicle
key.
(D Note
To avoid damaging the socket, only use
plugs that fit properly.
- Never connect equipment that generates
electrical current, such as a solar panel
or battery charger, to the 12-volt socket.
This could damage the vehicle's e lectri
cal system .
- The 12-volt socket should only be used
for a short period of time as a power
source for electrical equipment . Please
use the electrical sockets in the vehicle
when connecting equipment for longer periods .
- To avoid damaging the socket, only use
plugs that fit properly .
{D) Tips
The vehicle battery drains when accesso
ries are turned on but the engine is off .
Storage
Beverage holders
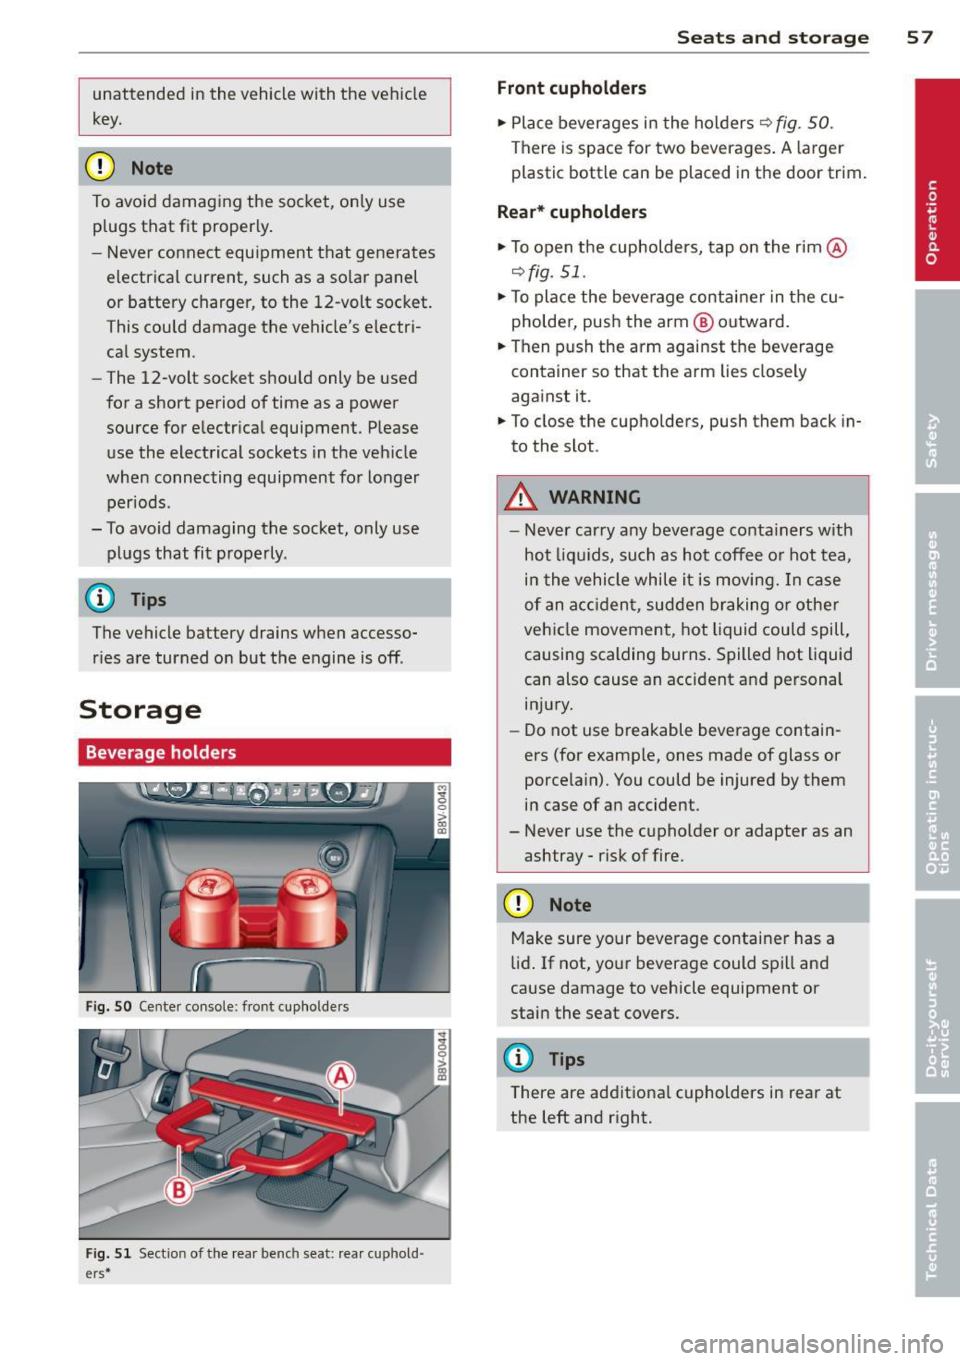
Fig. 50 Center console: front cupho lde rs
Fig. 51 Sect ion of the rear benc h seat: rea r cuphold ·
e rs *
Seats and storage 57
Front cupholders
.,. Place beverages in the holders ¢ fig . SO.
There is space for two beverages. A larger
plastic bottle can be placed in the door trim.
Rear* cupholders
.,. To open the cupholders, tap on the rim @
¢fig. 51.
.,. To place the beverage container in the cu
pholder, push the arm @ outward.
.,. Then push the arm against the beverage
container so that the arm lies closely
against it.
.,. To close the cupholders, push them back in
to the slot .
A WARNING
-
- Never carry any beverage conta iners with
hot liqu ids, such as hot coffee or hot tea,
in the vehicle while it is moving. In case
of an acc ident, sudden braking or other
vehicle movement, hot liquid could spill,
causing scalding burns. Spilled hot liquid
can also cause an accident and personal injury.
- Do not use breakable beverage contain
ers (for example, ones made of glass or
porcelain). You could be injured by them
in case of an accident .
- Never use the cupholder or adapter as an
ashtray -risk of fire.
(D Note
Make sure your beverage container has a
lid. If not, your beverage could spill and
cause damage to vehicle equipment or
stain the seat covers.
(D Tips
There are additiona l cupholders in rear at
the left and right.
Page 60 of 288
58 Seats and storage
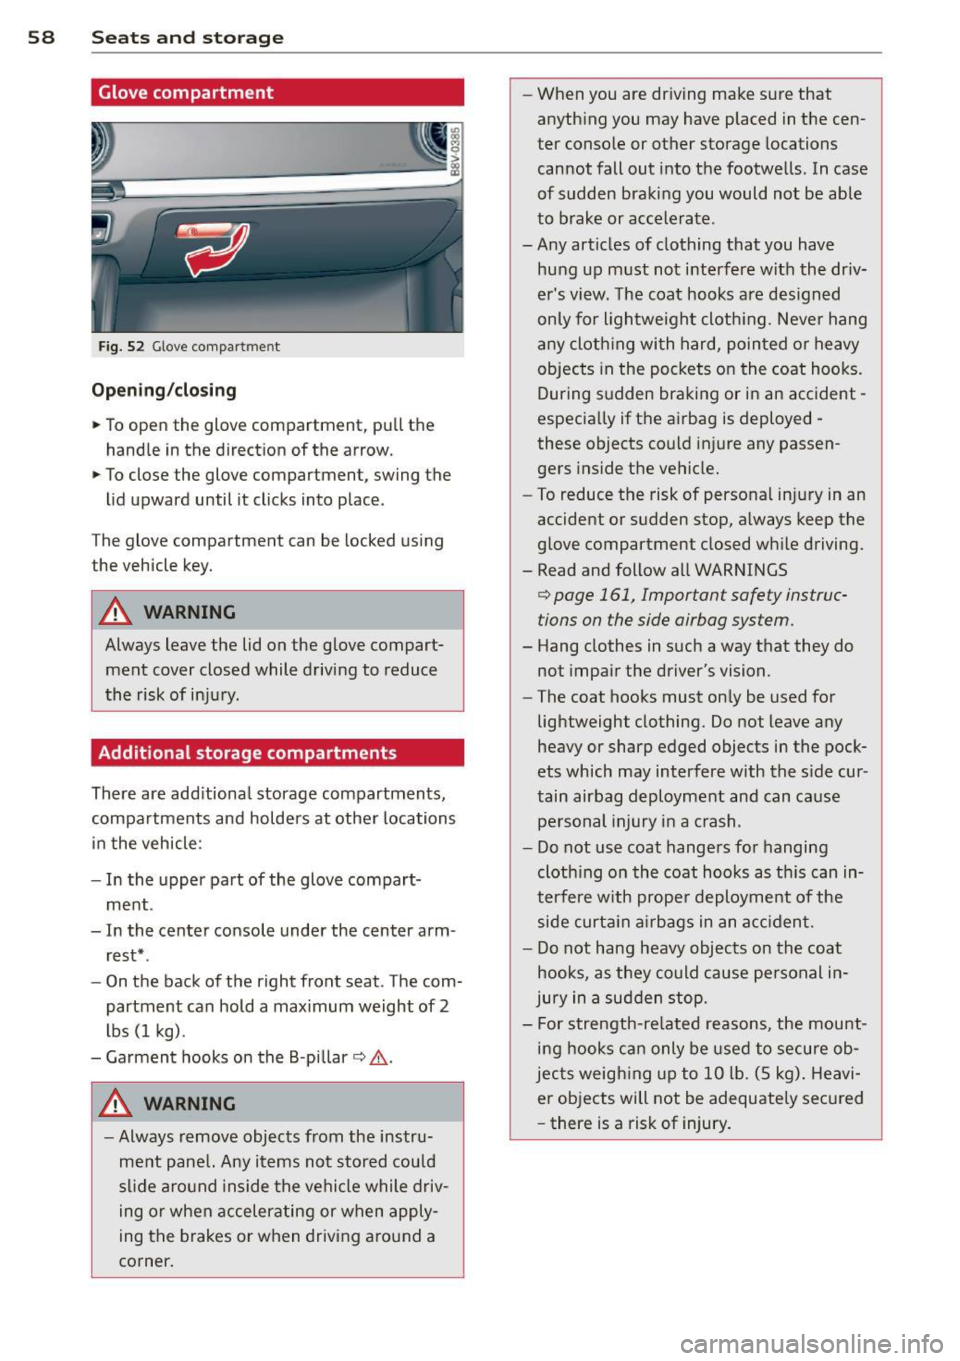
Glove compartment
Fig. 52 Glove compa rt m en t
Open ing /closing
,,. To open the glove compartment, pull the
handle in the direct ion of the arrow.
,,. To close the glove compartment, swing the
lid upward until it clicks into place .
The glove compartment can be locked using
the vehicle key.
A WARNING
Always leave the lid on the glove compart ment cover closed while driving to reduce
the risk of in ju ry .
Additional storage compartments
There are add itiona l storage compartments,
compartments and holders at other locations
in the vehicle :
- In the upper part of the glove compart
ment .
- In the center console under the center arm rest* .
- On the back of the right front seat. The com
partment can hold a max i mum weight of 2
lbs (1 kg) .
- Garment hooks on the B -pillar
c:> A .
A WARNING
-Always remove objects from the instru
me nt pane l. Any items not stored could
s li de aro und inside the vehicle while driv
ing or when accelerating or when apply
ing the brakes or when driving a round a
corner .
-
-When you are dr iving make sure that
anyth ing you may have placed in the cen
ter conso le or other storage locations
cannot fall out into the footwells . In case
of sudden braking you would not be able
to b rake or accele rate .
- A ny articles of clothing that you have
hung up m ust not interfere with the dr iv
e r's vi ew. The coat hooks are des igned
only for lightweight cloth ing. Neve r hang
a ny cloth ing wi th hard, pointed o r heavy
objects in the pockets on the coat hooks.
During s udden braking or in an accident -
especia lly if the airbag is deployed -
these objects cou ld injure any passen
gers inside the vehicle.
- To reduce the risk of persona l in ju ry in an
accident or s udden stop, always keep the
g love compartment closed wh ile driving.
- Read and follow all WARNINGS
<=> page 161, Important safety instruc
tions on the side airbag system.
- Hang clothes in such a way that they do
not impair the driver's vision.
- The coat hooks must on ly be used for
lightweight clothing. Do not leave any heavy or sharp edged objects in the pock
ets which may interfere w ith the s ide cur
tain airbag deployment and can cause
pe rsonal injury in a crash .
- Do not use coat hange rs fo r hanging
cloth ing o n the coat hooks as th is can in
terfere w ith prope r deployment of the
side curt ain air bags in an a cciden t.
- Do not hang heavy objects on the coat
hooks, as they could cause pe rsonal in
jury in a sud den stop.
- For strength-re lated reasons, the mount
i n g hooks ca n only be used to secure ob
jects weigh ing up to 10 lb . (5 kg) . Heavi
er objects will not be adequate ly sec ured
- there is a risk of injury.