lock AUDI A3 2015 Owner's Manual
[x] Cancel search | Manufacturer: AUDI, Model Year: 2015, Model line: A3, Model: AUDI A3 2015Pages: 288, PDF Size: 71.46 MB
Page 47 of 288
Canada models: The function cannot be
turned
off. It is activated automatical ly each
time the ignition is switched on .
Interior lighting
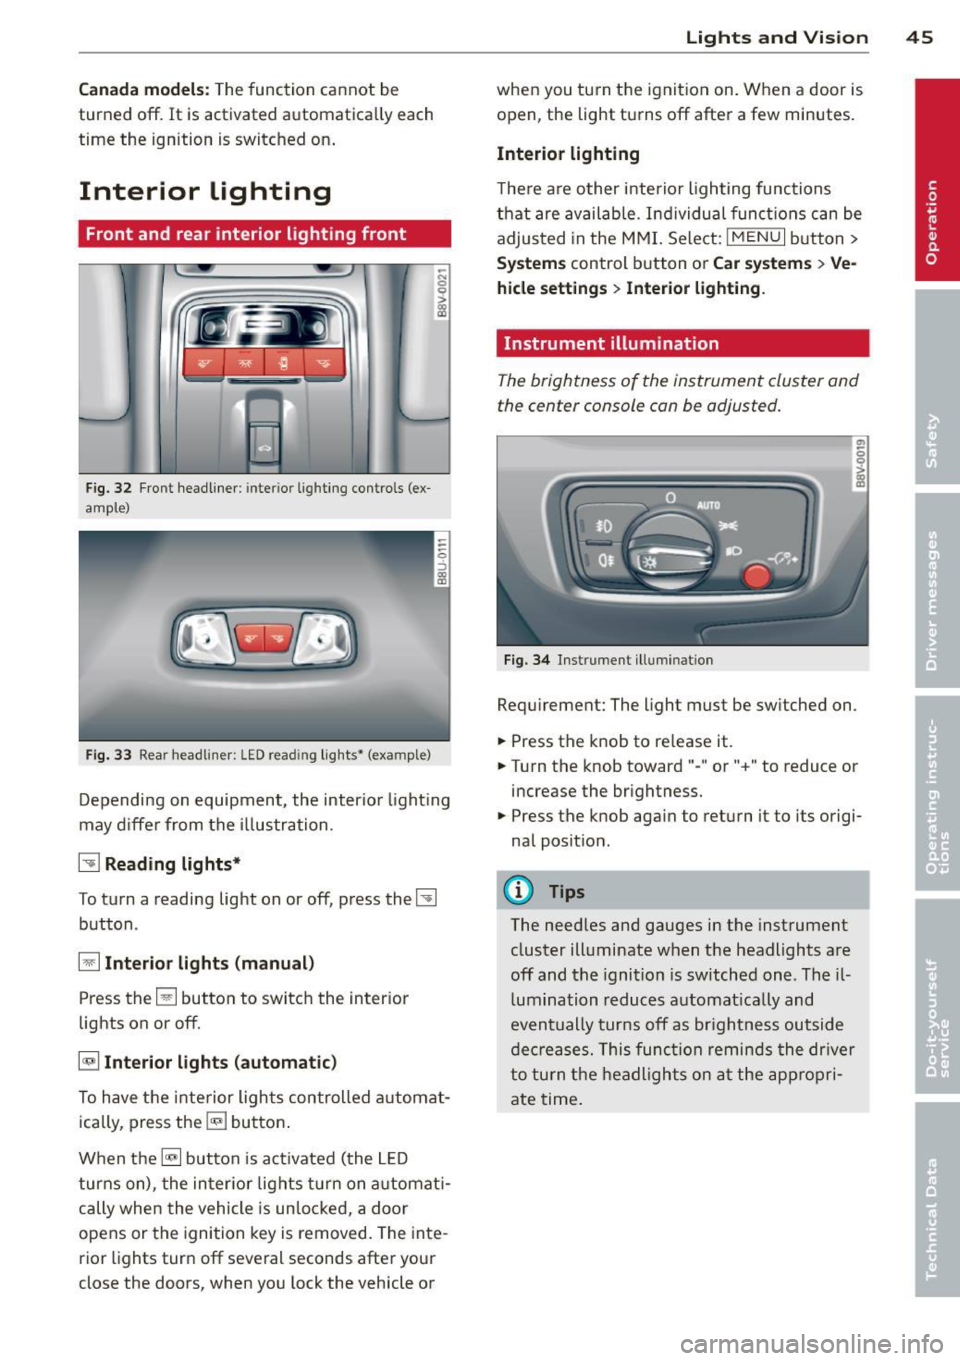
Front and rear interior light ing f ront
Fig. 32 Fr ont headliner : inter io r lighting controls (ex
ample)
Fig. 33 Rear headliner: LED read ing lights~ (example)
-N 0 0
i
Depending on equipment, the interior lighting
may differ from the illustration .
~ Reading lights*
To turn a reading light on or off, press the~
button .
§J Interior lights (manual)
Press the El button to switch the interior
lights on or
off.
§] Interior lights (automatic)
To have the interior lights controlled automat
ically, press the§] button .
When the§] button is activated (the LED
turns on), the interior lights turn on automat i
cally when the vehicle is un locked, a door
opens or the ignition key is removed. The inte
rior lights turn
off several seconds after your
close the doors, when you lock the vehicle or
Lights and Vision 45
when you turn the ignit ion on. When a door is
open, the light turns
off after a few minutes.
Interior lighting
T here are other interior lighting functions
that are available. Individual functions can be
adjusted in the MMI. Select:
IMENUI button>
Systems control button or Car systems > Ve
hicle settings> Interior lighting.
Instrument illumination
The brightness of the instrument cluster and
the center console con be adjusted.
Fig. 34 Instrument illuminat ion
Requirement: The light must be switched on .
.. Press the knob to release it.
.. Turn the knob toward"-" or"+" to reduce or
increase the brightness.
.. Press the knob again to return it to its origi
nal position .
(!} Tips
The needles and gauges in the instrument
cluster illuminate when the headlights are
off and the ignition is switched one. Theil
lumination reduces automatically and
eventually turns
off as brightness outside
decreases. This function reminds the driver
to turn the headlights on at the appropri
ate time.
Page 49 of 288
-Do not use the wipers to clear a window
that is covered with frost. Using the wip
ers as a convenient ice scraper will
destroy the wiper blades.
@ Tips
- The windshield wipers switch off when
the ignit ion is turned off. You can acti
vate the windshield wipers after the igni
tion is switched back on by moving the
windshield wiper lever to any pos ition.
- Worn or dirty windshield wiper blades
result in streaking. This can affect the
rain sensor funct ion. Check your wind
sh ield wiper blades regularly.
- The washer fluid nozzles in the w ind
sh ield washer system are heated" at low
temperatures when the ignit ion is on.
- When stopping temporarily, such as at a
traff ic light, the speed of the windsh ield
wipers automatically reduces by one lev
el.
- The rain sensor can be switched on or off
i n the MMI in the
Dr iv er a ssistan ce
menu
Cleaning windshield wiper blades
Clean the wiper blades when you see wiper
streaks. Use a soft cloth and a glass cleaner.
... Place the w indshield wiper arms i n the serv
ice position
¢ page 47.
... Fold the w indshield wiper arms away from
the windshie ld .
8_ WARNING
Dirty windshield wiper blades can impa ir
vision, which increases the risk of an acci
dent.
(D Note
If you see streaks again after cleaning the
w iper blades, the b lades must be replaced
¢page 47.
Light s and Visi on 47
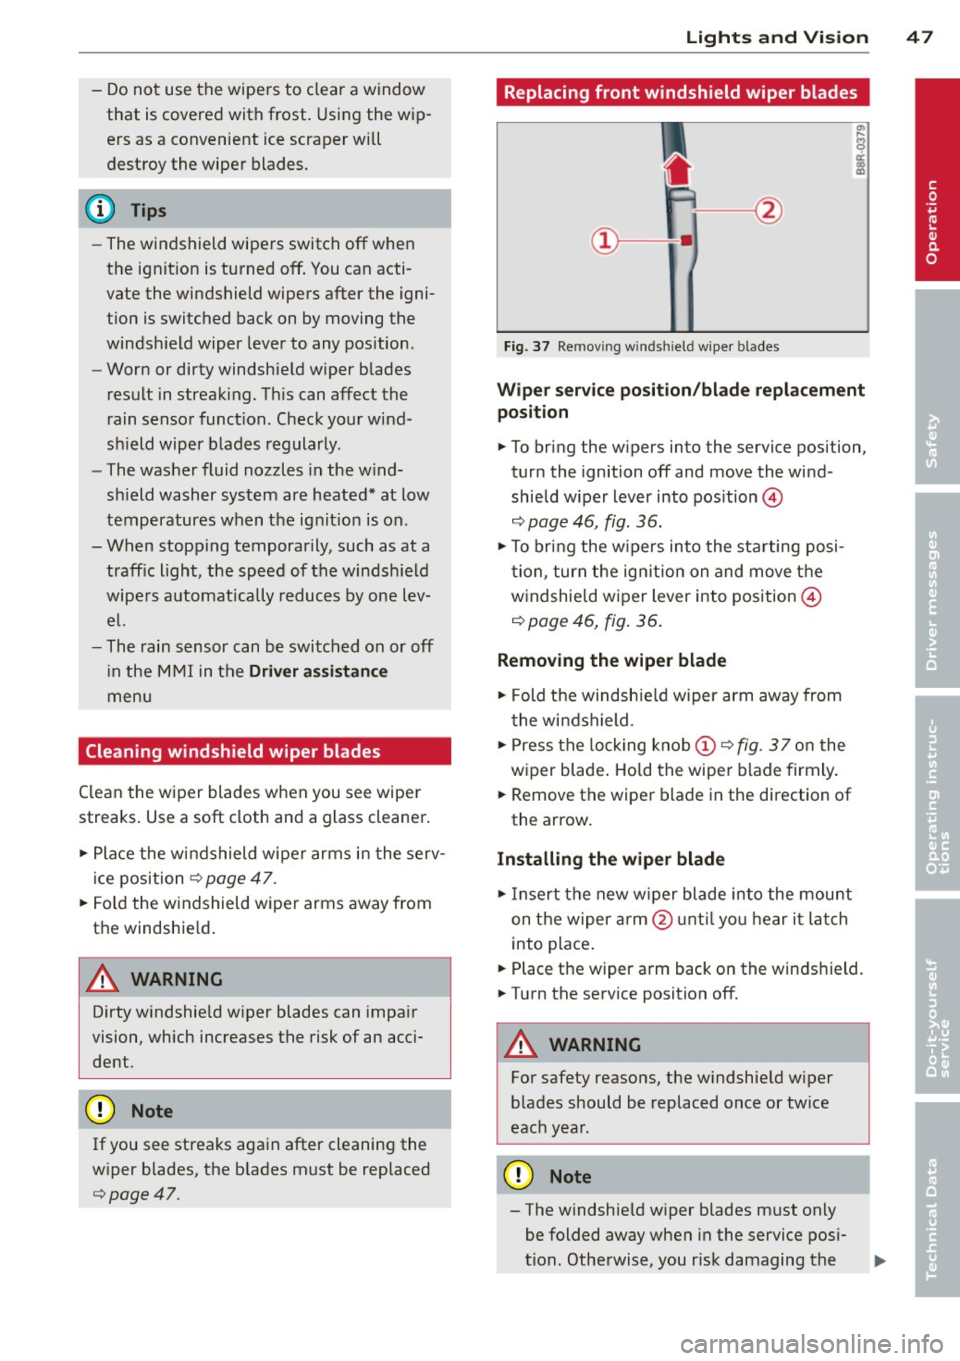
Replacing front windshield wiper blades
Fig. 37 Remov ing windshield wiper blades
Wipe r servic e posit io n/ blade re pla cement
po sition
... To bring the wipers into the service position,
turn the ignition off and move the wind
shield w iper lever into pos ition @
¢ page 46, fig. 36.
... To bring the w ipers into the s tarting posi
tion, turn the ign ition on and move the
windshie ld wiper lever into position @
¢ page 46, fig. 36 .
Removing the wiper blade
... Fold the windshield wiper arm away from
the windshield .
... Press the locking knob
(D ¢ fig . 3 7 on the
wiper blade . Hold the wiper blade firmly .
... Remove the wiper blade in the direction of
the arrow .
Installing the wiper blade
... Insert the new w iper blade into the mount
on the wiper arm @unti l you hear i t latch
into place .
... Place the wiper arm back on the winds hield.
... Turn the service position off.
8_ WARNING
For safety reasons, the windshield w iper
blades should be replaced once or tw ice
each year.
(D Note
- The windshield wiper blades must on ly
be folded away when in the service posi
tion. Otherwise, you r isk damaging the
-
•
Page 50 of 288

48 Lig hts an d Vi sion
paint on the hood or th e windshield wip
er motor.
- You should not drive your vehicle or
press the windshield wiper lever when
the wiper arms are folded away from the
windshield . The windshield wipers would
move back into their original position
and could damage the hood and w ind
shield .
- To help preven t damage to the wiper sys
tem , always loosen blades which are fro
zen to the windsh ield before ope rat ing
wipers .
- To he lp prevent damage to w iper blades,
do not use gasoline, ke rosene, pa int
th inner, or other so lvents on or near the
wiper blades.
- To he lp prevent damage to the wiper
arms or other components , do not at
tempt to move the wipers by hand .
(D Tips
-Commercial hot waxes applied by auto
matic car washes affe ct the cleanability
of the wi ndshield .
- You can also use the servic e pos ition, for
example , if you want to pro tect the
winds hield from i cing by using a cover .
- You cannot activate the service posit ion
when the hood is open.
Mirrors
Adjusting the exterior mirrors
F ig. 38 Driver's door: knob for th e exteri or mirro rs (e x·
amp le )
Turn the knob to the desired position : Q/P
-In this pos ition, yo u can adjust the
driver 's and front passenger 's exter ior mi rrors
by turning the knob in the desi red d irection.
4ill -The m irrors a re heated* depending on the
outside temperature and driv ing speed.
8 -The exter io r mir rors a re fo lded in* .
Front passenger's exterior mirror tilt
function*
T o he lp you see the curb when backing into a
parking space, the surface of the mir ror can
be ti lted s light ly. The knob must be in the P
pos ition for this to happen.
You can adjust the tilted m irror surface by
tu rning the knob in the desired d irect ion.
When you move out of reverse and into anoth
er ge ar, the new m irror position is s tored and
assigned to the key you a re using.
T he m irror goes ba ck into its orig inal position
once you drive forward fas te r than 9 mph
(15 km/h) o r turn the ignition off .
Folding mirrors in and out
To fold the mir ro rs in with the knob, turn the
k nob in the 8 position .
To fold the m irrors ou t, turn the knob in the
Q or P or O pos ition .
Applies to vehicles with MMI: You can adjust if
t h e mirrors fold when locking the vehicle
c> page 36. When you lock the vehicle, the
mir rors fo ld in. When you start the ignition,
t h e mirrors fold out .
A WARNING
-Curved mirror surfaces (convex o r asph e-
r ic *) enlarge the field of v is ion. However,
they ma ke objec ts in the mirror appe ar
smaller and fart her away . Your may es ti
mate incorrect ly when you use t hese mir
rors to gauge yo ur distance from the
vehicles beh ind yo u when changing lanes -
accident r isk!
Page 57 of 288
down. For this reason, the armrest should not
be folded down when driving in city traffic.
The arm rest can slide forward and back.
There is a storage compartment under the
armrest .
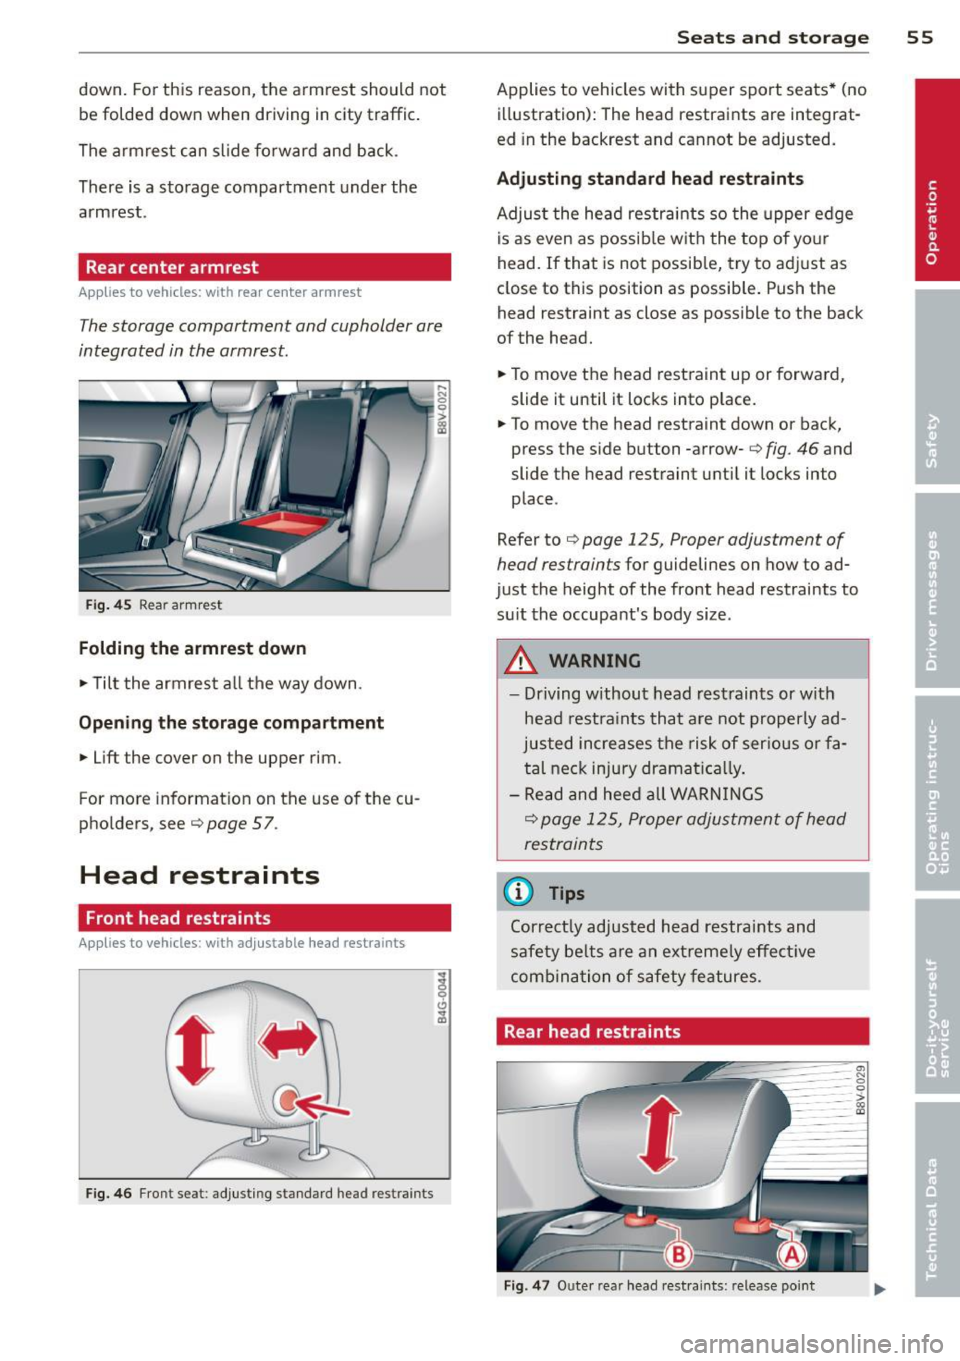
Rear center armrest
Applies to vehicles : wit h rear center armrest
The storage compartment and cupholder are
integrated in the armrest.
Fig. 45 Rear armrest
Folding the armrest down
~ Tilt the armrest all the way down .
Opening the storage compartment
~ Lift the cover on the upper rim.
For more information on the use of the cu
pholders, see¢
page 57 .
Head restraints
Front head restraints
Applies to vehicles : wit h adjustab le head restra ints
Fig. 46 Front seat : adjusting standard head restraints
Seats and storage 55
Applies to vehicles with super sport seats* (no
illustration): The head restraints are integrat
ed in the backrest and cannot be adjusted.
Adjusting standard head restraints
Adjust the head restraints so the upper edge
i s as even as possible with the top of your
head. If that is not possible, try to adjust as
close to this position as possib le. Push the
head restraint as close as possible to the back
of the head.
~ To move the head restraint up or forward,
slide it until it locks into place.
~ To move the head restraint down or back,
press the side button -arrow-¢
fig. 46 and
slide the head restraint until it locks into
place .
Refer to ¢
page 12 5, Proper adjustment of
head restraints
for guidelines on how to ad
just the height of the front head restraints to
su it the occupant's body size.
A WARNING
-Driving without head restraints or with
head restra ints that are not properly ad
justed increases the risk of ser ious or fa
tal neck injury dramatically.
- Read and heed all WARNINGS
¢ page 12 5, Proper adjustment of head
restraints
(D Tips
Correct ly adjusted head restraints and
safety belts are an extreme ly effective
combina tion of safety features.
, Rear head restraints
Fig . 47 Outer rear head restraint s: release point
-
Page 60 of 288
58 Seats and storage
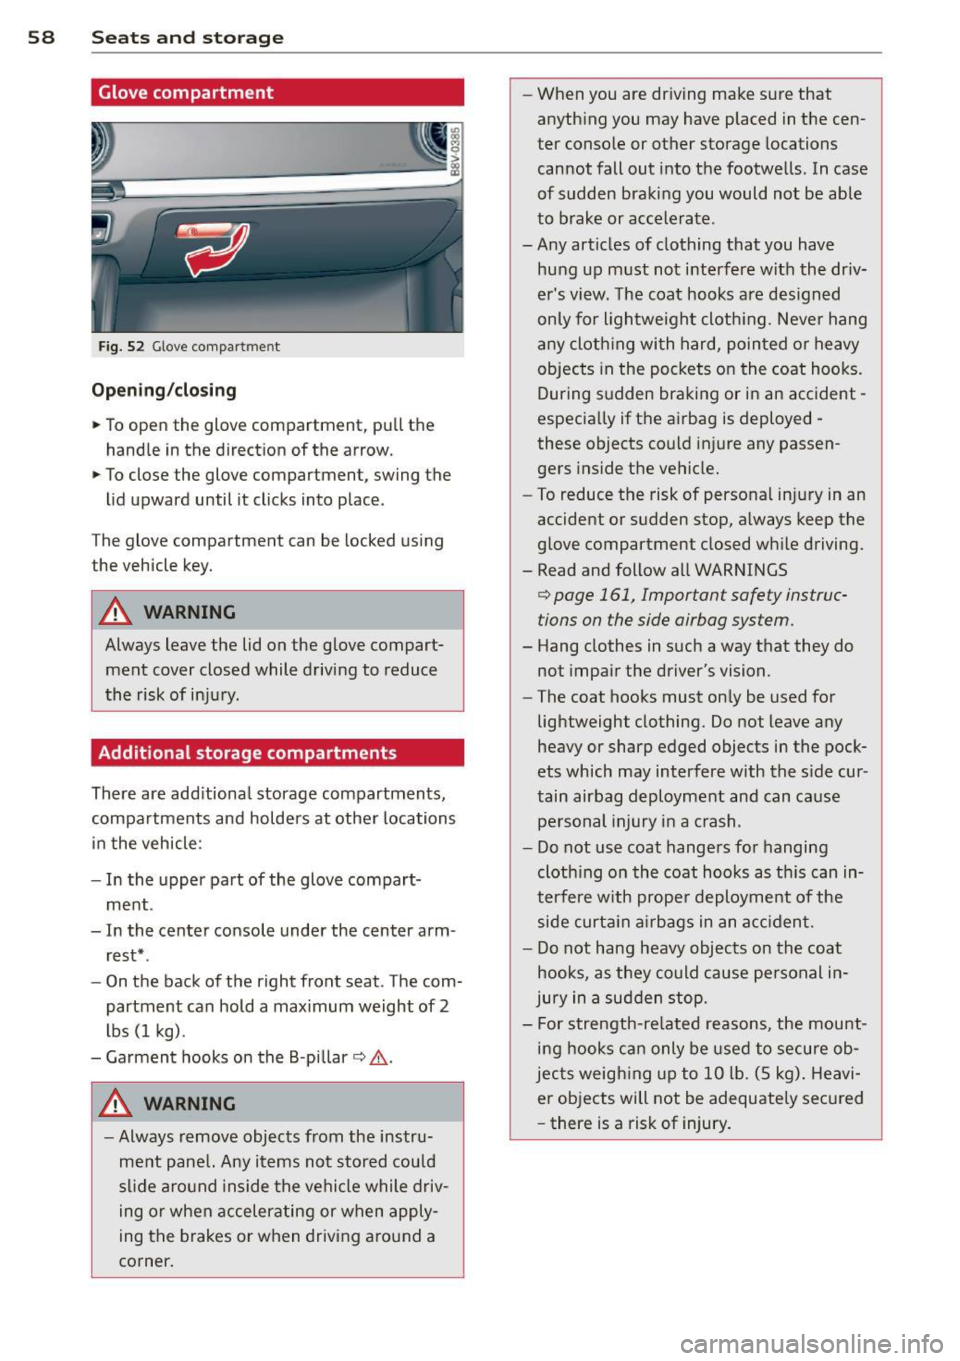
Glove compartment
Fig. 52 Glove compa rt m en t
Open ing /closing
,,. To open the glove compartment, pull the
handle in the direct ion of the arrow.
,,. To close the glove compartment, swing the
lid upward until it clicks into place .
The glove compartment can be locked using
the vehicle key.
A WARNING
Always leave the lid on the glove compart ment cover closed while driving to reduce
the risk of in ju ry .
Additional storage compartments
There are add itiona l storage compartments,
compartments and holders at other locations
in the vehicle :
- In the upper part of the glove compart
ment .
- In the center console under the center arm rest* .
- On the back of the right front seat. The com
partment can hold a max i mum weight of 2
lbs (1 kg) .
- Garment hooks on the B -pillar
c:> A .
A WARNING
-Always remove objects from the instru
me nt pane l. Any items not stored could
s li de aro und inside the vehicle while driv
ing or when accelerating or when apply
ing the brakes or when driving a round a
corner .
-
-When you are dr iving make sure that
anyth ing you may have placed in the cen
ter conso le or other storage locations
cannot fall out into the footwells . In case
of sudden braking you would not be able
to b rake or accele rate .
- A ny articles of clothing that you have
hung up m ust not interfere with the dr iv
e r's vi ew. The coat hooks are des igned
only for lightweight cloth ing. Neve r hang
a ny cloth ing wi th hard, pointed o r heavy
objects in the pockets on the coat hooks.
During s udden braking or in an accident -
especia lly if the airbag is deployed -
these objects cou ld injure any passen
gers inside the vehicle.
- To reduce the risk of persona l in ju ry in an
accident or s udden stop, always keep the
g love compartment closed wh ile driving.
- Read and follow all WARNINGS
<=> page 161, Important safety instruc
tions on the side airbag system.
- Hang clothes in such a way that they do
not impair the driver's vision.
- The coat hooks must on ly be used for
lightweight clothing. Do not leave any heavy or sharp edged objects in the pock
ets which may interfere w ith the s ide cur
tain airbag deployment and can cause
pe rsonal injury in a crash .
- Do not use coat hange rs fo r hanging
cloth ing o n the coat hooks as th is can in
terfere w ith prope r deployment of the
side curt ain air bags in an a cciden t.
- Do not hang heavy objects on the coat
hooks, as they could cause pe rsonal in
jury in a sud den stop.
- For strength-re lated reasons, the mount
i n g hooks ca n only be used to secure ob
jects weigh ing up to 10 lb . (5 kg) . Heavi
er objects will not be adequate ly sec ured
- there is a risk of injury.
Page 63 of 288
-Always store objects in the luggage com
partment and use suitable straps, partic
ularly with heavy objects.
- When you transport heavy objects, al
ways remember that a change in the cen
ter of gravity may result in a change in
the vehicle's handling characteristics .
- Follow all warnings
q page 121, Driving
safety.
(D Tips
The tire pressure must be adjusted to the
load -see the tire pressure sticker located
on the driver's side B-pillar.
General information
_& WARNING
Refer to the chapter Driving Safely
qpage 121, Driving safety for important
information, tips, s uggestions and warn
ings that you should read and fo llow for
your own safety and the safety of your pas sengers.
Increasing the size of the luggage
compartment
The rear seat backrests can be folded forward
either separately or together .
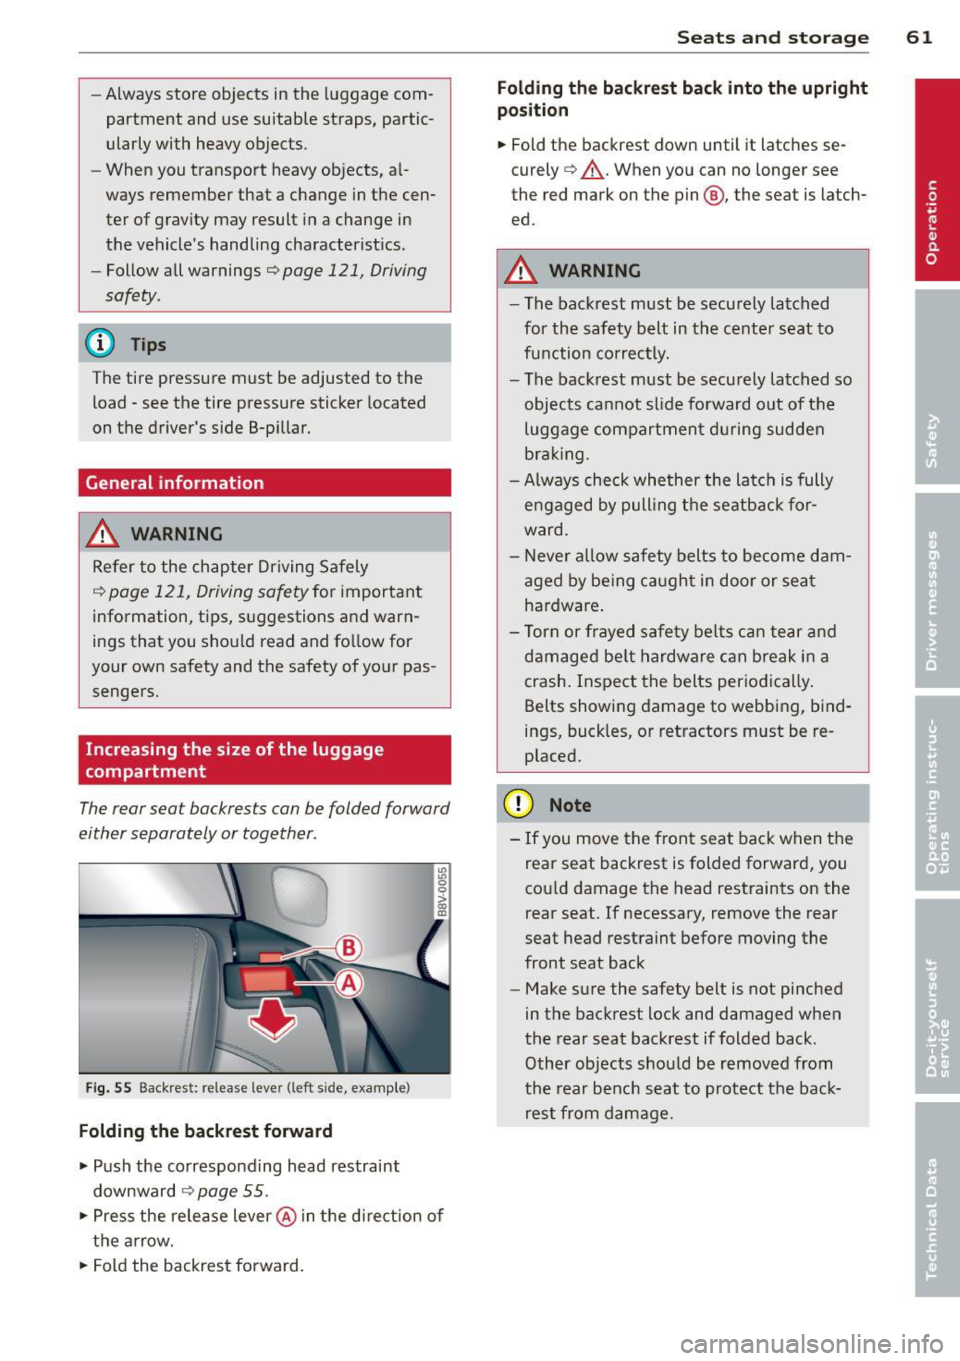
Fig. 55 Backrest: release lever (left sid e, e)(ample)
Folding the backrest forward
.,. Push the corresponding head restraint
downward
¢ page 55 .
.,. Press the release lever @in the d irection of
the arrow .
.,. Fold the backrest forward.
Seats and storage 61
Folding the backrest back into the upright
position
.,. Fold the backrest down until it latches se
curely
q _&. . When you can no longer see
the red mark on the pin @, the seat is latch
ed.
A WARNING
-- The backrest must be securely latched
for the safety belt in the center seat to
function correctly. -
-The backrest must be securely latched so
objects cannot slide forward out of the
luggage compartment during sudden
braking .
- Always check whether the latch is fully
engaged by pulling the seatback for
ward .
- Never allow safety belts to become dam
aged by being caught in door or seat
hardware .
- Torn or frayed safety belts can tear and
damaged be lt hardware can break in a
crash. Inspect the belts periodically.
Belts showing damage to webbing, bind
ings, buck les, or retractors must be re
placed.
(D Note
- If you move the front seat back when the
rear seat backrest is folded forward, you
cou ld damage the head restraints on the
rear seat. If necessary, remove the rear
seat head restraint before moving the
front seat back
- Make sure the safety belt is not pinched
in the backrest lock and damaged when
the rear seat backrest if folded back.
Other objects should be removed from
the rear bench seat to protect the back
rest from damage.
Page 72 of 288
70 Driving
Driving
Steering
Adjusting the steering wheel position
The steering wheel position is fully adjustable
up and down and forward and bock .
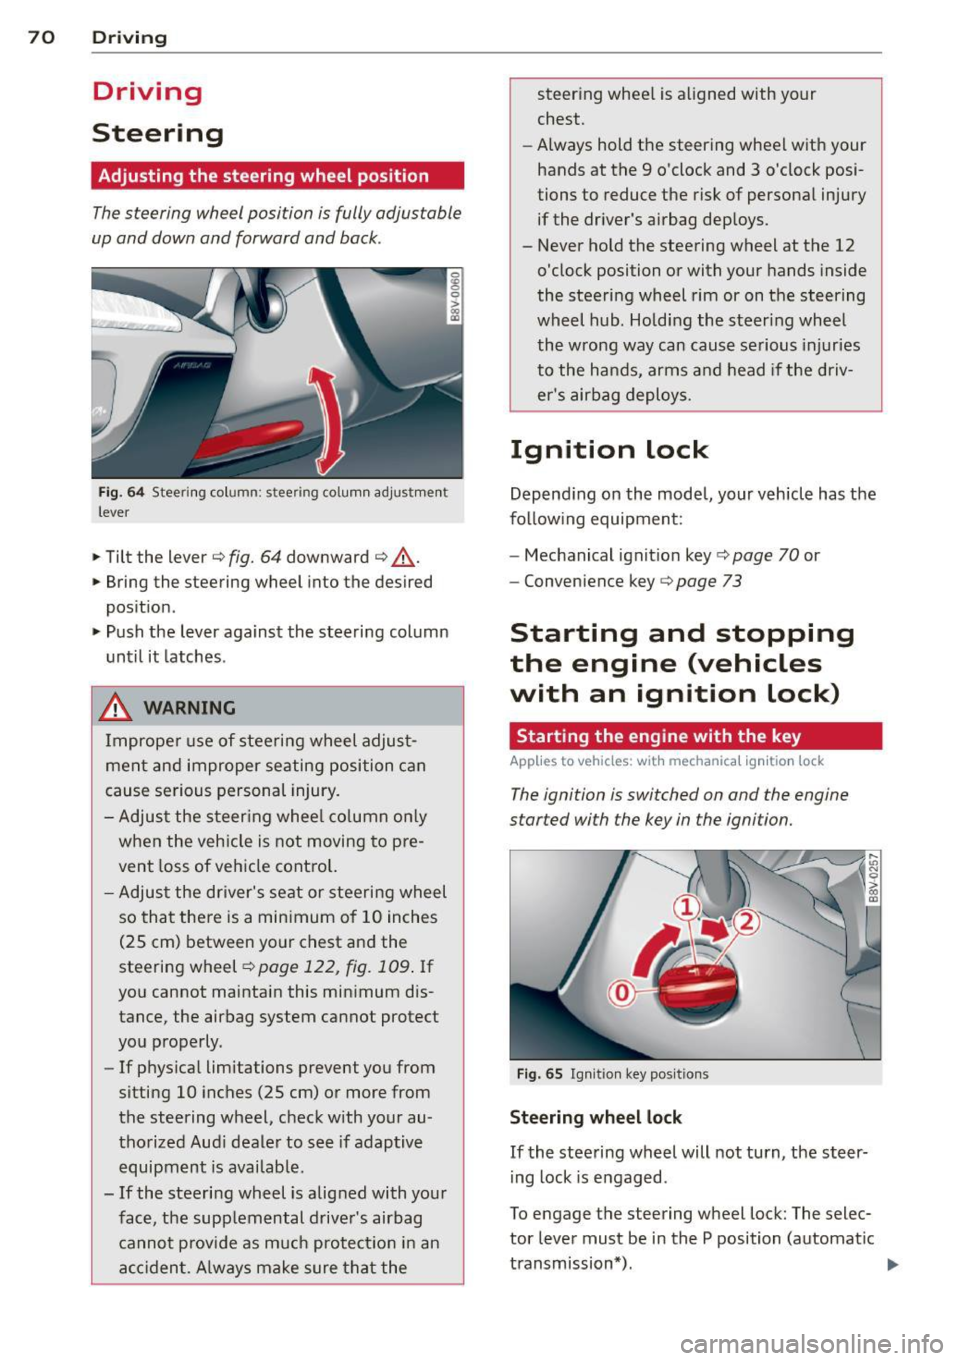
Fig. 64 Steering column: steering column adjustment
lever
.. Tilt the lever¢ fig. 64 downward ¢ &_.
.. Bring the steering wheel into the desired
position .
.. Push the lever against the steering column
until it latches .
_& WARNING
Improper use of steering wheel adjust
ment and improper seating position can
cause serious personal injury.
- Adjust the steering wheel column only
when the veh icle is not moving to pre
vent loss of vehicle control.
- Adjust the driver's seat or steering wheel
so that there is a min imum of 10 inches
(25 cm) between your chest and the
steering wheel¢
page 122, fig. 109 . If
you cannot maintain this minimum dis
tance, the airbag system cannot protect
you properly.
- If phys ica l limitations prevent you from
sitting 10 inches (25 cm) or more from
the steering wheel, check w ith your au
thorized Aud i dealer to see if adaptive
equipment is availab le .
- If the steering wheel is alig ned with your
face, the supplemental driver's airbag cannot p rovid e as much protectio n in an
accident. Always make sure that the steer
ing whee l is aligned with your
chest.
- Always hold the steering wheel with your
hands at the 9 o'clock and 3 o'clock posi
tions to reduce the risk of personal injury
if the driver's airbag deploys.
- Never hold the steering wheel at the 12
o'clock position or with your hands inside
the steering wheel rim or on the steering
wheel hub. Holding the steering wheel
the wrong way can cause serious injuries
to the hands, arms and head if the driv
er's airbag deploys.
Ignition lock
Depending on the model, your vehicle has the
follow ing equipment:
- Mechanical ignition key
c::> page 70 or
- Convenience key
c::> page 73
Starting and stopping
the engine (vehicles
with an ignition lock)
Starting the engine with the key
App lies to vehicles: wit h mechanica l igni tio n loc k
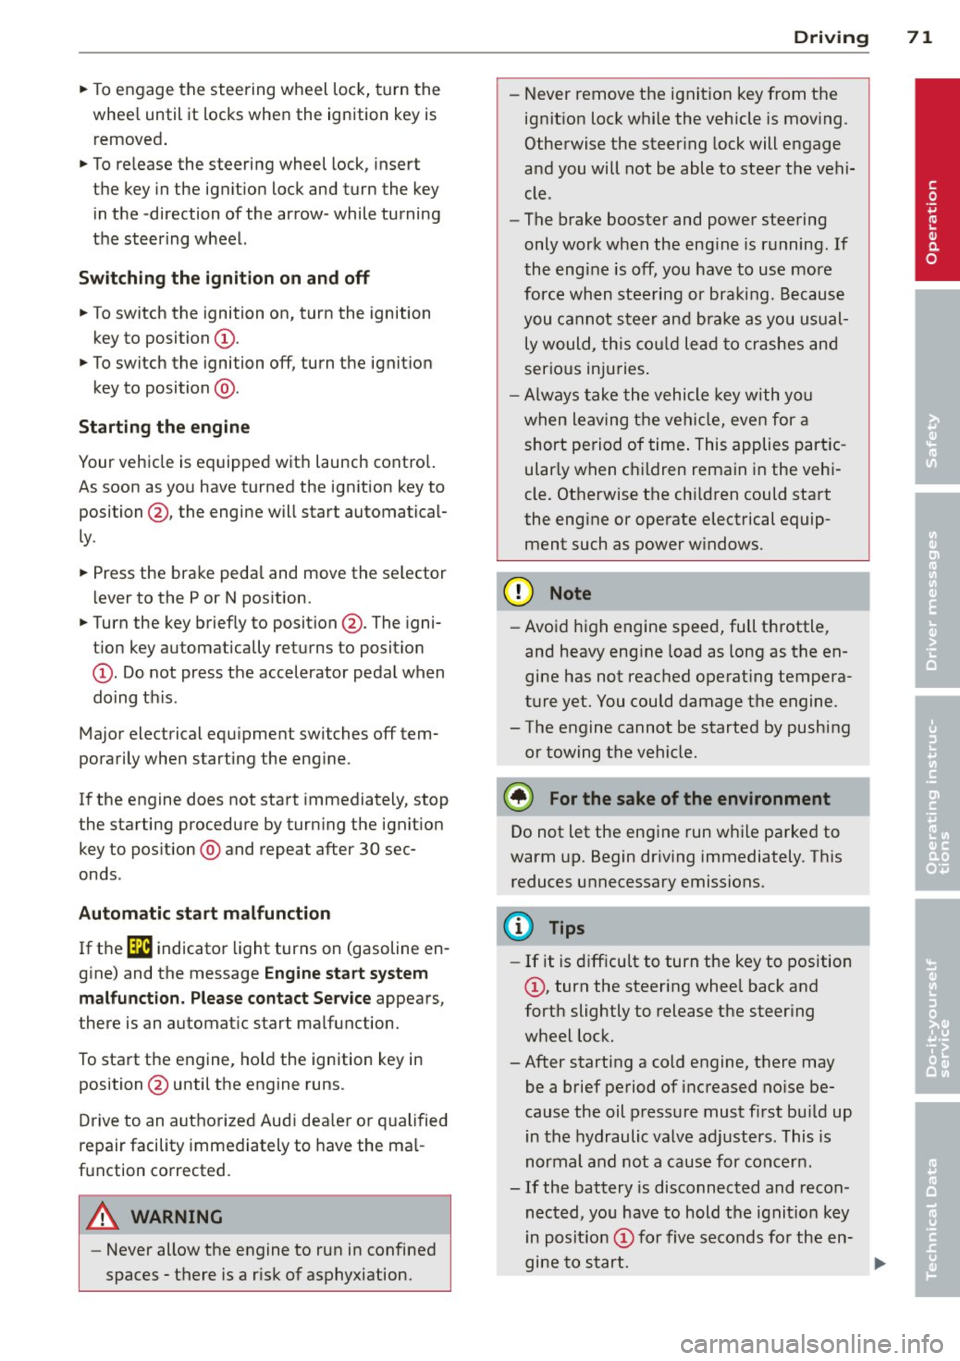
The ignition is switched on and the engine
started with the key in the ignition.
Fig. 65 Ignit ion key positio ns
Steering wheel lock
If the steering wheel will not turn, the steer
ing lock is engaged .
To engage the steering wheel lock: The selec
tor lever must be in the P position (automatic
transmission*). ..,.
Page 73 of 288
~ To engage the steering wheel lock, turn the
whee l until it locks when the ignition key is
removed .
~ To release the steering wheel lock, insert
the key in the ignition lock and turn the key
in the -direction of the arrow- while turning
the steering wheel.
Switching the ignition on and off
~ To switch the ignition on, turn the ignition
key to position
(D .
~ To switch the ignition off, turn the ignition
key to position @.
Starting the engine
Your vehicle is equipped with launch contro l.
As soon as you have turned the ign ition key to
position @, the engine will start automatical
ly.
~ Press the brake peda l and move the se lector
l ever to the P or N pos ition.
~ Turn the key briefly to position @. The igni
t ion key automatically returns to position
@. Do not press the accelerator pedal when
doing this.
Major electrical equ ipment switches off tem
porarily when starting the engine.
If the engine does not start immediately, stop
the starting procedure by turning the ignit ion
key to position @and repeat after 30 sec
onds .
Automatic start malfunction
If the Ila indicator light turns on (gasoline en
gine) and the message
Engine start system
malfunction. Please contact Service
appears,
there is an automatic start malfunction.
To start the engine, hold the ignition key in position @until the engine runs.
D rive to an autho rized Audi dea ler or qualified
repair facility immediately to have the ma l
function corrected.
A WARNING
- Never allow the engine to run in confined
spaces -there is a r isk of asphyxiation.
Driving 71
- Never remove the ignition key from the
ignit ion lock while the vehicle is mov ing.
Otherwise the steering lock will engage
and you will not be able to steer the vehi
cle.
- The brake booster and power steering
only work when the eng ine is running. If
the engine is off, you have to use more
force when stee ring or braking. Because
you cannot steer and bra ke as you usual
ly would, this could lead to crashes and
serious inju ries .
- Always take the vehicle key with you
when leaving the vehicle, even for a
short period of time . This applies partic
ular ly when c hildren remain in the vehi
cle. Otherwise the children could start
the engine or operate electrical equip
ment such as power windows.
(D Note
- Avoid high engine speed, full th rottle,
and heavy engine load as long as the en
gine has not reached operating tempera
ture yet. You could damage the engine.
- The engine cannot be started by pushing or towing the vehicle.
@ For the sake of the environment
Do not let the engine run while parked to
warm up. Begin driving immediately. This
reduces unnecessary emissions.
(D Tips
-If it is difficult to turn the key to position
(D, turn the steering wheel back and
forth slightly to release the steer ing
wheel lock.
-After starting a cold engine, there may be a brief period of increased no ise be
cause the oil pressure must first build up
in the hydraulic valve adjusters. This is
normal and not a cause for concern.
- If the battery is disconnected and recon
nected, you have to hold t he ignition key
in posit ion
(D for five seconds fo r the en-
gine to start.
Ill>
•
Page 74 of 288
72 Driving
-Vehicles with an automatic transmission:
After switching the ignition off, you can
only remove the key when the selector
lever is in the "P" (Park) position. After
that, the selector lever is locked.
Stopping the engine with the key
Applies to vehicles: with mechanical ignition lock
Stopping the engine
... Bring the vehicle to a full stop .
... Turn the key to position @.
Engaging the steering wheel lock
Requirement: The selector lever must be in
the P position (automatic transmission*).
... Remove the ignition key in position @
¢page 73, fig. 66 ¢,& .
... Turn the steering wheel until you hear the
steering wheel lock.
The locked steering helps prevent vehicle
theft.
A WARNING
- Never turn off the engine before the ve
hicle has come to a complete stop. The
full function of the brake booster and the
power steering is not guaranteed. You
must use more force to turn or brake, if
necessary . Because you cannot steer and
brake as you usually would, this could
lead to accidents and serious injuries.
- Never remove the ignition key from the
ignition lock while the vehicle is moving.
Otherwise, the steering lock could sud
denly engage and you would not be able
to steer the vehicle.
- The brake booster and power steering
only work when the engine is running. If
the engine is off, you have to use more
force when steering or braking. Because
you cannot steer and brake as you usual ly would, this could lead to crashes and
serious injuries.
- Always take the vehicle key with you
when leaving the vehicle, even for a
short period of time . This applies partic- ularly when children remain
in the vehi
cle. Otherwise the children could start
the engine or operate electrical equip ment such as power windows.
- For safety reasons, you should always
park your vehicle with the selector lever
in P. Otherwise, the vehicle could inad
vertently roll away.
- After the engine has been switched off,
the radiator fan can continue to run for
up to 10 minutes -even with the ignition
switched off.
It can also switch on again
after some time if the coolant tempera
ture rises as the result of a heat buildup
or if the engine is hot and the engine
compartment is additionally heated by
the sun's rays .
(D Note
-If the engine has been under heavy load
for an extended period of time, heat builds up in the engine compartment af
ter the engine is switched off -there is a
risk of damaging the @ngin@ . For this
reason, let the engine run for at idle for
approximately two minutes before shut
ting it off.
(D Tips
-After the engine has been switched off,
the radiator fan can continue to run for
up to 10 minutes -even with the ignition
switched off. It can also switch on again
after some time if the coolant tempera
ture rises as a result of heat buildup or if
the engine compartment is heated by
sunlight and the engine is hot.
Page 75 of 288
Starting and stopping
the engine (vehicles
with a convenience key)
St t· th · ith the
button
Applies to vehicles: with convenience key
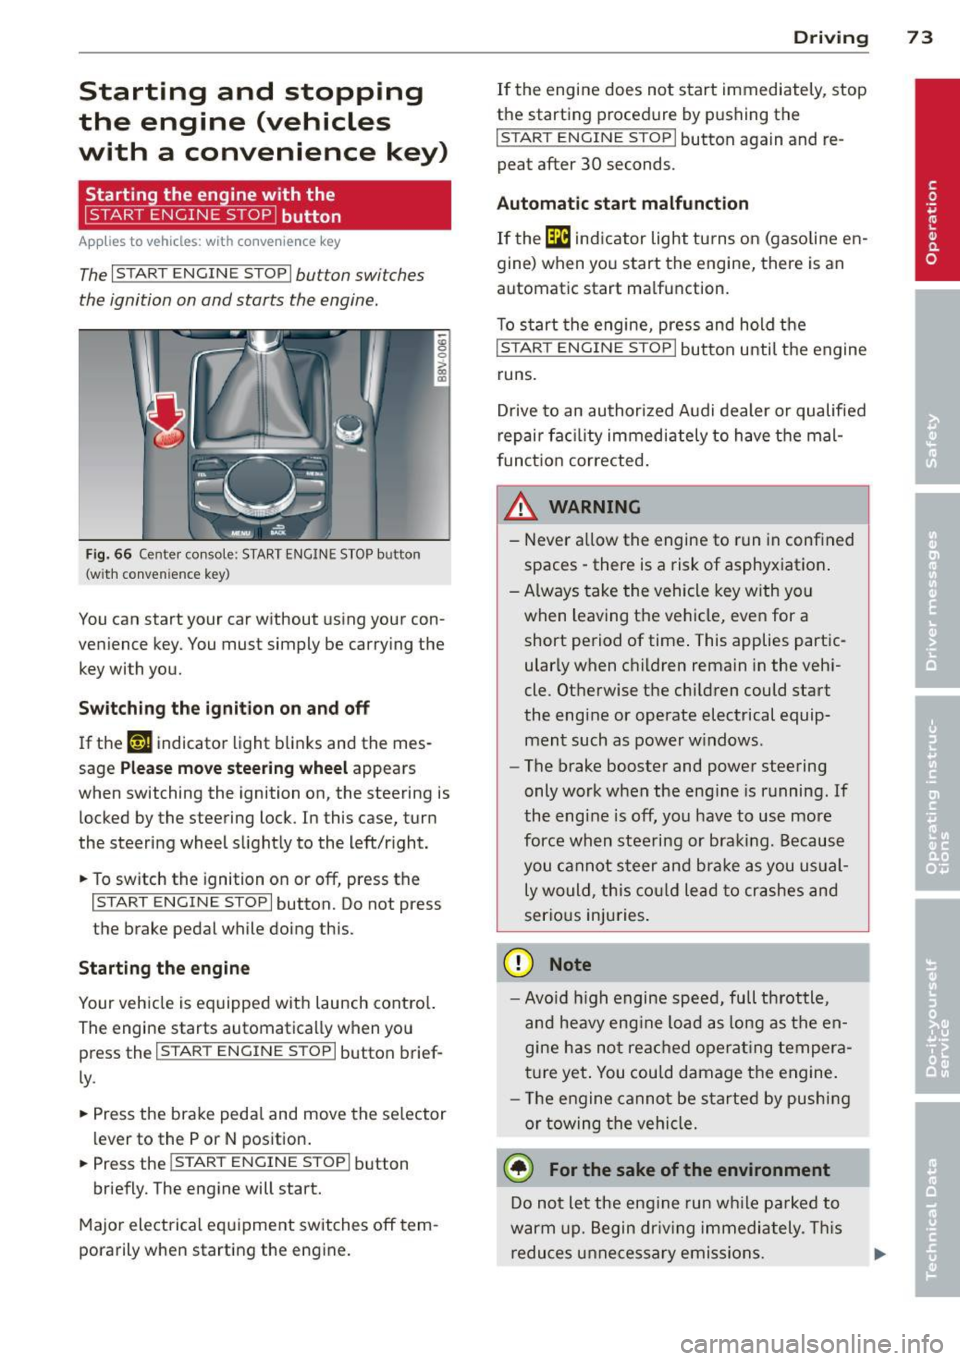
The I START ENGINE STOPI button switches
the ignition on and starts the engine.
Fig. 66 Cente r console: START ENGINE STOP button
(w ith conven ience key)
You can start your car without using your con
venience key. You must simply be carrying the
key with you.
Switching the ignition on and off
If the '-r, ij indicator light blinks and the mes
sage
Please move steering wheel appears
when switching the ignition on, the steering is
locked by the steering lock. In this case, turn
the steering wheel slightly to the left/right.
.. To switch the ignition on or
off, press the
I START ENGINE STOP I button. Do not press
the brake pedal while doing this.
Starting the engine
Your vehicle is equipped with launch control.
The engine starts automatically when you
press the
I START ENGINE STOP I button brief
ly.
.. Press the brake pedal and move the selector
lev er to the P or N position .
.. Press the
I START ENGINE STOPI button
briefly. The engine will start.
Major electrical equipment switches
off tem
porarily when starting the engine.
Driving 73
If the engine does not start immediately, stop
the starting procedure by pushing the
I START ENGINE STOP I button again and re
peat after 30 seconds.
Automatic start malfunction
If the [m ind icator light turns on (gasoline en
gine) when you start the engine, there is an
automat ic start ma lfunction.
To start the engine, press and hold the
I START ENGINE STOP I button until the engine
runs.
Drive to an authorized Audi dealer or qualified
repair fac ility immediately to have the mal
function corrected.
_& WARNING
-Never allow the engine to run in confined
spaces -there is a risk of asphyxiation.
- Always take the vehicle key with you
when leaving the vehicle, even for a short period of time . This applies partic
ularly when children remain in the vehi
cle. Otherwise the children could start
the engine or operate electrical equip ment such as power windows.
- The brake booster and power steering
only work when the engine is running.
If
the eng ine is off, you have to use more
force when steering or braking. Because
you cannot steer and brake as you usual
ly would, this could lead to crashes and
serious injuries.
(D Note
- Avoid high engine speed, full throttle,
and heavy eng ine load as long as the en
gine has not reached operating tempera
ture yet. You could damage the engine.
- Th e engine cannot be started by pushing
or towing the vehicle.
@ For the sake of the environment
Do not let the eng ine run while parked to
warm up. Begin driv in g immediately . This
reduces unnecessary emissions.