dead battery AUDI A3 2015 Owners Manual
[x] Cancel search | Manufacturer: AUDI, Model Year: 2015, Model line: A3, Model: AUDI A3 2015Pages: 288, PDF Size: 71.46 MB
Page 35 of 288

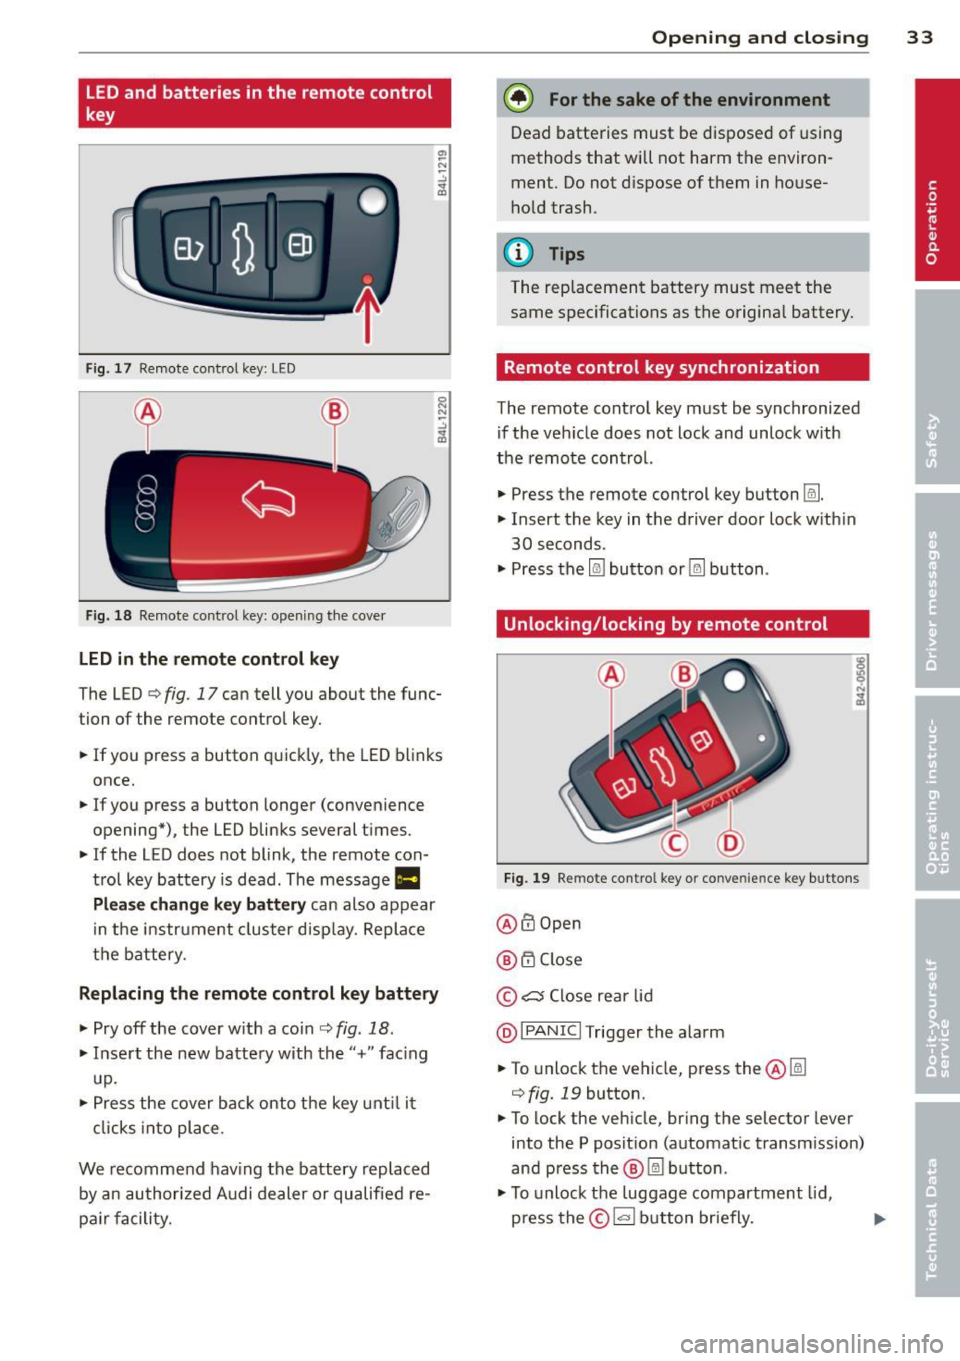
LED and batteries in the remote control
key
Fig. 17 Remote control key: LED
Fig. 18 Remote control key: opening the cover
LED in the remote control key
The LED ¢ fig. 17 can tell you about the func
tion of the remote control key .
.. If you press a button quickly, the LED blinks
once .
.. If you press a button longer (convenience
opening*) , the LED blinks several times .
.. If the LED does not blink, the remote con
trol key battery is dead. The message
1111
Plea se change key battery can also appear
in the instrument cluster display. Replace
the battery.
Replacing the remote control key battery
.. Pry off the cover w ith a coin ¢ fig. 18 .
.. Insert the new battery with the"+" fac ing
up.
.. Press the cover back onto the key until it
clicks into place .
We recommend having the battery replaced
by an authorized Audi dealer or qualified re
pa ir facility.
Opening and closing 33
@) For the sake of the environment
Dead batteries must be disposed of using
methods that will not harm the environ
ment. Do not dispose of them in house
hold trash .
{!) Tips
The rep lacement battery must meet the
same specifications as the origina l battery.
Remote control key synchronization
The remote control key must be synchronized
if the veh icle does not lock and unlock w ith
the remote control.
.. Press the remote control key button~-
.. Insert the key in the driver door lock w ith in
30 seconds .
"' Press the
l@J button or~ button .
Unlocking/locking by remote control
Fig. 19 Remote control key or conve nien ce key buttons
@ffi Open
@ 6".i Close
©
c:s Close rear lid
@I PANIC I Trigger the alarm
.. To unlock the vehicle, press the@~
¢
fig. 19 button .
"' To lock the veh icle, bring the selector lever
into the P posit ion (automatic transm ission)
and press the®~ button .
"' To unlock the luggage compartment lid,
press the©~ button briefly. ..,.
Page 115 of 288

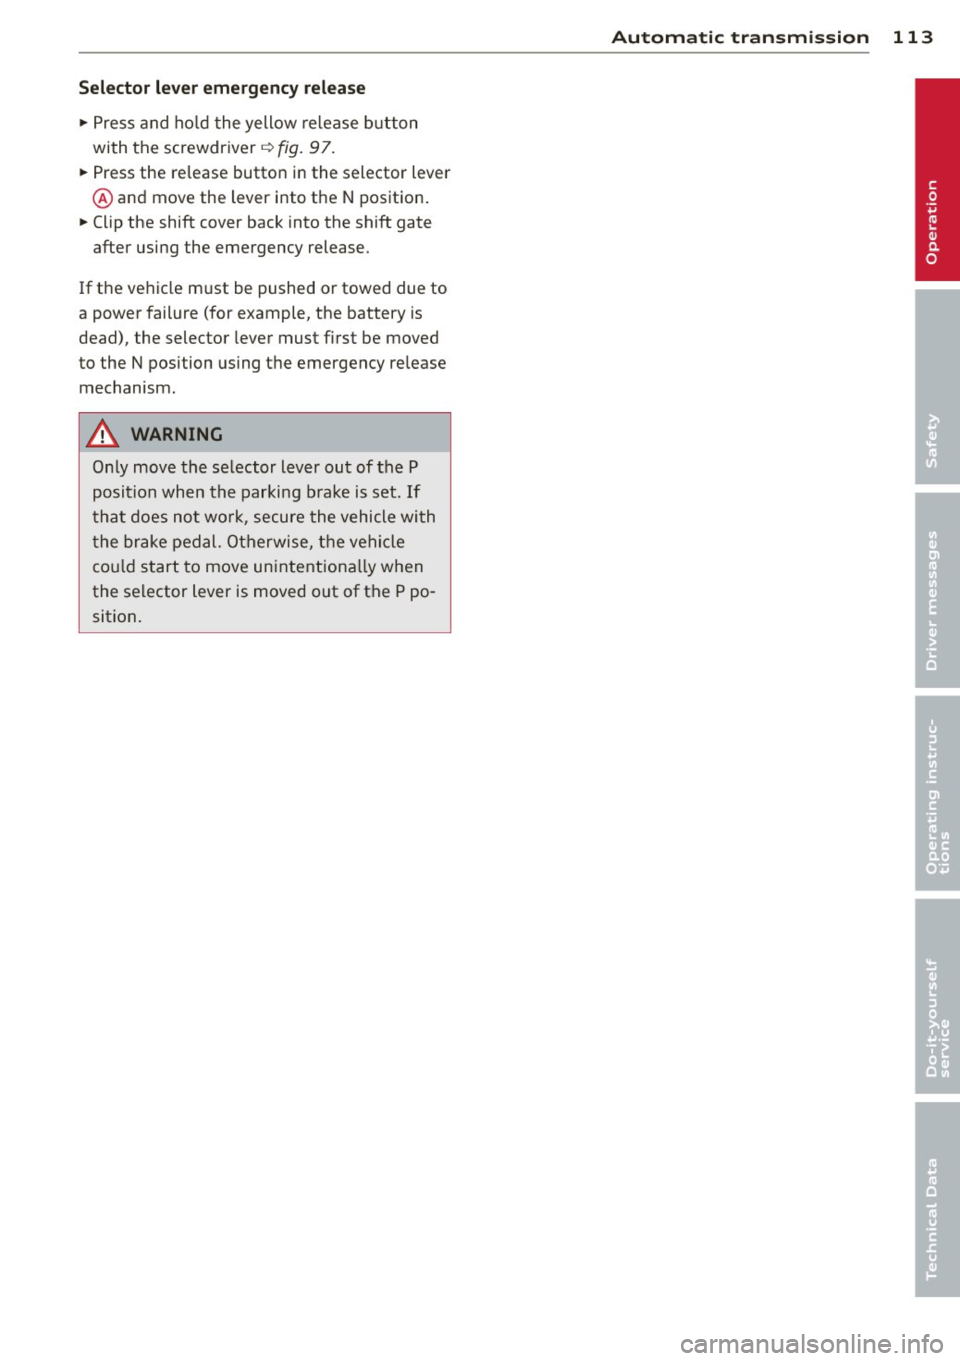
Selector lever emergency release
"'Press and hold the yellow release button
with the screwdriver ¢
fig. 97.
"' Press the release button in the selector lever
@ and move the lever into the N position.
"' Clip the shift cover back into the shift gate
after using the emergency release.
If the ve hicle must be pushed or towed due to
a power failure (for example, the battery is
dead), the selector lever must f irst be moved
to the N position using the emergency release
mechanism.
A WARNING
Only move the selector lever out of the P
position when the parking brake is set. If
that does not work, secure the vehicle with
the brake pedal. Otherwise, the vehicle
could start to move unintentiona lly when
the selector lever is moved out of the P po
sition .
Automatic transmission 113
•
Page 224 of 288

222 Checking and Fill in g
and then the negative cable . Never inter
change the cables -this could start a fire!
- Never charge a frozen or a thawed-out
battery. It could explode! If a battery has
frozen, then it must be replaced. A dead battery can freeze over at 32°F (0°C).
- Make sure the vent hose is always attach
ed to the opening on the side of the bat
tery.
- Never use batteries which are damaged.
There is the danger of an explosion! Al
ways replace a damaged battery.
&_ WARNING
California Propos ition 65 Warning:
- Battery posts, terminals and related ac
cessories contain lead and lead com
pounds, chemicals known to the State of
California to cause cancer and reproduc
t ive p roblems. Wash hands after han
dling.
(D Note
- Do not d isconnect t he veh icle battery
when the ignition is on or when the en
gine is running, otherwise, you will dam
age ele ctron ic componen ts in the elec tri
ca l system.
- If your vehicle is going to stand for a
l ong period of time wi thout being driven,
protect the battery from "freezing", oth
e rwise it w ill be damaged and wi ll then
have to be replaced.
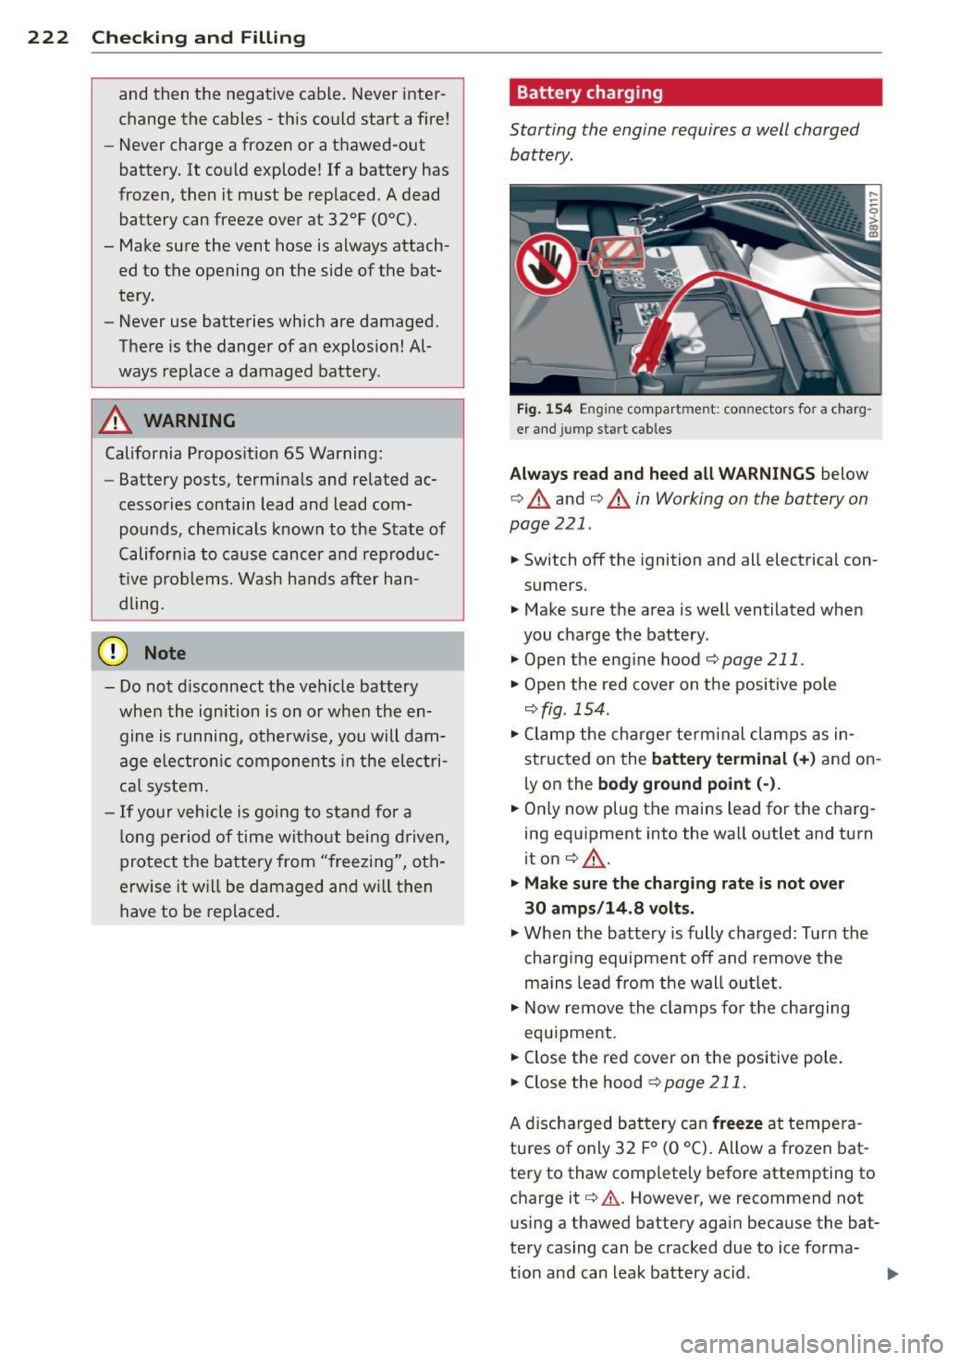
Battery charging
Starting the engine requires a well charged battery.
F ig . 1 54 Engine co mpartment : connectors for a charg
er and jump start cab les
Alwa ys read and heed all WARNINGS below
c> &. and c> &. in Working on the battery on
page 221.
.. Switch off the ignition and all electrical con
sumers.
.. Make sure the area is well ventilated when
you charge the battery .
.. Open the eng ine hood
r=;, page 211 .
.. Open the red cover on t he positive pole
r=;, fig. 154 .
.. Clamp the ch arger term inal clamps as in
structed on the
batter y terminal (+ ) and on
ly o n the
body ground po int (-) .
.. On ly now plug the mains lead for the charg
ing equ ipment into the wa ll outlet and turn
iton
c> &, .
.. Make sure th e charging rate is not over
30 amps /14 .8 volts .
.. When the battery is fully charged: Turn the
charg ing equipment off and remove the
mains lead from the wall ou tlet .
.. Now remove the clamps for the cha rging
equipment .
.. Close the red cover on the positive pole .
.. Close the hood
~ page 211.
A d ischarged bat tery can freeze at tempera
tu res of only 32 F
0 (0 °C). Allow a frozen bat
tery to thaw completely before attempting to charge it
r=;, .&, . However, we recommend not
using a thawed battery again because the bat
te ry casing can be cracked due to ice forma-
t ion and can leak battery acid . ..,.
Page 262 of 288

260 Emergency situations
@ Tips
The disc har ged battery must be properly
connected to the ve hicle's electrical sys
tem. W hen jump starting or charg ing t he
battery, never connect the negative
grou nd cab le to the batte ry negat ive post
because the batte ry ma nager sys tem must
be ab le to detect th e ba ttery 's state o f
charge. A lways connec t the nega tive
grou nd ca b le to t he neg ative ground pos t
of the batte ry ma nager con trol unit.
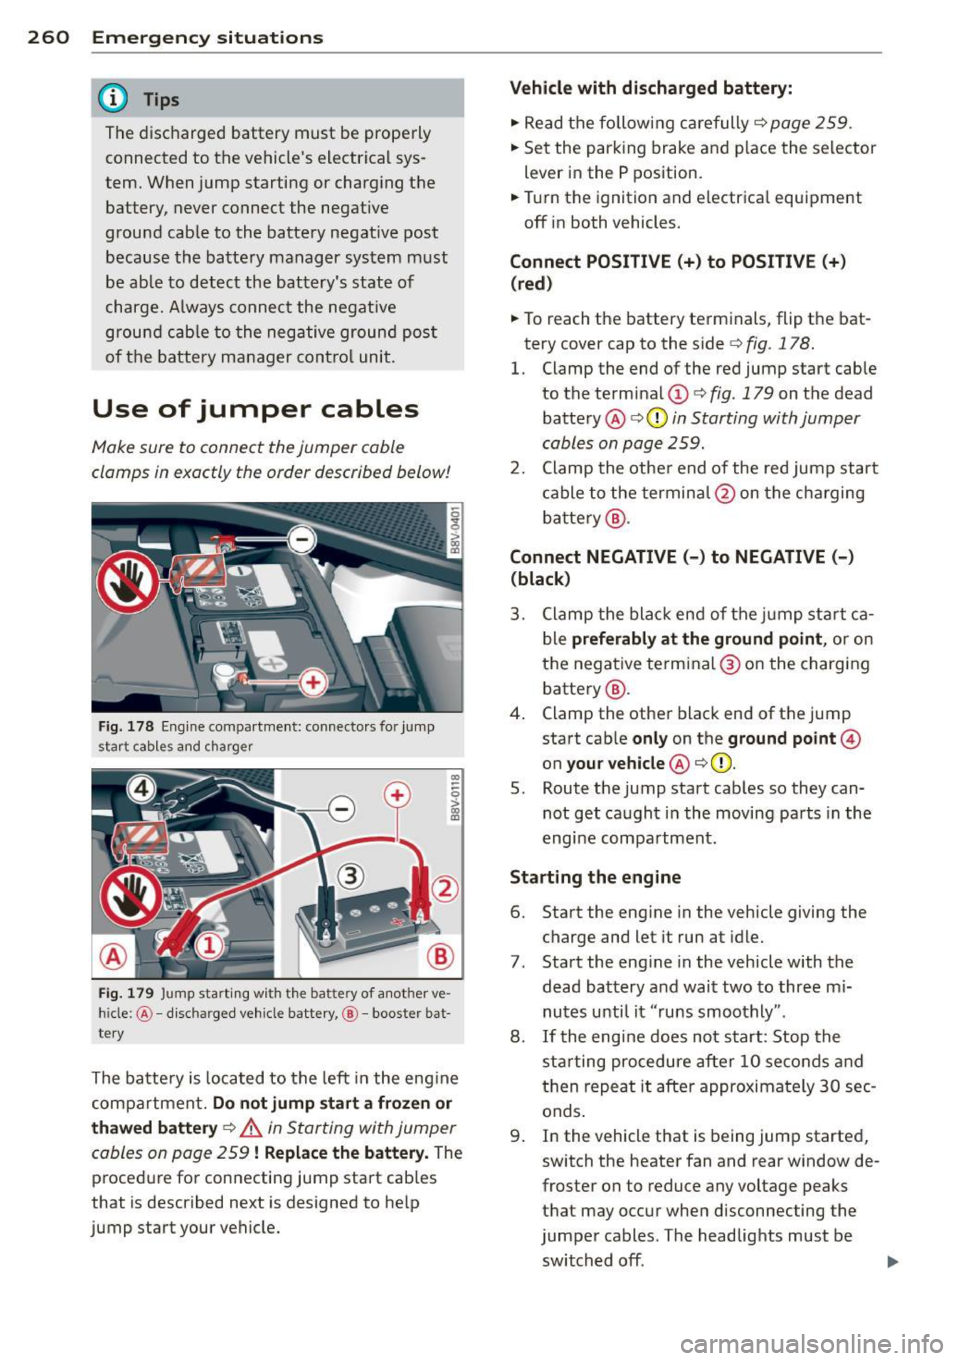
Use of jumper cables
Make sure to connect the jumper cable
clamps in exactly the order described below!
Fi g. 178 Eng ine compar tment: conne ctors for jump
start cables a nd charger
CD
--0 > ~
F ig. 1 79 Jump start ing with the battery of a nother ve·
h ide: @-di scharge d veh icle battery, @-booster bat
te ry
The ba tte ry i s loca ted to the left in the eng ine
compartment.
Do not jump start a frozen or
thawed battery
¢ .&. in Starting wi th jumper
cables on page 259
! Replace the battery. The
p roced ure fo r connecting jump start cab les
that is described next is designed to he lp
jump start your vehicle.
Vehicle with discharged battery:
.,. Read t he followi ng car efully¢ page 259.
.,. Se t the parking brake an d place the selector
lever in the P position.
.,. Tur n the ignition and electr ica l equ ipment
off in both vehicles.
Connect POSITIVE(+) to POSITIVE(+ )
(red )
.,. To reach the battery terminals, flip the bat
tery cover cap to the side¢
fig. 178.
1. Clamp the end of the red jump start cab le
to the term inal
(D ¢ fig. 179 on t he dead
batte ry @
¢ (Din Starting with jumper
cables on page 259.
2 . Clamp the othe r end of the re d jump start
c able to the termin al@ on the cha rging
b atte ry @ .
Connect NEGATIVE (-) to NEGATIVE(-)
(black)
3 . Clamp the bla ck end of the j ump st art ca
b le
preferably at the ground point , or on
the nega tive te rmi na l® on the chargi ng
battery @.
4. Clamp the othe r black end of the jump
start cab le
only on the ground point@
on your vehicle @¢(D.
S. Route the jump start cab les so they can
not get ca ught in the moving pa rts in the
engi ne compa rt m ent.
Starting the engine
6. Start the eng ine in the vehicle giving the
charge and let it run at idle.
7 . Start the eng ine in the vehicle with the
dead battery and wait two to three m i
nutes until it "runs smoothly" .
8.
If t he eng ine does not s tart: Stop the
sta rting procedure after 10 second s and
t h en re p eat it after approximately 3 0 sec
onds .
9 . In the vehicle that is being jump started,
switch the heater fan and rear window de
froster on to reduce any voltage peaks
that may occ ur whe n disconn ecting the
jumpe r cables. The headlights must be
switched off.
IJI,