cluster AUDI A3 2016 Owner´s Manual
[x] Cancel search | Manufacturer: AUDI, Model Year: 2016, Model line: A3, Model: AUDI A3 2016Pages: 328, PDF Size: 81.78 MB
Page 34 of 328

Driver information system
Lap timer and engine oil
temperature indicator
Introduction
Applies to vehicles: with lap timer (S models)
The engine oil temperature is only shown in the
lap timer display.
Lap timer
You can record and evaluate lap times with the
lap timer in the display
i=:,page 32, fig. 16. Th e
time is measured in minutes, seconds and
1/10
seconds . With lap times longer than 60 minutes,
the hour is also shown and the display of
1/10 seconds is removed.
The time measurement on an individua l lap ends
after
99 hours 59 minutes and 59 seconds. A
new lap starts automatically after that .
The measurement ends after a maximum of
30
laps. You can then evaluated the lap times or
start a new time measurement .
Engine oil temperature indicator
I f the engine o il temperature is below
140 °F
(60 °C), the 'l=:1: symbol followed by three hy
phens"- --" and the °C un it is shown .
The engine has reached its operating tempera
ture when the engine oil temperature is between
176 °f (80 °C) and 248 °f (120 °C) under nor
mal d riving conditions. The engine oil tempera
ture may be higher if there is heavy eng ine load
and high temperatures outside. This is not a
cause for concern as long as the .¢
page 20 or
Ill i=:,page 24 indicator lights in the display do
not blink.
A WARNING
Your focus should always be on driving your
vehicle safely . As the driver, you have com
plete responsibility for safety in traffic . Only
use the functions such as the lap timer in such
a way that you always maintain complete con
trol over your vehicle in all traffic s ituations.
32
.
@ Tips
You can retrieve information from the trip
computer while the lap timer stopwatch is
running.
Opening the lap timer and measuring time
Applies to vehicles: with lap timer (S models)
Fig. 15 Multi functio n stee ring whee l: co ntro ls
Fig. 16 Instrumen t cluster: lap timer
Opening the lap timer
M 0,
0
> g;:
.. Press the button @ on the multifunction steer
ing wheel and turn the thumbwheel
®
i=:, fig. 15 until Lap timer ¢ fig. 16 appears.
.. Press the thumbwheel
® to confirm the selec
tion.
Timing laps
.. To start timing, press the thumbwheel @while
on the
Lap 1 - press OK menu item. The time
measurement is shown in line @¢
fig. 16.
.. To measure the lap time, press the thumb
wheel
® again while on the New lap· press OK
menu item. This starts timing the next lap at
the same time . The last time measurement
moves up to the top line@. Line @ contains
the current lap t ime .
Page 39 of 328
..... N
0 > CX)
..... I.Cl U"I
..... I.Cl .....
.. The LED blinks several times when you press a
button longer (convenience opening*) .
.. If the LED does not blink, the remote control
key battery is dead. The message
1:1 Please
change key battery
may also appear in the in
strument cluster display . Replace the battery .
Replacing the remote control key battery
.. Pry the cover @off of the key (Dusing a coin
c::>fig . 20 .
.,. Insert the new battery with the "+" facing up .
.. Press the cover back onto the key until it clicks
into place .
We recommend having the battery replaced by
an authorized Audi dealer or authorized Audi
Service Facility .
@ For the sake of the environment
Dead batteries must be disposed of using
methods that will not harm the env ironment.
Do not dispose of them in household trash .
@ Tips
The replacement battery must meet the same
specifications as the orig inal battery.
Remote control key synchronization
The remote control key must be synchronized if
the vehicle does not lock and unlock with the re
mote control.
.. Press the remote control key button~-
.. Insert the key in the driver's door lock within 30
seconds .
.,. Press the~ button or~ button .
Open ing and closing
Unlocking/locking by remote control
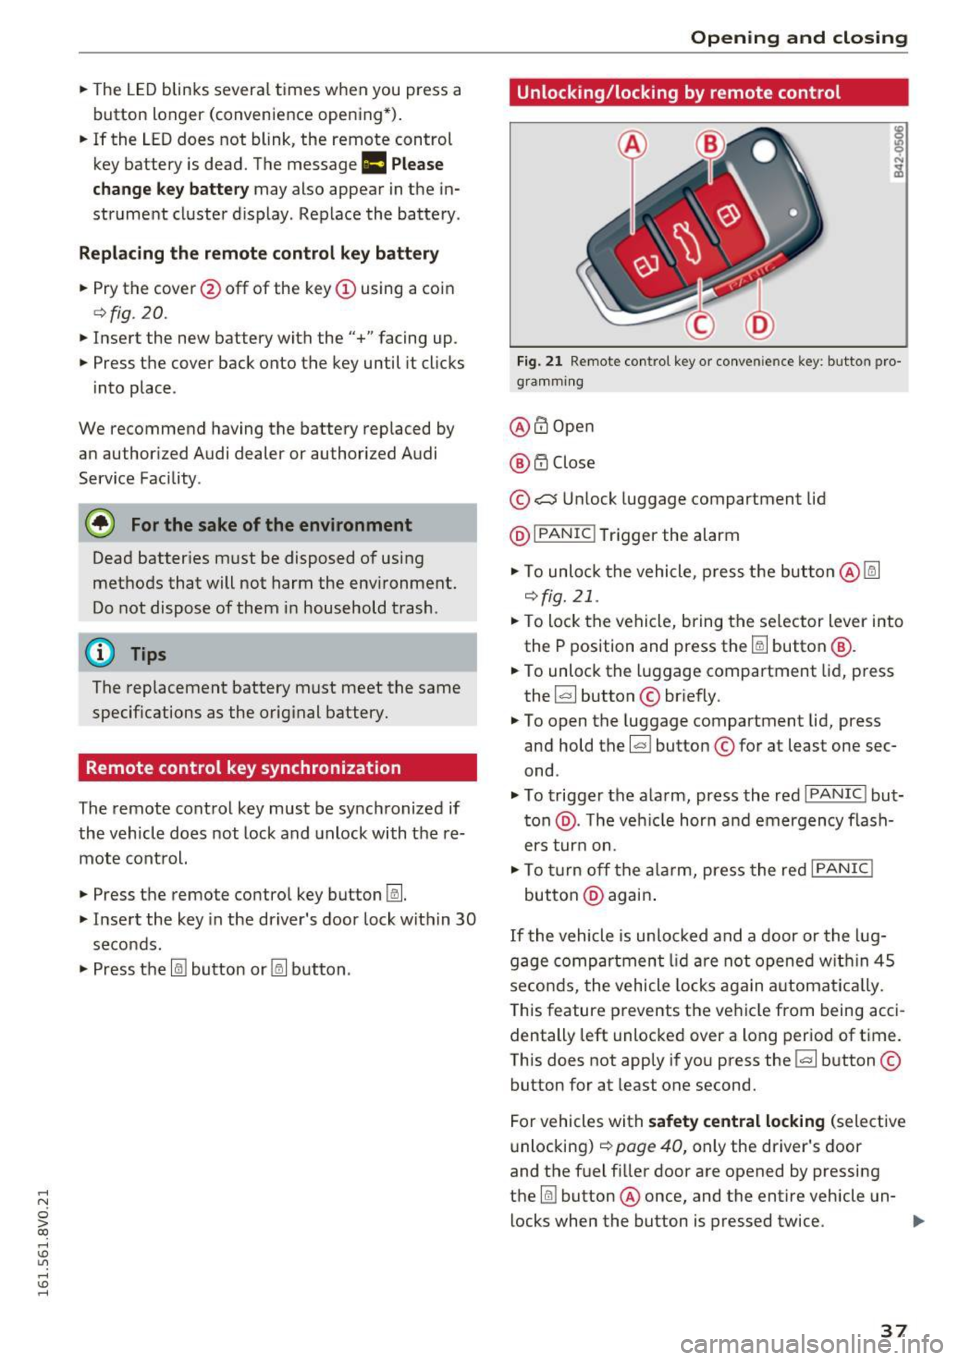
Fig. 21 Remote control key or conve nien ce key : button pro
gramm ing
@ m Open
@ i'.D Close
© .:::::$Unlock luggage compartment lid
@ IPANIC !T rigger the alarm
... To unloc k the vehicle, press the button@~
c::>fig. 21 .
.. To lock the vehicle, bring the selector lever into
the P position and press the~ button
@.
.. To unlock the luggage compartment lid, press
the ~ button © briefly.
.,. To open the luggage compartment lid, press
and hold the~ button © for at least one sec
ond .
... To trigger the alarm, press the red I PANIC ! but
ton @. T he veh icle horn and emergency flash
ers turn on.
.. To turn off the alarm, press the red I PANIC !
button @again .
If the vehicle is unlocked and a door or the lug
gage compartment lid are not opened w ithin 45
seconds, the vehicle locks again automat ically.
This feature prevents the vehicle from being acci
dentally left unlocked over a long period of time.
This does not apply if you press the~ button ©
button for at least one second.
For vehicles with
safety central locking (selective
unlocking)
c::> page 40, only the driver's door
and the fuel f iller door are opened by pressing
the ~ button @ once, and the entire vehicle un-
locks when the button is pressed twice .
Ill>
37
Page 49 of 328

.... N
0 > CX)
.... I.Cl U"I
.... I.Cl ....
When switched on, adaptive light adjusts to
curves depending on the vehicle speed and steering wheel angle. This provides better lighting
through the curve. The system operates in a
speed range from approximately 6 mph (10 km/
h) to 68 mph (110 km/h).
Static cornering light* (vehicles with adaptive
light) -the cornering light switches on automati
cally when the steering wheel is turned at acer
tain angle at speeds up to approximately 44 mph
(70 km/h) and when the turn signal is activated
at speeds up to approximately 25 mph (40 km/
h). The area to the side of the vehicle is illuminat
ed better when turning.
Speed dependent light distribution* -The speed
dependent light distribution adapts the light in
towns and on highways or expressways . Intersec
tions can also be illuminated on vehicles with a
navigation system* .
Highway light function*
(Vehicles with adaptive light or LED headlights) -
This function adapts the lighting for highway
driving based on vehicle speed .
& WARNING
-Automatic headlights* are only intended to
assist the driver. They do not relieve the
driver of responsibility to check the head
lights and to turn them on manually accord
ing to the current light and visibility condi
tions. For example, fog cannot be detected by the light sensors . So always switch on the
low beam under these weather conditions
and when driving in the dark
io.
-Accidents could occur if you cannot see the
road ahead of you well and if others on the
road cannot see you . Always switch your
headlightsonsothatyoucanseetheroad
ahead of you and others can see your vehicle
from behind.
- The rear fog lights should only be turned on
in accordance with traffic regulations, to
prevent glare for traffic behind your vehicle .
-If the battery has been discharging for a
while, the parking lights may switch off au
tomatically to conserve the battery charge
Lights and Vision
for the next time the engine is started. Al·
ways make sure your vehicle complies with
legal regulations regarding sufficient and
safe lighting when parking it. Avoid using
the parking lights for several hours.
- Please observe legal regulations when using
the lighting systems described .
@ Tips
-The light sensor for the automatic head
lights* is in the rearview mirror mount.
Therefore, do not place any stickers in this
area on the windshield.
- Some functions of the exterior lighting can
be adjusted
¢ page 48 .
-If you turn off the ignition while the exterior
lights are on and open the door, you will
hear a warning tone.
- In some market-specific versions, the tail
lights do not turn on when switching on the
daytime running lights .
- In cool or damp weather, the inside of the
headlights, turn signals and tail lights can
fog over due to the temperature difference
between the inside and outside. They will
clear shortly after switching them on. This
does not affect the service life of the light
ing.
- A message will appear in the instrument
cluster if there is a malfunction in the light
sensor
¢ page 25.
Emergency flasher
Fig. 33 Inst rume nt panel: e merge ncy flasher butto n
The emergency flashers makes other drivers
aware of your vehicle in dangerous situations .
N Cl) M 0
> Cl) (0
47
Page 52 of 328
Lights and Vision
Instrument illumination
The brightness of the instrument cluster and the
center console can be adjusted .
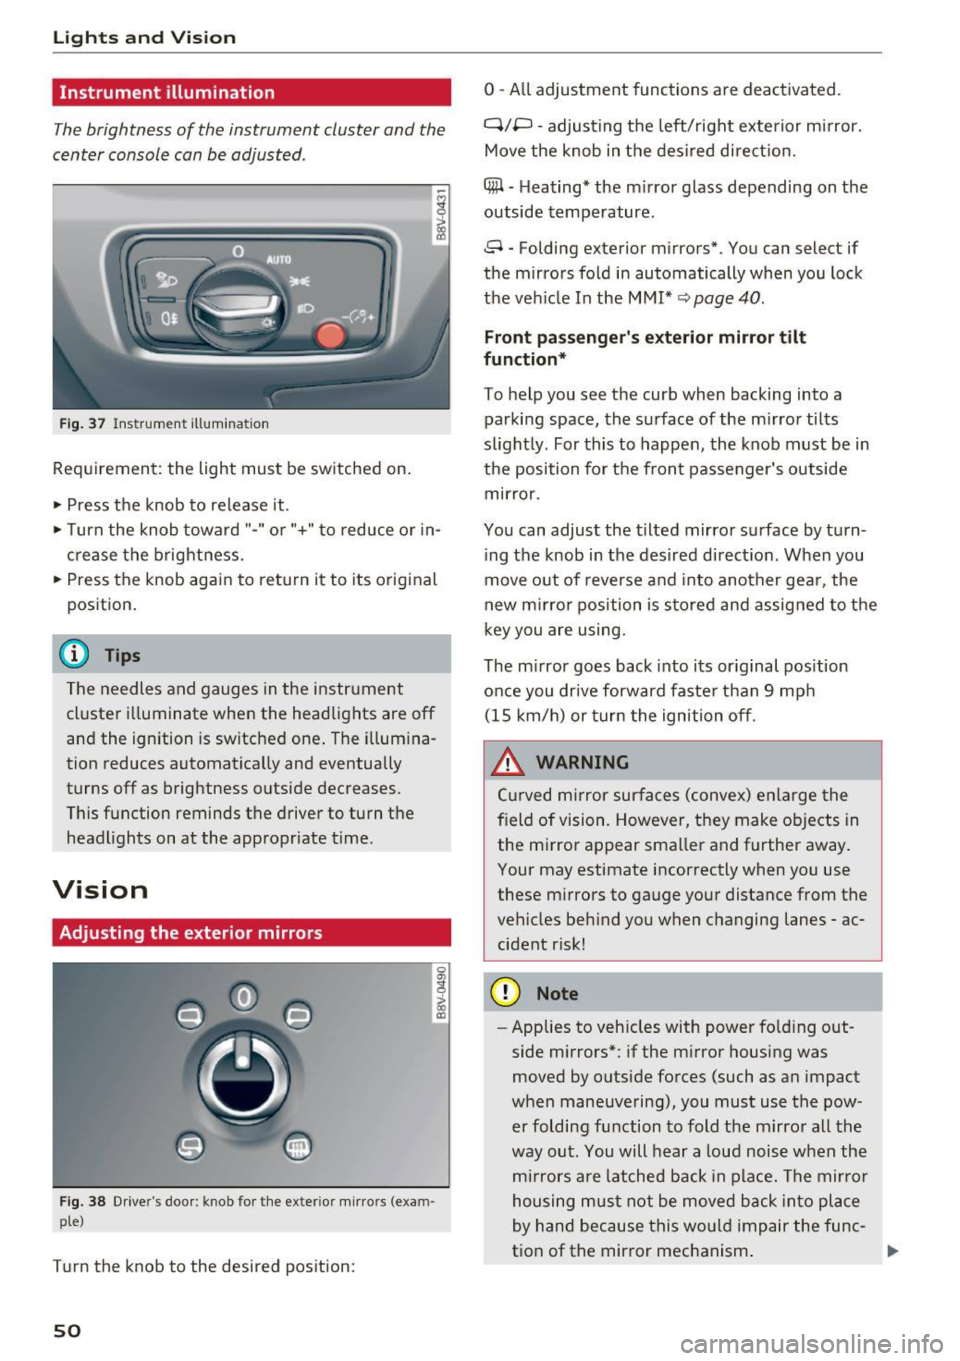
Fig. 37 Instrument ill umination
Requirement: the light must be switched on.
~ Press the knob to release it .
~ Turn the knob toward"-" or"+" to reduce or in
crease the brightness.
~ Press the knob again to return it to its original
position.
(D Tips
The needles and gauges in the instrument cluster illuminate when the headlights are off
and the ignition is switched one. The illumina
tion reduces automatically and eventually
turns off as brightness outside decreases.
This function reminds the driver to turn the
headlights on at the appropriate time.
Vision
Adjusting the exterior mirrors
Fig. 38 Driver's door: knob for the ex ter ior mirrors (exam
ple)
Turn the knob to the desired position:
50
0 - All adjustment functions are deactivated.
q;p -adjusting the left/right exterior mirror.
Move the knob in the desired direction.
4#1 -Heating* the mirror glass depending on the
outside temperature.
8 -Folding exterior mirrors*. You can select if
the mirrors fold in automatically when you lock
the vehicle In the
MMI* ~ page 40.
Front passenger's exterior mirror tilt
function*
To help you see the curb when backing into a
parking space, the surface of the mirror tilts
slightly. For this to happen, the knob must be in
the position for the front passenger's outside mirror.
You can adjust the tilted mirror surface by turn ing the knob in the desired direction . When you
move out of reverse and into another gear, the
new mirror position is stored and assigned to the
key you are using.
The mirror goes back into its original position
once you drive forward faster than 9 mph (15 km/h) or turn the ignition off.
.&, WARNING
Curved mirror surfaces (convex) enlarge the
field of vision. However, they make objects in the mirror appear smaller and further away.
Your may estimate incorrectly when you use
these mirrors to gauge your distance from the
vehicles behind you when changing lanes -ac
cident risk!
(D Note
- Applies to vehicles with power folding out
side mirrors*: if the mirror housing was
moved by outside forces (such as an impact
when maneuvering), you must use the pow er folding function to fold the mirror all the
way out. You will hear a loud noise when the
mirrors are latched back in place. The mirror
housing must not be moved back into place
by hand because this would impair the func
tion of the mirror mechanism.
-
Page 85 of 328

,....,
N
0 > co ,....,
There is an automatic start malfunction if the~
(gasoline engine) or
II (diesel engine) indicator
light turns on and the message
Engine start sys
tem malfunction! Please contact Service
ap
pears.
To start the engine, press and hold the
I S TART ENGINE STOPI button until the engine
runs.
Drive to an authorized Audi dealer or authorized
Audi Service Facility immediately to have the
malfunction corrected.
& WARNING
- To reduce the risk of poisoning, never allow
the engine to run in confined spaces.
- Always take the vehicle key with you when
leaving the vehicle, even for a short period
of time. This applies particularly when chil
dren remain in the vehicle. Otherwise the
children could start the engine or operate
electrical equipment such as power win
dows .
- Please note that the brake booster and pow
er steering only work when the engine is
running . When the engine off, you must use
more force to steer or brake the vehicle. Be
cause the usual steering and braking capa
bility is not available, the risk of accidents or
injuries increases.
(D Note
- Avoid high engine speed, full throttle, and
heavy engine load as long as the engine has
not reached operating temperature yet. You
could damage the engine.
- The engine cannot be started by pushing or
towing.
@) For the sake of the environment
Do not let the engine run while parked to
warm up. Begin driving immediately. This re
duces unnecessary emissions.
,....,
{!) Tips
-Some noise after starting the engine is nor
mal and is no cause for concern.
- If the . indicator light blinks in the instru
ment cluster before switching the ignition
off, the ignition will not switch on again.
¢page 162
-If you leave your vehicle with the ignition
switched on, the ignition will switch off af
ter a certain amount of time. Make sure that electrical equipment such as the exterior
lights are switched off .
Turning the engine off using the
button
Applies to vehicles: with convenience key
Plug-in hybrid drive*: refer to the information un
der
¢ page 100.
"' Bring the vehicle to a full stop.
"' Move the selector lever into the P position.
.. Press the
!STAR T ENGINE STOP ! button
¢ page 82, fig. 78.
The needle in the tachometer moves to OFF when
the ignition switches off.
Steering lock1
)
The steering locks when you turn the engine off
using the
I START ENGINE STOPI* button, move
the selector lever into the P position and open
the driver's door.
The locked steering helps prevent vehicle theft.
Emergency off function
If it is absolutely necessary, the engine can also
be turned off while driving at speeds lower than
6 mph (10 km/h). To switch the engine off, press
the
I START ENGINE STOPI button twice in a row
briefly or press and hold for longer than two sec -
onds. ..,.
83
Page 87 of 328
.... N
0 > CX)
rl I.Cl U"I
rl I.Cl ....
This message appears and a warning tone sounds if you open the driver's door when the ignition is
switched on. Switch the ign ition off so that the
battery will not d ischarge.
Pressing start/stop button again will switch off
engine!
This message appears when you press the
ISTART ENGINE STOPI* button while driving
¢ page 83, Emergency off function.
Engine start system malfunction. Please con
tact Service
The engine automatic start system has a mal
function . Drive to an author ized Audi dealer or
author ized Audi Service Facility immediate ly to
have the malf uncti on corrected. To start the en
g ine, press and hold the
!START ENGINE STOPI
button.
DJ Key not recognized. See owner's manual
This message appears if there is no convenience
key inside the vehicle or if the system does not
recognize the key. The conven ience key may not
be recognized, for example, if it is covered by an
object that
disrupts the signal (such as a brief
case), o r if the key battery is weak. Electronic de
vices such as cell phones can also interfere with
the signal.
To still be able to start or stop the engine, refer
to "Cor rect ing a malfunction" ¢
page 84.
Ill Key not in vehicle?
The Ill indicator light turns on and this message
appears if the convenience key was removed from
the vehicle when the eng ine was running . If the
conven ience key is no longer in the vehicle, you
cannot switch the ignition on o r start the engine
once yo u stop it. In addition, you cannot lock the
ve hicl e from the outside .
Press brake pedal
This message appears if you do not press the
brake pedal when starting the eng ine .
Please engage N or P
This message appears when starting or s topping
the engine if the selector lever is not in the Nor P
position . The engine will not start/stop .
Driving
Shift to P, vehicle can roll away . Doors can only
be locked in P
T his message appears for safety reasons along
with a warning tone. It appears if the selec to r
lever for the automat ic transmission is not in the
P position when switching the ignition off with
the
I START ENGINE STOPI * button. Shift these
lector lever to the P position. Otherwise, the vehi
cle could roll. You also cannot lock the vehicle us
ing the locking sensor o n the door hand le or us
ing the conven ience key.
Electromechanical
parking brake
Operating
The electromechanical parking brake replaces
the hand brake.
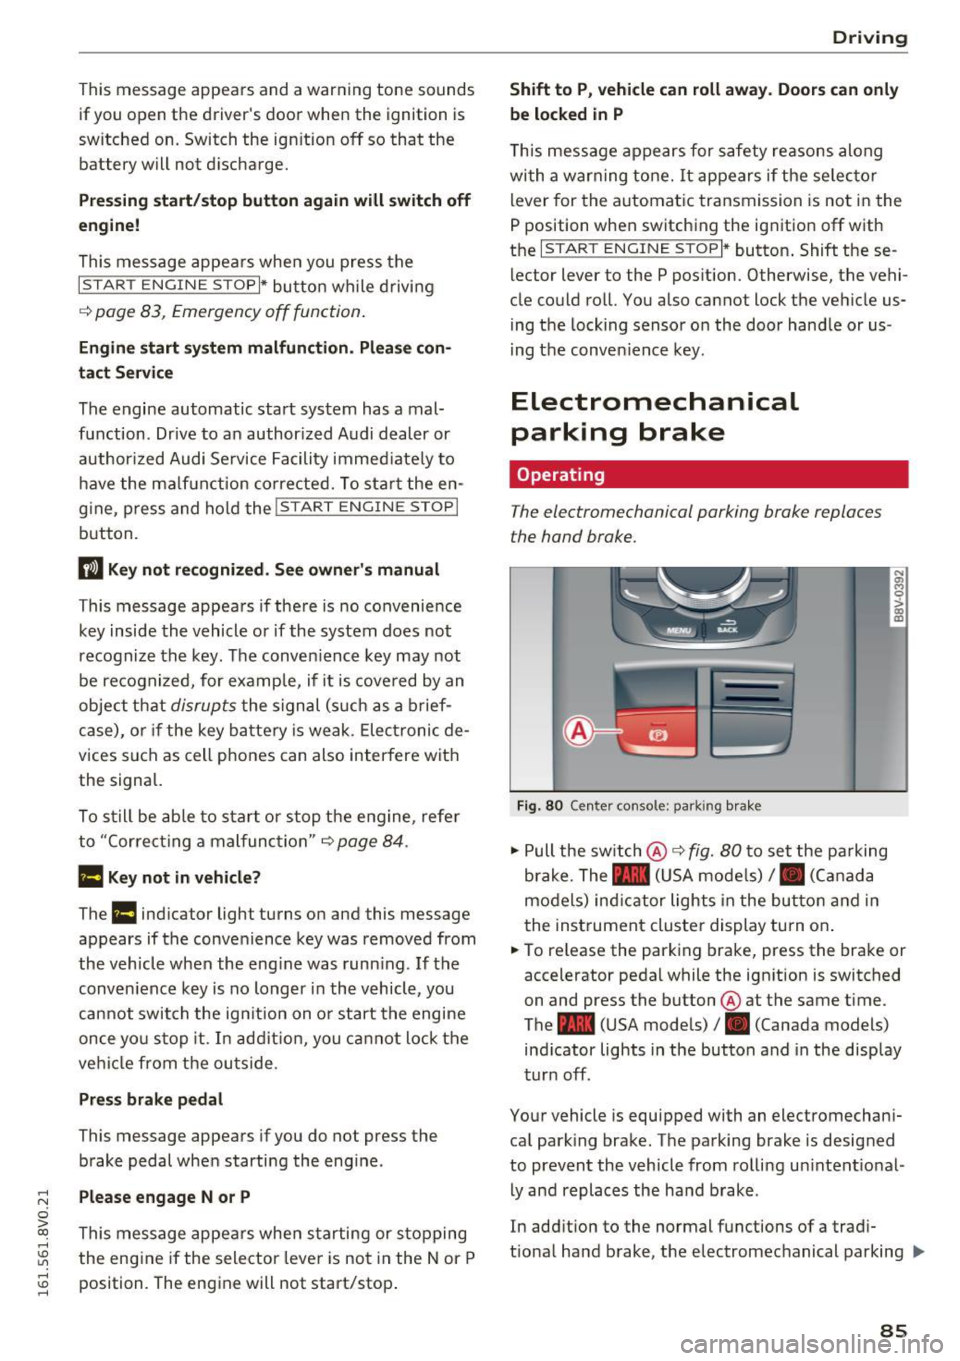
Fig . 80 Center console : pa rk ing brake
" Pull the switch @¢ fig. 80 to set the parking
brake. The - (USA models),. (Canada
models) ind icator lights in the button and in
the instrument cluster display turn on .
" To release the parking brake, press the brake or
accelerator pedal while the ign ition is switched
on and press the button @at the same time.
The - (USA models), . (Canada models)
ind icator lights in the button and in the display
turn off.
Your vehicle is equipped with an electromechani
cal park ing brake. The parking brake is designed
to prevent the vehicle from rolling un intent io nal
ly and replaces the hand brake .
In addition to the normal functions of a tradi
t ional hand brake, the electromec hanical parking ..,.
85
Page 88 of 328
Driving
brake provides various convenience and safety
functions.
When starting from a stop
- The integral hill start assist helps you when
driving by automatically releasing the parking
brake
c:;, page 87, Starting from a stop.
- When starting on inclines, the hill start assist
prevents the vehicle from unintentionally roll
ing back. The braking force of the parking brake
is not released until the wheels build up
enough driving force.
Emergency brake function
The emergency braking function ensures that the
vehicle can be slowed down even if the
standard
brakes fail c:;, page 87, Emergency braking
function.
A WARNING
- Do not press the accelerator pedal inadver
tently when the vehicle is stationary and the engine is running and a gear is selected.
Otherwise the vehicle will start to move im
mediately and could result in a crash.
- If the power supply fails, the released park
ing brake can no longer engage. In this
case, park the vehicle on level ground and
secure it by placing the selector lever in the
P position . See an authorized Audi dealer or
authorized Audi Service Facility for assis
tance.
(D Note
If the . or .. (USA models) /. (Canada
models) indicator light in the instrument
cluster blinks, there is a malfunction in the
brake system. Refer to the detailed descrip
tion of the indicator lights
c:;, page 18.
-If the - (USA models) /. (Cana-
da models) or
Ill indicator light turns on,
there is a malfunction in the parking brake
c;, page 19.
@ Tips
-If the parking brake is set while the ignition
is switched off, the
¢~jj indicator light in the
button and in the instrument cluster dis-
86
play - (USA models) /. (Canada mod
els) will turn off after a certain amount of
time.
- If driver's door is opened while the ignition
is switched on, the parking brake sets auto
matically. This prevents unintended rolling
of the vehicle.
- Occasional noises when the parking brake is
set and released are normal and are not a
cause for concern.
- When the vehicle is parked, the parking
brake goes through a self-test cycle at regu
lar intervals. Any noises associated with this
are normal.
- If there is a power failure, the parking brake
will not set if it is released, and it will not release if it is set
c:;, I!:::,. . See an authorized
Audi dealer or authorized Audi Service Fa cility for assistance.
· Parking
.,. Press the brake pedal to stop the vehicle.
.,. Pull the switch @
c:;, page 85, fig. 80 to set the
parking brake.
.,. Place the selector lever in the P position.
.,. Turn the engine off
c:;, & -
.,. Turn the steering wheel when parking on in
clines so that the wheels will roll into the curb
if the vehicle starts moving.
A WARNING
- Always take the vehicle key with you when
leaving the vehicle, even for a short period
of time . This applies particularly when chil
dren remain in the vehicle. Otherwise chil
dren could start the engine, release the
parking brake or operate electrical equip
ment such as power windows, which in
creases the risk of an accident.
- When the vehicle is locked, no one -particu
larly not children -should remain in the ve
hicle. Locked doors make it more difficult
for emergency workers to get into the vehi
cle, which puts lives at risk.
Page 91 of 328
,....,
N
0 > co ,....,
Introduction
App lies to vehicles: with S tronic transm ission
Your veh icle is equipped with an e lectron ically
controlled DSG transmiss ion called S tronic. Two
independent clutches transfer the power be
tween the engine and transmission . It allows the
vehicle to accelerate without a noticeable inter ruption in traction.
The transm ission upshifts or downsh ifts auto
matica lly. The driving sty le continuously influen
ces the selection of the driving program.
When a
moderate driving style is used , the
transmission selects the most economical driving
mode. The transmission upshifts at a lower RPM
and downshifts at a higher RPM to improve fuel
efficiency.
The transm ission switches to a sporty mode after
a kick-down o r when the driver uses a
sporty
driving style
characterized by quick accelerator
pedal movements, heavy acce leration , frequent
changes in speed and traveling at the maximum
speed.
If desired, the driver can also select the gears
manually (tiptronic mode) ¢ page 94, Shifting
manually (tiptronic mode) .
Selector lever positions
Applies to vehicles: with S tro nic t ra n sm issio n
Fig. 81 Instrument clus te r: selec tor leve r posi tions
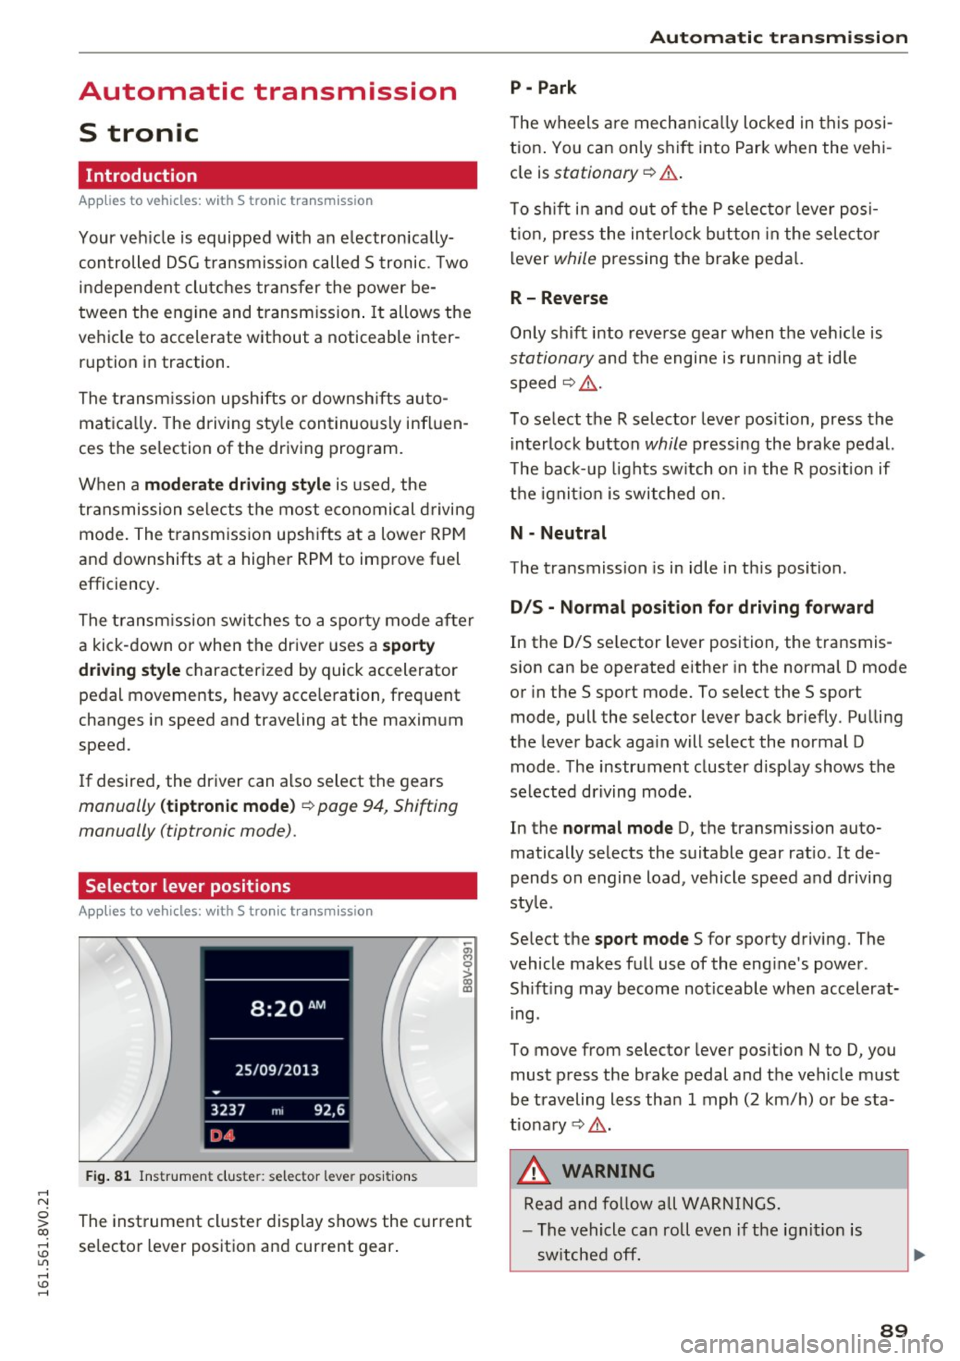
-~ 0 > (X) a,
The instrument cluster display shows the current
selector lever position and current gear .
Automatic transmission
P -Park
The wheels are mechan ically locked in this posi
tion. You can only shi ft into Park when the vehi
cle is
stationary ¢&. .
To s hift in and out of the P selector lever posi
tion, press the interlock button in the selector
lever
while pressing the brake pedal.
R- Reverse
Only shift into reverse gear when the vehicle is
stationary and the engine is running at idle
speed¢ ,&..
T o select the R selector lever position, press the
interlock button
while pressing the brake pedal.
T he back- up lights switch on in the R position if
the ignition is switched on.
N - Neutral
The transmission is in idle in this position .
D/S - Normal position for driving forward
In the D/S se lector lever position, the transmis
sion can be operated either in the normal D mode
or in the S sport mode. To select the S sport
mode, pull the selector lever back briefly . Pulling
the lever back again will select the normal D
mode . The instrument cluster display shows the
selected driving mode.
In the
normal mode D, the transmission auto
matically selects the suitable gear ratio . It de
pends on engine load, vehicle speed and driving
style .
Se lect the
sport mode S for sporty driving. The
vehicle makes full use of the engine's power .
Sh ifting may become noticeable when accelerat
ing.
To move from selector lever position N to D, you
must press the brake pedal and the vehicle must
be traveling less than 1 mph (2 km/h) or be sta
tionary ¢&. .
,&. WARNING
Read and follow all WARNINGS.
- The vehicle can roll even if the ignit ion is
switched off.
89
Page 92 of 328
Automat ic t ra nsm iss io n
-Never select R or P while driving, because
this increases the risk of an accident.
- Power is still transmitted to the wheels
when the engine is running at idle. To pre
vent the vehicle from "creeping" , you must
keep your foot on the brake in all selector
lever positions (except P) when the engine is
running. Otherwise, this increases the r isk
of an accident.
- Do not inadvertently press the accelerator
pedal when the veh icle is stopped if a gear is
engaged. Otherwise the vehicle will start to
move immediately, even if the parking brake
is set. This cou ld result in a crash.
- Do not press the accelerator pedal when
changing the selector lever position wh ile
the vehicle is stationary and the engine is running .
- Never leave yo ur vehicle with the engine
running whi le in gear. If you must leave
your vehicle when the engine is running, set
the parking brake and move the selector lev
er to the P position.
- To decrease the risk of an accident, these
lector lever must be in the P position and
the parking brake must be set before open ing the hood and working on a running en
gine . Always read and follow the applicable
warnings
q page 236, Working in the en
gine compartment.
(D Note
Never let the veh icle roll downhill with engine
off and the selector lever in the
N position,
because this could damage the automatic
transmission and catalytic converter .
(D Tips
-Audi drive select: Sporty shifting character
i stics can be selected us ing the
D ynami c
driving mode.Swill appear in the instru
ment cluster disp lay instead of D.
- Plug-in hybrid drive*: the transm iss ion
switc hes automatically to the normal D
mode if the
l a ' I butto n ¢ page 104 is p ress
ed while in spo rt mode 5 .
90
-If you accidentally select N whi le dr iving,
take your foot off the accelerator peda l im
mediately and wait for the eng ine to slow
down to idle before selecting Dor
5.
- If there is a power failure, the selector lever
will not move out of the P position. The
emergency release can be used if this hap
pens ¢
page 96.
Selector lever lock
Applies to vehicles: with S tronic transmiss ion
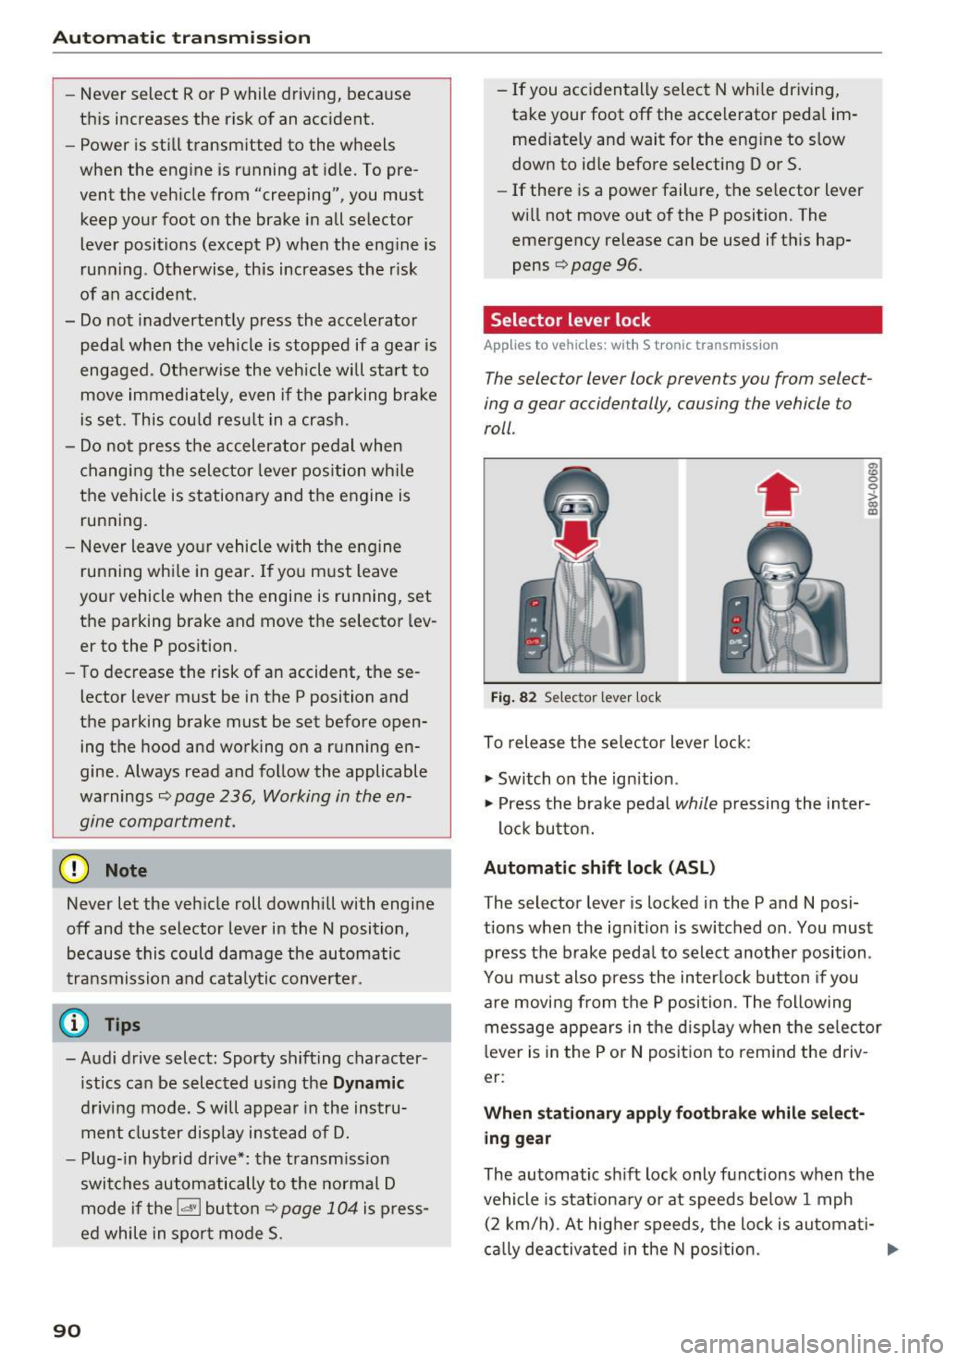
The sele ctor lever lock prevents you from select
ing a gear accidentally, causing the vehicle to
roll .
Fig. 82 Selecto r lever lock
To release the se lector lever lock :
.,. Sw itch on the ignition .
12 0
0
> Q) a)
.,. Press the brake pedal while pressing the in ter-
lock button.
Automat ic shift lock (ASL )
The selector lever is locked in the P and N posi
tions when the ign it ion is switched on. You must
press the brake peda l to select another position .
You must also press the in terlock button if you
are moving from the P posi tion . The follow ing
message appears in the d isp lay when the se lector
lever is in the P or N posit ion to rem ind the driv
er:
When stati onar y ap pl y fo otbrake while select
ing ge ar
The automatic sh ift lock only functions when the
vehicle is stationa ry or at speeds be low 1 mph
(2 km/h) . At highe r speeds, the lo ck is automati-
ca lly deactiva ted in the N pos ition . ..,.
Page 96 of 328
Automatic transmission
Shifting manually (tiptronic mode)
Applies to vehicles: with S tronic transmission/ shift paddles
The tiptronic allow the driver to shift the gears
manually .
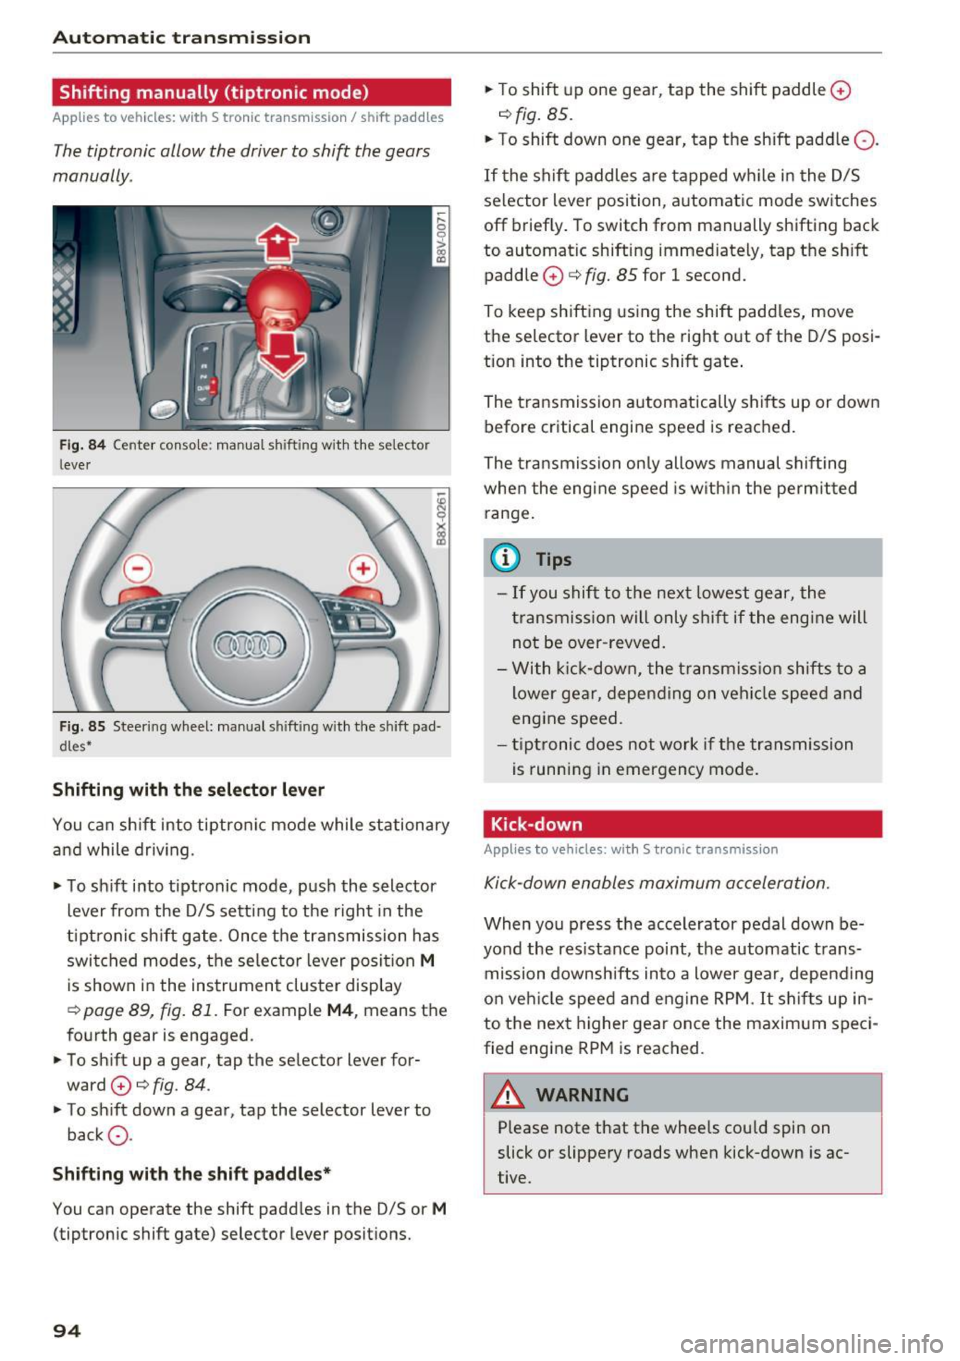
Fig. 84 Center conso le : manual shift in g with the selector
l ever
Fig . 85 Steer ing wheel: manual shi ftin g with the shi ft pad
dles•
Shifting with the selector lever
You can shift into tiptronic mode while stationary
and while driv ing.
• To shift into tiptronic mode, push the selector
lever from the D/S setting to the right in the
tiptronic shift gate. Once the transmission has
switched modes, the selector lever position
M
is shown in the instrument cluster display
¢ page 89, fig. 81. For example M4 , means the
fourth gear is engaged .
• To sh ift up a gear, tap the se lector lever for
ward
0 ¢ fig. 84.
• To shift down a gear, tap the selector lever to
back Q.
Shifting with the shift paddles*
You can operate the shift paddles in the D/S or M
(tiptronic shift gate) selector lever positions.
94
.,. To shift up one gear, tap the shift paddle 0
¢fig. 85 .
.,. To shift down one gear, tap the shift paddle Q.
If the shift paddles are tapped wh ile in the D/S
selector lever position, automatic mode switches
off briefly. To switch from manually shifting back
to automatic shifting immediately, tap the sh ift
paddle
0 ¢ fig. 85 for 1 second.
To keep shifting using the shift paddles, move
the selector lever to the right out of the D/S posi
tion into the tiptronic shift gate.
The transmission automatically shifts up or down
before critical engine speed is reached.
The transmission only allows manual shifting
when the engine speed is with in the permitted
range.
(j) Tips
- If you shift to the next lowest gear, the
transmission will only shift if the engine will
not be over-revved.
- With kick-down, the transmission shifts to a
lower gear, depending on vehicle speed and
engine speed.
- ti ptronic does not work if the transmission
is running in emergency mode.
. Kick-down
Applies to vehicles: with S tronic transmission
Kick-down enables maximum acceleration.
When you press the accelerator pedal down be
yond the res istance point, the automatic trans
mission downshifts into a lower gear, depending
on veh icle speed and engine RPM. It shifts up in
to the next higher gear once the maximum speci
fied engine RPM is reached.
A WARNING
Please note that the whee ls cou ld spin on
slick or slippery roads when kick-down is ac
tive.
-