mirror AUDI A3 2016 Owner´s Manual
[x] Cancel search | Manufacturer: AUDI, Model Year: 2016, Model line: A3, Model: AUDI A3 2016Pages: 328, PDF Size: 81.78 MB
Page 11 of 328
,....,
N
0 > co ,....,
@
®
©
®
®
(J)
®
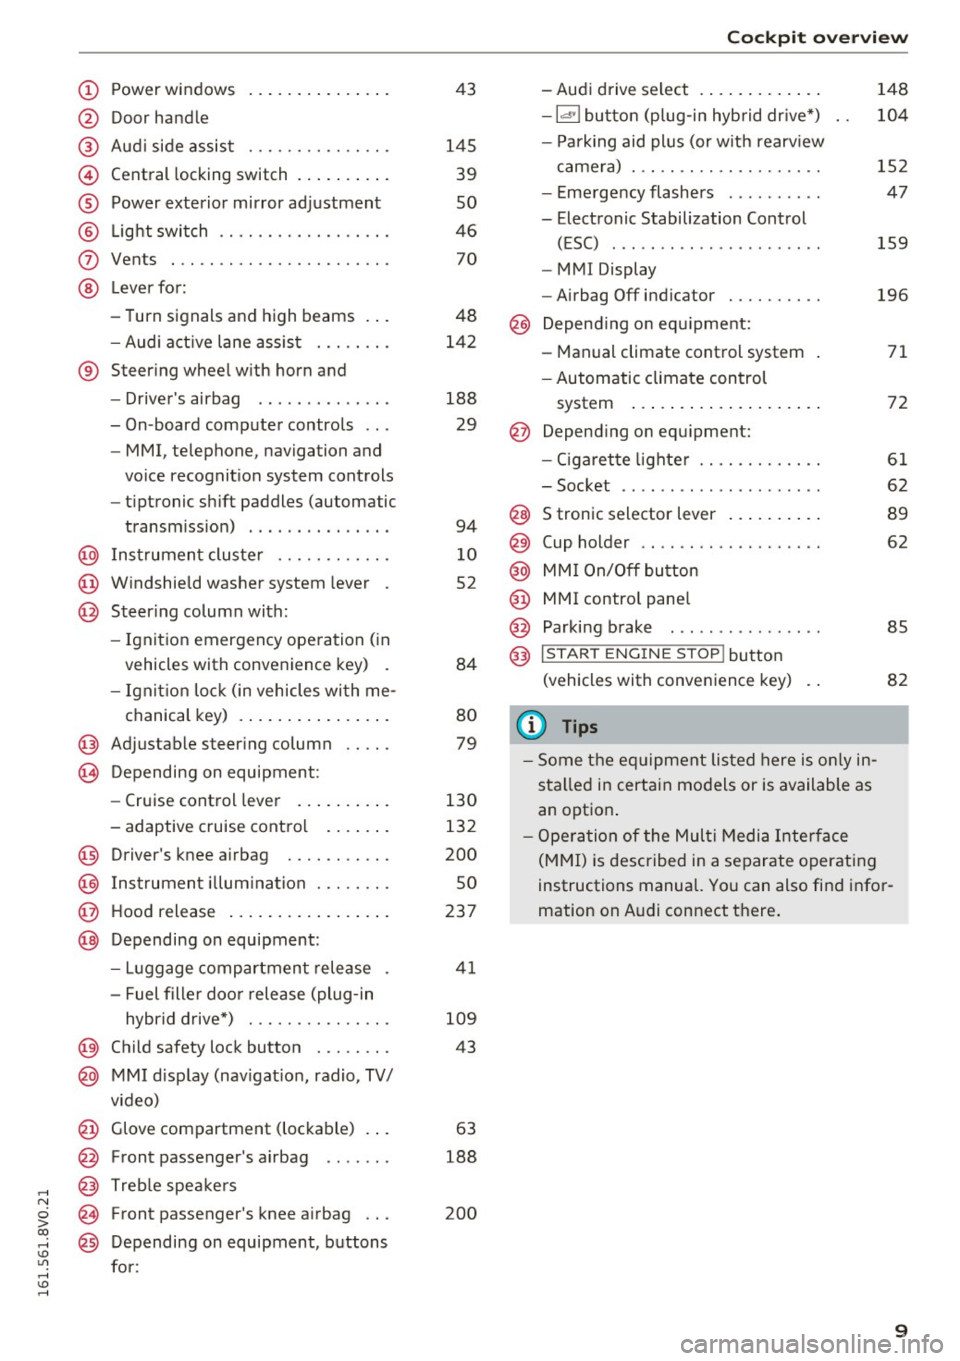
Power windows
Door handle
Aud i side assist ............ .. .
Central locking switch .. ... .. .. .
Power exterior mirror ad justment
L ig ht swit ch ............... .. .
Vents
L ever fo r:
- Turn signals and high beams . . .
- Audi a ct ive lane assis t ..... .. .
® Steer ing whee l w ith horn and
- Drive r's airbag ...... ..... .. .
- On-board compute r controls .. .
- MMI, telephone, navigation and
vo ice recognit ion system cont rols
- tiptronic sh ift paddles (automatic
transm iss ion) . .. .... ... .. .. .
@ Ins trumen t cluste r ....... .. .. .
@ W indshield washer system lever .
@ Steering column with:
- Ignit ion emergency operation ( in
vehicles with convenience key) .
- Ignit io n lock (in vehicles wi th me -
chanical key) . .. ..... ... .. .. .
@ Adjustable steer ing column .. .. .
(B) D epending on equipment:
- Cruise control leve r ..... .. .. .
- adaptive cruise contro l .. .. .. .
@ Driver's knee a irbag ........ .. .
@ Ins trumen t illum ination ..... .. .
@ Hood release ... .. .... ... .. .. .
@ Depending on equipment: 43
145 39
so
46 70
48
142
188 29
94
1 0
52
84
80
79
130
132
200
so
237
- Luggage compartment release . 41
- Fuel fille r doo r release (plug-in
hybrid drive*) . . . . . . . . . . . . . . . 109
@ Child safety lock button . . . . . . . . 43
@ MMI d isp lay (nav igat ion, radio, TV/
v ideo)
@ Glove compartment (lockable) . . . 63
@ Front passenger 's airbag . . . . . . . 188
@ Treb le spe akers
@ Front passenger's knee a irbag . . . 200
@ Depending on equipment, b uttons
for:
Coc kpit o ve rv iew
- Aud i drive select . .. .. ..... .. .
- la •I bu tton (p lug-in hyb rid dr ive *)
- P ark ing aid plus (or w it h rearv iew
came ra) . .. .. .............. .
- E me rgency flashers ......... .
- Electronic Stabilization Control (ESC) ....... .. ............ .
- MMI Display
- Airbag Off indicator ......... .
@ Depend ing o n eq uipment:
- Manual climate control system
- Automatic climate con trol
system ..... .. ... .. ..... .. .
@ Depend ing o n equ ipment:
- Ciga ret te lighte r ............ .
- Soc ket .. .. .. .. ............ .
@ S tronic selector lever .. ..... .. .
@) Cup holder .. .. .. ............ .
@ MM I On/Off bu tton
@ MMI contro l pane l
@ Parking brake . .. ............ .
@ I STAR T ENGINE ST OP ! button
(vehicle s with conve nience key)
(1) Tips
- Some t he e quipment listed here is o nly in
sta lled in certai n mo del s or is available as
an opt ion . 148
10
4
152
47
159
196
71
72
61
62
8 9
62
85
82
- Ope ra tio n of the Mul ti M edia Inte rface
(M MI) is described in a separate operatin g
instructions manual. Yo u can also fi nd info r
mation on A udi connect t here .
9
Page 42 of 328
Opening and closin g
"'Se lect : the IMENU ! button> Car> Syste m s*
contro l button > V ehicl e settin gs > Central
loc king > Door unlock ing.
Select ing All and pressing the~ button on the
remote control key un locks the entire vehicle .
I f you select
Dri ver and then press the~ button
on the remote contro l key , o nl y the drive r's door
will unlo ck. In veh icles w ith a convenience key,
only the front door whose handle you pull will
un lock . If you pr ess the ~ button twic e, the en
tire veh icle w ill unlock. If you press the~ button,
the entire vehicle w ill always lo ck.
F olding * th e ex ter ior m irrors
"'Se lect : the IMENU ! button> Car > Sy stem s*
contro l button > Ve hicl e s ett ing s > Central
lo ck ing > Fold m irro rs.
For more information,
refer to
c> page 50, Adjusting the exterior
mirrors.
If you select On , the exter ior mirrors wi ll fold in
automatically when you press the~ button on
the remote control key <=>
page 50.
T on e wh en locking
"' Se lect : the IMENU ! button> Car> S yst em s*
contro l button > V ehicl e sett ing s > Ce ntral
loc king > Tone wh en lo cking.
When checked off./, a tone will sou nd when you
lock the vehicle .
I f you press the~ button twice , the entire veh i
cle will lock. There is a locking to ne at the same
time
1l.
Electronic immobilizer
The immobilizer prevents unauthorized use of
your vehicle.
A microch ip in the key automat ically deactivates
the electronic immob ilizer when the key is locat
ed in the vehicle. If yo u remove the key from the
ve hicle, the electro nic immobilize r activates
again a utomat ica lly.
l) Th is fun ction is not a vail able in al l co un tries.
40
A WARNING ,_ -
A lways take the key w ith you whenever you
leave your veh icle. The electronic immobilizer
can be deactivated with the key, so this could make it possible for unauthorized persons to
start the engine and operate vehi cle systems
such as the power windows or sun roof. This
can increase the ris k of serious injury .
(D Tips
-The veh icle cannot be started if an unau
tho rized key is used. It may not be possib le
to start the veh icle unde r ce rtain c ircum
stances, for examp le if there is ano ther ra
dio module like the key from another vehi
cle or a transponder on the same keychai n.
- For an exp lanation on conformity w ith the
FCC regulations in the Un ited States and the
Industry Canada regulations, refer to
<=> page 309.
Safety central locking
App lies to vehicles : wit h safety cent ra l locking
Sa fety central locking provides the possib ility , to
only un lock the dr iver 's door and the fuel filler
door . The rest of the vehicle remains locked .
Unlocking the driver's door and the fuel filler
doo r
"' Press the remote control key or convenience
key
[§il button once or turn the key once in the
open ing d irection .
Unlocking all doors , the luggag e
compartment lid and th e fu el filler door
"' Press the remote control key or convenience
key
[§il button twice within five seconds or turn
the key
twice w ithin five seconds in the opening
di rect ion.
When unlock ing just the driver 's door, the a nti
theft alarm system* is also immediately deacti
vated .
In veh icles with an MMI, you can directly adjust
the safety central locking
c> page 39 .
Page 49 of 328

.... N
0 > CX)
.... I.Cl U"I
.... I.Cl ....
When switched on, adaptive light adjusts to
curves depending on the vehicle speed and steering wheel angle. This provides better lighting
through the curve. The system operates in a
speed range from approximately 6 mph (10 km/
h) to 68 mph (110 km/h).
Static cornering light* (vehicles with adaptive
light) -the cornering light switches on automati
cally when the steering wheel is turned at acer
tain angle at speeds up to approximately 44 mph
(70 km/h) and when the turn signal is activated
at speeds up to approximately 25 mph (40 km/
h). The area to the side of the vehicle is illuminat
ed better when turning.
Speed dependent light distribution* -The speed
dependent light distribution adapts the light in
towns and on highways or expressways . Intersec
tions can also be illuminated on vehicles with a
navigation system* .
Highway light function*
(Vehicles with adaptive light or LED headlights) -
This function adapts the lighting for highway
driving based on vehicle speed .
& WARNING
-Automatic headlights* are only intended to
assist the driver. They do not relieve the
driver of responsibility to check the head
lights and to turn them on manually accord
ing to the current light and visibility condi
tions. For example, fog cannot be detected by the light sensors . So always switch on the
low beam under these weather conditions
and when driving in the dark
io.
-Accidents could occur if you cannot see the
road ahead of you well and if others on the
road cannot see you . Always switch your
headlightsonsothatyoucanseetheroad
ahead of you and others can see your vehicle
from behind.
- The rear fog lights should only be turned on
in accordance with traffic regulations, to
prevent glare for traffic behind your vehicle .
-If the battery has been discharging for a
while, the parking lights may switch off au
tomatically to conserve the battery charge
Lights and Vision
for the next time the engine is started. Al·
ways make sure your vehicle complies with
legal regulations regarding sufficient and
safe lighting when parking it. Avoid using
the parking lights for several hours.
- Please observe legal regulations when using
the lighting systems described .
@ Tips
-The light sensor for the automatic head
lights* is in the rearview mirror mount.
Therefore, do not place any stickers in this
area on the windshield.
- Some functions of the exterior lighting can
be adjusted
¢ page 48 .
-If you turn off the ignition while the exterior
lights are on and open the door, you will
hear a warning tone.
- In some market-specific versions, the tail
lights do not turn on when switching on the
daytime running lights .
- In cool or damp weather, the inside of the
headlights, turn signals and tail lights can
fog over due to the temperature difference
between the inside and outside. They will
clear shortly after switching them on. This
does not affect the service life of the light
ing.
- A message will appear in the instrument
cluster if there is a malfunction in the light
sensor
¢ page 25.
Emergency flasher
Fig. 33 Inst rume nt panel: e merge ncy flasher butto n
The emergency flashers makes other drivers
aware of your vehicle in dangerous situations .
N Cl) M 0
> Cl) (0
47
Page 52 of 328
Lights and Vision
Instrument illumination
The brightness of the instrument cluster and the
center console can be adjusted .
Fig. 37 Instrument ill umination
Requirement: the light must be switched on.
~ Press the knob to release it .
~ Turn the knob toward"-" or"+" to reduce or in
crease the brightness.
~ Press the knob again to return it to its original
position.
(D Tips
The needles and gauges in the instrument cluster illuminate when the headlights are off
and the ignition is switched one. The illumina
tion reduces automatically and eventually
turns off as brightness outside decreases.
This function reminds the driver to turn the
headlights on at the appropriate time.
Vision
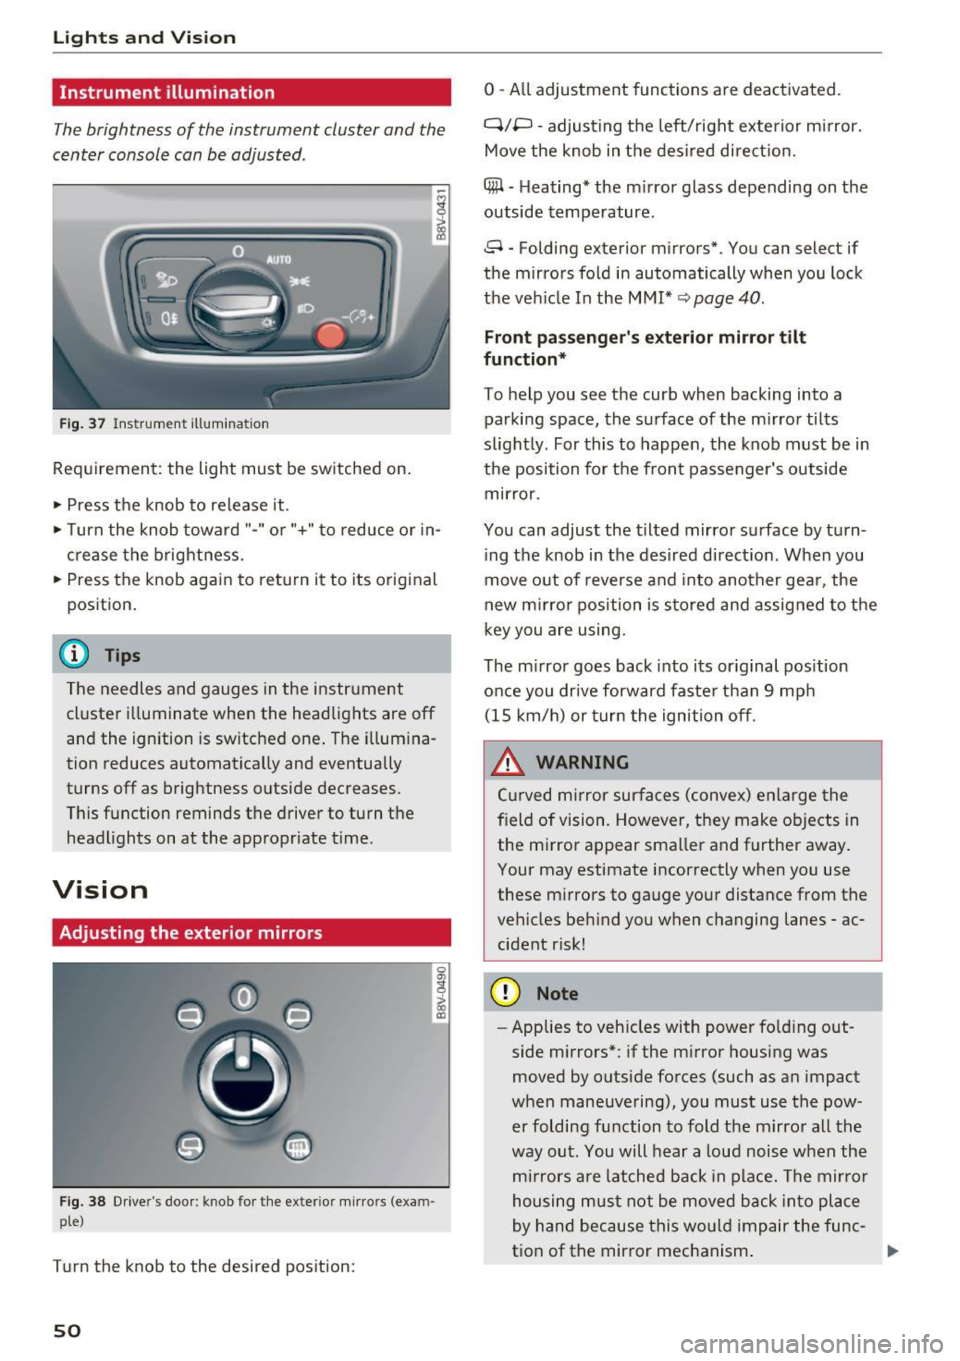
Adjusting the exterior mirrors
Fig. 38 Driver's door: knob for the ex ter ior mirrors (exam
ple)
Turn the knob to the desired position:
50
0 - All adjustment functions are deactivated.
q;p -adjusting the left/right exterior mirror.
Move the knob in the desired direction.
4#1 -Heating* the mirror glass depending on the
outside temperature.
8 -Folding exterior mirrors*. You can select if
the mirrors fold in automatically when you lock
the vehicle In the
MMI* ~ page 40.
Front passenger's exterior mirror tilt
function*
To help you see the curb when backing into a
parking space, the surface of the mirror tilts
slightly. For this to happen, the knob must be in
the position for the front passenger's outside mirror.
You can adjust the tilted mirror surface by turn ing the knob in the desired direction . When you
move out of reverse and into another gear, the
new mirror position is stored and assigned to the
key you are using.
The mirror goes back into its original position
once you drive forward faster than 9 mph (15 km/h) or turn the ignition off.
.&, WARNING
Curved mirror surfaces (convex) enlarge the
field of vision. However, they make objects in the mirror appear smaller and further away.
Your may estimate incorrectly when you use
these mirrors to gauge your distance from the
vehicles behind you when changing lanes -ac
cident risk!
(D Note
- Applies to vehicles with power folding out
side mirrors*: if the mirror housing was
moved by outside forces (such as an impact
when maneuvering), you must use the pow er folding function to fold the mirror all the
way out. You will hear a loud noise when the
mirrors are latched back in place. The mirror
housing must not be moved back into place
by hand because this would impair the func
tion of the mirror mechanism.
-
Page 53 of 328

.... N
0 > CX)
.... I.Cl U"I
.... I.Cl ....
-Applies to vehicles without power folding
outside mirrors : if the mirror housing was
moved by outside forces (such as an impact
when maneuvering), you must
move it back
in p lace by hand.
- If you wash the vehicle in an automatic car
wash, you must fold the exterior m irrors in
to reduce the risk of damage to the mirrors. Never fold power folding exterior m irrors*
by hand . Only fo ld them in and out using
the power controls.
(D Tips
If the power adjustment fails, both mirrors
can be adjusted by hand by pressing on the
edge of the mirror surface.
Dimm ing th e mirrors
Your vehicle is equipped with a manual or auto
matic* dimming rearview mirror.
F ig . 39 Automatic dimm ing rearv iew mirror•
Manual dimming rear vie w mirror
,..
0 0
> u. a,
~ Pull the lever on the bottom of the mirror back.
Automatic dimming rea rview mirror*
~ Press the b utton @. The indicator light @
tu rns on. The rearview and driver's exterior*
mirrors dim automatically when light shines on
them, for example from headlights on a vehicle
to the rear .
A WARNING 1=
Electrolyte fluid can leak from automatic dim-
ming mirrors if the g lass is broken. Electro
lyte f luid can irritate skin, eyes and airways .
Lights and Vision
-Repeated or long-term exposure to e lectro
lyte flu id can lead to irritation of the air
ways, especially in people with asthma or other respiratory conditions. Take deep
breaths immediately after leav ing the vehi
cle or, if this is not poss ible, open all of the
doors and windows as wide as possib le.
- If electro lyte fluid enters the eyes, flush
them thoroughly with a large amount of clean water fo r at least 15 minu tes and then
seek med ica l attention.
- If electro lyte fluid comes into contact wi th
the s kin, f lush the affected area with clean
water for at least 15 minutes and then clean
with soap and wate r and seek medical at
tention. Clean affected clothing and shoes
thorough ly before wearing again .
- If the fluid was swallowed and the person is
conscio us, flush the mo uth wit h water for at
least 15 minutes. Do not induce vomit ing
un less this is recommended by medical pro
fessionals. Seek medical attention immedi
ately.
(D Note
If the glass on an automatic dimming mirror
breaks, electro lyte can leak out. This liquid
damages plastic surfaces. C lean this liquid as
quick ly as possible w it h a wet sponge .
@ Tips
-If the light reaching the rearview mirror is
obstructed, the automatic dimming mirror
w ill not function correctly,
- The automatic dimming mirrors do not dim
when the inte rior lighting is turned on or
the reverse gear is selected.
51
Page 54 of 328

Lights and Vision
Sun visors
Fig. 40 Le ft s ide : sun visor
The sun viso rs can be moved out of their brackets
and turned toward the doors@. The sun shade
can also be moved back and forth lengthwise in
this pos ition .
The m irror ligh t switches on when the cover over
the vanity mirror* @opens .
Windshield wipers
Switching windshield wipers on
Fig . 41 Wind sh ield w iper leve r: ope ra tin g the w indshi eld
w ipe r system (ex ampl e: vehicle s w it h ou t rear wi ndow w iper
sy ste m)
Fig . 42 W ind sh ield w iper lev er wit h rear w indow w ip er" :
ope rat ing t he re ar win dow w iper sys te m
Req uirement: the ignition must be switched on.
52
"' N N
~
"'
Move the windshie ld w iper lever to the corre
sponding position:
@ -Fron t wipers off
(D -inte rval mode. To increase/decrease the w ip
er interva ls, move the switch @to the left/r ight .
In vehicles with a light/ra in sensor*, the wipers
turn o n when it is ra ining, whe n the vehicle is s ta
tiona ry and the leve r is tapped in the ® position,
o r once the vehicle speed exceeds app roximate ly
2 mph (4 km/h) . The higher the sensit ivity of the
rain sensor is set (switch @to the r ight), the ear
li er the windsh ie ld wipers react to moisture on
the windshie ld.
@ -slow wiping
@ -fast w iping
@) -sin gle wipe If you hold the lever i n this pos i
tion longer, the wipers switch from slow wiping
to fast wiping.
® -clean the windshield To e liminate water
droplets afte r switching the winds hield wipe rs
off while dr iv ing, they will operate one more time
severa l seco nds afte r switching them off if t he
temperat ure is above app rox ima tely 39 ° F (4 °C) .
You can swi tch th is func tion off by mov ing the
l ever to posit ion ® within 10 seconds o f the af
te rwipe. The afterwipe function is reactivated the
next t ime yo u sw itch the ignition on.
Cl eaning the headlig hts*. The headlight was he r
system * operates only when the low beam head
li ghts are on .
If you move the lever in position @,
the headlights will be cleaned in fixed interva ls .
Applies to vehicles wi th rear window w iper:
The rear wiper automa tica lly switches on when
the reverse gea r is engaged and the front wi nd
shield wipers are on and in ope ra t ion.
@ -Wiping the rea r window* . T he rear w iper
moves abo ut eve ry 6 seconds .
(J)-Cleaning the rear window* . The number of
wipes depends on how long the lever is he ld in
pos ition
(J) .
@ -Rear window wiper* off.
Page 57 of 328

.... N
0 > CX)
.... I.Cl U"I
.... I.Cl ....
A WARNING
For safety reasons, the windshield wiper
blades should be replaced once or tw ice each
year.
Digital compass
Switching the compass on and off
Appl ies to vehicles: with digital compass
Fig. 45 Rea rview mirro r: digital compass activated
0
~ 0
rt (0
.. To turn the compass on or off, press the button
@ until the compass in the mir ror appears o r
disappears.
The digital compass only works when the ign ition
is turned on. The direct ions are indicated with ab
breviations : N (north), NE (northeast), E (east),
SE (southeast), S (south), SW (southwest), W
(west), NW (northwest).
You must recalibrate the compass if it does not
display the correct direction
¢ page 55, Cali
brating the compass.
@ Tips
To prevent inaccu rate compass readings, do
not bring any remote controls , e lectr ical devi
ces or metallic objects near the mirror.
Lights and V ision
Adjusting the magnetic zone
Applies to vehicles: with digita l compass
The magnetic zone must be adjusted correctly
for the compass to read accurately.
Fig. 46 North Amer ica: mag netic zone map
.. Press and hold the button@¢ page 55, fig. 45
until the number of the magnetic zone appears
in the rearview m irror.
.. Press the button @ repeatedly to select the
correct magnetic zone. The se lection mode
turns off after a few seconds.
Calibrating the compass
Applies to vehicles: with digital compass
You must recalibrate the compass if it does not
display the correct direction.
.. Press and hold the button @¢ page 55, fig . 45
until a C appears in the interior rearv iew mirror .
.. Dr ive in a circle at about 5 mph (10 km/h) until
a direction is displayed in the rearv iew mirror.
.8_ WARNING
- To avoid endangering yourself and other
d rivers, calibrate the compass in an area
where there is no traffic .
55
Page 107 of 328
,....,
N
0 > co ,....,
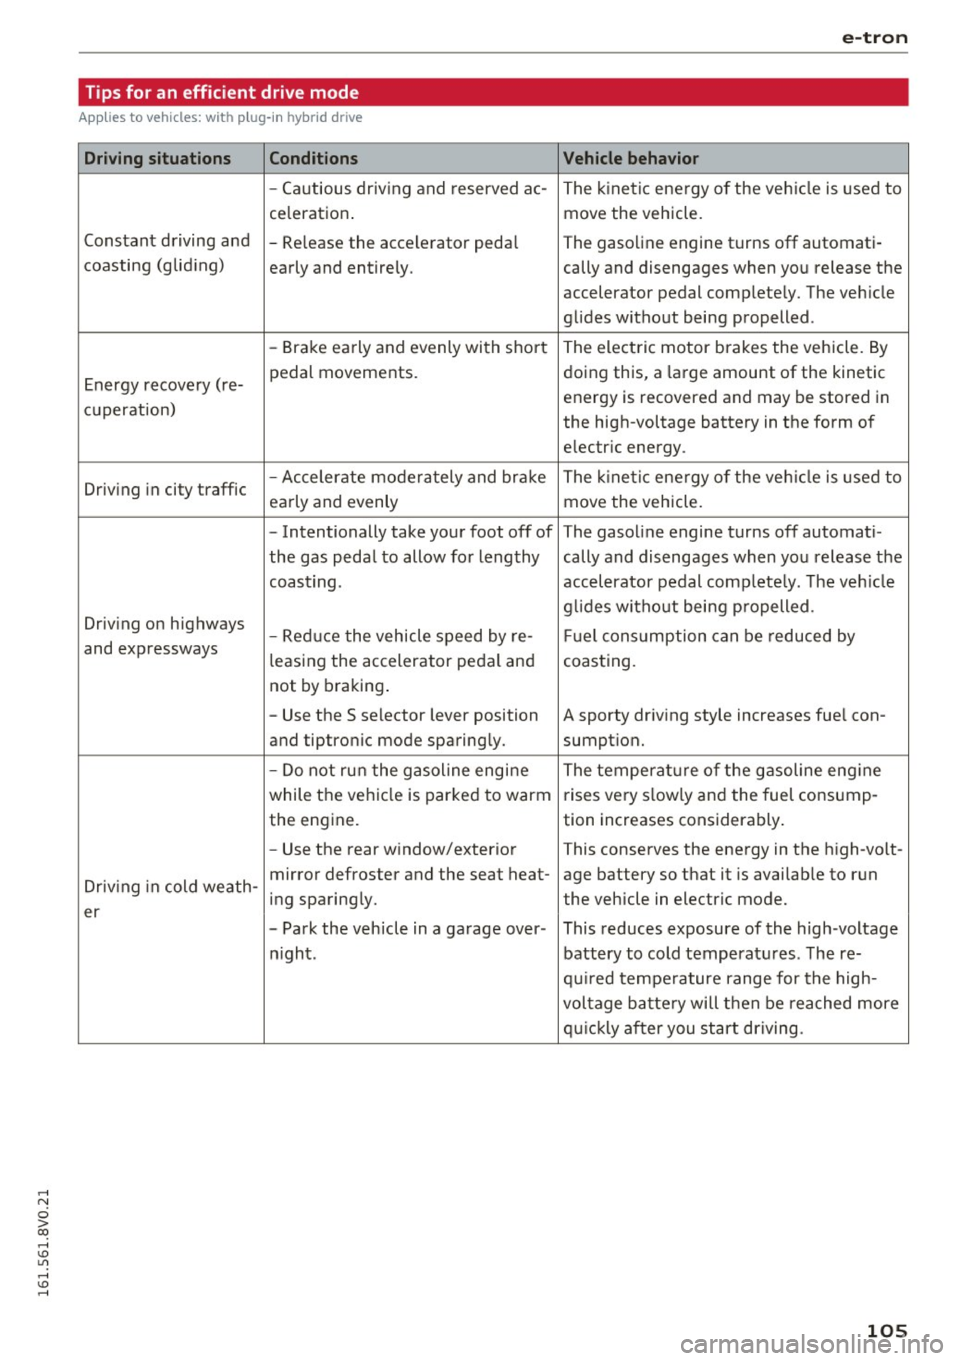
Applies to vehicles: with p lug-in hybrid drive
Driving situations
Conditions
-Cautious driving and reserved ac-
ce leration .
Constant driving and -Release the accelerator peda l
c oasting (glid ing)
early and entirely.
-Brake early and evenly with short
Energy recovery (re- pedal movements.
cu peration)
Driv ing in city traffic -
Accelerate moderately and brake
early and evenly
- Intentionally take your foot off of
the gas peda l to allow for Lengthy
coast ing .
Driv ing on highways
-Reduce the vehicle speed by re-
and expressways leasing the accelerator pedal and
not by braking.
- Use the S selector lever position
and tiptronic mode sparing ly.
- Do not run the gasoline engine
while the vehicle is parked to warm
the engine.
- Use the rear window/exterior
Driving in cold weath -mirror defroster and the seat heat-
ing sparingly.
er
-Park the vehicle in a garage over -
night.
e-tron
Vehicle behavior
The kinetic energy of the vehicle is used to
move the vehicle.
The gasoline engine turns
off automati -
cally and disengages when you release the
accelerator pedal comp letely. The veh icle
glides without being propelled .
The electric motor brakes the vehicle. By
doing this, a large amount of the kinetic
energy is recovered and may be stored in
the high-voltage battery in the form of
electric energy .
The kinetic ene rgy of the veh icle is used to
move the vehicle.
The gasoline engine turns
off automati-
cally and disengages when yo u release the
accelerator pedal comp lete ly . T he veh icle
g lid es without being p ropelled .
Fu el cons umption can be reduced by
coasting .
A sporty driv ing style increases fue l con-
sumpt ion.
The temperat ure of the gasoline eng ine
rises very s lowly and the fuel consump-
tion increases considerably .
This conserves the energy in the high-volt-
age battery so that it is availab le to run
the vehicle in electric mode.
This reduces exposure of the high-voltage
battery to cold temperatu res . The re-
quired temperature range for the high-
voltage battery will then be reached more
quickly after you start driving.
105
Page 129 of 328
,....,
N
0 > co ,....,
General information
Your Audi was designed primarily for passenger
transportation .
If you plan to tow a trailer, please remember that
the additional load will affect durability, econo
my and performance.
T railer towing not only places more stress on the
vehicle, it also calls for more concentration from
the driver.
For this reason, always follow the operating and
driving instructions provided and use common
sense.
Technical requirements
Trailer hitch
Use a weight-carrying hitch conforming to the
gross trailer weight. The hitch must be suitable
for your vehicle and trailer and must be mounted
securely on the vehicle's chassis at a technically
sound
location . Use only a trailer hitch with a re
movable ball mount . Always check with the trail
er hitch manufacturer to make sure that you are
using the correct hitch.
Do not use a bumper hitch.
The hitch must be installed in such a way that it
does not interfere with the impact -absorbing
bumper system . No modifications should be
made to the vehicle exhaust and brake systems .
From time to time, check that all hitch mounting
bo lts remain securely fastened.
When you are not towing a trailer,
remove the
tra iler hitch ball mount . This prevents the hitch
from causing damage should your vehicle be
struck from beh ind
~ ,&. .
Trailer brakes
If your trailer is equipped with a braking system,
check to be sure that it conforms to all regula
tions .
Trailer mode
The trailer hydraulic brake system must not be
directly connected to the vehicle's hydraulic
brake system.
Safety chains
Always use safety chains between your vehicle
and the trailer.
Trailer lights
T ra iler lights must meet all regulations . Be sure
to check with your Aud i dea ler for correct wiring,
switches and relays .
Mirrors
If you are unable to see the traffic behind you us
ing the regular outside mirrors, then you
must in
stall extended mirrors . It is important that you
always have clear vision to the rear.
,8. WARNING
After removing the trailer hitch, do not store
it in your vehicle. In case of sudden braking,
the hitch could fly forward and injure you or
your passengers.
Operating instructions
Maximum trailer weight
A trailer for your vehicle is limited to a typical
class 1 or class 2 trailer.
Trailer load distribution Be sure the load in the trailer is held securely in
place to prevent it from shifting forward, back
ward or sideways.
Never allow a passenger to ride in a trailer~.&.
in Driving instructions on page 128.
Engine cooling system
Towing a trailer makes the engine work harder. It
is important that the cooling system's perform
ance is up to the additional load. Make sure that
the cooling system has enough fluid.
Tire pressure
When towing a trailer, inflate the tires of your
vehicle to the cold tire pressure listed under "Full ..,.
127
Page 147 of 328

.... N
0 > CX)
.... I.Cl U"I
.... I.Cl ....
Late: in this set ting, t he system provides correc
tive steering just before a vehicle whee l touches a
detected lane marker line.
Vibrat ion warning
You can switch the additional vibrating warning
i n the steering wheel on or
off.
& WARNING
With the vibration warning switched off, no
visible warning will appear in the instr ument
cluster display when crossing a lane marker.
@ Tips
Market-specific: your sett ings are stored au
tomatically and assigned to the remote con
trol key in use.
Audi side assist
Description
A pp lies to vehicles: with Audi side assist
Fig. 130 Sensor detectio n range
Fig. 131 D isplay on the exterior mirro r
Side assist he lps you monitor your blind spot and
traffic behind your vehicle. Within the limits of
the system, it warns you about vehicles that are
com ing closer or that are traveling with yo u with-
A ss ist
in senso r range (D ¢ fig. 130 : if a lane change is
classified as critical, the display @ in the exterior
mirror¢
fig. 131 turns on .
T he displ ay in the left exterior mirror p rovides as
sistance when making a lane change to the le ft,
whi le the display in the right exterior mirror pro
vides ass istance when making a lane ch ange to
the right.
Information stag e
As long as you do not a ct ivate the tu rn signal,
side assist
informs you about vehicles that are
detected and classified as critical. The display in
the mirror turns on, but is dim .
T he disp lay remains dim i n the information stage
so that your view toward the front is not distur
bed.
Warning stage
If you activate the turn s ignal, side assist warns
yo u about vehicles that are detected and classi
fied as crit ica l. T he d isp lay in the respective mir
ror blinks bright ly. If this happens, check traffic
by glancing in the rearview mirror and over your
shou lder ¢.&.
in General information on
page 146.
(D Tips
- You can adjust the brightness on of the dis
play on the rearview mirror¢
page 147.
145