display AUDI A3 2020 Owner´s Manual
[x] Cancel search | Manufacturer: AUDI, Model Year: 2020, Model line: A3, Model: AUDI A3 2020Pages: 400, PDF Size: 107.47 MB
Page 235 of 400
8V2012721BK
System settings
Audi smartphone interface
Applies to: vehicles with Audi smartphone interface
> Connect your cell phone to the Audi music in-
terface > page 217 using a USB adapter
=> page 217, fig. 190.
> Select your cell phone from the list of cell
phones that have already been connected.
Additional options
Depending on the selected function, you can use
the right control button to access the available
additional options in the connection manager.
Delete Bluetooth device*
The selected cell phone/mobile device is discon-
nected from the MMI and is removed from the
list of all devices that are already paired.
Show Bluetooth profiles*
You can individually Connect or Disconnect the
Handsfree, Messages*, Directory/contacts and
Bluetooth audio player profiles.
Bluetooth settings*
— Bluetooth: select and confirm a setting for the
Bluetooth connection visibility. Select Visible
for the MMI to be visible to other devices. Se-
lect Invisible for the MMI to not be visible to
other devices. However, it is still possible to es-
tablish a Bluetooth connection with paired de-
vices when the visibility is switched off. Select
Off to turn visibility off. Then a Bluetooth con-
nection is not possible.
— Bluetooth audio player: when this function is
switched on [M, the Bluetooth audio player is
available as a source in the Media menu.
— Bluetooth name: the MMI Bluetooth name (for
example "AUDI MMI") is displayed and can be
changed.
Online settings*
— Data usage counter: the amount of data pack-
ets that are sent and received through the MMI
is displayed. You can reset the data usage infor-
mation to zero using the Reset data counter
option.
— Network status: the mobile network provider
for data service as well as the network status
are displayed.
Wi-Fi settings*
See > page 187.
Storing as a default telephone
Applies to: vehicles with telephone
Requirement: a mobile device must be connected
to the MMI > page 169.
When the mobile device is in range and the Blue-
tooth function on the mobile device and in the
MML is switched on, this mobile device will be
given priority over the other Bluetooth devices
and will be connected directly to the MMI. The
connected mobile device is displayed first in the
device list.
Network settings*
— Login: you can chose an Automatic login to
your cell phone service provider's network, or
you can choose a Manual login from the list of
available networks.
— Network selection: available networks in the
present location can be selected under network
selection. This function is only available for the
Manual login setting.
Apple CarPlay sound settings/Android Auto
sound settings
Applies to: vehicles with Audi smartphone interface
See > page 234.
About Apple CarPlay/About Android Auto
Applies to: vehicles with Audi smartphone interface
Here you will find legal information regarding the
use of Apple CarPlay or Android Auto and infor-
mation about device-specific data exchange.
Delete Apple CarPlay device/Delete Android
Auto device
Applies to: vehicles with Audi smartphone interface
Requirement: your cell phone must not be con-
nected to the Audi music interface with a USB
adapter.
Select: Audi smartphone interface > a device
from the list > right control button.
233
Page 236 of 400
![AUDI A3 2020 Owner´s Manual System settings
To remove your mobile device from the list, select
and confirm Delete Apple CarPlay device or De-
lete Android Auto device.
System update
> Select: [MENU] button > Setti AUDI A3 2020 Owner´s Manual System settings
To remove your mobile device from the list, select
and confirm Delete Apple CarPlay device or De-
lete Android Auto device.
System update
> Select: [MENU] button > Setti](/img/6/40265/w960_40265-235.png)
System settings
To remove your mobile device from the list, select
and confirm Delete Apple CarPlay device or De-
lete Android Auto device.
System update
> Select: [MENU] button > Settings > left control
button > System maintenance.
— System update: insert the storage device with
the update data into the appropriate drive
=> page 212. Select and confirm: the drive >
Start update. The length of the process de-
pends on the size of the update.
— Reset driver installation: the selected media
driver package is reset to the settings at the
time of delivery.
— Version information: information on the MMI
software version and the navigation database*
software version is displayed. The Software in-
formation function also provides information
on the software contained in the MMI and the
licensing agreement.
Sound settings
The sound distribution and volume of the MMI
can be adjusted individually. The settings depend
on the vehicle equipment.
> Select: [MENU] button > Sound > left control
button > Entertainment.
Treble/Bass
You can adjust the Treble and Bass settings by
turning the control knob. The changed settings
only apply for the audio source that is active at
the time. This allows you to adjust the sound set-
tings for each audio source separately.
Balance/fader (Sound focus)
— Adjusting the sound distribution to the left or
right: press the control knob. Turn the control
knob to the left or right to the desired position.
— Adjusting the sound distribution to the front
or rear: press the control knob again. Turn the
control knob to the left or right to the desired
position.
234
— Adjusting the sound distribution using the
MMI touch: move your finger on the MMI touch
control panel in the desired direction.
Sound effects
Select and confirm a Focus setting:
— All: all speakers in the vehicle are active (sym-
metrical sound distribution).
— Front: only the speakers in the front of the ve-
hicle are active.
— Rear: only the speakers in the rear of the vehi-
cle are active.
Surround level
Turn the control knob to adjust the surround
sound level.
Subwoofer
Turn the control knob to adjust the subwoofer.
Speed dependent volume control
Turn the control knob to adjust the playback vol-
ume to the noise inside the vehicle.
Volume settings
Adjusting the volume
The volume of an audio source or a system mes-
sage (for example, from the voice recognition
system*) can be adjusted directly while the sound
is playing using the On/Off knob.
> Increasing or decreasing the volume: turn the
On/Off knob @) > page 146, fig. 144 to the
right or left.
> Muting or pausing: press the On/Off knob
briefly, or:
> Turn the On/Off knob to the left until the sym-
bol @ > page 155 appears. An active audio/
video source is stopped.
> Unmuting or resuming: press the On/Off knob
briefly, or:
> Turn the On/Off knob to the right.
ZA WARNING
To reduce the risk of an accident, adjust the
volume of the audio system so that audible
signals from outside the vehicle, such as >
Page 237 of 400

8V2012721BK
System settings
police and fire sirens, can be heard easily at all
times.
@) Tips
The volume is automatically adjusted to a pre-
set level when the MMI is switched on.
Adjusting the system volume
> Select: [MENU] button > Sound > left control
button.
Telephone
Applies to: vehicles with telephone
Mute telephone: messages and ringtones are set
to mute.
Ringtone: see > page 180, Ringtone and volume
settings.
Ringtone volume: you can adjust the volume of
the selected ringtone by turning the control
knob.
Message volume: you can adjust the volume of
the notification for an incoming text message by
turning the control knob.
Microphone input level: you can adjust the call
volume during a phone call by turning the control
knob.
Navigation
Applies to: vehicles with navigation system
Voice guidance: see > page 198.
Voice guidance during phone call: see
=> page 198.
Voice guidance volume: you can adjust the voice
guidance volume by turning the control knob or
you can adjust it while route guidance is active by
turning the On/Off knob.
Entertainment fader: the volume of audio play-
back can be temporarily lowered when the park-
ing system or voice guidance is active.
Voice recognition system
Applies to: vehicles with voice recognition system
Command display: see > page 231.
Short dialog: see > page 231.
Speech dialog system volume: see > page 231.
Individual speech training: see > page 231.
Parking aid*
You can adjust the volume of the signal tone by
turning the control knob.
— Adjusting the Front volume: select and con-
firm High, Medium or Low.
— Adjusting the Rear volume: select and confirm
High, Medium or Low.
MMI touch*
Turn the control knob to adjust the volume of the
spoken prompts from the MMI touch*.
Restarting the MMI
wv
RAH-8611
= 5
Fig. 197 MMI control panel: button combination for re-
start
> Briefly press the control knob and both buttons
at the same time to immediately open the
menu upward > fig. 197.
Software License
information
Information on MMI software and licensing
agreements
> Select: [MENU] button > Settings > left control
button > System maintenance > Version infor-
mation, or:
> online at www.audi.com/softwareinfo.
235
Page 258 of 400
Airbag system
Always remember, a child seat or infant carrier
installed on the front seat may be struck and
knocked out of position by the rapidly inflating
passenger's airbag in a frontal collision. The air-
bag could greatly reduce the effectiveness of the
child restraint and even seriously injure the child
during inflation.
For this reason, and because the back seat is the
safest place for children - when properly restrain-
ed according to their age and size - we strongly
recommend that children always sit in the back
seat > page 278, Child safety.
Z\ WARNING
A child in a rearward-facing child seat instal-
led on the front passenger seat will be seri-
ously injured and can be killed if the front air-
bag inflates - even with an Advanced Airbag
System.
— The inflating airbag will hit the child seat or
infant carrier with great force and will
smash the child seat and child against the
backrest, center armrest, door or roof.
— Always install rear-facing child seats on the
rear seat.
— If you must install a rearward facing child
seat on the front passenger seat because of
exceptional circumstances and the PASSEN-
GER AIR BAG OFF light does not come on
and stay on, immediately install the rear-
facing child seat in a rear seating position
and have the airbag system inspected by
your Audi dealer.
— Forward-facing child seats installed on the
front passenger's seat may interfere with
the deployment of the airbag and cause seri-
ous personal injury to the child.
— Never put the forward-facing child restraint
up against or very near the instrument pan-
el,
— Always move the front passenger seat to the
highest position in the up and down adjust-
ment range and move it back to the rear-
most position in the seat's fore and aft ad-
justment range, as far away from the airbag
as possible, before installing the forward-
facing child restraint.
— Always make sure that the safety belt upper
anchorage is behind the child restraint and
not next to or in front of the child restraint
so that the safety belt will be properly posi-
tioned.
— Make sure that the PASSENGER AIR BAG
OFF light comes on and stays on all the time
whenever the ignition is switched on.
ZA WARNING
If, in exceptional circumstances, you must in-
stall a forward-facing child restraint on the
front passenger's seat:
— Always make sure the forward-facing seat
has been designed and certified by its manu-
facturer for use on a front seat with a pas-
senger front and side airbag.
ZA\ WARNING
To reduce the risk of serious injury, make sure
that the PASSENGER AIR BAG OFF light will
be displayed whenever a child restraint is in-
stalled on the front passenger seat and the ig-
nition is switched on.
— If the PASSENGER AIR BAG OFF light does
not stay on, perform the checks described
= page 265, Monitoring the Advanced Air-
bag System.
— Take the child restraint off the front passen-
ger seat and install it properly at one of the
rear seat positions if the PASSENGER AIR
BAG OFF light does not stay on.
— Have the airbag system inspected by your
Audi dealer immediately.
— Always carefully follow instructions from
child restraint manufacturers when instal-
ling child restraints.
ZA, WARNING
If, in exceptional circumstances, you must in-
stall a forward or rearward-facing child re-
straint on the front passenger's seat:
— Improper installation of child restraints can
reduce their effectiveness or even prevent
them from providing any protection.
256
Page 320 of 400
Checking and Filling
Service interval display
The service interval display detects when your ve-
hicle is due for service.
The service interval display works in two stages:
— Inspection or oil change reminder: after driv-
ing a certain distance, a message appears in the
instrument cluster display each time the igni-
tion is switched on or off. The remaining dis-
tance or time is displayed briefly.
— Inspection or oil change due: if your vehicle
has reached an inspection or oil change interval
or both intervals at the same time, the mes-
sage Inspection due! or Oil change due! or Oil
change and inspection due! appears briefly af-
ter switching the ignition on/off.
Checking service intervals
You can check the remaining distance or time un-
til the next oil change or next inspection in the
Infotainment system. Select in the Infotainment
system: the [MENU] button > Vehicle > left con-
trol button > Service & checks > Service inter-
vals.
Resetting the indicator
An authorized Audi dealer or authorized Audi
Service Facility will reset the service interval dis-
play after performing service.
If you have changed the oil yourself, you must re-
set the oil change interval.
To reset the display, select in the Infotainment
system: the [MENU] button > Vehicle > left con-
trol button > Service & checks > Service intervals
> Reset oil change interval.
@ Note
— Only reset the oil change indicator if the oil
was changed.
— Following the service intervals is critical to
maintaining the function, service life, and
value of your vehicle, especially the engine.
Even if the mileage on the vehicle is low, do
not exceed the time for the next service.
318
Page 339 of 400
8V2012721BK
Wheels
tests, and does not include acceleration, cor-
nering, hydroplaning or peak traction charac-
teristics.
ZA WARNING
The temperature grade for this tire is estab-
lished for a tire that is properly inflated and
not overloaded. Excessive speed, underinfla-
tion, or excessive loading, either separately or
in combination, can cause heat buildup and
possible tire failure.
Z\ WARNING
Temperature grades apply to tires that are
properly inflated and not over or underinflat-
ed.
Tire Pressure Monitoring
System indicator
(1) General notes
Each tire, including the spare (if provided),
should be checked monthly when cold and inflat-
ed to the inflation pressure recommended by the
vehicle manufacturer on the vehicle placard or
tire
inflation pressure label. (If your vehicle has
tires of a different size than the size indicated on
the vehicle placard or tire inflation pressure la-
bel, you should determine the proper tire infla-
tion pressure for those tires).
As an added safety feature, your vehicle has been
equipped with a tire pressure monitoring system
(TPMS) that illuminates a Low tire pressure tell-
tale when one or more of your tires is significant-
ly under-inflated. Accordingly, when the low tire
pressure telltale illuminates, you should stop and
check your tires as soon as possible, and inflate
them to the proper pressure. Driving on a signifi-
cantly under-inflated tire causes the tire to over-
heat and can lead to tire failure. Under-inflation
also reduces fuel efficiency and tire tread life,
and may affect the vehicle's handling and stop-
ping ability.
Please note that the TPMS is not a substitute for
proper tire maintenance, and it is the driver's re-
sponsibility to maintain correct tire pressure,
even if under-inflation has not reached the level
to trigger illumination of the TPMS low tire pres-
sure telltale.
Your vehicle has also been equipped with a TPMS
malfunction indicator to indicate when the sys-
tem is not operating properly. The TPMS mal-
function indicator is combined with the low tire
pressure telltale. When the system detects a
malfunction, the telltale will flash for approxi-
mately one minute and then remain continuously
illuminated. This sequence will continue upon
subsequent vehicle start-ups as long as the mal-
function exists.
When the malfunction indicator is illuminated,
the system may not be able to detect or signal
low
tire pressure as intended. TPMS malfunctions
may occur for a variety of reasons, including the
installation of replacement or alternate tires or
wheels on the vehicle that prevent the TPMS
from functioning properly. Always check the
TPMS malfunction telltale after replacing one or
more tires or wheels on your vehicle to ensure
that the replacement or alternate tires and
wheels allow the TPMS to continue to function
properly.
If the Tire Pressure Monitoring System
indicator appears
Applies to: vehicles with Tire Pressure Monitoring System in-
dicator
The tire pressure indicator in the instrument
cluster informs you if the tire pressure is too low
or if there is a system malfunction.
Using the ABS sensors, the tire pressure monitor-
ing system compares the tire tread circumference
and vibration characteristics of the individual
tires. If the pressure changes in one or more
tires, this is indicated in the instrument cluster
display with an @ indicator light and a message.
If only one tire is affected, the location of that
tire will be indicated.
The tire pressures must be stored in the menu
display again each time the pressures change
(switching between partial and full load pres-
sure) or after changing or replacing a tire on your
vehicle > page 338. The tire pressure monitoring >
337
Page 340 of 400
Wheels
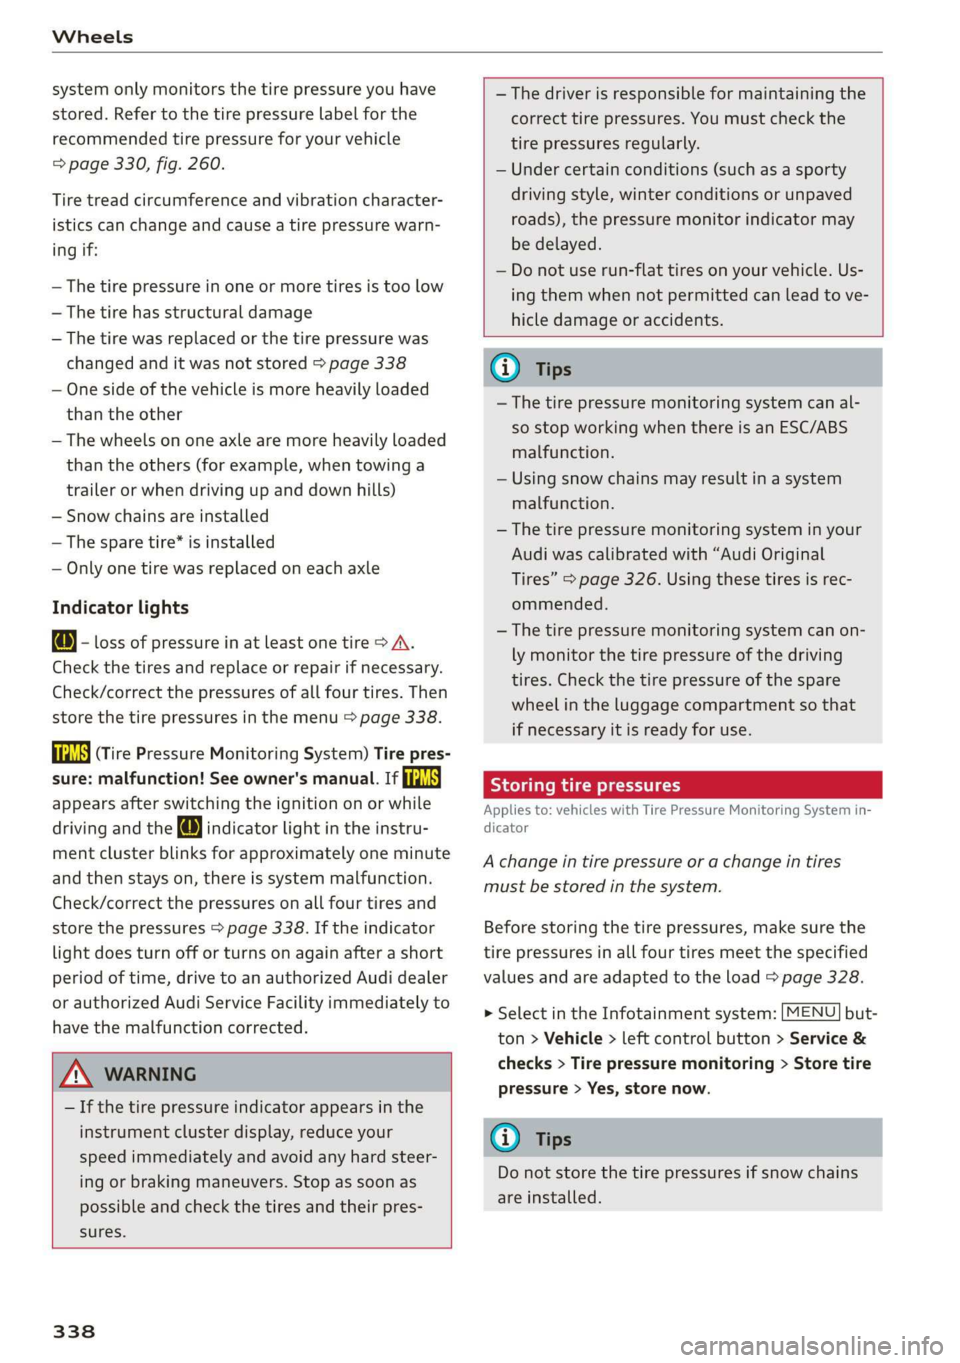
system only monitors the tire pressure you have
stored. Refer to the tire pressure label for the
recommended tire pressure for your vehicle
=> page 330, fig. 260.
Tire tread circumference and vibration character-
istics can change and cause a tire pressure warn-
ing if:
— The tire pressure in one or more tires is too low
—The tire has structural damage
— The tire was replaced or the tire pressure was
changed and it was not stored > page 338
— One side of the vehicle is more heavily loaded
than the other
— The wheels on one axle are more heavily loaded
than the others (for example, when towing a
trailer or when driving up and down hills)
— Snow chains are installed
— The spare tire* is installed
— Only one tire was replaced on each axle
Indicator lights
@ - loss of pressure in at least one tire > A\.
Check the tires and replace or repair if necessary.
Check/correct the pressures of all four tires. Then
store the tire pressures in the menu > page 338.
is (Tire Pressure Monitoring System) Tire pres-
sure: malfunction! See owner's manual. If
appears after switching the ignition on or while
driving and the @ indicator light in the instru-
ment cluster blinks for approximately one minute
and then stays on, there is system malfunction.
Check/correct the pressures on all four tires and
store the pressures > page 338. If the indicator
light does turn off or turns on again after a short
period of time, drive to an authorized Audi dealer
or authorized Audi Service Facility immediately to
have the malfunction corrected.
ZX WARNING
— If the tire pressure indicator appears in the
instrument cluster display, reduce your
speed immediately and avoid any hard steer-
ing or braking maneuvers. Stop as soon as
possible and check the tires and their pres-
sures.
338
— The driver is responsible for maintaining the
correct tire pressures. You must check the
tire pressures regularly.
— Under certain conditions (such as a sporty
driving style, winter conditions or unpaved
roads), the pressure monitor indicator may
be delayed.
— Do not use run-flat tires on your vehicle. Us-
ing them when not permitted can lead to ve-
hicle damage or accidents.
(i) Tips
—The tire pressure monitoring system can al-
so stop working when there is an ESC/ABS
malfunction.
— Using snow chains may result in a system
malfunction.
— The tire pressure monitoring system in your
Audi was calibrated with “Audi Original
Tires” > page 326. Using these tires is rec-
ommended.
—The tire pressure monitoring system can on-
ly monitor the tire pressure of the driving
tires. Check the tire pressure of the spare
wheel in the luggage compartment so that
if necessary it is ready for use.
Storing tire pressures
Applies to: vehicles with Tire Pressure Monitoring System in-
dicator
A change in tire pressure or a change in tires
must be stored in the system.
Before storing the tire pressures, make sure the
tire pressures in all four tires meet the specified
values and are adapted to the load > page 328.
> Select in the Infotainment system: [MENU] but-
ton > Vehicle > left control button > Service &
checks > Tire pressure monitoring > Store tire
pressure > Yes, store now.
(i) Tips
Do not store the tire pressures if snow chains
are installed.
Page 342 of 400

Wheels
the tread to separate and even cause the tire
to burst, increasing the risk of an accident.
— The tire pressure monitoring system does
not warn about damage or defects in the
tire construction that could cause the tire to
burst, for example. Inspect your tires regu-
larly.
Note that the tire pressure also depends on the
temperature of the tire. The tire pressure increas-
es as the engine becomes warmer while driving.
Z\ WARNING
Read and follow the important information
and notes > page 339.
@) Tips
— If tires are replaced, the sensors and valves
do not need to be removed or replaced. Only
replace the valve stem and, if necessary, the
valve and the wheel electronics. If you have
questions, see an authorized Audi dealer or
authorized Audi Service Facility.
— An incorrect display or a malfunction in the
tire pressure monitoring system can occur
after using the tire mobility kit. Have the
sensors replaced by an authorized Audi
dealer or authorized Audi Service Facility.
— For an explanation on conformity with the
FCC regulations in the United States and the
Industry Canada regulations, see
=> page 377.
Displaying tire pressures and temperatures
Applies to: vehicles with tire pressure monitoring system
Requirement: you must be driving the vehicle.
> Select in the Infotainment system: the [MENU
button > Vehicle > left control button > Service
& checks > Tire pressure monitoring > Display
tire pressure.
The current tire pressures are shown in green,
yellow or red numbers in the Infotainment sys-
tem:
— Green: the current tire pressure and the speci-
fied tire pressure are approximately the same.
— Yellow: the current tire pressure is lower than
the specified tire pressure.
— Red: the current tire pressure is much lower
than the specified tire pressure.
The specified tire pressure is the last tire pressure
that was stored > page 341.
340
@) Tips
The tire pressure or temperature is not dis-
played while the vehicle is stationary and in
adaptation mode. Dashes --.-- are shown in
place of the pressure and temperature.
ON ic deste oy
Applies to: vehicles with tire pressure monitoring system
If the @ indicator light turns on, the pressure in
at least one tire is too low or new sensors were
not adapted:
@ Indicator light turns on after turning the
ignition on
The tire pressure is too low compared to the
specified pressure.
> Check and store the tire pressure(s) the next
time it is possible > page 341.
@ Indicator light turns on while driving
Wheels with new sensors were not adapted or
the tire pressure has reached a critical level com-
pared to the specified pressure.
> Avoid unnecessary steering and braking maneu-
vers.
> Adapt your driving style to the situation.
> Stop as soon as possible and check the tire(s).
> If it is possible to continue driving, see an au-
thorized Audi dealer or authorized Audi Service
Facility immediately and have your tire(s) re-
paired or replaced.
ZA\ WARNING
Read and follow the important information
and notes > page 339.
Page 343 of 400

8V2012721BK
Wheels
Storing new tire pressures
Applies to: vehicles with tire pressure monitoring system
The tire pressure specifications must be stored
correctly for the tire pressure monitoring system
to function reliably.
It is always necessary to store the tire pressures
when the tire pressures are modified, for exam-
ple due to a change in load or when new sensors
are installed.
> Before storing the tire pressures, make sure the
tire pressures of all four tires meet the speci-
fied values and are adapted to the load
=> page 330, fig. 260. Only correct and store
the pressure in tires whose temperature is ap-
proximately the same as the ambient tempera-
ture. If the temperature of the tire is higher
than the ambient air temperature, the tire
pressure must be increased approximately
3.0 PSI (0.2 bar) above the value on the sticker.
» Switch the ignition on.
> Select in the Infotainment system: [MENU] but-
ton > Vehicle > left control button > Service &
checks > Tire pressure monitoring > Store tire
pressure > Yes, store now. After storing the tire
pressures, the tire pressure monitoring system
measures the current pressures while driving
and stores them as the new specified pressures.
> If the changed tire pressures are not displayed
in the Infotainment system, drive the vehicle
for approximately 10 minutes so that the sen-
sor signal from the wheels is received again.
During this adaptation phase, --.-- is displayed
for the pressure and temperature and the tire
pressure monitoring system is only partially
available. It only provides a warning if one or
more tire pressures is below the minimum per-
mitted specified pressure.
If the @ indicator light turns on and the mes-
sage Tire pressure: wheel change detected.
Please check all tires and store pressures in
MMI also appears, the system has detected that
the position of the sensors has changed because
of a tire rotation, or that new sensors were instal-
led. Store the new tire pressures.
ZX WARNING
Read and follow the important information
and notes > page 339.
Malfunctions
Applies to: vehicles with tire pressure monitoring system
If the tire pressure monitoring system is not
available, the a indicator light appears in the
instrument cluster display along with the mes-
sage Tire pressure: malfunction! See owner's
manual.
If the ia indicator light appears after switching
the ignition on or while driving and the @ indi-
cator light also blinks for approximately one mi-
nute and then stays on, there is a system mal-
function. The following are examples of situa-
tions that could cause a malfunction:
— If the message appears at the end of the adap-
tation phase, the system may not detect one or
several of the wheel sensors necessary for pres-
sure monitoring. This may result from one or
more wheels without wheel sensors or with in-
compatible wheel sensors being installed.
—Awheel sensor or another component has
failed.
— Using snow chains can affect the function of
the system because of the shielding effect of
the chains.
— The tire pressure monitoring system is not
available due to a malfunction.
— Transmitters with the same frequency, such as
headphones or remote-controlled devices, may
cause a temporary system malfunction due to
the strong electromagnetic field.
The ia indicator light and the message turn off
once the tire pressure monitoring system is avail-
able again. If you cannot correct the malfunction
and the ia indicator light stays on, drive imme-
diately to an authorized Audi dealer or author-
ized Audi Service Facility to have the malfunction
repaired.
341
Page 347 of 400
8V2012721BK
Care and cleaning
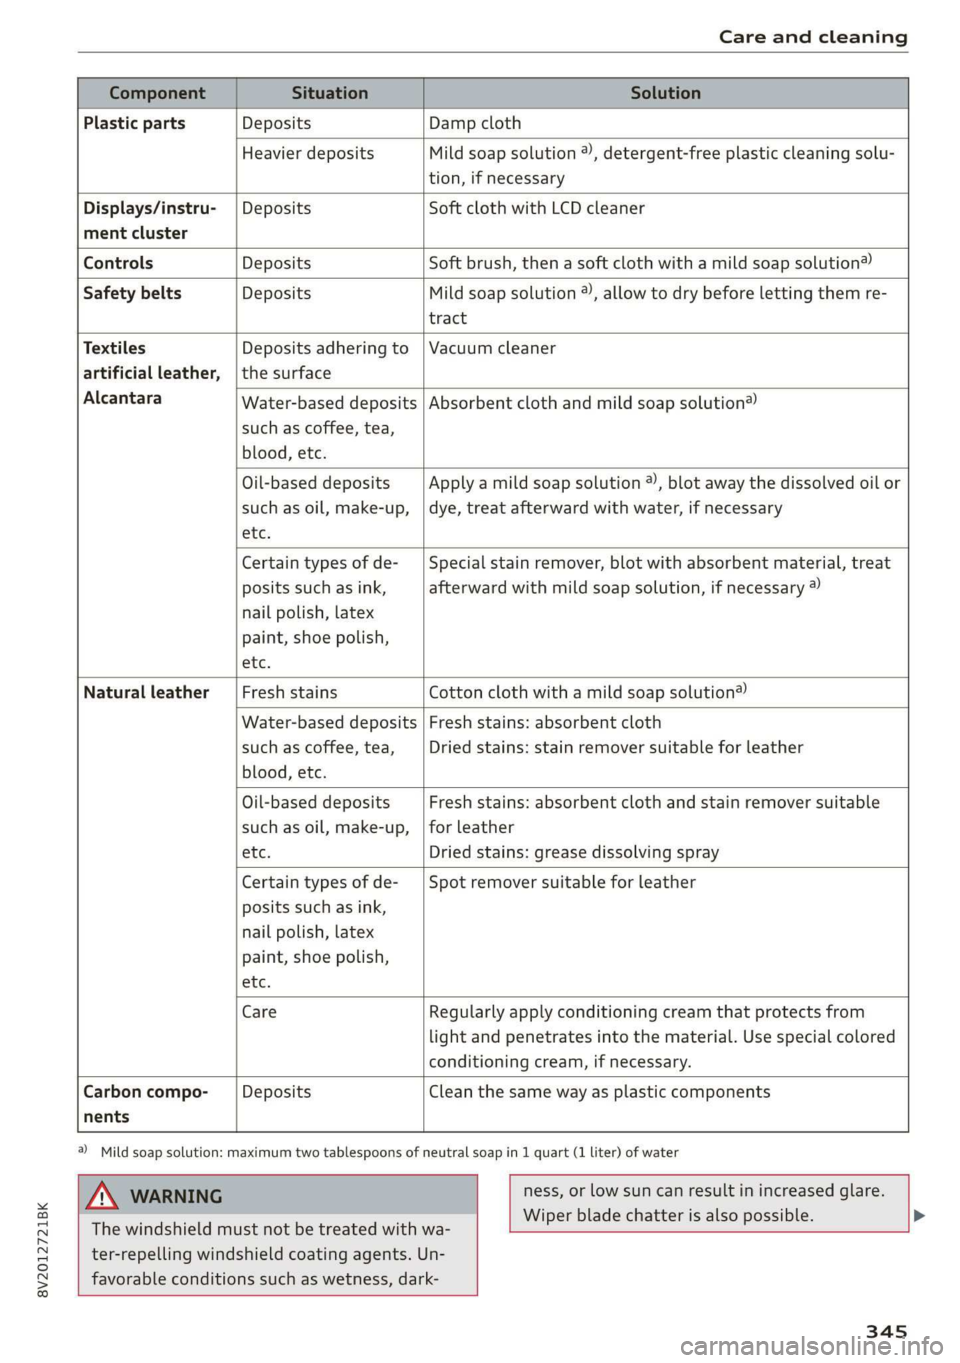
Component Situation Solution
Plastic parts Deposits Damp cloth
Heavier deposits Mild soap solution 2), detergent-free plastic cleaning solu-
tion, if necessary
Water-based deposits
such as coffee, tea,
blood, etc.
Displays/instru- | Deposits Soft cloth with LCD cleaner
ment cluster
Controls Deposits Soft brush, then a soft cloth with a mild soap solution®)
Safety belts Deposits Mild soap solution ®), allow to dry before letting them re-
tract
Textiles Deposits adhering to | Vacuum cleaner
artificial leather, |the surface
Alcantara Absorbent cloth and mild soap solution®
Oil-based deposits
such as oil, make-up,
etc.
Apply a mild soap solution ®), blot away the dissolved oil or
dye, treat afterward with water, if necessary
Certain types of de-
posits such as ink,
nail polish, latex
paint, shoe polish,
etc.
Special stain remover, blot with absorbent material, treat
afterward with mild soap solution, if necessary ®
Natural leather Fresh stains Cotton cloth with a mild soap solution®
Water-based deposits
such as coffee, tea,
blood, etc.
Fresh stains: absorbent cloth
Dried stains: stain remover suitable for leather
Oil-based deposits
such as oil, make-up,
etc.
Fresh stains: absorbent cloth and stain remover suitable
for leather
Dried stains: grease dissolving spray
Certain types of de-
posits such as ink,
nail polish, latex
paint, shoe polish,
etc.
Spot remover suitable for leather
nents
Care Regularly apply conditioning cream that protects from
light and penetrates into the material. Use special colored
conditioning cream, if necessary.
Carbon compo- Deposits Clean the same way as plastic components
a) Mild soap solution: maximum two tablespoons of neutral soap in 1 quart (1 liter) of water
ZA WARNING
The windshield must not be treated with wa-
ter-repelling windshield coating agents. Un-
favorable conditions such as wetness, dark-
ness, or low sun can result in increased glare.
Wiper blade chatter is also possible.
345