sensor AUDI A3 2020 Owner´s Manual
[x] Cancel search | Manufacturer: AUDI, Model Year: 2020, Model line: A3, Model: AUDI A3 2020Pages: 400, PDF Size: 107.47 MB
Page 13 of 400
8V2012721BK
Quick access
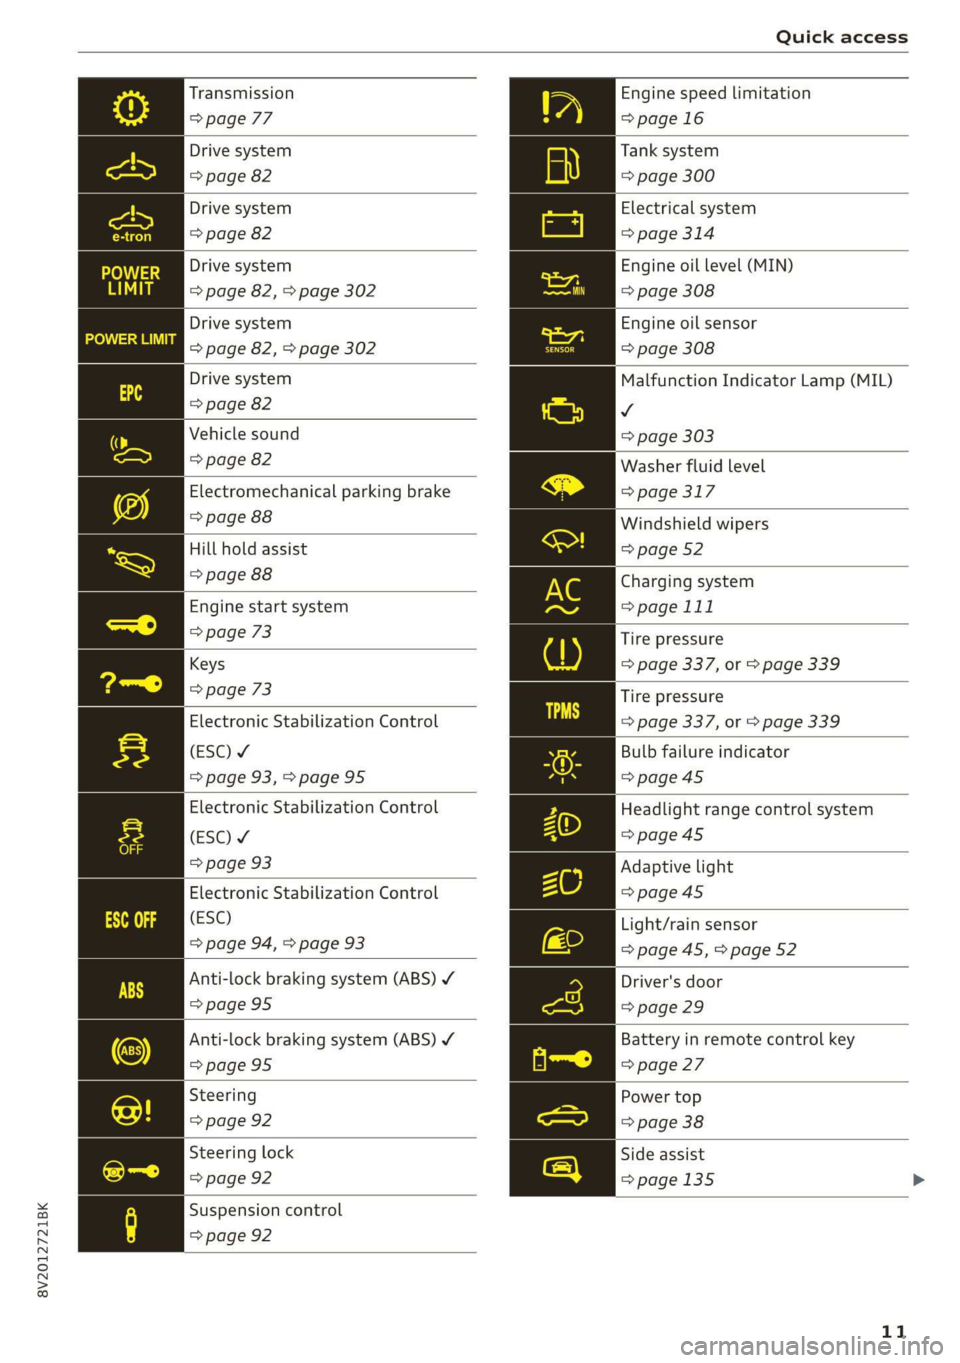
Transmission
=> page 77
Drive system
=> page 82
Drive system
=> page 82
Drive system
=> page 82, > page 302
Drive system
=> page 82, > page 302
Drive system
=> page 82
Vehicle sound
=> page 82
Electromechanical parking brake
=> page 88
Hill hold assist
=> page 88
Engine start system
=> page 73
Keys
=> page 73
Electronic Stabilization Control
(ESC) ¥
=> page 93,>page 95
Electronic Stabilization Control
(ESC) ¥
=> page 93
Electronic Stabilization Control
(ESC)
=> page 94, > page 93
Anti-lock braking system (ABS) ¥
=>page 95
Anti-lock braking system (ABS) Y
=> page 95
Steering
=> page 92
Steering lock
=> page 92
Suspension control
=> page 92
Engine speed limitation
=>page 16
Tank system
=> page 300
Electrical system
=> page 314
Engine oil level (MIN)
=> page 308
Engine oil sensor
=> page 308
Malfunction Indicator Lamp (MIL)
v
=> page 303
Washer fluid level
=> page 317
Windshield wipers
=> page 52
Charging system
=> page 111
Tire pressure
=> page 337, or > page 339
Tire pressure
=> page 337, or > page 339
Bulb failure indicator
=> page 45
Headlight range control system
=>page 45
Adaptive light
=>page 45
Light/rain sensor
=> page 45, > page 52
Driver's door
=> page 29
Battery in remote control key
=> page 27
Power top
=> page 38
Side assist
=>page 135
11
Page 27 of 400
8V2012721BK
Opening and closing
Opening and closing
Central locking
You can lock and unlock the vehicle centrally. You
have the following options:
— Remote control key > page 27
— Sensors in the front door handles* > page 28
— Lock cylinder on the driver's door > page 30,
or
— Interior central locking switch > page 29
Turn signals
The turn signals flash twice when you unlock the
vehicle and flash once when you lock the vehicle.
If they do not flash when locking, check if all
doors and lids are closed.
Automatic locking (Auto Lock)
The Auto Lock function locks all doors and the
luggage compartment lid once the speed has ex-
ceeded approximately 9 mph (15 km/h). The ve-
hicle will unlock again if the unlock function in
the central locking switch is pressed, the “P” gear
is engaged, or the ignition is switched off.
You can open the doors individually from the in-
side by pulling the door handle one time. To open
the rear doors* individually, you must pull the
door handle twice.
In the event of a crash with airbag deployment,
the doors will also automatically unlock to allow
access to the vehicle.
Selective door unlocking
The doors and luggage compartment lid will lock
when they close. You can set in the Infotainment
system whether only the driver's door or the en-
tire vehicle should be unlocked when unlocking
=> page 29.
Unintentionally locking yourself out
Only lock your vehicle when all of the doors and
the luggage compartment lid are closed and the
remote control key is not in the vehicle. This re-
duces the risk of locking yourself out accidental-
ly.
The following conditions prevent you from lock-
ing your remote control key in the vehicle:
—If the driver's door is open, the vehicle cannot
be locked by pressing the & button on the re-
mote control key or by touching the locking
sensor* on a door.
— If the convenience key* that was last used is in-
side the luggage compartment, the luggage
compartment lid will automatically open again
after closing it >©.
— If the last convenience key* that was used is de-
tected inside the vehicle, the vehicle cannot be
locked from the outside for a brief time > ©.
ZA WARNING
— If you leave the vehicle, switch the ignition
off and take the vehicle key with you. This
applies particularly when children remain in
the vehicle. Otherwise the children could
start the engine or operate electrical equip-
ment such as power windows.
— No one, especially children, should stay in
the vehicle when it is locked from the out-
side, because the windows can no longer be
opened from the inside > page 30. Locked
doors make it more difficult for emergency
workers to get into the vehicle, which puts
lives at risk.
CG) Note
Applies to: vehicles with convenience key
— If the convenience key that was last used is
detected inside the passenger compart-
ment, then the vehicle cannot be locked
from the outside using the sensor. Take the
convenience key with you and lock the vehi-
cle again. Otherwise, the vehicle will not be
protected against unauthorized access.
— If you lock the vehicle using the button on
the vehicle key with the front passenger's
or rear door* open while accidentally plac-
ing the key in the passenger compartment
and closing the door, the vehicle will not
lock. The turn signals will flash several
times to indicate this. If you do not open
25
>
Page 30 of 400
Opening and closing
the vehicle from being accidentally left unlocked
for a long period of time. This does not apply if
you press and hold the <¥ button @) for at least
one second.
You can select in the Infotainment system if the
entire vehicle or only the driver's door should un-
locking when unlocking the vehicle > page 29.
ZA\ WARNING
Read and following all warnings > A\ in De-
scription on page 25.
@ Tips
— Only use the remote control key when you
are within view of the vehicle.
— The vehicle can only be locked when the se-
lector lever is in the P position.
— Do not use the vehicle key to lock and un-
lock when you are inside the vehicle. Other-
wise, you could trigger the anti-theft
alarm*. If this happens, press the @ unlock
button.
— Only use the panic function in an emergen-
cy.
Unlocking and locking with the
convenience key
Applies to: vehicles with convenience key
The doors and luggage compartment lid can be
unlocked and locked without using the remote
control key.
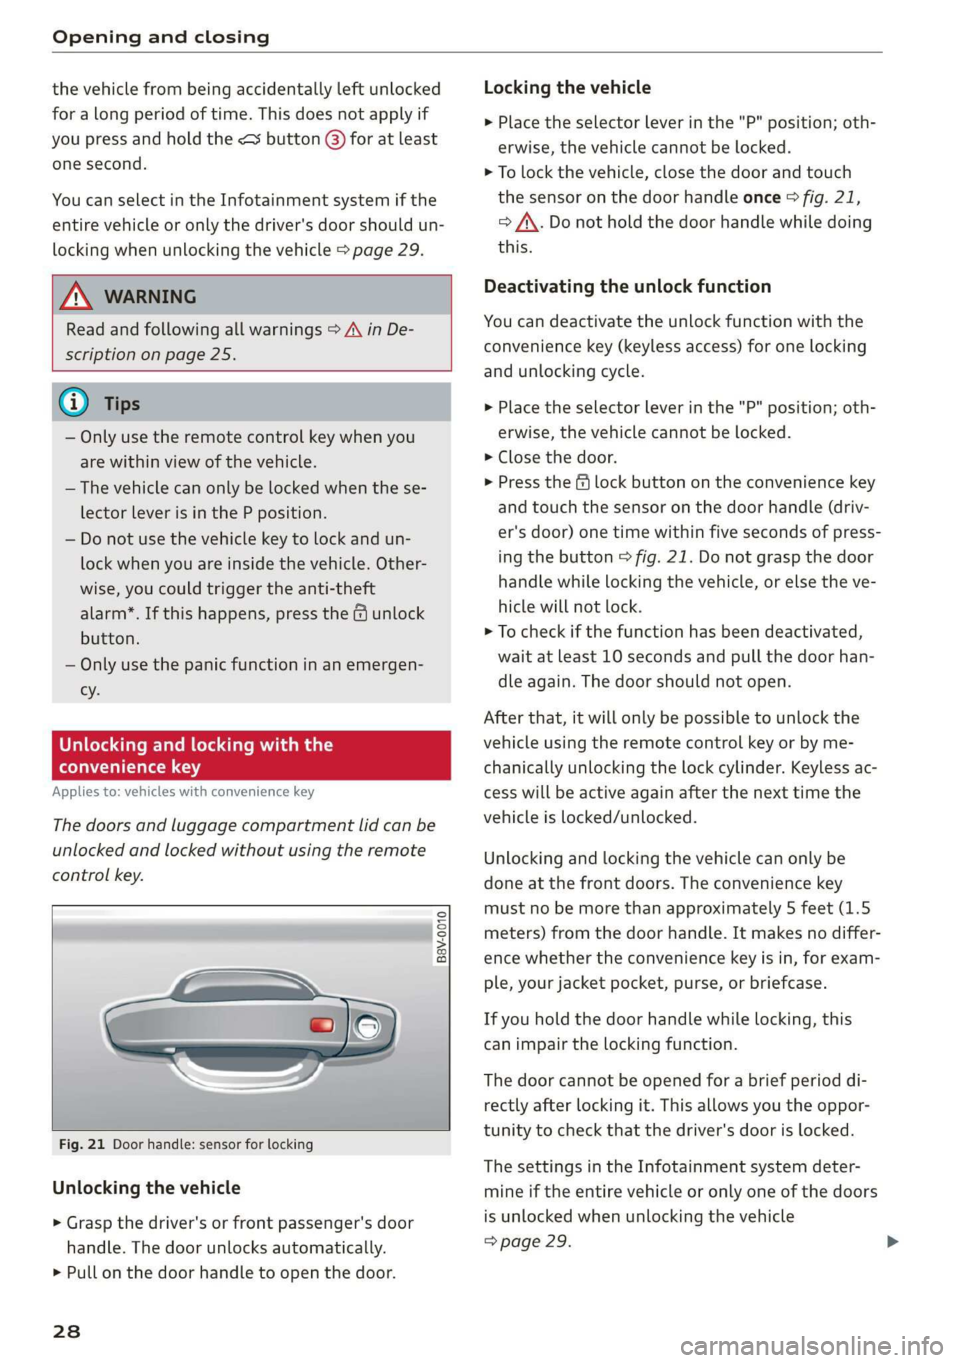
B8V-0010
Fig. 21 Door handle: sensor for locking
Unlocking the vehicle
> Grasp the driver's or front passenger's door
handle. The door unlocks automatically.
> Pull on the door handle to open the door.
238
Locking the vehicle
> Place the selector lever in the "P" position; oth-
erwise, the vehicle cannot be locked.
> To lock the vehicle, close the door and touch
the sensor on the door handle once > fig. 21,
> AX. Do not hold the door handle while doing
this.
Deactivating the unlock function
You can deactivate the unlock function with the
convenience key (keyless access) for one locking
and
unlocking cycle.
>» Place the selector lever in the "P" position; oth-
erwise, the vehicle cannot be locked.
> Close the door.
> Press the ff lock button on the convenience key
and touch the sensor on the door handle (driv-
er's door) one time within five seconds of press-
ing the button > fig. 21. Do not grasp the door
handle while locking the vehicle, or else the ve-
hicle will not lock.
> To check if the function has been deactivated,
wait at least 10 seconds and pull the door han-
dle again. The door should not open.
After that, it will only be possible to unlock the
vehicle using the remote control key or by me-
chanically unlocking the lock cylinder. Keyless ac-
cess will be active again after the next time the
vehicle is locked/unlocked.
Unlocking and locking the vehicle can only be
done at the front doors. The convenience key
must no be more than approximately 5 feet (1.5
meters) from the door handle. It makes no differ-
ence whether the convenience key is in, for exam-
ple, your jacket pocket, purse, or briefcase.
If you hold the door handle while locking, this
can impair the locking function.
The door cannot be opened for a brief period di-
rectly after locking it. This allows you the oppor-
tunity to check that the driver's door is locked.
The settings in the Infotainment system deter-
mine if the entire vehicle or only one of the doors
is unlocked when unlocking the vehicle
> page 29.
Page 31 of 400
8V2012721BK
Opening and closing
ZA WARNING
Read and following all warnings > A\ in De-
scription on page 25.
@ Tips
If your vehicle is left standing for a long peri-
od of time, note the following:
— The proximity sensor switches off after a
few days to save energy. You then have to
pull once on the door handle to unlock the
vehicle and a second time to open it.
—To prevent the vehicle battery from dis-
charging, the energy management gradual-
ly switches off convenience functions that
are not needed. You then may no longer be
able to unlock your vehicle with the sensors.
(eye eked Reauuia
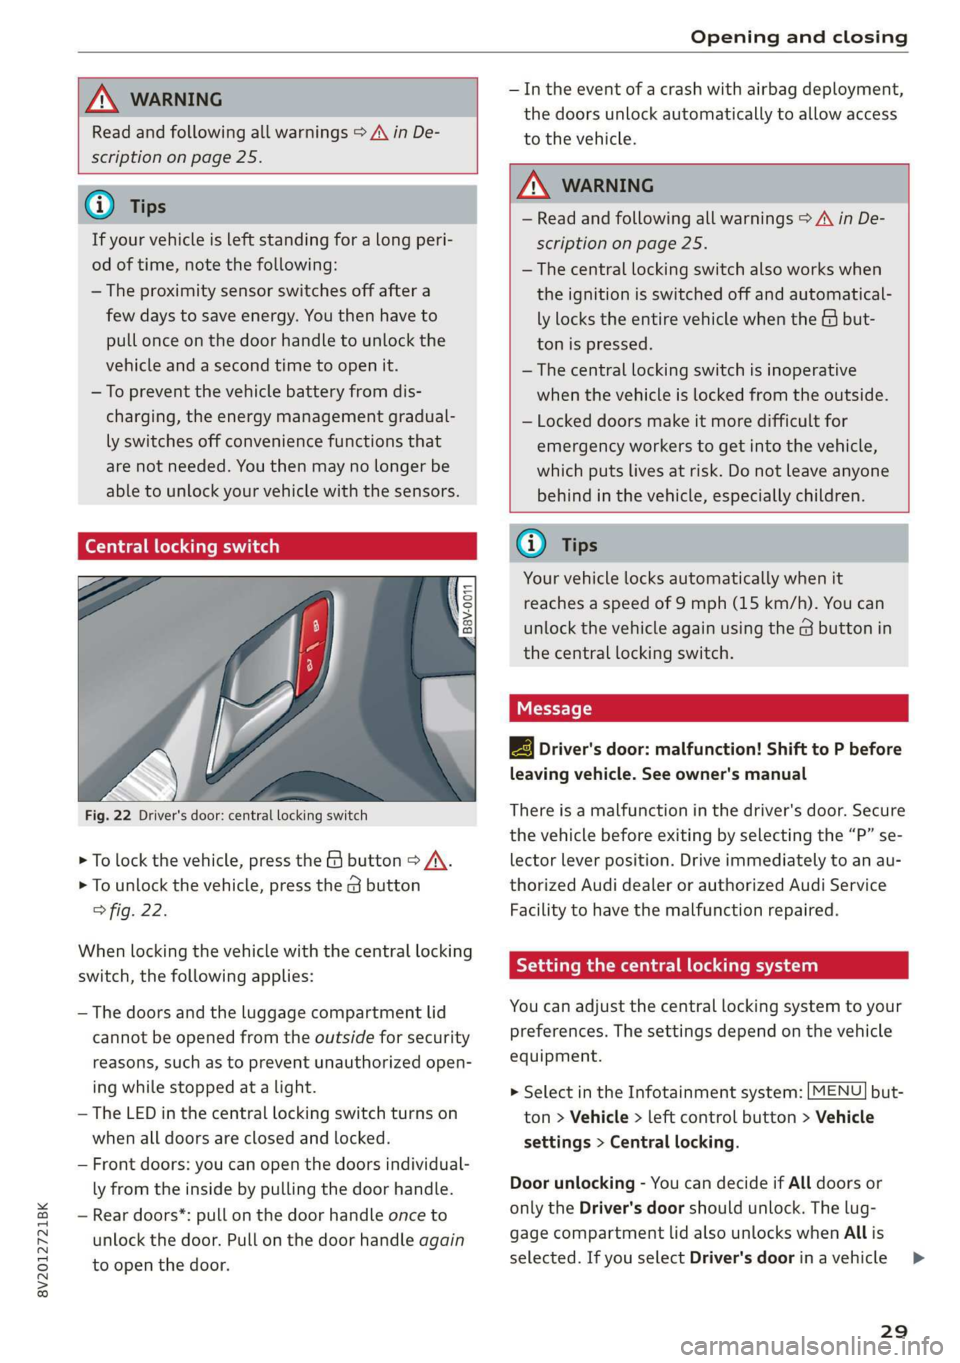
Fig. 22 Driver's door: central locking switch
> To lock the vehicle, press the & button > A\.
> To unlock the vehicle, press the G button
fig. 22.
When locking the vehicle with the central locking
switch,
the following applies:
— The doors and the luggage compartment lid
cannot be opened from the outside for security
reasons, such as to prevent unauthorized open-
ing while stopped at a light.
— The LED in the central locking switch turns on
when all doors are closed and locked.
— Front doors: you can open the doors individual-
ly from the inside by pulling the door handle.
— Rear doors*: pull on the door handle once to
unlock the door. Pull on the door handle again
to open the door.
— In the event of a crash with airbag deployment,
the doors unlock automatically to allow access
to the vehicle.
ZA WARNING
— Read and following all warnings > A in De-
scription on page 25.
— The central locking switch also works when
the ignition is switched off and automatical-
ly locks the entire vehicle when the & but-
ton is pressed.
—The central locking switch is inoperative
when the vehicle is locked from the outside.
— Locked doors make it more difficult for
emergency workers to get into the vehicle,
which puts lives at risk. Do not leave anyone
behind in the vehicle, especially children.
@ Tips
Your vehicle locks automatically when it
reaches a speed of 9 mph (15 km/h). You can
unlock the vehicle again using the @ button in
the central locking switch.
2B Driver's door: malfunction! Shift to P before
leaving vehicle. See owner's manual
There is a malfunction in the driver's door. Secure
the vehicle before exiting by selecting the “P” se-
lector lever position. Drive immediately to an au-
thorized Audi dealer or authorized Audi Service
Facility to have the malfunction repaired.
Setting the central locking system
You can adjust the central locking system to your
preferences. The settings depend on the vehicle
equipment.
> Select in the Infotainment system: [MENU] but-
ton > Vehicle > left control button > Vehicle
settings > Central locking.
Door unlocking - You can decide if All doors or
only the Driver's door should unlock. The lug-
gage compartment lid also unlocks when All is
selected. If you select Driver's door inavehicle >
29
Page 33 of 400
8V2012721BK
Opening and closing
Interior/towing protection monitor
The alarm will be triggered if there are move-
ments detected in the vehicle interior or if there
is a change in the vehicle angle.
If you leave persons/animals in the vehicle or
have the vehicle transported, switch off the inte-
rior/towing protection monitoring alarm to pre-
vent the alarm from being triggered:
> Press the & button on the remote control key a
second time within 2 seconds. Or
> Applies to: vehicles with convenience key:
Touch the sensor on the door handle a second
time within two seconds. Or
> Turn the vehicle key in the door lock to the close
position a second time within two seconds.
> If you lock the vehicle, then the interior/towing
protection monitor will stay off until the next
time the vehicle is unlocked.
@ Tips
The interior/towing protection monitor only
functions correctly when the windows, the
roof*, and the power top* are closed.
Luggage compartment
lid
Opening and closing the luggage
compartment lid
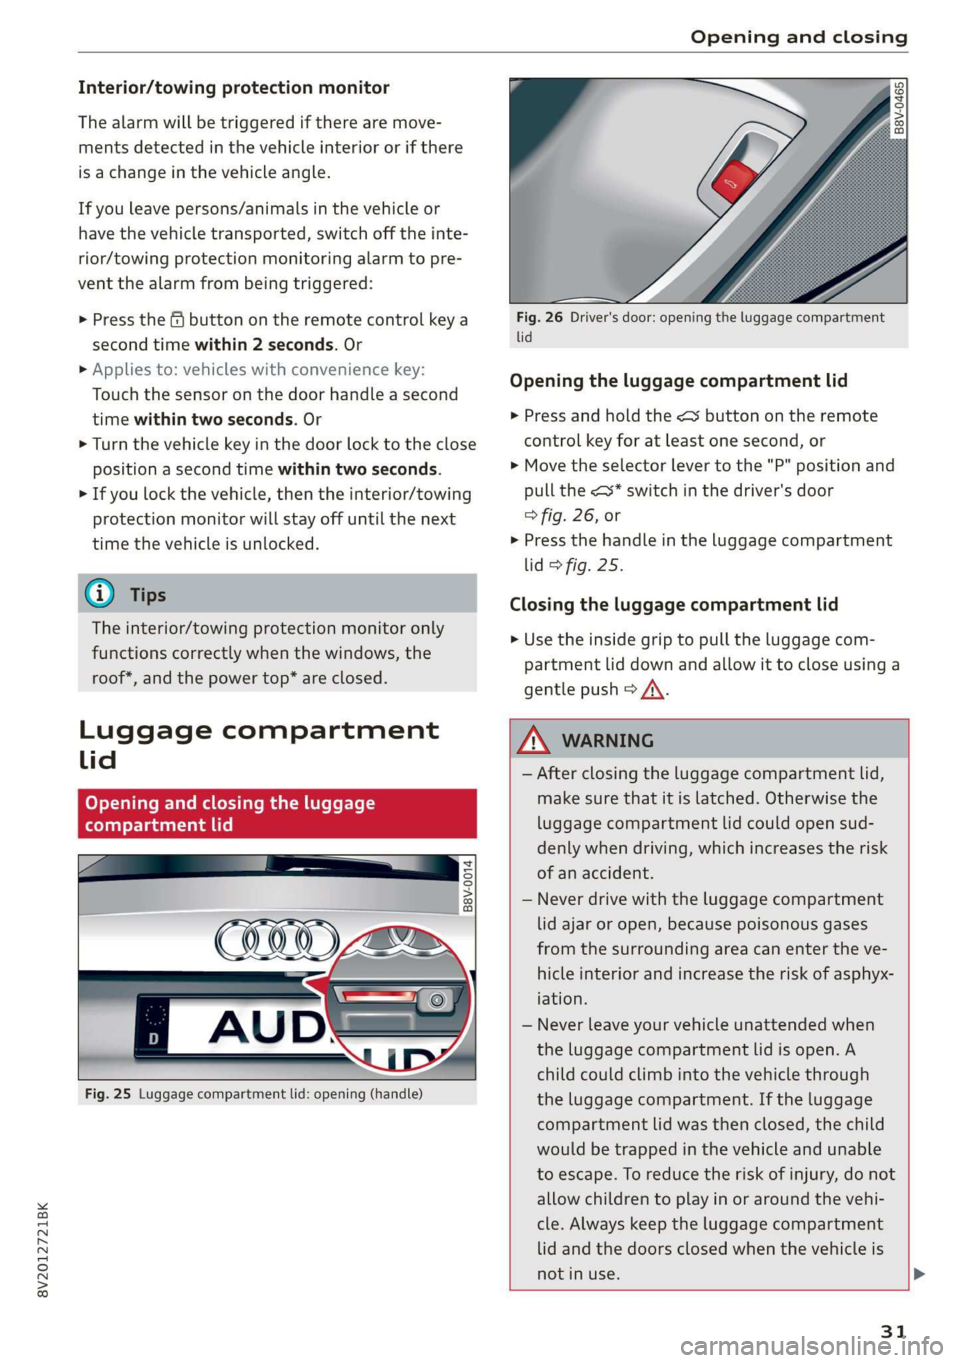
B8V-0014
Fig. 25 Luggage compartment lid: opening (handle)
Fig. 26 Driver's door: opening the luggage compartment
lid
Opening the luggage compartment lid
>» Press and hold the <5 button on the remote
control key for at least one second, or
> Move the selector lever to the "P" position and
pull the <* switch in the driver's door
> fig. 26, or
> Press the handle in the luggage compartment
lid > fig. 25.
Closing the luggage compartment lid
> Use the inside grip to pull the luggage com-
partment lid down and allow it to close using a
gentle push > A\.
Z\ WARNING
— After closing the luggage compartment lid,
make sure that it is latched. Otherwise the
luggage compartment lid could open sud-
denly when driving, which increases the risk
of an accident.
— Never drive with the luggage compartment
lid ajar or open, because poisonous gases
from the surrounding area can enter the ve-
hicle interior and increase the risk of asphyx-
iation.
— Never leave your vehicle unattended when
the luggage compartment lid is open. A
child could climb into the vehicle through
the luggage compartment. If the luggage
compartment lid was then closed, the child
would be trapped in the vehicle and unable
to escape. To reduce the risk of injury, do not
allow children to play in or around the vehi-
cle. Always keep the luggage compartment
lid and the doors closed when the vehicle is
not in use.
31
Page 36 of 400
Opening and closing
Power window switches
@ Left front
@ Right front
@® Left rear*
@ Right rear*
© Central switch* for opening or closing all side
windows at the same time
ZA\ WARNING
— If you leave the vehicle, switch the ignition
off and take the vehicle key with you. This
applies particularly when children remain in
the vehicle. Otherwise the children could
start the engine or operate electrical equip-
ment such as power windows.
— Pay careful attention when closing the win-
dows. Pinching could cause serious injuries.
— When locking the vehicle from outside, the
vehicle must be unoccupied since the win-
dows can no longer be opened in an emer-
gency.
@) Tips
— You can still open and close the windows for
several minutes after turning the ignition
off. The power window switch is not disa-
bled until the driver's door or front passeng-
er's door is opened.
— The power windows are equipped with pinch
protection. The automatic window may stop
closing and will open all the way again even
if no obstacle is detected. Pull the power
window switch up until the window is com-
pletely raised.
Convenience opening and closing
Applies to: vehicles with convenience opening/closing
All of the windows and the panoramic glass
roof* can be opened or closed at the same time.
For power top convenience opening and closing,
refer to the information in > page 37.
Convenience opening feature
> Press and hold the @ button on the remote con-
trol key until all windows and the panoramic
34
glass roof* have reached the desired position.
Or
> Hold the key in the driver's door lock until all
windows and the panoramic glass roof* have
reached the desired position.
Convenience closing feature
> Press the & button on the remote control key
until all windows and the panoramic glass roof*
are closed > A\. Or
> Applies to: vehicles with convenience key:
Touch the sensor on one of the front door han-
dles and continue touching it until all of the
windows and the panoramic glass roof* are
closed. Do not place your hand in the door han-
dle when doing this.
> Hold the key in the driver's door lock in the lock
position until all windows and the panoramic
glass roof* are closed > A\.
Setting convenience opening in the
Infotainment system
The function can be switched on/off in the Info-
tainment system > page 29.
ZA WARNING
— Never close the windows or panoramic glass
roof* carelessly or in an uncontrolled man-
ner, because this increases the risk of injury.
— For security reasons, the windows and the
panoramic glass roof* can only be opened
and closed with the remote control key at a
maximum distance of approximately 6.5
feet (2 m) away from the vehicle. Always pay
attention when using the & button to close
the windows and the panoramic glass roof*
so that no one is pinched. The closing proc-
ess will stop immediately when the f# but-
ton is released.
Correcting power window malfunctions
You can reactivate the one-touch up/down func-
tion if it malfunctions.
> Pull the power window switch until the window
is completely raised.
> Release the switch and pull it up again for at
least one second.
Page 45 of 400
8V2012721BK
Lights and Vision
Lights and Vision
Exterior lighting
Stare MUL Las eal
B8V-0430
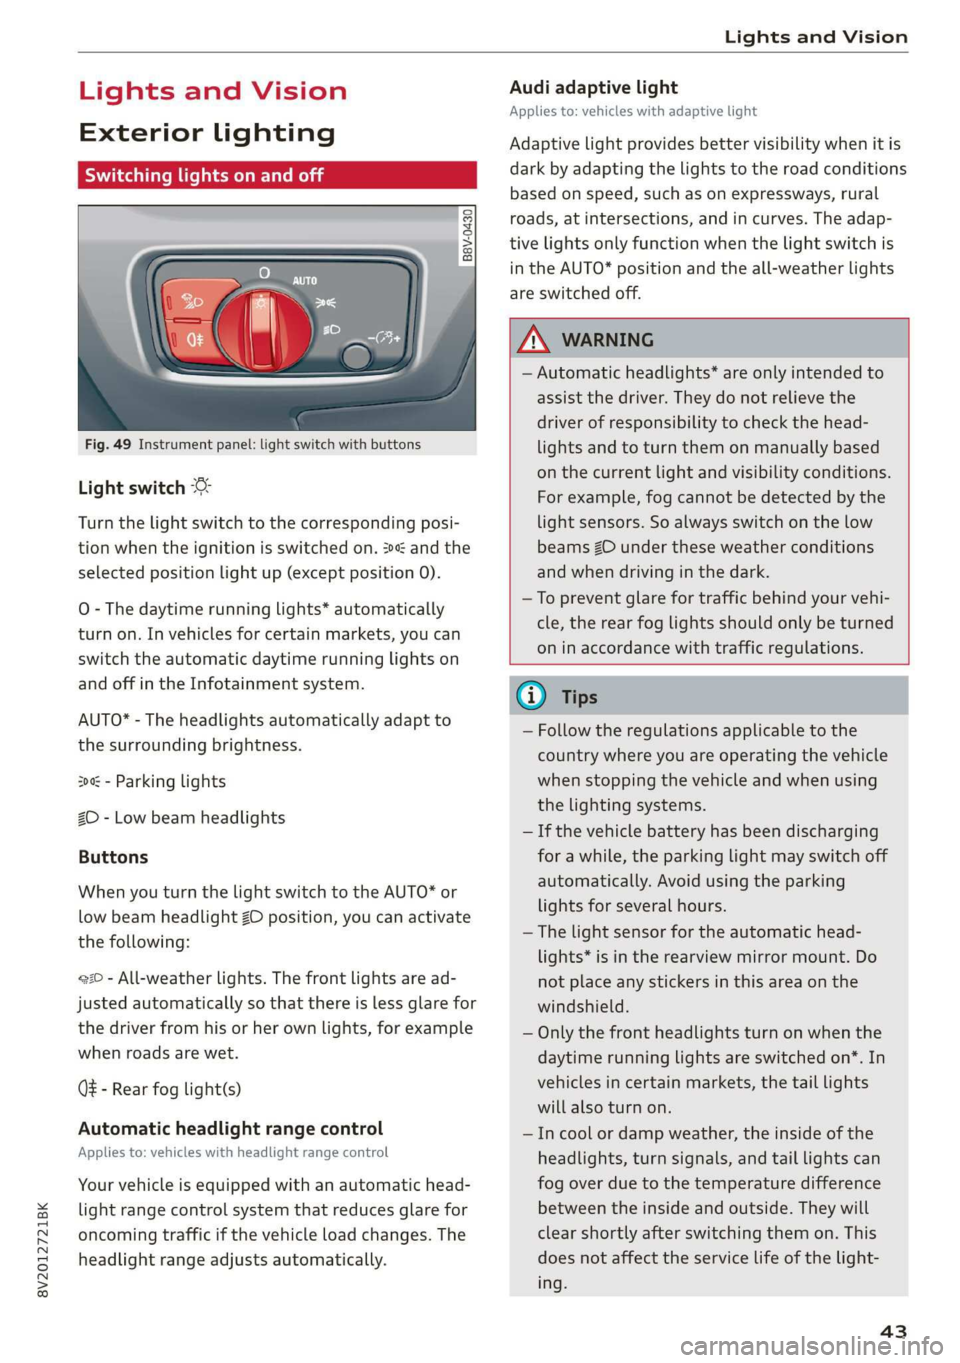
Fig. 49 Instrument panel: light switch with buttons
Light switch
Turn the light switch to the corresponding posi-
tion when the ignition is switched on. 2 and the
selected position light up (except position 0).
O
- The daytime running lights* automatically
turn on. In vehicles for certain markets, you can
switch the automatic daytime running lights on
and off in the Infotainment system.
AUTO* - The headlights automatically adapt to
the surrounding brightness.
300 - Parking lights
2D - Low beam headlights
Buttons
When you turn the light switch to the AUTO* or
low beam headlight ZO position, you can activate
the following:
220 - All-weather lights. The front lights are ad-
justed automatically so that there is less glare for
the driver from his or her own lights, for example
when roads are wet.
Q - Rear fog light(s)
Automatic headlight range control
Applies to: vehicles with headlight range control
Your vehicle is equipped with an automatic head-
light range control system that reduces glare for
oncoming traffic if the vehicle load changes. The
headlight range adjusts automatically.
Audi adaptive light
Applies to: vehicles with adaptive light
Adaptive light provides better visibility when it is
dark by adapting the lights to the road conditions
based on speed, such as on expressways, rural
roads, at intersections, and in curves. The adap-
tive lights only function when the light switch is
in the AUTO* position and the all-weather lights
are switched off.
Z\ WARNING
— Automatic headlights* are only intended to
assist the driver. They do not relieve the
driver of responsibility to check the head-
lights and to turn them on manually based
on the current light and visibility conditions.
For example, fog cannot be detected by the
light sensors. So always switch on the low
beams ZO under these weather conditions
and when driving in the dark.
—To prevent glare for traffic behind your vehi-
cle, the rear fog lights should only be turned
on in accordance with traffic regulations.
G) Tips
— Follow the regulations applicable to the
country where you are operating the vehicle
when stopping the vehicle and when using
the lighting systems.
— If the vehicle battery has been discharging
for a while, the parking light may switch off
automatically. Avoid using the parking
lights for several hours.
— The light sensor for the automatic head-
lights* is in the rearview mirror mount. Do
not place any stickers in this area on the
windshield.
— Only the front headlights turn on when the
daytime running lights are switched on*. In
vehicles in certain markets, the tail lights
will also turn on.
—Incool or damp weather, the inside of the
headlights, turn signals, and tail lights can
fog
over due to the temperature difference
between the inside and outside. They will
clear shortly after switching them on. This
does not affect the service life of the light-
ing.
43
Page 47 of 400
8V2012721BK
Lights and Vision
manually depending on light and visibility
conditions. It may be necessary to operate
them manually in situations such as:
— In adverse weather conditions such as fog,
heavy rain, blowing snow or spraying water.
— On roads where oncoming traffic may be
partially obscured, such as expressways.
— If there are road users with poor lighting,
such as bicyclists.
— In tight curves and on steep hills.
—In poorly lit areas.
— With strong reflectors, such as signs.
— If the area of the windshield near the sensor
is fogged over, dirty, icy or covered with a
sticker.
Adjusting the exterior lighting
You can adjust the exterior lighting separately.
The settings depend on the vehicle equipment.
The functions are adjusted in the Infotainment
system.
> Select in the Infotainment system: [MENU] but-
ton > Vehicle > left control button > Vehicle
settings > Exterior lighting.
Automatic headlights
You can adjust the following settings in the Auto-
matic
headlights menu:
Activation time - You can adjust if the headlights
switch on Early, Medium or Late according to the
sensitivity of the light sensor.
Headlight assistant - You can switch the high
beam assistant* on and off.
Entry/exit lighting
When it is dark, the Entry/exit lighting illumi-
nates the area around the vehicle when unlocking
the vehicle and after switching off the ignition
and opening the driver's door.
The entry/exit lighting only works when it is dark
and the light switch is in the AUTO* position.
)_ This function is not available in all countries.
Daytime running lights!)
The daytime running lights can be turned on and
off. When daytime running lights are turned on,
the lights will stay on continuously whenever the
ignition is switched on.
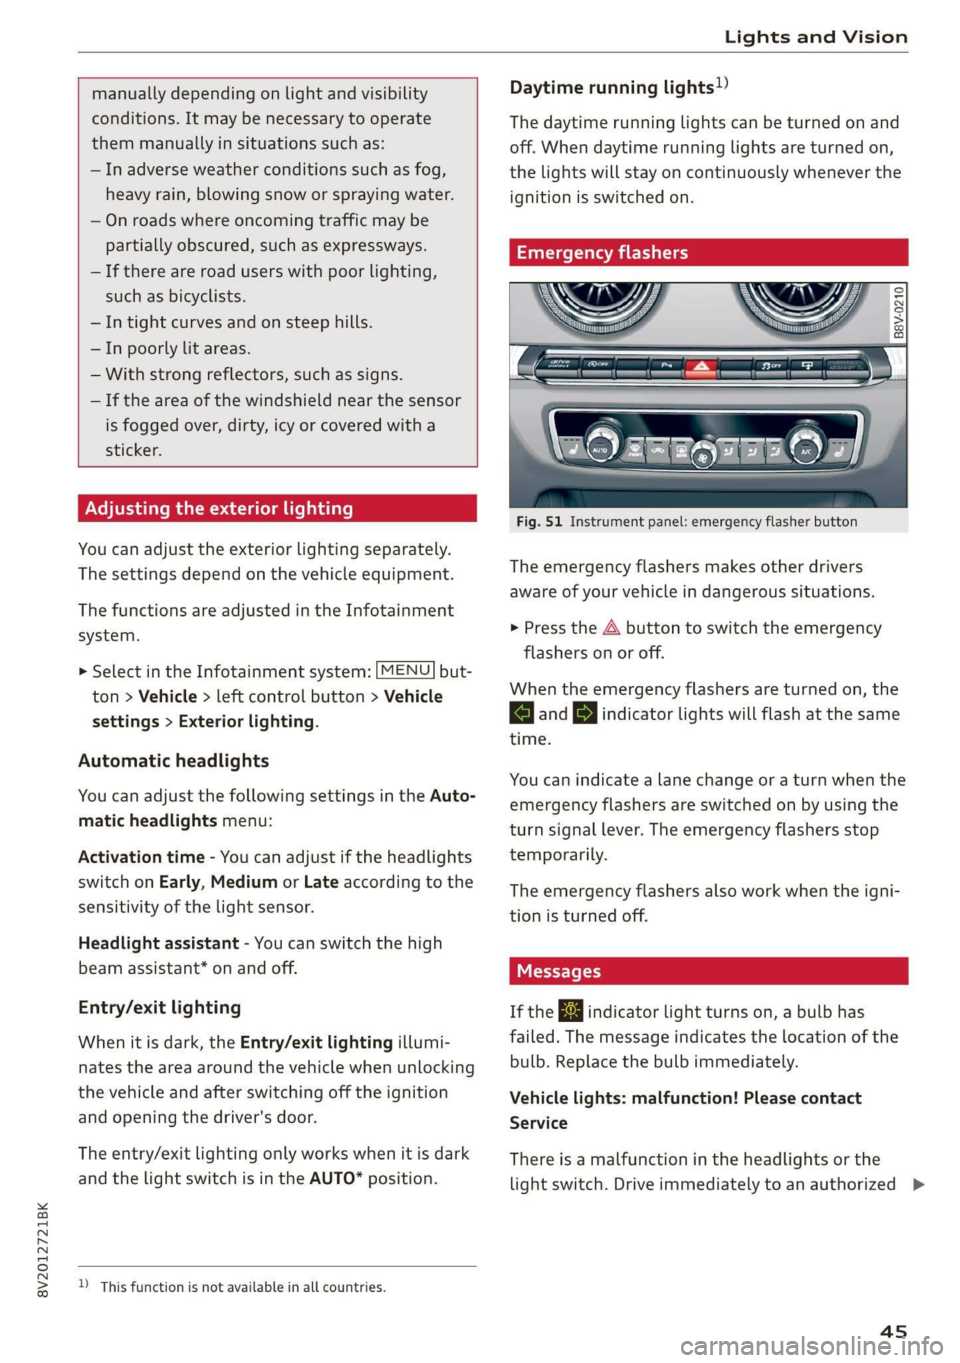
Emergency flashers
B8V-0210
Fig. 51 Instrument panel: emergency flasher button
The emergency flashers makes other drivers
aware of your vehicle in dangerous situations.
> Press the A button to switch the emergency
flashers on or off.
When the emergency flashers are turned on, the
a and BY indicator lights will flash at the same
time.
You can indicate a lane change or a turn when the
emergency flashers are switched on by using the
turn signal lever. The emergency flashers stop
temporarily.
The emergency flashers also work when the igni-
tion is turned off.
If the ka indicator light turns on, a bulb has
failed. The message indicates the location of the
bulb. Replace the bulb immediately.
Vehicle lights: malfunction! Please contact
Service
There is a malfunction in the headlights or the
light switch. Drive immediately to an authorized >
45
Page 48 of 400
Lights and Vision
Audi dealer or authorized Audi Service Facility to
have the malfunction repaired.
Bg) Audi adaptive light: malfunction! See own-
er's manual
Adaptive light* is not working. The headlights
still function.
Drive immediately to an authorized Audi dealer
or authorized Audi Service Facility to have the
malfunction repaired.
automatic headlights: malfunction! See
owner's manual
The light/rain sensor is malfunctioning.
The low beams remain switched on at all times
for safety reasons when the light switch is in the
AUTO position. However, you can continue to
turn the lights on and off using the light switch.
Drive immediately to an authorized Audi dealer
or authorized Audi Service Facility to have the
malfunction repaired.
Ba Headlight range control: malfunction! See
owner's manual
There is a malfunction in the dynamic headlight
range control system, which may cause glare for
other drivers.
Drive to an authorized Audi dealer or authorized
Audi Service Facility immediately to have the
malfunction corrected.
Headlight assistant: malfunction! See own-
er's manual
Drive immediately to an authorized Audi dealer
or authorized Audi Service Facility to have the
malfunction repaired. You can still switch the
high
beams on or off manually.
Headlight assistant: currently unavailable.
No camera view
Headlight assistant: currently unavailable.
Camera view restricted due to surroundings.
See owner's manual
The camera view is blocked, for example by a
sticker or debris. Please clean the windshield.
46
The sensor is located in the interior rearview mir-
ror mount. Do not place any stickers in this area
on the windshield.
Z\ WARNING
— Light bulbs are pressurized and can explode
when they are replaced, which increases the
risk of injury.
—To reduce the risk of fatal injury, the high-
voltage component on HID headlights (xe-
non lights) must be handled correctly.
Interior lighting
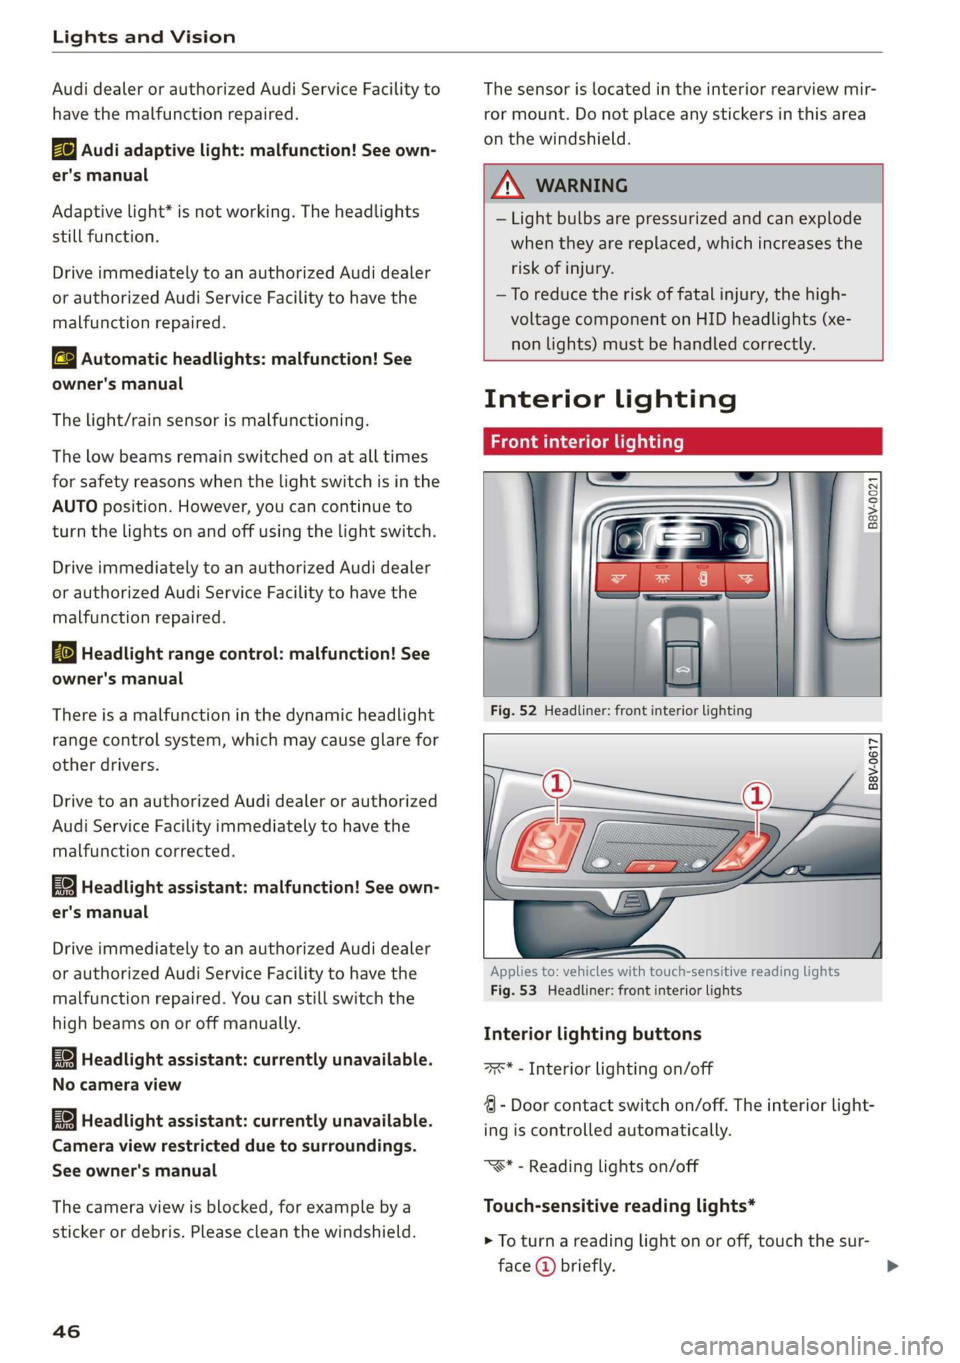
Front interior lighting
B8v-0021
B8V-0617
Applies to: vehicles with touch-sensitive reading lights
Fig. 53 Headliner: front interior lights
Interior lighting buttons
axs* - Interior lighting on/off
4 - Door contact switch on/off. The interior light-
ing is controlled automatically.
“S* - Reading lights on/off
Touch-sensitive reading lights*
> To turn a reading light on or off, touch the sur-
face @ briefly.
Page 51 of 400

8V2012721BK
Lights and Vision
— If electrolyte fluid comes into contact with
the eyes, flush them thoroughly with plenty
of clean water for at least 15 minutes and
then seek medical attention.
— If electrolyte fluid comes into contact with
the skin, flush the affected area with clean
water for at least 15 minutes, and then
clean with soap and water and seek medical
attention. Clean affected clothing and shoes
thoroughly before wearing again.
— If the fluid was swallowed and the person is
conscious, flush the mouth with water for at
least 15 minutes. Do not induce vomiting
unless this is recommended by medical pro-
fessionals. Seek medical attention immedi-
ately.
@) Note
Applies to: vehicles with automatic dimming rearview
mirror
Electrolyte fluid can leak out from broken mir-
ror glass. This liquid damages plastic surfa-
ces. Clean this liquid as quickly as possible
with a wet sponge.
G) Tips
Applies to: vehicles with automatic dimming rearview
mirror
— If the light reaching the rearview mirror is
obstructed, the automatic dimming mirror
will not function correctly,
— The automatic dimming mirrors do not dim
when the interior lighting is turned on or
the reverse gear is selected.
Sun visors
B8X-0209
Fig. 57 Front headliner: sun visor
The sun visors can be moved out of their brackets
and turned toward the doors (a). The sunshade
can also be moved back and forth lengthwise in
this position*.
The mirror light switches on when the cover over
the
vanity mirror* @) opens.
Windshield wipers
Switching the windshield wipers on
B8V-0600
B8V-0601
Fig. 59 Lever: rear window wiper*
Move the windshield wiper lever S7 to the corre-
sponding position:
@©- Windshield wipers off
@- Interval mode. To increase/decrease the wip-
er intervals, move the switch @ to the left/right.
In vehicles with a rain sensor, the wipers turn on
in the rain once the vehicle speed exceeds ap-
proximately 2 mph (4 km/h). The higher the sen-
sitivity of the rain sensor that is set (switch @) to
the right), the earlier the windshield wipers react
to moisture on the windshield. You can deacti-
vate the rain sensor mode in the Infotainment
system, which switches the intermittent mode
on. To do this, select: [MENU] button > Vehicle >
49
>