four wheel drive AUDI A3 CABRIOLET 2016 Owners Manual
[x] Cancel search | Manufacturer: AUDI, Model Year: 2016, Model line: A3 CABRIOLET, Model: AUDI A3 CABRIOLET 2016Pages: 272, PDF Size: 67.88 MB
Page 24 of 272
<( co ..... N
" N ..... 0 r--. > 00
Driver information
system
Overview
Applies to: ve hicles with driver information system
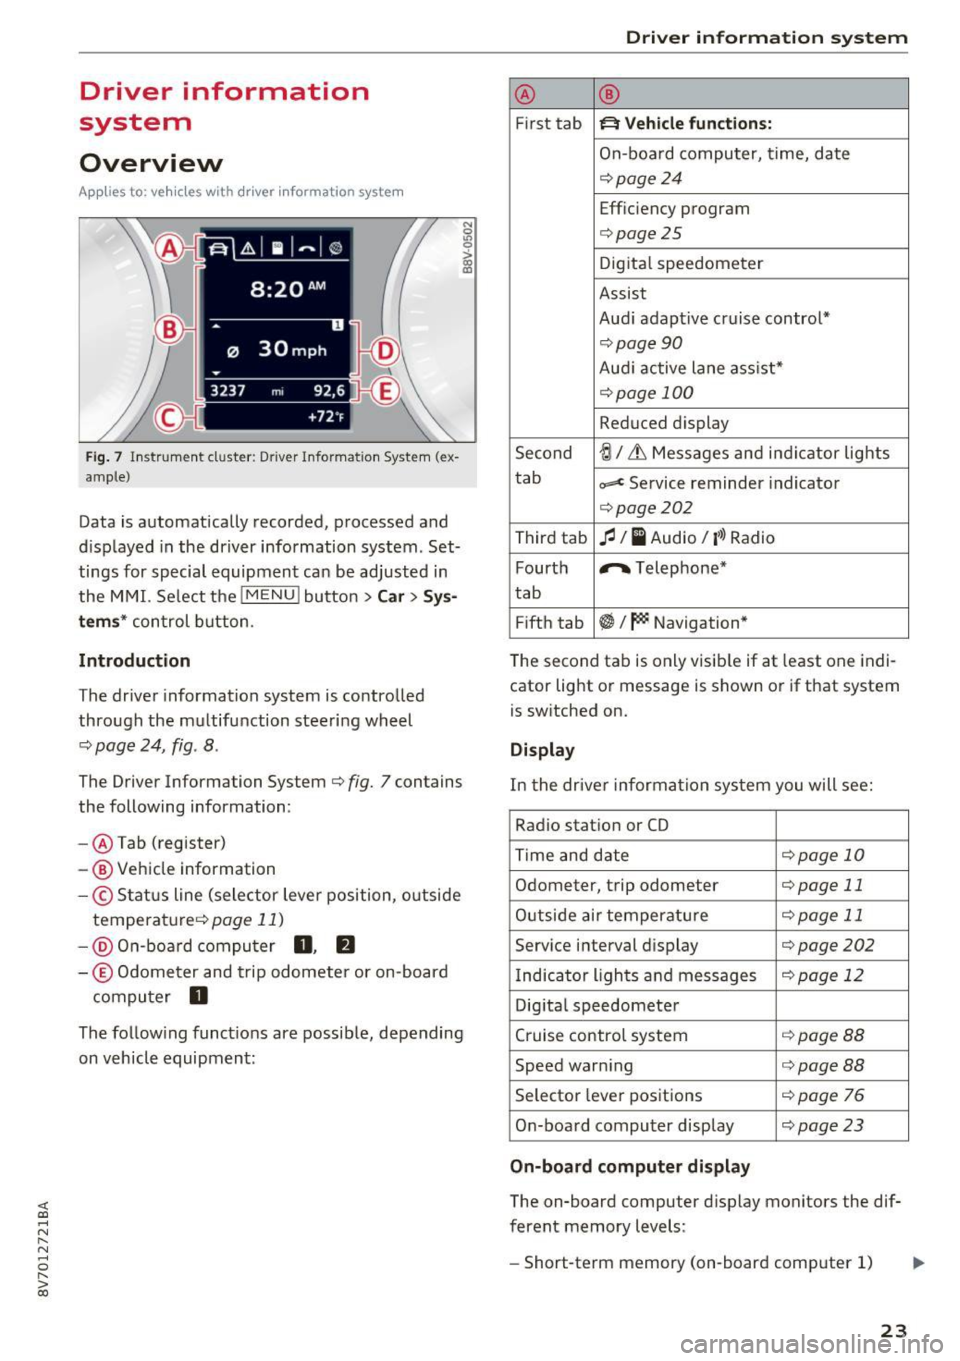
Fig. 7 Instrument cluster : Driver Information System (ex
ample)
Data is automatically recorded, processed and
displayed in the driver information system . Set·
tings for special equipment can be adjusted in
the MMI. Select the
I MENU I button >Car > Sys
tems*
control button.
Introduction
The driver information system is controlled
through the multifunction steering wheel
¢ page 24, fig . 8 .
The Driver Information System ¢ fig. 7 contains
the following information:
- @ Tab (register)
- @ Vehicle information
-© Status line (selector lever position, outside
temperat ure¢ page
11)
-@ On-board computer D , fJ
-© Odometer and trip odometer or on-board
computer
D
The following functions are possible, depending
on vehicle equipment:
Driver in forma tion system
@ ®
First tab ~ Vehicle functions:
On-boa rd computer, time, date
¢page24
Efficiency program
¢page25
Digital speedometer
Assist
Aud i adaptive cruise control*
¢page 90
Audi active lane ass ist*
¢ page 100
Reduced display
Second
ti/ & Messages and indicator lights
tab
c,,,d Service reminder indicator
¢ page202
Third tab fl I I Audio/ I'>) Radio
Fourth ,.,.
Telephone*
tab
Fifth tab
$I~ Navigation*
The second tab is only visible if at least one indi
cator light or message is shown or if that system
is switched on.
Display
In the driver information system you will see:
Radio station or CD
Time and date
¢page 10
Odometer, trip odomete r ¢page 11
Outside air temperature ¢page 11
Service interval display ¢page202
Indicator lights and messages ¢ page 12
Digital speedometer
Cruise control system
¢page BB
Speed warning <=:>page BB
Selector lever positions ¢ page 76
On-board computer display ¢page 23
On-board computer display
The on-board computer display monitors the dif
ferent memory levels :
- Short-term memory (on-board computer 1)
23
Page 82 of 272
<( co ..... N
" N ..... 0 r--. > 00
Shifting manually (tiptronic mode)
Applies to: vehicles with automatic transmissions
The tiptronic allows the driver to shift the gears
manually.
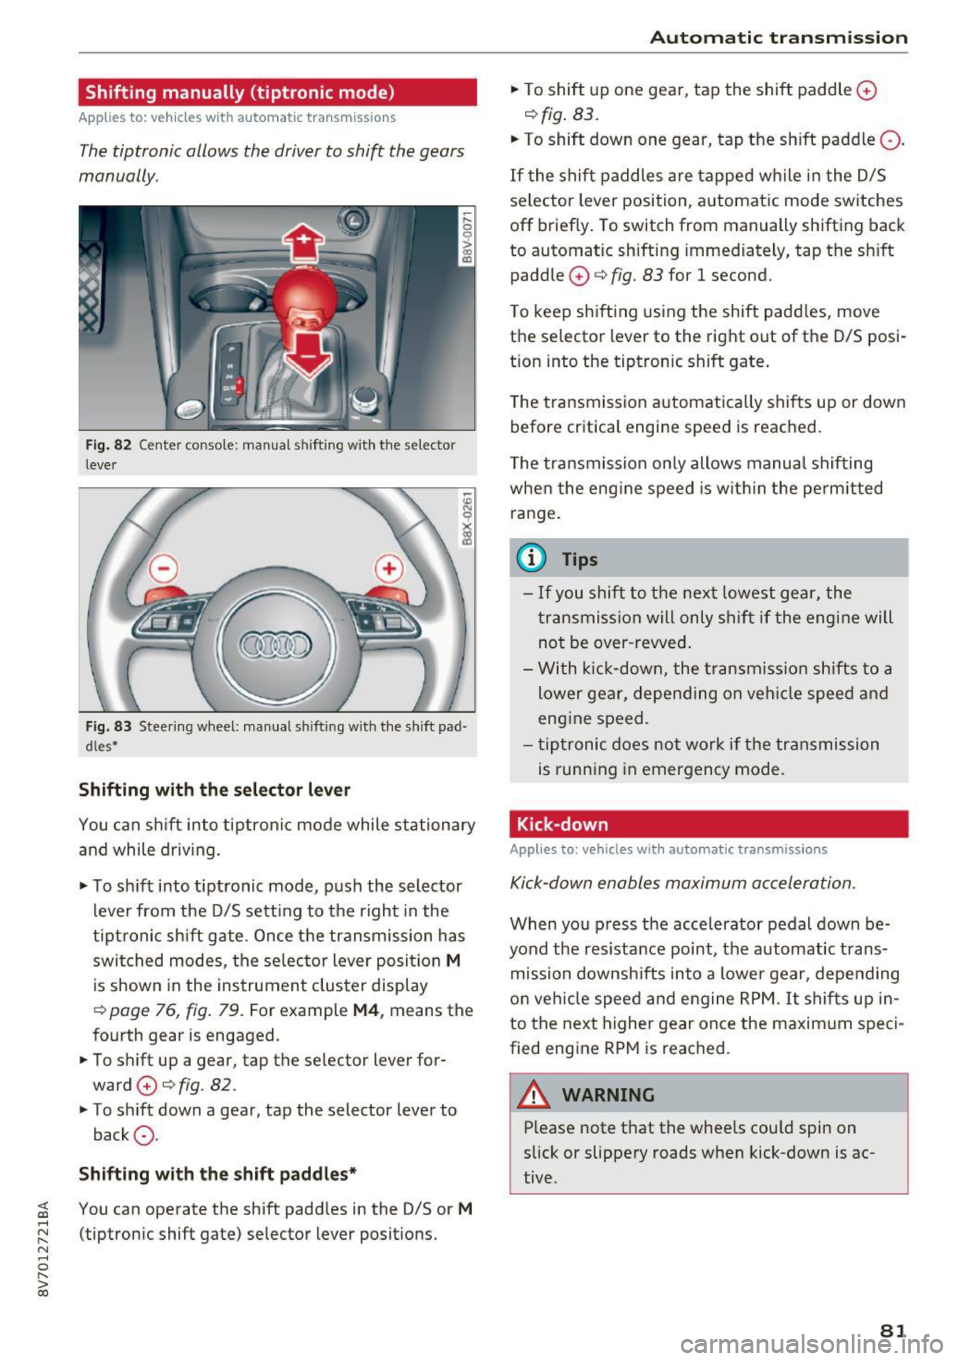
Fig . 82 Center conso le: manua l shifting with the selector
lever
Fig. 83 Steering wheel: manual sh ifting with the shift pad·
dles*
Shifting with th e select or lever
You can sh ift into tiptron ic mode while stationary
and while driv ing.
• To sh ift into tiptronic mode, push the selector
lever from the D/S sett ing to the right in the
tiptronic shift gate. Once the transmission has
switched modes, the se lector lever posi tion
M
is shown in the instrument cluster display
r:::>page 76, fig. 79. For example M4, means the
fourth gear is engaged.
• To shift up a gear, tap the selector lever for
ward
0 r:::> fig. 82.
• To shift down a gear, tap the selector lever to
back
a .
Shifting with the sh ift padd le s*
You can operate the shift padd les in the D/S or M
(tiptronic shift gate) selector lever positions.
Aut oma tic tr ansm iss ion
• To shift up one gear, tap the shift paddle 0
r:::> fig. 83.
• To shift down one gear, tap the shift paddle Q.
If the shift paddles are tapped while in the D/S
selector lever position, automatic mode switches
off briefly. To switch from manually shifting back
to automatic shifting immed iately, tap the sh ift
paddle
0 ¢ fig. 83 for 1 second.
T o keep shifting using the shift padd les, move
the selector lever to the rig ht out of the D/S posi
t ion into the tiptronic shift gate .
T he transmission automatically shifts up or down
before critica l engine speed is reached.
T he transmission only allows manua l shifting
whe n the eng ine speed is w it hi n the pe rmitted
ra nge.
(0 Tips
- If you shift to the next lowest gear, the
transmission will only shift if the eng ine will
not be over -revved .
- With k ick-down, the t ransmiss ion shifts to a
lower gear, depending on vehi cle speed and
engine speed.
- tiptronic does not work if the transmission
is running in emergency mode.
Kick-down
Applies to: vehicles with automatic transmissions
Kick-down enables maximum acceleration.
When you press the accelerator pedal down be
yond the res istance point, the automatic trans
mission downsh ifts into a lower gear, depending
o n veh icle speed and engine RPM.
It shifts up in
to the next higher gear once the maxim um speci
fied eng ine RPM is reached.
A WARNING ~
P lease note that the wheels cou ld spin on
slick or slippery roads when kick-down is ac
tive.
-
81
Page 117 of 272
<( co ..... N
" N ..... 0 r--. > 00
prevent collisions -there is still a risk of ac
cidents!
- Press the accelerator pedal carefully when
accelerating on even, slippery surfaces such
as ice and snow. The drive wheels can spin
even when these control systems are instal
led and this can affect driving stability and
increase the risk of a collision.
Switching on /off
Intelligent Technology
(D Tips
- The ABS and ASR only function correctly
when all four wheels have a sim ilar wear
condition. Different tire sizes can lead to a
reduction in engine power.
- You may hear noises when the systems de
scribed are working.
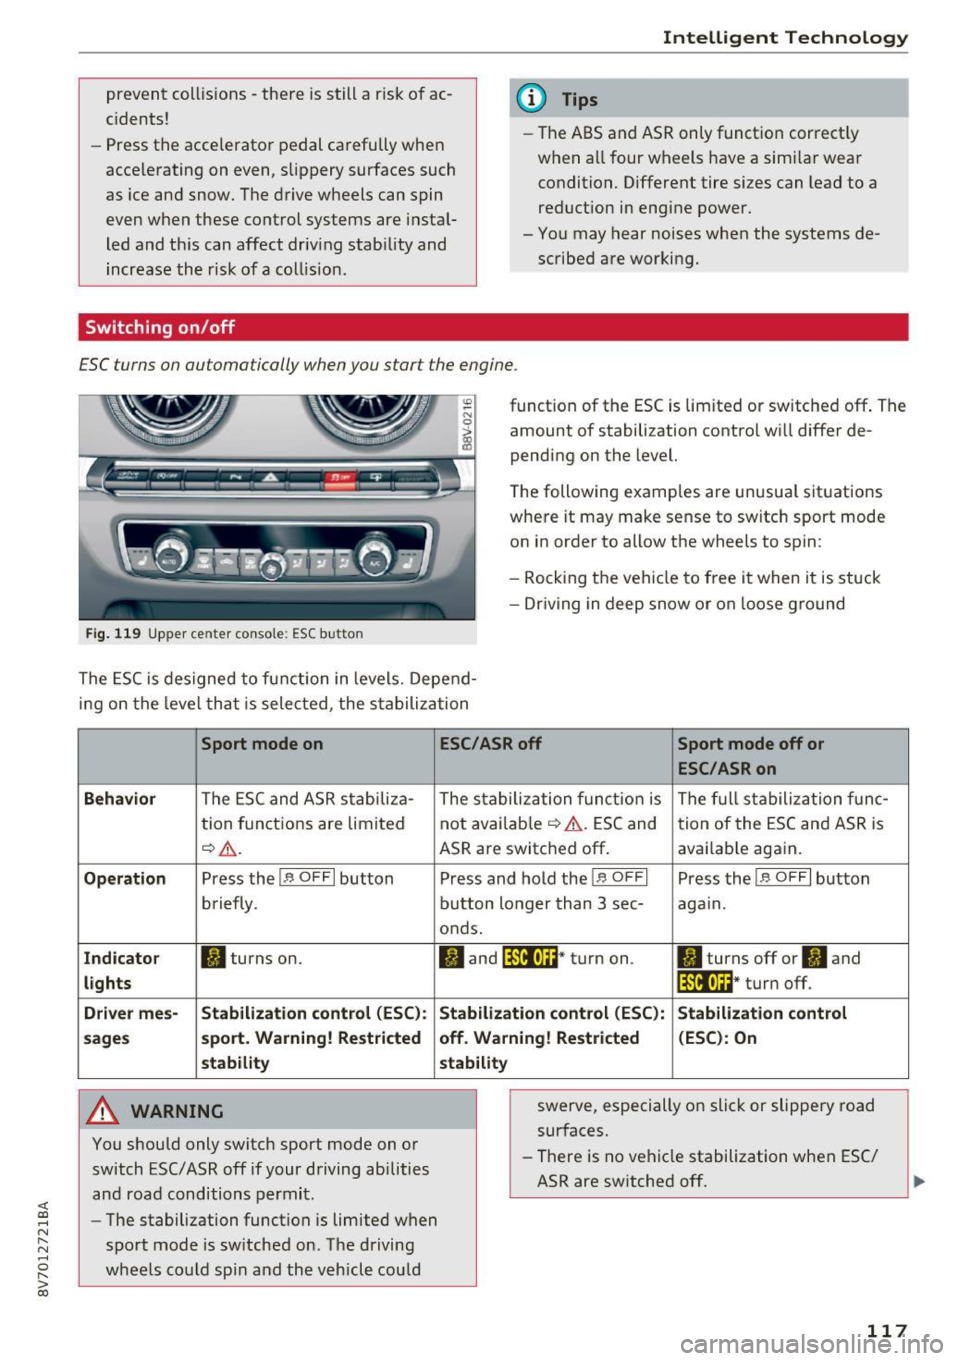
£SC turns on automatically when you start the engine.
Fig. 119 Upper center console : ESC button
function of the ESC is limited or switched off . The
amount of stabilization control will differ de
pending on the level.
The following examples are unusual situations
where it may make sense to switch sport mode
on in order to allow the wheels to spin:
- Rocking the vehicle to free it when it is stuck
- Dr iving in deep snow or on loose ground
The ESC is designed to function in levels. Depend
ing on the level that is selected, the stabilization
Sport mode on
Behavior
The ESC and ASR stabiliza-
tion functions are limited
~A .
Operation Press the!.$ OFFI button
briefly .
Indicator II turns on.
lights
Driver mes- Stabilization
control (ESC):
sages sport. Warning! Restricted
stability
A WARNING
You should only switch sport mode on or
switch ESC/ ASR off if your driving abilities
and road conditions permit.
- The stabilization function is limited when
sport mode is switched on. The driving
wheels could spin and the vehicle could
ESC/ASR off Sport mode off or
ESC/ASRon
The stabilization function is The full stabilization func-
not available
~ A. ESC and tion of the ESC and ASR is
ASR are switched off. avai lab le again.
Press and hold the!.$ OFFI Press the!.$ OFFI button
button longer than 3 sec- again.
onds.
II and lf'illtla~* turn on . II turns off or'II and
lf'tl•I~~ · turn off.
Stabilization control (ESC):
Stabilization control
off. Warning! Restricted (ESC): On
stability
swerve, especially on slick or slippery road
surfaces.
- There is no vehicle stabilization when ESC/
ASR are switched off.
117
Page 120 of 272
Intelligent Technology
Do not tow your veh icle bec ause it cannot be
steered. See an authorized Audi dealer or author
ized Audi Service Fac ility for assistance .
,IM Steering: Sy stem fault You can continu e
dri ving
If the indi cator lig ht t urns on , the steering whee l
may be mo re diff icu lt to move o r more sensitive
than usual. The steering wheel may also be a t an
angle when dr iving straight.
D rive s low ly to an authorized A udi dealer or au
thor ized A udi Se rvice Fa cility to have the m al
f u nction co rrected.
m Steering lock: sy stem fault! Please contact
Servic e
There is a malfunction in the electronic steering
lock.
Drive to an a uthori zed Aud i dea ler or authori zed
Aud i Serv ice Facility immedia tely to have the
malfunct io n corrected .
A WARNING
Have the system malfunction corrected as
soon as poss ible by an author ized Audi dealer
or au thori zed Aud i Serv ice Fa cili ty, as this in
c re ases the risk of an accident.
{D Tips
If the . or ,:rM i ndica to r light only turns on
for a short time, you may continue dr iv ing.
All wheel drive (quattro)
Applies to: veh icles with all whee l drive
In all wheel drive, all four wheels are powered .
General information
In all wheel drive, the driving power is divided be
tween all four wheels. This happens automatical
ly depe nding on your driving behavior as well as
the c urrent road cond itions . Also see
s>
page 116, Electronic stabilization control
( ES C).
The all wheel drive concept is designed for high
engine power . Your ve hicle is exceptionally pow
erful and has ex cellent driving characterist ics
120
both under normal d riving conditions and on
snow and ice . A lways read and follow safety pre
ca utions s>
.&..
Winter tires
By using all wheel dr ive, your veh icle has good
forward motion w it h standard t ires in win ter con
ditions . However, in winter we recommend using
winter or all season tires on
oil four whee ls, be
ca use this will improve the
broking effect.
Snow chains
I f there are snow ch ain laws , snow ch ains m ust
a lso be used on veh icles with all wheel drive
s>
page 219 , Snow chains .
Replacing tires
For vehicles with a ll w heel drive, o nly wheels with
t h e same ro lli ng ci rcumfe rence sho uld be used.
Avo id whee ls with diffe rent t read depths
¢ page 211 .
Offroad vehicle?
You r Audi is no t an off road vehicle - there is not
enough ground clearance. For th is reaso n, avoid
difficul t ter rain . Also see s>
page 251.
A WARNING
-Also, in veh icles with all wheel drive, ad apt
your d riving sty le to the cu rren t road and
traffic conditions. Do not let the increased
safety provi ded tempt you into taking r is k s,
because this inc reases the risk of an acc i
dent.
- The braking abi lity of your vehicle is limited
to the traction of the whee ls. I n this way, it
is not different from a two w heel drive vehi
cle . Do not be tempted to accelerate to a
hig h speed when the road is slippery, be
cause t his i ncreases the r is k of an accident .
- Note that on wet s treets, the front wheels
can " hydrop la ne" if dr iv ing at spee ds that
are too high. Unlike front w heel d rive
veh icles, t he engine does no t rev h ig her sud
de nly when t he vehi cle begins hydrop lan ing.
F or this reason, pay atte ntion to the road
conditions rega rdless of your speed to re
duce t he risk of an accident .
Page 211 of 272
<( a:, ... N .... N ... 0
s: a:,
Occupant loading and distri
bution for vehicle normal load
for various designated seating
capacities
Refer to the tire inflation pres
sure label
c::> page 214, fig. 171
for the number of seating posi
tions. Refer to the table
c::> table
on page 216
for the number of
people that correspond to the ve
hicle normal load.
New tires or wheels
Audi recommends having all work
on tires or whee ls perfo rmed by
an authorized Audi dealer or au
thorized Audi Service Facility .
These facilities have the proper
knowledge and are equ ipped with
the required tools and replace
ment parts .
.,,. New tires do not yet have the
opt imum adhesion properties.
Drive carefully and at moderate
speeds for the first 350 m iles
(500 km) with new tires .
.,,. On ly use tires w ith the same de
sign, size (rolling c ircumference)
and as close to the same tread pattern as possible on all four
wheels.
Tire s and wheel s
.,,.Do not replace tires individually.
At least replace both tires on the same axle at the same time .
.,,. Audi recommends that you use
A udi Original equipment tires. If
you would like to use different
tires, please note that the tires may perform differently even if
they are the same si ze
c::> ,&. .
.,,. If you would like to equip your
vehicle w ith a tire/r im comb ina
tion that is different from what
was installed at the factory, con
sult w ith an authorized Audi
dealer or authorized Audi Service
Facility before making a pur
chase ¢
..1,..
The spare t ire* is diffe rent from
the regular tires installed on the
vehicle - for example, if winter
tires or wide tires are installed -
then only use the spare tire* tem
porarily in case of emergency and
drive carefully while it is in use . It
should be replaced with a regular
tire as soon as possible.
On
all wheel d rive vehicles, all
four wheels must be equipped
with tires that are the same brand
and have the same construction
and tread pa ttern so that the
drive system is not damaged by
2 11
Page 219 of 272

<( co .... N r--N .... 0 r--> co
the availab le cargo an d lug
gage loa d capaci ty o f yo ur vehi
c le.
.,,. Chec k the tire s idewall
(¢ page 204 , fig. 16 8) to deter
min e th e des ig nate d lo ad ratin g
for a speci fic tir e.
Wheel bolts and rims
Wheel b olts
Wheel bolts must be clean and loosen/t ighten
eas ily.
Rims
R ims with a bolted rim ring* or w ith bolted wheel
covers* consist of mu ltip le pieces . These compo
n ents we re bolted toge ther using specia l bolts
and a specia l procedure . You must not repair or
disassemble them¢
A.
A WARNING
-
Wheel bolts that are tightened or repaired in
correctly can become loose and result in loss
of vehicle control, which increases the risk of
an acc ident. For the correct tightening specif i
cation, refer to¢
page 235, After changing a
wheel .
-Always keep the wheel bolts and the
threads in the wheel hub clean and free of
grease.
- Only use wheel bolts that fit the rim.
-Always have damaged r ims repaired by an
authorized Audi dealer or authorized Aud i
Service Facility. Never repair or d isassemble
rims yourself, because this increases the risk
of an accident.
Winter tires
W inter tires s ignificantly improve the vehicle's
h andling w hen d riving in w inter condit ions. Be
cause of the ir constr uction (width, compound,
tread pattern), summe r tires provide less trac
tion on ice and snow.
Tir es and wheel s
.. Use winter tires on all four wheels.
.. On ly use winter tires that are approved for your
veh icle.
.. Please note that the maximum permitted
speed may be lower with winter tires¢,&. An
author ized Audi dealer or authorized Audi Serv
ice Facility can inform you about the maximum
perm itted speed for your t ires .
.. Check the tire p ressure afte r insta lling wheels
¢ page 214.
The effectiveness of winter tires is reduced great
ly when the tread is wo rn down to a depth of
0.157 i nch (4 mm). The characte ris tics of winter
t ir es also decrease g reatly as the ti re ages, re
gard less of the rema ining t read.
A WARNING
-- Never drive faster than the max imum per
mitted speed for your tires . This could cause
the t ires to heat up too much. This increases
the risk of an accident because it can cause
the t ire to burst.
- Always adapt your driving to the road and
traffic cond itions. Drive carefully and reduce
your speed on icy or slippery roads . Even
winter t ires can lose tract ion on black ice .
(® For the sake of the environment
Reinstall summer tires at the appropr iate
time, because they prov ide better handling
when roads are free of snow and ice. Summer
tires cause less road no ise, tire wear and fue l
consumpt ion.
(D Tips
You can also use all season tires instead of
winter tires. Please note that in some coun
tries where winter tires are required, on ly
winter tires w ith the
& symbo l may be per
mitted.
Snow chains
Snow chains improve traction in the snow.
.. Only install snow chains on the front wheels .
This applies a lso to vehicles with a ll wheel
drive*.
219
Page 223 of 272
<( co .... N r--N .... 0 r--> co
Indicat or lights
IE -Loss of pressure in at least one ti re c::> ,& .
Check the tires and replace or repair if necessary.
Check/correct the pressures of all four tires. Then
store the tire pressures in the MMI
<=:>page 223.
mm (T ire Pressure Monitoring System) Tire
press ure: System malfuncti on!.
Ifm appears
after switching the ignition on or whi le driving
and the
IE indicator light in the instrument clus
ter blinks for approximately one minute and then
stays on, there is system malfunction . Try to
store the correct tire pressures
c::> page 223 . If
the indicator light does not turn off or turns on
again after a short period of time, drive to an au
thor ized Audi dealer or authorized Audi Service
Faci lity immediately to have the malfunction cor
rected.
A WARNING
- If the tire pressure warning light IE in the
instrument cluster turns on, the pressure in
one or more tires is too low . Reduce the ve
hicle speed immediately and avo id any hard
steering or braking maneuvers. Stop as soon as possible, check the tire and inflate the
t ire to the correct pressure, which is speci
fied on the tire pressure label on the veh icle
<=:> page 214. Driving w ith a t ire with low
pressure c auses the t ire to overheat and can
result in failure of the tire . Low pressure can
also have a negative effect on the driving
and braking behavior of the vehicle .
- T he driver is responsib le for maintaining the
correct tire pressures . You must check the
tire pressures regularly .
- Under certain conditions (such as a sporty
driv ing style, winter conditions or unpaved
roads), the pressure monitor indicator may
be delayed.
- Do not use run-flat tires on your vehicle . Us
ing them when not permitted can lead to
vehicle damage or accidents .
(D Tips
-The tire pressure monitoring system can al
so stop working when there is an ESC mal
function.
Tir es and wheel s
- Us ing snow chains may result in a system
ma lfunction.
- The tires with the identification "AO" or
"RO"
c::> page 211 have been matched with
your Audi tire pressure monitoring system .
We recommend that you use these tires.
- The tire pressure monitoring system can on
ly monitor the tire pressure of the driving
tires. Check the tire pressure of the spare
wheel in the luggage compartment so that if necessary it is ready for use.
Storing tire pressures
App lies to : vehicles wi th Tir e Pressure Mo nito rin g Sys te m in
dic ator
A change in tire pressur e or a change in tires
must be stored in the syst em .
The tire press ure is stored in the MM I.
.,. Make sure before storing that the t ire pressures
of all four tires meet the specified values and
are adap ted to the load. O therwise the system
could malfunction
c::> page 214.
.. Switch on the ignition.
.,. Select: the I MENU I button> Ca r> Sys tem s*
con trol button > S er vice & control > Tire pre s
s u re m on itor > Stor e tire pressu re > Yes , sto re
no w.
(D Tips
Do not store the tire pressures if snow chains
are installed. Otherw ise the system could
malfunction.
223
Page 235 of 272
<( co ..... N
" N ..... 0 r--. > 00
3. Locate the proper mounting point for the
jack and align the jack below that poin t
¢page 236.
4. Raise the car with the jack¢ page 236.
5. Remove the wheel with the flat tire and then
install
the spare ¢ page 238.
6. Tighten all wheel bolts lightly.
7. Lower the veh icle with the jack.
8. Use the wheel bolt wrench and firmly tighten
all wheel bolts
¢page 236 .
9. Replace the decorative wheel cover* .
_& WARNING
Always read and follow all WARNINGS and in
formation
¢ .&. in Raising the vehicle on
page
237 and ¢ page 239.
After changing a wheel
A wheel change is not complete without the do
ing the following .
.,. Always store the vehicle tool kit, the jack* and
the replaced tire in the luggage compartment
¢ page 130.
.,. Check the tire pressure on the spar e wheel im
mediate ly after mount ing it .
.,. As soon as possible, have the
tightening tor
ques
on all wheel bolts checked with a torque
wrench . The correct tightening torque is
90 ft
lb
(120 Nm) .
.,. Have the flat tire
replaced as soon as possible .
(D Tips
-If you notice that the wheel bolts are cor
ro ded and difficult to turn while changing a
tire , they should be replaced before you
check the tightening torque .
- Drive at reduced speed until you have the
tightening torques checked.
-Af ter changing a wheel, the tire pressure in
all four tires must be checked/corrected and
the tire pressure monitoring indicator must
be stored in the MMI
9page 223.
Emergency assistance
Decorative wheel covers
Applies to: vehicles with decorative wheel covers
The decorative wheel covers must be removed
first to access the wheel bolts .
Fig. 179 Changing a whe el: Removin g the wh eel cov er
Removing
.,. Insert the hook (provided w ith the vehicle tool
kit) in the hole in the wheel hub cover.
.,. Pull off the
decorative wheel cover¢ fig. 179.
Wheels with wheel bolt caps
Applies to: vehicles with wheel bolts w,th caps
The caps must be removed first from the wheel
bolts before the bolts can be unscrewed.
Fig. 180 Chang ing a whee l: removing th e whee l bol t cap s
Removing
.,. Push the plastic clip (provided with the vehicle
tool kit) over the wheel bolt cap until the inne r
reta iners on the clip align with the edge of the
cover.
.,. Remove the cap with the
plastic clip (vehicle
tool kit)
¢ fig. 180.
Refitting
.,. Place t he caps over the wheel bolts and push
t hem back on.
235