buttons AUDI A3 SEDAN 2017 Owners Manual
[x] Cancel search | Manufacturer: AUDI, Model Year: 2017, Model line: A3 SEDAN, Model: AUDI A3 SEDAN 2017Pages: 400, PDF Size: 67.32 MB
Page 11 of 400
CXl CXl .... N ,.__
N .... 0 N > 00
CD
@
®
©
®
®
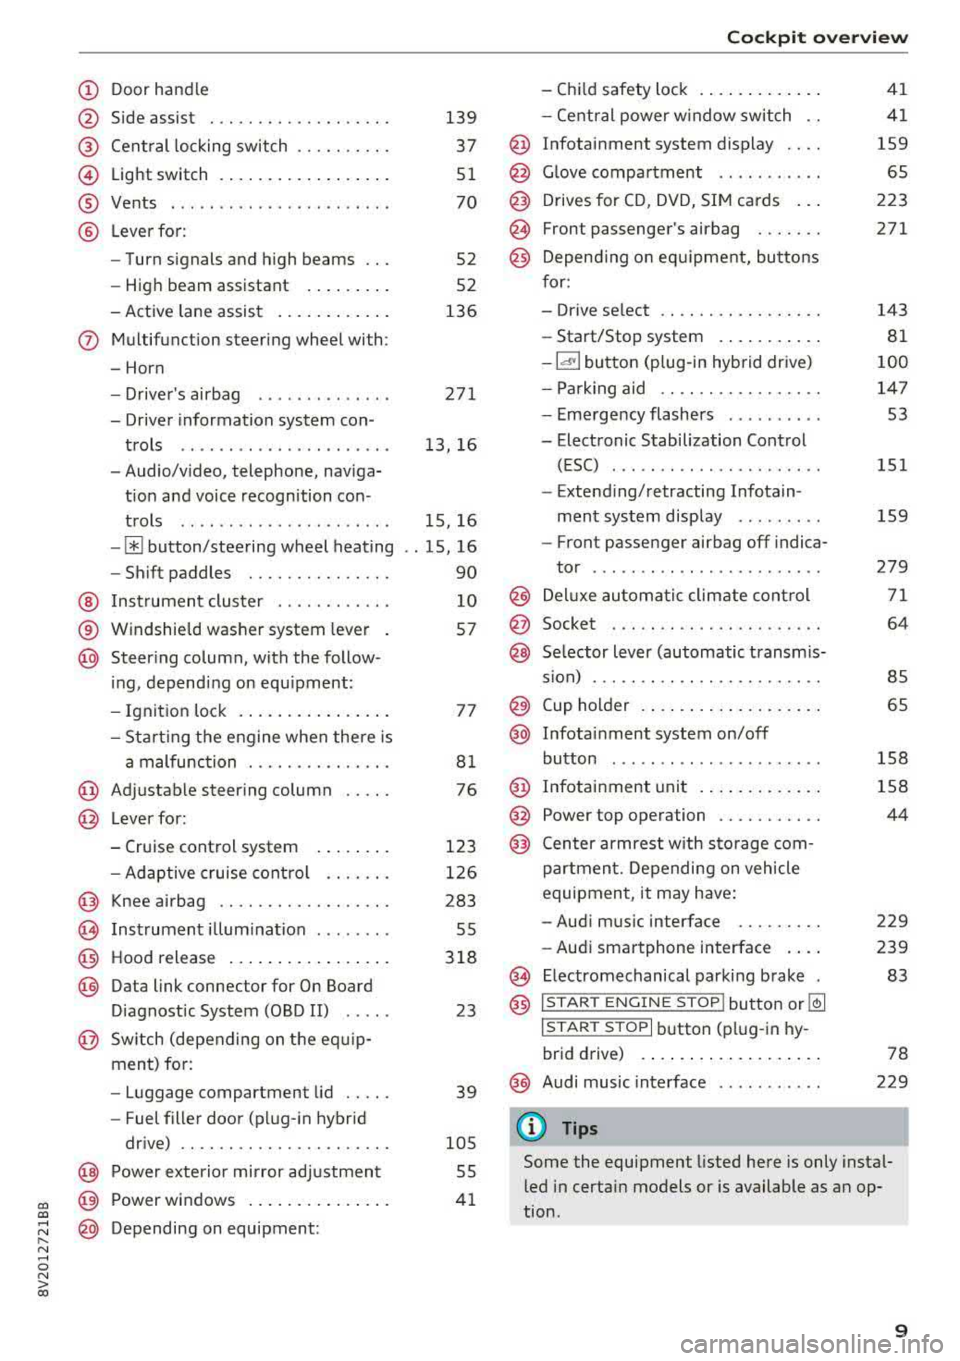
Door handle
Side assist
Central locking switch ....... .. .
Light switch ................ . .
Vents ... .. ........ ..... ... . .
Lever for:
- Turn signals and high beams .. .
- High beam assistant ....... . .
- Active lane assist .......... . .
(J) Multifunction steering wheel with:
- Horn
D. ' . b -rivers air ag .... ..... ... . .
- Driver information system con-
trols ......... ....... ..... .
- Audio/video, telephone, naviga
t ion and voice recognition con -
trols .. .. ........ ..... ... . .
-[ii button/steering wheel heating
- Shift paddles ............ .. .
@ Instrument cluster ......... .. .
® Windshield washer system lever
@ Steering column, with the follow -
ing, depending on equipment :
- Ignition lock .............. . .
- Starting the engine when there is
a malfunction ............ .. .
@ Adjustable steering column .. .. .
@ Lever for:
- Cruise control system ....... .
- Adaptive cruise control ...... .
@ Knee airbag ............. .. .. .
@) Instrument illumination ....... .
@ Hood release ................ .
@ Data link connector for On Board
Diagnostic System (OBD II) .....
@ Switch (depending on the equ ip
ment) for:
- Luggage compartment lid .... .
- Fuel filler door (plug-in hybrid
drive) .. .. ............... .. .
@ Power exterior mirror adjustment
~ p . d ~ ower win ows .............. .
@ Depending on equipment:
139
37
51
70
52
52
136
271
13, 16
15, 16
. . 15, 16
90
10
57
77
81
76
123
126
283
55
318
23
39
105
55
41
Cockpit overview
- Child safety lock ............ .
- Central power window switch ..
@ Infotainment system display ... .
@ Glove compartment .... ...... .
@ Drives for CD, DVD, SIM cards .. .
@ Front passenger's airbag ...... .
@ Depending on equ ipment, buttons
for:
- Drive select .. .............. .
- Start/Stop system .......... .
-la •I button (plug-in hybrid drive)
- Parking aid .. .............. .
- Emergency flashers ......... .
- Electronic Stabilization Control (ESC) ....... .. ............ .
- Extending/retracting Infotain -
ment system display ........ .
- Front passenger airbag off indica-
tor .... ... .. .. ............ .
@ Deluxe automatic climate control
@ Socket . .... .. .. ............ .
@ Selector lever (automatic transmis-
s ion) ... .... .. .............. .
@ Cup holder .... .. ............ .
@ Infotainment system on/off
button ..... .. .. ... ....... .. .
@ Infotainment unit ............ .
@ Power top operation .......... .
@ Center armrest w ith storage com-
partment. Depending on vehicle
equipment , it may have:
- Audi music interface ........ .
- Audi smartphone interface ... .
~ Electromechanical parking brake
@ ISTAR T ENGINE ST OP lbutton or ~
I STAR T STOPI button (plug-in hy-
brid drive) .... .. ............ .
@) Audi music interface
(D Tips
41
41
159
65
223
271
143
81
100
147 53
151
159
279
71
64
85
65
158
158
44
229
239
83
78
229
Some the equipment listed here is only instal
led in certain models or is available as an op
tion .
9
Page 15 of 400
a, co .... N
" N .... 0 N > 00
be slightly higher than the actual temperature
outside due to the heat radiating from the en
g ine.
At temperatures below 41 °F (+5 °C), a snowflake
symbol appears in front of the temperature dis
p lay
c::> .&. .
A WARNING
Do not assume the roads are free of ice based
on the outside temperature display. Be aware
that there may be ice on roads even when the
outs ide temperature is around 41 °F (+5 °C)
and that ice can increase the risk of accidents.
Multifunction steering
wheel plus
Operating
A ppl ies to : ve hicl es with Audi virtual cockpit
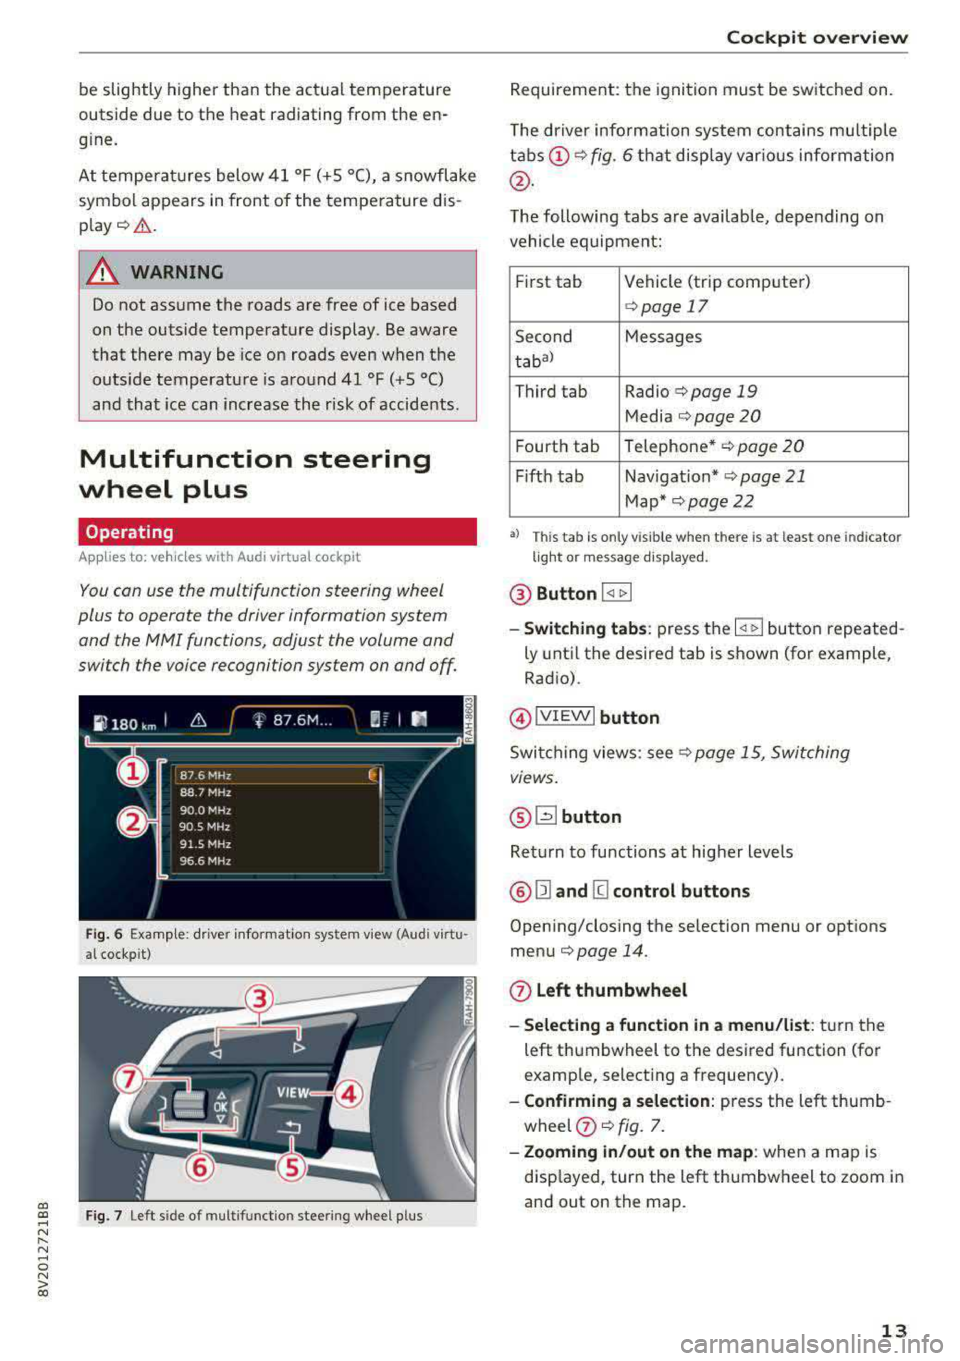
You con use the multifunction steering wheel
plus to operate the driver information system and the MMI functions, adjust the volume and
switch the voice recognition system on and off
Fig. 6 Example : drive r informat ion system v iew (Aud i virtu ·
al cockp it )
F ig. 7 Le ft sid e of multifunctio n stee ring wheel p lus
Cockpit overview
Requirement: the ignition must be switched on.
The driver information system contains mu ltiple
tabs (!) c::> fig. 6 that display var ious information
@ .
The following tabs are available, depending on
vehicle equipment:
First tab Vehicle (trip computer)
c::> page 17
Second Messages
tabal
Third tab Radio c::>page 19
Media c::> page 20
Fourth tab Telephone* c::> page
20
Fifth tab Navigation* c::> page 21
Map* c::> page 22
•> This tab is only v is ible when t here is at leas t on e indi ca to r
light or mes sage displayed .
@ Button I
-Switching tabs: press the I
ly until the desired tab is shown (for example,
Radio).
@ !VIEWI button
Switching views: see c::> page 15, Switching
views.
@ ~button
Return to functions at higher levels
@ 121 and [g control buttons
Opening/closing the selection menu or options
menu
c::> page 14.
0 Left thumbwheel
- Selecting a function in a menu/list : turn the
left thumbwheel to the desired function (for
examp le, selecting a frequency).
- Confirming a selection: press the left thumb
wheel
(j) c::> fig. 7.
- Zooming in/out on the map : when a map is
disp layed, turn the left thumbwheel to zoom in
and out on the map.
13
Page 16 of 400
Cockpit overview
Control buttons
Applies to: vehicles with Audi virtual cockpit
I rM
' t M' ...
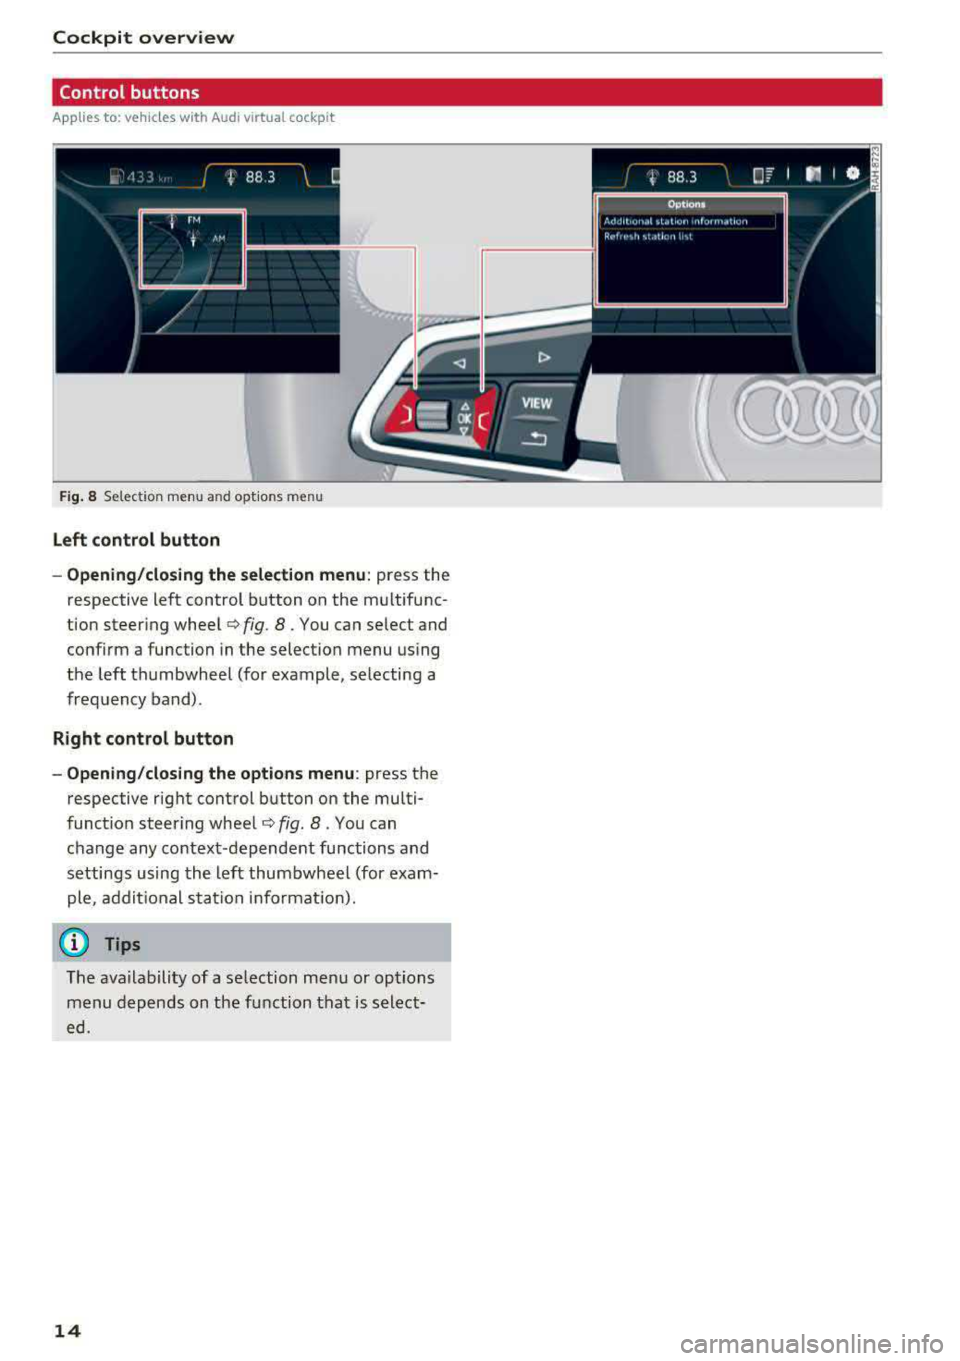
F ig . 8 Se lect ion menu and optio ns m en u
Left control button
- Opening/closing the selection menu :
press the
respect ive left control button on the multifunc
tion steering wheel
¢ fig . 8. You can select and
confirm a func tion in the selection menu using
the left thumbwheel (for example, selecting a
frequency band) .
Right control button
- Opening/closing the options menu :
press the
respective right control button on the multi
function steering
wheel ¢ fig. 8. You can
change any context -dependent functions and
settings using the left thumbwheel (for exam
ple , additional station informat ion).
(D Tips
The ava ilability of a selection menu or options
menu depends on the function that is select
ed.
14
Page 17 of 400
a, a, ..... N
" N ..... 0 N > 00
Switching views
Applies to: vehicles with Audi virtual cockpit
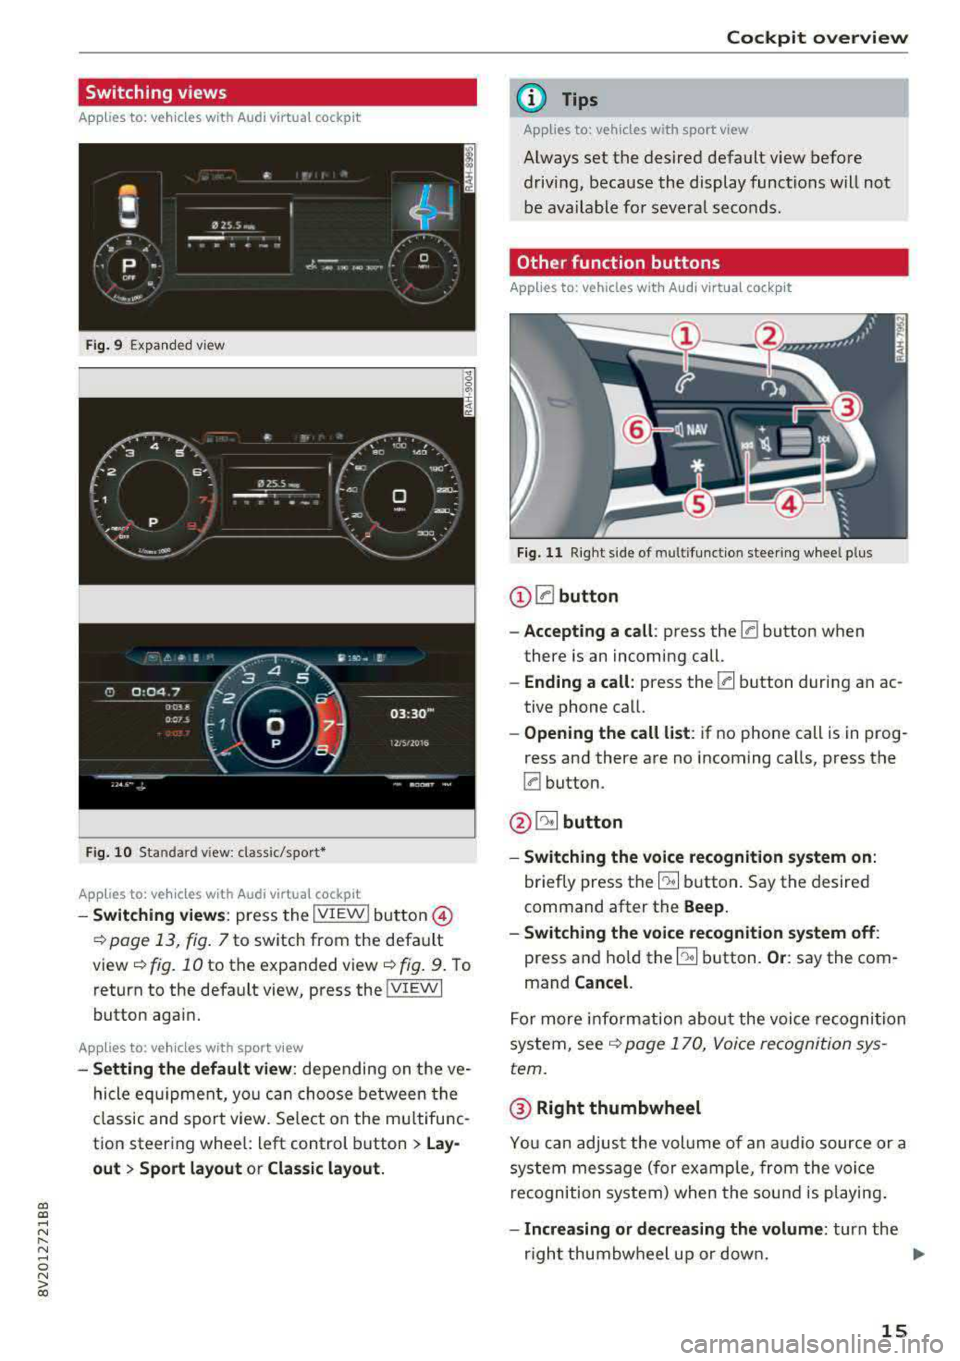
Fig. 9 Expa nded v iew
F ig. 10 Sta ndard view : class ic/spor t•
Applies to: vehicles with Audi virtual cockpit
- Switching v iews : press the IVIEW I bu tton @
~ page 13, fig . 7 to switch from the defa ult
view ¢
fig. 10 to the expanded view¢ fig. 9. To
return to the defa ult view, press the
!VIEWI
button again.
Applies to: veh icles with sport v iew
- Setting the default view : depending on the ve
hicle eq uipment, yo u ca n choose between the
cl assic and spo rt view. Se le ct o n the mu ltifu nc
tion steering whee l: left control button
> Lay
out
> Sport layout or Clas sic layout.
Cockpit overview
(D Tips
Applies to: vehicles with sport view
A lways set the desired default view before
d rivi ng, because the display functions will not
b e ava ilable fo r seve ral seco nds .
Other function buttons
Applies to: vehicles with Audi virtual cockpit
Fig. 11 R ig ht s ide of m ultifunct ion stee ring w hee l p lus
(D !:abutton
-Accepting a call : press the [a button when
there is an incoming call.
-Ending a call: press the [a b utton during an ac
tive phone cal l.
-Opening the call list : if no phone call is in prog
ress and there are no incoming ca lls, press the
[a button.
@ 51 button
- Switching the voice recognition sy stem on :
briefly press the E:9 button. Say the desi red
command after the
Beep.
-Switching the voice re cognition system off :
press and hold the E:9 button . Or: say the com
mand
Cancel.
F or more i nfo rm at ion abou t the voice recognition
system, see ¢
page 170, Voice recognition sys
tem.
@ Right thumbwheel
You can adju st the vol ume of an a udio source or a
system mes sage (for ex ample, from t he voi ce
recognition system) when the soun d is pl aying .
-Increasing or decreas ing the volume : turn the
r ight thumbw heel up or dow n.
.,.
15
Page 53 of 400
a, a, ..... N
" N ..... 0 N > 00
Lights and Vision
Exterior Lighting
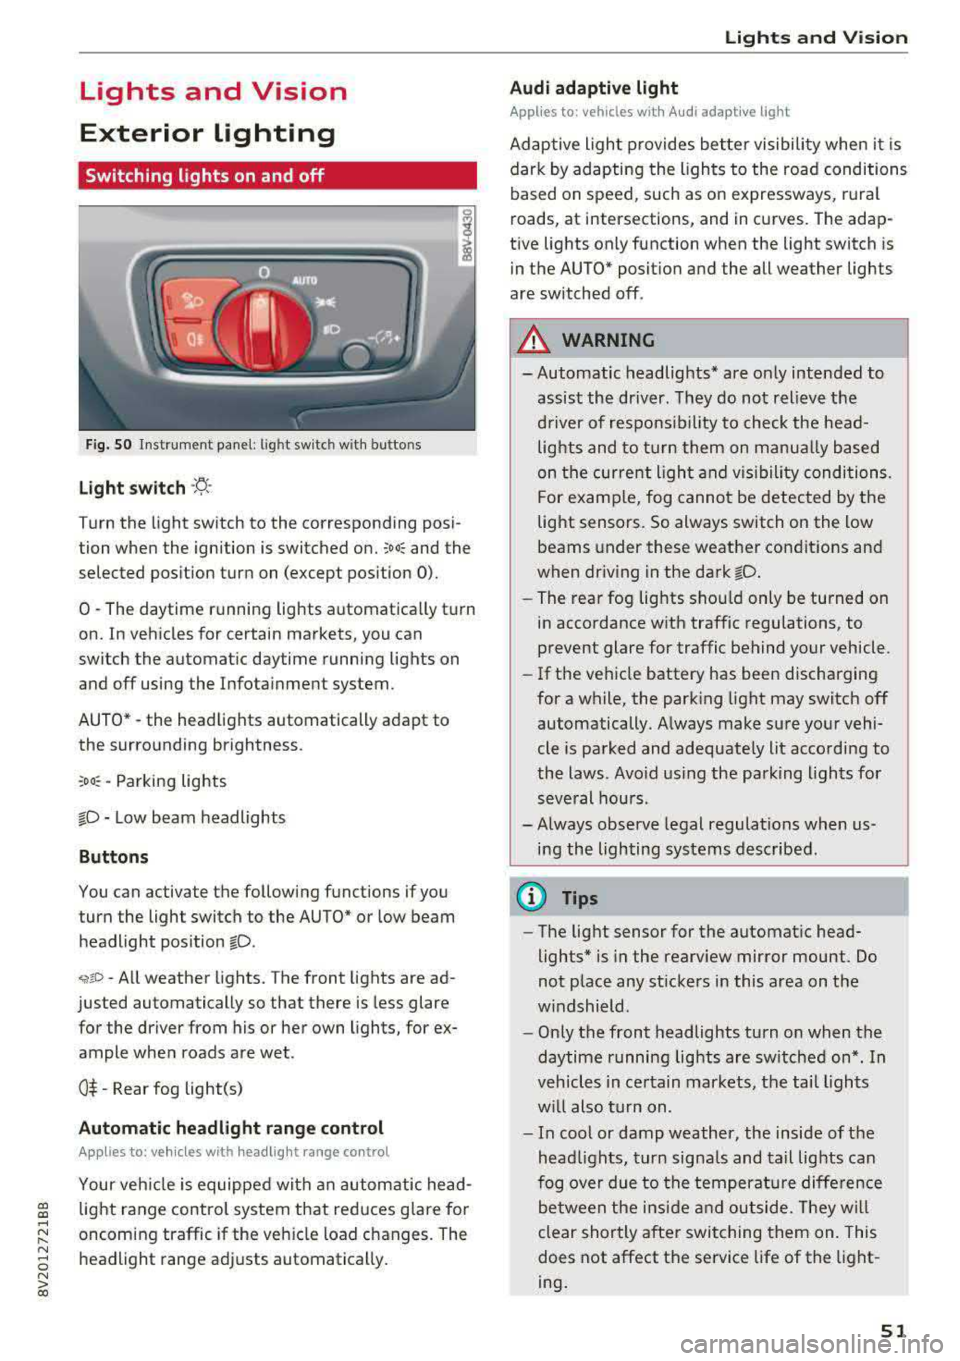
Switching lights on and off
Fig . 50 Instrument panel: l ig ht switc h w ith buttons
Light switch ·'t! ·
Turn the light sw itch to the corresponding posi
tion when the ignition is switched on.
;oo: and the
selected pos ition turn on (except pos ition 0).
0
-The daytime r unning lights automat ica lly t urn
on. In vehicles for certain markets, you can
switch the automatic daytime running lights on
and
off using the Infota inment system.
AUTO*
-the head lights automatically adapt to
the surro unding brightness.
:oo~ -Parking lights
fD -Low beam headlights
Button s
You can activate the following functions if you
turn the light switch to the AUTO* or low beam
headlight pos ition
fD .
~ro -All weather lights. The front lights are ad
justed automatically so that there is less glare
for the driver from his or her own lights, for ex
ample whe n roads are wet .
0$ -Rear fog light(s)
Automatic headlight range control
Applies to: vehicles with headlight range control
Your vehicle is equipped with an autom atic head
light range control system that red uces g lare for
oncoming traffic if the veh icle load changes. The
headlight range adj usts automatically .
Lights and V ision
Audi adaptive light
Appl ies to: veh icles w ith Audi adaptive light
Adaptive light provides bette r visibili ty when i t is
dark by adapting the ligh ts to the road condi tions
based on speed, such as on e xpressways, rura l
roads, at intersections, and in curves. The adap
t ive lights only function when the light switch is
in the AUTO* posit ion and the all weather lights
are switched off .
A WARNING
-
- Automatic headlights * are on ly intended to
assis t the dr iver. They do not relieve t he
d river of respons ibi lity to check the head
lights and to turn them on manua lly based
on the cur re nt ligh t and v isibility condition s.
For e xamp le, fog cannot be detected by the
light senso rs . So always switch on the low
beams under these weather con dit ions an d
when dr iv ing in the dark
fD.
- The rear fog lights sho uld only be turned on
in accordance wit h traffic regulations , to
prevent glare for traffic behind your vehicle.
- If the ve hicle battery has bee n discharging
for a wh ile, the park ing light may switch
off
automatically. A lways make su re your vehi
cle is parked and adequate ly lit acco rdi ng to
the laws . Avo id us ing the parking ligh ts for
seve ral hou rs .
- Always observe legal regulations when us
i n g the lighting systems described.
@ Tips
- The lig ht sensor for the automat ic head
lights* is in the rearview mirror mount. Do
not p lace any st ickers in this area on t he
w indshield .
- Only the front headlights turn on when the
daytime running lig hts are sw itched on *. In
veh icles in ce rtain markets, the tai l lights
w ill also tu rn on.
- In cool or damp weathe r, the inside of the
head lights, t urn sign als and tail lights can
fog ove r due to t he tempera ture diffe rence
b etween the ins ide an d ou tside. They wi ll
clear shortly a fter swi tching them on. This
does not affect the service life of the light
ing .
51
Page 73 of 400
Warm and cold
Automatic climate control system
App lies to: ve hicles with a utomat ic clima te contro l syste m
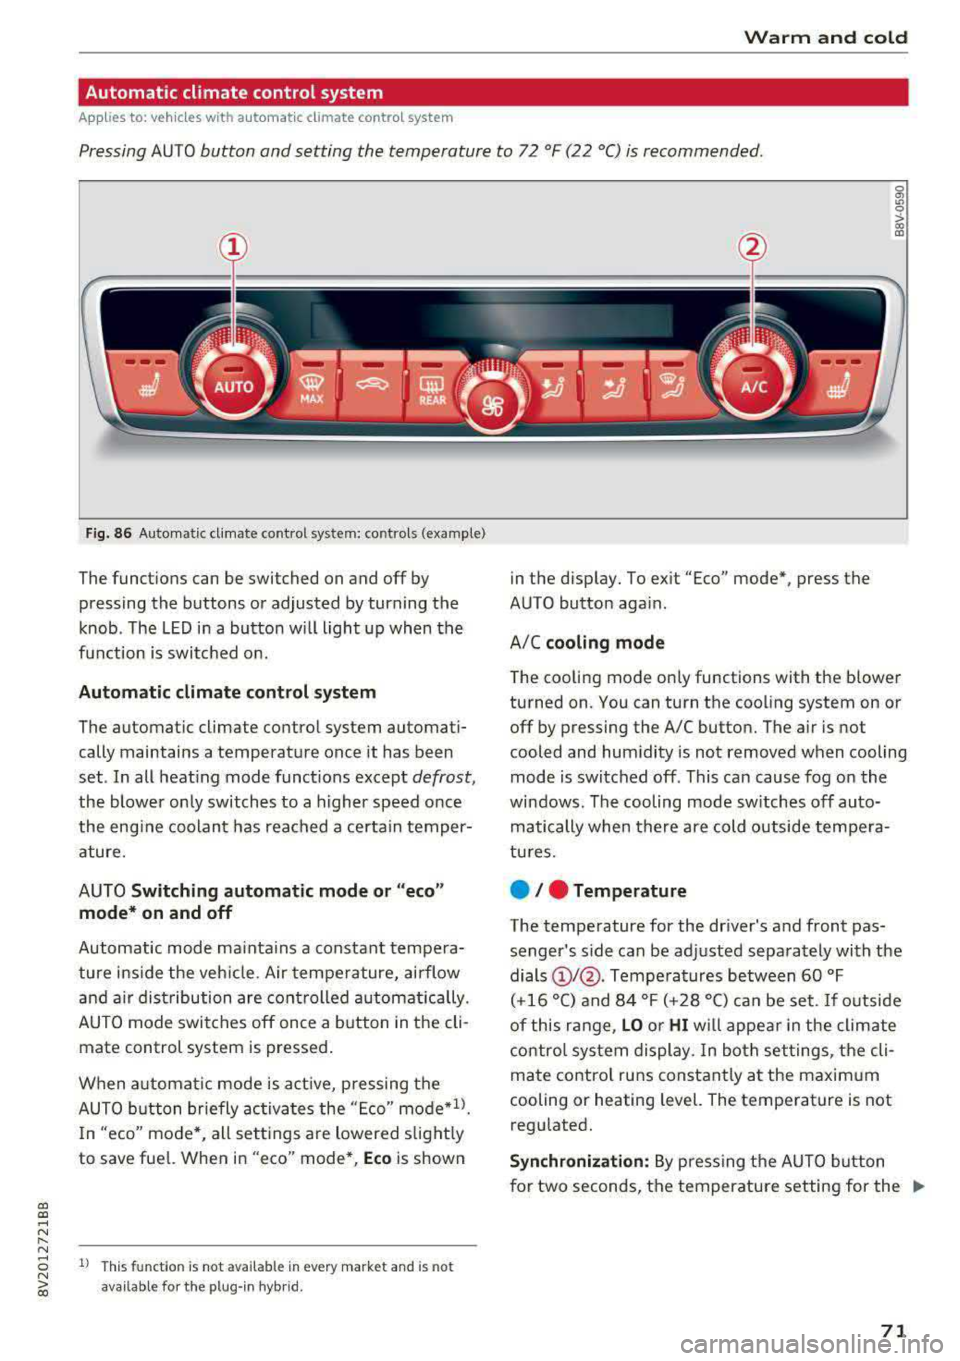
Pressing AUTO button and setting the temperature to 72 °F (22 °C) is recommended.
a, a, ..... N
" N
Fig. 86 Automatic cl imate con trol system: controls (exa mple)
The funct io ns can be switched on and off by
pressing the buttons or adjusted by turning the
k n ob. The LED i n a butto n w ill light up wh en the
f u nction is switched o n.
Automatic climate control system
The automat ic climate control system automati
cally maintains a temperatu re once it has been
set . In all heat ing mode funct ions e xcep t
defrost,
the blower on ly switches to a higher speed once
the eng ine coolan t has reached a cer ta in temper
ature.
AUTO
Switching automatic mode or "eco "
mode* on and off
Automatic mode ma inta ins a constant tempera
ture ins ide the veh icle. Air tempe rature, airflow
and a ir dist ribution are cont rolled automat ically.
AUTO mode switches off once a b utton in t he cli
mate control system is pressed .
When a utomat ic mode is a ct ive, pressing the
AUTO b utton briefly activa tes the "E co"
mode*ll.
In "eco" mode'<-, all sett ings are lowered slight ly
to save fue l. When in "eco" mode*,
Eco is shown
8 1l Thi s funct ion is not available in every market and is not N ~ availab le fo r the plug- in hyb rid.
in the disp lay. To ex it "Eco" mode*, press the
AUTO button aga in.
A/C
cooling mode
T he cooling mode on ly functions with the blower
turned on. You can turn the cooling system on or
off by pressing the A/C button. The air is not
cooled and humidity is not removed when cooling
mode is switched off. This can cause fog on the
windows . The cooling mode sw itches off auto
matically when there are cold outside tempera
tu res.
e / e Temperature
The temperature for the driver's and front pas
senger's side can be ad justed separately with the
dials
(D I@ . Tempe ra tures between 60 °F
(+16 °() and 84 °F (+ 28 °() ca n be set. If o utside
of this range,
LO o r HI w ill appe ar in the climate
contro l system display. In bot h set tings, the cli
mate contro l runs constant ly a t the maxim um
cooling or heating level. The temperature is not
regu lated.
Synchronization: By pressing t he AUTO b utton
for two seconds, the temperature setting for the
.,..
71
Page 101 of 400
a, a, .... N
" N .... 0 N > 00
If the i ndicator lig ht t urns on and th is message
ap pears, there may be an en gine contro l ma l
function.
The ~* indicator light in t he instr u
ment cluster also turns on. The engine output is
reduced. Drive to an author ized Audi dealer or
author ized Audi Se rvice Facility immed iate ly to
h ave the ma lf u nct ion co rrected .
Ill e-tron mode: EV currently unavailable
This message appears when the 141 button is
p ressed and the cond itions for elect ric drive
mode a re not met .
@vehicle sound: malfunction! Pedestrians
cannot hear vehicle. Please contact Service
The vehicle sou nd is no longe r fu nct io nin g. Drive
ex tremely c are fully, sin ce o thers m ay no t hea r
your ve hicle. Dr ive to an au th orized Audi de aler
or author ized Audi Se rvice Facility immed iate ly to
have the ma lf u nction co rrecte d.
Range display
Applies to: vehicles with plug-in hybrid drive
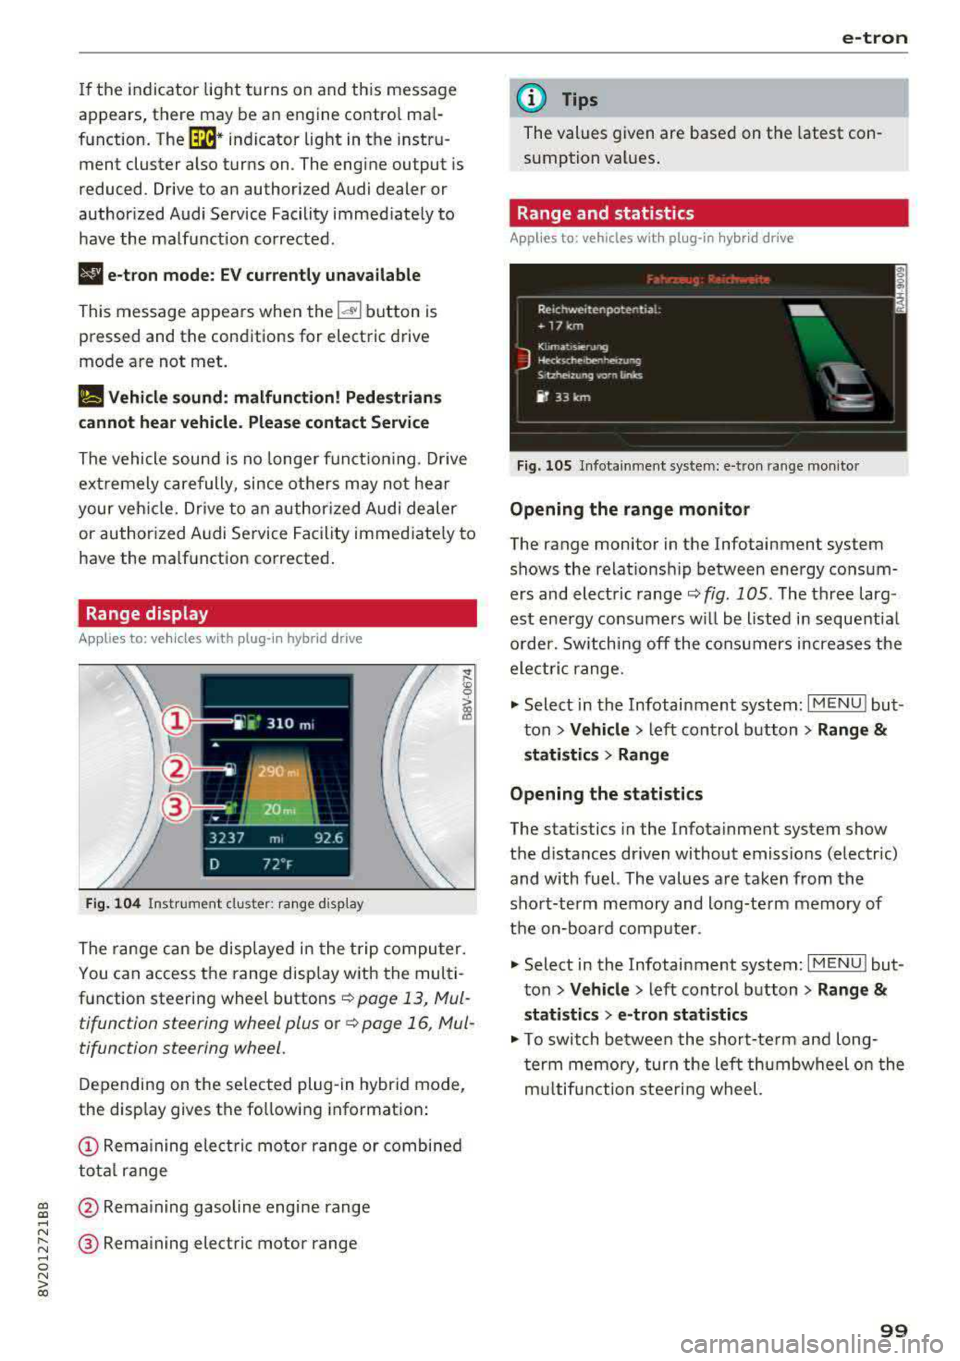
Fig. 104 Inst rument cl uster: ra nge d is p lay
The range c an be displ aye d in t he t rip co mputer.
You can access the range disp lay with the mul ti
function steering wheel buttons
r::!') page 13, Mul
tifunction steering wheel plus o r
r::!') page 16, Mul
tifunction steering wheel.
D epen ding on t he se lected plug -in hybrid mode,
the display gives t he fo llowing informat ion:
(D Re mai ning ele ctric mo tor range or combined
to tal range
@ Rema ining gasol ine engine rang e
® Remaining electric motor range
e-tron
(D Tips
The values given are base d on the latest con
sumption val ues .
Range and statistics
Applies to: vehicles with plug-in hybrid drive
Fig. 105 In fotainme nt system: e-tro n range mo nito r
Opening the range monitor
The range monitor in the Infotainment system
s h ows the relat ions hip between ene rgy co nsu m
ers and elect ric ranger::!')
fig. 105 . The three larg
est ene rgy cons umers w ill be listed i n se que ntial
o rder. Sw itching off the co nsu mers increases the
ele ctri c range .
.,. Select i n the Infotainment system: I MENU ! but
t on
> Vehicle > left con trol button > Range &
statistics > Range
Opening the statistics
The stat istics in the Infota inment system show
t h e d istances dr iven without emiss ions (electric)
and with fuel. The values a re ta ken from the
sho rt-term memory and long-te rm memory of
t h e on-bo ard com puter.
.,. Select in the Infotainment system: I MENU! but
t on
> Vehicle > left control b utton > Range &
statistics > e-tron statistics
.,. To switch be twee n the short-te rm an d long
t er m memo ry, tur n the left th umbwheel o n the
m ultifun ction steeri ng wheel.
99
Page 113 of 400
a, a, ..... N
" N ..... 0 N > 00
Removing the charging syst em from the
charging clip
• Remove the power cable connector from the
socket @.
• Unwind the cable from the charging connector
mount (D.
• To loosen the control unit from the bracket,
push the lock ing mechan ism @ upward
9fig. 119.
Transport ing
App lies to: veh icles with plug-in hybrid drive
Fig. 1 20 Storage bag
• Store the charg ing system and the special
charg ing cable* in the bag befo re transport ing .
• Secure the bag using the tie-downs ¢ page 66.
The flat hook must be secured to the left side
of the tie-downs.
_& WARNING
- If the vehicle charging cab le is not secured
or pos itioned correct ly, it can slide out of
place and endanger vehicle occupants when
brak ing, when changing directions, or in an
acc ident.
- Never transport the Audi e-tron charging system or the special charg ing cable" unse
cured.
- Store the Audi e-tron charging system or the spec ial charging cable* in the storage
bag in the luggage compartment.
- Always transport the storage bag in the lug
gage compartment and never i n the passen
ger compartment (for example the seats or
in front of them) .
e-tron
Charging overview
Applies to: vehicles with pl ug-in hybrid drive
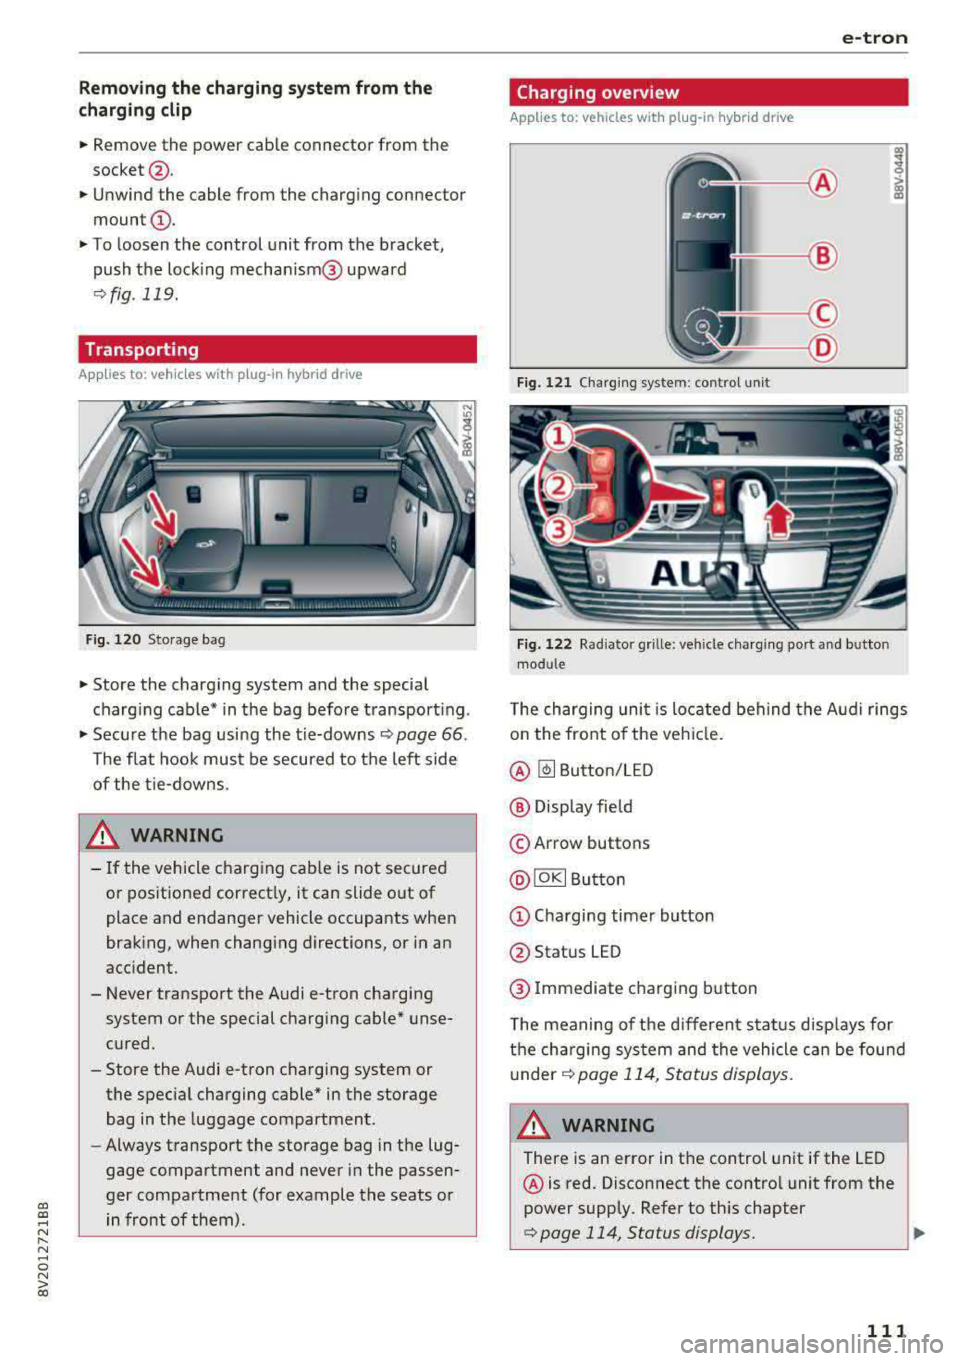
Fig. 121 Charging system : control unit
Fi g. 122 Rad iator grille: veh icle charg ing port and bu tton
module
T he charging uni t is located behind the Audi rings
o n the front of the vehicle .
@ ~ Button/LED
@ Display field
© Arrow buttons
@IOKI Butto n
(D Chargi ng timer button
@ Status LED
@ Immediate charging button
T he meaning of the d ifferent status displays for
the cha rging sys tem and the vehicle can be found
u nder
9 page 114, S tatus displays.
A WARNING
There is an error in the control unit if the LED
@ is red. Disconnect the contro l unit from the
power supply. Refer to th is chapter
¢page 114, Status displays. ..,
111
Page 119 of 400
CXl CXl .... N r--N .... 0 N > 00
unavailable because of this. Contact an au
thorized Audi dealer or authorized Audi
Service Fac ility for more in format ion .
- Charg ing may take longe r when tempera
tures a re extremely high or low .
- The char ging t ime at pu blic char ging sta
tions may vary from the times given in the
ta ble
¢ table on page 116 .
Audi e-tron charging system PIN
Applies to: ve hicles with p lug- in hybrid drive
The contro l unit can be locked by entering a 4-
d igit PIN of yo ur cho ice. If a PIN is activated, the
selected PIN must be ente red before every use .
We recommend locking yo ur contro l unit to pro
tect it against unautho riz ed access by a third pa r
ty .
Activating the PIN
~ Press t he IOK I@ ¢ page 111, fig . 121 bu tton
on the cont ro l unit.
POWER and SET PIN ap
pear in the display field .
~ Select SET PIN using t he arrow button ©-
~ Press the IOKI b utton @. ENTER PIN appears i n
t h e d isplay field .
~ Select t he des ired value by pressing the arrow
bu ttons © up or dow n.
~ U se the right ar row bu tto n© to go t o th e nex t
digi t.
~ Press t he left ar row bu tto n © to go to the pre -
vio us menu.
~ Ente r all of the d igits .
~ Press t he IOKI b utton @after the last d igit .
~ REPEAT PIN appears in the display field .
~ Enter the PIN again using the arrow buttons
© -
~ Press t he IOKI button @.
~ PIN OK appears in t he di sp lay fie ld if bo th en-
t ries ma tch.
~ Th e P IN is now a ct ivate d.
Deactivating the PIN
Requ irement: The control unit mus t be un locked .
~ Enter the numer ica l code 0000 . Proceed as if
you were act ivat ing the
PIN¢ page 117 .
~ The PIN is deact ivated .
e-tron
Locking the control unit
Requiremen t: T he PIN m ust be activated.
~ Press t he~ button @¢ page 111, fig . 121 o n
t he co ntrol unit.
Unlocking the control unit
Requirement: The PIN m ust be act ivated.
~ Press any button on the contro l unit .
~ PIN? appears in the display field.
~ Enter the P IN .
~ Press the I OK I button @.
(D Tips
-The PIN is deactivated in the factory defa ult
sett ings.
- If you do not remember yo ur PIN, contact
an authorized A udi dealer or autho rized
Audi Service Facility.
- If the first PIN entry differs from the second
entry, the first PIN entry is d isplayed .
- If nothin g is entered within
20 seconds of
this , the set va lue is not changed.
Indicator Lights and
messages
Applies to : vehicles with plug-in hybr id drive
If the . indicator light tu rns o n, the high -volt
age ba tte ry is charging or is already completely
c h arged .
If
the . indicator light stays on, the re is a ma l
funct ion in the charg ing system. Have t he p rob
l em corrected immediately by an a uthor ized Audi
d eal er or authori zed A udi Se rvice Fa cility.
!I Charging connector still attached . Driving
not possible
This message appears w hen the charging system
is still connected to the vehicle. Remove the con
nector
c:> page 114, After charging.
Applies to: vehicles with A udi v irtual cockpit : ii
Incompatible charging system. Please check
charging system
Applies to: vehicles wi th analog instr ument clus -
te r:
ii AC charging: currently not possible IJ,-
117
Page 131 of 400
a, a, ..... N
" N ..... 0 N > 00
The stored speed in the LED line is erased.
@ Indicator lights
It -Adaptive cruise control is switched on. No
vehicles are detected ahead. The stored speed is
maintained .
B-A vehicle driving ahead was detected. The
adaptive cruise control system regulates the
speed and distance to the vehicle ahead and
brakes/accelerates automatically.
r51 -Adaptive cruise control is switched on. Ave
hicle was detected ahead. Your vehicle remains
stopped and will not start driv ing automat ically.
•-The automatic braking is not enough to
maintain a sufficient distance to a veh icle driving
ahead. You must intervene
c::> page 132, Driver
intervention request.
@ Instrument cluster display
I f adaptive cruise control is not shown in the in
strument cluster display, yo u can call it up using
the mu ltifunction steering wheel buttons
c::> page 13.
Based on the g raphics in the disp lay, you can de
termine if the system is maintaining a distance to
a vehicle ahead and what that distance to th is ve
hicle is:
No vehicle -no vehicle was detected driving
ahead.
Silver vehicle -a veh icle was detec ted dr iv in g
ahead .
Red vehicle -request for driver intervention
<=:>page 132 .
The five distance bars on the gauge © represent
the set d istance (refer to
c::> page 131 for infor
mat ion on how to change the distance) .
If you
fal l below the selected distance, the distance
bars become red from the bottom upward.
A WARNING
If you press the !SETI button when driving at
speeds below 20 mph (30 km/h), the vehicle
accelerates automatically up to 20 mph (30
Assistance systems
km/h), which is the minimum speed that can
be set.
(D Tips
-If you switch the ignition or the adaptive
cruise control system off, the set speed is
erased for safety reasons .
-The e lectronic stabilization control (ESC)
and the anti-slip -regulation (ASR) are auto
matically switched on when the adaptive
cruise control is switched on.
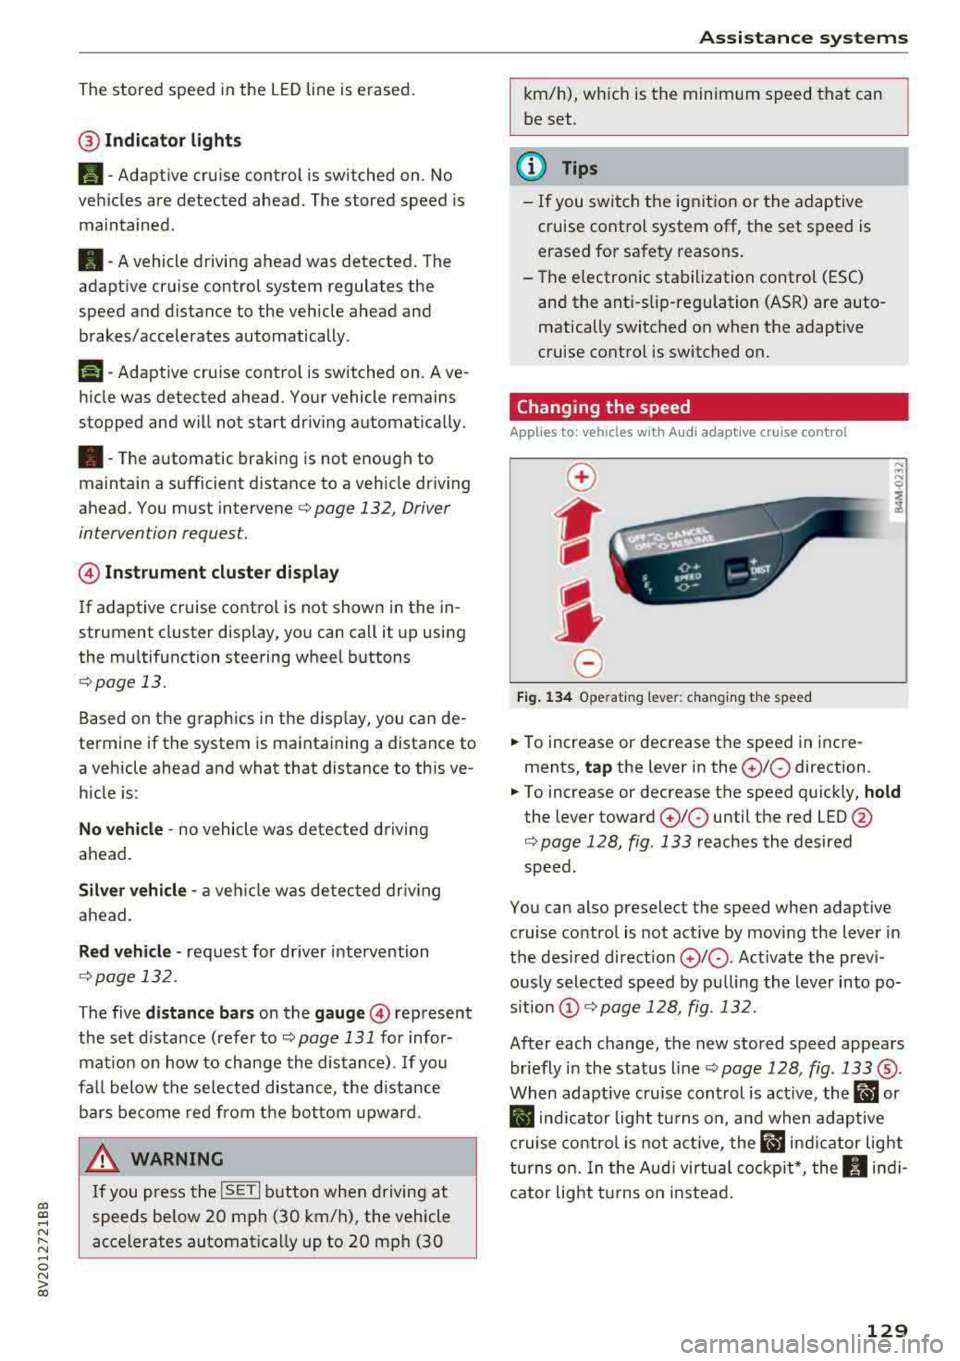
Changing the speed
Applies to: vehicles with Audi adaptive cruise control
0
f
J
0
Fig. 134 Operat ing lever: changing the speed
.. To increase or decrease the speed in incre
ments,
tap the lever in the 0 10 direction .
.. To increase or decrease the speed quickly, hold
the lever toward 010 until the red LED @
c::> page 128, fig. 133 reaches the desired
speed.
You can also preselect the speed when adaptive cruise control is not active by moving the lever in
the desired direction
0 10 . Act ivate the previ
ously selected speed by pulling the lever into po
s ition
@ c::> page 128, fig . 132.
After each change, the new stored speed appears
briefly in the status line
c::> page 128, fig. 133 ®·
When adaptive cru ise control is active, the ill or
• indicator light turns on, and when adaptive
cruise control is not active, the
ill ind icator light
turns on. In the Audi virtual cockpit*, the
II indi
cator light t urns on instead.
129