seat adjustment AUDI A3 SEDAN 2017 Owners Manual
[x] Cancel search | Manufacturer: AUDI, Model Year: 2017, Model line: A3 SEDAN, Model: AUDI A3 SEDAN 2017Pages: 400, PDF Size: 67.32 MB
Page 63 of 400
a, a, ..... N
" N ..... 0 N > 00
Seats and storage
General information
A WARNING
Refer to the chapter Driving Safely
~ page 247, Driving safety for important in
formation, tips, suggestions and warnings
that you should read and follow for your own
safety and the safety of your passengers.
Front seats
Manual seat adjustment
Applies to vehicles with manual adjustable seats
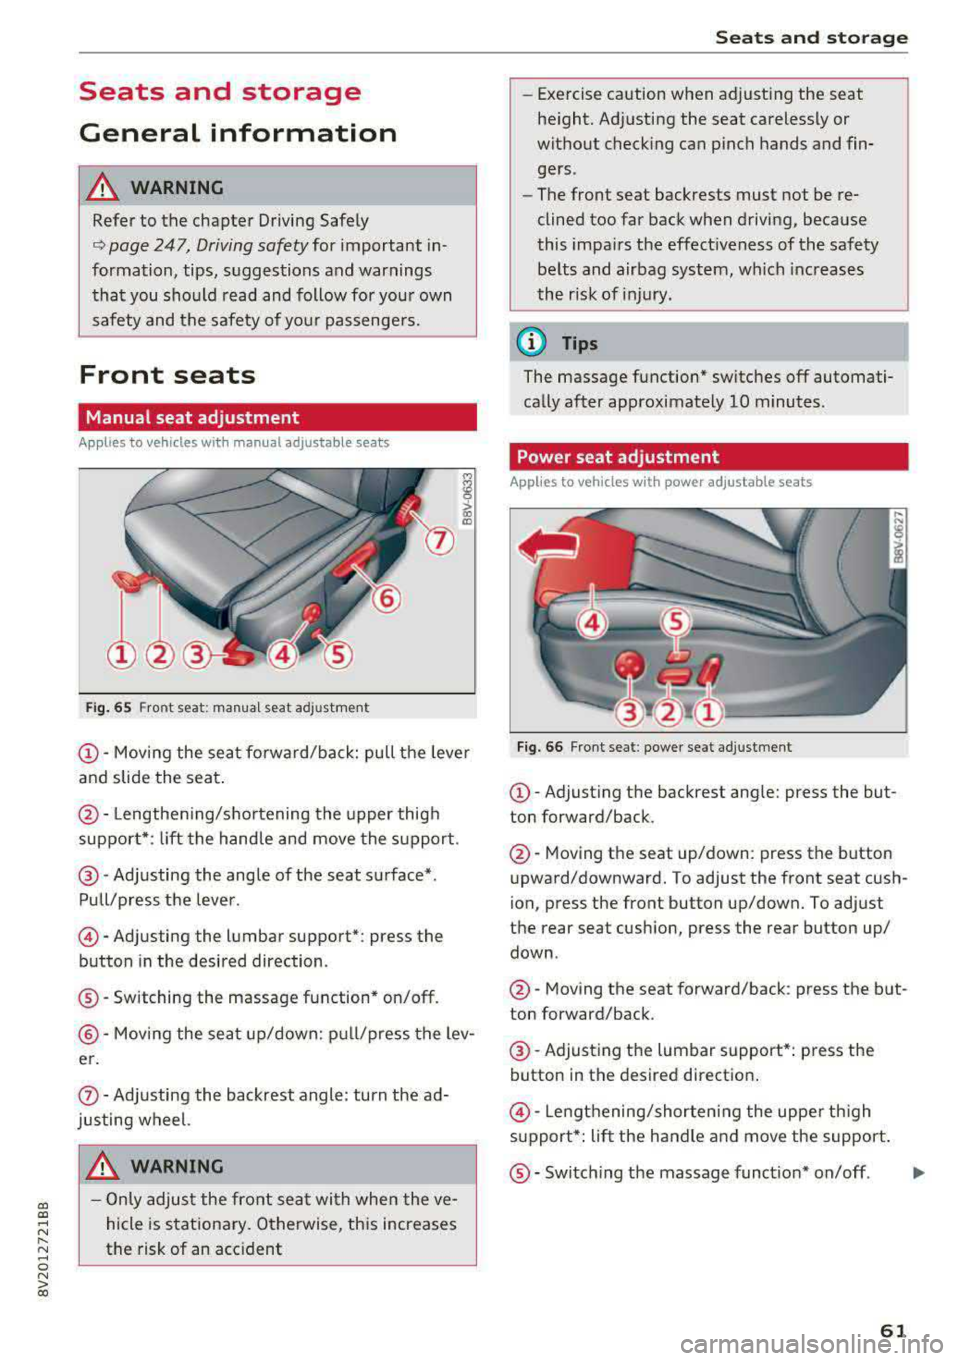
Fig. 65 Fro nt seat: manual seat adj ustment
@ -Moving the seat forward/back: pu ll the lever
and slide the seat .
@-Lengthening/shortening the upper thigh
support* : lift the handle and move the support.
@-Adjusting the angle of the seat surface*.
Pull/press the lever .
@-Adjusting the lumbar support* : press the
button in the desired direction .
®-Switching the massage function* on/off.
@ -Moving the seat up/down: pull/press the lev
er.
0 -Adjusting the backrest angle : turn the ad
justing wheel.
A WARNING
- Only adjust the front seat with when the ve
hicle is stationary. Otherwise, this increases
the risk of an accident
Seats and storage
-Exercise caution when adjusting the seat
height. Adjusting the seat carelessly or
without checking can pinch hands and fin
gers .
- The front seat backrests must not be re
clined too far back when driving, because
this impairs the effectiveness of the safety
belts and airbag system, which increases
the risk of injury.
(D Tips
The massage function* switches off automati
cally after approximately 10 minutes.
Power seat adjustment
Applies to vehicles w ith power adjustab le seats
Fig. 66 Front seat : power seat adj ustment
@ -Adjusting the backrest angle: press the but
ton forward/back .
@-Moving the seat up/down: press the button
upward/downward. To adjust the front seat cush
ion, press the front button up/down. To adjust
the rear seat cushion, press the rear button up/
down .
@-Moving the seat forward/back : press the but
ton forward/back .
@-Adjusting the lumbar support*: press the
button in the desired direction .
@-Lengthening/shortening the upper thigh
support*: lift the handle and move the support.
®-Switching the massage function* on/off .
61
...
Page 64 of 400
Sea ts and stor age
_& WARNING
- Only adjust the front seat with when the ve
hicle is stat ionary . Otherwise, this increases
the risk of an acc ident
- The power adjustment for the front seats al
so works with the ignition switched off or
with the ignition key removed . For this rea
so n, children should never be left unattend
ed in the veh icle
-they co uld be inj ured!
- Exercise caution when adjusting the seat
height. Uns upervised or careless seat ad
justment can p inch fingers or hands causing
injur ies .
- T he front seat backrests m ust not be re
cl ined too far back when driving, because
this impairs the effectiveness of the safety
belts and airbag system, which increases
the risk of injury .
(Di Tips
The massage function* switches off a utomat i
cally after approximately 10 mi nutes.
Entry assistance
Applies to: vehicles with entry ass istance
E asy seat entry makes it easier to get into the
back seats .
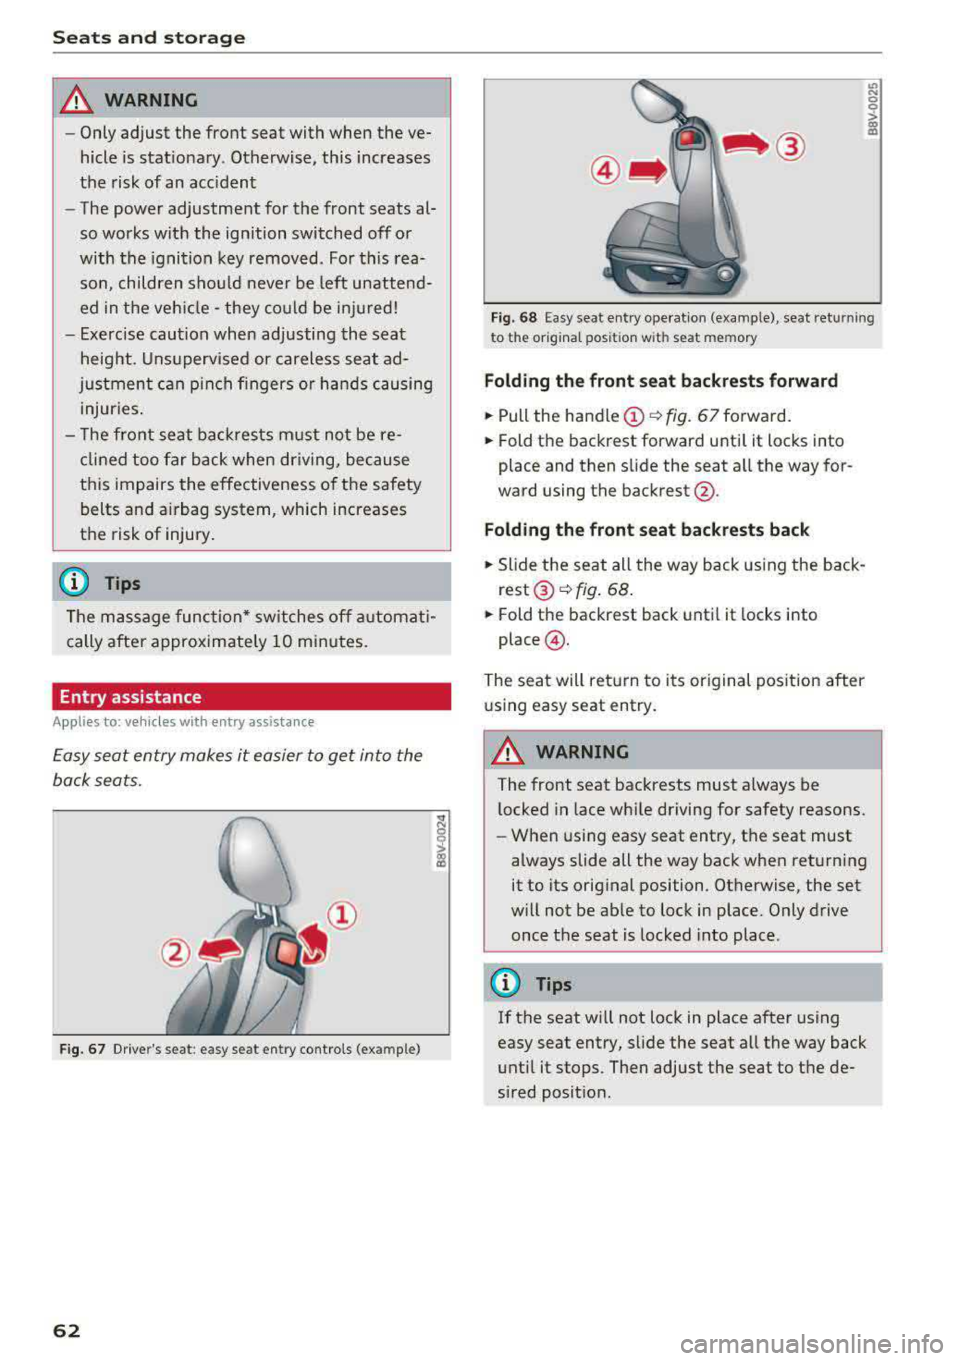
Fig. 67 Dr ive r's seat : easy se at ent ry controls (ex ample )
62
'° ::: 0 ::l-a) 113
F ig. 6 8 Easy sea t en try ope rat io n (examp le) , seat ret urnin g
t o t he origina l pos ition w it h se at mem ory
Fold ing th e front seat backrests forward
.,. Pull the handle (!)¢ fig. 67 forward.
.,. Fold the backrest forward unti l it locks into
place and then slide the seat a ll the way for
ward using the backrest @.
Fold ing the front seat back rests back
.,. Slide the seat all the way back using the back
rest ®~ fig. 68 .
.,. Fold the backrest back until it locks into
place @.
The seat will ret urn to its original posit ion after
u sing easy seat entry.
A WARNING
-The front seat backrests must a lways be
l ocked in lace wh ile driving for safety reasons.
- When using easy seat entry, t he seat must
always slide all the way back when returning
it to its orig inal position . Otherwise, the set
w ill not be ab le to lock in place. Only drive
once the seat is locked into place .
(D Tips
If the seat w ill not lock in place after using
easy seat entry, slide the seat all the way back
unt il it stops. Then adjust the seat to the de
sired posit ion.
Page 65 of 400
a, a, ..... N
" N ..... 0 N > 00
Front center armrest
Applies to vehicles with a front center armrest
There is a storage compartment under the arm
rest.
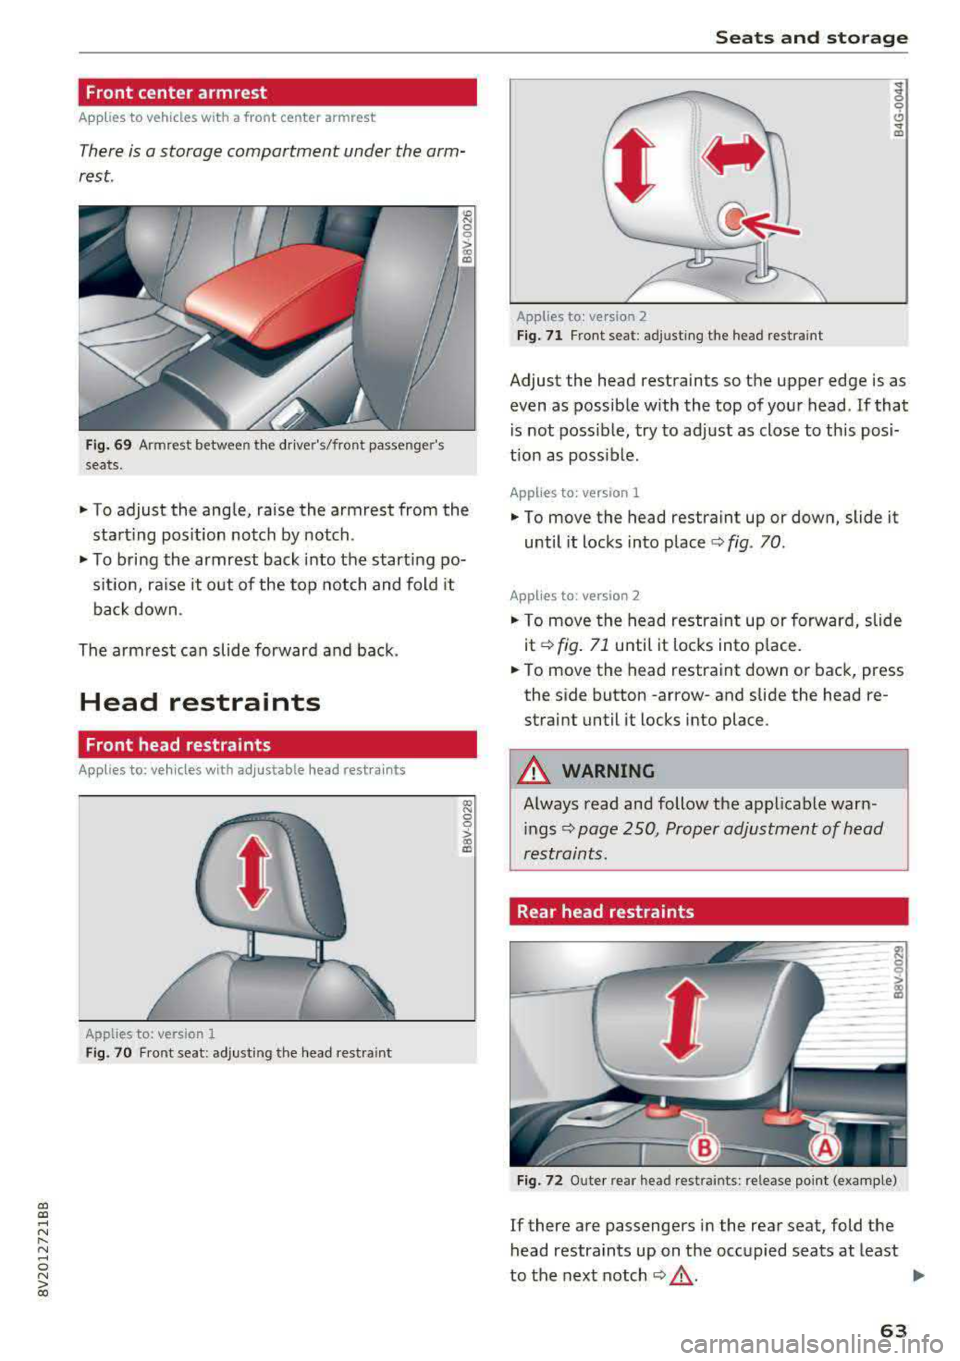
Fi g. 69 Armrest between the driver's/front passenge r's
seats.
.. To adjust the angle, raise the armrest from the
start ing pos ition notch by notch.
.. To bring the armrest back into the starting po
s it ion, ra ise it out of the top notch and fold it
back down .
The armrest can slide forward and back.
Head restraints
Front head restraints
Applies to: ve hicles with ad justable head rest ra in ts
Applies to: version 1
Fig. 70 Fr ont seat: adjusting the head restraint
Seats and storag e
Applies to: vers ion 2
F ig . 71 Front seat: adjusting the head restra int
Adjust the head restraints so the upper edge is as
even as possible with the top of you r head . If that
is not possible, try to adjust as close to th is posi
t ion as poss ible .
Applies to: version 1
.. To move the head restraint up or down, slide it
until it locks into place
c:> fig. 70 .
Applies to : version 2
.. To move the head restraint up or forward, slide
it
c:>fig . 71 until it locks into p lace.
.. To move the head restraint down or back, press
the side button
-arrow-and slide the head re
straint until it locks into place.
_& WARNING
-A lways read and follow the applicable warn-
i ngs
c:> page 250, Proper adjustment of head
restraints.
Rear head restraints
F ig . 72 O ute r rear head rest rain ts: release point (exam ple)
If there are passengers in the rear seat, fold the
head restraints up on the occupied seats at least
-
to the next notch c:> _& . Iii-
63
Page 66 of 400
Sea ts and stor age
Mov ing the head rest raints
.. T o move the head res traint up, ho ld it at the
sides with both hands and slide it upward unt il
you fee l it click into place .
.. To move the head restraint down, press the
button @¢ fig. 72 and slide the head restra int
downward.
R emov ing th e head rest raints
To remove the head restraints, the backrest must
be folded forward partially .
.. Remove the screwd river from the vehicle tool
k it
¢page 353 .
.. Release the backrest ¢ page 67 .
.. Press the button @ c::> fig. 72 and slide the head
restra int up as far as it can go .
.. Place the screwdriver in position @ in the
opening, press the button @ and pull the head
restra int out of the backrest at the same time
¢ &_ .
• Fold the backrest down until it latches secure ly
¢ &_ in Increasing the cargo area on
page
67.
Installing the head restraints
To install the head restraints, the backrest must
be folded forward partially .
.. Release the backrest c::> page 67.
.. Slide the posts on the head restraint down into
the gu ides unti l the posts click into place . You
should not be able to pull the head restra int
out of the backrest .
• Fold the backrest down un til it latches secure ly
¢ &_ in Increasing the cargo area on
page
67 .
_& WARNING
-Always read and fo llow the applicable warn
ings
c::> page 2 50, Proper adjustment of
head restraints.
- Only remove the rear seat head restraints
when necessary in order to install a child
safety seat
c::> page 292, Child safety. In
sta ll the head restra int aga in immediately
once the child safety seat is removed. Dr iv
ing with the head restra ints removed o r not
64
in the upright position increases the risk of
serio us injury .
Sockets
Applies to: vehicles with socket
-,:~
I '
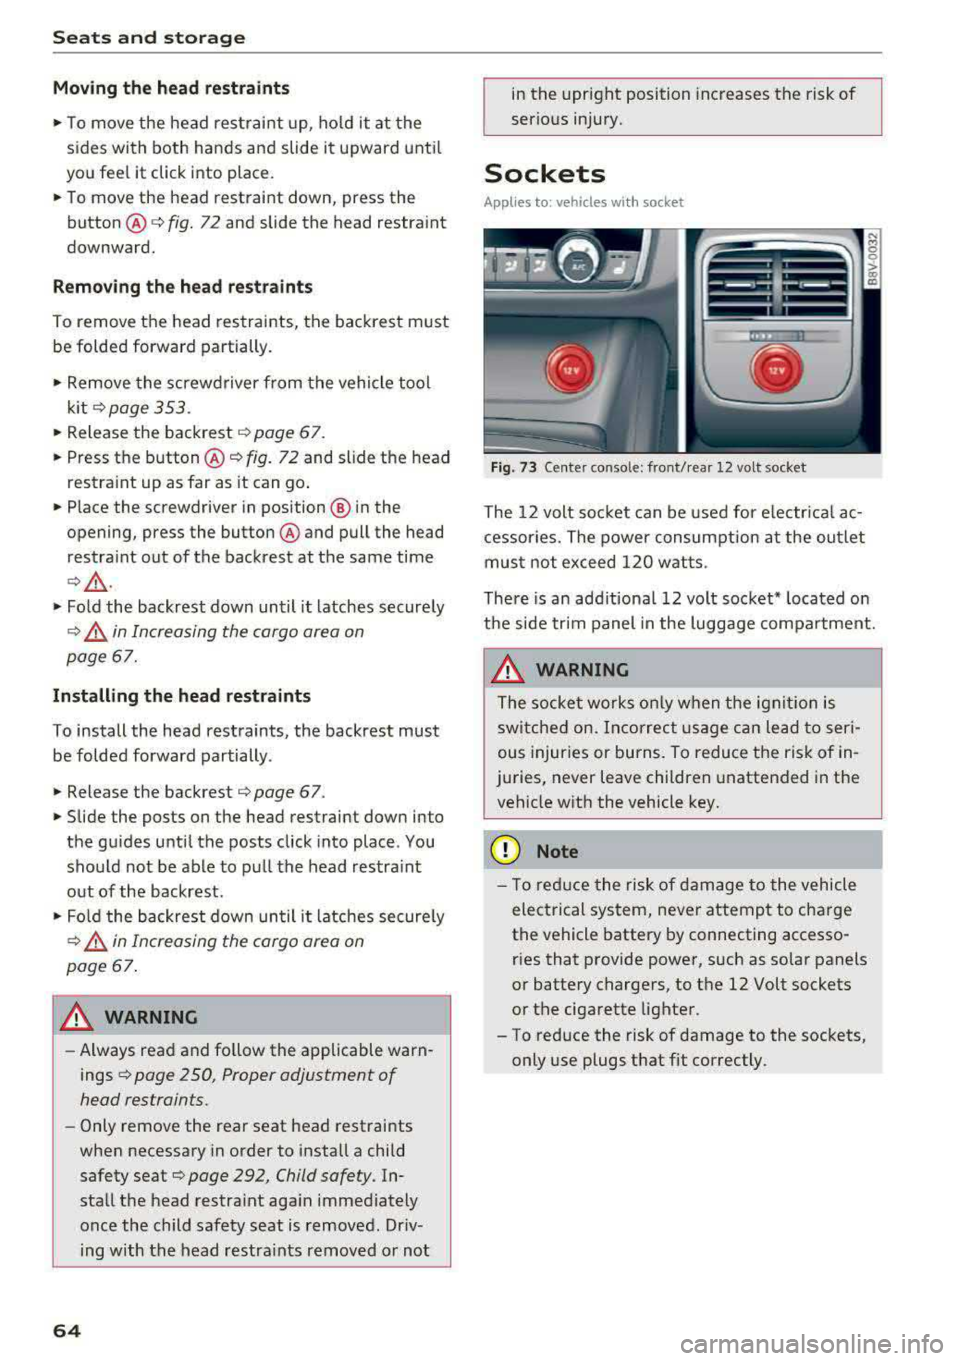
Fig. 73 Center console: front/rea r 12 volt socket
The 12 volt soc ket can be used for e lectr ica l ac
cessor ies. The power consum ption at the out let
mus t not exceed 120 w atts.
There is an add itiona l 12 volt socket * located on
the side trim panel in the luggage compa rtment.
_& WARNING
T he socke t works only w hen t he igni tion is
switche d on. Incorrec t usage c an lead to seri
ous injur ies or burns. To reduce the ri sk of in
juries, never leave children unattended in the vehicle wit h the vehicle key .
{[) Note
-
- T o red uce the risk of dam age to t he vehicle
electrical system, never attemp t to cha rge
the vehicle battery by connecting accesso ries that p rovide power, such as solar panels
or battery chargers, to the 12 Volt sockets
o r the ciga rette lighter.
- To reduce the risk of damage to the sockets, only use plugs t hat fit correctly.
Page 78 of 400
Driving
other damage to the vehicle or other property .
-Have your vehicle maintained properly and
in accordance with the service recommenda
tions in your Warranty
& Maintenance book
let . Lack of proper maintenance as well as
improper use of the vehicle will impair the
function of the emission control system and
could lead to damage.
- Do not alter or remove any component of
the Emission Control System unless ap
proved by the manufacturer .
- Do not alter or remove any device, such as
heat shields, switches, ignition wires,
valves, which are designed to protect your
vehicle's Emission Control System and other
important vehicle components.
(I) Tips
The consumption estimates as published by
ENVIRONMENTAL PROTECTION AGENCY
(EPA) and Transport Canada may not corre
spond to your actual consumption on the
road, which will vary depending upon vehicle
load and speed, road and weather conditions,
trip length, etc .
Steering
Adjusting the steering wheel position
The steering wheel position is fully adjustable up
and down and forward and back .
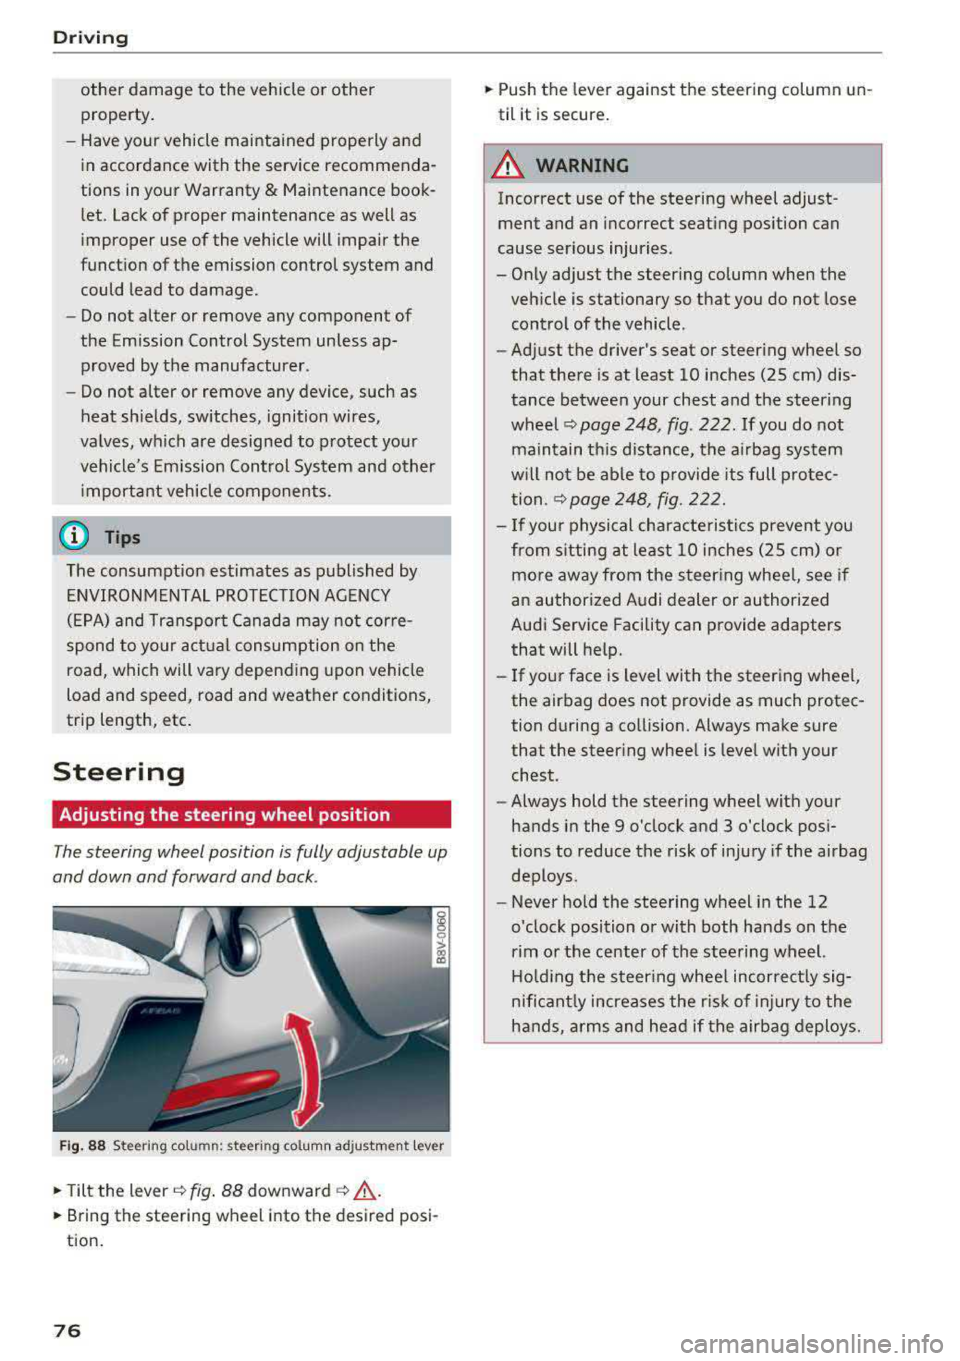
Fig. 88 Steering column: steering col umn adjustment lever
.,. Tilt the lever c:::;, fig. 88 downward c:::;, ,& .
.,. Bring the steering wheel into the desired posi
tion.
76
.,. Push the lever against the steering column un
til it is secure.
A WARNING
Incorrect use of the steering wheel adjust ment and an incorrect seating position can
cause serious injuries.
- Only adjust the steering column when the
vehicle is stationary so that you do not lose control of the vehicle .
-
-Adjust the driver's seat or steering wheel so
that there is at least 10 inches (25 cm) dis
tance between your chest and the steering
wheel
c:::;, page 248, fig. 222 . If you do not
maintain this distance, the airbag system
will not be able to provide its full protec
tion .
c:::;,page248, fig. 222.
- If your physical characte ristics prevent you
from s itting at least 10 inches (25 cm) or
more away from the steering whee l, see if
an authorized Audi dealer or authorized
Audi Service Facility can provide adapters
that will help.
- If your face is level with the steering whee l,
the airbag does not provide as much protec
tion during a collision. Always make sure
that the steer ing wheel is level with your
chest.
- Always hold the steering wheel with your
hands in the 9 o'clock and 3 o'clock posi
tions to reduce the risk of injury if the airbag
deploys.
- Never hold the steering wheel in the 12
o'clock position or with both hands on the
rim or the center of the steering wheel.
Holding the steer ing wheel incorrect ly sig
nificant ly increases the r isk of injury to the
hands, arms and head if the airbag deploys.
Page 249 of 400
CXl CXl .... N ,.__
N .... 0 N > 00
Driving safety
Basics
Safe driving habits
Please remember -safety first!
This chapter contains important information,
tips, instructions and warnings that you need to
read and observe for your own safety, the safety
of your passengers and others . We have summar
ized here what you need to know about safety
belts, airbags, child restraints as well as child
safety. Your safety is for us
priority number 1. Al
ways observe the information and warnings in
this section - for your own safety as well as that
of your passengers.
The information in this section applies to all
model versions of your vehicle. Some of the fea
tures descr ibed in this sections may be standard
equipment on some models, or may be optional
equipment on others. If you are not sure, ask
your authorized Audi dealer.
A WARNING
- Always make sure that you follow the in
structions and heed the WARNINGS in this
Manual. It is in your interest and in the in
terest of your passengers .
-
-Always keep the complete Owner's Litera
ture in your Audi when you lend or sell your
vehicle so that this important information
will always be available to the driver and
passengers.
- Always keep the Owner's literature handy so
that you can find it easily if you have ques
tions.
Safety equipment
The safety features are part of the occupant re
straint system and work together to help reduce the risk of injury in a wide variety of accident sit
uations.
Your safety and the safety of your passengers
should not be left to chance. Advances in tech
nology have made a var iety of features available
to help reduce the risk of injury in an accident.
Driving safety
The following is a list of just a few of the safety
features in your Audi:
- sophisticated safety belts for driver and all pas
senger seat ing pos itions,
- safety belt pretensioners,
- safety belt height adjustment systems for the
front seats*,
- front airbags,
- knee airbags for the front seats*
- side airbags in the front seats and outer rear seats*,
- side curtain airbags with ejection mitigation features*,
- special LATCH anchorages for child restraints,
- head restraints for each seating position,
- adjustable steering column.
- pre sense* (preventat ive passenger protection)
These individual safety features, can work to gether as a system to help protect you and your
passengers in a wide range of accidents . These
features cannot work as a system if they are not
always correctly adjusted and correctly used.
Safety is everybody's responsibility!
Important things to do before driving
Safety is everybody 's job! Vehicle and occupant
safety always depends on the informed and care
ful driver .
For your safety and the safety of your passen
gers,
before driving always:
.,. Make sure that all lights and signals are operat
ing correctly .
.,. Make sure that the tire pressure is correct.
.,. Make sure that all windows are clean and afford
good visibility to the outside .
.,. Secure all luggage and other items carefully
¢ page 66, ¢ page 65.
.,. Make sure that nothing can interfere with the
pedals.
.,. Adjust front seat, head restraint and mirrors correctly for your height .
.,. Instruct passengers to adjust the head re
straints according to their height .
247
Page 252 of 400
Driving safety
-Passengers who are unbelted , out of posi
tion or too close to the airbag can be seri
ously injured by an airbag as it unfolds with
great force in the blink of an eye .
-Always make sure that there are at least
10 inches (25 cm) between the front pas
senger 's breastbone and the instrument
panel.
-Always make sure that there are at least
4 inches (10 cm) between the front passen ger's knees and the lower part of the instru
ment panel.
-Each passenger must always sit on a seat of
their own and properly fasten and wear the
safety belt belonging to that seat.
-Before dr iving, always adjust the front pas
senger seat properly .
-For adjustable head restraints: before driv
ing, always also adjust the head restraints
properly .
- Always keep your feet on the floor in front
of the seat. Never rest them on the seat, in
strument pane l, out of the window, etc. The
airbag system and safety be lt will not be
able to protect you properly and can even in
crease the risk of injury in a crash .
-Never dr ive with the backrest reclined or
ti lted far back! The farther the backrests are
ti lted back , the greater the risk of injury due
to incorrect positioning of the safety belt
and improper seating position.
-Children must always ride in child safety
seats
c::> page 292 . Special precautions ap
ply when installing a child safety seat on the
front passenger seat
c::> page 267 .
Proper seating positions for passengers in
rear seats
Rear seat passengers must sit upright with both
feet on the floor consistent with their physical
size and be properly restrained whenever the ve
hicle is in use.
To reduce the r isk of injury caused by an incorrect
seating position in the event of a sudden braking
maneuver or an accident, you r passengers on the
rear bench seat must always observe the follow
ing:
250
.,. For adjustab le head restraints: adjust the head
restraint so the upper edge is as even as possi
ble with the top of your head. If that is not pos
sible, try to adjust the head restraint so that it
is as close to this position as possible
c::> page 63.
.,. Keep both feet flat in the footwell in front of
the rear seat .
.,. Fasten and wear safety belts properly
c::> page 2 62.
.,. Make sure that children are always properly re
strained in a child restraint that is appropriate
for their size and age
c::> page 292.
A WARNING
Passengers who are improperly seated on the
rear seat can be seriously injured in a crash.
-E ach passenger must always sit on a seat of
their own and properly fasten and wear the safety belt belonging to that seat .
-Safety belts only offer maximum protection
when the safety belts are properly posi
tioned on the body and securely latched . By
not sitting upright, a rear seat passenger in
creases the risk of personal injury from im
properly positioned safety belts!
-For adjustable head restraints: always ad
just the head restraint properly so that it
can give maximum protection.
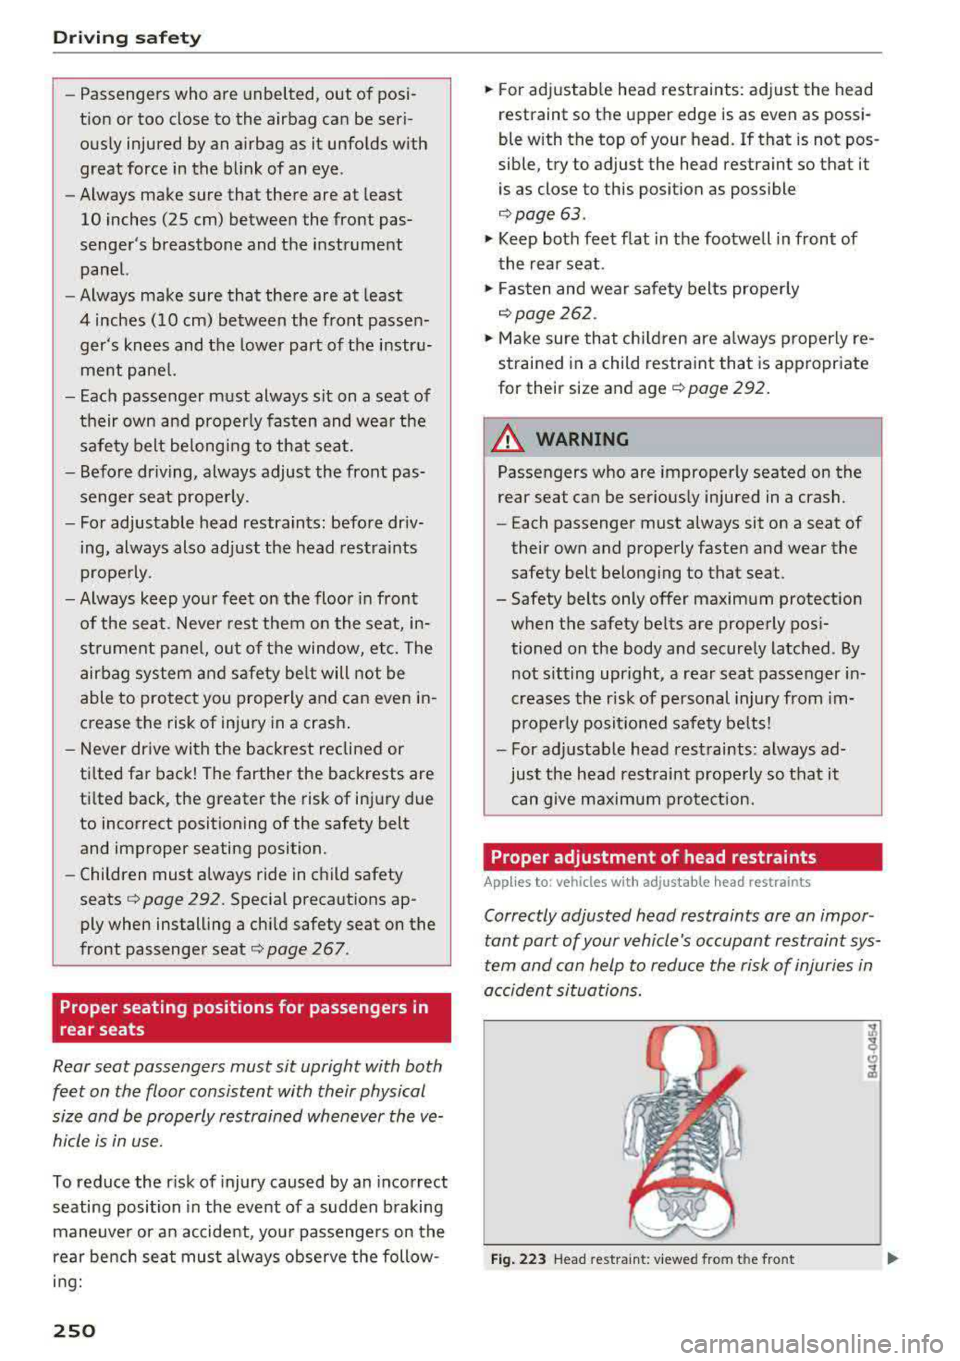
Proper adjustment of head restraints
Applies to: vehicles with adjustable head restraints
Correctly adjusted head restraints ore on impor
tant port of your
vehicle's occupant restraint sys
tem and con help to reduce the risk of injuries in
occident situations.
Fig. 223 Head restraint : viewed from t he front
Page 266 of 400
Safety belts
Unfastening safety belts
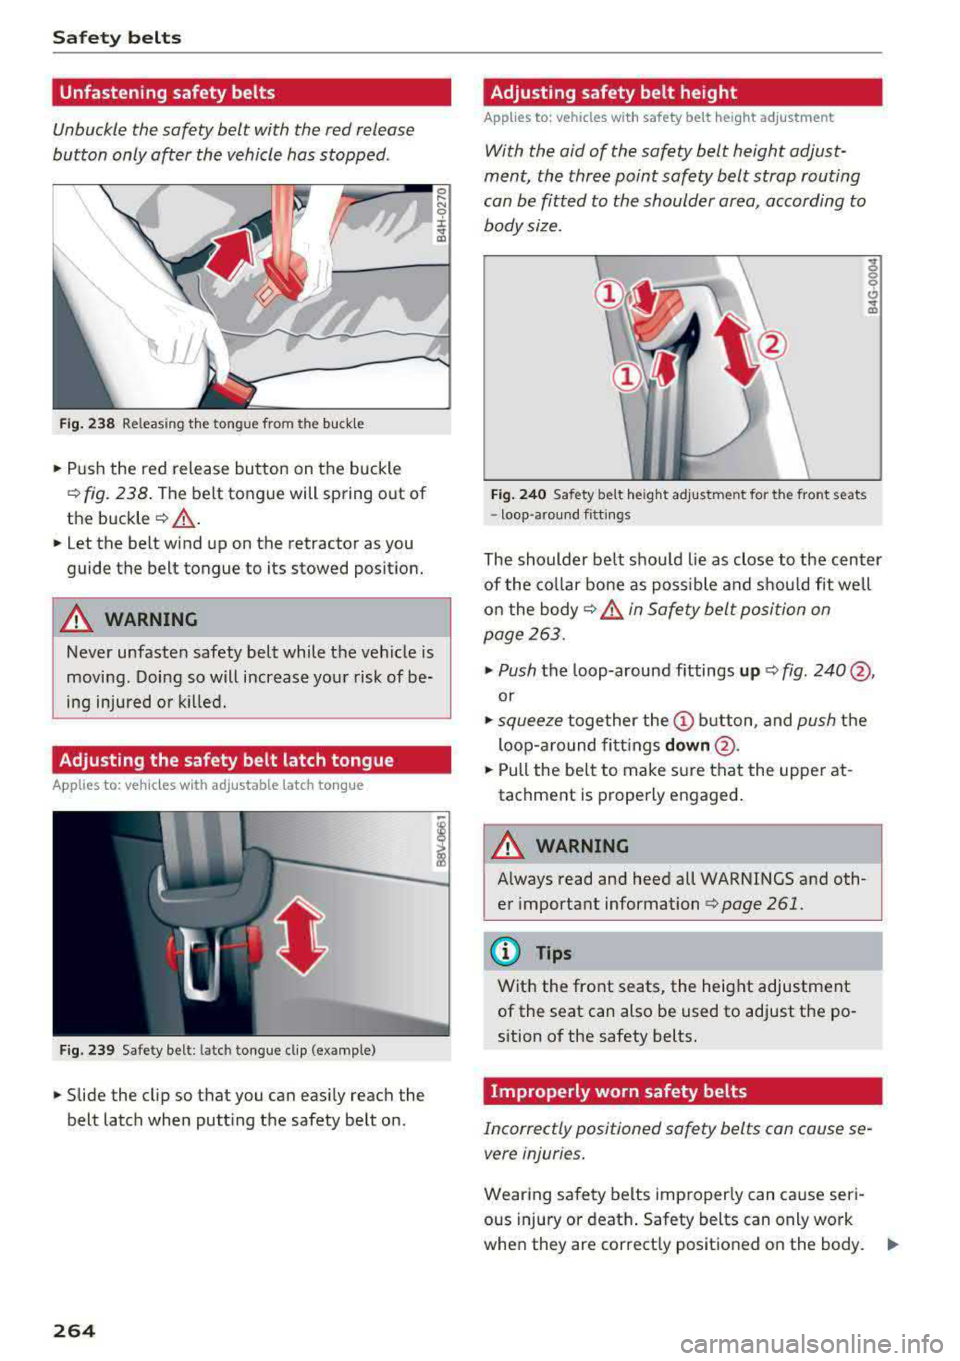
Unbuckle the safety belt with the red release
button only after the vehicle has stopped.
Fig. 238 Releasing t he tongue from the buckle
.. Push the red release button on the buckle
q fig. 238. The belt tongue will spring out of
the buckle
q ,& .
.. Let the belt wind up on the retractor as you
guide the belt tongue to its stowed position.
A WARNING
Never unfasten safety belt while the vehicle is
moving. Doing so will increase your risk of be
ing injured or killed.
Adjusting the safety belt latch tongue
Applies to: vehicles with adjustable latch tongue
Fig. 239 Safety belt: latch tongue cl ip (example)
.. Slide the cl ip so that you can easily reach the
belt latch when putt ing the safety belt on .
264
a
~ 0 :i: .. 0J
Adjusting safety belt he ight
Applies to: vehicles with safety belt height adjustment
With the aid of the safety belt height adjust
ment, the three point safety belt strap routing
can be fitted to the shoulder area, according to
body size .
Fig. 240 Safety belt heigh t adjustment for the front seats
-loop-around fittings
The shoulder belt shou ld lie as close to the center
of the collar bone as poss ible and shou ld fit well
on the body
q .&. in Safety belt position on
page 263.
.,. Push the loop-around fittings up ¢ fig. 240 @,
or
.,. squeeze together the @ button, and push the
loop-a round fittings
down @.
.. Pull the belt to make sure that the upper at
tachment is properly engaged.
A WARNING
Always read and heed all WARNINGS and oth
er important information
q page 261.
(D Tips
With the front seats, the height adjustment
of the seat can also be used to adjust the po
sition of the safety belts.
Improperly worn safety belts
Incorrectly positioned safety belts can cause se vere injuries.
Wearing safety belts imp roper ly can cause seri-
ous injury or death. Safety belts can only work
when they are correct ly positioned on the body.
..,.
Page 269 of 400
CXl CXl .... N ,.__
N .... 0 N > 00
Airbag system
Important information
Importance of wearing safety belts and
sitting properly
Airbags are only supplemental restraints. For
airbags to do their job, occupants must always
properly wear their safety belts and be in a prop er seating position.
For your safety and the safety of your passen
gers, before driving off, always :
.,. Adjust the driver's seat and steering wheel
properly
9 page 248,
.,. Adjust the front passenger's seat properly
¢page 249,
.,. Wear safety belts properly ¢ page 261,
.,. Always properly use the proper child restraint
to protect children ¢
page 292.
In a collision, airbags must inflate within the
blink of an eye and with considerable force. The
supplemental airbags can cause injuries if the
driver or the front seat passenger is not seated
properly. Therefore in order to help the airbag to
do its job, it is important, both as a driver and as
a passenger to sit properly at all times.
By keeping room between your body and the
steering wheel and the front of the passenger
compartment, the airbag can inflate fully and
completely and provide supplemental protection in certain frontal
collisions ¢ page 248, Correct
passenger seating positions .
For details on the
operation of the seat adjustment controls
¢page 61.
It's especially important that children are proper
ly restrained
¢page 292.
There is a lot that the driver and the passengers
can and must do to help the individual safety fea
tures installed in your Audi work together as a
system.
Proper seating position is important so that the
front airbag on the driver side can do its job. If
you have a physical impairment or condition that prevents you from sitting properly on the driver
seat with the safety belt properly fastened and
Airbag system
reaching the pedals, or if you have concerns with
regard to the function or operation of the Ad
vanced Airbag System, please contact your au
thori zed Audi dealer or qualified workshop, or
call Audi Customer Relations at 1-800-822-2834
for possible modifications to your vehicle.
When the airbag system deploys, a gas generator
will fill the airbags, break open the padded cov ers, and inflate between the steering wheel and
the driver and between the instrument panel and
the front passenger. The airbags will deflate im
mediately after deployment so that the front oc
cupants can see through the windshield again
without interruption.
All of this takes place in the blink of an eye, so
fast that many people don't even realize that the airbags have deployed. The airbags also inflate
with a great deal of force and nothing should be
in their way when they deploy. Front airbags in
combination with properly worn safety belts slow
down and limit the occupant's forward move
ment . Together they help to prevent the driver
and front seat passenger from hitting parts of
the inside of the vehicle while reducing the forces
acting on the occupant during the crash . In this
way they help to reduce the risk of injury to the
head and upper body in the crash. Airbags do not
protect the arms or the lower parts of the body.
Both front airbags will not inflate in all frontal
collisions . The triggering of the airbag system de
pends on the vehicle deceleration rate caused by
the collision and registered by the electronic con
trol unit . If this rate is below the reference value
programmed into the control unit, the airbags
will not be triggered, even though the car may be badly damaged as a result of the collision. Vehi
cle damage, repair costs or even the lack of vehi
cle damage is not necessarily an indication of
whether an airbag should inflate or not.
Since the circumstances will vary considerably between one collision and another, it is not possi
ble to define a range of vehicle speeds that will
cover every possible kind and angle of impact
that will always trigger the airbags . Important
factors include, for example, the nature (hard or
soft) of the object which the car hits, the angle of
impact, vehicle speed , etc. The front airbags will
II>
267
Page 276 of 400
Airbag syste m
seat. Please be sure to read the important infor
mation in the sections that follow and be sure to
heed all of the WARNINGS.
A WARNING
To reduce the risk of injury when an airbag in
flates, always wear safety belts properly.
- If you are unrestrained, leaning forward, sit ting s ideways or out of position in any way,
your risk of injury is much h igher.
- You will also receive serious injuries and could even be killed if you are up aga inst the
airbag or too close to it when it inflates -
even with an Advanced Airbag
c::> page 267 .
A WARNING
A child in a rearward-facing chi ld safety seat
installed on the front passenge r seat w ill be
ser iously injured and can be killed i f the front
airbag inflates
-even w ith an Advanced Ai rbag
System.
-Although the Advanced A irbag System in
yo ur vehicle is designed to tu rn off the front
airbag when a rearwa rd -facing child re
straint has been insta lled on the front pas
senger seat, nobody can absolutely guaran
tee that deployment is impossible in all con
ceivable s ituations that may happen during
the useful life of your vehicle .
- The inflating a irbag w ill hit the child safety
seat or infant carrier with great force and
will smash the chi ld safety seat and child
against the backrest, center armrest , door,
o r roof .
- Always install rearward -facing ch ild re
straints on the rear seat .
- If you must install a rearward fac ing ch ild
safety seat on the front passenger seat be
cause of exceptiona l circumstances and the
PASSENGER AIR BAG OFF light does not
come on and s tay on, immed iate ly install
the rear-fac ing ch ild safety seat in a rear
seating position and have the airbag system
inspected by your Audi dealer.
274
A WARNING ,_
If, in exceptional circumstances, you must in
stall a forward-facing child restraint on the
front passenger's seat:
- Always make sure the forward-facing seat
has been des igned and certified by its man
ufacturer for use on a front seat with a pas
senger front and side airbag.
- Never put the forwa rd-facing child restraint
up against or very nea r the instrument pan
el.
- Always move the front passenge r seat to
the highest posit ion in the up and down ad
justmen t range and move it back to the
rearmost posit io n in the seat's fo re and aft
adjustment range, as far away from the a ir
bag as poss ible, before install ing the for
ward-facing chi ld restraint.
- Always make sure that the safety be lt upper
anchorage is behind the chi ld rest raint and
not next to o r in front of the c hild restraint
so that the safety be lt will be p roper ly posi
tioned.
- Always make sure that there is noth ing on
the front passenger seat that will cause the
capacitive passenger detection system in
the seat to signal to the Airbag System that
the seat is occup ied by a person when it is
no t, or to signal that it is occupied by some
one who is heavier than the person ac tually
si tting on the sea t. T he presence of addi
tional objects could cause the passenger
front airbag to be turned on when it should
be
off, or could cause the airbag to work in a
way that is d ifferent from the way it wou ld
have worked without the object on the seat.
- Make sure that the
PASSENGER AIR BAG
OFF
li ght comes on and stays on all the time
whenever the ign it ion is switched on.
Advanced Airbag System components
T he front passenger seat in your veh icle has a lot
of ve ry important parts of the Advanced A irbag
System i n it. These parts incl ude the capacitive
passenger detection system, wir ing , b rackets,
and more. The control uni t moni tors the system
on the front passenge r seat when t he ignit ion is
..,.