wheel bolts AUDI A3 SEDAN 2017 Owners Manual
[x] Cancel search | Manufacturer: AUDI, Model Year: 2017, Model line: A3 SEDAN, Model: AUDI A3 SEDAN 2017Pages: 400, PDF Size: 67.32 MB
Page 344 of 400
Wheels
Wheel bolts and rims
Wheel bolts
Wheel bolts must be clean and loosen/tighten
easily .
Rims
Rim s with a bolted r im ring * or with bolted wheel
covers* consist of multiple pieces. These compo
nents were bolted together using special bolts
and a special procedure . You must not repair or
disassemble
them ¢_&. .
..&, WARNING
Wheel bolts that are tightened or repaired in
correctly can become loose and result in loss
of vehicle control , which increases the risk of
an accident. For the correct tightening specifi
cation, see
¢ page 35 7, After changing a
wheel.
- Always keep the wheel bolts and the
threads in the wheel hub clean and free of
grease.
- Only use wheel bolts that fit the rim.
- Always have damaged rims repaired by an
authorized Audi dealer or authorized Audi
Service Facility. Never repair or disassemble
rims yourself, because this increases the risk
of an accident .
Winter tires
Winter tires significantly improve the vehicle 's
handling when driving in winter conditions. Be
cause of their construction (width, compound,
tread pattern) , summer tires provide less trac
tion on ice and snow.
.,. Use winter tires on all four wheels .
.,. Only use winter tires that are approved for your
vehicle.
.,. Please note that the maximum permitted
speed may be lower with winter tires
¢ _&. .An
authorized Audi dealer or authorized Audi Serv
ice Facility can inform you about the maximum
permitted speed for your tires.
.. Check the tire pressure after installing wheels
¢ page 336.
342
The effectiveness of winter tires is reduced great
ly when th e tread is worn down to a depth of
0.157 inch (4 mm). The characteristics of winter
tires also decrease greatly as the tire ages, re
gardless of the remaining tread.
'
..&, WARNING
- Never drive faster than the maximum per
mitted speed for your tires. This could cause
the tires to heat up too much. This increases
the risk of an accident because it can cause
the tire to burst .
- Always adapt your driving to the road and
traffic conditions . Drive carefully and reduce
your speed on icy or slippery roads . Even
winter tires can lose traction on black ice.
{® For the sake of the environment
Reinstall summer tires at the appropriate
time, because they provide better handling
when roads are free of snow and ice. Summer
tires cause less road noise, tire wear and fuel
consumption.
(D Tips
You can also use all season tires instead of
winter tires. Please note that in some coun
tries where winter tires are required, only
winter tires with the
& symbol may be per
mitted.
Snow chains
-
Snow chains not only improve the driving in win
ter road conditions, but also the braking.
.. Only install snow chains on the front wheels.
This applies also to vehicles with all wheel drive* .
.. Check and correct the seating of the snow
chains after driving a few feet, if necessary . Fol
low the instructions from the manufacturer .
.,. Note the maximum speed of 30 mph (SO km/
h). Note the local regulations.
Use of snow chains is only permitted with certain
rim/tire combinations due to technical reasons.
.,.
Page 356 of 400
Emergency assistance
• To open the side pane l, turn the lock and re
move the
cover @*/ @ ¢ fig. 283.
• Lift the cargo floor using the plastic handle @
un til the cargo floor engages behind the tabs
© in both side panels¢ fig. 284 (upper im
age) .
• Fold the cargo floor back before closing the
luggage compartment lid.
Vehicle tool kit and cargo floor cover
App lies to: ve hicles w ith versio n 2
The vehicle too l kit, tire mobility kit* and com
pressor* are stored in the luggage compartment
under the cargo floor
cover @¢ fig. 283 .
• Engage the plastic hook® in the luggage com
partment
seal ¢ fig. 284.
• Fold the cargo floor back before closing the
luggage compartment lid .
.&_ WARNING
Improper use of the vehicle jack can cause se
r ious personal injuries.
- Never use the screw driver hex head to
tighten wheel bolts, since the bolts cannot
attain the necessary tightening torque if you
use the hex head, potentially causing an ac
cident.
- T he factory-supplied jack is intended only
for your vehicle model. Under no circum
stances should it be used to lift heavy
vehicles or other loads; you risk injuring
yourself.
- Never start the engine when the vehicle is
raised, which could cause an accident.
- Support the vehicle securely with appropri
ate stands if work is to be performed under
neath the vehicle; otherwise, there is a po
tent ial risk for injury.
- Never use the jack supplied with your Audi
on another vehicle, particularly on a heavier
one. The jack is only suitable for use on the
vehicle it came w ith.
@ Tips
The vehicle jack* in your vehicle is mainte
nance-free.
354
Tire mobility kit
Preparation
App lies to: vehicles with tire mobility kit
• Read and fo llow the important safety precau-
tions
in ¢ page 353.
• Set the parking brake.
• Move the selector lever into the P position.
• Check if a repair with the tire mobility kit is pos
sible
¢ page 354.
Using the tire mobility kit
Applies to: vehicles wit h tire mobility kit
Fig. 285
Tire: t ir e damage that cannot be repaired
The tire repair is only meant for temporary use .
Change the spare tire as soon as possible
c:;> .&..
If the tire is pierced by an object such as a nail ,
do not remove the object from the tire.
..... N
0
> 00 m
The tire repair set is able to be used at tempera
tures as low as -4 °F ( -20 °C).
The tire mobility kit may not be used :
-if the tire has cuts or punctures that are larger
than
0.16 in (4 mm) (!)¢ fig. 285.
-if the rim is damaged @.
- if you drove with very low tire pressure or with-
out air in the tire @.
In this case, see an authorized Aud i dea ler or au
thorized Audi Service Facility for assistance.
~ WARNING
-Please note that the tire mobility kit cannot
be used in all situations, and that it may on
ly be used temporarily.
-The tire sealant must not come in contact
with skin, eyes, or clothes.
Page 359 of 400
a, a, ..... N
" N ..... 0 N > 00
_& WARNING
You or your passengers could be injured while
changing a wheel if you do not follow these
safety precautions:
- If you have a flat tire, move a safe distance
off the road. Turn off the engine, turn the emergency flashers on and use other warn
ing devices to alert other motorists.
- Make sure that passengers wait in a safe
place away from the vehicle and well away
from the road and traffic.
- To help prevent the vehicle from moving
suddenly and possibly slipping off the jack,
always fully set the parking brake and block
the wheel diagonally opposite the wheel be
ing changed. When one front wheel is lifted
off the ground, placing the Automatic
Transmission in P (Park) will
not prevent the
vehicle from moving.
- Before you change a wheel, be sure the
ground is level and firm. If necessary, use a
sturdy board under the jack.
- Always store the vehicle tool kit, the jack
and the replaced tire in the luggage com
partment
c:> page 253.
Changing a wheel
When you change a wheel, follow the sequence
described below step-by-step and in exactly that
order.
1. Remove the decorative wheel cover*. For
more details see also
c:> page 357, Decora-
tive wheel covers
or c:> page 358, Wheels
with wheel bolt caps.
2. Loosen the wheel bolts c:> page 358.
3 . Locate the proper mounting point for the
jack and align the jack below that point
c:> page359.
4. Raise the car with the jack c:> page 359.
5. Remove the wheel with the flat tire and then
install
the spare c:> page 360.
6. Tighten all wheel bolts lightly.
7. Lower the vehicle with the jack .
8 . Use the wheel bolt wrench and firmly tighten
all wheel bolts
c:> page 358 .
9. Replace the decorative wheel cover* .
Emergency assistance
_& WARNING
-Always read and follow all WARNINGS and in-
formation
c:> .&. in Raising the vehicle on
page 359
and c:> page 361.
After changing a wheel
A wheel change is not complete without the do
ing the following.
.. Always store the vehicle tool kit, the jack* and
the replaced tire in the lugg age compartment
c:> page 253.
.. Check the tire pressure on the spare wheel im
mediately after mounting it .
.. As soon as possible, have the tightening tor
ques
on all wheel bolts checked with a torque
wrench. The correct tightening torque is
90 ft lb (120 Nm).
.. Have the flat tire replaced as soon as possible.
@ Tips
-If you notice that the wheel bolts are cor
roded and difficult to turn while changing a
tire, they should be replaced before you
check the tightening torque.
- Drive at reduced speed until you have the tightening torques checked.
- After changing a wheel, the tire pressure in
all four tires must be checked/corrected and
the tire pressure monitoring indicator must
be stored in the MMI
c:>page 346.
Decorative wheel covers
Applies to : vehicles wit h decorative w heel covers
The decorative wheel covers must be removed
first to access the wheel bolts.
Fig. 288 Changing a wheel: Removing the wheel cover
357
Page 360 of 400
Emergency assistance
Removing
.. Insert the hook (provided with the vehicle tool
kit) in the hole in the wheel hub cover.
.. Pull off the decorative wheel cover¢ fig. 288.
Wheels with wheel bolt caps
App lies to: vehicles with wheel bolts with caps
The caps must be removed first from the wheel
bolts before the bolts can be unscrewed.
Fig. 289 Changing a wheel: remov ing the wheel bo lt caps
Removing
" Push the plastic clip (provided with the veh icle
tool kit) over the wheel bolt cap until the inn er
retainers on the clip align with the edge of the
cover.
.. Remove the cap with the plastic clip (vehicle
tool kit)
¢fig. 289.
Refitting
" Place the caps over the wheel bolts and push
them back on.
The caps are to protect and keep the wheel bolts
clean.
358
Loosening and tightening the wheel bolts
The wheel bolts must be loosened before raising
the vehicle .
Fig. 290 Changing a whee l: loose ning the wheel bolts
Loosening
"Slid e the wheel wrench onto the wheel bolt as
far as it will go .
.. Take tight hold of the end of the wrench handle
and turn the wheel bolts
counter-clockwise
about one single turn in the direction of arrow
¢fig. 290.
Tightening
.. Slide the wheel wrench onto the wheel bolt as
far as it will go.
.. Take tight hold of the end of the wrench handle
and turn each wheel bolt
clockwise until it is
seated.
A WARNING
-Do not use force or hurry when changing a
wheel - you can cause the vehicle to slip off
the jack and cause serious personal injuries.
-Do not loosen the wheel bolts more than
one turn
before you raise the vehicle with
the jack.
-You risk an injury.
(D Tips
-Never use the hexagonal socket in the han
dle of the screwdriver to loosen or tighten
the wheel bolts.
-If a wheel bolt is very tight, you may find it
easier to loosen by carefully pushing down
on the end of the wheel bolt wrench with
one foot only. As you do so, hold on to the
Page 362 of 400
Emerg ency assis ta nce
-To help prevent injury to yourself and your
passengers:
-Do not ra ise the vehicle until you are sure
the jack is secure ly engaged.
-Passengers must not remain in the vehicle
when it is jacked up.
-Make sure that passengers wait in a safe
place away from the vehicle and well away
from the road and traffic.
-Make sure jack posit ion is correct, adjust
as necessary and then cont inue to raise
the jack.
CD Note
Do not lift the vehicle by the sill. Position the
veh icle jack only at the designated lifting
points on the sill. Otherwise, your vehicle will
be damaged.
Taking the wheel off /installing the spare
Follow these instructions step-by-step for chang
ing the wheel .
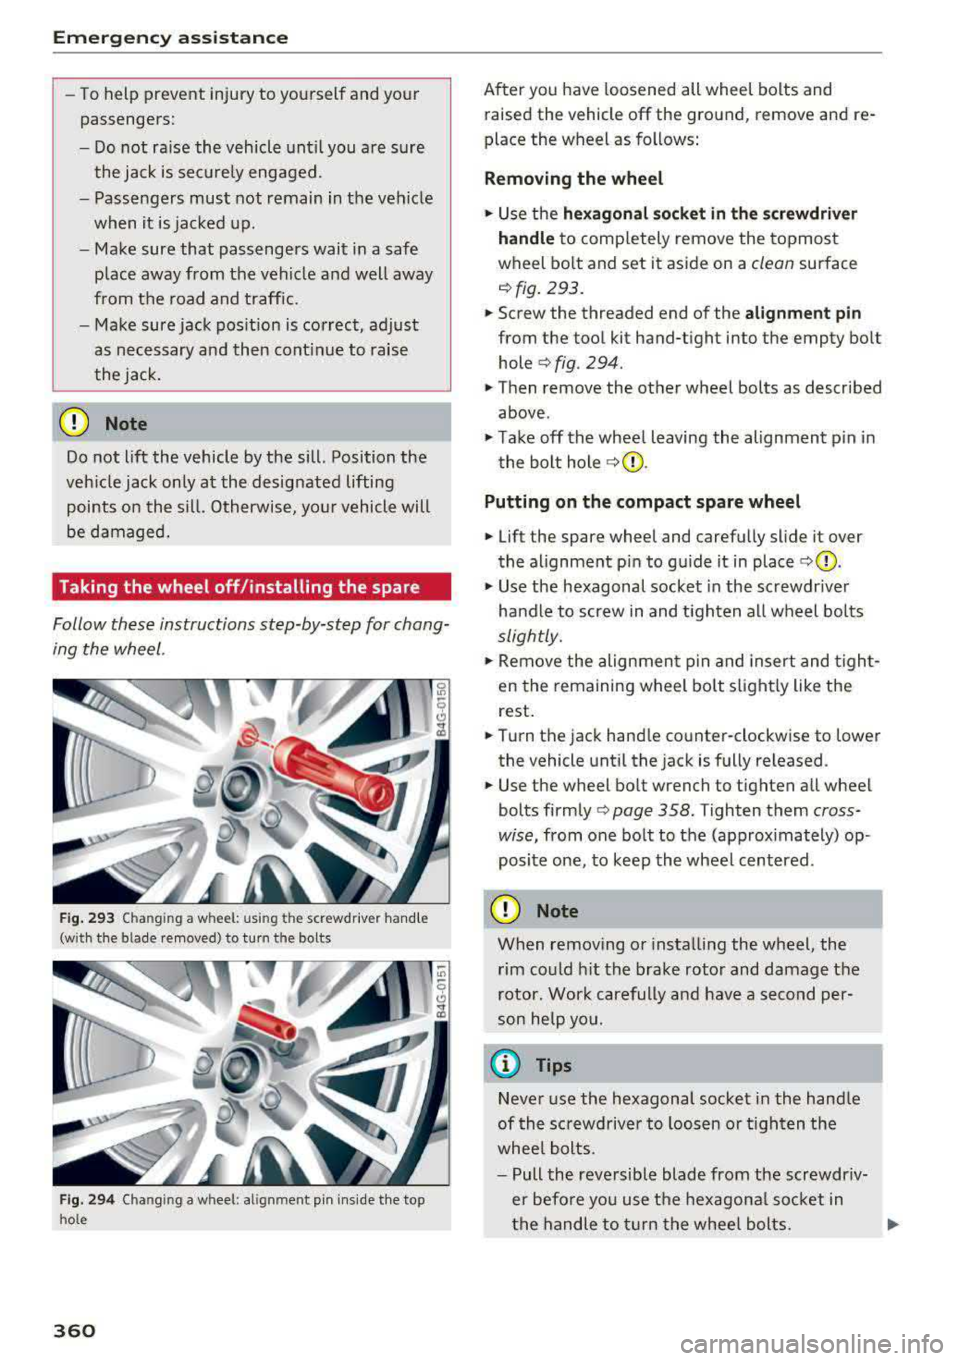
Fig . 293 Changing a wheel: using the screwdr iver hand le
(with the blade removed) to turn the bolts
Fig. 29 4 Changing a wheel: alignm ent pin ins ide the top
ho le
360
After you have loosened all wheel bolts and
raised the vehicle off the ground, remove and re
place the wheel as follows:
Removing the wheel
.. Use the he xago nal socket in th e screwdriver
handle
to comp letely remove the topmost
wheel bo lt and set it aside on a
clean surface
<=> fig. 293.
.. Screw the threaded end of the alig nm ent pi n
from the tool kit hand-tight into the empty bolt
hole
<=> fig. 294.
.. Then remove the other wheel bolts as described
above .
.. Take off the whee l leaving the alignment p in in
the bolt hole
<=> (j) .
Putting on the c omp act spare wheel
.. Lift the spare wheel and carefully slide it over
the alignment p in to gu ide it in place
<=>(j) .
.. Use the hexagonal socket in the screwdr iver
handle to screw in and t igh ten all wheel bolts
slightly.
.. Remove the alignmen t pin and insert and t igh t
en the remaining wheel bolt s light ly like the
rest .
.. Turn the jack hand le counter-clockwise to lower
the vehicle until the jack is fully released .
.. Use the wheel bolt wrench to tighten all wheel
bolts
firmly <=> page 358. Tighten them cross
wise,
from one bolt to the (approximately) op
posite one, to keep the wheel centered.
CD Note
When removing o r insta lling the wheel, the
rim could h it the brake rotor and damage the
r otor. Wor k carefully and have a second per
son he lp yo u.
{!) Tips
Neve r use the hexagonal socket in the handle
of th e sc rewdriver to loos en o r tigh ten the
whee l bolts.
-Pull the reve rsible blade from the screwdr iv
er befo re you use the hexagona l socket in
the handle to turn the whee l bolts.
Page 363 of 400
CXl CXl .... N ,.__
N .... 0 N > 00
-When mountin g tires w ith unidirectional
tread design
ma ke sure the t read pattern is
p oin ted the r ight way ¢
page 36 1.
-The wheel bolts should be clean and easy to
turn. C heck for d irt a nd cor rosion on the
ma ting surfaces o f both the wheel an d the
hub. Remove all dirt from t hese surfaces be
fo re remo unt ing the wheel.
Tires with unidirectional tread design
Tires with unidirectional tread design must be
mounted with their tread pattern pointed in the
right direction.
Using a spare t ire with a tread pattern
intended for use in a specific direction
W hen using a spa re t ire with a tread patte rn in
tended fo r use in a specific direction, please note
the following:
-The direct ion of rotat ion is ma rked by an a rrow
on the side of the tire .
-If the spare tire has to be installed in the incor
rect d irection, use the spare tire only tempora
ri ly s ince the tire w ill not be ab le to achieve its
opt imum p erformance c harac ter istics wi th re
gard to aquaplaning, noise and wea r.
-We recommend t hat you pay particular atten
t io n t o this fac t during we t weat her and that
yo u adju st yo ur speed to match road condi
ti ons.
-Rep lace the flat t ire with a new one and have it
insta lled on yo ur ve hicl e as soon as possibl e to
r es to re th e hand li n g adva ntages of a unid irec
tional t ire.
Notes on changing tires
Please read the info rmation I:!> page 3 35 if you
are go ing to use a spare tire which is different
from the tires on your veh icle.
Af te r yo u c hange a tire:
-Check the tire pressure on the spare immedi
ately after in stallation .
-Have the wheel bolt tightening torque
checked with a torque wrench as soon as pos -
Emergency assistance
sible by your authorized Audi dealer or a
qualified service station.
-With steel and alloy wheel rims, the wheel bolts are correctly tightened at a torque of
90 ft lb (120 Nm).
-If you notice that the wheel bolts are corroded
and difficult to turn while changing a tire ,
they should be replaced before you check the
tightening torque.
-Replace the flat tire with a new one and have
it installed on your vehicle as soon as possi ·
ble. Remount the wheel cover .
Until then , dr ive with extra care and at reduced
speeds.
_& WARNING
-I f you are going to equip yo ur vehicle with
tires or r ims which differ from those w hich
were factory installed, the n be sure to read
th e information
¢ pag e 335.
-Always make sure the damaged wheel or
e ven a flat tire a nd the jack and tool kit are
p rop erly secur ed in t he lu ggag e compart
m en t an d are not l oose in th e p asseng er
compa rtme nt.
-In an accide nt or sudde n man euv er th ey
could fly forward, injuri ng a nyo ne in the ve
hicl e.
-Always s tor e damag ed w heel, jack and t ools
securely i n the lu ggage compa rtm ent. Ot h
erwise, in an accid ent or sud den m aneuve r
t he y c ould fl y forwar d, ca using injury to pas
sen gers in the ve hicle.
-
361
Page 397 of 400
CXl CXl .... N ,.__
N .... 0 N > 00
Voicemail . . . . . . . . . . . . . . . . . . . . . . . . . . . 185
Voice recognition system . . . . . . . . . . . . . . . 170
Commands . . . . . . . . . . . . . . . . . . . . . . . . . 171
External . . . . . . . . . . . . . . . . . . . . . . . . . . . 175
Multifunction steering wheel . . . . . . . . . . . 15
Operating . . . . . . . . . . . . . . . . . . . . . . . . . . 170
Settings . . . . . . . . . . . . . . . . . . . . . . . . . . . 241
Volume . . . . . . . . . . . . . . . . . . . . . . . . . . . . 246
Volume 245
w
Warning/Indicator lights
A irbag system . . . . . . . . . . . . . . . . . . . . . . 279
Warning lights
refer to Indicator lights . . . . . . . . . . . . . . . . 24
Warranty coverages . . . . . . . . . . . . . . . . . . . 378
Washing matte finish paint . . . . . . . . . . . . . 347
Weights. . . . . . . . . . . . . . . . . . . . . . . . . . . . . 374
What happens if you wear your safety belt too
loose? . . . . . . . . . . . . . . . . . . . . . . . . . . . . . . 263
What happens to unbelted occupants? . . . . 259
What impairs driving safety? . . . . . . . . . . . . 248
Wheel bolts . . . . . . . . . . . . . . . . . . . . . . . . . 342
Wheels . . . . . . . . . . . . . . . . . . . . . . . . . . . . . 328
Cleaning . . . . . . . . . . . . . . . . . . . . . . . . . . . 348
Glossary of tire and loading terminology . 330
Replac ing . . . . . . . . . . . . . . . . . . . . . . . . . . 356
Tires and vehicle load limits . . . . . . . . . . . 339
Wheel wrench . . . . . . . . . . . . . . . . . . . . . . . . 353
When must a safety belt be replaced? . . . . 261
When must the airbag system be inspected?
279
Where are lower anchorages located? . . . . 307
Wi- Fi
Audi music stream . . . . . . . . . . . . . . . . . . . 226
Audio player . . . . . . . . . . . . . . . . . . . . . . . . 226
Hotspot . . . . . . . . . . . . . . . . . . . . . . . . . . . 195
Online media . . . . . . . . . . . . . . . . . . . . . . . 227
also refer to Wi-Fi . . . . . . . . . . . . . . . . . . . 226
Wind deflector . . . . . . . . . . . . . . . . . . . . . . . . 47
Cleaning . . . . . . . . . . . . . . . . . . . . . . . . . . . 349
W indow regulators . . . . . . . . . . . . . . . . . . . . . 41
Windows Cleaning/removing ice . . . . . . . . . . . . . . . . 349
Windshield washer system . . . . . . . . . . 57, 327
Reservoir capacity . . . . . . . . . . . . . . . . . . . 375
Index
Windshield wipers . . . . . . . . . . . . . . . . . . . . . 57
Replacing wiper blades . . . . . . . . . . . . . . . . 58
Winter driving Snow cha ins . . . . . . . . . . . . . . . . . . . . . . . . 342
Winter operation Cooling system . . . . . . . . . . . . . . . . . . . . . . 323
Defrosting windows (automatic climate con
trol system) . . . . . . . . . . . . . . . . . . . . . . . . . 72
Seat heating (automatic climate control sys-
tem) . . . . . . . . . . . . . . . . . . . . . . . . . . . . . . . 72
Steering wheel heating . . . . . . . . . . . . . . . . 73
Windshield washer system . . . . . . . . . . . . 327
Winter tires . . . . . . . . . . . . . . . . . . . . . . . . 342
Winter use Car washes .... .. .. ............... .. 347
Removing ice from windows 349
X
Xenon headlights .. .. ............. . Sl, 366
z
Zooming (map) . . . . . . . . . . . . . . . . . . . . . . . 209
395