seat adjustment AUDI A3 SEDAN 2018 Owners Manual
[x] Cancel search | Manufacturer: AUDI, Model Year: 2018, Model line: A3 SEDAN, Model: AUDI A3 SEDAN 2018Pages: 404, PDF Size: 62.3 MB
Page 61 of 404
LL co .... N
" N .... 0 N > co
Seats and storage
General information
A WARNING
Refer to the chapter Driving Safely
~ page 249, Driving safety for important in
formation, tips, suggestions and warnings that you should read and follow for your own
safety and the safety of your passengers.
Front seats
Manual seat adjustment
Applies to vehicles with manual adjustable seats
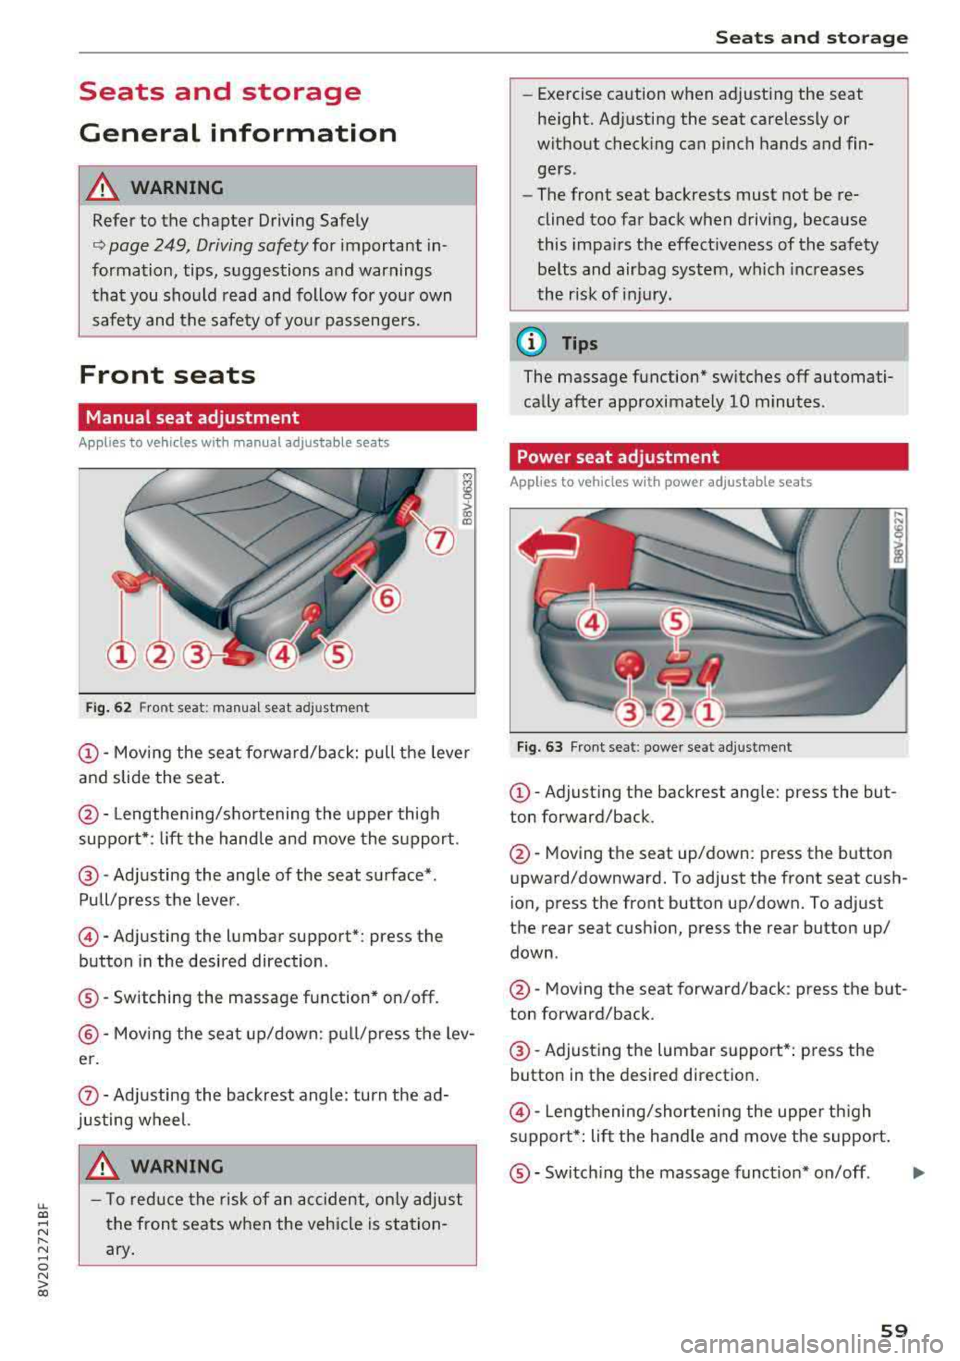
Fig. 62 Fro nt seat: manual seat ad justment
@ -Moving the seat fo rward/back: pu ll the leve r
and slide the seat .
@-Lengthen ing/shortening the upper thigh
support* : lift the handle and move the support.
@-Adjusting the angle of the seat surface* .
Pull/press the lever .
©-Adjusting the lumbar support* : press the
button in the desired direction .
®-Switching the massage function* on/off .
@-Moving the seat up/down: pull/press the lev
er.
(J) -Adjusting the backrest angle : turn the ad
justing wheel.
A WARNING
- T o reduce the risk of an accident , only adjust
the front seats when the vehicle is station
ary.
Seats and storage
-Exercise caution when adjusting the seat
height. Adjusting the seat carelessly or
without checking can pinch hands and fin
gers .
- The front seat backrests must not be re
clined too far back when driving, because
this impairs the effectiveness of the safety
be lts and airbag system, which increases
the risk of injury.
(D Tips
The massage function* switches off automati
cally after approximately 10 minutes .
Power seat adjustment
Applies to vehicles w it h power adjustab le seats
Fig. 63 Front se at: p ower seat adj ustmen t
@-Adjust ing the backrest ang le: press the but
ton forward/back .
@-Moving the seat up/down: press the button
upward/downward. To adjust the front seat cush
ion, press the front button up/down. To adjust
the rear seat cushion, press the rear button up/
down .
@-Moving the seat forward/back : press the but
ton forward/back .
@-Adjusting the lumbar support*: press the
button in the desired direction .
©-Lengthening/shorten ing the uppe r th igh
s u pport*: lift the handle and move the support.
®-Switch ing the massage funct ion* on/off .
59
...
Page 62 of 404
Seats and stor age
A WARNING
- To reduce the risk of an accident, on ly adjust
the front seats when the vehicle is station
ary.
- The power adjustment for the front seats al
so works w ith the ignition switched off or
with the ignition key removed . T o reduce
the risk of injury, chi ld ren should never be
left unattended in the vehicle for this rea
son.
- Exercise caution when adjusting the seat
height. Uns uperv ised or careless seat ad
justment can p inch f ingers or hands, wh ich
increases the risk of injury.
- T he front seat backres ts m ust not be re
clined too far back when driving, because
this impairs the effectiveness of the safety
belts and airbag system, which increases
the risk of injury.
(D Tips
The massage function* switches off a utomat i
cally after approximately 10 min utes.
Easy seat entry
Applies to: veh icles with entry assistance
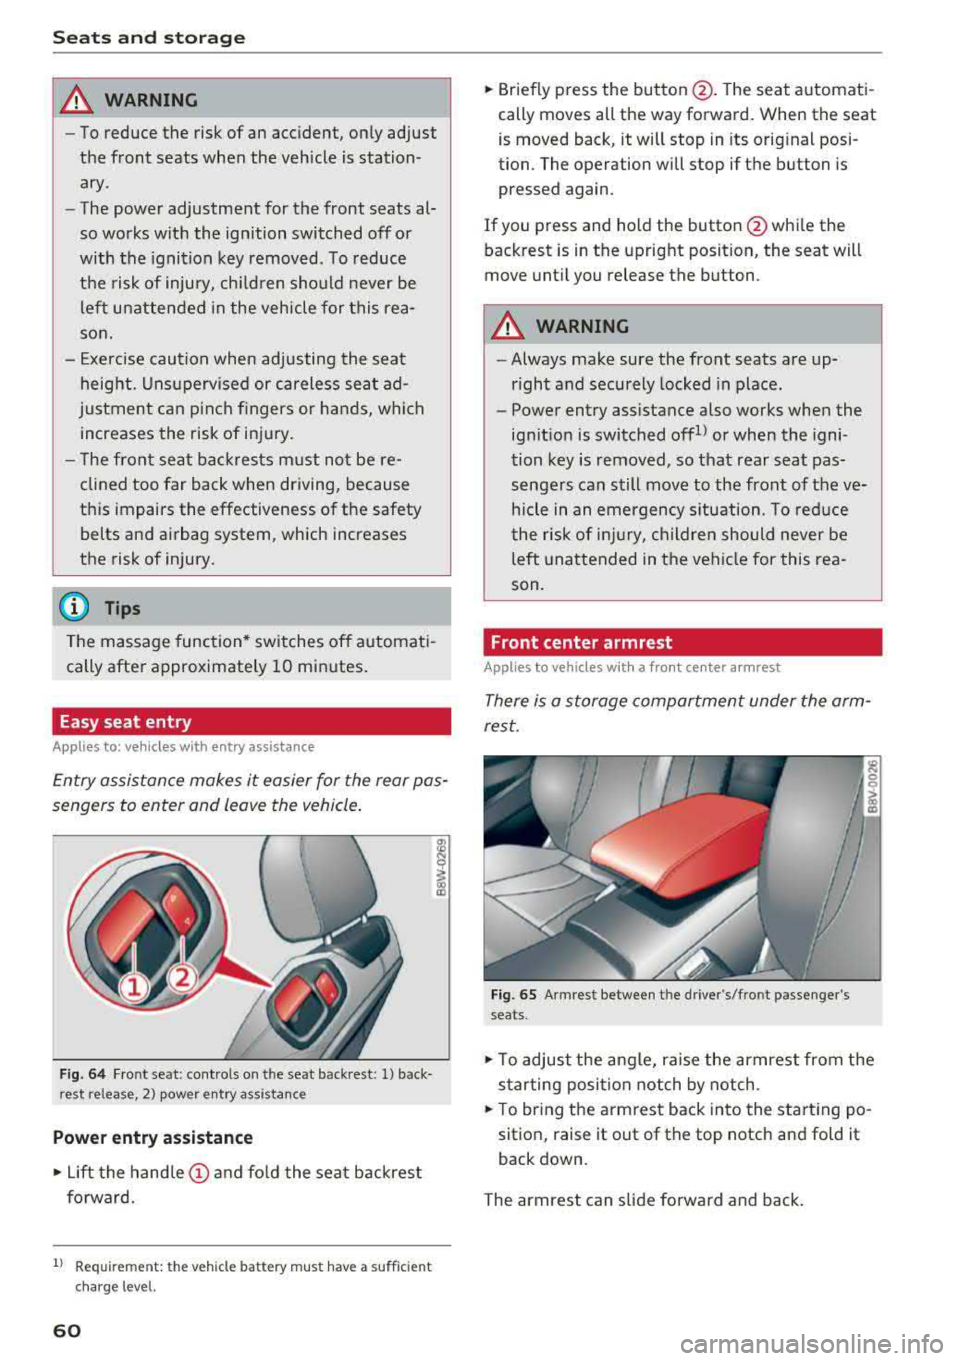
En try assistance makes it easier for the rear pas
sengers to enter and leave the vehicle.
F ig . 64 Fr ont se at: cont ro ls on t he sea t back res t: 1) back
rest release , 2) power entry a ssistance
Power entry assistance
.,. Lift the hand le (!) and fo ld the seat backrest
forward.
1) Requ irem en t: the ve hicle battery m ust have a suff ic ie n t
c ha rg e le v e l.
60
.,. Briefly p ress the button @. T he seat a utomati
cally moves all the way forward. When the seat
is moved back, it will stop in its orig inal posi
tion. The operation will stop if the button is
pressed again .
If you press and ho ld the button @whi le the
back rest is in the upright posit ion, the seat will
move unt il you release the button .
A WARNING
-Always make sure the front seats are up
r ight and securely locked in place.
-
- Power entry assistance also works when the
ign it ion is switched offll or when the igni
tion key is removed , so that rear seat pas
senge rs can still move to the front of the ve
hicle in an emergency s ituation. To reduce
the r isk of injury, childre n should never be
left unattended in the vehi cle for this rea
son.
Front center armrest
Applies to vehicles with a front center armrest
There is a storage compartment under the arm
rest.
Fig. 65 Armrest between t he dr ive r's/fro nt passenger 's
seats .
.,. To adjust the angle, raise the armrest from the
s tarting posi tion notch by notch .
.,. To br ing the armrest back in to the start ing po
sition, raise it out of the top notch and fold it
back down .
The armrest can slide forwa rd and ba ck .
Page 63 of 404
LL co .... N
" N .... 0 N > co
Head restraints
Front head restraints
Applies to: vehicles with adjustable head restraints
Applies to: version 1
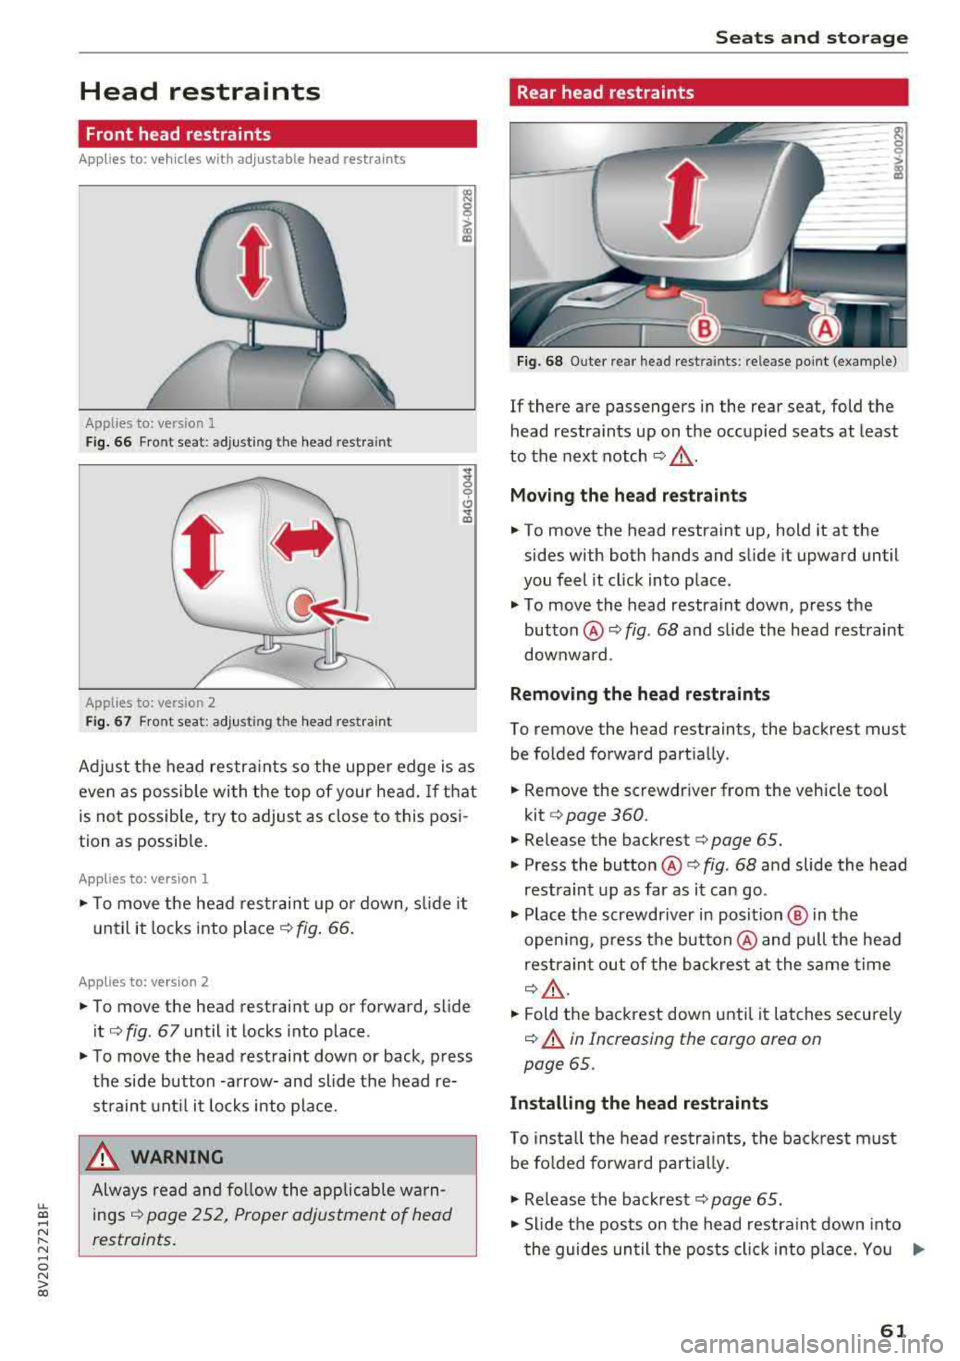
Fig . 66 Front seat: adjusting the head res train t
Applies to: version 2
Fig. 67 Front seat: adjusting the head restrain t
Adjust the head restra ints so the upper edge is as
even as possible wi th the top of your head.
If that
is not possible, t ry to adjust as close to this posi
tion as possible.
Applies to: version l
... To move the head restraint up or down, s lide it
until it locks into
place ¢ fig. 66.
App lies to: version 2
... To move the head restraint up or forward, slide
it¢ fig . 67 until it locks into place .
... To move the head restraint down or back, press
the side button -arrow-and slide the head re
straint unt il it locks into place.
_& WARNING
Always read and follow the applicable warn
ings
~ page 2 52, Proper adjustment of head
restraints.
-
S eats and storag e
Rear head restraints
~ -0 -c;>
18
Fig. 68 O uter rear head restraints: release point (example)
If there are passengers in the rear seat, fold the
head restraints up on the occupied seats at least
to the next notch
~ .&_ .
Mo ving the head r estraint s
... To move the head restraint up, hold it at the
sides with both hands and slide it upward until
you feel it cl ick into place .
.,. To move the head restraint down, press the
button@~ fig. 68 and slide the head restraint
downward .
Removing the he ad re straint s
To remove the head restraints, the backrest must
be folded forward partially .
... Remove the screwdriver from the vehicle tool
kit¢ page 360.
.,. Release the backrest ¢ page 65.
... Press the button @¢ fig. 68 and slide the head
restraint up as far as it can go .
.,. Place the screwdriver in posit ion @ in the
open ing , press the button @and pull the head
restraint out of the backrest at the same time
¢ A .
... Fold the backrest down until it latches securely
~.&. in Increasing the cargo area on
page 65.
In stalling the head r estraint s
To insta ll the head restra ints, the back rest must
be fo lded forward part ia lly.
.,. Re lease the backrest ¢ page 65.
.,. Slide the posts on the head restraint down into
t he guides un til the posts click into place. You
.,.
61
Page 64 of 404
Seats and stor age
shou ld not be able to pu ll the head restraint
out of the backrest.
~ Fo ld the backrest down until it latches securely
c:> .& in Increasing the cargo area on
page 65.
.,&. WARNING
-Always read and fo llow the applicable warn
ings
c:> page 252, Proper adjustment of
head restraints .
-Only remove the rear seat head restraints
when necessary in order to install a child
sa fety seat ¢
page 294, Child safety. In
stall t he head res tra int aga in immed iately
once the child safe ty seat is removed . Dr iv
ing with the head restraints removed or not
in the upright position increases the risk of
serious injury.
Power sources
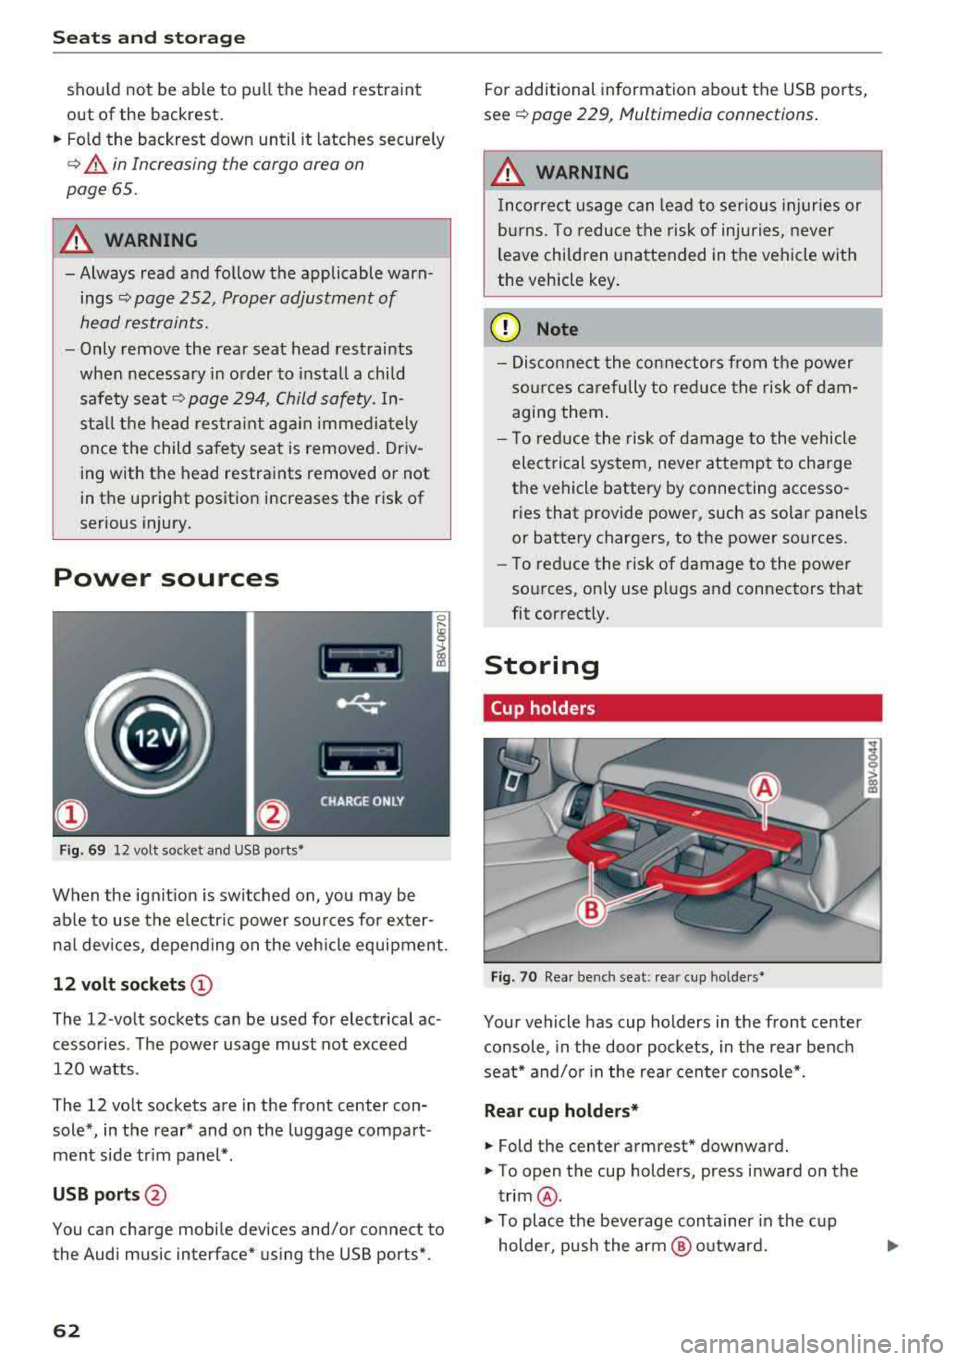
F ig . 69 12 volt socket and USB ports•
When the ign it ion is swit ched on , you may be
ab le to use the e lectr ic power sou rces for exter
nal devices, depending on the veh icle equipment .
12 volt sockets(!)
The 12-volt sockets can be used for electrical ac
cessories . The power usage must not exceed
120 watts .
The 12 volt sockets are in the front center con sole*, in the rear* and on the luggage compart
men t side tr im panel* .
USB ports @
You can charge mobile devices and/or connect to
the Audi music interface* us ing the USB ports*.
62 For additional information about the USB ports,
se e¢
page 229, Multimedia connections .
.,&. WARNING
Incorrect usage can lead to se rious injuries or
b ur ns. To reduce the risk of injuries, never
l eave children una ttended in the vehicle with
the vehicle key .
(D Note
-Disconnect the connectors from t he power
so urces carefully to reduce the risk of dam
agi ng them .
- T o red uce the risk of damage to the vehicle
electrical system, never attempt to charge
the vehicle battery by connecting accesso
ries that provide power, such as solar panels
or battery chargers , to the power sources.
- To reduce the risk of damage to the power
so urces, on ly use plugs and connectors that
fit correctly.
Storing
Cup holders
Fig . 70 Rear benc h seat : rea r cup holder s•
Your vehicle has cup holders in the front center
console, in the door pockets, in the rear bench
seat* and/or in the rea r cente r console*.
Rear cup holders*
~ Fold the center armrest* downward.
~ T o open the cup holders, press inward on the
trim @.
~ To place the beverage container in the c up
holder, pus h the arm @ outward.
Page 76 of 404
Driving
When not being used, a roof rack should be re
moved to decrease the wind resistance of the ve
hicle. This will save you approximately 12% fuel
at speeds from 62
-75 mph (100 -120 km/h).
Save energy
The engine drives the generator, which generates
electricity; the fuel consumption also increases
with the demand for electricity. Therefore, switch
electrical equipment
off when you no longer
need it. Examples of equipment that uses a lot of
energy are air blowers at a high setting, the rear
window defogger and seat heating* .
(D Note
-Do not leave engine idling unattended after
starting. If warning lights should come on
to indicate improper operation, they would
go unheeded. Extended idling also produces
heat, which could result in overheating or
other damage to the vehicle or other prop erty.
- Have your vehicle maintained properly and
in accordance with the service recommenda
tions in your Warranty
& Maintenance book
let . Lack of proper maintenance as well as
improper use of the vehicle will impair the
function of the emission control system and
could lead to damage.
- Do not alter or remove any component of
the Emission Control System unless ap
proved by the manufacturer.
- Do not alter or remove any device, such as
heat shields, switches, ignition wires,
valves, which are designed to protect your
vehicle's Emission Control System and other
important vehicle components.
@ Tips
The consumpt ion estimates as published by
ENVIRONMENTAL PROTECTION AGENCY
(EPA) and Transport Canada may not corre
spond to your actual consumption on the
road, which will vary depending upon vehicle
load and speed, road and weather conditions,
trip length, etc.
74
Steering
Adjusting the steering wheel position
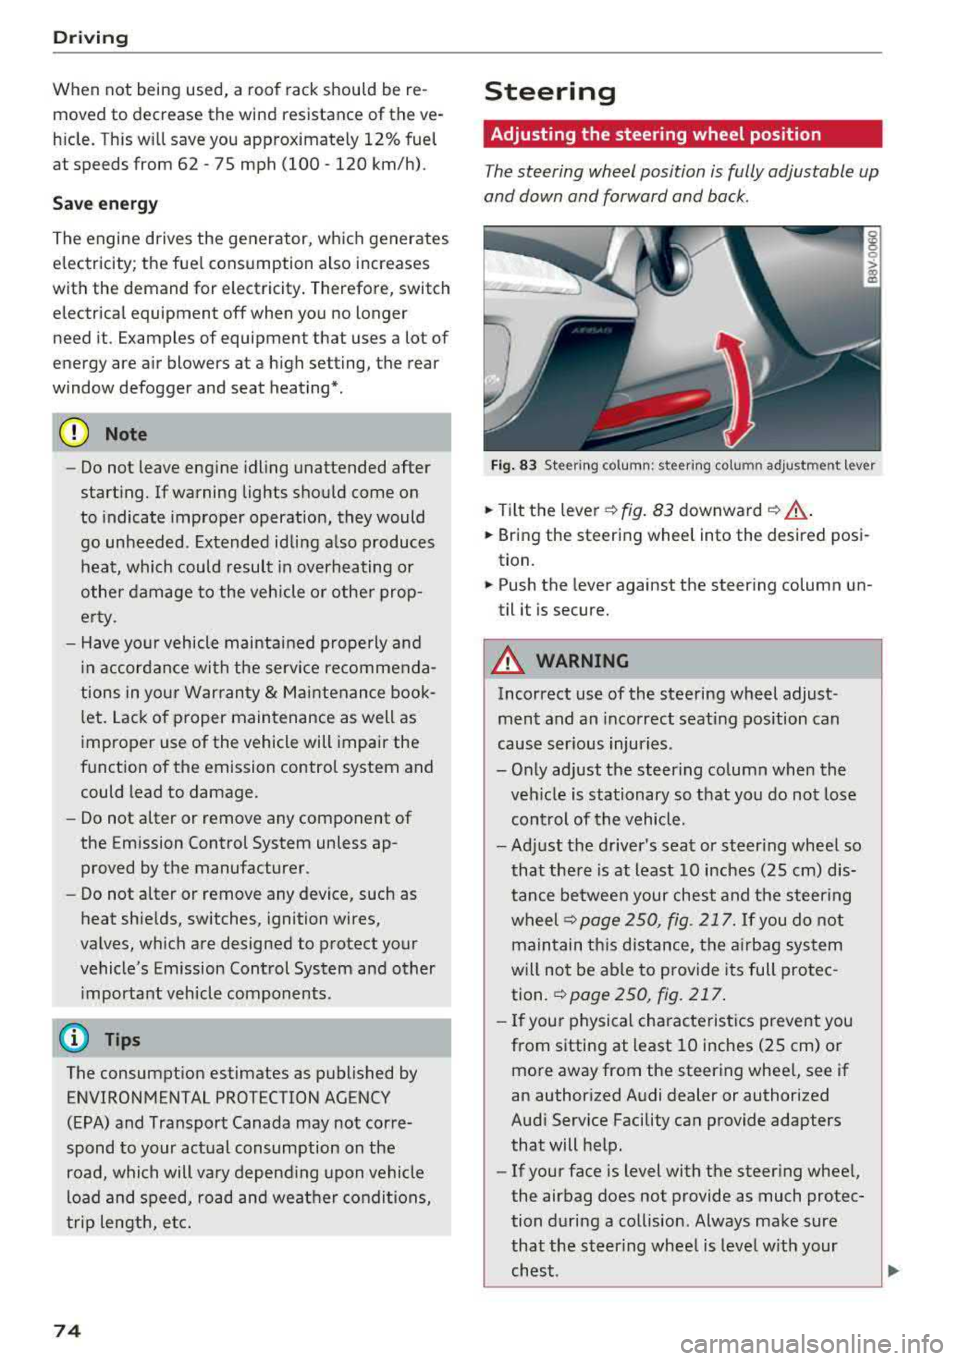
The steering wheel position is fully adjustable up
and down and forward and back.
Fig . 83 Steering column : steering column adjustment lever
.. Tilt the lever -c> fig. 83 downward¢ ,&..
.. Bring the steering wheel into the desired posi
tion.
.. Push the lever against the steering column un
til it is secure.
A WARNING
Incorrect use of the steering wheel adjust
ment and an incorrect seating position can
cause serious injuries.
- Only adjust the steering column when the veh icle is stationary so that you do not lose
control of the vehicle.
-
-Adjust the driver's seat or steer ing wheel so
that there is at least 10 inches
(25 cm) dis
tance between your chest and the steering
wheelr::!>page250, fig. 217. If you do not
maintain this distance, the airbag system
will not be able to provide its full protec tion.
c:> page 250, fig. 217.
- If your physical characteristics prevent you
from sitting at least 10 inches
(25 cm) or
more away from the steering wheel, see if
an authorized Audi dealer or authorized
Audi Service Facility can provide adapters that will help.
- If your face is level with the steering wheel,
the airbag does not provide as much protec
tion during a collision. Always make sure
that the steering wheel is level with your
chest.
Page 254 of 404
Driving safety
to incorrect positioning of the safety belt
and improper seating position.
- Children must always ride in child seats
c:> page 294. Special precautions apply
when installing a child seat on the front passenger seat
c:> page 269.
Proper seating positions for passengers in
rear seats
Rear seat passengers must sit upright with both
feet on the floor consistent with their physical
size and be properly restrained whenever the ve hicle is in use.
To reduce the r isk of injury caused by an incorrect
seating position in the event of a sudden braking
maneuver or an accident, yo ur passengers on the
rear bench seat must always observe the follow
i n g:
• For adjustable head restra ints: adjust the head
r estra int so the uppe r edge is as even as poss i
ble with the top of your head. If that is not pos
sible, try to ad just the head restra int so th at it
is as close to this position as possib le
c:> page 61.
• Keep both feet flat i n the footwell in front of
the rear seat.
• Fasten and wear safety belts properly
c:> page264.
• Make sure that children are always properly re
strained in a ch ild restraint that is approp riate
for their size and age
c::> page 294.
_& WARNING
Passenge rs who are improperly seated on the
rear seat can be seriously injured in a crash .
- E ach passenger m ust always sit on a seat o f
their own an d properly fas ten and we ar the
sa fe ty belt belongi ng to th at sea t.
- Safe ty belt s only offe r max imum p rotection
when the safety belts are properly posi
tioned on the body and securely latched . By
not sitting upright, a rear seat passenger in
creases the risk of personal in ju ry from im
properly positioned safety belts!
252
- For adjustable head restraints: always ad
just the head restraint properly so that it can give maximum protection.
Proper adjustment of head restraints
App lies to : vehicles with adjustable head restra ints
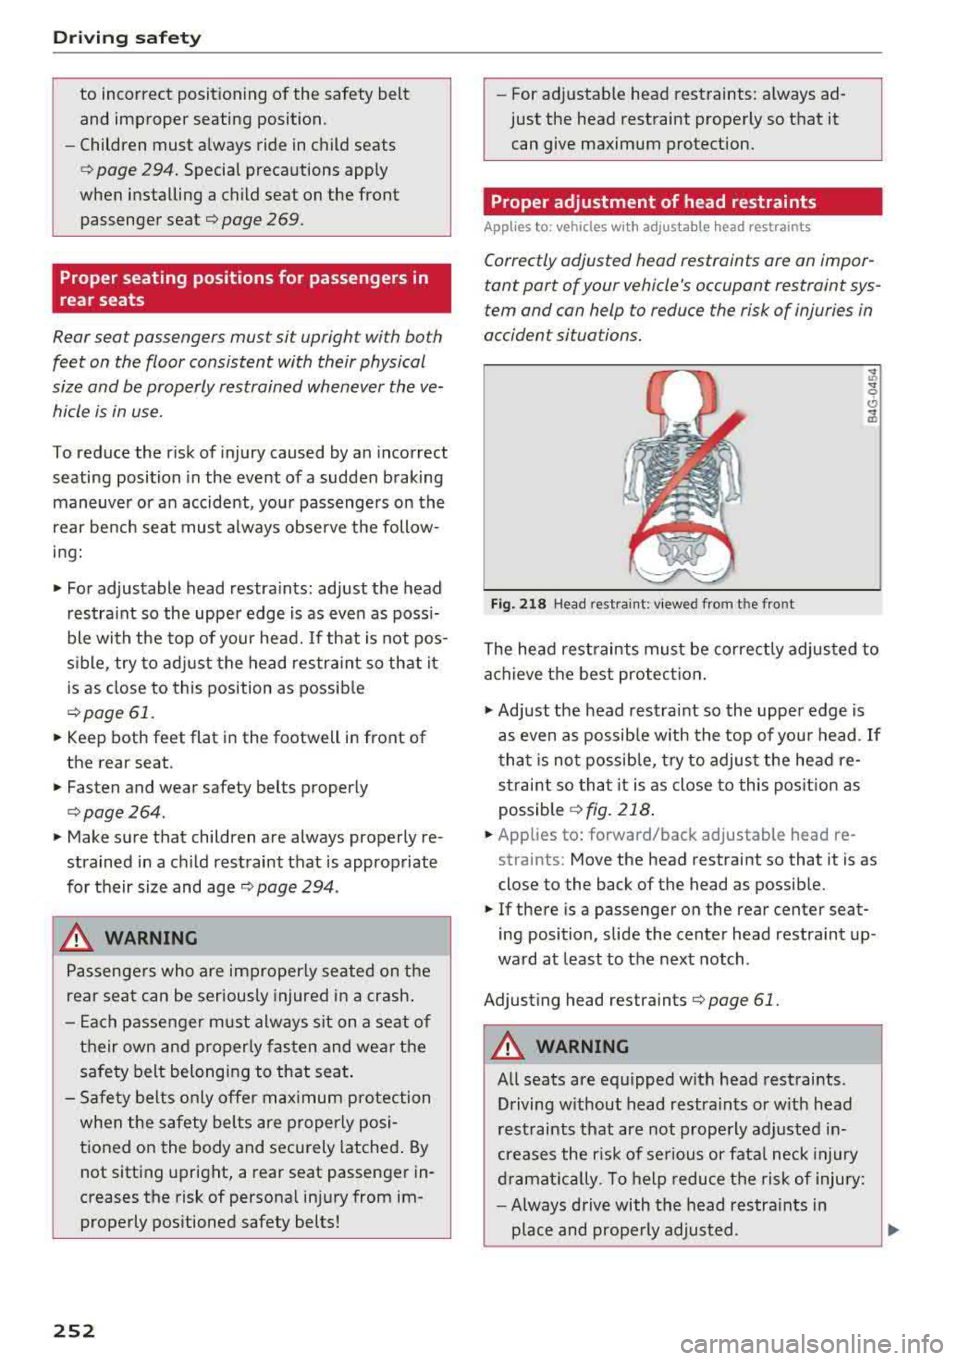
Correctly adjusted head restraints are an impor
tant part of your vehicle's occupant restraint sys
tem and can help to reduce the risk of injuries in
accident situations.
Fig. 2 18 Head rest ra in t: viewed from t he front
The head rest raints must be corre ctly adjus ted to
a chieve t he best protec tion .
• Adjust the head rest raint so the upper edge is
as even as possib le w ith the top of you r head . If
t ha t is no t possib le, try to adjus t the head re
s trai nt so that it is as close to this pos it ion as
possible
c:> fig. 218 .
• Applies to: forward/back adjustable head re
straints: Move the head restraint so that it is as
close to the back of the head as possib le.
• If there is a passenger on the rear center seat
ing position, slide the center head restraint up
ward at least to the next notch .
Adjust ing head restraints
c:>page 61.
_& WARNING
All seats are eq uipped w ith head restraints .
Driving w ithout head restraints or w ith head
restraints that are not prope rly adjusted in
creases the r is k of se rious or fata l neck injury
dr amat ic al ly. T o help reduce t he risk of injury:
- Always drive with the head restra ints in
place and properly adjusted.
Page 268 of 404
Safety belts
Unfastening safety belts
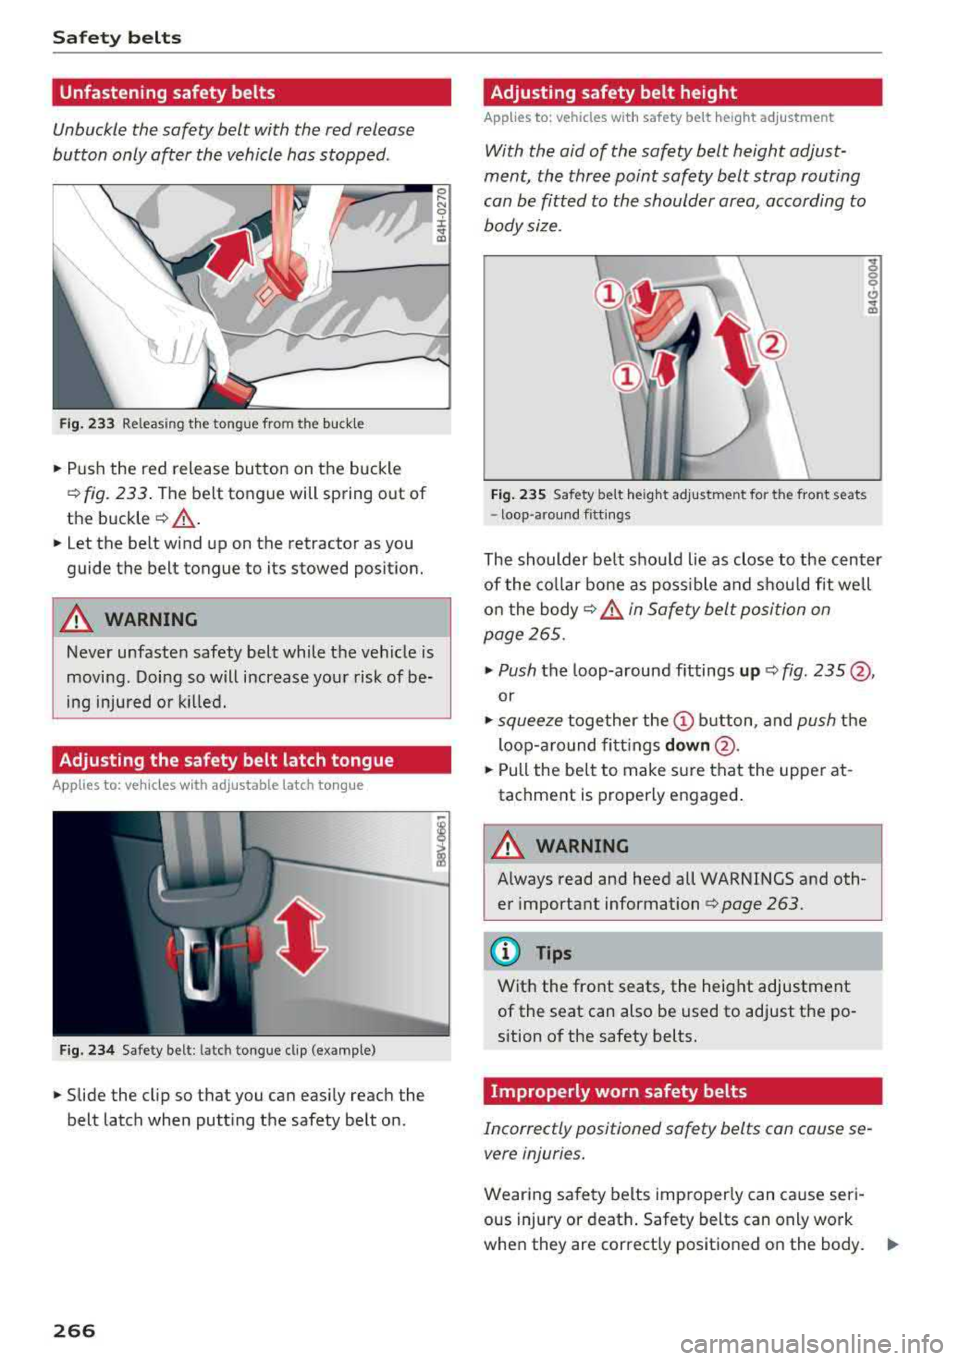
Unbuckle the safety belt with the red release
button only after the vehicle has stopped .
Fig. 233 Releasing the tongue from the buckle
.,. Push the red release button on the buckle
¢
fig. 233. The belt tongue will spring out of
the buckle ¢
,&.
.. Let the belt wind up on the retractor as you
guide the belt tongue to its stowed position.
A WARNING
Never unfasten safety belt while the vehicle is
moving. Doing so will increase your risk of be
ing injured or killed.
Adjusting the safety belt latch tongue
Applies to: vehicles with adjustable latch tongue
Fig. 234 Safety belt: latch tongue cl ip (example)
.. Slide the clip so that you can easily reach the
belt latch when putting the safety belt on .
266
0 i:::; 0 ± .. a,
Adjusting safety belt height
Applies to: vehicles with safety belt height adjustment
With the aid of the safety belt height adjust
ment, the three point safety belt strap routing
can be fitted to the shoulder area, according to
body size .
Fig. 235 Safety belt heigh t adjustment for the front seats
-loop-around fittings
The shoulder belt shou ld lie as close to the center
of the collar bone as possible and shou ld fit well
on the body¢
A in Safety belt position on
page 265 .
.,. Push the loop-around fittings up q fig . 235 @,
or
.,. squeeze together the (D button, and push the
loop-a round fittings
down @.
.. Pull the belt to make sure that the upper at
tachment is properly engaged.
A WARNING
Always read and heed all WARNINGS and oth
er important information¢
page 263.
(l} Tips
With the front seats, the height adjustment
of the seat can also be used to adjust the po
sition of the safety belts.
Improperly worn safety belts
Incorrectly positioned safety belts can cause se vere injuries.
Wearing safety belts imp roper ly can cause seri-
ous injury or death. Safety belts can only work
when they are correct ly positioned on the body.
IIJ,,
Page 271 of 404
u. 00 .-< N l' N .-< 0 N > 00
Airbag system Important information
Importance of wearing safety belts and
sitting properly
Airbags are only supplemental restraints. For
airbags to do their job, occupants must always
properly wear their safety belts and be in a prop
er seating position.
For your safety and the safety of your passen
gers, before driving off, always :
.,. Adjust the driver's seat and steering wheel
properly~ page 250,
.,. Adjust the front passenger's seat properly
~page 251,
.,. Wear safety belts properly ~page 263,
.. Always properly use the proper child restraint
to protect children
r=> page 294.
In a collision, airbags must inflate within the
blink of an eye and with considerable force. The
supplemental airbags can cause injuries if the
driver or the front seat passenger is not seated
properly. Therefore in order to help the airbag to
do its job, it is important, both as a driver and as
a passenger to sit properly at all times .
By keeping room between your body and the
steering wheel and the front of the passenger
compartment, the airbag can inflate fully and
completely and provide supplemental protection in certain frontal collisions
r=> page 250, Correct
passenger seating positions .
For details on the
operation of the seat adjustment controls
r=>page 59.
It's especially important that children are proper
ly restrained
r::> page 294 .
There is a lot that the driver and the passengers
can and must do to help the individual safety fea
tures installed in your Audi work together as a
system .
Proper seating position is important so that the
front airbag on the driver side can do its job. If
you have a physical impairment or condition that prevents you from sitting properly on the driver
seat with the safety belt properly fastened and
Airbag system
reaching the pedals, or if you have concerns with
regard to the function or operation of the Ad
vanced Airbag System, please contact your au
thori zed Audi dealer or qualified workshop, or
call Audi Customer Relations at 1-800-822-2834
for possible modifications to your vehicle.
When the airbag system deploys, a gas generator
will fill the airbags, break open the padded cov ers, and inflate between the steering wheel and
the driver and between the instrument panel and
the front passenger. The airbags will deflate im
mediately after deployment so that the front oc
cupants can see through the windshield again
without interruption.
All of this takes place in the blink of an eye, so
fast that many people don't even realize that the
airbags have deployed. The airbags also inflate
with a great deal of force and nothing should be
in their way when they deploy. Front airbags in
combination with properly worn safety belts slow
down and limit the occupant's forward move
ment . Together they help to prevent the driver
and front seat passenger from hitting parts of
the inside of the vehicle while reducing the forces acting on the occupant during the crash . In this
way they help to reduce the risk of injury to the
head and upper body in the crash. Airbags do not
protect the arms or the lower parts of the body.
Both front airbags will not inflate in all frontal
collisions . The triggering of the airbag system de
pends on the vehicle deceleration rate caused by
the collision and registered by the electronic con
trol unit . If this rate is below the reference value
programmed into the control unit, the airbags
will not be triggered, even though the car may be badly damaged as a result of the collision. Vehi
cle damage, repair costs or even the lack of vehi
cle damage is not necessarily an indication of
whether an airbag should inflate or not .
Since the circumstances will vary considerably between one collision and another, it is not possi
ble to define a range of vehicle speeds that will
cover every possible kind and angle of impact
that will always trigger the airbags . Important
factors include, for example, the nature (hard or
soft) of the object which the car hits, the angle of
impact, vehicle speed , etc. The front airbags will
.,.
269
Page 286 of 404
Airbag syste m
seat into its rearmost position in the seat's
fore and aft adjustment range, as far away
from the airbag as possible. The backrest must be adjusted to an upright posit ion .
Make sure that the
P A SSEN GER AIR BAG
OFF
light comes on and stays on all the t ime
whenever the ignition is sw itched on.
A WARNING
- If the PASSENGER AIR BAG OFF light does
not go o ut w hen an ad ult is sitting on the
front passenger seat after taking the steps
described above, make sure the adu lt is
properly seated and restrained at one of the
rear seating positions .
- Have the airbag system inspected by your
Audi dealer before transporting anyone on
the front passenger seat .
(D Tips
If the capacitive passenge r detection system
determines that the front passenger seat is
empty, the fronta l airbag on the passenger
side w ill be turned off, and the
PA SSE NGER
AIR BAG OFF light will stay on.
Repair , care and disposal of the airbags
Parts of the a irbag system are installed at many
d ifferent places on your Aud i. Install ing , remov
ing, servic ing or repa iring a part in an area of the
ve hicle can damage a pa rt of an airbag system
and p revent that system from working properly
in a co llision .
There are some important th ings you have to
know to make sure that the effect iveness of the
system w ill not be impaired and th at discarded
components do not cause injury or pollute the
environment .
A WARNING
Improper care, servicing and repair proce
dures can increase the r isk of personal injury
and death by preventing an airbag from de
ploying when needed or dep loying an airbag
unexpectedly:
284
-
- Never cover, obstruct, or change the steer
ing wheel horn pad or airbag cover or the in
strument panel or modify them in any way.
- Never attach any objects such as cup ho lders
or telephone mountings to the surfaces cov
ering the a irbag un its .
- For cleaning the horn pad or instrument panel, use only a soft, dry cloth or one mois
tened w it h plai n water . Solvents or cleaners
could damage the airbag cover or change
the st iffness or strength of the material so
that the ai rbag cannot deploy and p rotect
p roperly.
- Never repair, ad just, o r change any parts of
the airbag system.
- All work on the steer ing wheel, inst rument
pa nel, front seats o r electr ica l system ( in
cl uding the insta llation of a udio eq uipment,
cell ular te lephones and CB radios, etc.)
m ust be performed by a qualified techn ician
who has the training and specia l equipment
necessary.
- For any work on the airbag system, we
strong ly recommend that you see yo ur a u
thorized A udi dealer or qualified workshop .
- Never modify the front b umper or parts of
the vehicle body.
-Always make sure that the side airbag can inf late wit hout interference:
- Never install seat covers or replacement upholstery ove r the front seatbacks that
have not bee n specifica lly approved by
A udi .
- Never use additional seat c ushi ons that
cover the areas where the side airbags in
flate.
- Damage to the orig inal seat cove rs or to
t h e seam in the area of the s ide a irbag
module mus t always be repai red immedi
ate ly by an authorized Aud i dealer.
- The airba g sys tem can deploy o nly on ce. Af
t er an airbag has been dep loyed, i t m ust be
replaced with new replaceme nt parts de
signed and approved especia lly for your
Aud i mode l version . Rep lacement of com
plete airbag systems or airbag components
must be performed by qua lified workshops
only . Make sure t hat any airbag service
Page 297 of 404
u. 00 ... N l' N ... 0 N > 00
A WARNING
Children on the front seat of any car even with
Advanced Airbags can be seriously injured or
even killed when an airbag inflates. A child in
a rearward-facing child safety seat installed
on the front passenger seat will be serious ly
injured and can be killed if the front airbag i n
flat es.
- The inflating a irbag w ill hit the child safety
seat or infant carrier with great force and
will smash the ch ild safety seat and child
against the backrest, center armrest, or
doo r.
- Always install rear-facing child safety seats
on the rear seat.
- If you must install a rearward fac ing ch ild
safety seat on the front passenger seat in
exceptiona l circumstances and the
PASSEN
GER AIR BAG OFF
light does not come on
and stay on, immediately insta ll the rear
facing child safety seat in a rear seating po sition and have the airbag system inspected
immediately by your Audi dealer.
A WARNING
- Forward-fac ing ch ild seats installed on the
front passenger seat may interfere with the
deployment of the a irbag and cause serious
personal injury to the child.
- If except ional circumstances require the use
of a forward-facing child restraint on the
front passenger's seat, the child's safety
and well-being require the following special
prec autions to be taken:
- Always make sure that the fo rward-facing
seat has been designed and cert ified by its
manufacturer fo r use on a front passenger
seat with a front and s ide a irbag.
- Always care fully follow the manufacturer's
instructions provided with the child seat
or infant carrier.
- Never install a chi ld restraint without a
proper ly attached top tether strap if the
child restraint manufacturer's instructions
require the top tether strap to be used .
Child saf ety
- Never put the forward-fac ing child re
straint up against or very near the instru
ment panel.
- Applies to: vehicles with safety be lt height
adjustment: Always set the safety belt up
per anchorage to the adjustment pos ition
that permits proper insta llation in accord
ance with the child restrain t manufactur
er's instr uctions .
- Always move the fron t passenger seat to
the h ighes t position in the up and down
adjustment range and move it back to the
re armos t position in the se at's fore a nd
a ft a dju stmen t range, as far away from
the a irbag as poss ible, befo re installing
the forward-facing child restra int .
- Always make sure tha t the safety belt up
per anchorage is behind the ch ild restraint
and not next to or in front of the child re
straint so that the safety belt will be prop
erly pos it ioned.
- Always make sure that nothing p revents
the front passenger's seat from being moved to the rearmost position in its fore
and aft adjustment range .
- Never place objects on the seat (such as a
laptop , CD player , electronic games de
vice, power inverter o r seat heater fo r
ch ild seats) . These may influence the elec
trical capacitance measu red by the capac i
tive p assenger detec tion system an d can
also fly around in an a ccid en t a nd c ause
serious person al injury .
- Never pla ce or use any ele ct rical devi ce
(s uch as a laptop, CD player, ele ctroni c
games device, powe r inverter or seat heat
er for child seats) on the front passenger
seat if the device is connected to the 12-
vo lt socket or the cigarette lighter socket.
- If a seat heate r has been retrofitted or
othe rw ise added to the front passenger
seat, never insta ll any child restraint sys
tem on this seat.
- Make su re that there a re no wet objects
(such as a wet towe l) and no water or oth
er liquids on the front passenger seat
cush io n.
295