AUDI A4 1995 B5 / 1.G AWM Engine Valve Gear Service Workshop Manual
Manufacturer: AUDI, Model Year: 1995,
Model line: A4,
Model: AUDI A4 1995 B5 / 1.G
Pages: 58, PDF Size: 1.06 MB
AUDI A4 1995 B5 / 1.G AWM Engine Valve Gear Service Workshop Manual
A4 1995 B5 / 1.G
AUDI
AUDI
https://www.carmanualsonline.info/img/6/945/w960_945-0.png
AUDI A4 1995 B5 / 1.G AWM Engine Valve Gear Service Workshop Manual
Trending: check engine, oil change, light, roof, coolant temperature, oil temperature, width
Page 1 of 58
15-37
Valve gear, servicing
Note:
Cylinder heads that have cracks between the
valve seats or between valve seat inserts and
the spark plug thread can be used further
without reducing service life, provided the
cracks do not exceed a maximum of 0.3 mm in
width, or when no more than the first 4 turns of
the spark plug threads are cracked.
Wait about 30 minutes after installing the
camshafts before starting the engine. Hydraulic
valve compensation elements have to settle
(otherwise valves will strike pistons).
After working on the valve gear, turn the engine
carefully at least 2 rotations to ensure that none
of the valves make contact when the starter is
operated.
Replace all gaskets and seals.
Pa
ge 1 of 58 Valve
gear, servicin
g
11/21/2002 htt
p://127.0.0.1:8080/audi/servlet/Dis
play?action=Goto&t
yp
e=re
pair&id=AUDI.B5.GE06.15.2
Page 2 of 58
15-38
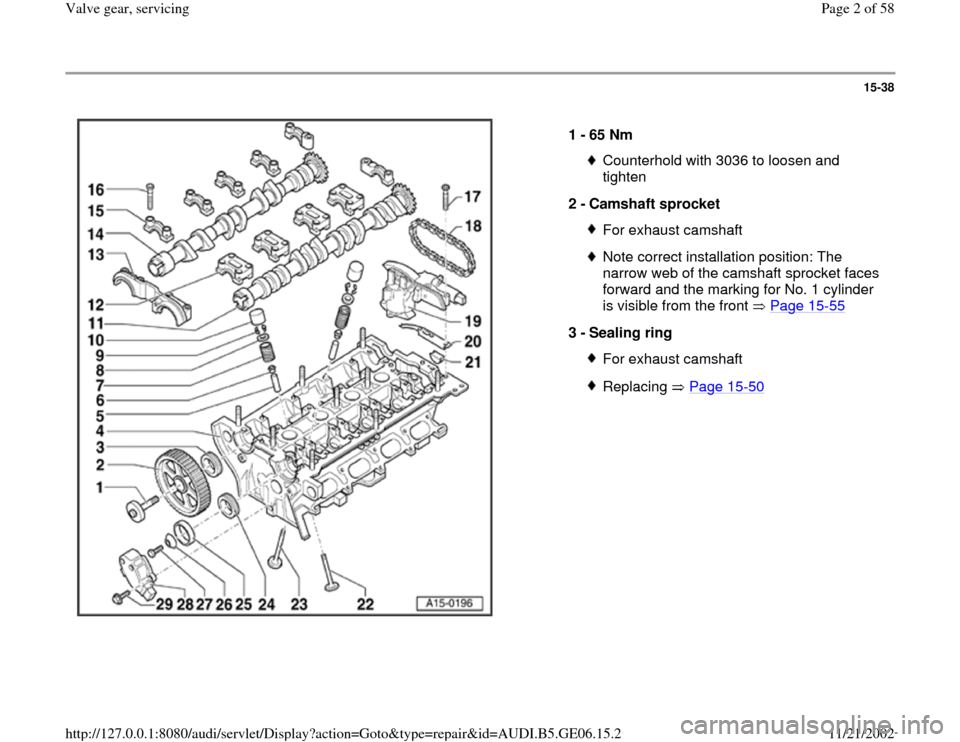
1 -
65 Nm
Counterhold with 3036 to loosen and
tighten
2 -
Camshaft sprocket For exhaust camshaftNote correct installation position: The
narrow web of the camshaft sprocket faces
forward and the marking for No. 1 cylinder
is visible from the front Page 15
-55
3 -
Sealing ring
For exhaust camshaftReplacing Page 15
-50
Pa
ge 2 of 58 Valve
gear, servicin
g
11/21/2002 htt
p://127.0.0.1:8080/audi/servlet/Dis
play?action=Goto&t
yp
e=re
pair&id=AUDI.B5.GE06.15.2
Page 3 of 58
15-39
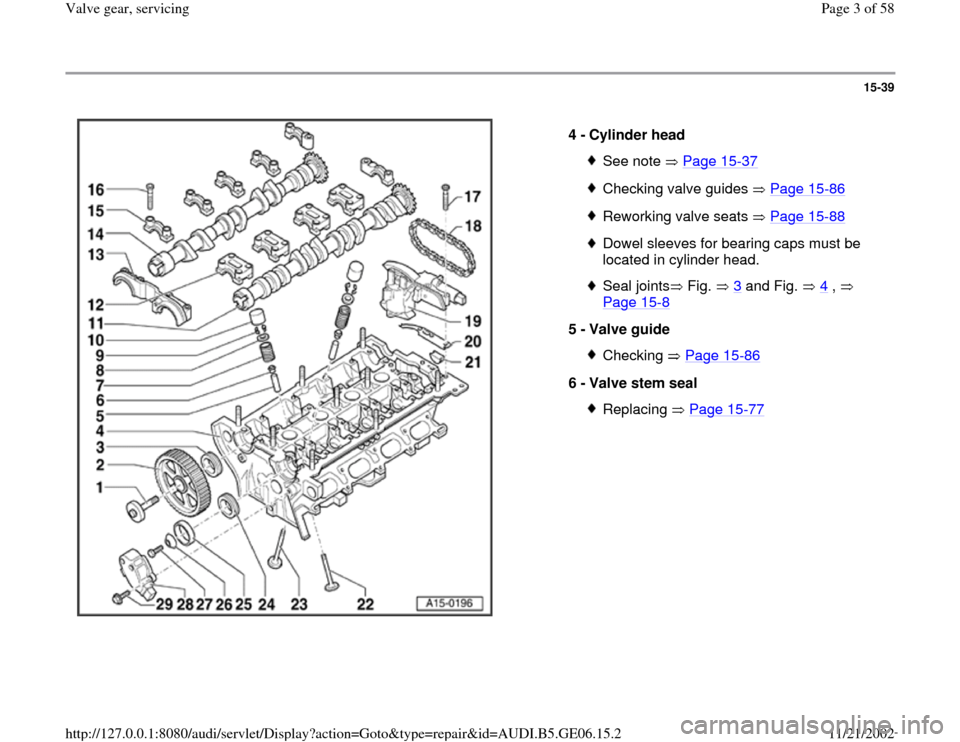
4 -
Cylinder head
See note Page 15
-37
Checking valve guides Page 15
-86
Reworking valve seats Page 15
-88
Dowel sleeves for bearing caps must be
located in cylinder head. Seal joints Fig. 3
and Fig. 4
,
Page 15
-8
5 -
Valve guide
Checking Page 15
-86
6 -
Valve stem seal
Replacing Page 15
-77
Pa
ge 3 of 58 Valve
gear, servicin
g
11/21/2002 htt
p://127.0.0.1:8080/audi/servlet/Dis
play?action=Goto&t
yp
e=re
pair&id=AUDI.B5.GE06.15.2
Page 4 of 58
15-40
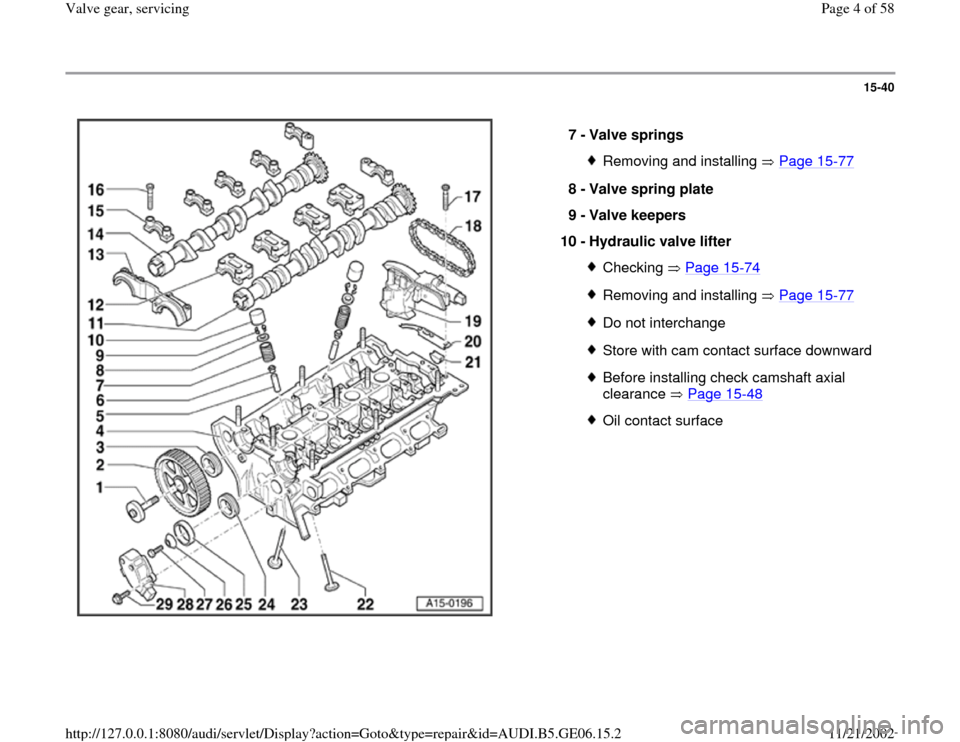
7 -
Valve springs
Removing and installing Page 15
-77
8 -
Valve spring plate
9 -
Valve keepers
10 -
Hydraulic valve lifter
Checking Page 15
-74
Removing and installing Page 15
-77
Do not interchangeStore with cam contact surface downwardBefore installing check camshaft axial
clearance Page 15
-48
Oil contact surface
Pa
ge 4 of 58 Valve
gear, servicin
g
11/21/2002 htt
p://127.0.0.1:8080/audi/servlet/Dis
play?action=Goto&t
yp
e=re
pair&id=AUDI.B5.GE06.15.2
Page 5 of 58
15-41
11 -
Intake camshaft
Check radial clearance with Plastigage
(hydraulic lifters not installed). Wear limit:
0.1 mm Run-out: no more than 0.035 mmChecking axial clearance Page 15
-48
Removing and installing camshafts
Page 15
-62
12 -
Bearing cap for intake camshaft
Must be located on dowel sleevesDowel sleeves must be located in cylinder
head. Note installation positionInstallation sequence Page 15
-67Pa
ge 5 of 58 Valve
gear, servicin
g
11/21/2002 htt
p://127.0.0.1:8080/audi/servlet/Dis
play?action=Goto&t
yp
e=re
pair&id=AUDI.B5.GE06.15.2
Page 6 of 58
15-42
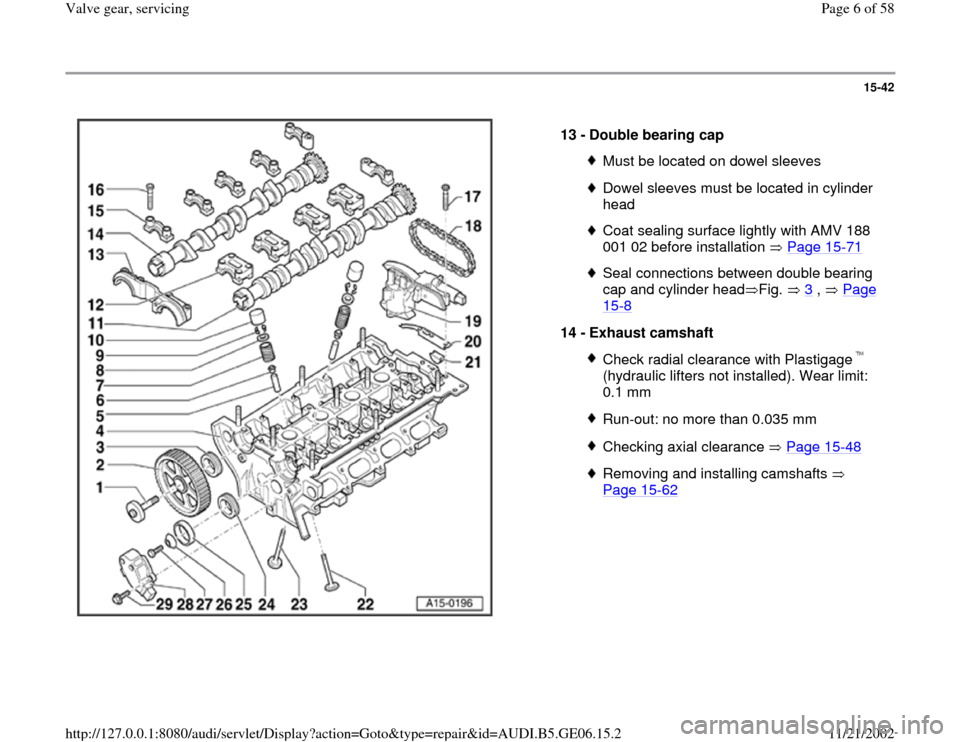
13 -
Double bearing cap
Must be located on dowel sleevesDowel sleeves must be located in cylinder
head Coat sealing surface lightly with AMV 188
001 02 before installation Page 15
-71
Seal connections between double bearing
cap and cylinder head Fig. 3
, Page
15
-8
14 -
Exhaust camshaft
Check radial clearance with Plastigage
(hydraulic lifters not installed). Wear limit:
0.1 mm Run-out: no more than 0.035 mmChecking axial clearance Page 15
-48
Removing and installing camshafts
Page 15
-62
Pa
ge 6 of 58 Valve
gear, servicin
g
11/21/2002 htt
p://127.0.0.1:8080/audi/servlet/Dis
play?action=Goto&t
yp
e=re
pair&id=AUDI.B5.GE06.15.2
Page 7 of 58
15-43
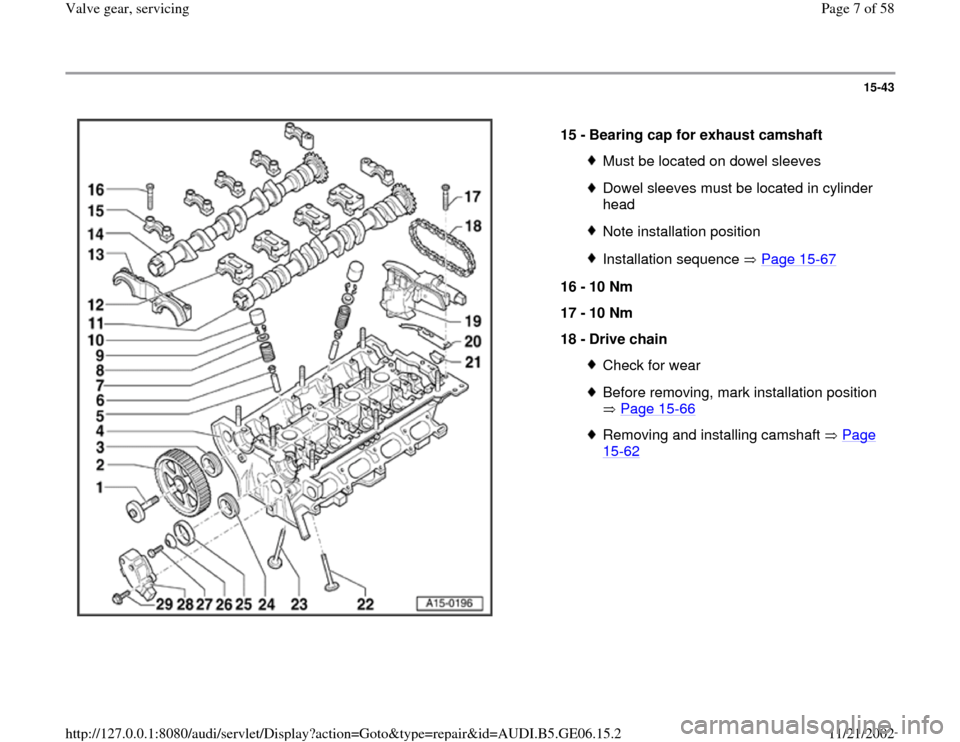
15 -
Bearing cap for exhaust camshaft
Must be located on dowel sleevesDowel sleeves must be located in cylinder
head Note installation positionInstallation sequence Page 15
-67
16 -
10 Nm
17 -
10 Nm
18 -
Drive chain
Check for wearBefore removing, mark installation position
Page 15
-66
Removing and installing camshaft Page 15
-62
Pa
ge 7 of 58 Valve
gear, servicin
g
11/21/2002 htt
p://127.0.0.1:8080/audi/servlet/Dis
play?action=Goto&t
yp
e=re
pair&id=AUDI.B5.GE06.15.2
Page 8 of 58
15-44
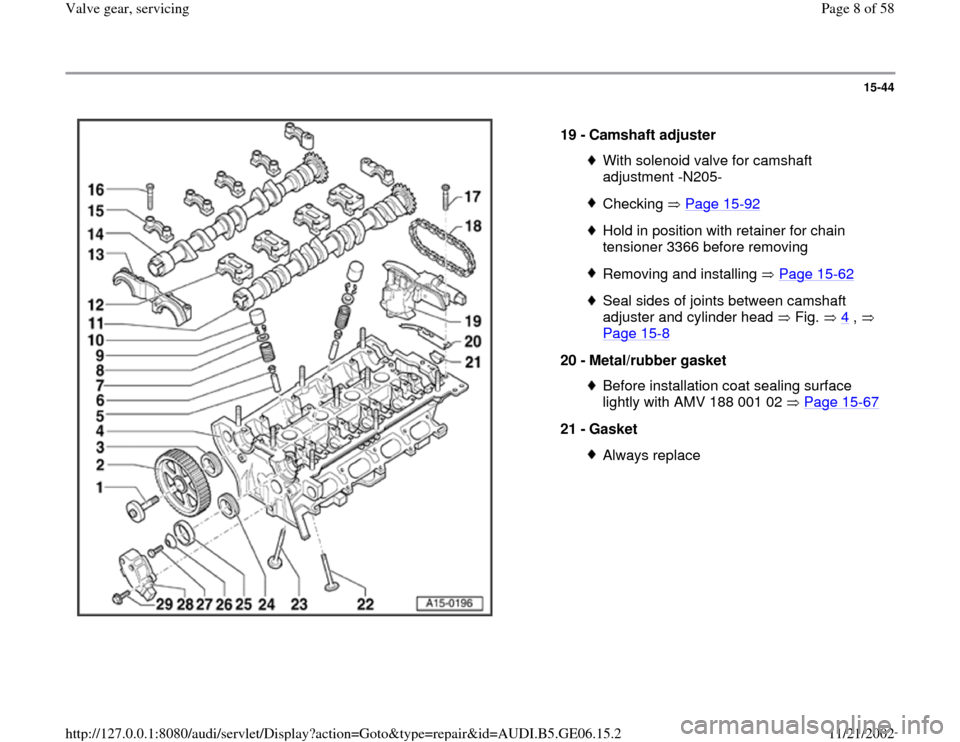
19 -
Camshaft adjuster
With solenoid valve for camshaft
adjustment -N205- Checking Page 15
-92
Hold in position with retainer for chain
tensioner 3366 before removing Removing and installing Page 15
-62
Seal sides of joints between camshaft
adjuster and cylinder head Fig. 4
,
Page 15
-8
20 -
Metal/rubber gasket
Before installation coat sealing surface
lightly with AMV 188 001 02 Page 15
-67
21 -
Gasket
Always replace
Pa
ge 8 of 58 Valve
gear, servicin
g
11/21/2002 htt
p://127.0.0.1:8080/audi/servlet/Dis
play?action=Goto&t
yp
e=re
pair&id=AUDI.B5.GE06.15.2
Page 9 of 58
15-45
22 -
Exhaust valve
With sodium fillingNote instructions on scrapping valves with
a sodium filling Page 15
-47
Do not rework, only lapping in is permittedValve dimensions Fig. 1
, Page 15
-
47
Checking valve guides Page 15
-86
Reworking valve seats Page 15
-88
23 -
Intake valve
Do not rework, only lapping in is permittedValve dimensions Fig. 1
, Page 15
-
47
Checking valve guides Page 15
-86
Reworking valve seats Page 15
-88Pa
ge 9 of 58 Valve
gear, servicin
g
11/21/2002 htt
p://127.0.0.1:8080/audi/servlet/Dis
play?action=Goto&t
yp
e=re
pair&id=AUDI.B5.GE06.15.2
Page 10 of 58
15-46
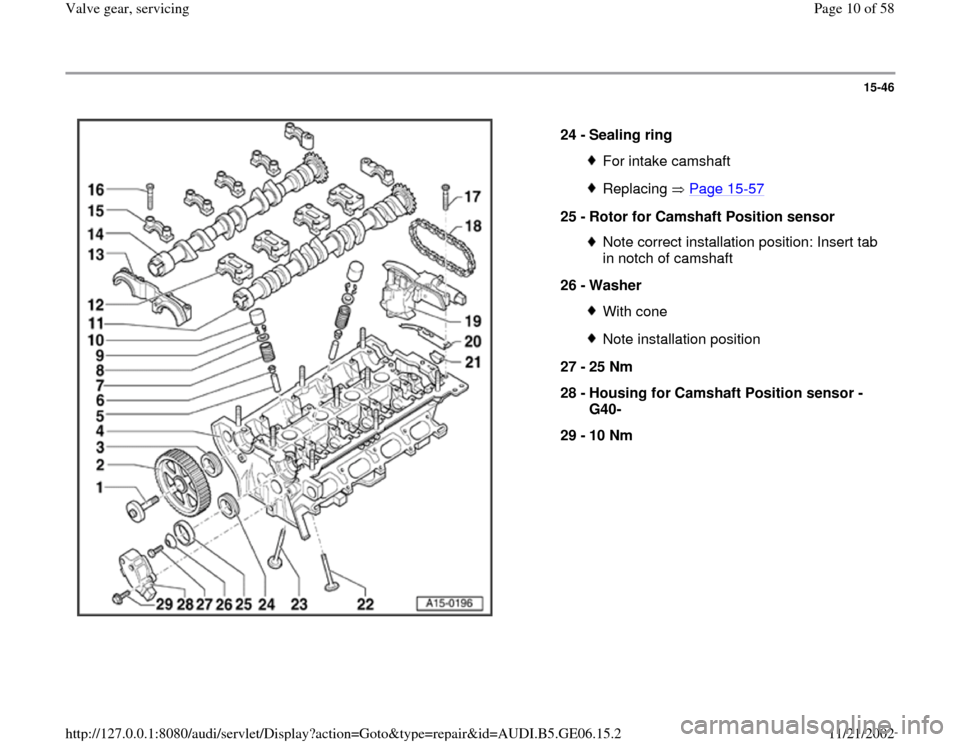
24 -
Sealing ring
For intake camshaftReplacing Page 15
-57
25 -
Rotor for Camshaft Position sensor
Note correct installation position: Insert tab
in notch of camshaft
26 -
Washer With coneNote installation position
27 -
25 Nm
28 -
Housing for Camshaft Position sensor -
G40-
29 -
10 Nm
Pa
ge 10 of 58 Valve
gear, servicin
g
11/21/2002 htt
p://127.0.0.1:8080/audi/servlet/Dis
play?action=Goto&t
yp
e=re
pair&id=AUDI.B5.GE06.15.2
Trending: oil pressure, engine oil, mileage, clock, torque, checking oil, check engine
