wheel bolts AUDI A4 1995 B5 / 1.G Suspension Wheel Alignment Workshop Manual
[x] Cancel search | Manufacturer: AUDI, Model Year: 1995, Model line: A4, Model: AUDI A4 1995 B5 / 1.GPages: 37, PDF Size: 0.41 MB
Page 1 of 37
44-6
Wheel alignment
WARNING!
Do not re-use any fasteners that are worn or
deformed in normal use.
Some fasteners are designed to be used only
once, and are unreliable and may fail if used
a second time. This includes, but is not
limited to, nuts, bolts, washers, circlips and
cotter pins. Always follow the
recommendations in this manual-replace
these fasteners with new parts where
indicated, and any other time it is deemed
necessary by inspection.
The wheel alignment should be measured using
VW/Audi approved wheel alignment equipment.
Wheel alignment checks must always include
both the front and the rear axles. Otherwise the
proper running characteristics of the vehicle
cannot be ensured.
Notes:
The wheel alignment should not be checked
before the vehicle has completed 1000-2000
km (600-1200 miles) so that the coil springs
have time to settle.
Pa
ge 1 of 37 Wheel ali
gnment
11/19/2002 htt
p://127.0.0.1:8080/audi/servlet/Dis
play?action=Goto&t
yp
e=re
pair&id=AUDI.B5.SU01.44.2
Page 20 of 37
44-21
Rear axle toe (front-wheel-drive
vehicles), centering
Individual toe settings on the rear axle cannot be
adjusted.
By moving the rear axle within the elongated
holes it is possible to center the individual toe
settings.
- Loosen securing bolts on mounting brackets.
- Center individual toe settings by moving axle
beam within elongated holes at mounting
brackets.
If the overall toe setting is outside the allowable
tolerance, or if it is not possible to center the
individual settings, the axle beam must be
checked for damage and replaced if necessary.
The body alignment must also be
checked/measured in the area of the rear axle
mounting points and serviced as necessary.
Repair Manual, Body Collision Repair
Pa
ge 20 of 37 Wheel ali
gnment
11/19/2002 htt
p://127.0.0.1:8080/audi/servlet/Dis
play?action=Goto&t
yp
e=re
pair&id=AUDI.B5.SU01.44.2
Page 23 of 37
44-24
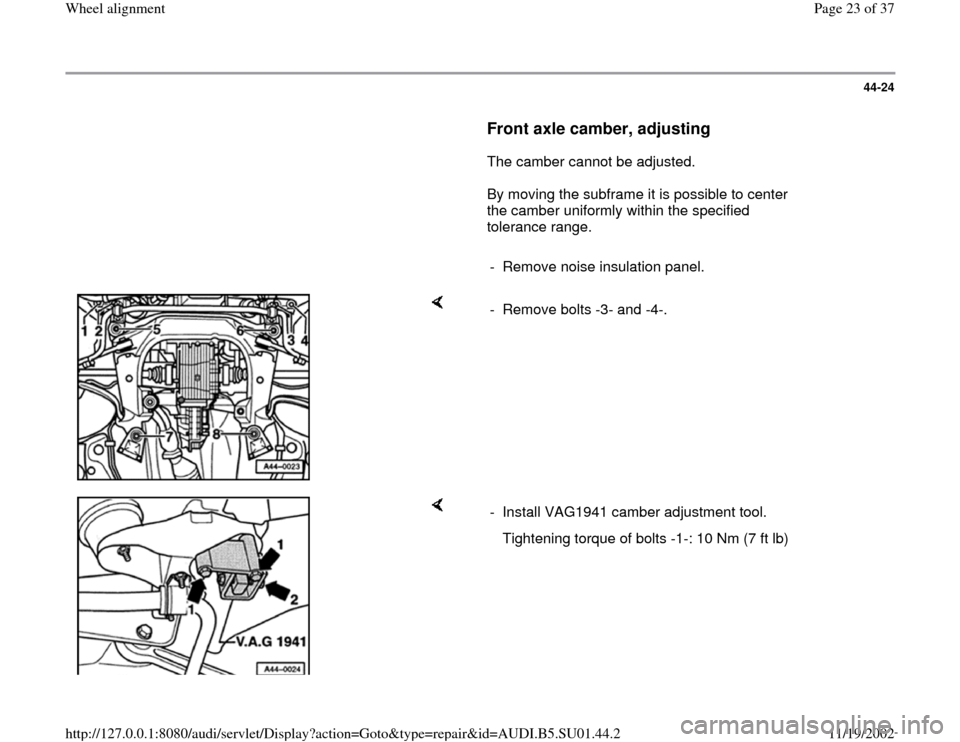
Front axle camber, adjusting
The camber cannot be adjusted.
By moving the subframe it is possible to center
the camber uniformly within the specified
tolerance range.
- Remove noise insulation panel.
- Remove bolts -3- and -4-.
- Install VAG1941 camber adjustment tool.
Tightening torque of bolts -1-: 10 Nm (7 ft lb)
Pa
ge 23 of 37 Wheel ali
gnment
11/19/2002 htt
p://127.0.0.1:8080/audi/servlet/Dis
play?action=Goto&t
yp
e=re
pair&id=AUDI.B5.SU01.44.2
Page 24 of 37
44-25
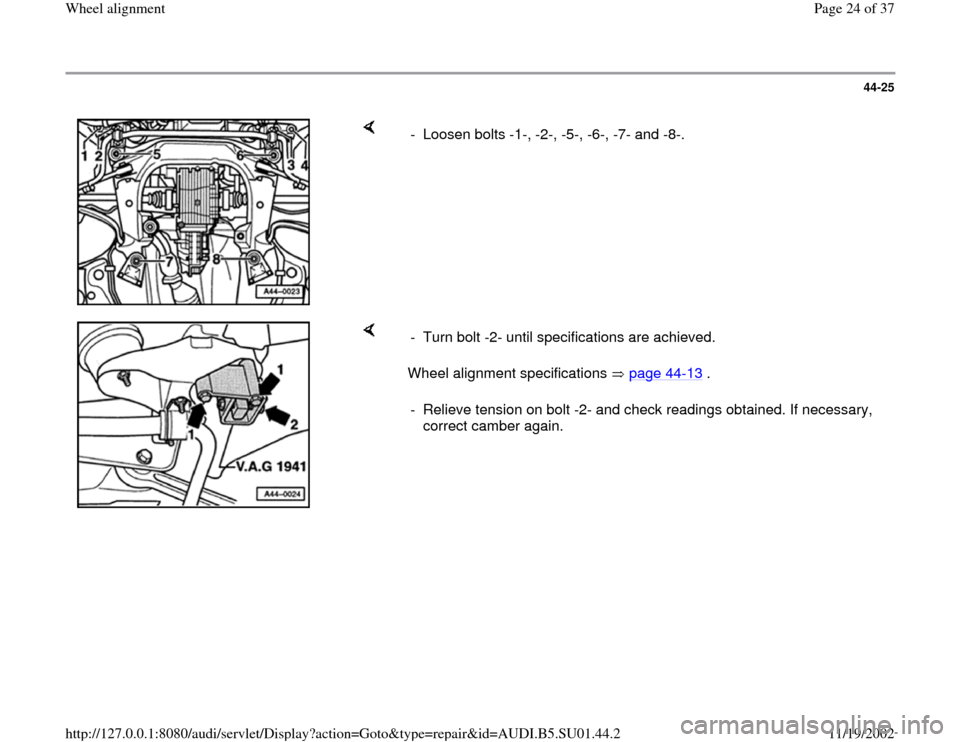
- Loosen bolts -1-, -2-, -5-, -6-, -7- and -8-.
Wheel alignment specifications page 44
-13
. - Turn bolt -2- until specifications are achieved.
- Relieve tension on bolt -2- and check readings obtained. If necessary,
correct camber again.
Pa
ge 24 of 37 Wheel ali
gnment
11/19/2002 htt
p://127.0.0.1:8080/audi/servlet/Dis
play?action=Goto&t
yp
e=re
pair&id=AUDI.B5.SU01.44.2
Page 25 of 37
44-26
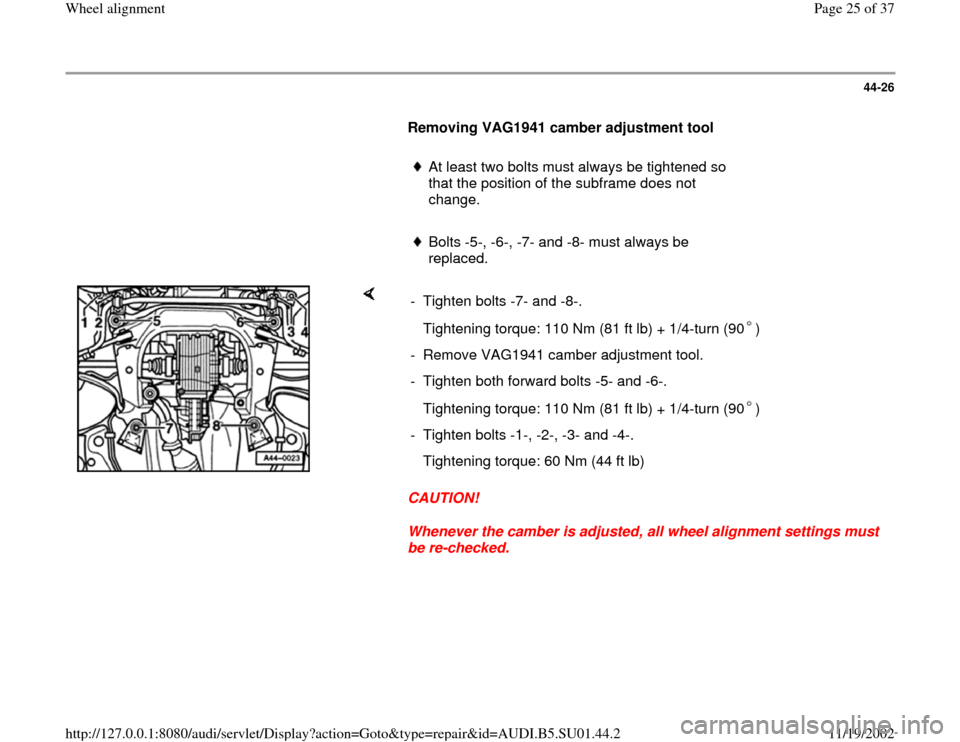
Removing VAG1941 camber adjustment tool
At least two bolts must always be tightened so
that the position of the subframe does not
change.
Bolts -5-, -6-, -7- and -8- must always be
replaced.
CAUTION!
Whenever the camber is adjusted, all wheel alignment settings must
be re-checked. - Tighten bolts -7- and -8-.
Tightening torque: 110 Nm (81 ft lb) + 1/4-turn (90 )- Remove VAG1941 camber adjustment tool.
- Tighten both forward bolts -5- and -6-.
Tightening torque: 110 Nm (81 ft lb) + 1/4-turn (90 )- Tighten bolts -1-, -2-, -3- and -4-.
Tightening torque: 60 Nm (44 ft lb)
Pa
ge 25 of 37 Wheel ali
gnment
11/19/2002 htt
p://127.0.0.1:8080/audi/servlet/Dis
play?action=Goto&t
yp
e=re
pair&id=AUDI.B5.SU01.44.2
Page 29 of 37
44-30
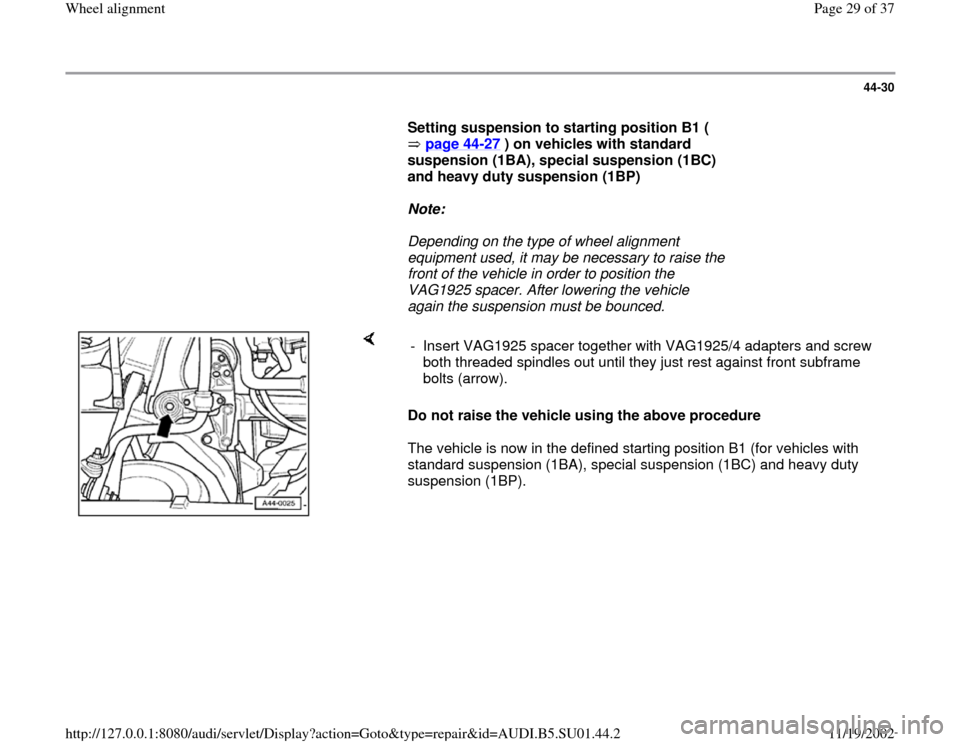
Setting suspension to starting position B1 (
page 44
-27
) on vehicles with standard
suspension (1BA), special suspension (1BC)
and heavy duty suspension (1BP)
Note:
Depending on the type of wheel alignment
equipment used, it may be necessary to raise the
front of the vehicle in order to position the
VAG1925 spacer. After lowering the vehicle
again the suspension must be bounced.
Do not raise the vehicle using the above procedure
The vehicle is now in the defined starting position B1 (for vehicles with
standard suspension (1BA), special suspension (1BC) and heavy duty
suspension (1BP). - Insert VAG1925 spacer together with VAG1925/4 adapters and screw
both threaded spindles out until they just rest against front subframe
bolts (arrow).
Pa
ge 29 of 37 Wheel ali
gnment
11/19/2002 htt
p://127.0.0.1:8080/audi/servlet/Dis
play?action=Goto&t
yp
e=re
pair&id=AUDI.B5.SU01.44.2
Page 30 of 37
44-31
Setting suspension to starting position B1 (
page 44
-27
) on vehicles with sport
suspension
Note:
Depending on the type of wheel alignment
equipment used, it may be necessary to raise the
front of the vehicle in order to position the
VAG1925 spacer. After lowering the vehicle
again the suspension must be bounced.
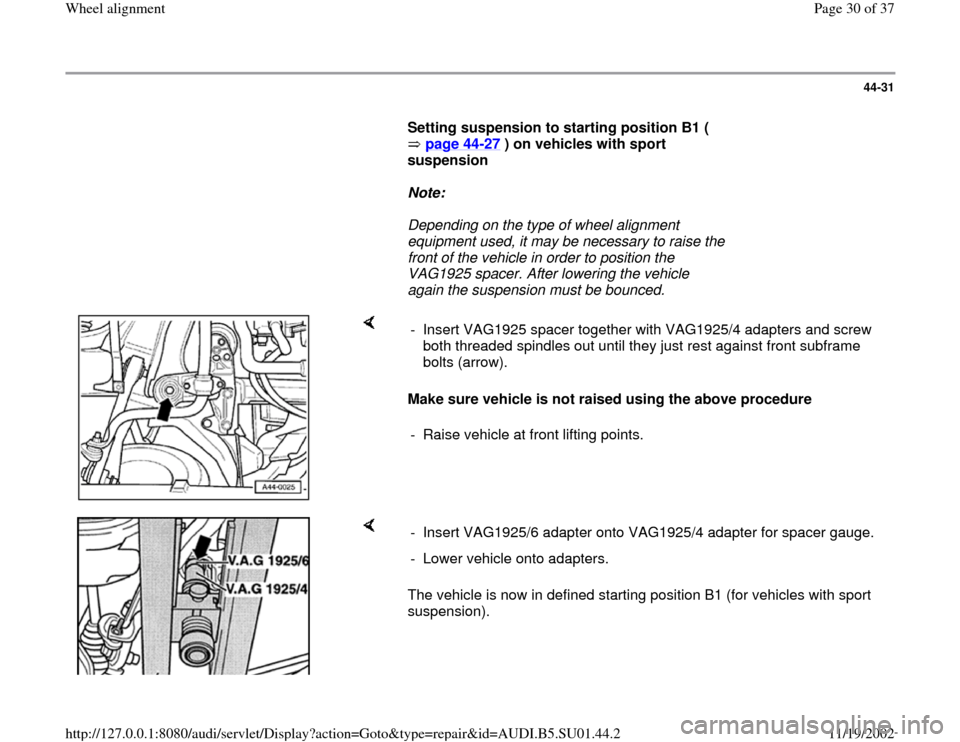
Make sure vehicle is not raised using the above procedure - Insert VAG1925 spacer together with VAG1925/4 adapters and screw
both threaded spindles out until they just rest against front subframe
bolts (arrow).
- Raise vehicle at front lifting points.
The vehicle is now in defined starting position B1 (for vehicles with sport
suspension). - Insert VAG1925/6 adapter onto VAG1925/4 adapter for spacer gauge.
- Lower vehicle onto adapters.
Pa
ge 30 of 37 Wheel ali
gnment
11/19/2002 htt
p://127.0.0.1:8080/audi/servlet/Dis
play?action=Goto&t
yp
e=re
pair&id=AUDI.B5.SU01.44.2
Page 31 of 37
44-32
Bring vehicles with heavy duty suspension
1BB (vehicle ride height 20 mm higher) into
defined starting position B1 page 44
-28
Note:
Depending on the type of wheel alignment
equipment used, it may be necessary to raise the
front of the vehicle in order to position the
VAG1925 spacer. After lowering the vehicle
again the suspension must be bounced.
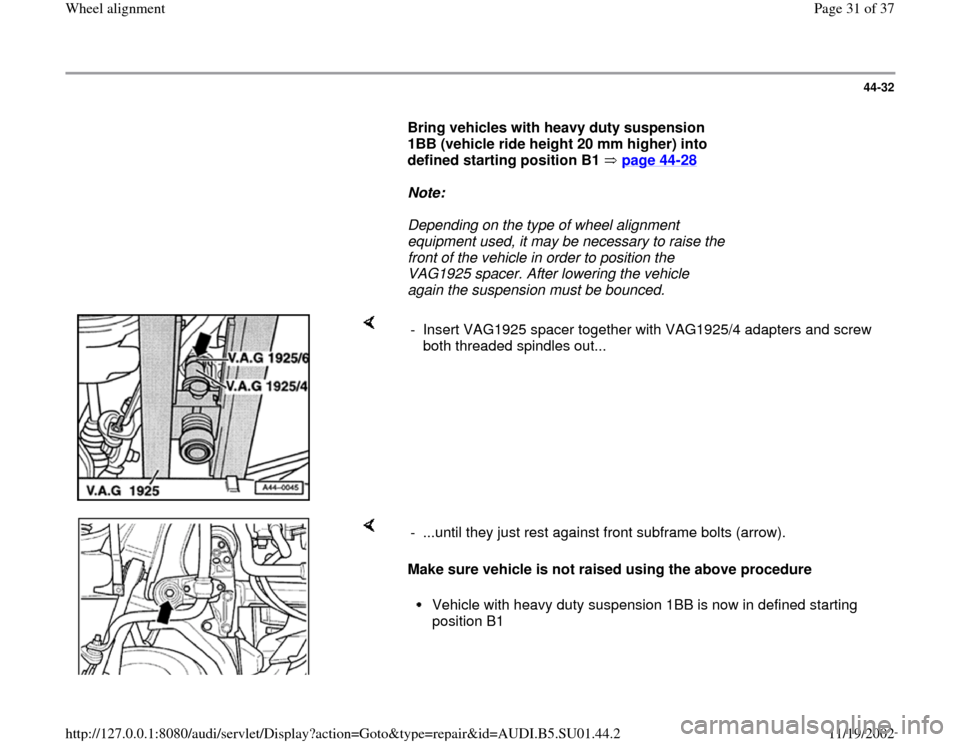
- Insert VAG1925 spacer together with VAG1925/4 adapters and screw
both threaded spindles out...
Make sure vehicle is not raised using the above procedure - ...until they just rest against front subframe bolts (arrow).
Vehicle with heavy duty suspension 1BB is now in defined starting
position B1
Pa
ge 31 of 37 Wheel ali
gnment
11/19/2002 htt
p://127.0.0.1:8080/audi/servlet/Dis
play?action=Goto&t
yp
e=re
pair&id=AUDI.B5.SU01.44.2