lock AUDI A4 1996 B5 / 1.G AEB ATW Engines Cylinder Head Remove And Install Workshop Manual
[x] Cancel search | Manufacturer: AUDI, Model Year: 1996, Model line: A4, Model: AUDI A4 1996 B5 / 1.GPages: 35, PDF Size: 0.68 MB
Page 1 of 35
15-2
Cylinder head, removing and
installing
Note:
Replace cylinder head bolts.
Always replace self-locking nuts, bolts as well
as gaskets and O-rings.
After installing a replacement cylinder head with
camshafts attached, grease contact surfaces
between valve lifters and cam lubricating
surfaces.
Do not remove plastic covers protecting
exposed valves until immediately before
installing cylinder head.
When replacing the cylinder head or cylinder
head gasket, coolant must be completely
replaced.
Cylinder heads with small cracks between the
valve seats that are less than 0.3 mm (0.012
in.) wide and/or between one valve seat and
only the first 4 threads of the spark plug thread,
can continue to be used without reduced
service life.
Pa
ge 1 of 35 C
ylinder head, removin
g and installin
g
11/18/2002 htt
p://127.0.0.1:8080/audi/servlet/Dis
play?action=Goto&t
yp
e=re
pair&id=AUDI.B5.GE02.15.2
Page 15 of 35
Radio operating manual
- Fully close power windows to stop.
- Operate all power window switches again for at
least one second in "close" direction to activate
"one touch" opening/closing function.
- Set clock to correct time.
Pa
ge 15 of 35 C
ylinder head, removin
g and installin
g
11/18/2002 htt
p://127.0.0.1:8080/audi/servlet/Dis
play?action=Goto&t
yp
e=re
pair&id=AUDI.B5.GE02.15.2
Page 20 of 35
15-20
Cylinder head, removing
Engine installed
Lock carrier in service position Page 13
-1
Note:
Secure all hose connections with original
equipment clamps parts catalog.
All tie wraps opened or cut during removal must
be reinstalled at the same locations.
CAUTION!
BEFORE disconnecting the battery:
Stop the engine.
Be sure the ignition is switched OFF (also
applies when connecting the battery). Failure
to do so may damage the Engine Control
Module (ECM).
Determine the correct coding for the anti-
theft radio.
Pa
ge 20 of 35 C
ylinder head, removin
g and installin
g
11/18/2002 htt
p://127.0.0.1:8080/audi/servlet/Dis
play?action=Goto&t
yp
e=re
pair&id=AUDI.B5.GE02.15.2
Page 25 of 35
15-25
Cylinder head, installing
Note:
Always replace cylinder head bolts.
Note inner 12-point or Polydrive versions of
cylinder head bolts Page 15
-1 .
Always replace self-locking nuts, bolts, gaskets
and O-rings.
Carefully remove any sealant residue from
cylinder head or engine block repairs. Avoid
any scratches or scoring.
Thoroughly remove all sanding and grinding
residue.
Do not remove new cylinder head gasket from
package until immediately before installing.
Handle gasket with extra care. Silicon layer and
grooved areas can be damaged leading to
leakage.
Pocket holes in engine block for cylinder head
bolts must be free of oil and coolant.
Pa
ge 25 of 35 C
ylinder head, removin
g and installin
g
11/18/2002 htt
p://127.0.0.1:8080/audi/servlet/Dis
play?action=Goto&t
yp
e=re
pair&id=AUDI.B5.GE02.15.2
Page 27 of 35
15-26
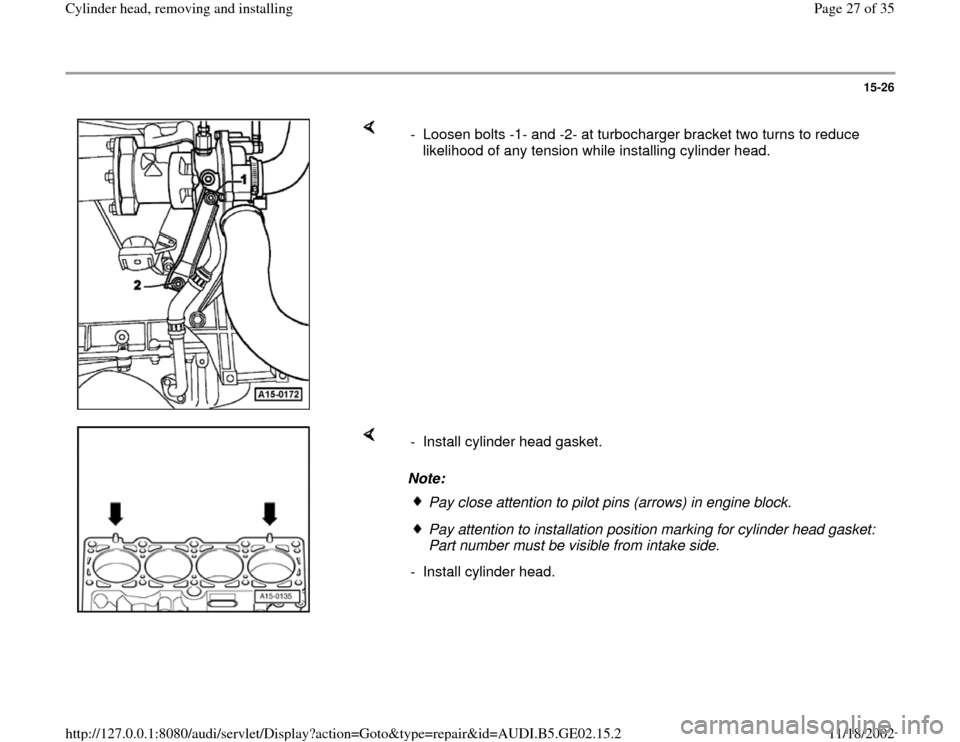
- Loosen bolts -1- and -2- at turbocharger bracket two turns to reduce
likelihood of any tension while installing cylinder head.
Note: - Install cylinder head gasket.
Pay close attention to pilot pins (arrows) in engine block.Pay attention to installation position marking for cylinder head gasket:
Part number must be visible from intake side.
- Install cylinder head.
Pa
ge 27 of 35 C
ylinder head, removin
g and installin
g
11/18/2002 htt
p://127.0.0.1:8080/audi/servlet/Dis
play?action=Goto&t
yp
e=re
pair&id=AUDI.B5.GE02.15.2
Page 28 of 35
15-27
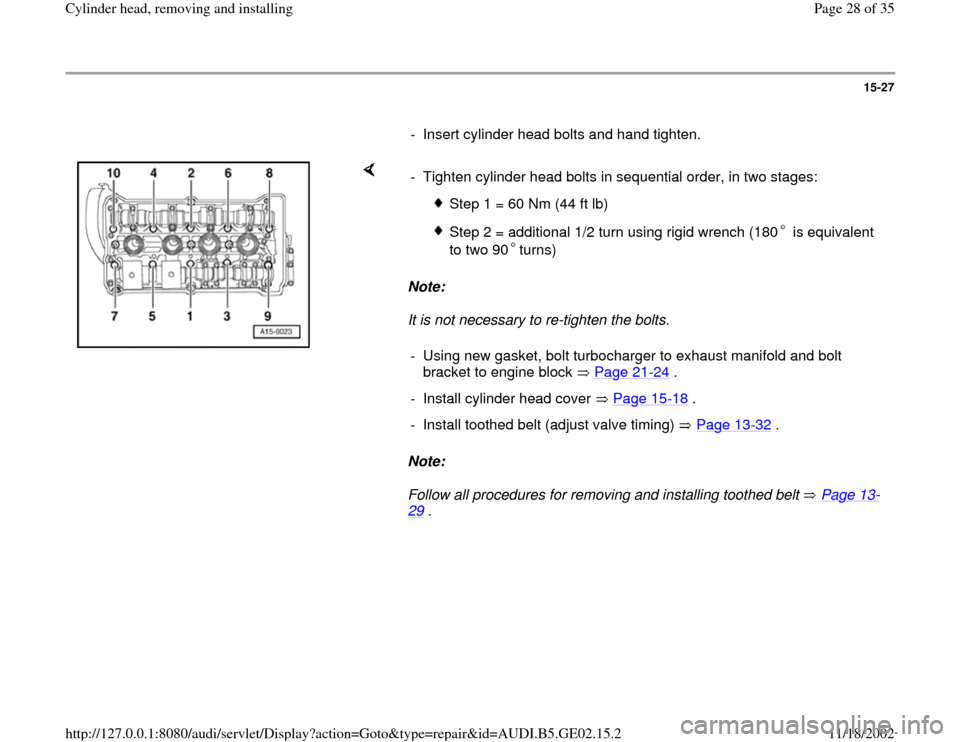
- Insert cylinder head bolts and hand tighten.
Note:
It is not necessary to re-tighten the bolts.
Note:
Follow all procedures for removing and installing toothed belt Page 13
-
29
. - Tighten cylinder head bolts in sequential order, in two stages:
Step 1 = 60 Nm (44 ft lb)
Step 2 = additional 1/2 turn using rigid wrench (180 is equivalent
to two 90 turns)
- Using new gasket, bolt turbocharger to exhaust manifold and bolt
bracket to engine block Page 21
-24
.
- Install cylinder head cover Page 15
-18
.
- Install toothed belt (adjust valve timing) Page 13
-32
.
Pa
ge 28 of 35 C
ylinder head, removin
g and installin
g
11/18/2002 htt
p://127.0.0.1:8080/audi/servlet/Dis
play?action=Goto&t
yp
e=re
pair&id=AUDI.B5.GE02.15.2
Page 30 of 35
Radio operating manual
- Using power window switch, raise windows to
stop.
- Operate all power window switches again for at
least one second in "close" direction to activate
"one touch" opening/closing function.
- Set clock to correct time.
Pa
ge 30 of 35 C
ylinder head, removin
g and installin
g
11/18/2002 htt
p://127.0.0.1:8080/audi/servlet/Dis
play?action=Goto&t
yp
e=re
pair&id=AUDI.B5.GE02.15.2
Page 31 of 35
15-29
- Perform throttle valve control module adaptation
to Engine Control Module (ECM).
Repair Manual, 1.8 Liter 5V Turbo Fuel
Injection & Ignition, Repair Group 24
Tightening torques
Component
Tightening
torque
Intake manifold brace to intake
manifold 20 Nm (15 ft
lb)
Intake manifold brace to bracket 20 Nm (15 ft
lb)
Turbocharger to exhaust
manifold 35 Nm (26 ft
lb)
Turbocharger bracket to
turbocharger (bolt and washer
assembly M8) 40 Nm (30 ft
lb)
Turbocharger bracket to cylinder
block 45 Nm (33 ft
lb)
Retainer straps for oil supply line
to cylinder head 20 Nm (15 ft
lb)
Pa
ge 31 of 35 C
ylinder head, removin
g and installin
g
11/18/2002 htt
p://127.0.0.1:8080/audi/servlet/Dis
play?action=Goto&t
yp
e=re
pair&id=AUDI.B5.GE02.15.2