ignition AUDI A4 1996 B5 / 1.G Airbag Service Workshop Manual
[x] Cancel search | Manufacturer: AUDI, Model Year: 1996, Model line: A4, Model: AUDI A4 1996 B5 / 1.GPages: 75, PDF Size: 0.91 MB
Page 21 of 75
- Switch ignition on and connect battery Ground (GND) strap.
Pa
ge 21 of 75 Airba
gs, servicin
g
11/19/2002 htt
p://127.0.0.1:8080/audi/servlet/Dis
play?action=Goto&t
yp
e=re
pair&id=AUDI.B5.BD03.69.3
Page 24 of 75
69-56
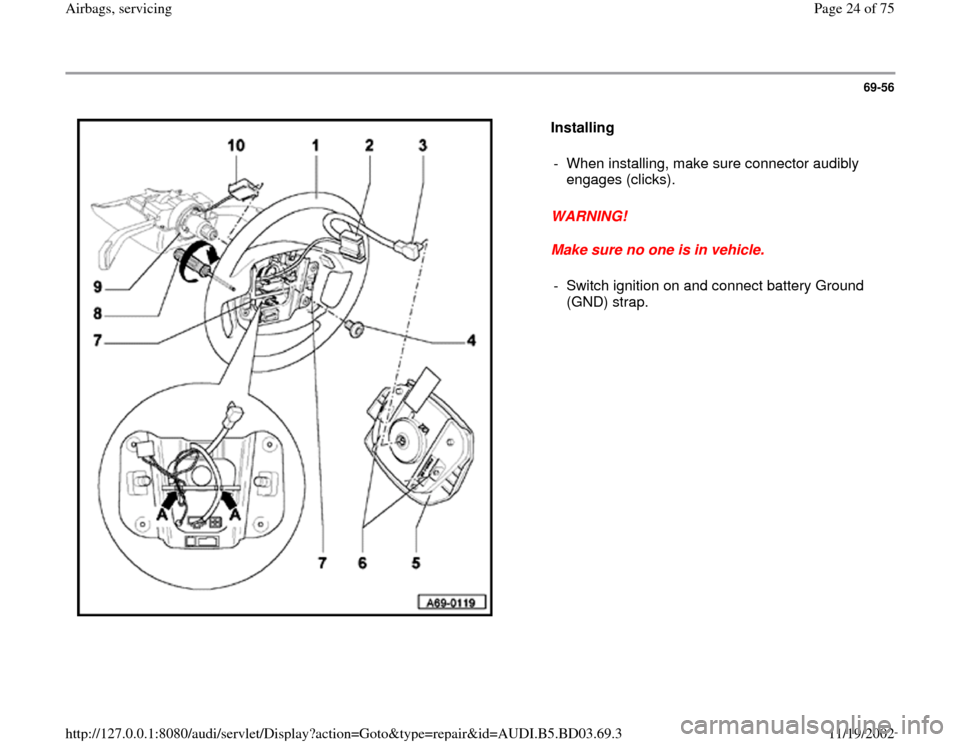
Installing
WARNING!
Make sure no one is in vehicle. - When installing, make sure connector audibly
engages (clicks).
- Switch ignition on and connect battery Ground
(GND) strap.
Pa
ge 24 of 75 Airba
gs, servicin
g
11/19/2002 htt
p://127.0.0.1:8080/audi/servlet/Dis
play?action=Goto&t
yp
e=re
pair&id=AUDI.B5.BD03.69.3
Page 27 of 75
69-59
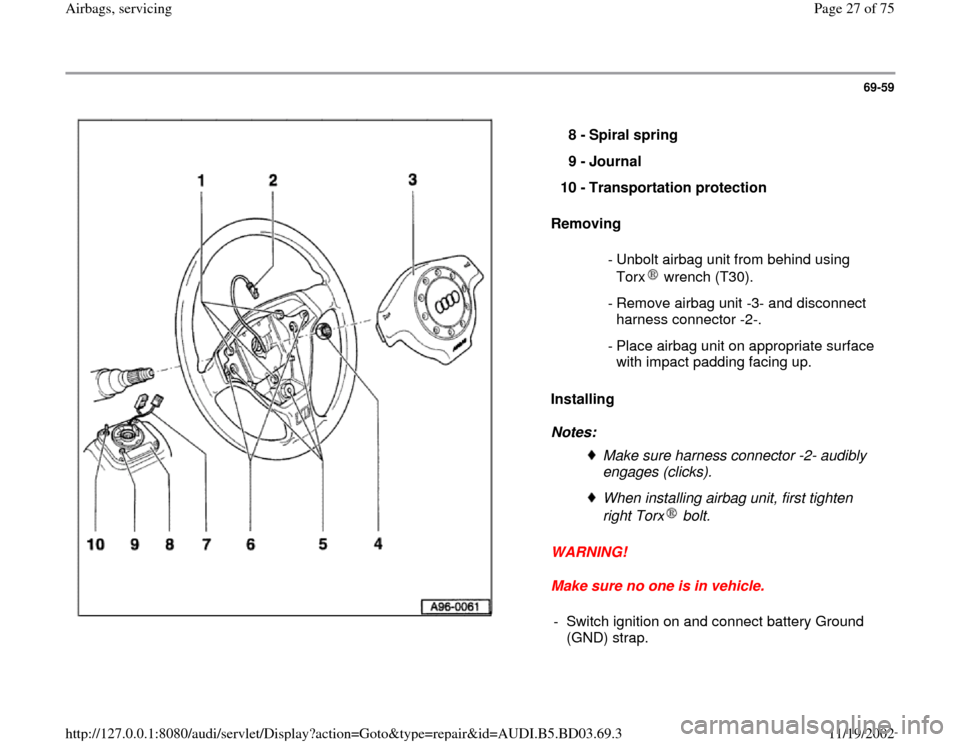
Removing
Installing
Notes:
WARNING!
Make sure no one is in vehicle. 8 -
Spiral spring
9 -
Journal
10 -
Transportation protection
- Unbolt airbag unit from behind using
Torx wrench (T30).
- Remove airbag unit -3- and disconnect
harness connector -2-.
- Place airbag unit on appropriate surface
with impact padding facing up.
Make sure harness connector -2- audibly
engages (clicks). When installing airbag unit, first tighten
right Torx bolt.
- Switch ignition on and connect battery Ground
(GND) strap.
Pa
ge 27 of 75 Airba
gs, servicin
g
11/19/2002 htt
p://127.0.0.1:8080/audi/servlet/Dis
play?action=Goto&t
yp
e=re
pair&id=AUDI.B5.BD03.69.3
Page 30 of 75
69-62
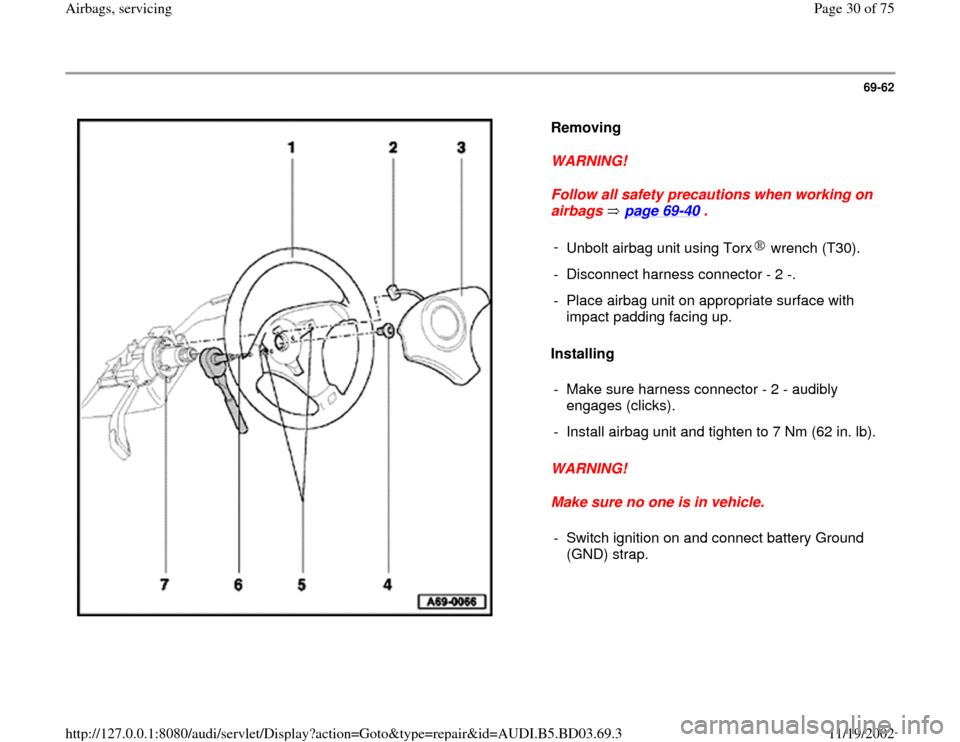
Removing
WARNING!
Follow all safety precautions when working on
airbags page 69
-40
.
Installing
WARNING!
Make sure no one is in vehicle.
-
Unbolt airbag unit using Torx wrench (T30).- Disconnect harness connector - 2 -.
- Place airbag unit on appropriate surface with
impact padding facing up.
- Make sure harness connector - 2 - audibly
engages (clicks).
- Install airbag unit and tighten to 7 Nm (62 in. lb).
- Switch ignition on and connect battery Ground
(GND) strap.
Pa
ge 30 of 75 Airba
gs, servicin
g
11/19/2002 htt
p://127.0.0.1:8080/audi/servlet/Dis
play?action=Goto&t
yp
e=re
pair&id=AUDI.B5.BD03.69.3
Page 40 of 75
69-72
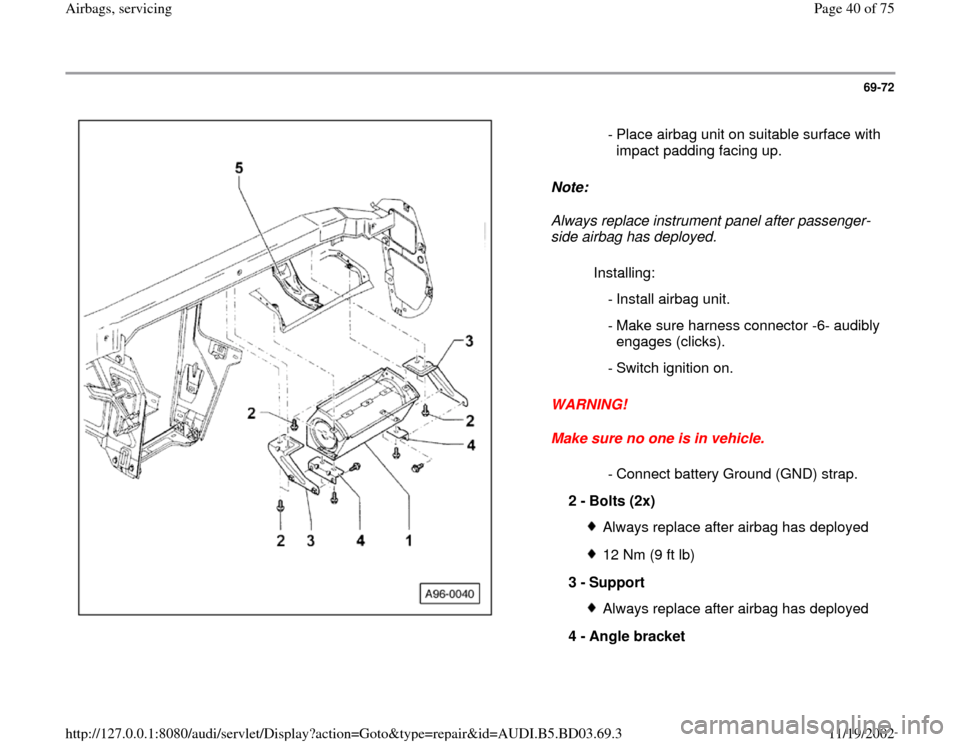
Note:
Always replace instrument panel after passenger-
side airbag has deployed.
WARNING!
Make sure no one is in vehicle. - Place airbag unit on suitable surface with
impact padding facing up.
Installing:
- Install airbag unit.
- Make sure harness connector -6- audibly
engages (clicks).
- Switch ignition on.
- Connect battery Ground (GND) strap.
2 -
Bolts (2x)
Always replace after airbag has deployed12 Nm (9 ft lb)
3 -
Support Always replace after airbag has deployed
4 -
Angle bracket
Pa
ge 40 of 75 Airba
gs, servicin
g
11/19/2002 htt
p://127.0.0.1:8080/audi/servlet/Dis
play?action=Goto&t
yp
e=re
pair&id=AUDI.B5.BD03.69.3
Page 46 of 75
69-77
WARNING!
WARNING!
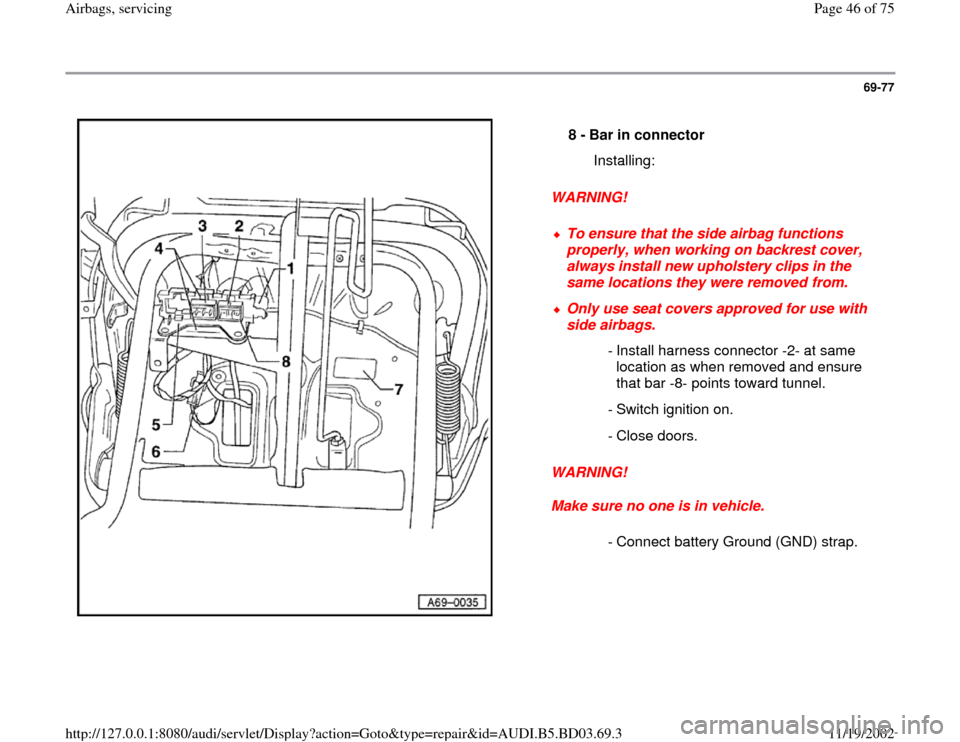
Make sure no one is in vehicle. 8 -
Bar in connector
Installing:
To ensure that the side airbag functions
properly, when working on backrest cover,
always install new upholstery clips in the
same locations they were removed from.
Only use seat covers approved for use with
side airbags.
- Install harness connector -2- at same
location as when removed and ensure
that bar -8- points toward tunnel.
- Switch ignition on.
- Close doors.
- Connect battery Ground (GND) strap.
Pa
ge 46 of 75 Airba
gs, servicin
g
11/19/2002 htt
p://127.0.0.1:8080/audi/servlet/Dis
play?action=Goto&t
yp
e=re
pair&id=AUDI.B5.BD03.69.3
Page 57 of 75
69-86
Removing
- Disconnect battery Ground (GND) strap.
- Remove front seat page 72
-2 .
- Remove lower A-pillar trim page 70
-72
.
- Unclip sill molding and fold upward.
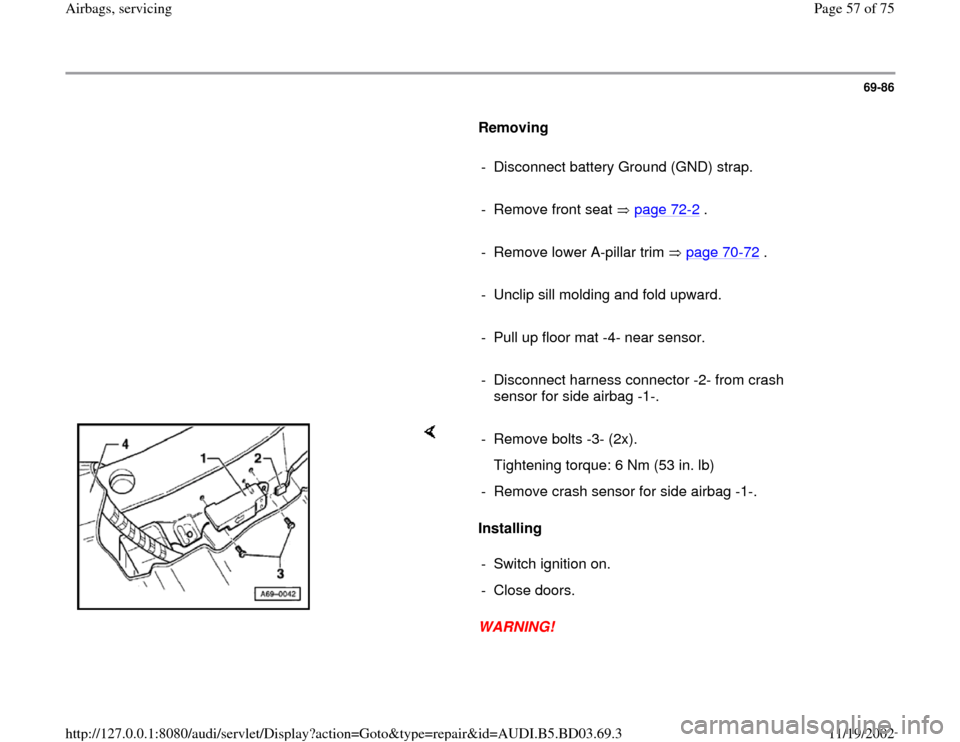
- Pull up floor mat -4- near sensor.
- Disconnect harness connector -2- from crash
sensor for side airbag -1-.
Installing
WARNING! - Remove bolts -3- (2x).
Tightening torque: 6 Nm (53 in. lb)
- Remove crash sensor for side airbag -1-.
- Switch ignition on.
- Close doors.
Pa
ge 57 of 75 Airba
gs, servicin
g
11/19/2002 htt
p://127.0.0.1:8080/audi/servlet/Dis
play?action=Goto&t
yp
e=re
pair&id=AUDI.B5.BD03.69.3
Page 61 of 75
69-89
WARNING!
Always follow installation sequence for side
curtain airbag.
WARNING!
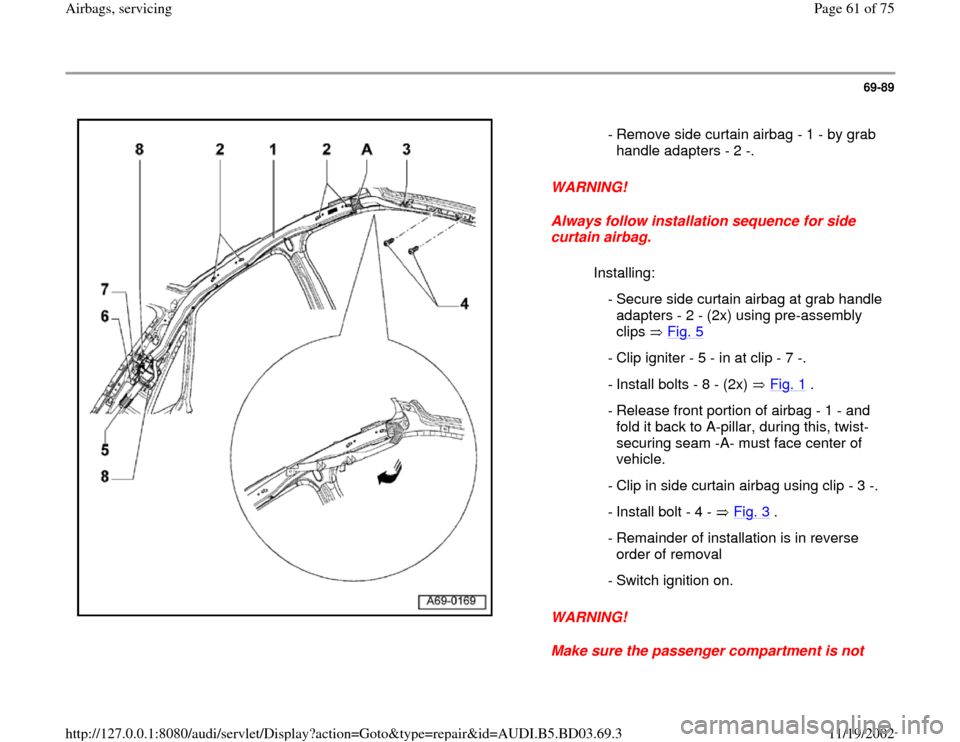
Make sure the passenger compartment is not - Remove side curtain airbag - 1 - by grab
handle adapters - 2 -.
Installing:
- Secure side curtain airbag at grab handle
adapters - 2 - (2x) using pre-assembly
clips Fig. 5
- Clip igniter - 5 - in at clip - 7 -.
- Install bolts - 8 - (2x) Fig. 1
.
- Release front portion of airbag - 1 - and
fold it back to A-pillar, during this, twist-
securing seam -A- must face center of
vehicle.
- Clip in side curtain airbag using clip - 3 -.
- Install bolt - 4 - Fig. 3
.
- Remainder of installation is in reverse
order of removal
- Switch ignition on.
Pa
ge 61 of 75 Airba
gs, servicin
g
11/19/2002 htt
p://127.0.0.1:8080/audi/servlet/Dis
play?action=Goto&t
yp
e=re
pair&id=AUDI.B5.BD03.69.3
Page 70 of 75
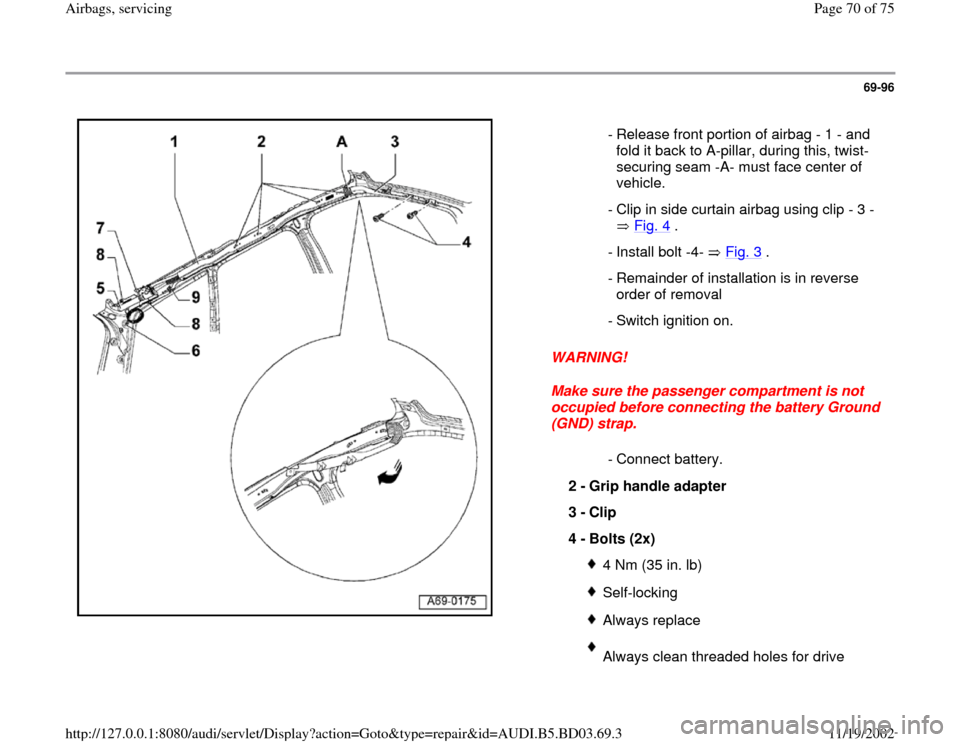
69-96
WARNING!
Make sure the passenger compartment is not
occupied before connecting the battery Ground
(GND) strap. - Release front portion of airbag - 1 - and
fold it back to A-pillar, during this, twist-
securing seam -A- must face center of
vehicle.
- Clip in side curtain airbag using clip - 3 -
Fig. 4
.
- Install bolt -4- Fig. 3
.
- Remainder of installation is in reverse
order of removal
- Switch ignition on.
- Connect battery.
2 -
Grip handle adapter
3 -
Clip
4 -
Bolts (2x)
4 Nm (35 in. lb)Self-lockingAlways replaceAlways clean threaded holes for drive
Pa
ge 70 of 75 Airba
gs, servicin
g
11/19/2002 htt
p://127.0.0.1:8080/audi/servlet/Dis
play?action=Goto&t
yp
e=re
pair&id=AUDI.B5.BD03.69.3