wheel AUDI A4 1996 B5 / 1.G Engine Oil Level Checking Workshop Manual
[x] Cancel search | Manufacturer: AUDI, Model Year: 1996, Model line: A4, Model: AUDI A4 1996 B5 / 1.GPages: 111, PDF Size: 1.26 MB
Page 14 of 111
20
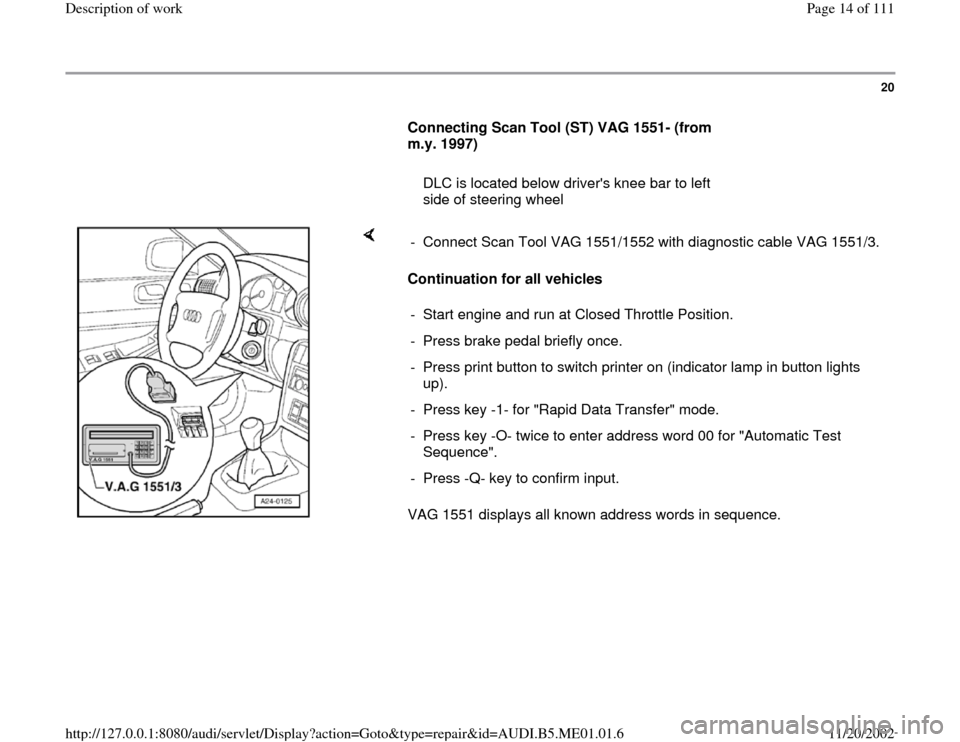
Connecting Scan Tool (ST) VAG 1551- (from
m.y. 1997)
DLC is located below driver's knee bar to left
side of steering wheel
Continuation for all vehicles
VAG 1551 displays all known address words in sequence. - Connect Scan Tool VAG 1551/1552 with diagnostic cable VAG 1551/3.
- Start engine and run at Closed Throttle Position.
- Press brake pedal briefly once.
- Press print button to switch printer on (indicator lamp in button lights
up).
- Press key -1- for "Rapid Data Transfer" mode.
- Press key -O- twice to enter address word 00 for "Automatic Test
Sequence".
- Press -Q- key to confirm input.
Pa
ge 14 of 111 Descri
ption of wor
k
11/20/2002 htt
p://127.0.0.1:8080/audi/servlet/Dis
play?action=Goto&t
yp
e=re
pair&id=AUDI.B5.ME01.01.6
Page 33 of 111
38
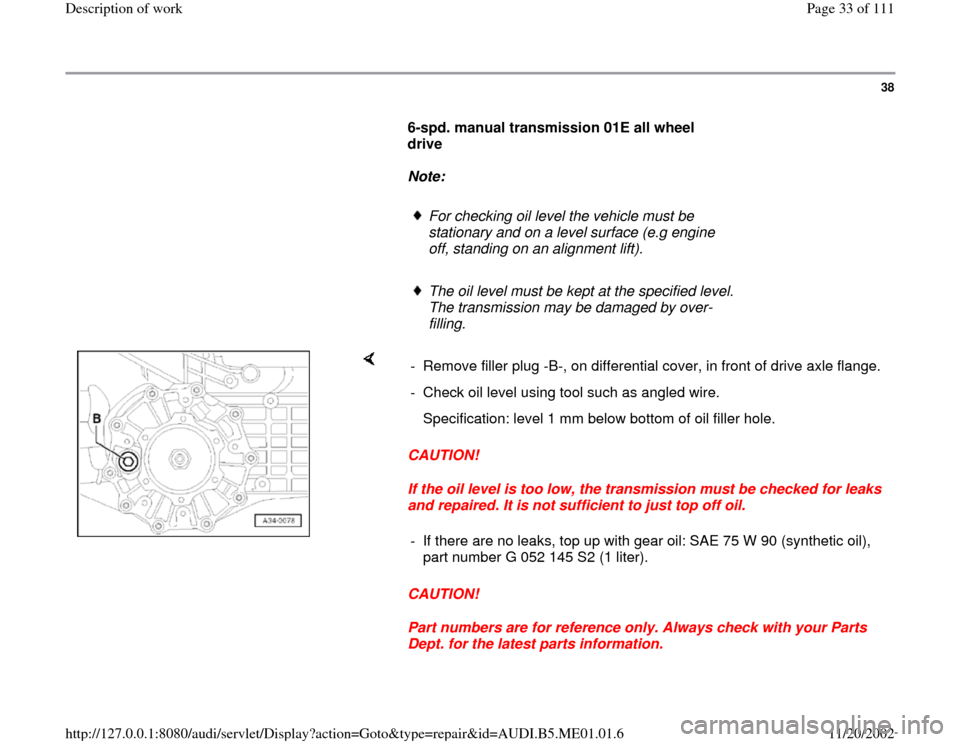
6-spd. manual transmission 01E all wheel
drive
Note:
For checking oil level the vehicle must be
stationary and on a level surface (e.g engine
off, standing on an alignment lift).
The oil level must be kept at the specified level.
The transmission may be damaged by over-
filling.
CAUTION!
If the oil level is too low, the transmission must be checked for leaks
and repaired. It is not sufficient to just top off oil.
CAUTION!
Part numbers are for reference only. Always check with your Parts
Dept. for the latest parts information. - Remove filler plug -B-, on differential cover, in front of drive axle flange.
- Check oil level using tool such as angled wire.
Specification: level 1 mm below bottom of oil filler hole.
- If there are no leaks, top up with gear oil: SAE 75 W 90 (synthetic oil),
part number G 052 145 S2 (1 liter).
Pa
ge 33 of 111 Descri
ption of wor
k
11/20/2002 htt
p://127.0.0.1:8080/audi/servlet/Dis
play?action=Goto&t
yp
e=re
pair&id=AUDI.B5.ME01.01.6
Page 41 of 111
43
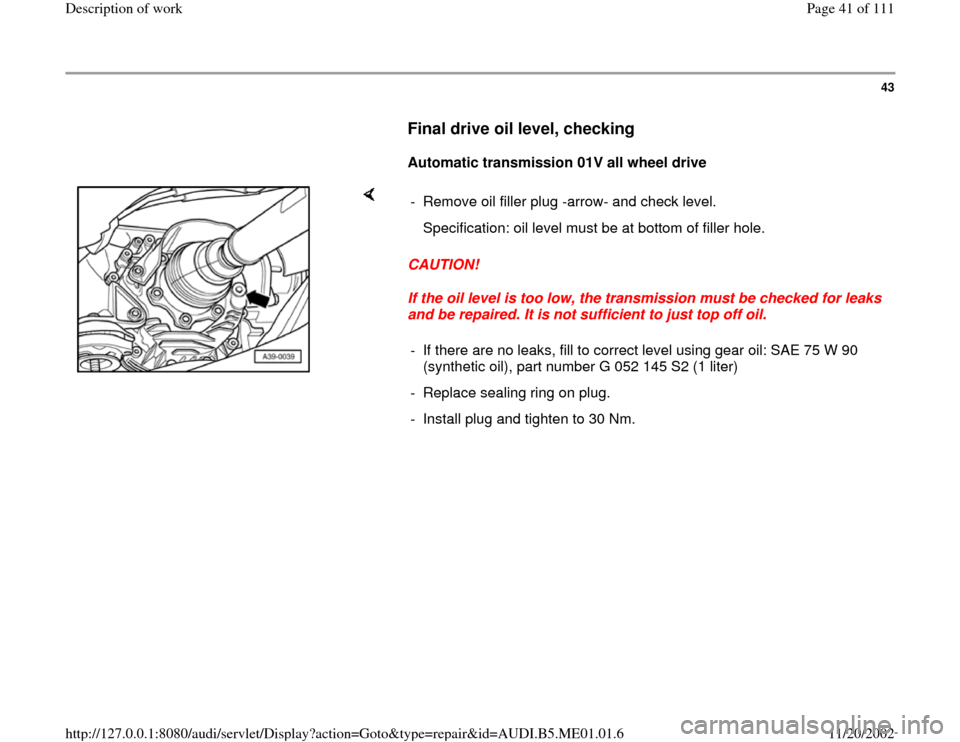
Final drive oil level, checking
Automatic transmission 01V all wheel drive
CAUTION!
If the oil level is too low, the transmission must be checked for leaks
and be repaired. It is not sufficient to just top off oil. - Remove oil filler plug -arrow- and check level.
Specification: oil level must be at bottom of filler hole.
- If there are no leaks, fill to correct level using gear oil: SAE 75 W 90
(synthetic oil), part number G 052 145 S2 (1 liter)
- Replace sealing ring on plug.
- Install plug and tighten to 30 Nm.
Pa
ge 41 of 111 Descri
ption of wor
k
11/20/2002 htt
p://127.0.0.1:8080/audi/servlet/Dis
play?action=Goto&t
yp
e=re
pair&id=AUDI.B5.ME01.01.6
Page 42 of 111
44
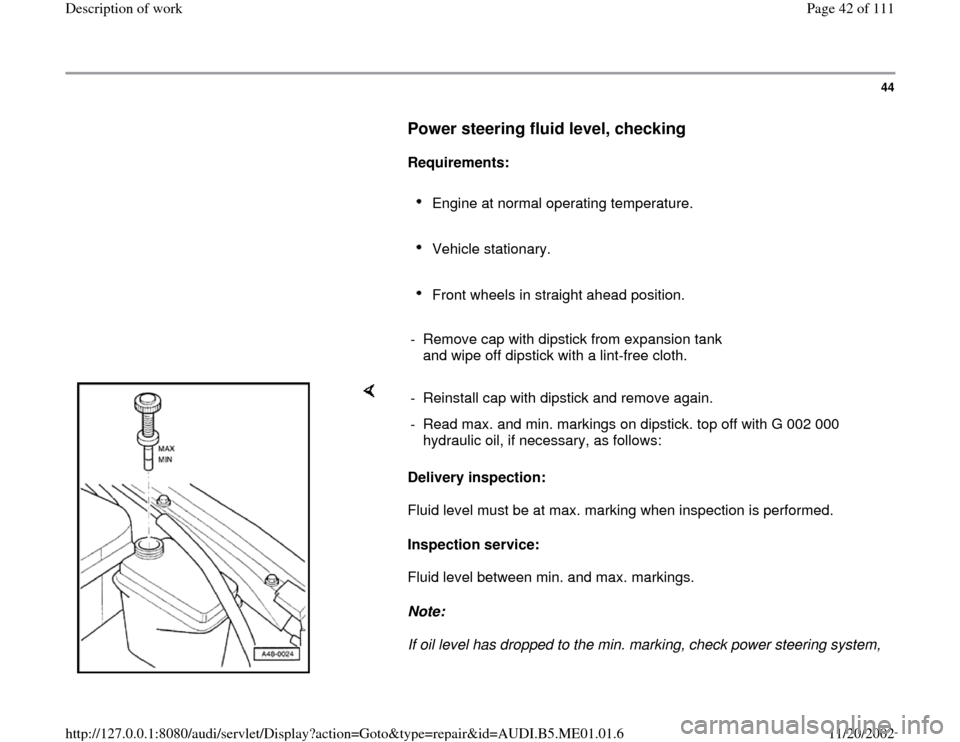
Power steering fluid level, checking
Requirements:
Engine at normal operating temperature.
Vehicle stationary.
Front wheels in straight ahead position.
- Remove cap with dipstick from expansion tank
and wipe off dipstick with a lint-free cloth.
Delivery inspection:
Fluid level must be at max. marking when inspection is performed.
Inspection service:
Fluid level between min. and max. markings.
Note:
If oil level has dropped to the min. marking, check power steering system, - Reinstall cap with dipstick and remove again.
- Read max. and min. markings on dipstick. top off with G 002 000
hydraulic oil, if necessary, as follows:
Pa
ge 42 of 111 Descri
ption of wor
k
11/20/2002 htt
p://127.0.0.1:8080/audi/servlet/Dis
play?action=Goto&t
yp
e=re
pair&id=AUDI.B5.ME01.01.6
Page 44 of 111
45
Tie rod ends, checking
Requirements:
Vehicle raised, wheels off the ground.
- Check play by moving tie rods and wheels.
Specification: no play.
- Check attachment.
- Check dust boots for damage and correct
installation.
Pa
ge 44 of 111 Descri
ption of wor
k
11/20/2002 htt
p://127.0.0.1:8080/audi/servlet/Dis
play?action=Goto&t
yp
e=re
pair&id=AUDI.B5.ME01.01.6
Page 46 of 111
For safety reasons, only tires of same type
and tread pattern should be installed on all
four wheels.
Pa
ge 46 of 111 Descri
ption of wor
k
11/20/2002 htt
p://127.0.0.1:8080/audi/servlet/Dis
play?action=Goto&t
yp
e=re
pair&id=AUDI.B5.ME01.01.6
Page 47 of 111
47
CAUTION!
Tires of same type and tread pattern must be
used on cars with All Wheel Drive (otherwise
risk of damage to central differential).
- Check tread wear pattern:
Tread wear pattern on front tires is an indication
of whether toe and camber settings need to be
checked:
"Feathering" on tread indicates incorrect toe.
If tread is worn on one side, this is usually
caused by incorrect camber.
If wear of this nature is noticed, check wheel
alignment.
Pa
ge 47 of 111 Descri
ption of wor
k
11/20/2002 htt
p://127.0.0.1:8080/audi/servlet/Dis
play?action=Goto&t
yp
e=re
pair&id=AUDI.B5.ME01.01.6
Page 48 of 111
48
Tire inflation pressure, checking, and
correcting (including spare wheel)
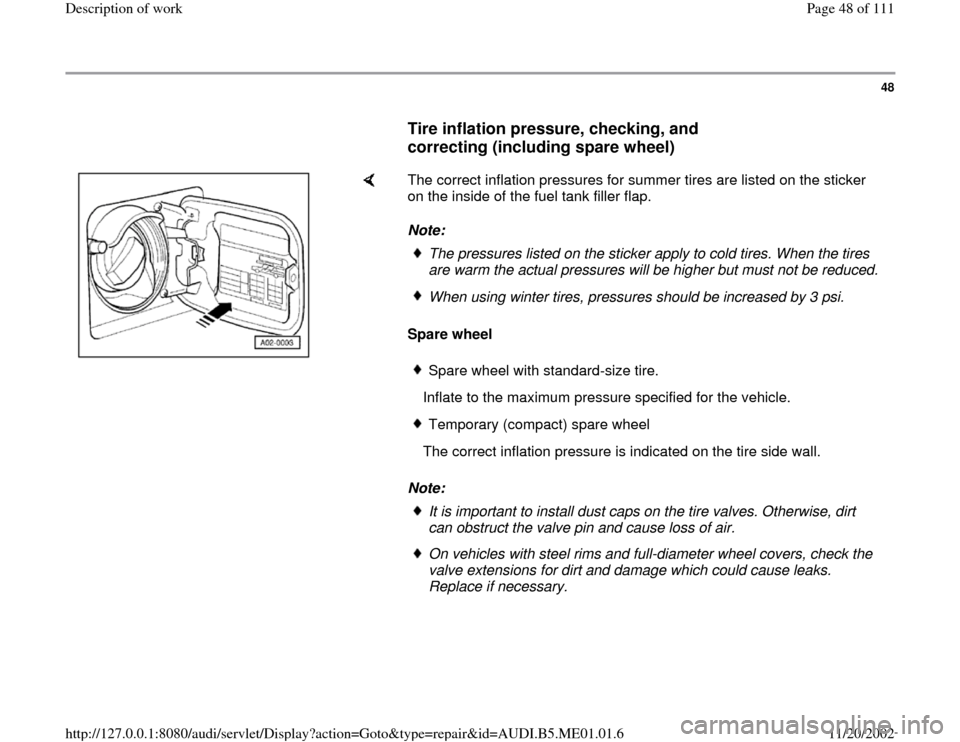
The correct inflation pressures for summer tires are listed on the sticker
on the inside of the fuel tank filler flap.
Note:
Spare wheel
Note:
The pressures listed on the sticker apply to cold tires. When the tires
are warm the actual pressures will be higher but must not be reduced. When using winter tires, pressures should be increased by 3 psi.Spare wheel with standard-size tire.
Inflate to the maximum pressure specified for the vehicle.Temporary (compact) spare wheel
The correct inflation pressure is indicated on the tire side wall.It is important to install dust caps on the tire valves. Otherwise, dirt
can obstruct the valve pin and cause loss of air. On vehicles with steel rims and full-diameter wheel covers, check the
valve extensions for dirt and damage which could cause leaks.
Replace if necessary.
Pa
ge 48 of 111 Descri
ption of wor
k
11/20/2002 htt
p://127.0.0.1:8080/audi/servlet/Dis
play?action=Goto&t
yp
e=re
pair&id=AUDI.B5.ME01.01.6
Page 49 of 111
49
Wheel bolts, tightening to specified
torque
Trim cap
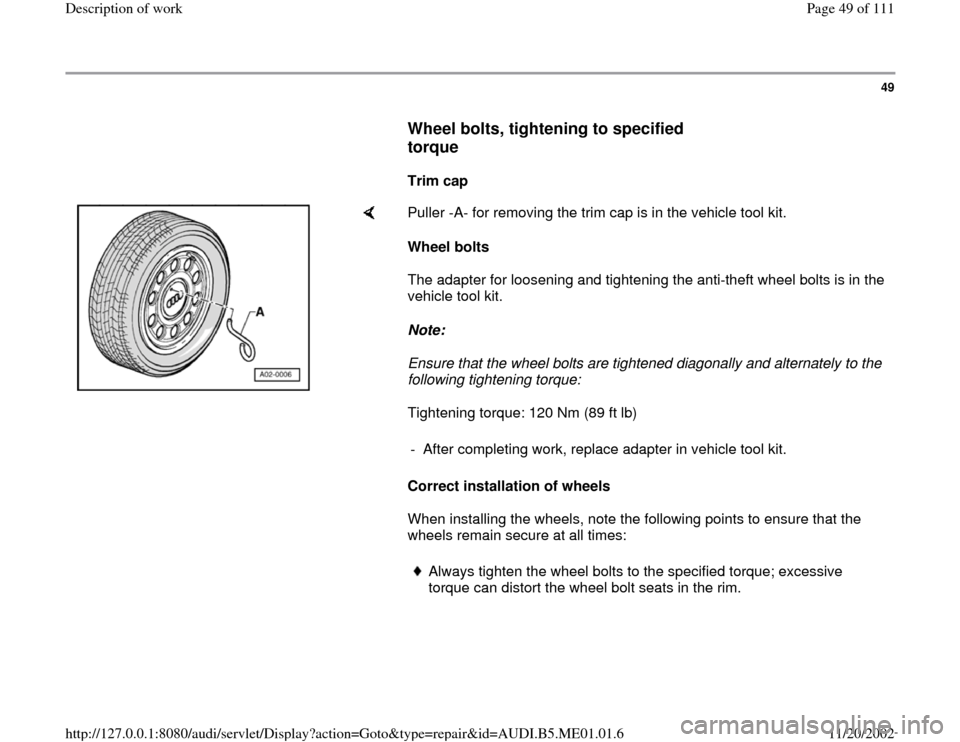
Puller -A- for removing the trim cap is in the vehicle tool kit.
Wheel bolts
The adapter for loosening and tightening the anti-theft wheel bolts is in the
vehicle tool kit.
Note:
Ensure that the wheel bolts are tightened diagonally and alternately to the
following tightening torque:
Tightening torque: 120 Nm (89 ft lb)
Correct installation of wheels
When installing the wheels, note the following points to ensure that the
wheels remain secure at all times: - After completing work, replace adapter in vehicle tool kit.
Always tighten the wheel bolts to the specified torque; excessive
torque can distort the wheel bolt seats in the rim.
Pa
ge 49 of 111 Descri
ption of wor
k
11/20/2002 htt
p://127.0.0.1:8080/audi/servlet/Dis
play?action=Goto&t
yp
e=re
pair&id=AUDI.B5.ME01.01.6
Page 50 of 111
50
When installing a wheel, do not torque down
the first wheel bolt immediately (for instance,
with an impact wrench). This would prevent the
other bolts from centering the wheel properly
when they are threaded in; the rim could then
come loose, even though the bolts have been
tightened to the specified torque.
Before installing the wheels, examine the seats
of the wheel bolts and the contact surfaces
between the rims and the hubs for rust and
corrosion. Clean off these parts if necesary,
otherwise this can affect the clamping force of
the bolts after installation, and the rims can
come loose.
WARNING!
If the points listed above are not observed,
the wheel mountings can come loose and the
wheel bolt seats can become distorted.
This distortion may be very slight and not
visible to the naked eye.
Even this slight distortion of the wheel bolt
seats can prevent the rims from being held
firmly and the wheels will come loose
repeatedly.
Pa
ge 50 of 111 Descri
ption of wor
k
11/20/2002 htt
p://127.0.0.1:8080/audi/servlet/Dis
play?action=Goto&t
yp
e=re
pair&id=AUDI.B5.ME01.01.6