wheel AUDI A4 1996 B5 / 1.G Suspension Rear Drive Axle Remove And Install Workshop Manual
[x] Cancel search | Manufacturer: AUDI, Model Year: 1996, Model line: A4, Model: AUDI A4 1996 B5 / 1.GPages: 15, PDF Size: 0.26 MB
Page 1 of 15
42-93
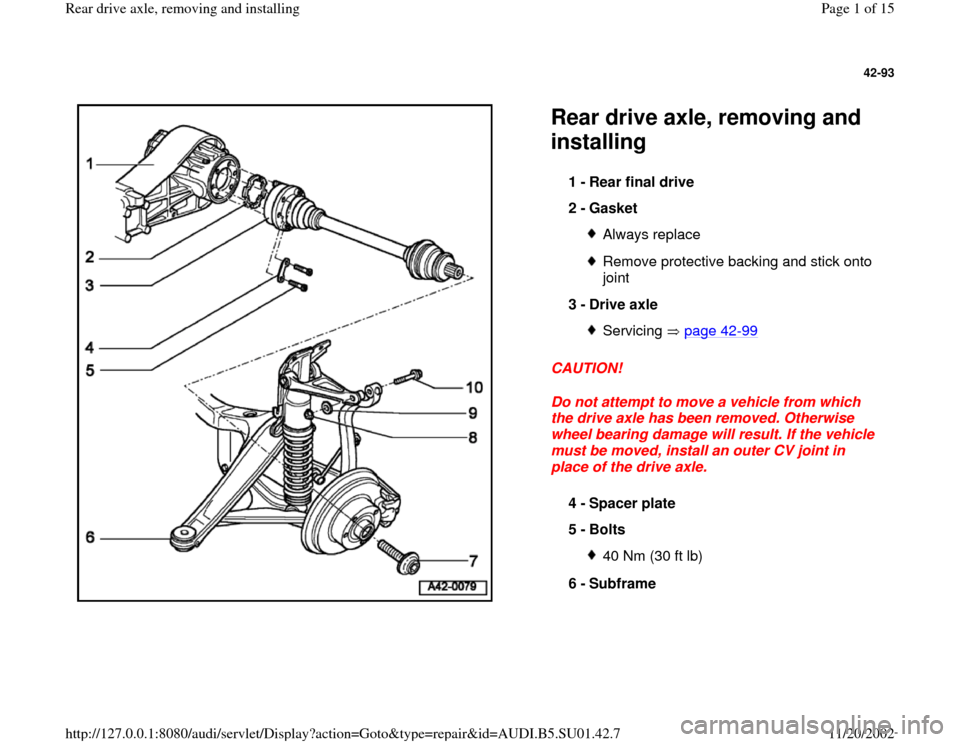
Rear drive axle, removing and
installing CAUTION!
Do not attempt to move a vehicle from which
the drive axle has been removed. Otherwise
wheel bearing damage will result. If the vehicle
must be moved, install an outer CV joint in
place of the drive axle. 1 -
Rear final drive
2 -
Gasket
Always replaceRemove protective backing and stick onto
joint
3 -
Drive axle Servicing page 42
-99
4 -
Spacer plate
5 -
Bolts
40 Nm (30 ft lb)
6 -
Subframe
Pa
ge 1 of 15 Rear drive axle, removin
g and installin
g
11/20/2002 htt
p://127.0.0.1:8080/audi/servlet/Dis
play?action=Goto&t
yp
e=re
pair&id=AUDI.B5.SU01.42.7
Page 2 of 15
42-94
WARNING!
The vehicle must be standing on its wheels
when loosening or tightening. Otherwise the
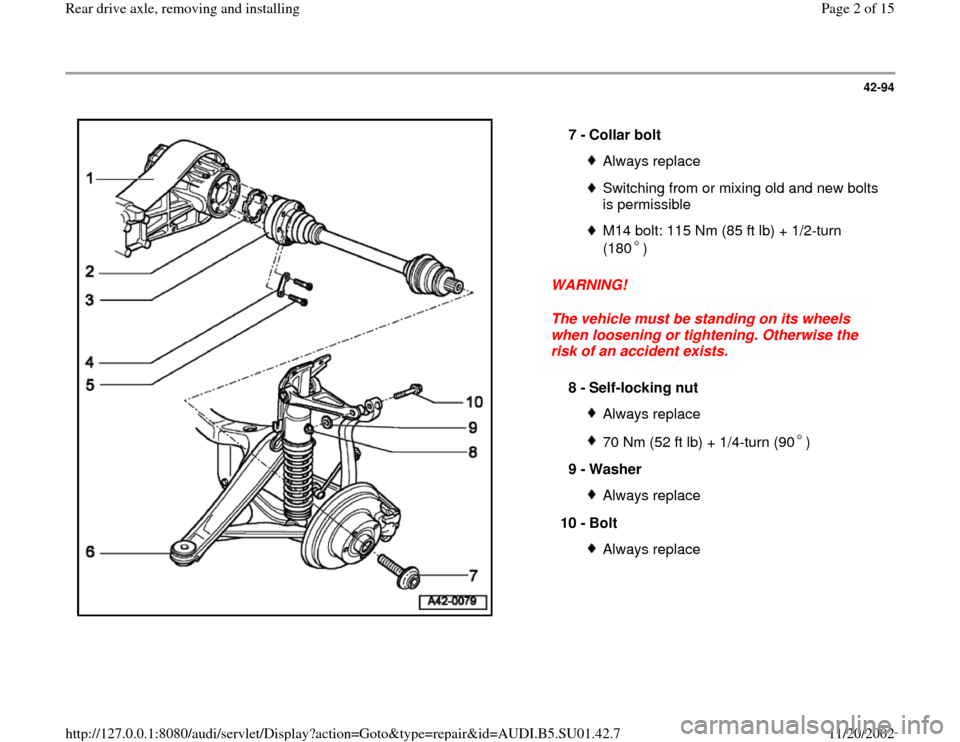
risk of an accident exists. 7 -
Collar bolt
Always replaceSwitching from or mixing old and new bolts
is permissible M14 bolt: 115 Nm (85 ft lb) + 1/2-turn
(180 )
8 -
Self-locking nut
Always replace70 Nm (52 ft lb) + 1/4-turn (90 )
9 -
Washer
Always replace
10 -
Bolt Always replace
Pa
ge 2 of 15 Rear drive axle, removin
g and installin
g
11/20/2002 htt
p://127.0.0.1:8080/audi/servlet/Dis
play?action=Goto&t
yp
e=re
pair&id=AUDI.B5.SU01.42.7
Page 3 of 15
42-95
Removing and installing drive axle (left-hand
side)
Vehicle must be standing on its wheels
above vehicle lift
- Remove wheel trim.
On light alloy wheels use puller in vehicle tool kit
to remove trim cap
- Loosen collar bolt.
WARNING!
The vehicle must be standing on its wheels
when loosening or tightening the collar bolt
for the drive axle. Otherwise the risk of an
accident exists.
- Loosen wheel bolts.
- Raise vehicle on lift.
- Remove wheel.
- Pull ABS wheel speed sensor slightly out of
wheel bearing housing.
Pa
ge 3 of 15 Rear drive axle, removin
g and installin
g
11/20/2002 htt
p://127.0.0.1:8080/audi/servlet/Dis
play?action=Goto&t
yp
e=re
pair&id=AUDI.B5.SU01.42.7
Page 5 of 15
42-96
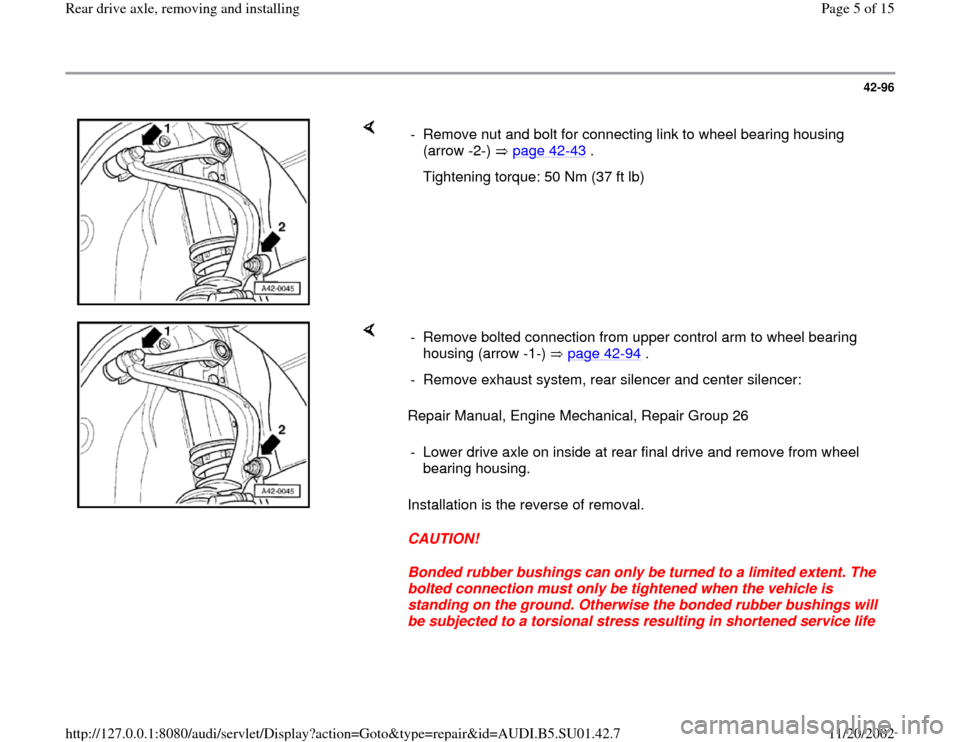
- Remove nut and bolt for connecting link to wheel bearing housing
(arrow -2-) page 42
-43
.
Tightening torque: 50 Nm (37 ft lb)
Repair Manual, Engine Mechanical, Repair Group 26
Installation is the reverse of removal.
CAUTION!
Bonded rubber bushings can only be turned to a limited extent. The
bolted connection must only be tightened when the vehicle is
standing on the ground. Otherwise the bonded rubber bushings will
be subjected to a torsional stress resulting in shortened service life - Remove bolted connection from upper control arm to wheel bearing
housing (arrow -1-) page 42
-94
.
- Remove exhaust system, rear silencer and center silencer:
- Lower drive axle on inside at rear final drive and remove from wheel
bearing housing.
Pa
ge 5 of 15 Rear drive axle, removin
g and installin
g
11/20/2002 htt
p://127.0.0.1:8080/audi/servlet/Dis
play?action=Goto&t
yp
e=re
pair&id=AUDI.B5.SU01.42.7
Page 6 of 15
42-97
Removing and installing drive axle (right-
hand side)
Vehicle must be standing on its wheels
above vehicle lift
- Remove wheel trim.
On light alloy wheels use puller in vehicle tool kit
to remove trim cap
- Loosen collar bolt.
WARNING!
The vehicle must be standing on its wheels
when loosening or tightening the collar bolt
for the drive axle. Otherwise the risk of an
accident exists.
- Loosen wheel bolts.
- Raise vehicle on lift.
- Remove wheel.
- Pull ABS wheel speed sensor slightly out of
wheel bearing housing.
Pa
ge 6 of 15 Rear drive axle, removin
g and installin
g
11/20/2002 htt
p://127.0.0.1:8080/audi/servlet/Dis
play?action=Goto&t
yp
e=re
pair&id=AUDI.B5.SU01.42.7
Page 8 of 15
42-98
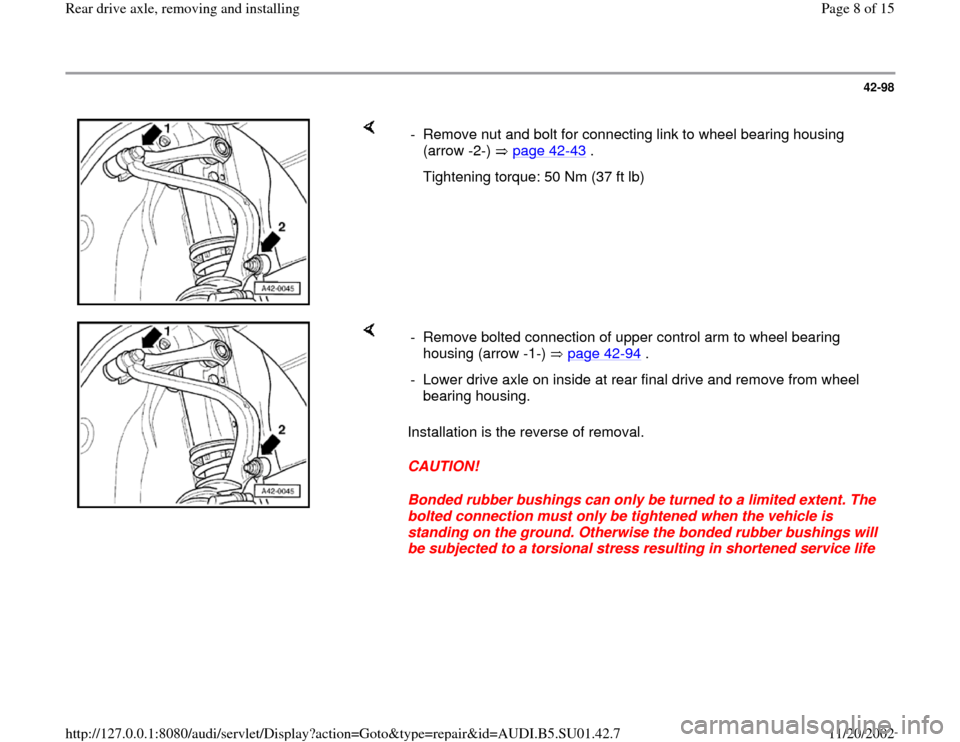
- Remove nut and bolt for connecting link to wheel bearing housing
(arrow -2-) page 42
-43
.
Tightening torque: 50 Nm (37 ft lb)
Installation is the reverse of removal.
CAUTION!
Bonded rubber bushings can only be turned to a limited extent. The
bolted connection must only be tightened when the vehicle is
standing on the ground. Otherwise the bonded rubber bushings will
be subjected to a torsional stress resulting in shortened service life - Remove bolted connection of upper control arm to wheel bearing
housing (arrow -1-) page 42
-94
.
- Lower drive axle on inside at rear final drive and remove from wheel
bearing housing.
Pa
ge 8 of 15 Rear drive axle, removin
g and installin
g
11/20/2002 htt
p://127.0.0.1:8080/audi/servlet/Dis
play?action=Goto&t
yp
e=re
pair&id=AUDI.B5.SU01.42.7