turn AUDI A4 1997 B5 / 1.G APB Engine Assembly Workshop Manual
[x] Cancel search | Manufacturer: AUDI, Model Year: 1997, Model line: A4, Model: AUDI A4 1997 B5 / 1.GPages: 13, PDF Size: 0.49 MB
Page 1 of 13
13-1
Engine, disassembly and
assembly
Ribbed belt, removing and installing
Removing
Repair Manual, Body Exterior, Repair Group 63
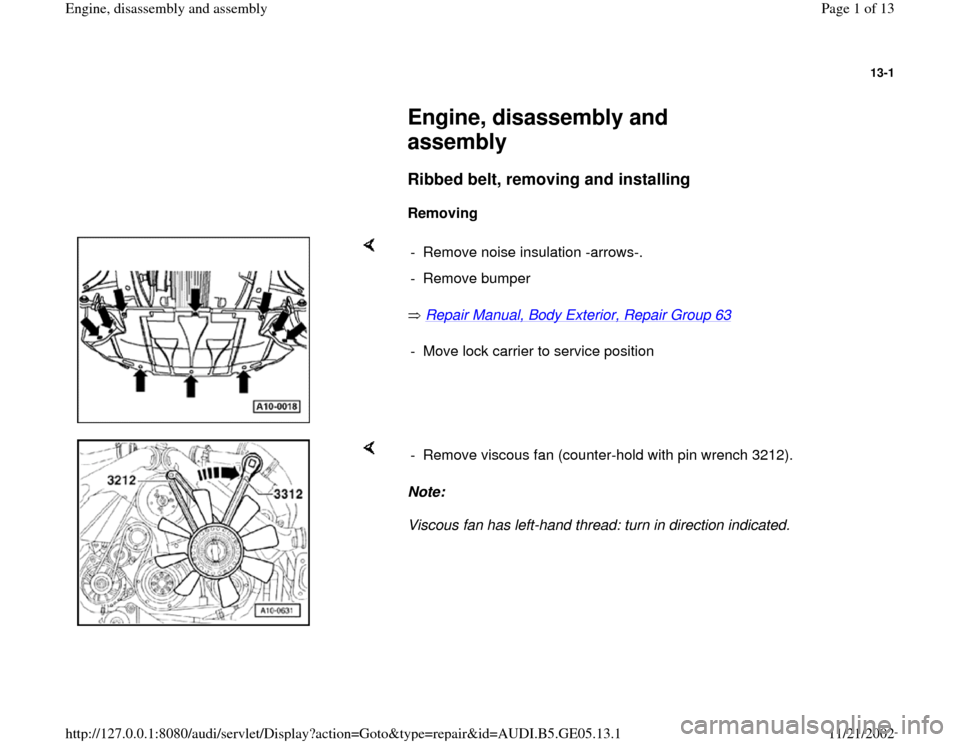
- Remove noise insulation -arrows-.
- Remove bumper
- Move lock carrier to service position
Note:
Viscous fan has left-hand thread: turn in direction indicated. - Remove viscous fan (counter-hold with pin wrench 3212).
Pa
ge 1 of 13 En
gine, disassembl
y and assembl
y
11/21/2002 htt
p://127.0.0.1:8080/audi/servlet/Dis
play?action=Goto&t
yp
e=re
pair&id=AUDI.B5.GE05.13.1
Page 2 of 13
13-2
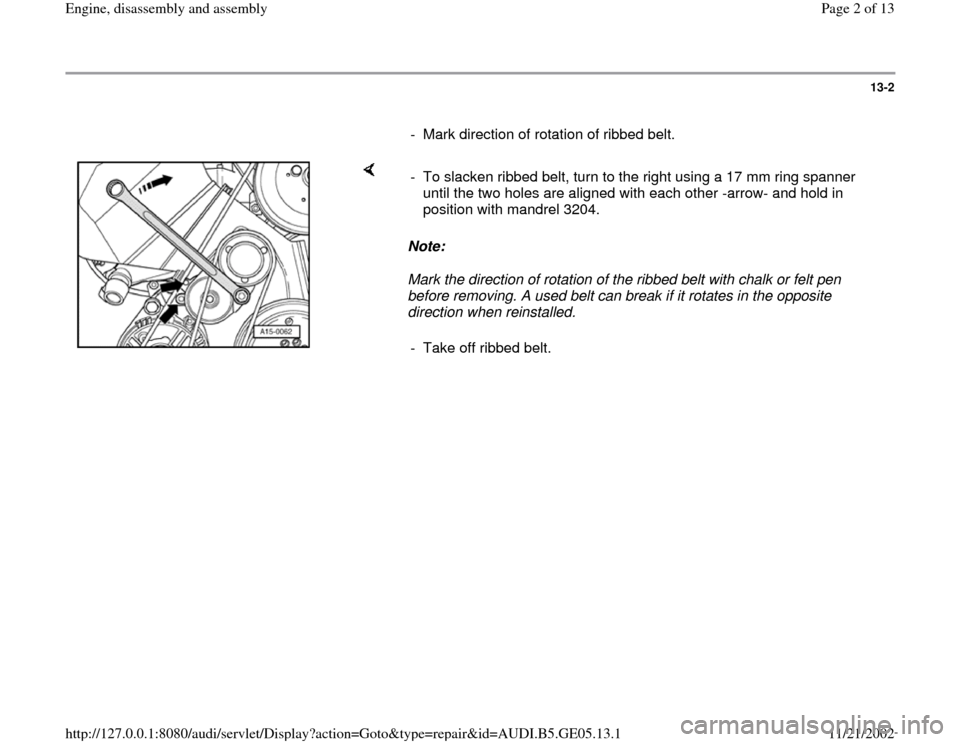
- Mark direction of rotation of ribbed belt.
Note:
Mark the direction of rotation of the ribbed belt with chalk or felt pen
before removing. A used belt can break if it rotates in the opposite
direction when reinstalled. - To slacken ribbed belt, turn to the right using a 17 mm ring spanner
until the two holes are aligned with each other -arrow- and hold in
position with mandrel 3204.
- Take off ribbed belt.
Pa
ge 2 of 13 En
gine, disassembl
y and assembl
y
11/21/2002 htt
p://127.0.0.1:8080/audi/servlet/Dis
play?action=Goto&t
yp
e=re
pair&id=AUDI.B5.GE05.13.1
Page 3 of 13
13-3
Installing
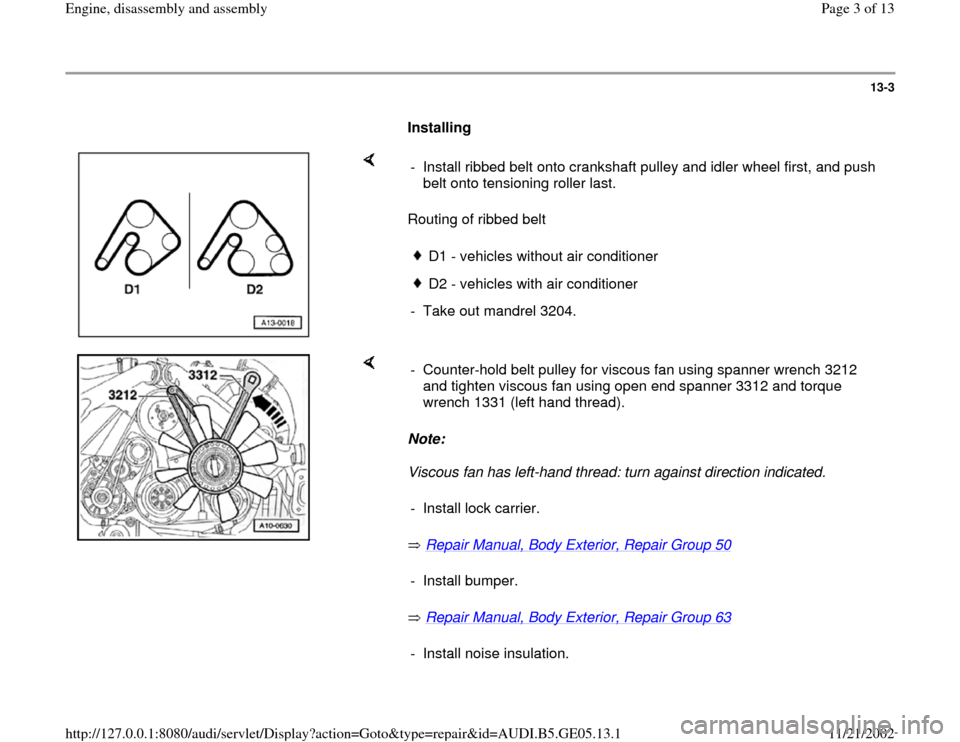
Routing of ribbed belt - Install ribbed belt onto crankshaft pulley and idler wheel first, and push
belt onto tensioning roller last.
D1 - vehicles without air conditionerD2 - vehicles with air conditioner
- Take out mandrel 3204.
Note:
Viscous fan has left-hand thread: turn against direction indicated.
Repair Manual, Body Exterior, Repair Group 50
Repair Manual, Body Exterior, Repair Group 63 - Counter-hold belt pulley for viscous fan using spanner wrench 3212
and tighten viscous fan using open end spanner 3312 and torque
wrench 1331 (left hand thread).
- Install lock carrier.
- Install bumper.- Install noise insulation.
Pa
ge 3 of 13 En
gine, disassembl
y and assembl
y
11/21/2002 htt
p://127.0.0.1:8080/audi/servlet/Dis
play?action=Goto&t
yp
e=re
pair&id=AUDI.B5.GE05.13.1
Page 6 of 13
13-6
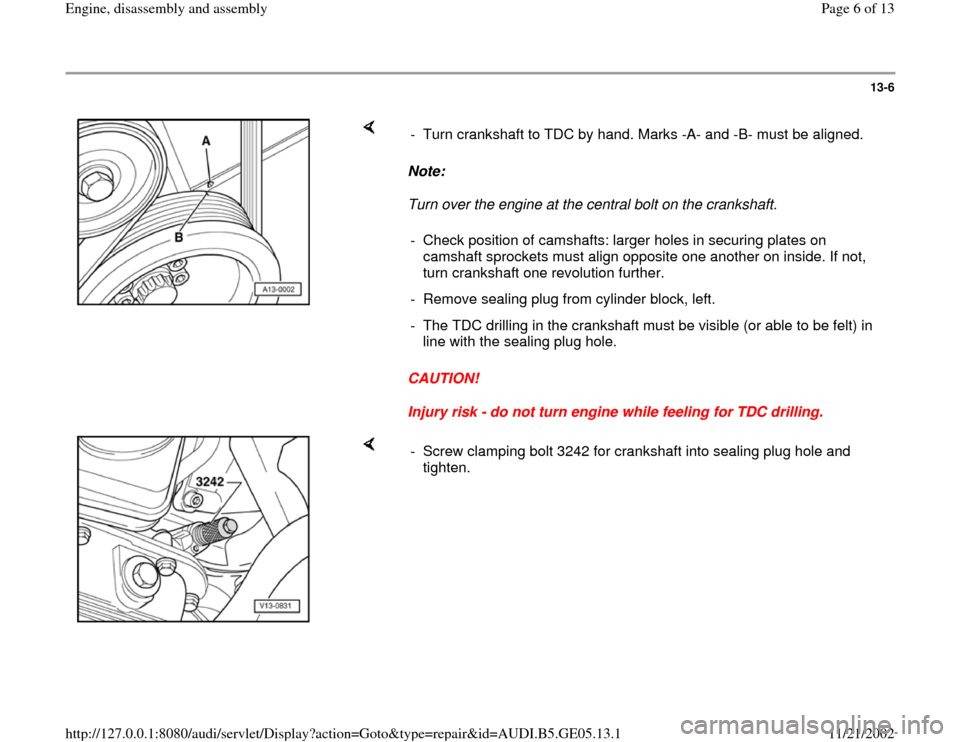
Note:
Turn over the engine at the central bolt on the crankshaft.
CAUTION!
Injury risk - do not turn engine while feeling for TDC drilling. - Turn crankshaft to TDC by hand. Marks -A- and -B- must be aligned.
- Check position of camshafts: larger holes in securing plates on
camshaft sprockets must align opposite one another on inside. If not,
turn crankshaft one revolution further.
- Remove sealing plug from cylinder block, left.
- The TDC drilling in the crankshaft must be visible (or able to be felt) in
line with the sealing plug hole.
- Screw clamping bolt 3242 for crankshaft into sealing plug hole and
tighten.
Pa
ge 6 of 13 En
gine, disassembl
y and assembl
y
11/21/2002 htt
p://127.0.0.1:8080/audi/servlet/Dis
play?action=Goto&t
yp
e=re
pair&id=AUDI.B5.GE05.13.1
Page 8 of 13
13-8
Note:
Mark the direction of rotation of the toothed belt
with chalk or felt pen before removing. A used
belt can break if it rotates in the wrong direction
when reinstalled.
The toothed belt tensioning element is oil-
damped and can therefore only be compressed
slowly by applying constant pressure.
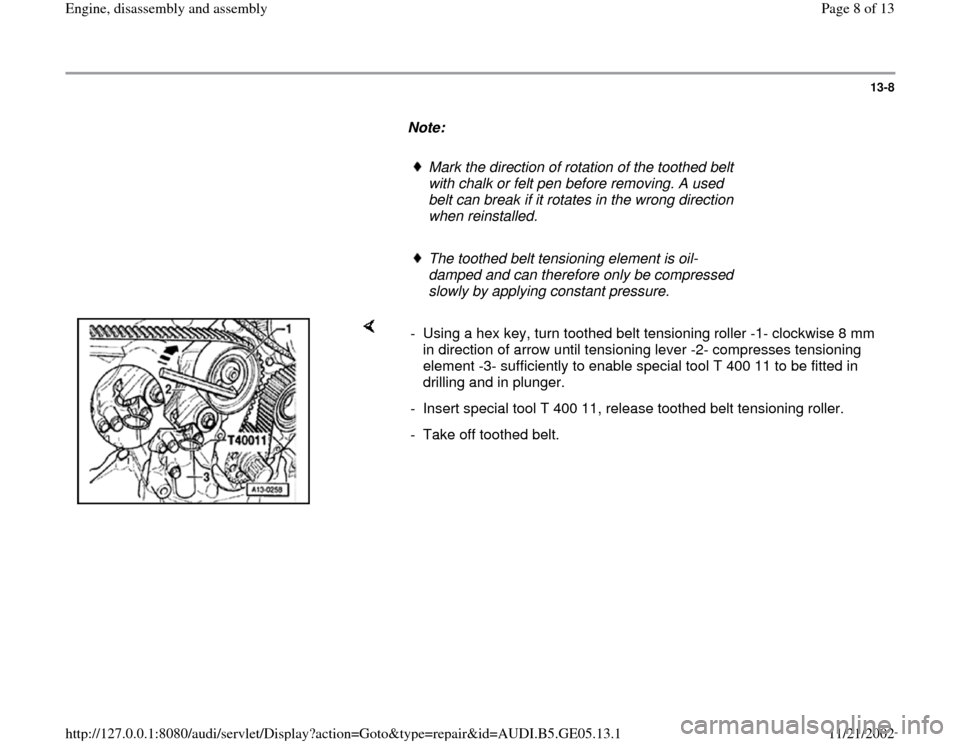
- Using a hex key, turn toothed belt tensioning roller -1- clockwise 8 mm
in direction of arrow until tensioning lever -2- compresses tensioning
element -3- sufficiently to enable special tool T 400 11 to be fitted in
drilling and in plunger.
- Insert special tool T 400 11, release toothed belt tensioning roller.
- Take off toothed belt.
Pa
ge 8 of 13 En
gine, disassembl
y and assembl
y
11/21/2002 htt
p://127.0.0.1:8080/audi/servlet/Dis
play?action=Goto&t
yp
e=re
pair&id=AUDI.B5.GE05.13.1
Page 9 of 13
13-9
Installing
- Insert camshaft clamp 3391 in securing plates of
two camshafts.
- Slacken both camshaft bolts and remove
approx. 5 turns.
- Take out camshaft clamp 3391.
Note:
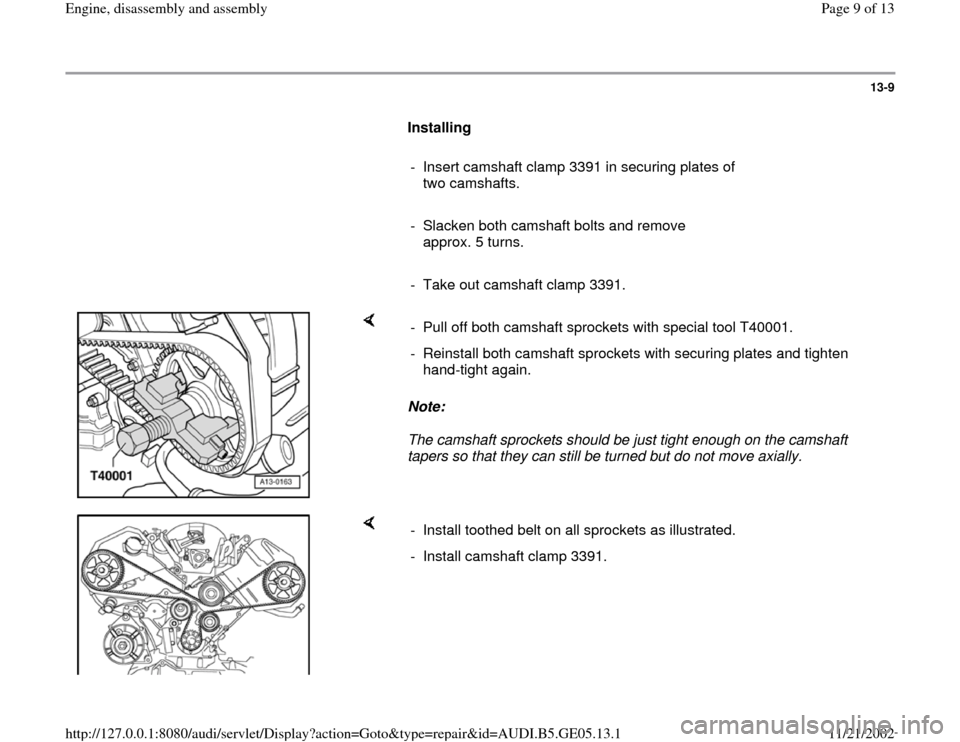
The camshaft sprockets should be just tight enough on the camshaft
tapers so that they can still be turned but do not move axially. - Pull off both camshaft sprockets with special tool T40001.
- Reinstall both camshaft sprockets with securing plates and tighten
hand-tight again.
- Install toothed belt on all sprockets as illustrated.
- Install camshaft clamp 3391.
Pa
ge 9 of 13 En
gine, disassembl
y and assembl
y
11/21/2002 htt
p://127.0.0.1:8080/audi/servlet/Dis
play?action=Goto&t
yp
e=re
pair&id=AUDI.B5.GE05.13.1
Page 10 of 13
13-10
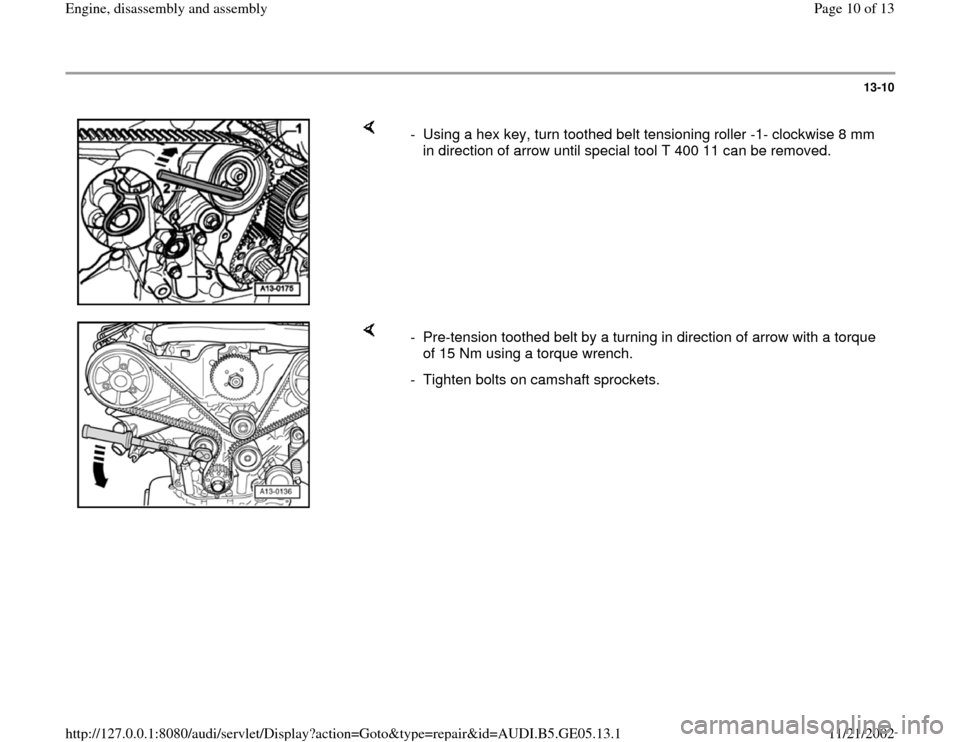
- Using a hex key, turn toothed belt tensioning roller -1- clockwise 8 mm
in direction of arrow until special tool T 400 11 can be removed.
- Pre-tension toothed belt by a turning in direction of arrow with a torque
of 15 Nm using a torque wrench.
- Tighten bolts on camshaft sprockets.
Pa
ge 10 of 13 En
gine, disassembl
y and assembl
y
11/21/2002 htt
p://127.0.0.1:8080/audi/servlet/Dis
play?action=Goto&t
yp
e=re
pair&id=AUDI.B5.GE05.13.1
Page 12 of 13
13-12
- Install toothed belt guard.
- Install ribbed belt Page 13
-3 .
Tightening torques
Toothed belt sprocket to
camshaft 55 Nm
Idler wheel 45 Nm
Toothed belt tensioning roller 20 Nm
Pulley to crankshaft 20 Nm
Toothed belt tensioning
element 10 Nm
Central bolt
1)
to crankshaft
200 Nm + 180
2)
1) The central bolt must always be replaced.
2) Turning in two stages of 90 is also
permissible.
Pa
ge 12 of 13 En
gine, disassembl
y and assembl
y
11/21/2002 htt
p://127.0.0.1:8080/audi/servlet/Dis
play?action=Goto&t
yp
e=re
pair&id=AUDI.B5.GE05.13.1