wheel bolts AUDI A4 1998 B5 / 1.G Suspension Rear Axle Front Wheel Drive Workshop Manual
[x] Cancel search | Manufacturer: AUDI, Model Year: 1998, Model line: A4, Model: AUDI A4 1998 B5 / 1.GPages: 26, PDF Size: 0.49 MB
Page 1 of 26
42-1
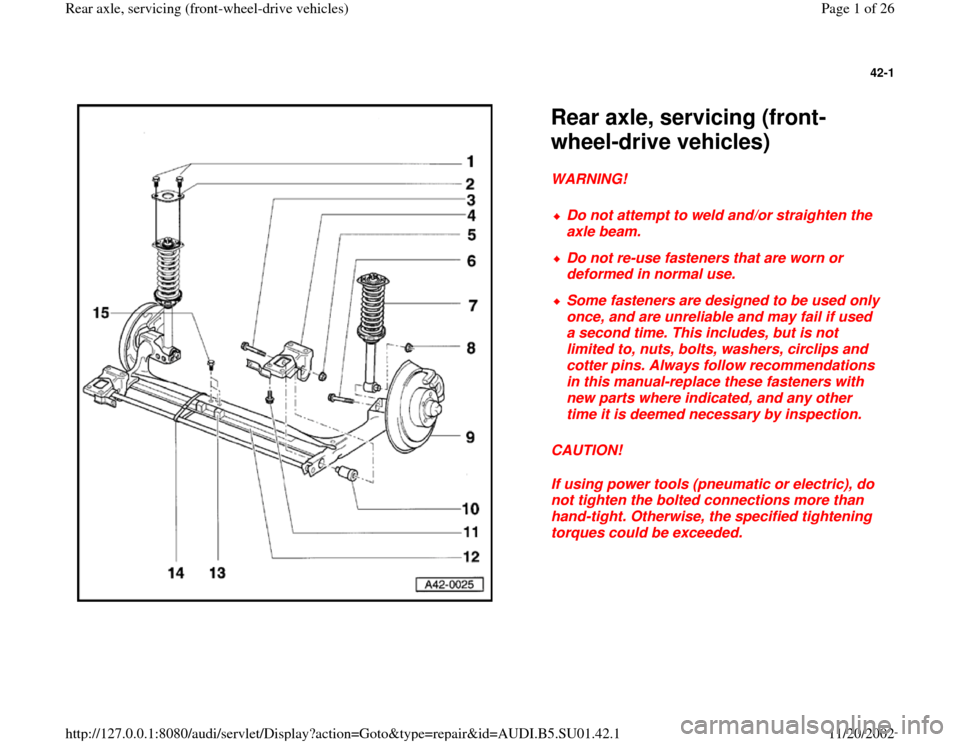
Rear axle, servicing (front-
wheel-drive vehicles) WARNING!
CAUTION!
If using power tools (pneumatic or electric), do
not tighten the bolted connections more than
hand-tight. Otherwise, the specified tightening
torques could be exceeded.
Do not attempt to weld and/or straighten the
axle beam.
Do not re-use fasteners that are worn or
deformed in normal use.
Some fasteners are designed to be used only
once, and are unreliable and may fail if used
a second time. This includes, but is not
limited to, nuts, bolts, washers, circlips and
cotter pins. Always follow recommendations
in this manual-replace these fasteners with
new parts where indicated, and any other
time it is deemed necessary by inspection.
Pa
ge 1 of 26 Rear axle, servicin
g (front-wheel-drive vehicles
)
11/20/2002 htt
p://127.0.0.1:8080/audi/servlet/Dis
play?action=Goto&t
yp
e=re
pair&id=AUDI.B5.SU01.42.1
Page 2 of 26
42-2
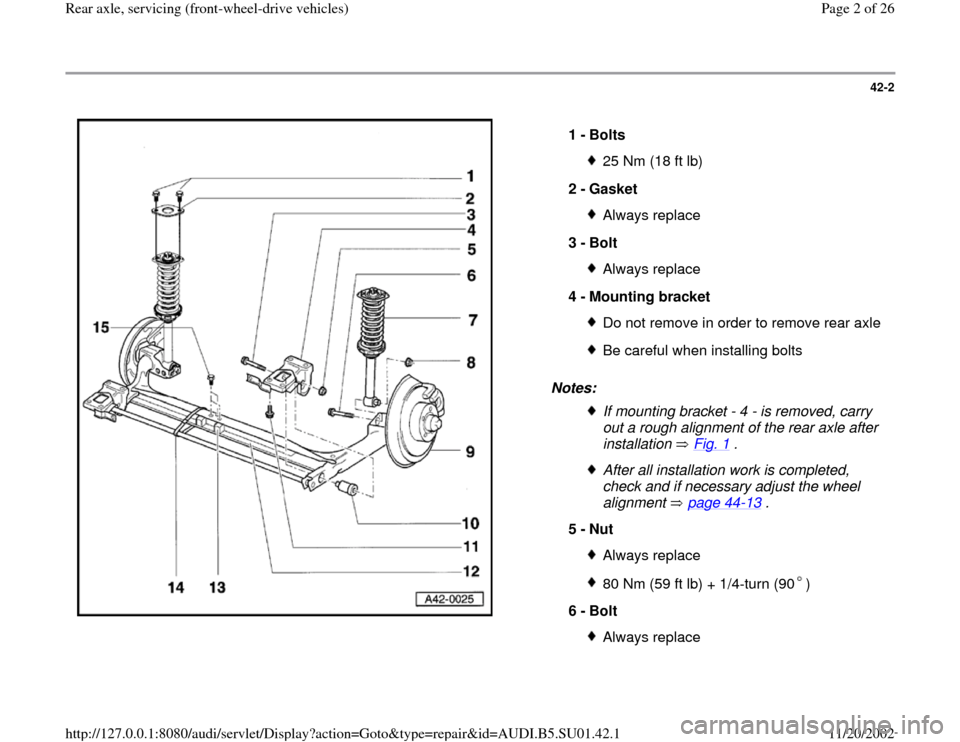
Notes: 1 -
Bolts
25 Nm (18 ft lb)
2 -
Gasket Always replace
3 -
Bolt Always replace
4 -
Mounting bracket Do not remove in order to remove rear axleBe careful when installing boltsIf mounting bracket - 4 - is removed, carry
out a rough alignment of the rear axle after
installation Fig. 1
.
After all installation work is completed,
check and if necessary adjust the wheel
alignment page 44
-13
.
5 -
Nut
Always replace80 Nm (59 ft lb) + 1/4-turn (90 )
6 -
Bolt
Always replace
Pa
ge 2 of 26 Rear axle, servicin
g (front-wheel-drive vehicles
)
11/20/2002 htt
p://127.0.0.1:8080/audi/servlet/Dis
play?action=Goto&t
yp
e=re
pair&id=AUDI.B5.SU01.42.1
Page 8 of 26
42-6
1BT: Heavy duty suspension (approx. 7 mm or
1/4 in. higher)
1BP: Heavy duty suspension (same ride height
as 1BA but with limited bump)
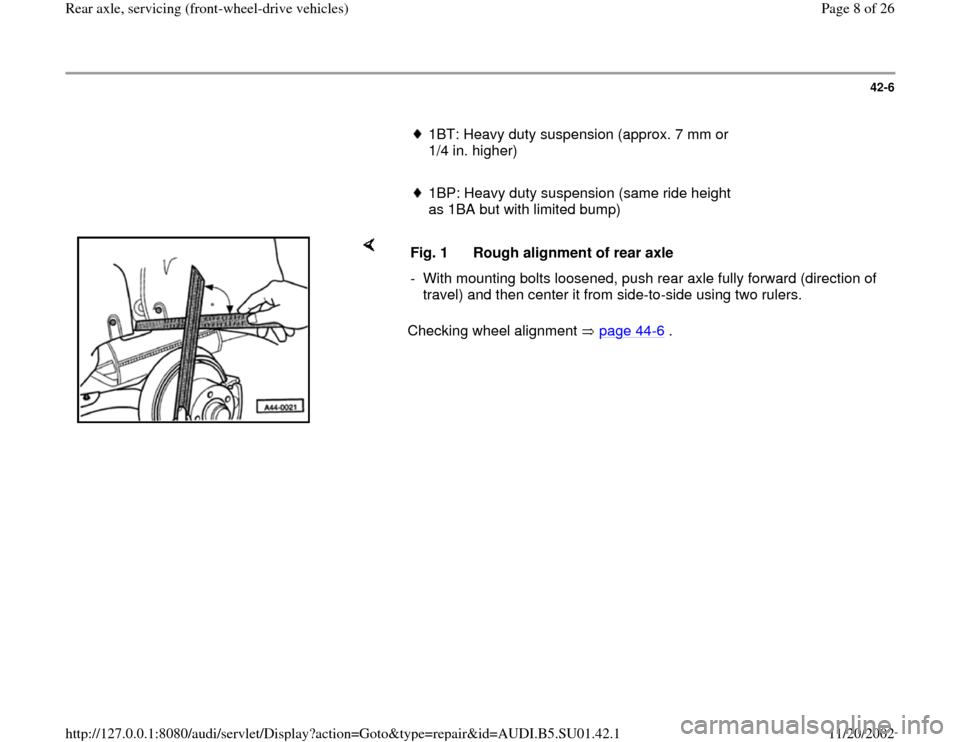
Checking wheel alignment page 44
-6 . Fig. 1 Rough alignment of rear axle
- With mounting bolts loosened, push rear axle fully forward (direction of
travel) and then center it from side-to-side using two rulers.
Pa
ge 8 of 26 Rear axle, servicin
g (front-wheel-drive vehicles
)
11/20/2002 htt
p://127.0.0.1:8080/audi/servlet/Dis
play?action=Goto&t
yp
e=re
pair&id=AUDI.B5.SU01.42.1
Page 12 of 26

42-10
- Remove locking plates -1- on left and right-sides, slightly loosen bolts -
2- for cable retaining plate, and remove cables from axle beam.
- Disconnect brake lines at rear axle (arrow) on both sides.
Pa
ge 12 of 26 Rear axle, servicin
g (front-wheel-drive vehicles
)
11/20/2002 htt
p://127.0.0.1:8080/audi/servlet/Dis
play?action=Goto&t
yp
e=re
pair&id=AUDI.B5.SU01.42.1
Page 13 of 26
42-11
- Pull ABS wheel speed sensors out of mounting
holes on both sides.
- Detach ABS wheel speed sensor wiring from
rear axle.
- On vehicles with headlight range control remove
linkage from axle beam.
Note:
Use VAG1383 gearbox lifter together with 1359/2
attachment for removing and installing the axle
beam.
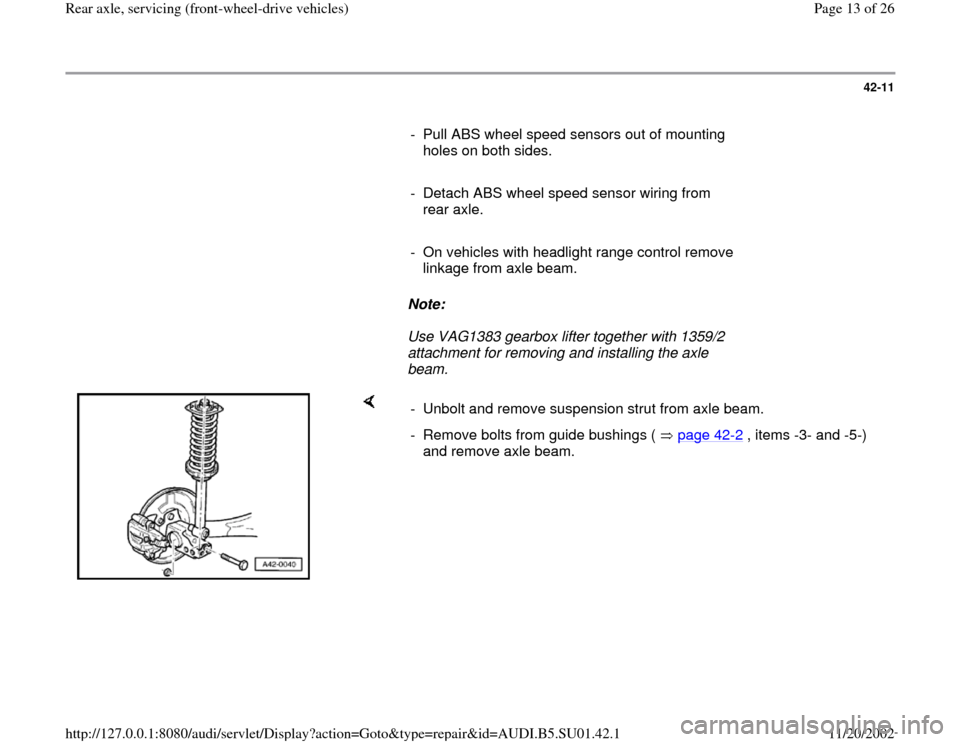
- Unbolt and remove suspension strut from axle beam.
- Remove bolts from guide bushings ( page 42
-2 , items -3- and -5-)
and remove axle beam.
Pa
ge 13 of 26 Rear axle, servicin
g (front-wheel-drive vehicles
)
11/20/2002 htt
p://127.0.0.1:8080/audi/servlet/Dis
play?action=Goto&t
yp
e=re
pair&id=AUDI.B5.SU01.42.1
Page 14 of 26
42-12
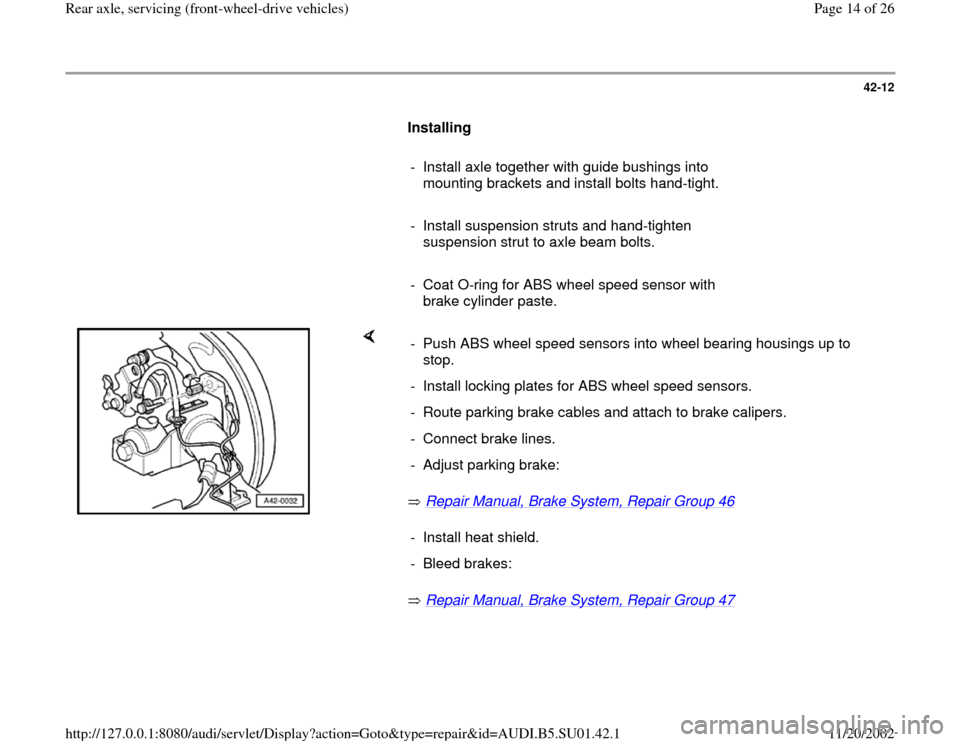
Installing
- Install axle together with guide bushings into
mounting brackets and install bolts hand-tight.
- Install suspension struts and hand-tighten
suspension strut to axle beam bolts.
- Coat O-ring for ABS wheel speed sensor with
brake cylinder paste.
Repair Manual, Brake System, Repair Group 46
Repair Manual, Brake System, Repair Group 47 - Push ABS wheel speed sensors into wheel bearing housings up to
stop.
- Install locking plates for ABS wheel speed sensors.
- Route parking brake cables and attach to brake calipers.
- Connect brake lines.
- Adjust parking brake:
- Install heat shield.
- Bleed brakes:
Pa
ge 14 of 26 Rear axle, servicin
g (front-wheel-drive vehicles
)
11/20/2002 htt
p://127.0.0.1:8080/audi/servlet/Dis
play?action=Goto&t
yp
e=re
pair&id=AUDI.B5.SU01.42.1
Page 15 of 26
42-13
CAUTION!
Vehicle must be standing on its wheels when
tightening guide bushing to rear axle bolts.
Otherwise bonded rubber bushings will be
subjected to torsion resulting in shortened
service life
- Tighten guide bushing bolts ( page 42
-2 ,
items -3- and -5-).
Tightening torque: 80 Nm (59 ft lb) + 1/4-turn
(90 )
CAUTION!
Vehicle must be standing on its wheels when
tightening suspension strut to rear axle bolts.
Otherwise bonded rubber bushings will be
subjected to torsion resulting in shortened
service life
- Tighten suspension strut to axle beam bolts (
page 42
-2 , items -6- and -8-).
Tightening torque: 50 Nm (37 ft lb) + 1/4-turn
(90 )
-
On vehicles with headlight range control, tighten
bolted connection between headlight range
Pa
ge 15 of 26 Rear axle, servicin
g (front-wheel-drive vehicles
)
11/20/2002 htt
p://127.0.0.1:8080/audi/servlet/Dis
play?action=Goto&t
yp
e=re
pair&id=AUDI.B5.SU01.42.1
Page 17 of 26

42-14
Guide bushings, removing and installing
Lowering rear axle
- On vehicles with headlight range control remove linkage from axle
beam.
- Remove bolts from guide bushing mount and lower axle.
- Position VW552 guide piece to prevent brake lines from becoming
stressed.
Removing guide bushing
Pa
ge 17 of 26 Rear axle, servicin
g (front-wheel-drive vehicles
)
11/20/2002 htt
p://127.0.0.1:8080/audi/servlet/Dis
play?action=Goto&t
yp
e=re
pair&id=AUDI.B5.SU01.42.1
Page 18 of 26

42-15
Guide bushing installation position
The guide bushing must be pulled into the rear axle with the arrow on the
3128/1a installation piece pointing in direction -B-.
Pulling in guide bushing
The remainder of the installation is the reverse of removal.
CAUTION!
Vehicle must be standing on its wheels when tightening guide
bushing to rear axle bolts. Otherwise bonded rubber bushings will
be subjected to torsion resulting in shortened service life
Pa
ge 18 of 26 Rear axle, servicin
g (front-wheel-drive vehicles
)
11/20/2002 htt
p://127.0.0.1:8080/audi/servlet/Dis
play?action=Goto&t
yp
e=re
pair&id=AUDI.B5.SU01.42.1