transmission AUDI A4 1999 B5 / 1.G 01A Transmission Final Drive Flange Housing Remove Workshop Manual
[x] Cancel search | Manufacturer: AUDI, Model Year: 1999, Model line: A4, Model: AUDI A4 1999 B5 / 1.GPages: 21, PDF Size: 0.49 MB
Page 1 of 21
39-85
Drive flange housing, removing
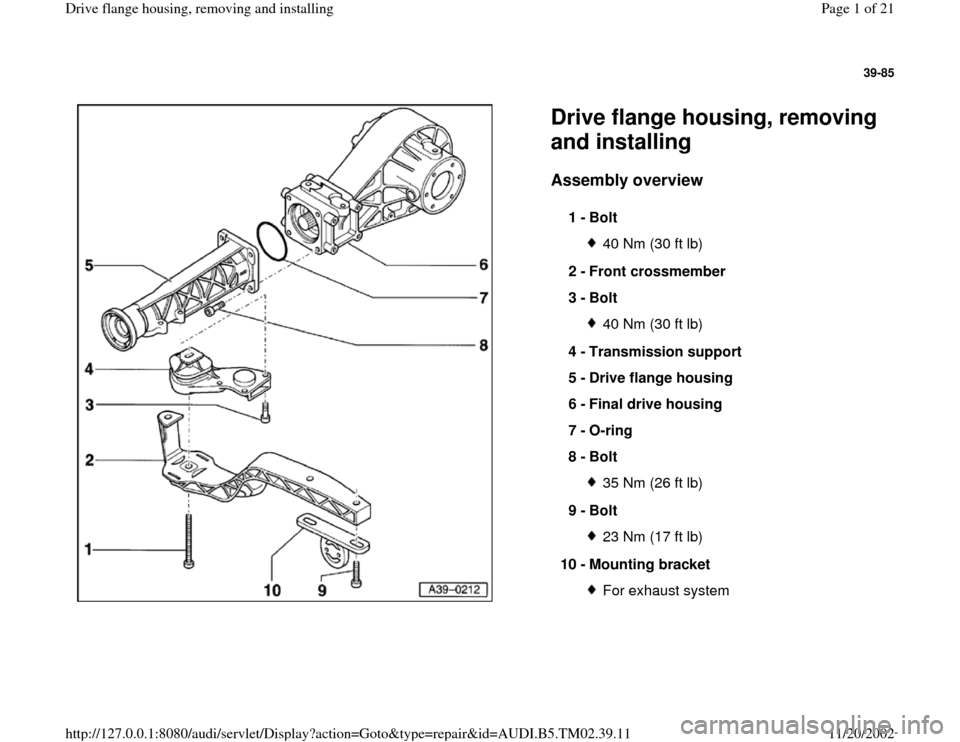
and installing Assembly overview
1 -
Bolt
40 Nm (30 ft lb)
2 -
Front crossmember
3 -
Bolt 40 Nm (30 ft lb)
4 -
Transmission support
5 -
Drive flange housing
6 -
Final drive housing
7 -
O-ring
8 -
Bolt 35 Nm (26 ft lb)
9 -
Bolt 23 Nm (17 ft lb)
10 -
Mounting bracket For exhaust system
Pa
ge 1 of 21 Drive flan
ge housin
g, removin
g and installin
g
11/20/2002 htt
p://127.0.0.1:8080/audi/servlet/Dis
play?action=Goto&t
yp
e=re
pair&id=AUDI.B5.TM02.39.11
Page 2 of 21
39-86
Removing
Rear differential installed
Special tools and equipment
VW771 with 771/15 multi-purpose tool
VAG1306 drip tray
VAG1359/2 universal mounting
VAG1383A engine-/transmission hoist
- Place VAG1306 drip tray underneath
transmission and drain fluid.
- Remove rear section of exhaust system located
rearward of exhaust pipe clamp(s).
Repair Manual, Engine Mechanical, Repair
Group 26
Pa
ge 2 of 21 Drive flan
ge housin
g, removin
g and installin
g
11/20/2002 htt
p://127.0.0.1:8080/audi/servlet/Dis
play?action=Goto&t
yp
e=re
pair&id=AUDI.B5.TM02.39.11
Page 5 of 21
39-89
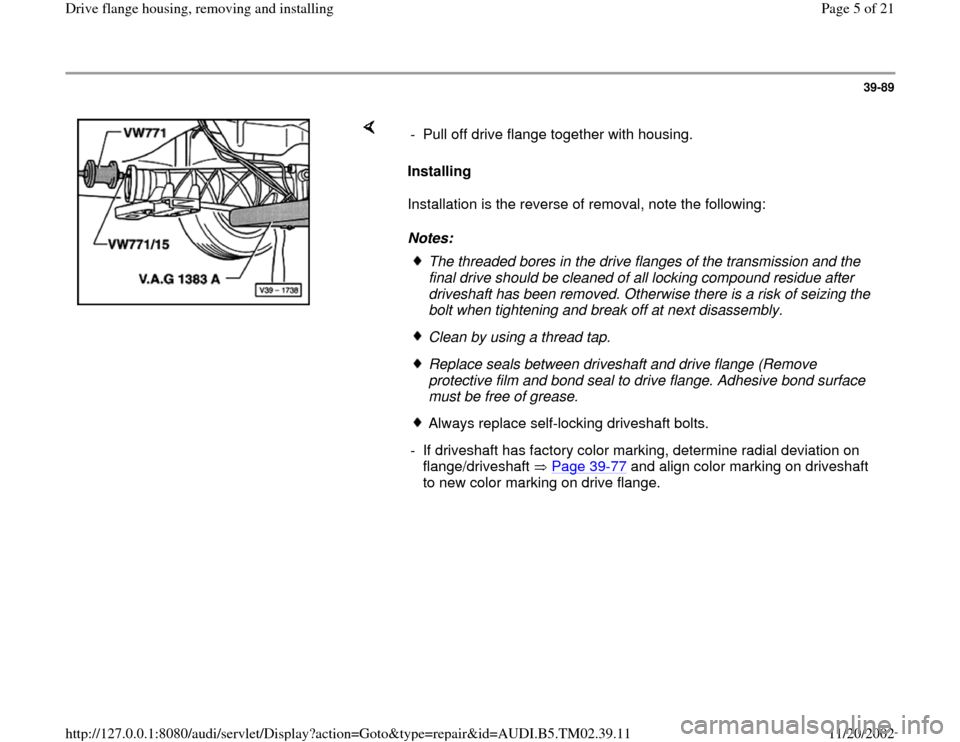
Installing
Installation is the reverse of removal, note the following:
Notes: - Pull off drive flange together with housing.
The threaded bores in the drive flanges of the transmission and the
final drive should be cleaned of all locking compound residue after
driveshaft has been removed. Otherwise there is a risk of seizing the
bolt when tightening and break off at next disassembly. Clean by using a thread tap.Replace seals between driveshaft and drive flange (Remove
protective film and bond seal to drive flange. Adhesive bond surface
must be free of grease. Always replace self-locking driveshaft bolts.
- If driveshaft has factory color marking, determine radial deviation on
flange/driveshaft Page 39
-77
and align color marking on driveshaft
to new color marking on drive flange.
Pa
ge 5 of 21 Drive flan
ge housin
g, removin
g and installin
g
11/20/2002 htt
p://127.0.0.1:8080/audi/servlet/Dis
play?action=Goto&t
yp
e=re
pair&id=AUDI.B5.TM02.39.11
Page 6 of 21
39-90
- Align exhaust system free of stress.
Repair Manual, Engine Mechanical, Repair
Group 26
- Top off transmission oil for final drive and check
oil level Page 39
-84
.
Tightening torques
Component
Tightening
torque
Drive flange housing to final drive 35 Nm (26 ft
lb)
Driveshaft to final drive 55 Nm (41 ft
lb)
Front crossmember for final drive
to body 40 Nm (30 ft
lb)
Front crossmember for final drive
with mounting bracket for exhaust
system to body 23 Nm (17 ft
lb)
Oil filler plug 35 Nm (26 ft
lb)
Nuts for clamping sleeve 40 Nm (30 ft
lb)
Pa
ge 6 of 21 Drive flan
ge housin
g, removin
g and installin
g
11/20/2002 htt
p://127.0.0.1:8080/audi/servlet/Dis
play?action=Goto&t
yp
e=re
pair&id=AUDI.B5.TM02.39.11
Page 8 of 21
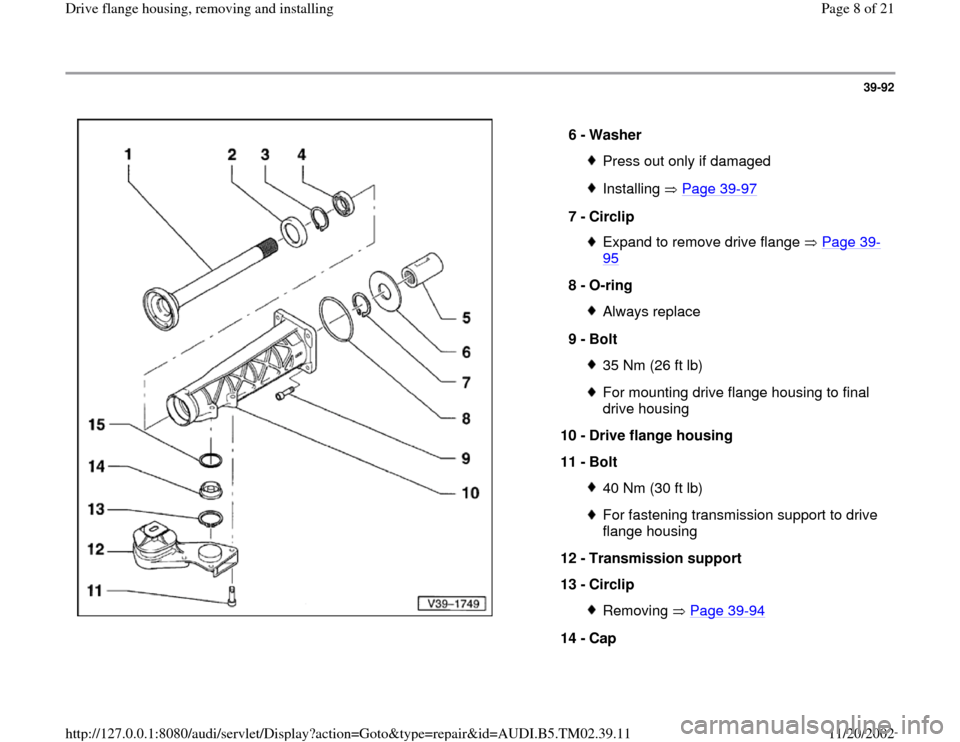
39-92
6 -
Washer
Press out only if damagedInstalling Page 39
-97
7 -
Circlip
Expand to remove drive flange Page 39
-
95
8 -
O-ring
Always replace
9 -
Bolt 35 Nm (26 ft lb)For mounting drive flange housing to final
drive housing
10 -
Drive flange housing
11 -
Bolt 40 Nm (30 ft lb)For fastening transmission support to drive
flange housing
12 -
Transmission support
13 -
Circlip Removing Page 39
-94
14 -
Cap
Pa
ge 8 of 21 Drive flan
ge housin
g, removin
g and installin
g
11/20/2002 htt
p://127.0.0.1:8080/audi/servlet/Dis
play?action=Goto&t
yp
e=re
pair&id=AUDI.B5.TM02.39.11
Page 12 of 21
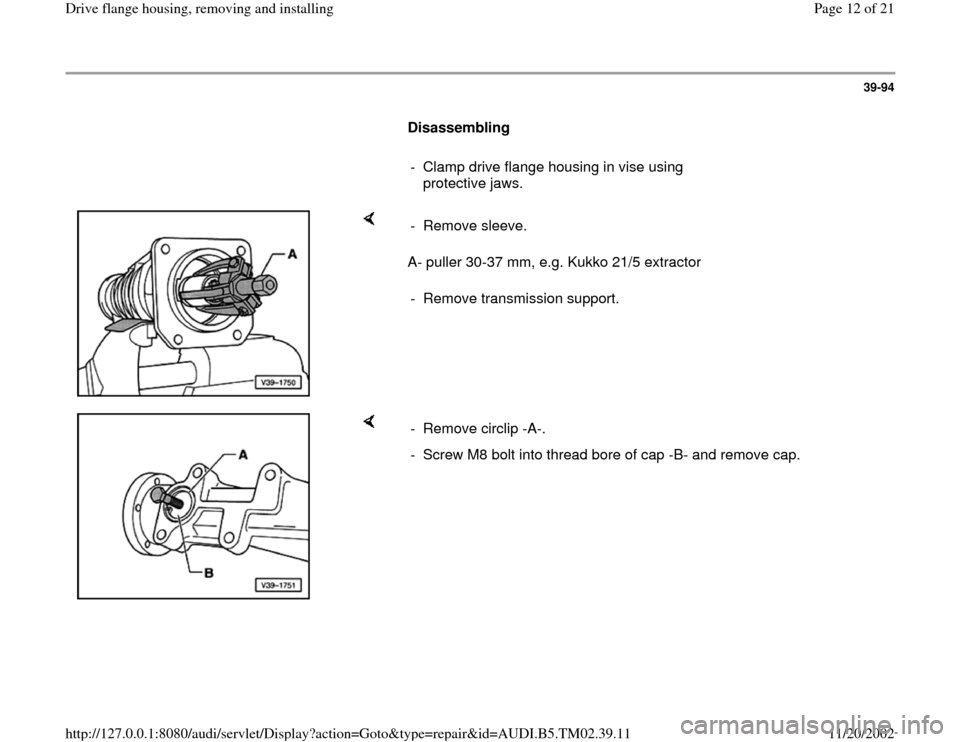
39-94
Disassembling
- Clamp drive flange housing in vise using
protective jaws.
A- puller 30-37 mm, e.g. Kukko 21/5 extractor - Remove sleeve.
- Remove transmission support.
- Remove circlip -A-.
- Screw M8 bolt into thread bore of cap -B- and remove cap.
Pa
ge 12 of 21 Drive flan
ge housin
g, removin
g and installin
g
11/20/2002 htt
p://127.0.0.1:8080/audi/servlet/Dis
play?action=Goto&t
yp
e=re
pair&id=AUDI.B5.TM02.39.11
Page 17 of 21
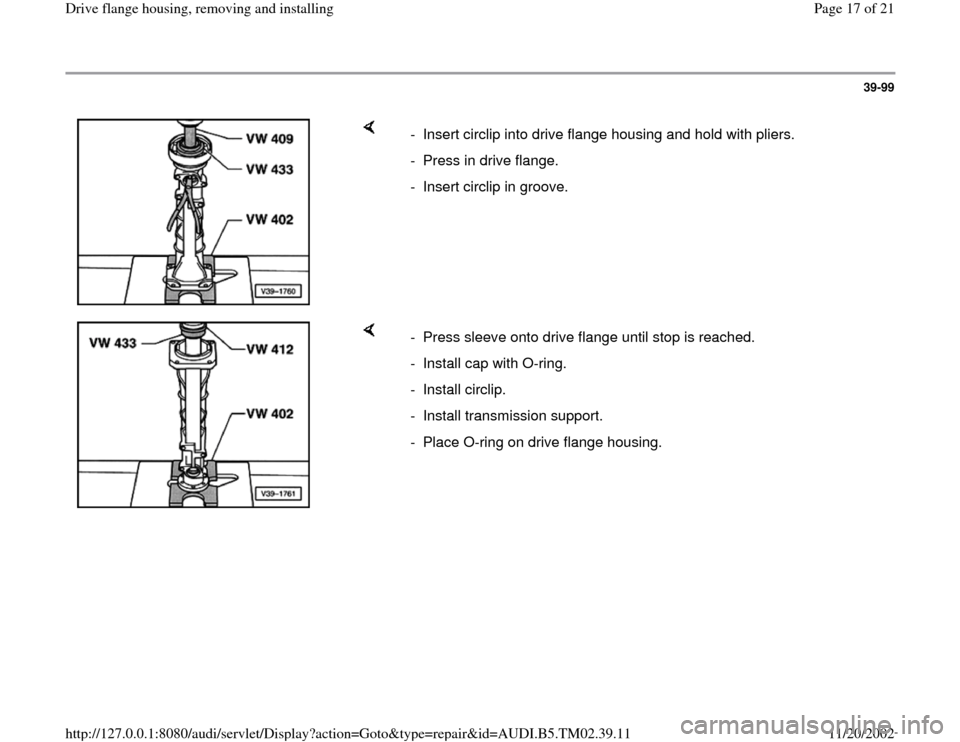
39-99
- Insert circlip into drive flange housing and hold with pliers.
- Press in drive flange.
- Insert circlip in groove.
- Press sleeve onto drive flange until stop is reached.
- Install cap with O-ring.
- Install circlip.
- Install transmission support.
- Place O-ring on drive flange housing.
Pa
ge 17 of 21 Drive flan
ge housin
g, removin
g and installin
g
11/20/2002 htt
p://127.0.0.1:8080/audi/servlet/Dis
play?action=Goto&t
yp
e=re
pair&id=AUDI.B5.TM02.39.11
Page 18 of 21
39-100
Drive flange seals, replacing
Final drive installed
- Refer to general repair instructions Page 00
-
14
.
Note:
The exhaust system needs to be removed only if
the left seal is replaced.
Special tools and equipment
2062 driver
3066 seal installer set
VAG1306 drip tray
VAG1359/2 universal mount
VAG1383A engine/transmission hoist
Pa
ge 18 of 21 Drive flan
ge housin
g, removin
g and installin
g
11/20/2002 htt
p://127.0.0.1:8080/audi/servlet/Dis
play?action=Goto&t
yp
e=re
pair&id=AUDI.B5.TM02.39.11