ECU AUDI A4 2000 B5 / 1.G APB Engine Cooling System Components
[x] Cancel search | Manufacturer: AUDI, Model Year: 2000, Model line: A4, Model: AUDI A4 2000 B5 / 1.GPages: 34, PDF Size: 0.64 MB
Page 1 of 34
19-1
Cooling system components,
removing and installing
WARNING!
Hot steam can escape from the expansion
tank when the filler cap is opened. Cover the
filler cap with a cloth and unscrew it carefully.
Notes:
When the engine is hot the cooling system is
under pressure. Carefully open filler cap on
expansion tank to release pressure before
starting repair work.
Hoses are secured with spring-type clips. When
repairing only use spring-type clips.
VAG 1921 pliers are recommended when
installing spring-type clips.
The O-rings fitted at the quick-release
connections must be replaceed if damaged or
leaking.
When installing coolant hoses, ensure that they
are free of stress and do not come into contact
with other components (observe markings on
coolant connection and hose).
Pa
ge 1 of 34 Coolin
g system com
ponents, removin
g and installin
g
11/21/2002 htt
p://127.0.0.1:8080/audi/servlet/Dis
play?action=Goto&t
yp
e=re
pair&id=AUDI.B5.GE05.19.1
Page 4 of 34

19-3
1 -
Radiator
Removing and installing Page 19
-26
After replacing, replace coolant in complete
system
2 -
Securing clip
3 -
Securing rubber
4 -
O-ring Replace if damaged
5 -
Bottom coolant hose Secured to radiator with retaining clipCheck for secure seatingDiagram of coolant hose connections
Page 19
-17
6 -
Rubber washer
Pa
ge 4 of 34 Coolin
g system com
ponents, removin
g and installin
g
11/21/2002 htt
p://127.0.0.1:8080/audi/servlet/Dis
play?action=Goto&t
yp
e=re
pair&id=AUDI.B5.GE05.19.1
Page 5 of 34
19-4
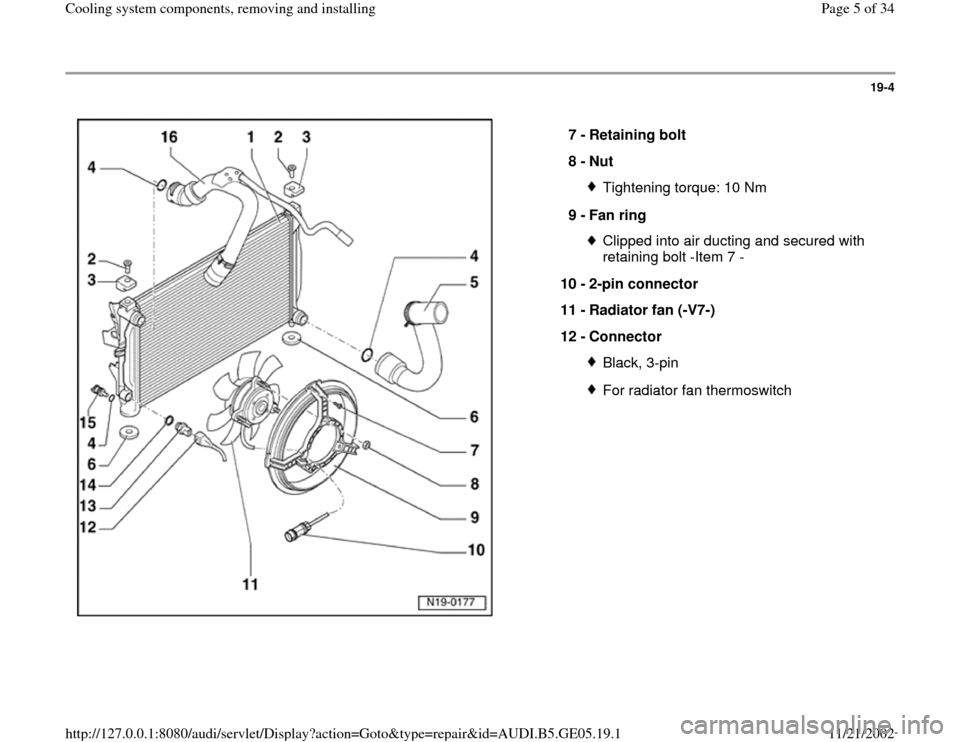
7 -
Retaining bolt
8 -
Nut
Tightening torque: 10 Nm
9 -
Fan ring Clipped into air ducting and secured with
retaining bolt -Item 7 -
10 -
2-pin connector
11 -
Radiator fan (-V7-)
12 -
Connector Black, 3-pinFor radiator fan thermoswitch
Pa
ge 5 of 34 Coolin
g system com
ponents, removin
g and installin
g
11/21/2002 htt
p://127.0.0.1:8080/audi/servlet/Dis
play?action=Goto&t
yp
e=re
pair&id=AUDI.B5.GE05.19.1
Page 6 of 34
19-5
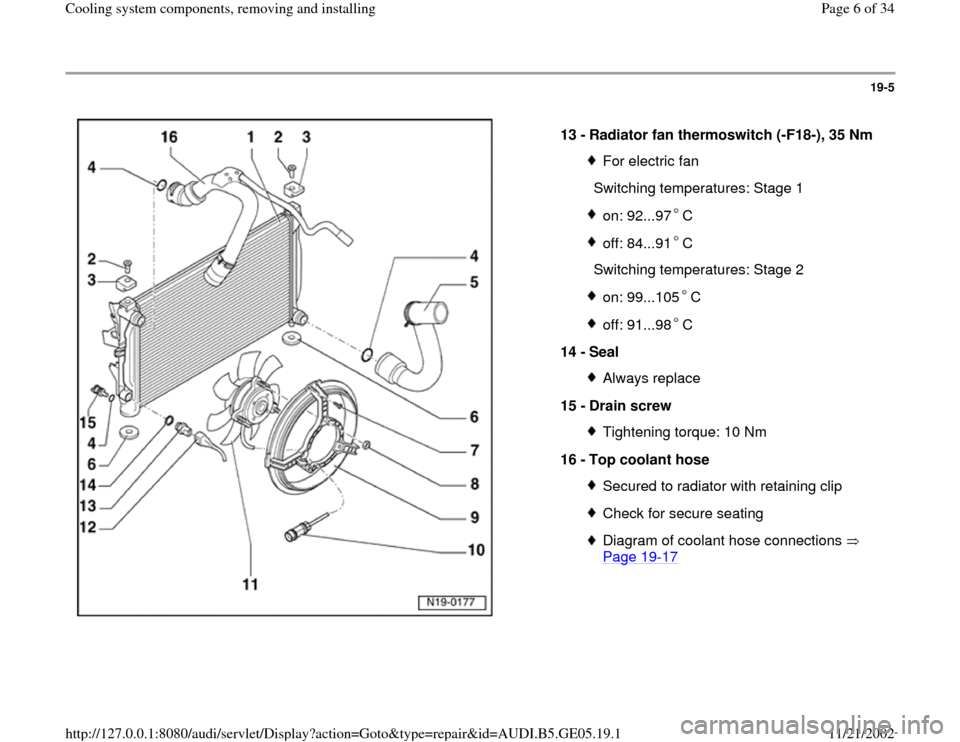
13 -
Radiator fan thermoswitch (-F18-), 35 Nm
For electric fan
Switching temperatures: Stage 1on: 92...97 Coff: 84...91 C
Switching temperatures: Stage 2
on: 99...105 Coff: 91...98 C
14 -
Seal
Always replace
15 -
Drain screw Tightening torque: 10 Nm
16 -
Top coolant hose Secured to radiator with retaining clipCheck for secure seatingDiagram of coolant hose connections
Page 19
-17
Pa
ge 6 of 34 Coolin
g system com
ponents, removin
g and installin
g
11/21/2002 htt
p://127.0.0.1:8080/audi/servlet/Dis
play?action=Goto&t
yp
e=re
pair&id=AUDI.B5.GE05.19.1
Page 11 of 34
19-10
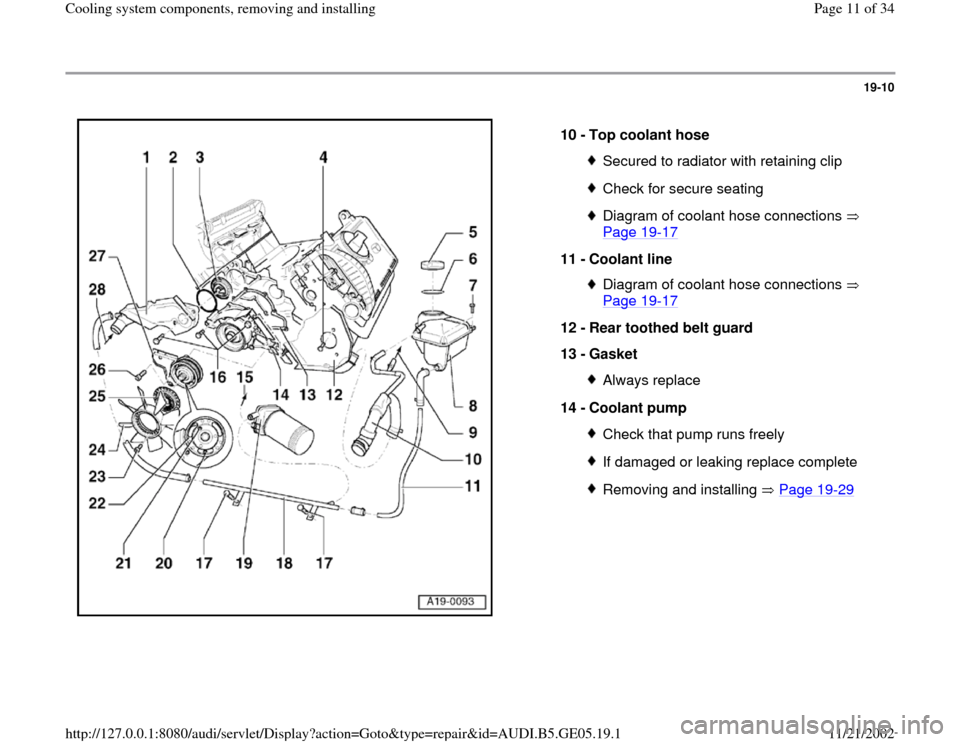
10 -
Top coolant hose
Secured to radiator with retaining clipCheck for secure seatingDiagram of coolant hose connections
Page 19
-17
11 -
Coolant line
Diagram of coolant hose connections
Page 19
-17
12 -
Rear toothed belt guard
13 -
Gasket
Always replace
14 -
Coolant pump Check that pump runs freelyIf damaged or leaking replace completeRemoving and installing Page 19
-29
Pa
ge 11 of 34 Coolin
g system com
ponents, removin
g and installin
g
11/21/2002 htt
p://127.0.0.1:8080/audi/servlet/Dis
play?action=Goto&t
yp
e=re
pair&id=AUDI.B5.GE05.19.1
Page 25 of 34
19-23
- Replace O-ring on coolant drain screw and
screw drain screw back into engine.
Tightening torque: 20 Nm
- Install bottom coolant hose and secure.
- Close coolant drain tap on radiator.
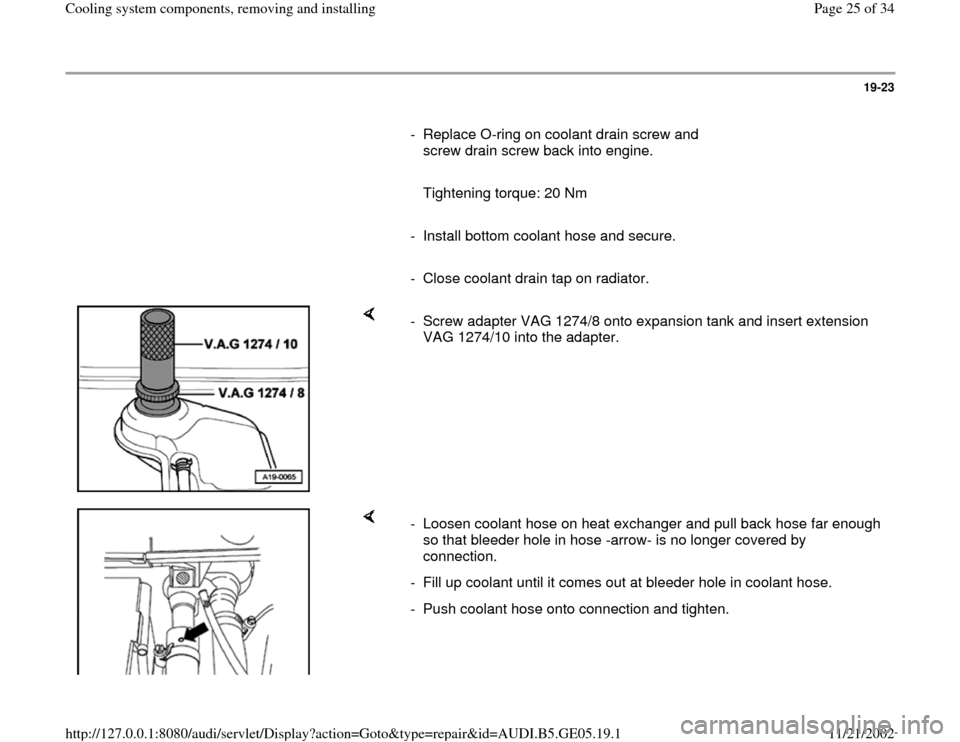
- Screw adapter VAG 1274/8 onto expansion tank and insert extension
VAG 1274/10 into the adapter.
- Loosen coolant hose on heat exchanger and pull back hose far enough
so that bleeder hole in hose -arrow- is no longer covered by
connection.
- Fill up coolant until it comes out at bleeder hole in coolant hose.
- Push coolant hose onto connection and tighten.
Pa
ge 25 of 34 Coolin
g system com
ponents, removin
g and installin
g
11/21/2002 htt
p://127.0.0.1:8080/audi/servlet/Dis
play?action=Goto&t
yp
e=re
pair&id=AUDI.B5.GE05.19.1
Page 29 of 34
19-27
Vehicles with air conditioner
WARNING!
Do not open the air conditioner refrigerant circuit.
Note:
To prevent damage to the condenser and refrigerant lines and hoses,
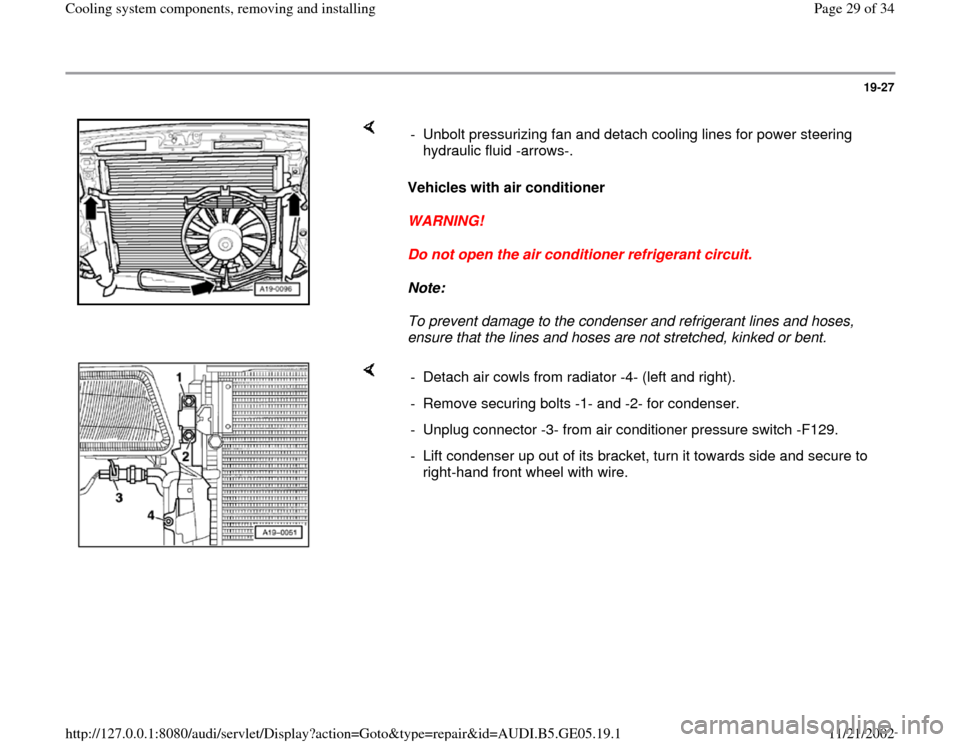
ensure that the lines and hoses are not stretched, kinked or bent. - Unbolt pressurizing fan and detach cooling lines for power steering
hydraulic fluid -arrows-.
- Detach air cowls from radiator -4- (left and right).
- Remove securing bolts -1- and -2- for condenser.
- Unplug connector -3- from air conditioner pressure switch -F129.
- Lift condenser up out of its bracket, turn it towards side and secure to
right-hand front wheel with wire.
Pa
ge 29 of 34 Coolin
g system com
ponents, removin
g and installin
g
11/21/2002 htt
p://127.0.0.1:8080/audi/servlet/Dis
play?action=Goto&t
yp
e=re
pair&id=AUDI.B5.GE05.19.1
Page 33 of 34
19-30
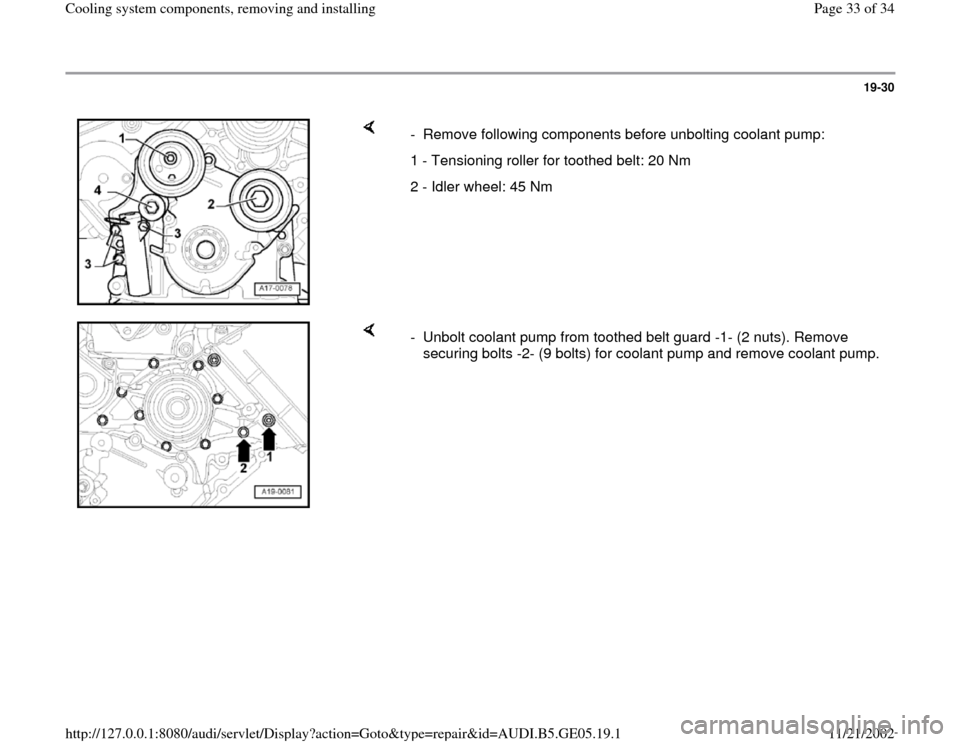
- Remove following components before unbolting coolant pump:
1 - Tensioning roller for toothed belt: 20 Nm
2 - Idler wheel: 45 Nm
- Unbolt coolant pump from toothed belt guard -1- (2 nuts). Remove
securing bolts -2- (9 bolts) for coolant pump and remove coolant pump.
Pa
ge 33 of 34 Coolin
g system com
ponents, removin
g and installin
g
11/21/2002 htt
p://127.0.0.1:8080/audi/servlet/Dis
play?action=Goto&t
yp
e=re
pair&id=AUDI.B5.GE05.19.1
Page 34 of 34
19-31
Installing
Install in the opposite order to removing. When
installing, note the following points:
- Remove residues of sealant on sealing surfaces
of coolant pump and cylinder block.
- Clean sealing surfaces; ensure that they are free
of oil and grease.
- Fit new gasket on coolant pump flange.
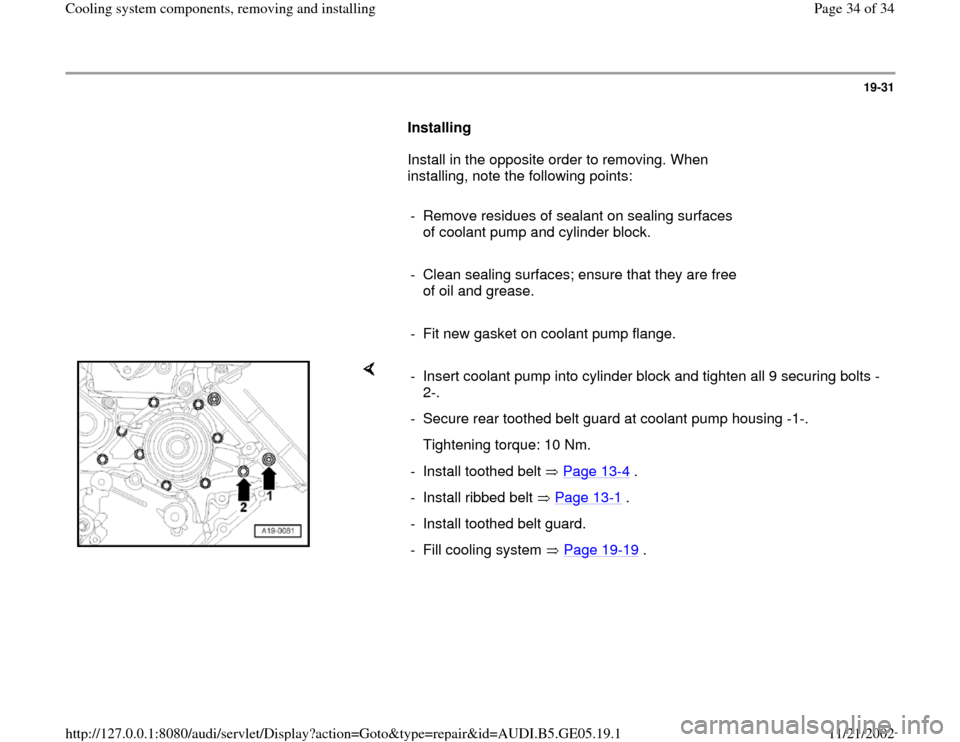
- Insert coolant pump into cylinder block and tighten all 9 securing bolts -
2-.
- Secure rear toothed belt guard at coolant pump housing -1-.
Tightening torque: 10 Nm.
- Install toothed belt Page 13
-4 .
- Install ribbed belt Page 13
-1 .
- Install toothed belt guard.
- Fill cooling system Page 19
-19
.
Pa
ge 34 of 34 Coolin
g system com
ponents, removin
g and installin
g
11/21/2002 htt
p://127.0.0.1:8080/audi/servlet/Dis
play?action=Goto&t
yp
e=re
pair&id=AUDI.B5.GE05.19.1