AUDI A4 2000 B5 / 1.G Engine Oil Level Checking Owners Manual
Manufacturer: AUDI, Model Year: 2000,
Model line: A4,
Model: AUDI A4 2000 B5 / 1.G
Pages: 111, PDF Size: 1.26 MB
AUDI A4 2000 B5 / 1.G Engine Oil Level Checking Owners Manual
A4 2000 B5 / 1.G
AUDI
AUDI
https://www.carmanualsonline.info/img/6/1117/w960_1117-0.png
AUDI A4 2000 B5 / 1.G Engine Oil Level Checking Owners Manual
Trending: fog light, steering wheel, seat adjustment, coolant reservoir, clock setting, child lock, oil dipstick
Page 91 of 111
90
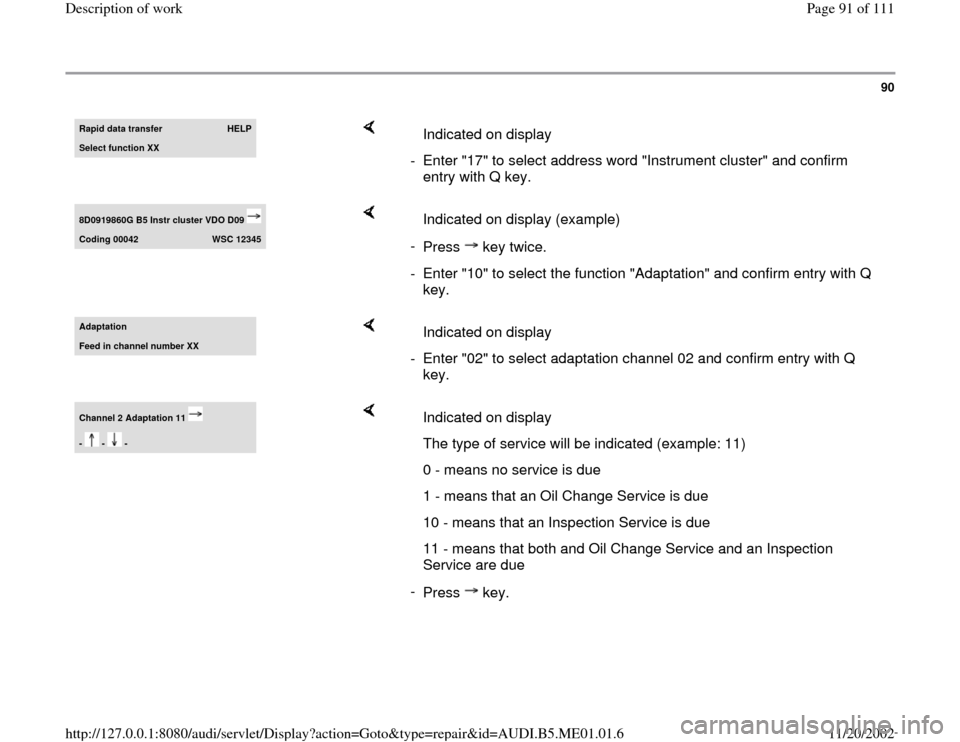
Rapid data transfer
HELP
Select function XX
Indicated on display
- Enter "17" to select address word "Instrument cluster" and confirm
entry with Q key.
8D0919860G B5 Instr cluster VDO D09 Coding 00042
WSC 12345
Indicated on display (example)
-
Press key twice.- Enter "10" to select the function "Adaptation" and confirm entry with Q
key.
AdaptationFeed in channel number XX
Indicated on display
- Enter "02" to select adaptation channel 02 and confirm entry with Q
key.
Channel 2 Adaptation 11 - - -
Indicated on display
The type of service will be indicated (example: 11)
0 - means no service is due
1 - means that an Oil Change Service is due
10 - means that an Inspection Service is due
11 - means that both and Oil Change Service and an Inspection
Service are due
-
Press key.
Pa
ge 91 of 111 Descri
ption of wor
k
11/20/2002 htt
p://127.0.0.1:8080/audi/servlet/Dis
play?action=Goto&t
yp
e=re
pair&id=AUDI.B5.ME01.01.6
Page 92 of 111
91
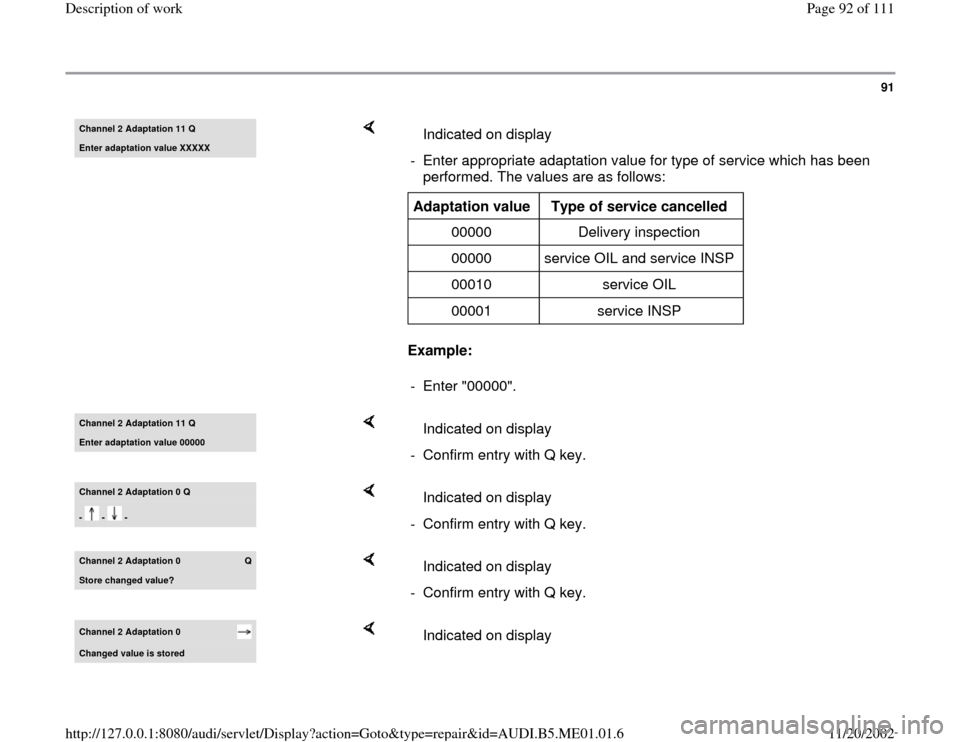
Channel 2 Adaptation 11 QEnter adaptation value XXXXX
Example: Indicated on display
- Enter appropriate adaptation value for type of service which has been
performed. The values are as follows: Adaptation value
Type of service cancelled
00000 Delivery inspection
00000 service OIL and service INSP
00010 service OIL
00001 service INSP - Enter "00000".
Channel 2 Adaptation 11 QEnter adaptation value 00000
Indicated on display
- Confirm entry with Q key.
Channel 2 Adaptation 0 Q- - -
Indicated on display
- Confirm entry with Q key.
Channel 2 Adaptation 0
Q
Store chan
ged value?
Indicated on display
- Confirm entry with Q key.
Channel 2 Adaptation 0 Chan
ged value is stored
Indicated on display
Pa
ge 92 of 111 Descri
ption of wor
k
11/20/2002 htt
p://127.0.0.1:8080/audi/servlet/Dis
play?action=Goto&t
yp
e=re
pair&id=AUDI.B5.ME01.01.6
Page 93 of 111
-
Press key to terminate resetting of service interval display.
Pa
ge 93 of 111 Descri
ption of wor
k
11/20/2002 htt
p://127.0.0.1:8080/audi/servlet/Dis
play?action=Goto&t
yp
e=re
pair&id=AUDI.B5.ME01.01.6
Page 94 of 111
92
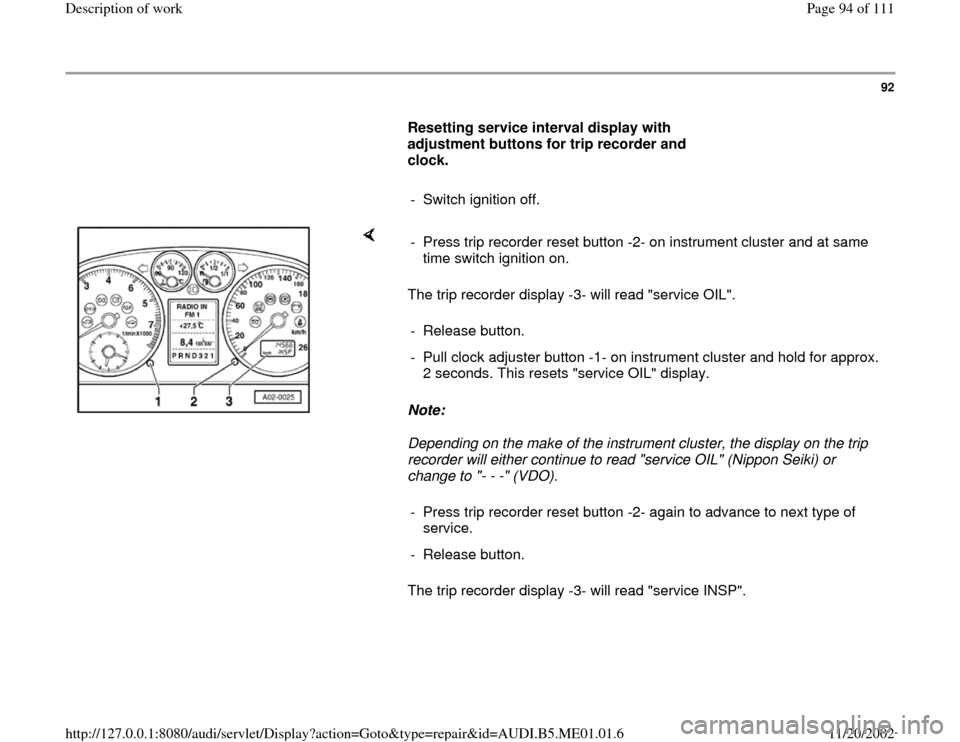
Resetting service interval display with
adjustment buttons for trip recorder and
clock.
- Switch ignition off.
The trip recorder display -3- will read "service OIL".
Note:
Depending on the make of the instrument cluster, the display on the trip
recorder will either continue to read "service OIL" (Nippon Seiki) or
change to "- - -" (VDO).
The trip recorder display -3- will read "service INSP". - Press trip recorder reset button -2- on instrument cluster and at same
time switch ignition on.
- Release button.
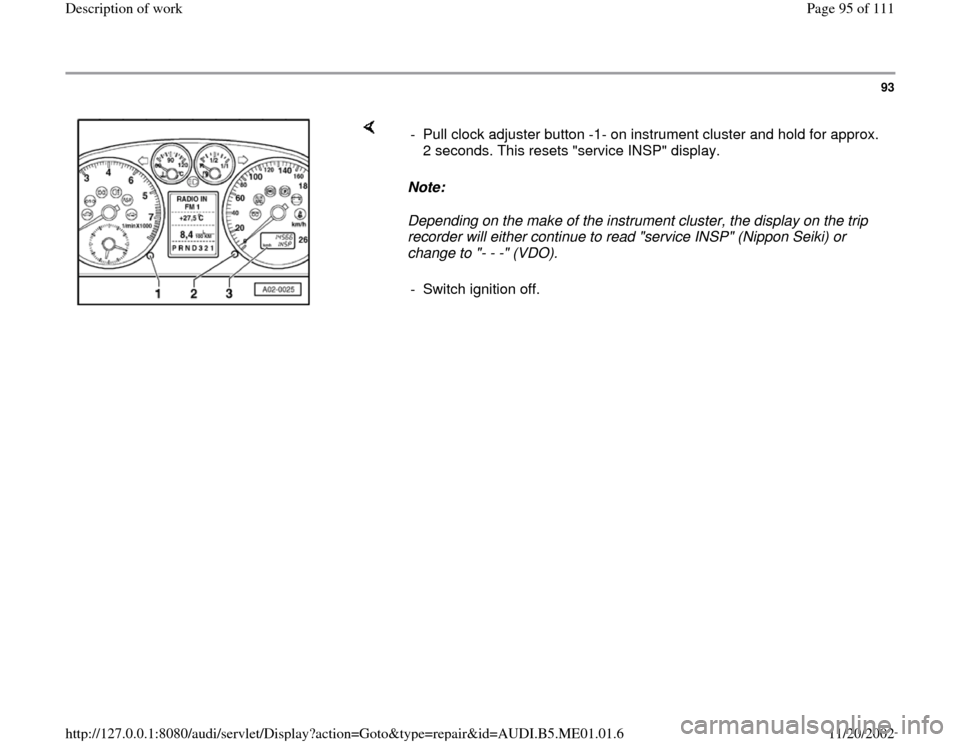
- Pull clock adjuster button -1- on instrument cluster and hold for approx.
2 seconds. This resets "service OIL" display.
- Press trip recorder reset button -2- again to advance to next type of
service.
- Release button.
Pa
ge 94 of 111 Descri
ption of wor
k
11/20/2002 htt
p://127.0.0.1:8080/audi/servlet/Dis
play?action=Goto&t
yp
e=re
pair&id=AUDI.B5.ME01.01.6
Page 95 of 111
93
Note:
Depending on the make of the instrument cluster, the display on the trip
recorder will either continue to read "service INSP" (Nippon Seiki) or
change to "- - -" (VDO). - Pull clock adjuster button -1- on instrument cluster and hold for approx.
2 seconds. This resets "service INSP" display.
- Switch ignition off.
Pa
ge 95 of 111 Descri
ption of wor
k
11/20/2002 htt
p://127.0.0.1:8080/audi/servlet/Dis
play?action=Goto&t
yp
e=re
pair&id=AUDI.B5.ME01.01.6
Page 96 of 111
94
Clock, setting
Clock is included in tachometer display. To set
time, pull out instrument panel light dimmer
switch.
When switch is pulled out briefly, hands will
advance a minute at a time. Pulled out and held,
hands will advance slowly at first, then rapidly.
Pa
ge 96 of 111 Descri
ption of wor
k
11/20/2002 htt
p://127.0.0.1:8080/audi/servlet/Dis
play?action=Goto&t
yp
e=re
pair&id=AUDI.B5.ME01.01.6
Page 97 of 111
95
RAPGARD , inspection, removal and
disposal
From my 2002
Service
Within 48 Hours after arrival at Dealer:
Inspection
-
Inspect RAPGARD for damage or peeling.
If RAPGARD is disturbed (dented, scratched,
etc.):
- You must note the damage on the Carrier
Delivery Receipt, including damage type, extent
and location. Failure to note damage on the
Carrier Delivery Receipt will result in non-
payment of the repair.
Note:
RAPGARD must be removed from the
vehicle no later than six months after
application. See sticker (location on vehicle
body varies) for detailed information.
Pa
ge 97 of 111 Descri
ption of wor
k
11/20/2002 htt
p://127.0.0.1:8080/audi/servlet/Dis
play?action=Goto&t
yp
e=re
pair&id=AUDI.B5.ME01.01.6
Page 98 of 111
96
Within 72 Hours prior to delivery to the
Customer:
Remove RAPGARD from vehicle.
Wash vehicle exterior.
Inspect paint surfaces, moldings and glass.
Protect the paint surface of all new vehicles
by applying 3M Perfect-It Paste Wax
(3M Part No. 39526) or equivalent.
Removal
Vehicle must be at room temperature.
The ideal body surface temperature for
RAPGARD removal is 60 F (15.5 C) to 80
F (26.6 C).
If body surface temperatures are below 60 F
(15.5 C) or above 80 F (26.6 C) then:
Removal procedure should be performed
indoors after surface temperatures have
been allowed to stabilize within the given
range.
Pa
ge 98 of 111 Descri
ption of wor
k
11/20/2002 htt
p://127.0.0.1:8080/audi/servlet/Dis
play?action=Goto&t
yp
e=re
pair&id=AUDI.B5.ME01.01.6
Page 99 of 111
- Rinse vehicle thoroughly with water to remove
surface dirt or dust and to help stabilize body
surface temperatures.
- Starting at the corners of each panel, carefully
remove RAPGARD from vehicle.
Pa
ge 99 of 111 Descri
ption of wor
k
11/20/2002 htt
p://127.0.0.1:8080/audi/servlet/Dis
play?action=Goto&t
yp
e=re
pair&id=AUDI.B5.ME01.01.6
Page 100 of 111
97
RAPGARD , paint inspection after removal
- Inspect painted surfaces under one of the
following lighting conditions:
Indoors under fluorescent lighting.
Outdoors under bright sunlight.
Important!:
If any defects on the exterior have been identified
(scratches, dings, dents and other types of body
damage):
- Contact your Service Manager and arrange to
repair defects immediately.
Note:
After removal of RAPGARD , some vehicles
may exhibit temporary paint discoloration or paint
swelling (caused by trapped moisture under the
RAPGARD ).
This temporary swelling is caused by the paint
finish absorbing moisture trapped under the
RAPGARD film.
Pa
ge 100 of 111 Descri
ption of wor
k
11/20/2002 htt
p://127.0.0.1:8080/audi/servlet/Dis
play?action=Goto&t
yp
e=re
pair&id=AUDI.B5.ME01.01.6
Trending: door lock, instrument cluster, spark plugs replace, oil pressure, brake fluid, parking brake, brake pads
